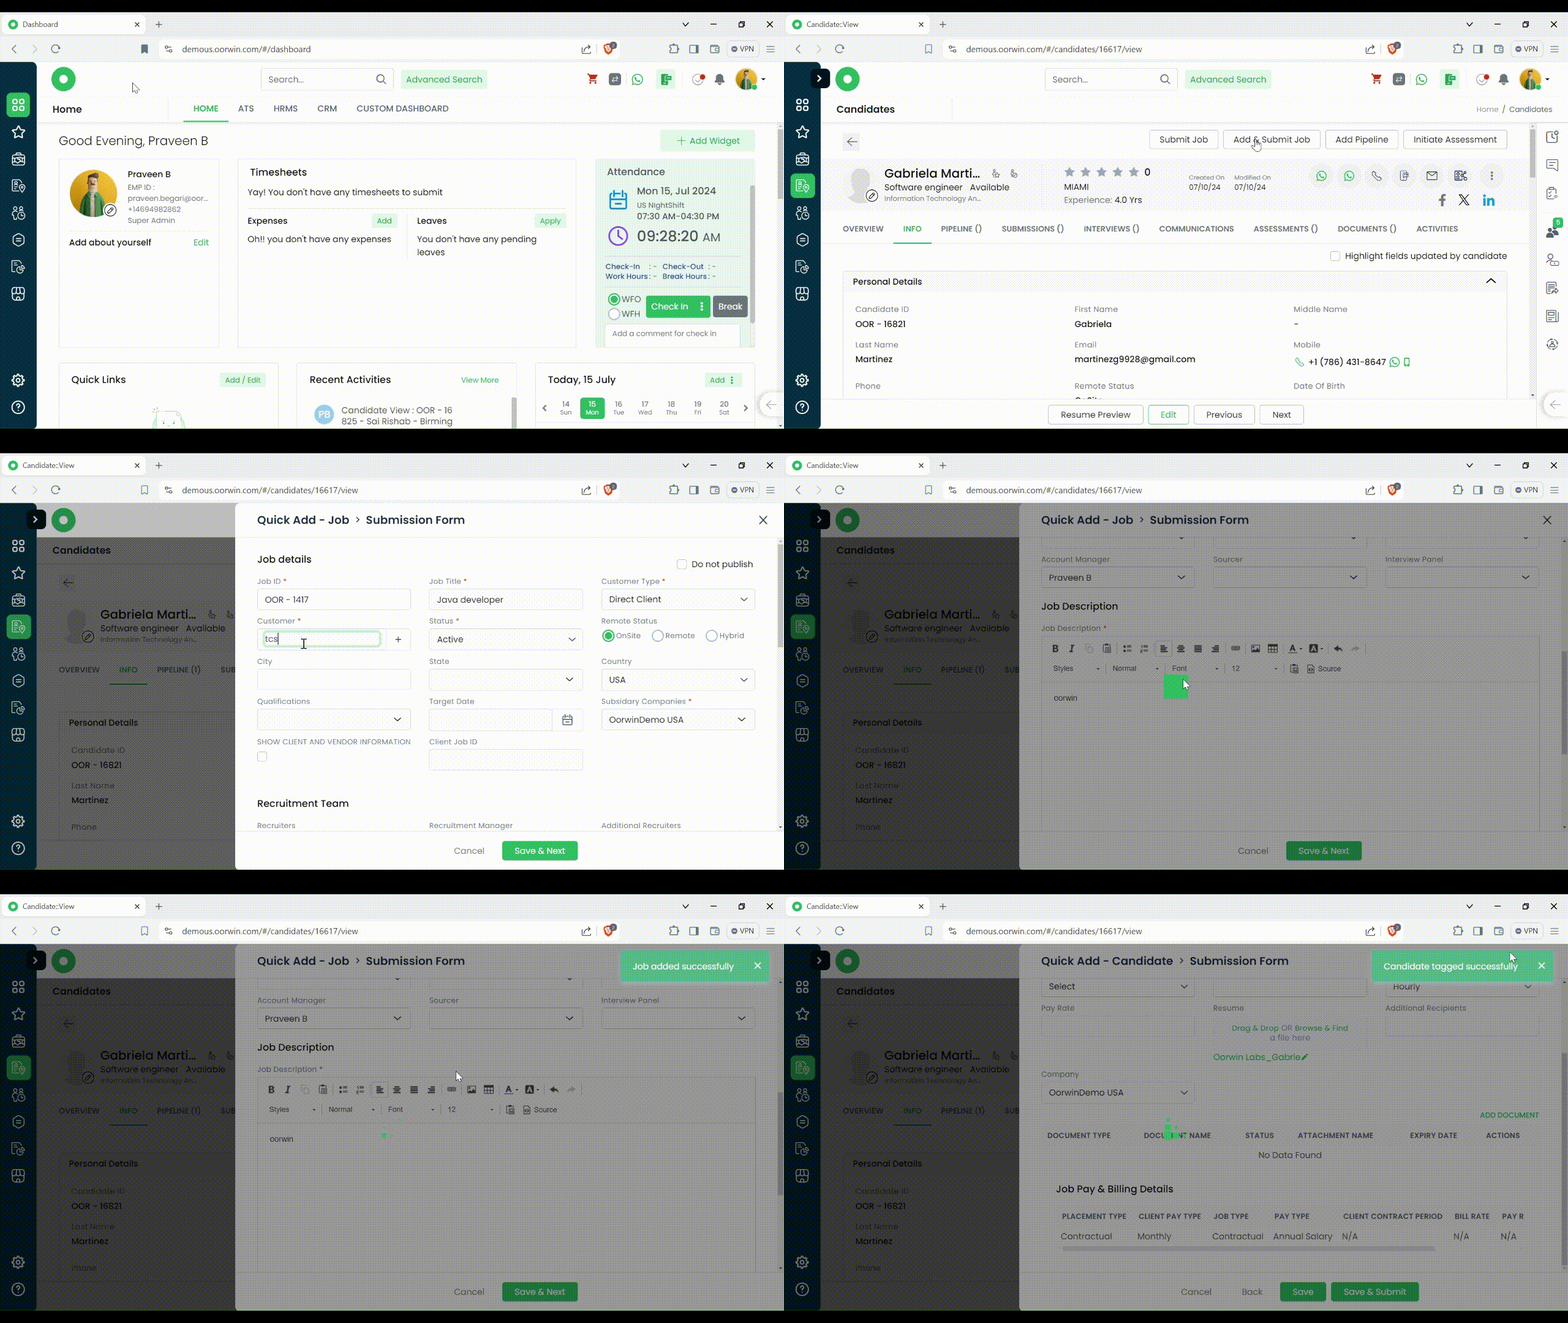
Here’s a guide on how to Add & submit job:
- Login to your “Oorwin account” and Navigate to “Candidates module” on the left menu under the “Recruitment” section.
- Click on “Candidate ID/ Name” to open the profile.
- Click on “Add & submit job” button on the top right side and a pop-up will come up on your screen.
- Fill in the “Job details” and click on “Save & next”
- Fill in the Submission details on the job Submission Page and click on “Save” or “Save & Submit” button to complete the Submission.
Was this article helpful?
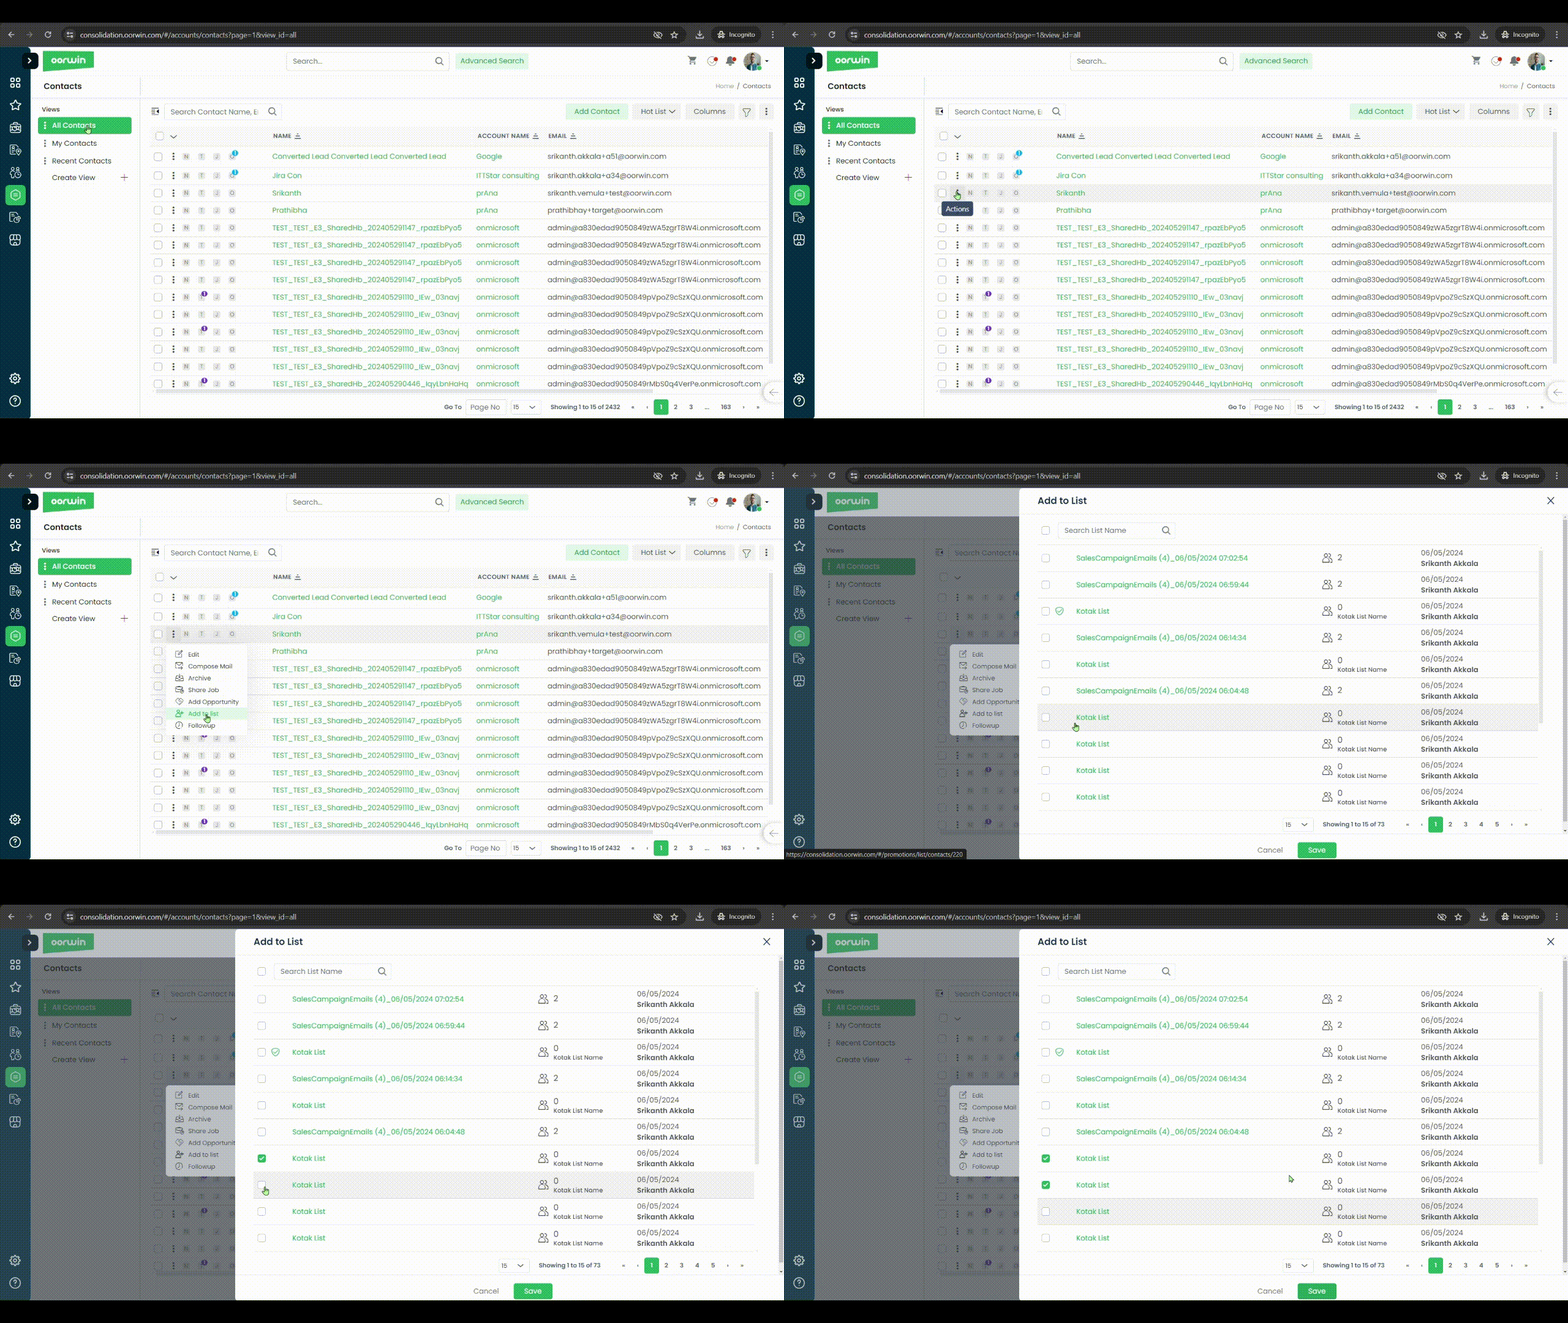
If you wish to add a contact to your campaign list, you can do it from the contacts listing page
Here is how you can do it:
- Log in to your Oorwin Account and navigate to Contacts module from the left menu under General Section
- Click on “Actions(three dots)” icon for the contact you wish to add to the campaign list
- Click on Add to list option from the list of actions
- It opens a popup with the all the camapign lists that you have created as well as access to
- Select any of the list that you wanted add this contact to that list by clicking on the check boxes
- Now click on Save and your contact has been added to that campaign list
Was this article helpful?
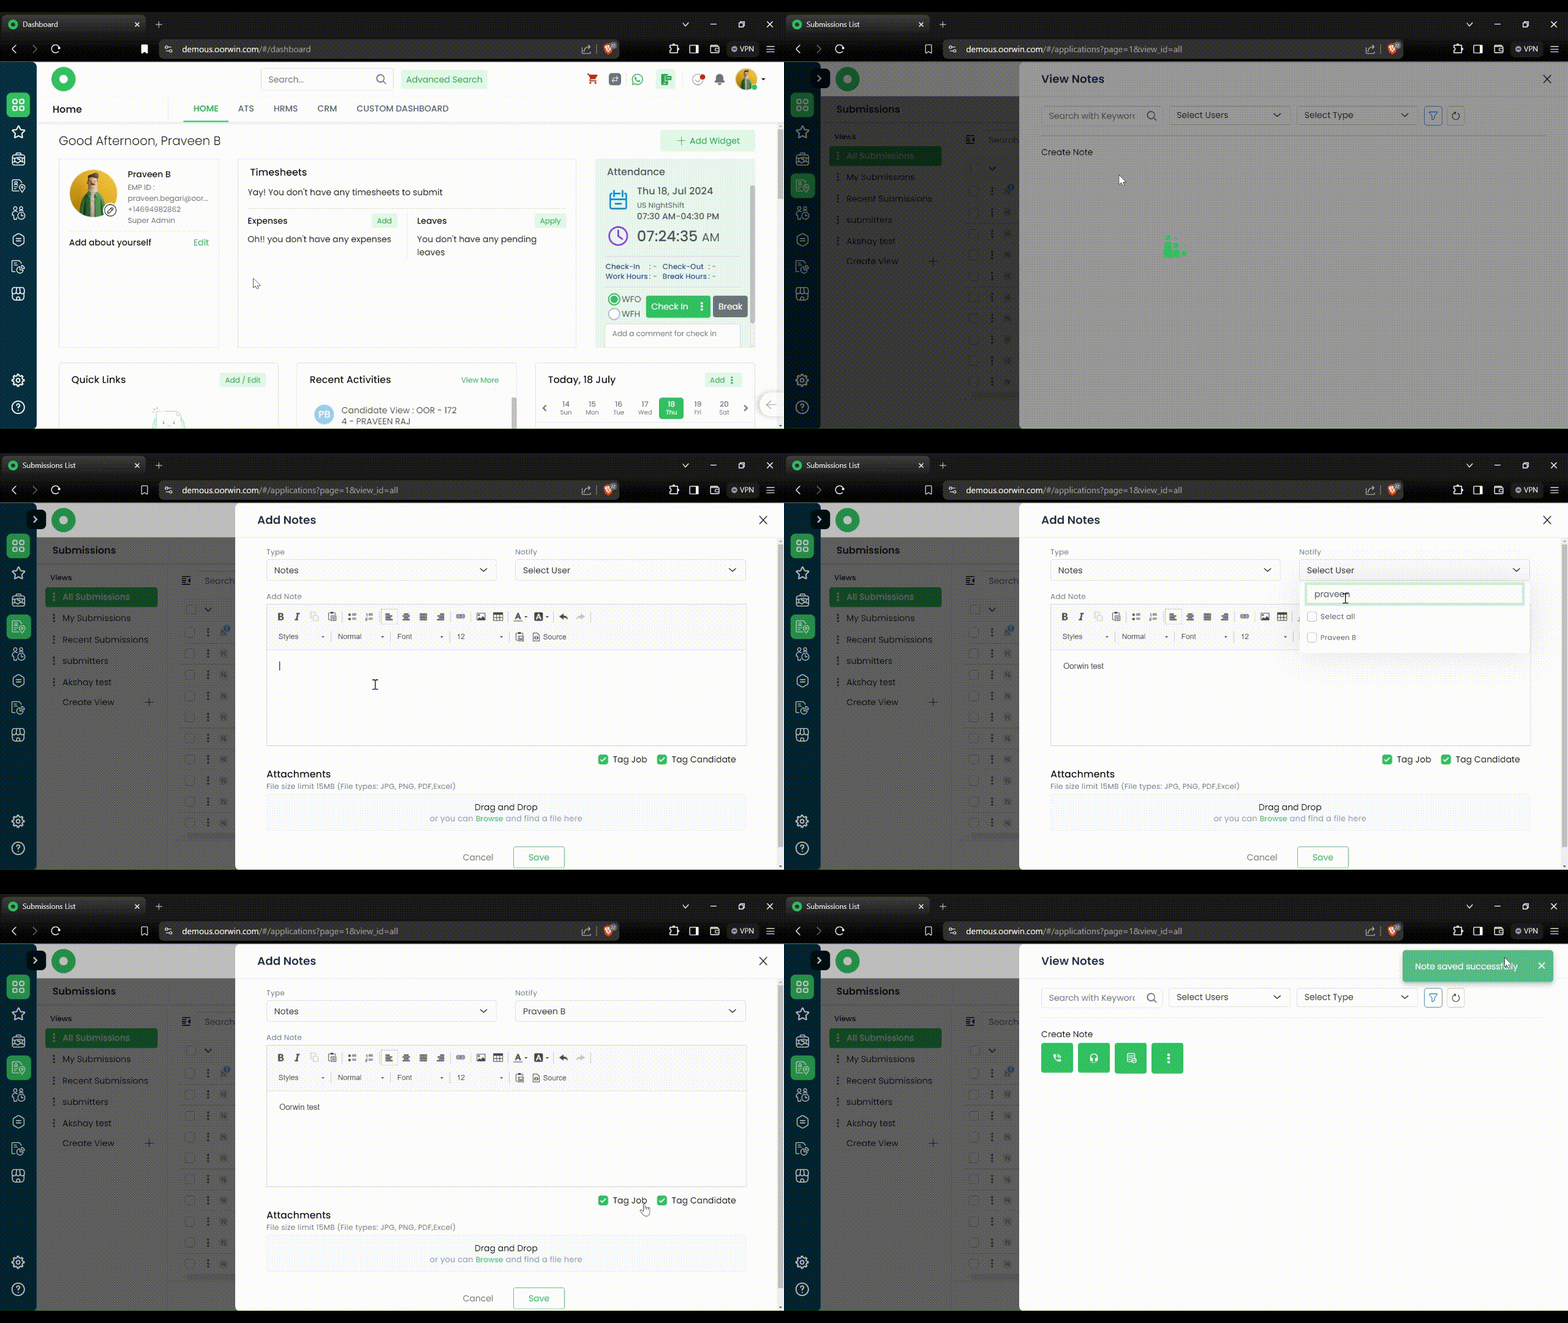
Here’s a guide on how to Add a Note in Submissions:
- Login to your “Oorwin account” and Navigate to “Submissions module” on the left menu under the “Recruitment” section.
- Select the Submission where you want to “Add/Create” a note.
- Click on “N” (Notes Icon) on the Listing page next to the Submission ID, a pop-up will appear on your screen with all the previous notes added.
- Select the type of note that you want create.(ex : Add call, Add Meeting, Add Note, etc.)
- Enter the Information that you want to add in the note.
- Click on the “Save” button, note will be added to that Candidate.
Was this article helpful?
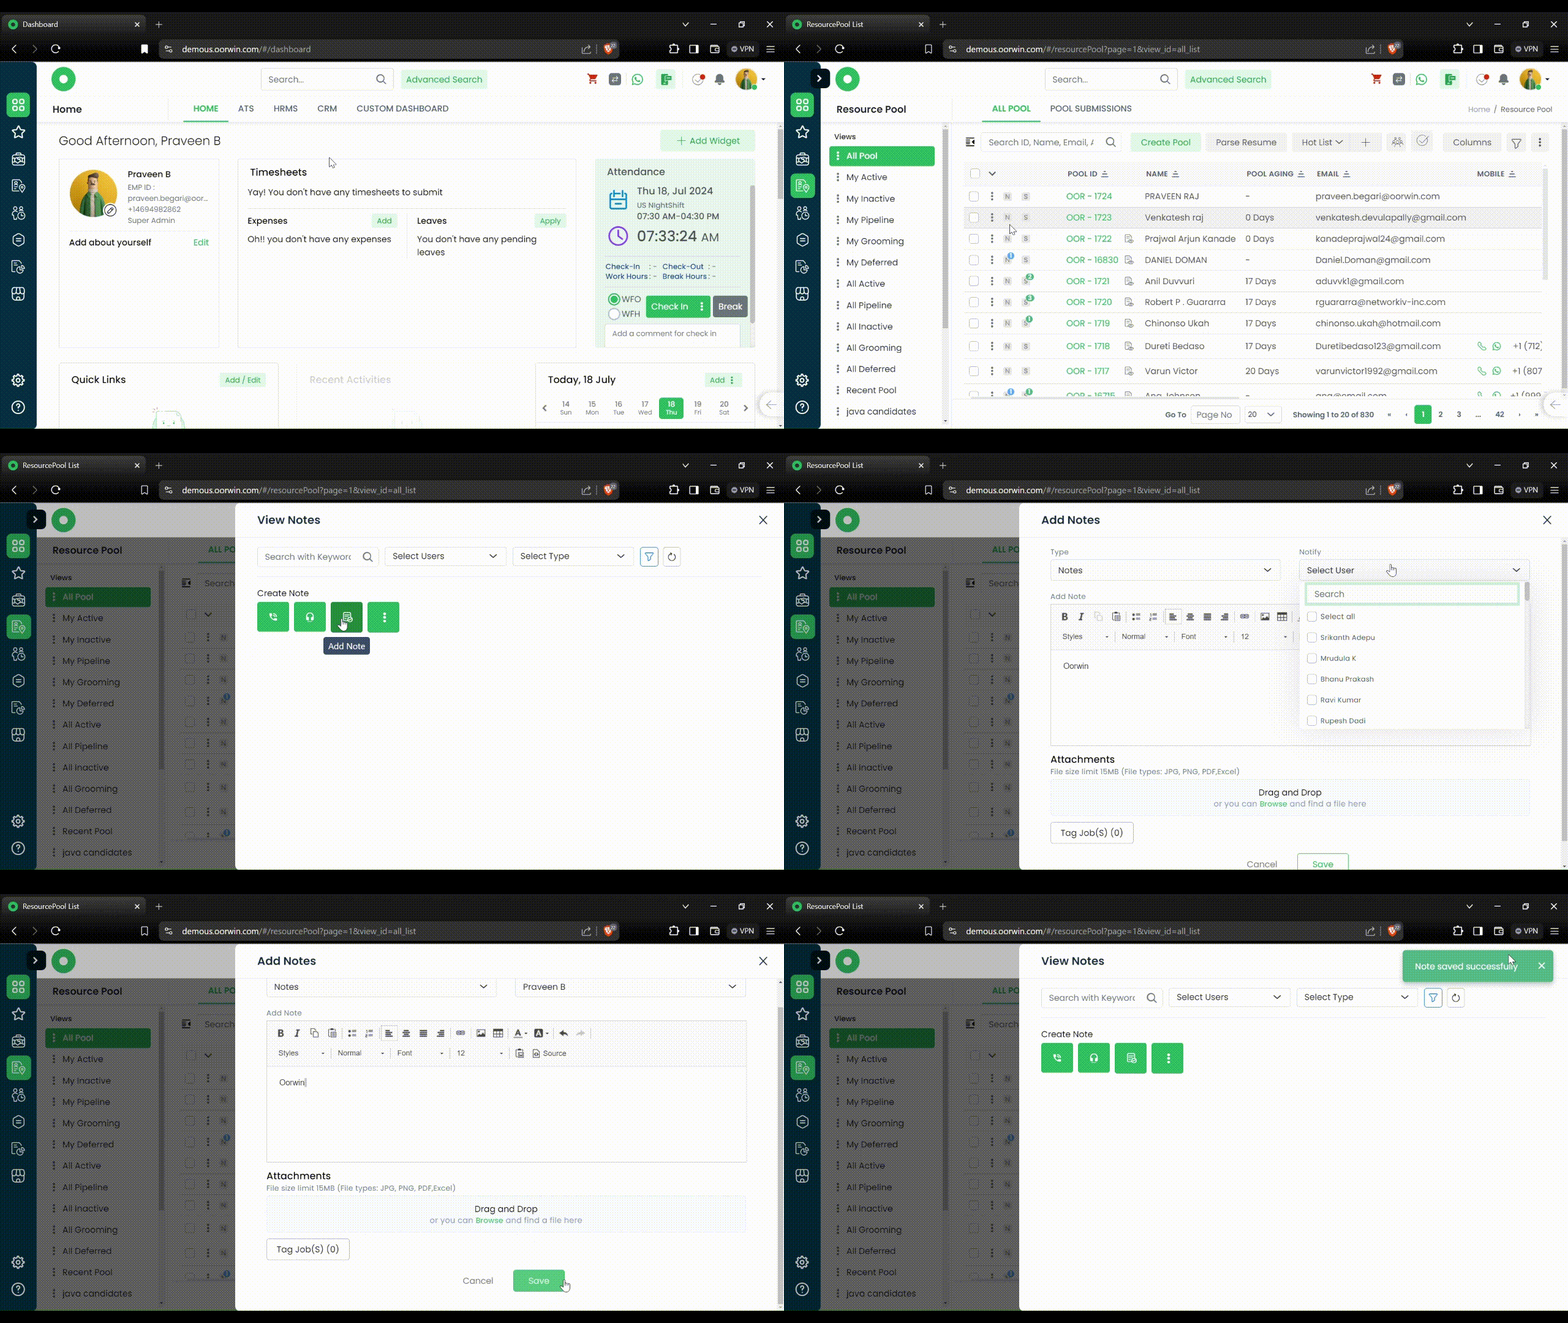
Here’s a guide on how to Add a Note:
- Login to your “Oorwin account” and Navigate to “Resource Pool module” on the left menu under the “Recruitment” section.
- Select the Pool profile where you want to “Add/Create” a note.
- Click on “N” (Notes Icon) beside the Pool ID, a pop-up will appear on your screen to add Note & with all the previous notes added.
- Select the type of note that you want create.(ex : Add call, Add Meeting, Add Note, etc.)
- Enter the Information that you want to add in the note.
- Click on the “Save” button, note will be added to that profile.
Was this article helpful?
Here’s a guide on how to add an Interview:
- Login to your “Oorwin account” and Navigate to “Interviews module” on the left menu under the “Recruitment” section.
- Select the Interview where you want to Add/Create a note.
- Click on “N” (Notes Icon) on the landing page next to the Interview, a pop-up will appear on your screen with all the previous notes added.
- Select the type of note that you want create.(ex : Add call, Add Meeting, Add Note, etc.)
- Enter the Information that you want to add.
- Click on the “Save” button, note will be added to that Interview.

Was this article helpful?
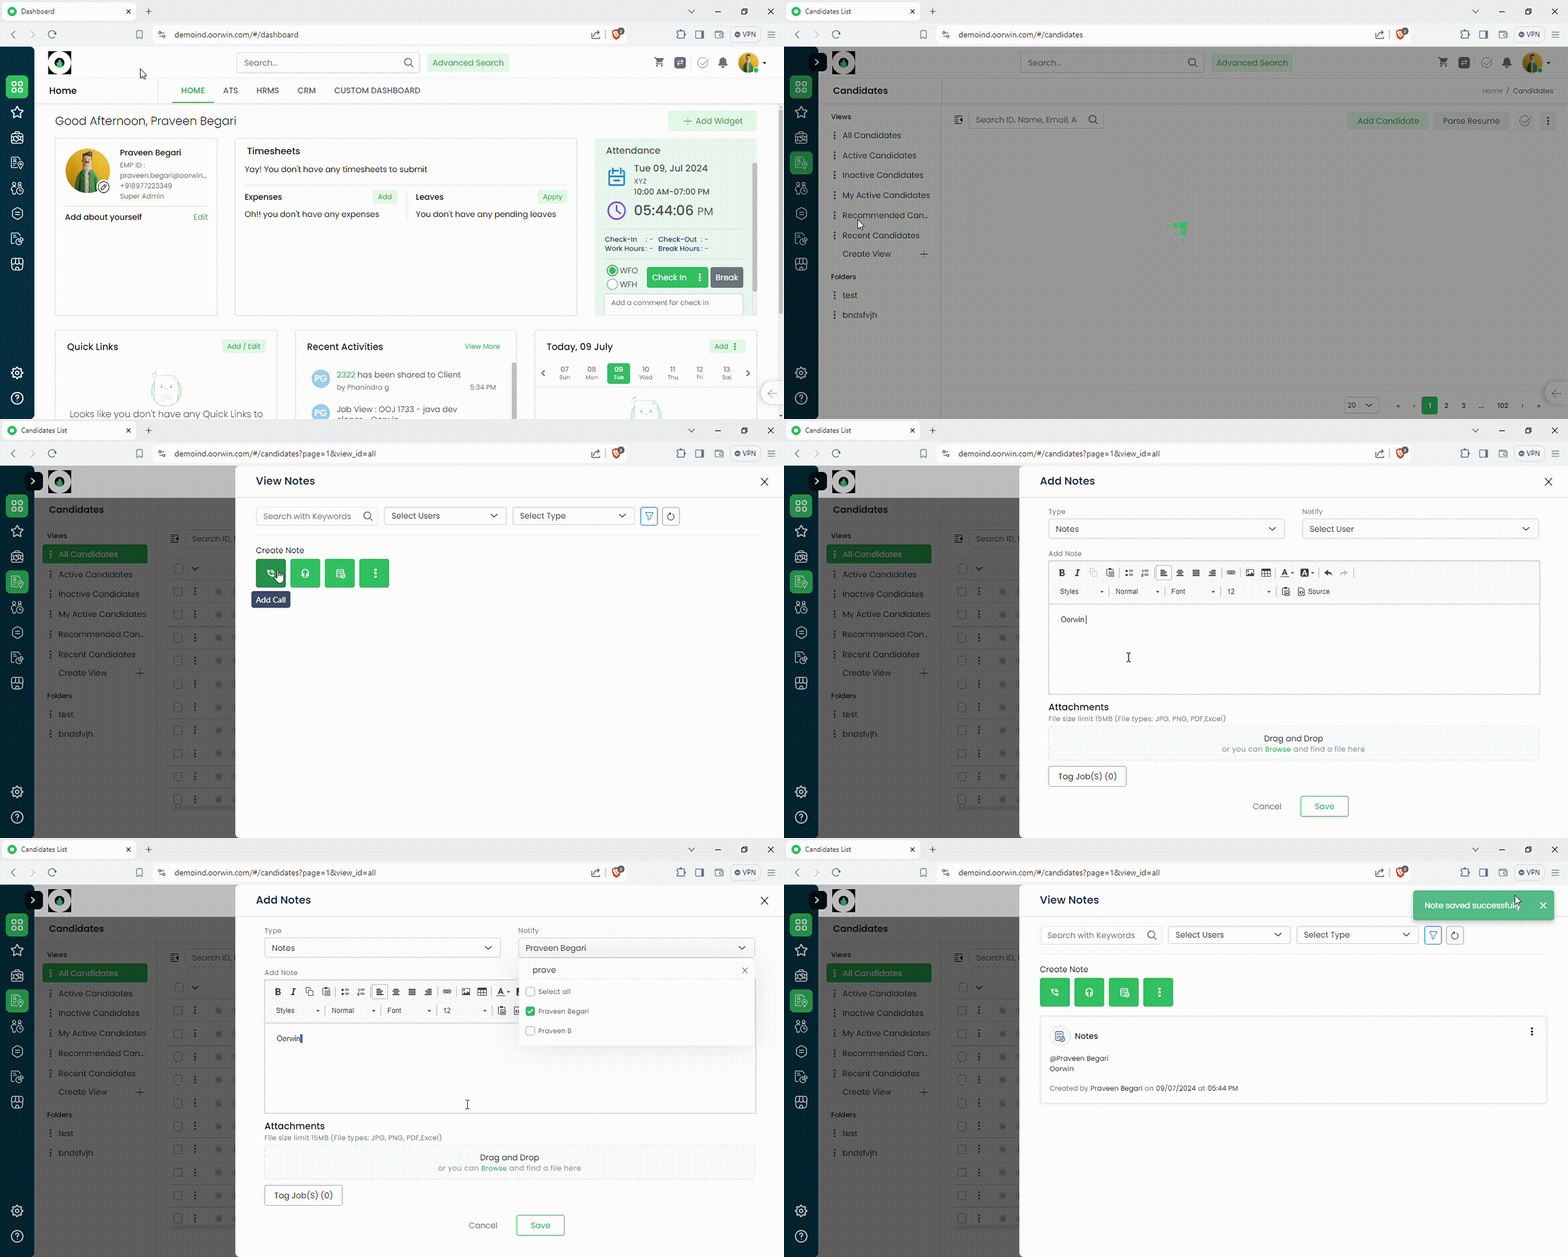
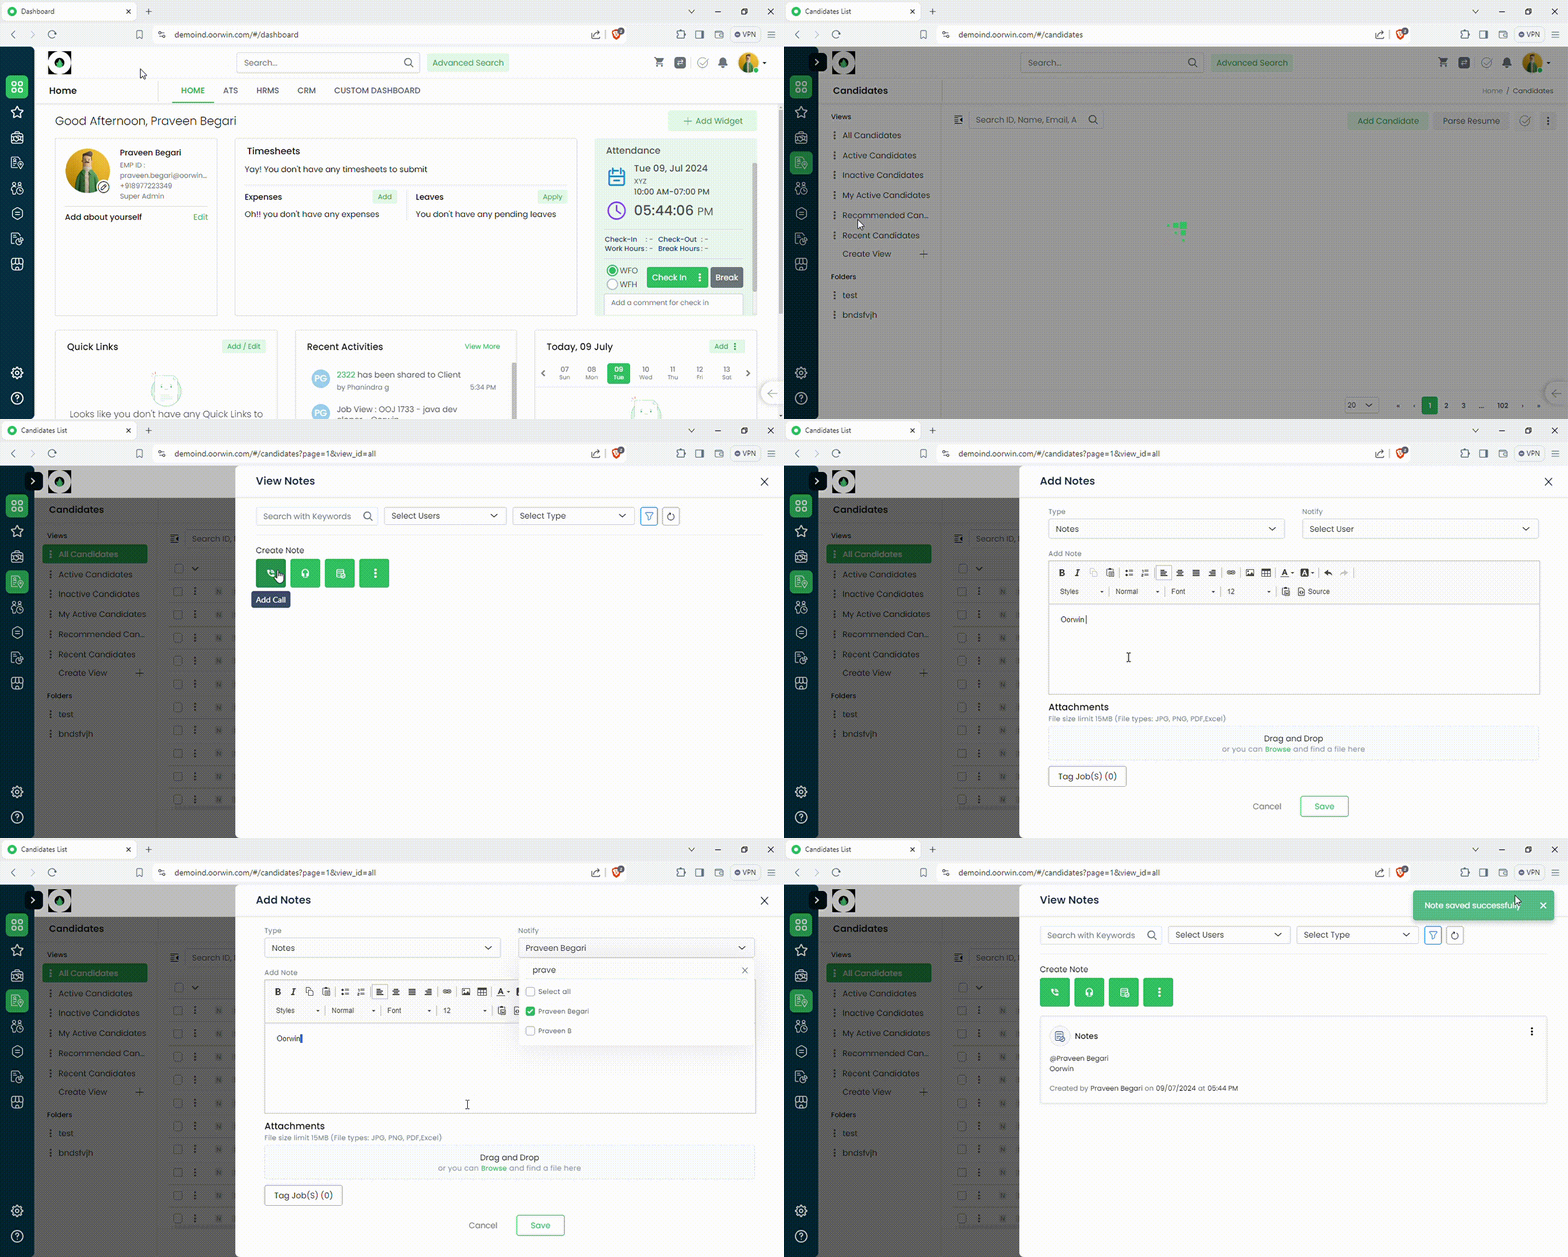
Here’s a guide on how to Add a Note to Candidates Module:
- Login to your “Oorwin account” and Navigate to “Candidates module” on the left menu under the “Recruitment” section.
- Select the Candidate where you want to “Add/Create” a note.
- Click on “N” (Notes Icon) on the landing page in Candidates, a pop-up will appear on your screen with all the previous notes added.
- Select the type of note that you want create.(ex : Add call, Add Meeting, Add Note, etc.)
- Enter the Information that you want to add in the note.
- Click on the “Save” button, note will be added to that Candidate.
Was this article helpful?
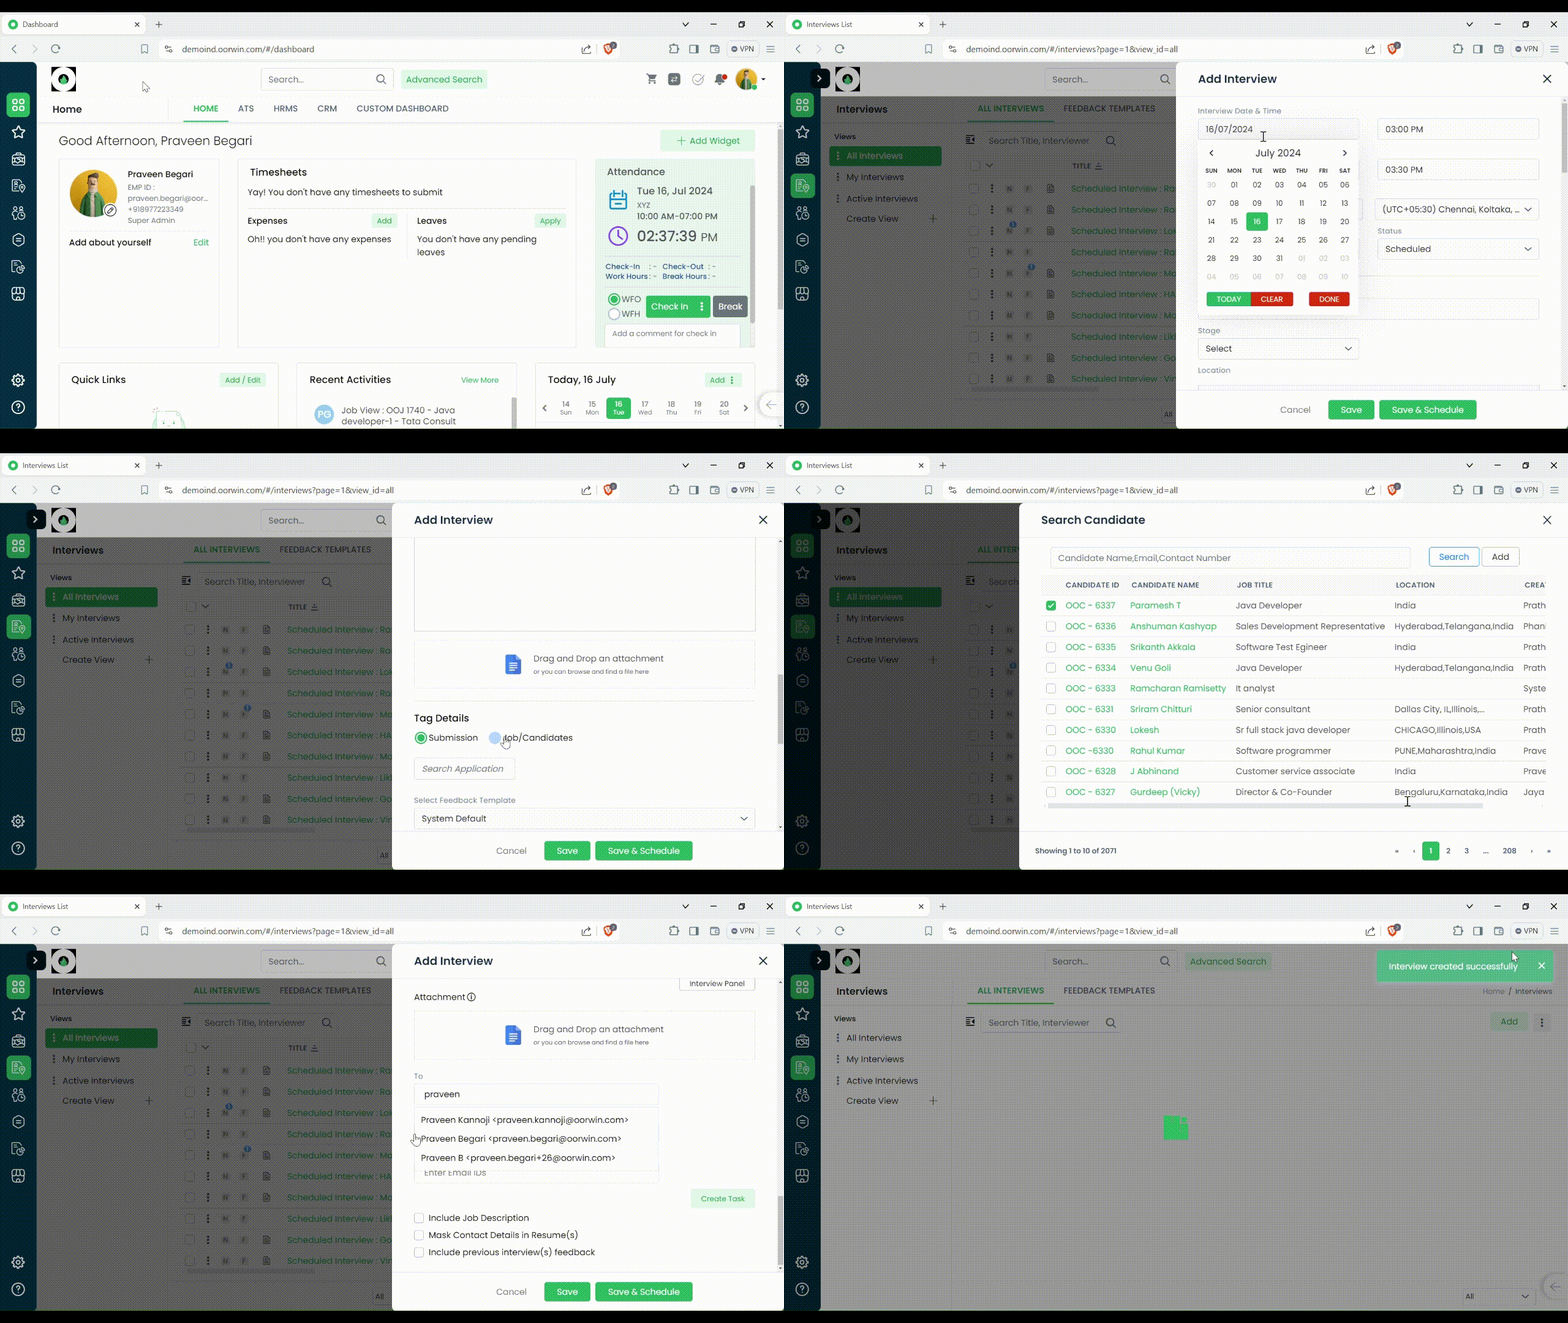
Here’s a guide on how to Manually add an Interview in Oorwin :
- Login to your “Oorwin account” and Navigate to “Interviews module” on the left menu under the “Recruitment” section.
- Click on ADD button on the top right corner.
- Fill in the details of the Interview on the Pop-up. Select the time & date, stage, Interview type, Status.
- User will have an option to tag the Submission or job/Candidates.
- Once all the details are filled in click on Save or Save & schedule to save the Interview record.
Was this article helpful?
Candidates module is designed to enhance the efficiency and effectiveness of managing candidates in various contexts. Allows for the input of candidate information such as name, contact details, qualifications, and other relevant data for managing and evaluating a list of candidates based on certain criteria.
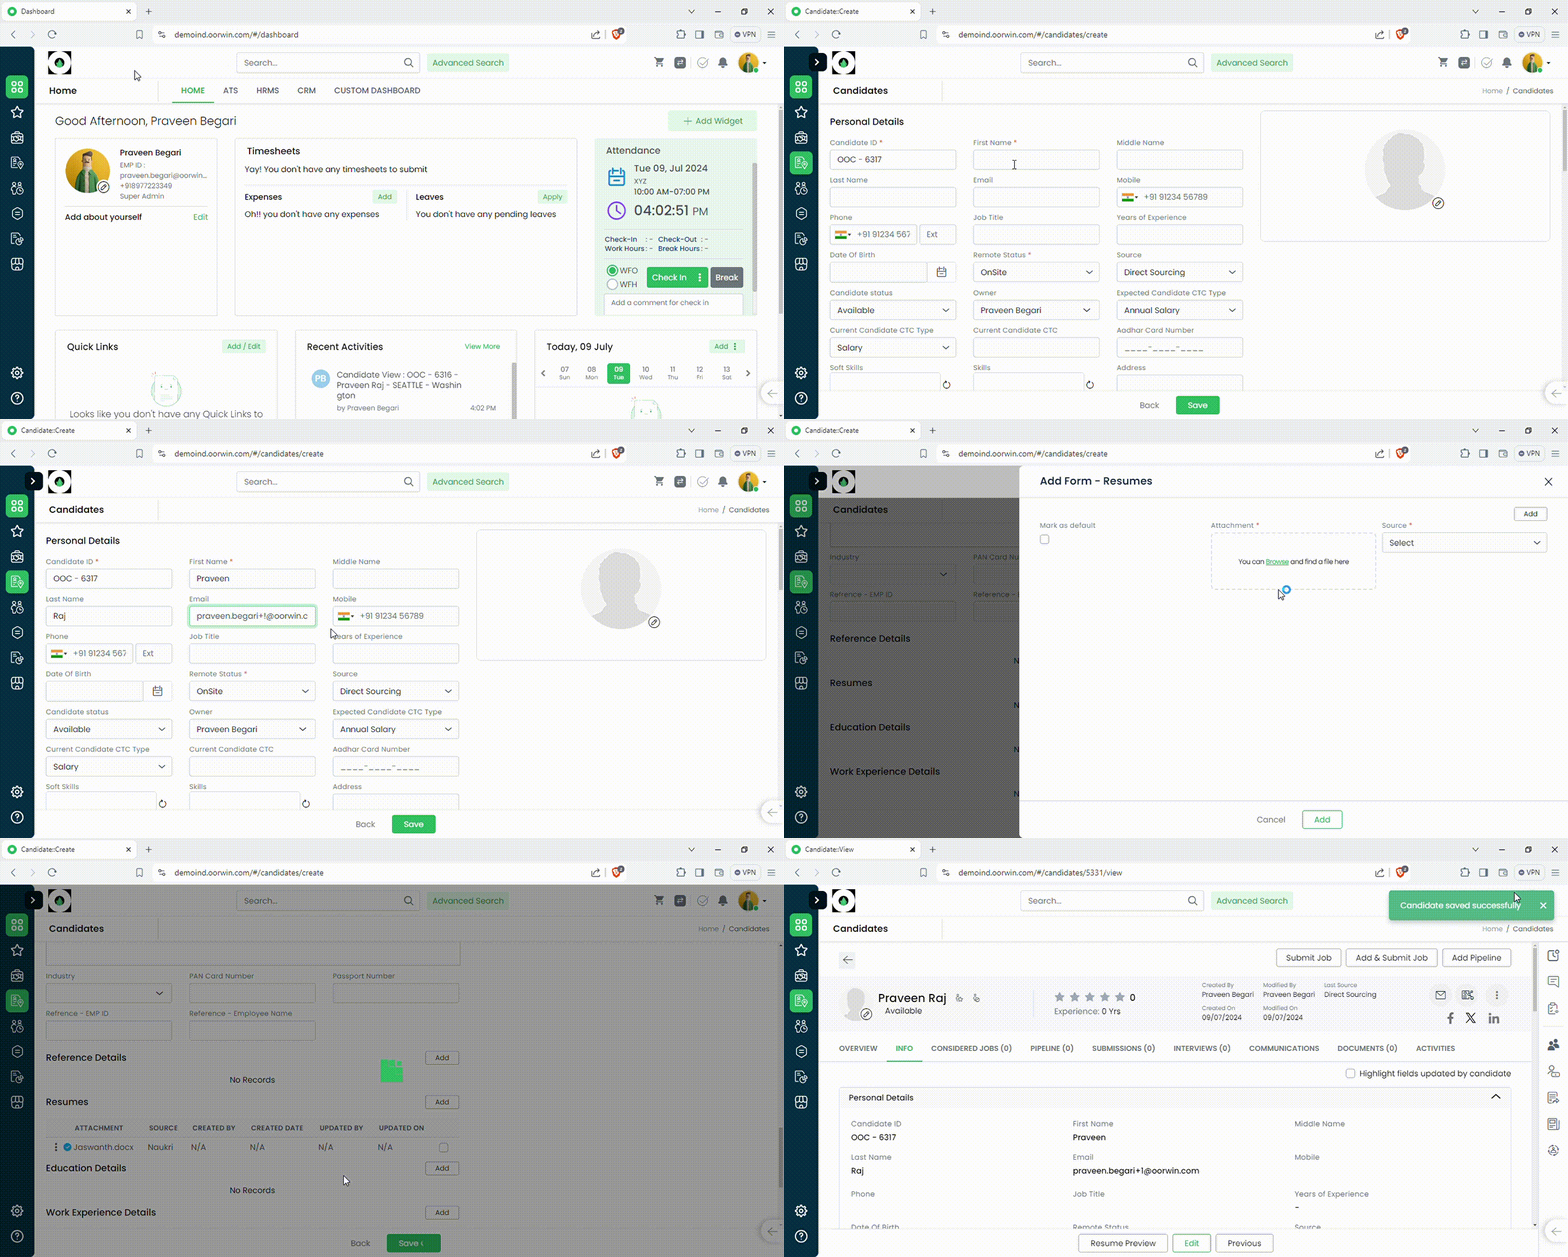
Here’s a guide on how to Add a Candidate (Manual):
- Login to your “Oorwin account” and Navigate to “Candidates module” on the left menu under the “Recruitment” section.
- Click on “Add Candidate” button.
- Fill in the Candidate information and add the required attachments.
- Click on the “Save” button on the bottom of the screen.
- The profile is now added to the “Candidates Module”.
Was this article helpful?
Uploading candidate resumes in bulk to a candidate database is a crucial feature for recruitment particularly for organizations dealing with a high volume of applicants. Allows users to upload multiple resume files in a single operation by selecting files from the local storage. You can upload a maximum of 10 profiles using Bulk upload.
Here’s a guide on how to Bulk Upload:
- Login to your “Oorwin account” and Navigate to “Candidates module” on the left menu under the “Recruitment” section.
- Click on the 3 dots/More on the top right hand side, click on Bulk upload.
- Select the Resume profiles that you want to upload (A maximum of only 10 profiles can be selected).
- Click open and once you see all the profiles Queued up, Click on “Upload all”.
- All the profiles that were selected will be uploaded to “Candidates Module” as candidate record

Note: Supports only .doc, .docx, .rtf, .html and .pdf formats
Was this article helpful?
Contacts module can hold multple type of documents related to particular contact.
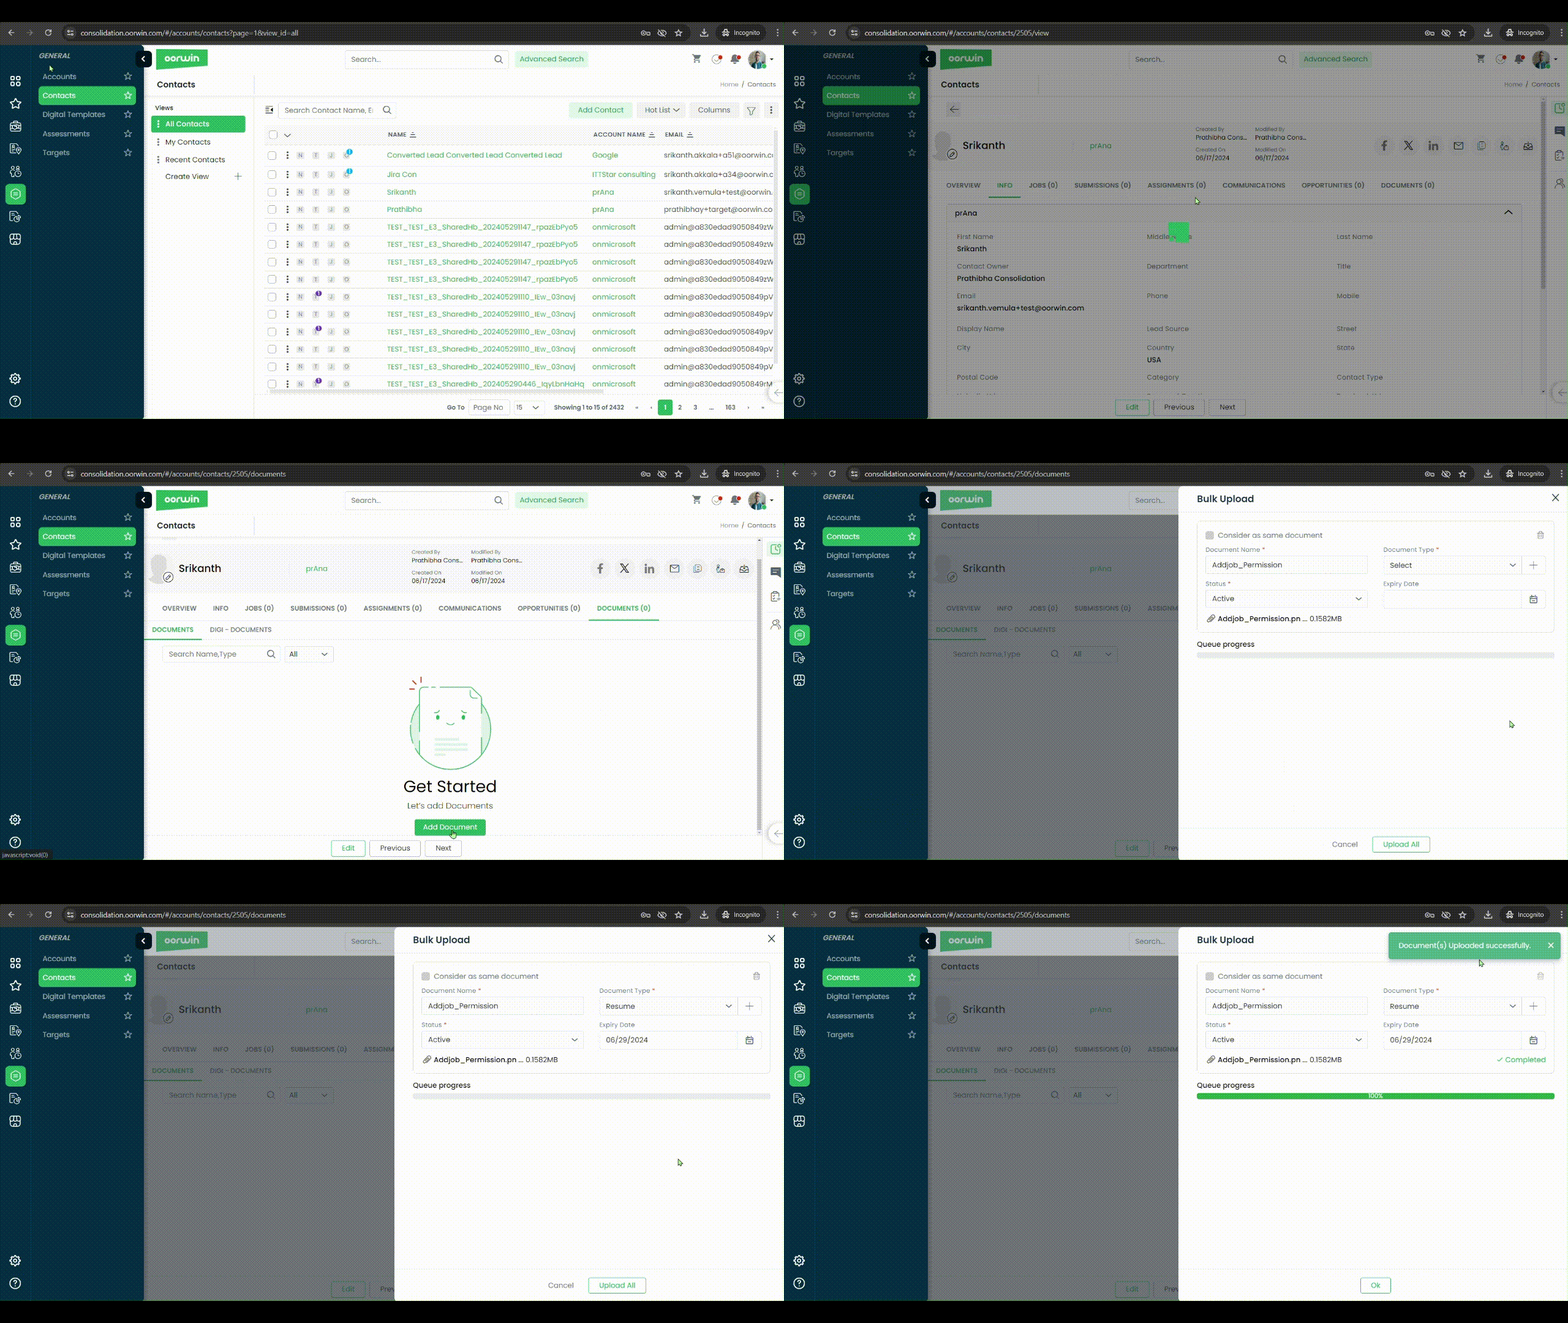
Please follow the below steps to add a document specific to your contact
- Log in to your Oorwin Account and navigate to Contacts module from the left menu under General Section
- Open any contact by clicking on the contact name to whom you wanted to add a document
- Look for the Documents tab on the header and click on it
- Click on Add document button and select any of the option from the source list
- Attach and upload the documents and fill the details and click on Upload button
- All your documents has uploaded and tagged to specific contact
Was this article helpful?
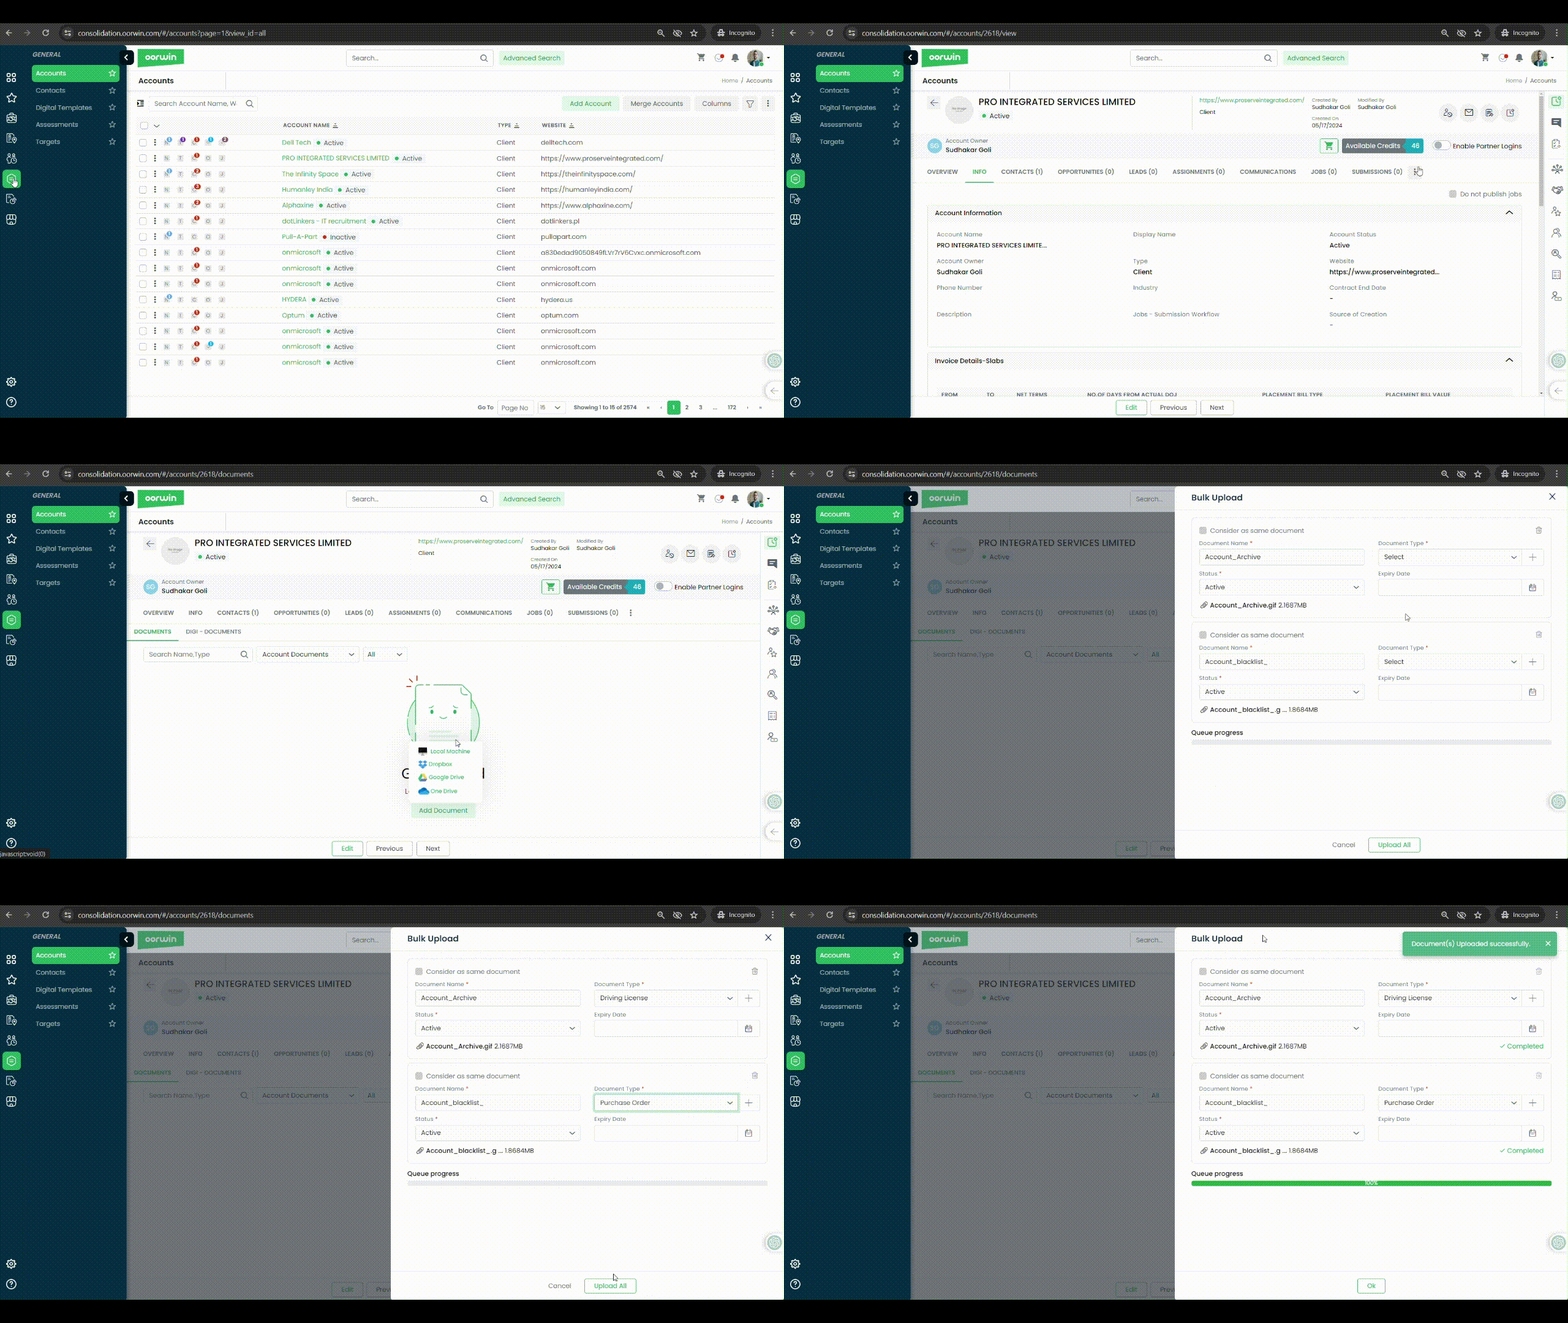
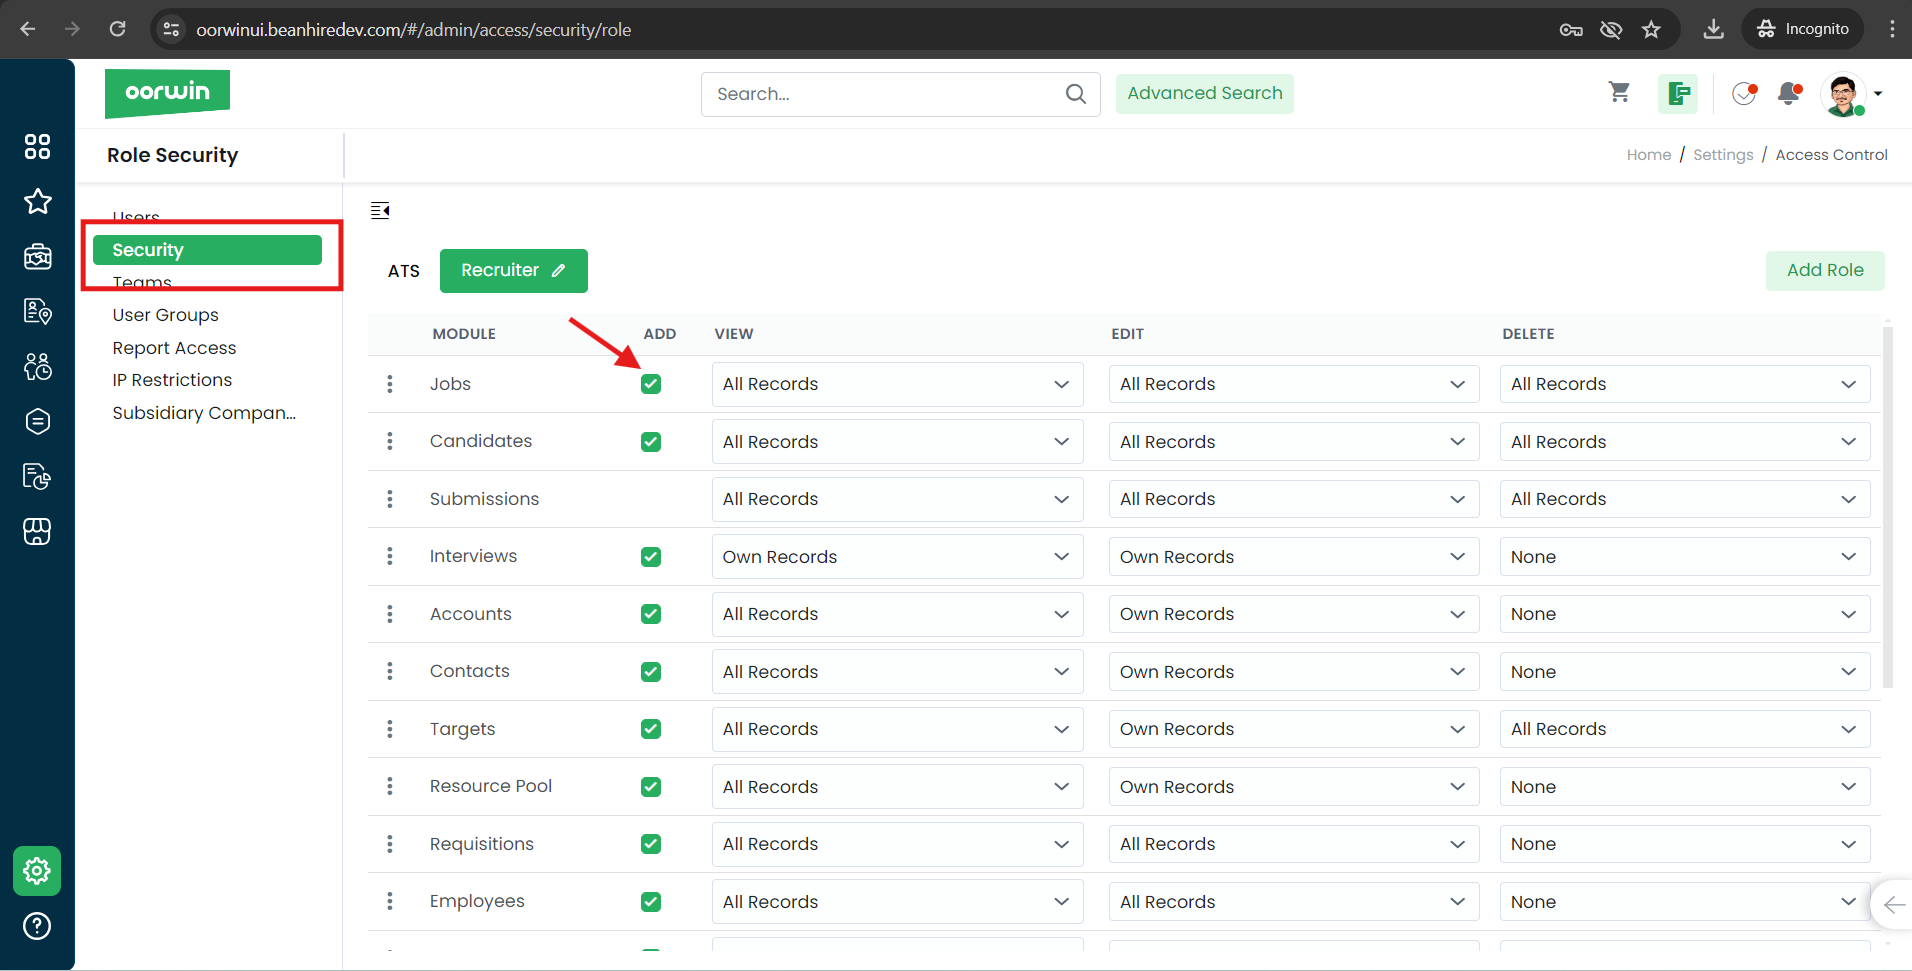
Accounts module can hold the multiple type of documents related to particular account.To do this action you need to have add permission enabled for your role from the Settings->Role security
Please follow the below steps to add a document specific to your account
- Log in to your Oorwin Account and navigate to Accounts module from the left menu under General Section
- Click on any account name to whom you wanted to add a document
- Click on three dots icon on the top header and click on Documents tab in it
- Click on Add document button and select any of the option from the source list
- Attach and upload the documents and fill the details and click on Upload button
- All your documents has uploaded and tagged to specific account
Was this article helpful?
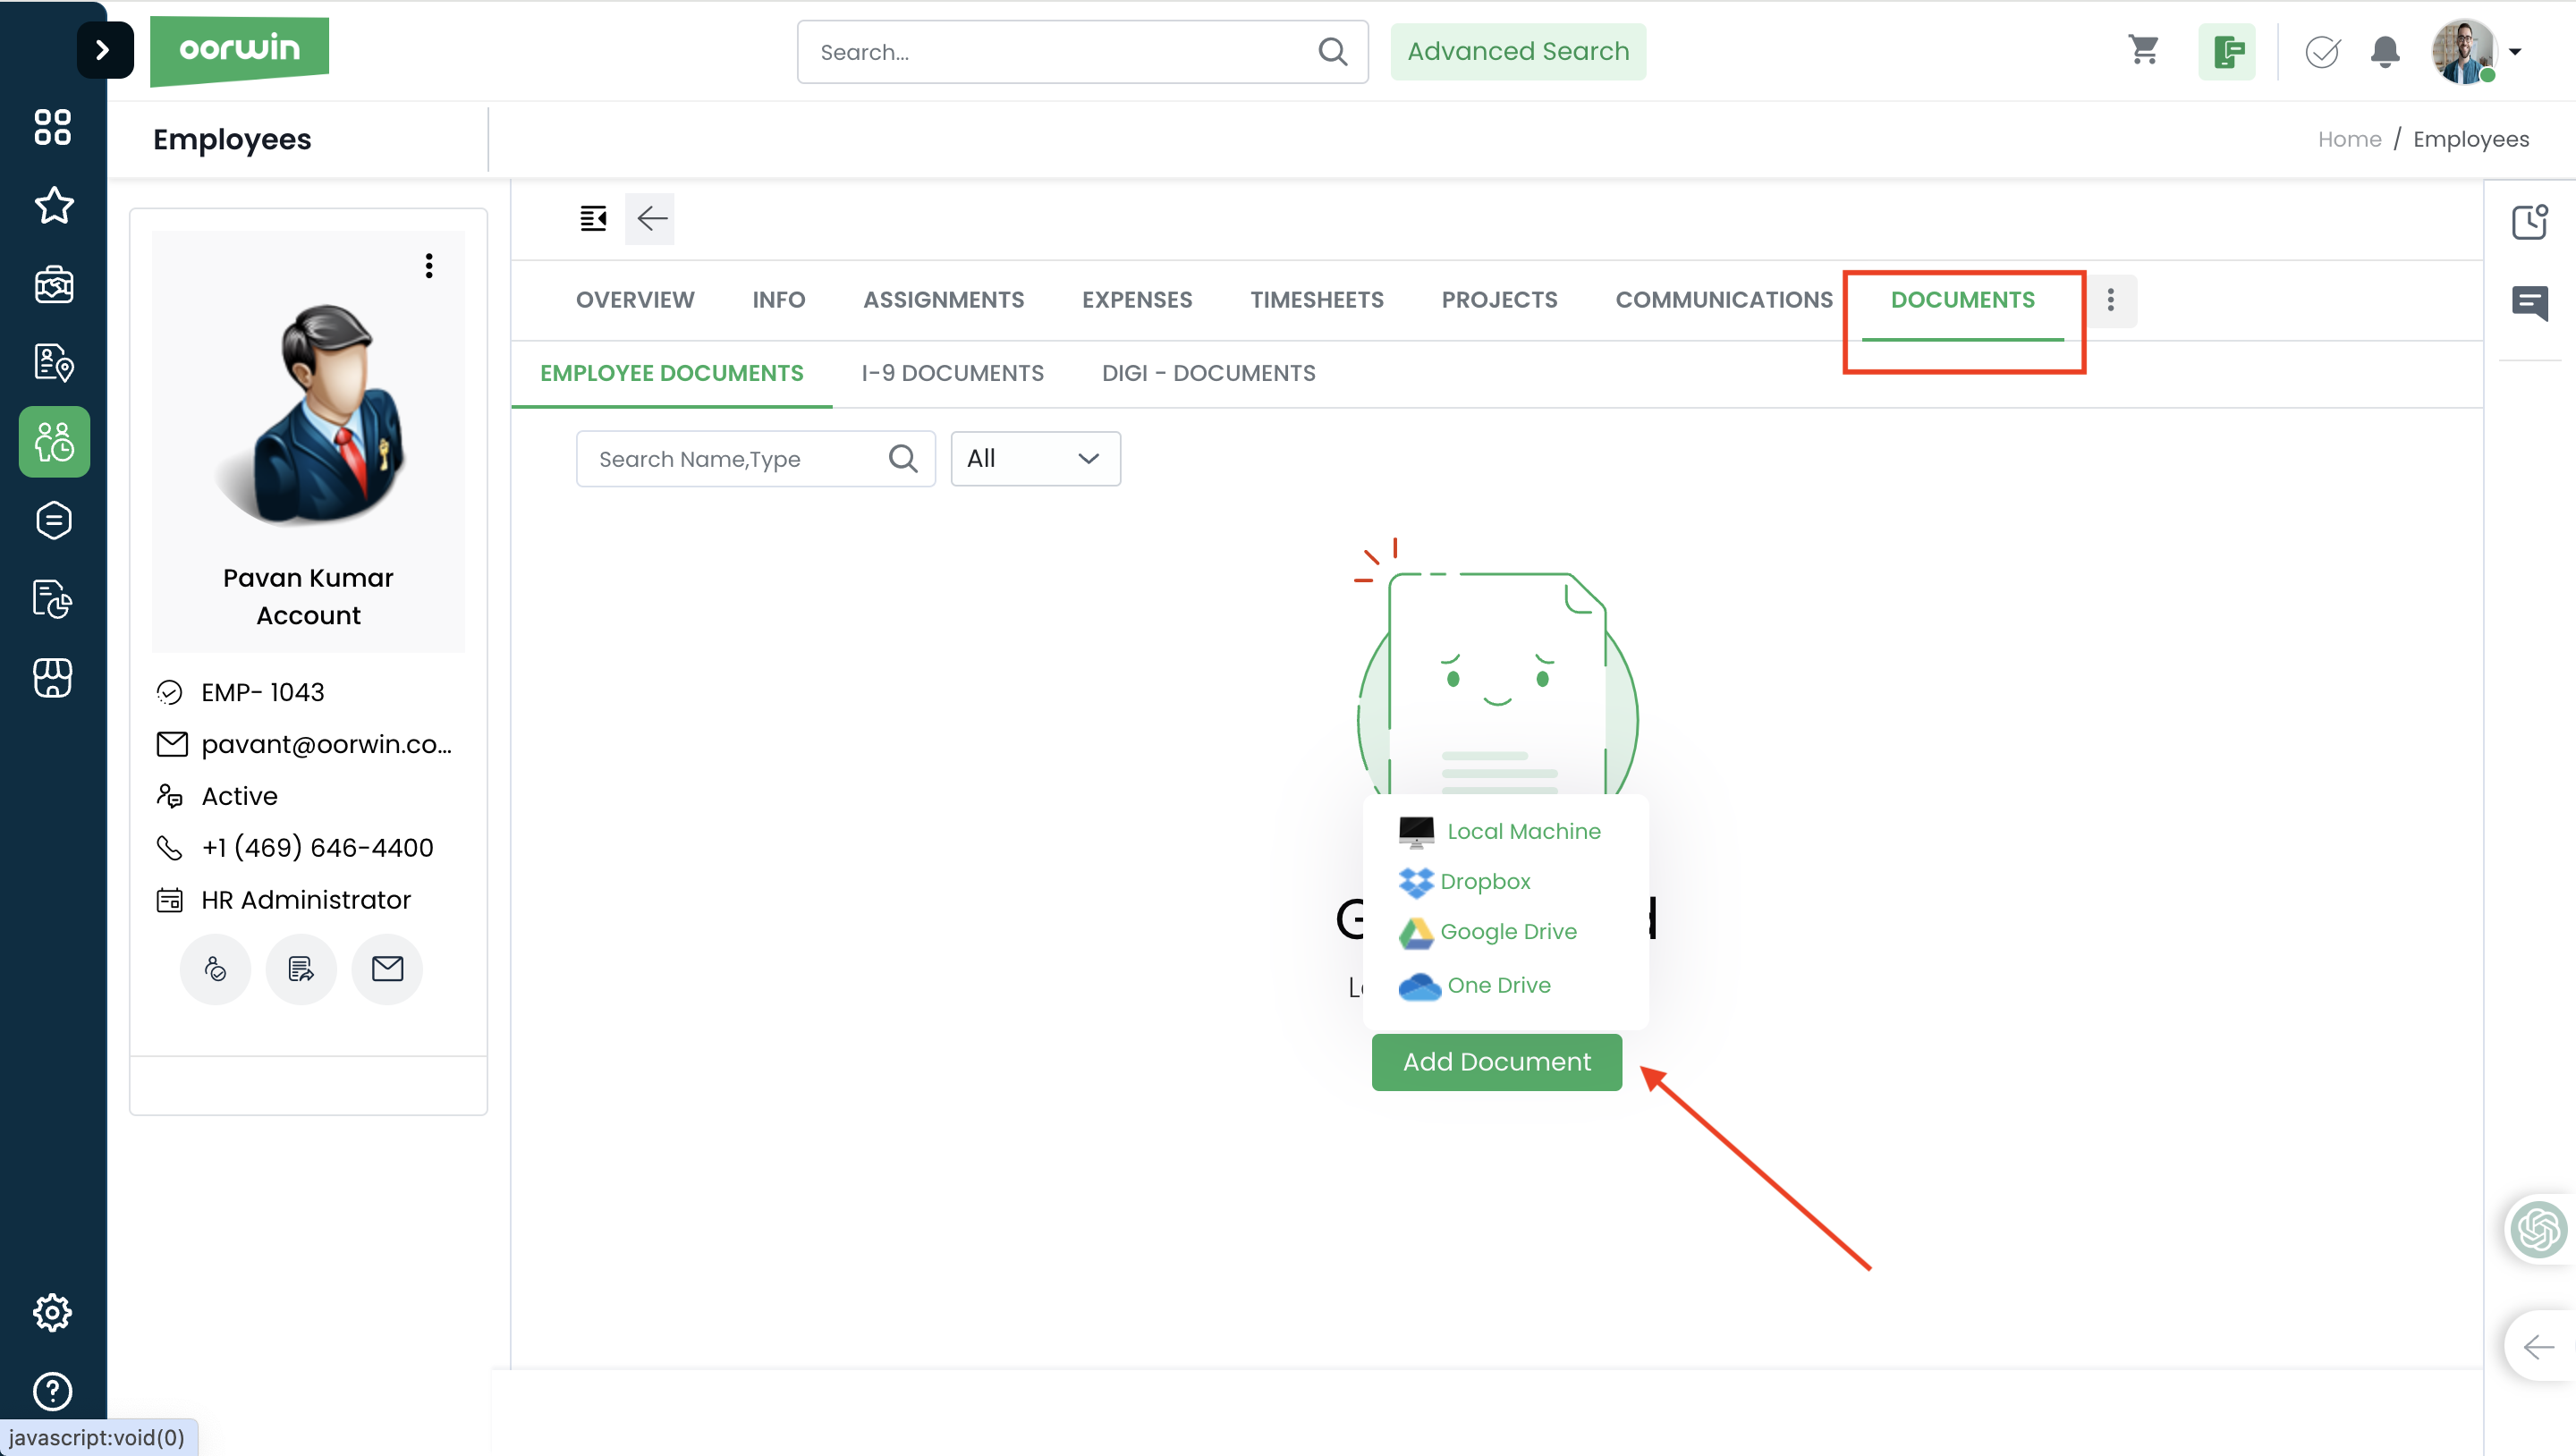
Employees module can hold the multiple type of documents related to particular employee.To do this action you need to have add permission enabled for your role from the Settings->Role security
Please follow the below steps to add a document specific to your employee
- Log in to your Oorwin Account and navigate to Employees module from the left menu under HRMS Section
- Click on any employee name to whom you wanted to add a document
- Click on three dots icon on the top header and click on Documents tab in it
- Click on Add document button and select any of the option from the source list
- Attach and upload the documents and fill the details and click on Upload button
- All your documents has uploaded and tagged to specific employee
Was this article helpful?
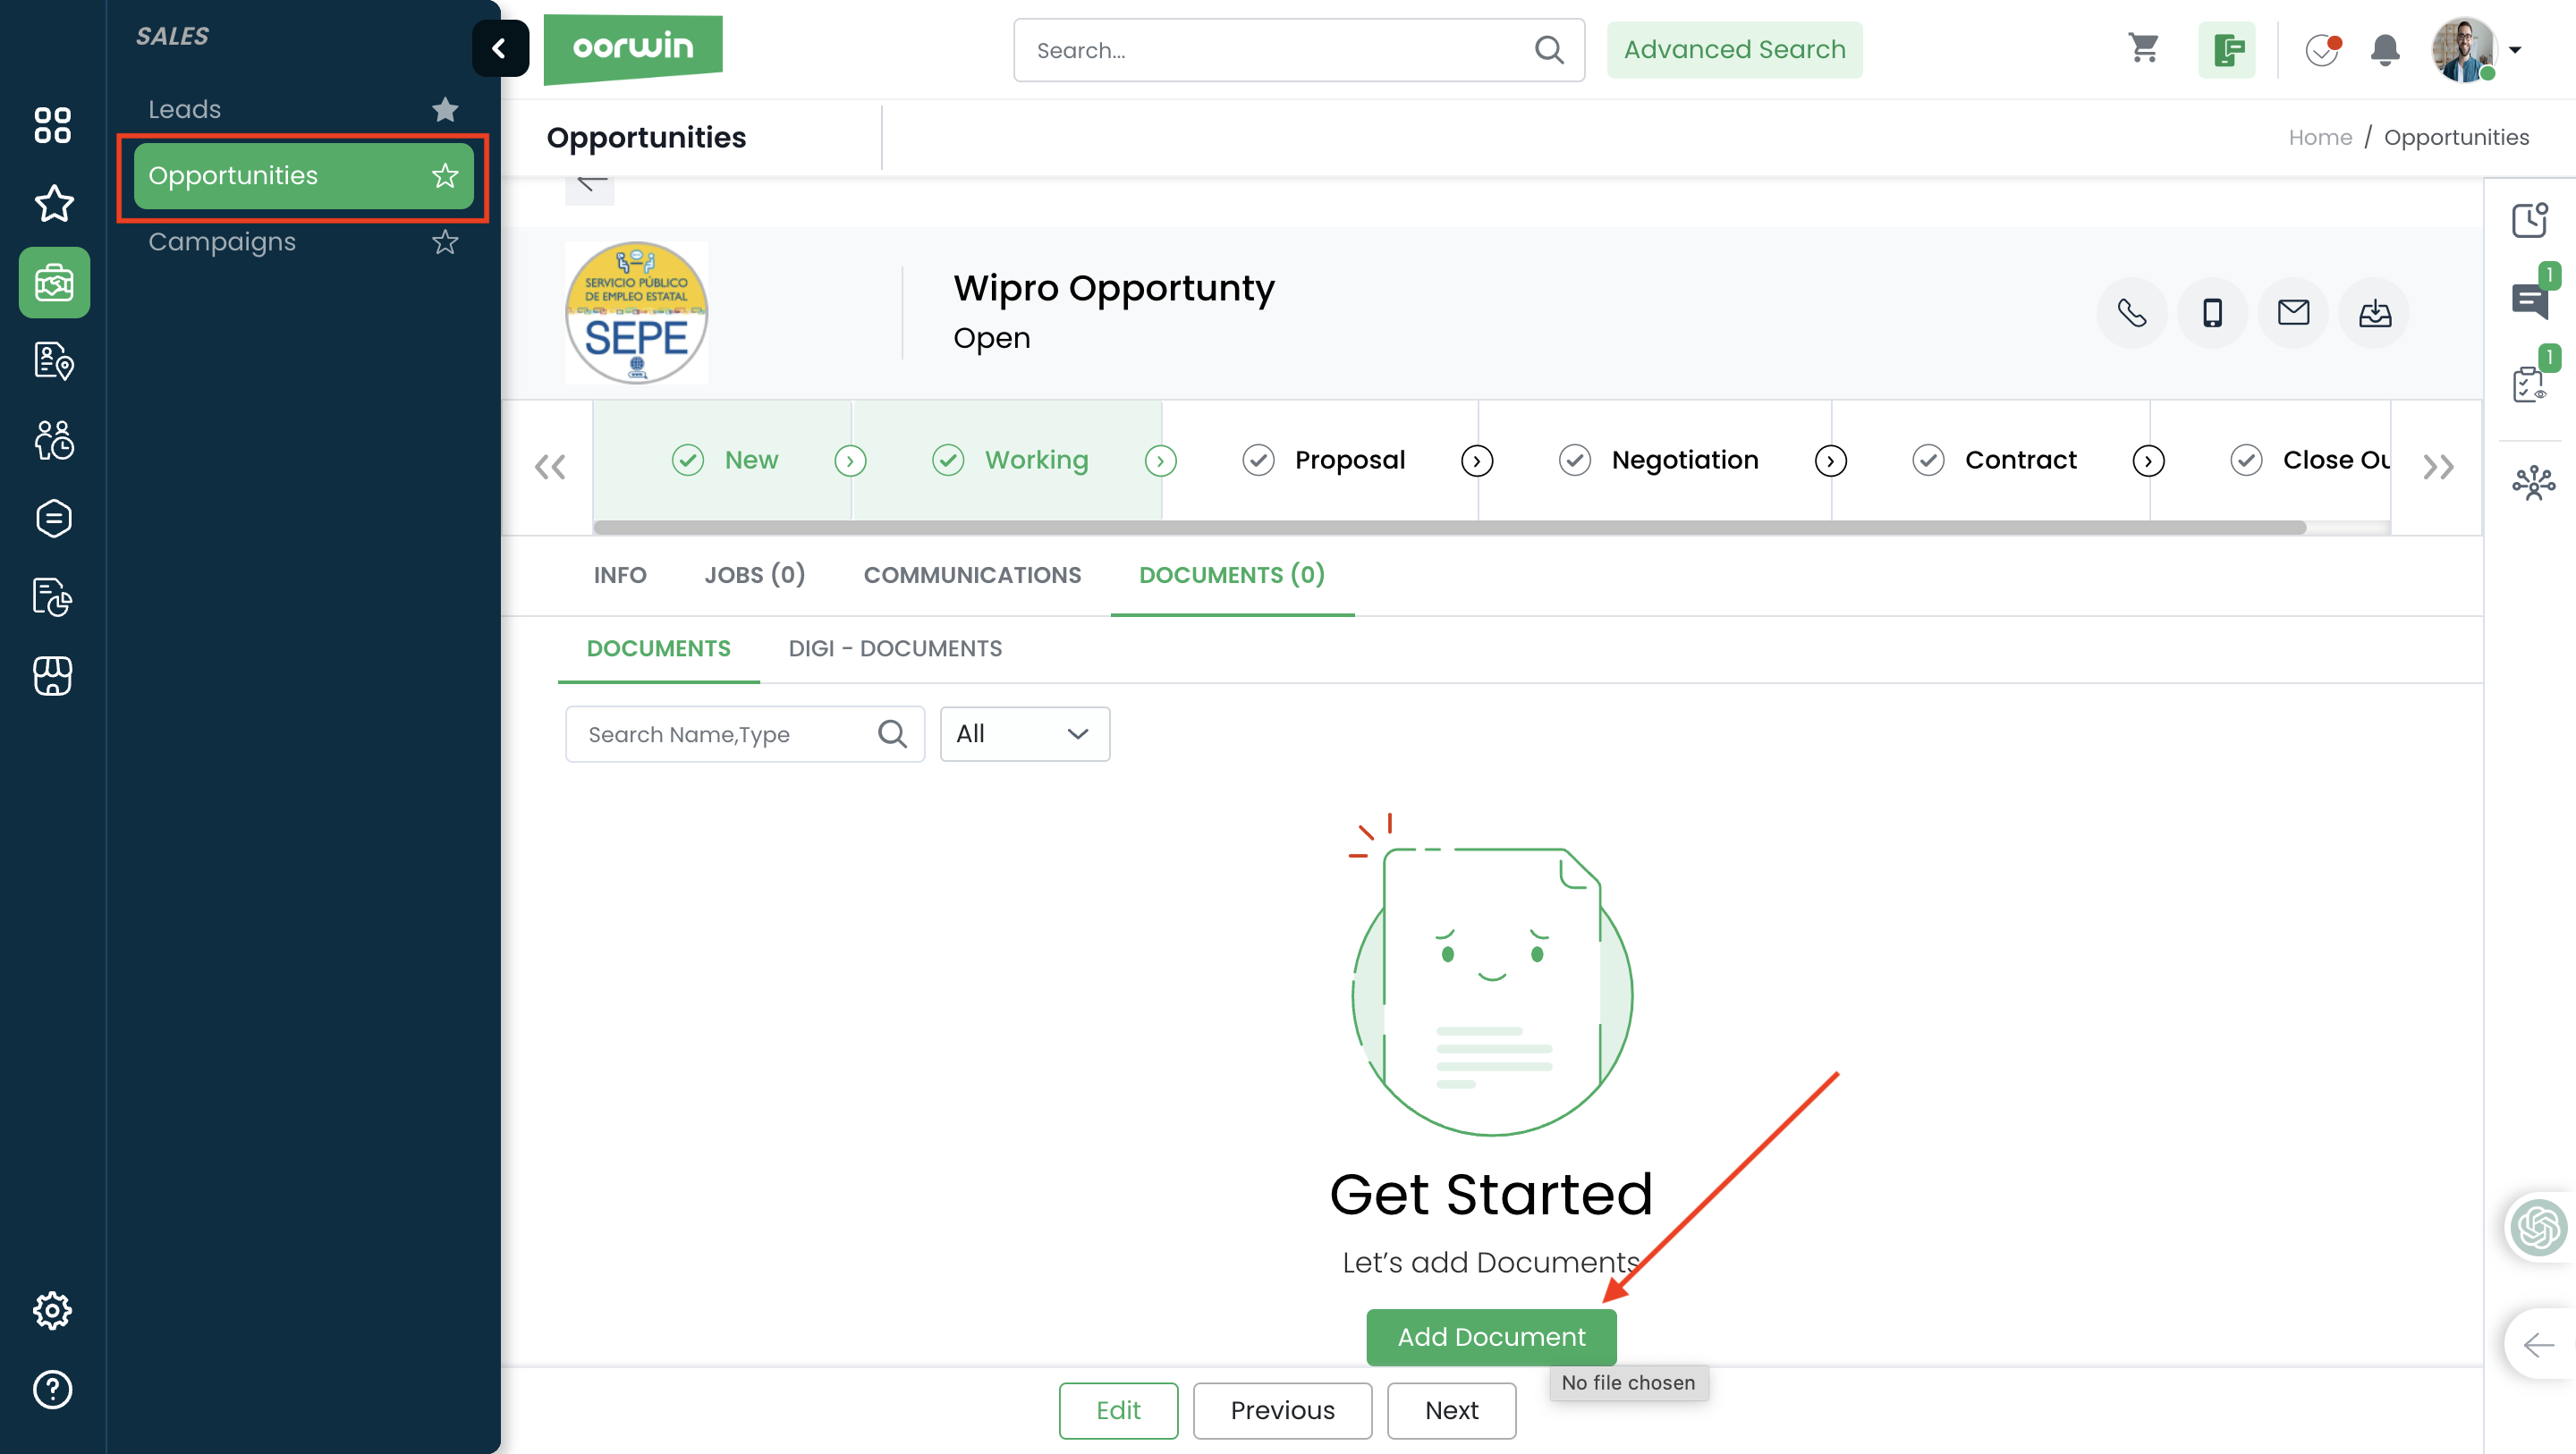
Opportunity module can hold the multiple type of documents related to particular record.To do this action you need to have add permission enabled for your role from the Settings->Role security
Please follow the below steps to add a document specific to your opportunity
- Log in to your Oorwin Account and navigate to Opportunities module from the left menu under Sales Section
- Click on any opportunity name to whom you wanted to add a document
- Click on Documents on the top header
- Click on Add document button and select any of the option from the source list
- Attach and upload the documents and fill the details and click on Upload button
- All your documents has uploaded and tagged to specific lead record
Was this article helpful?
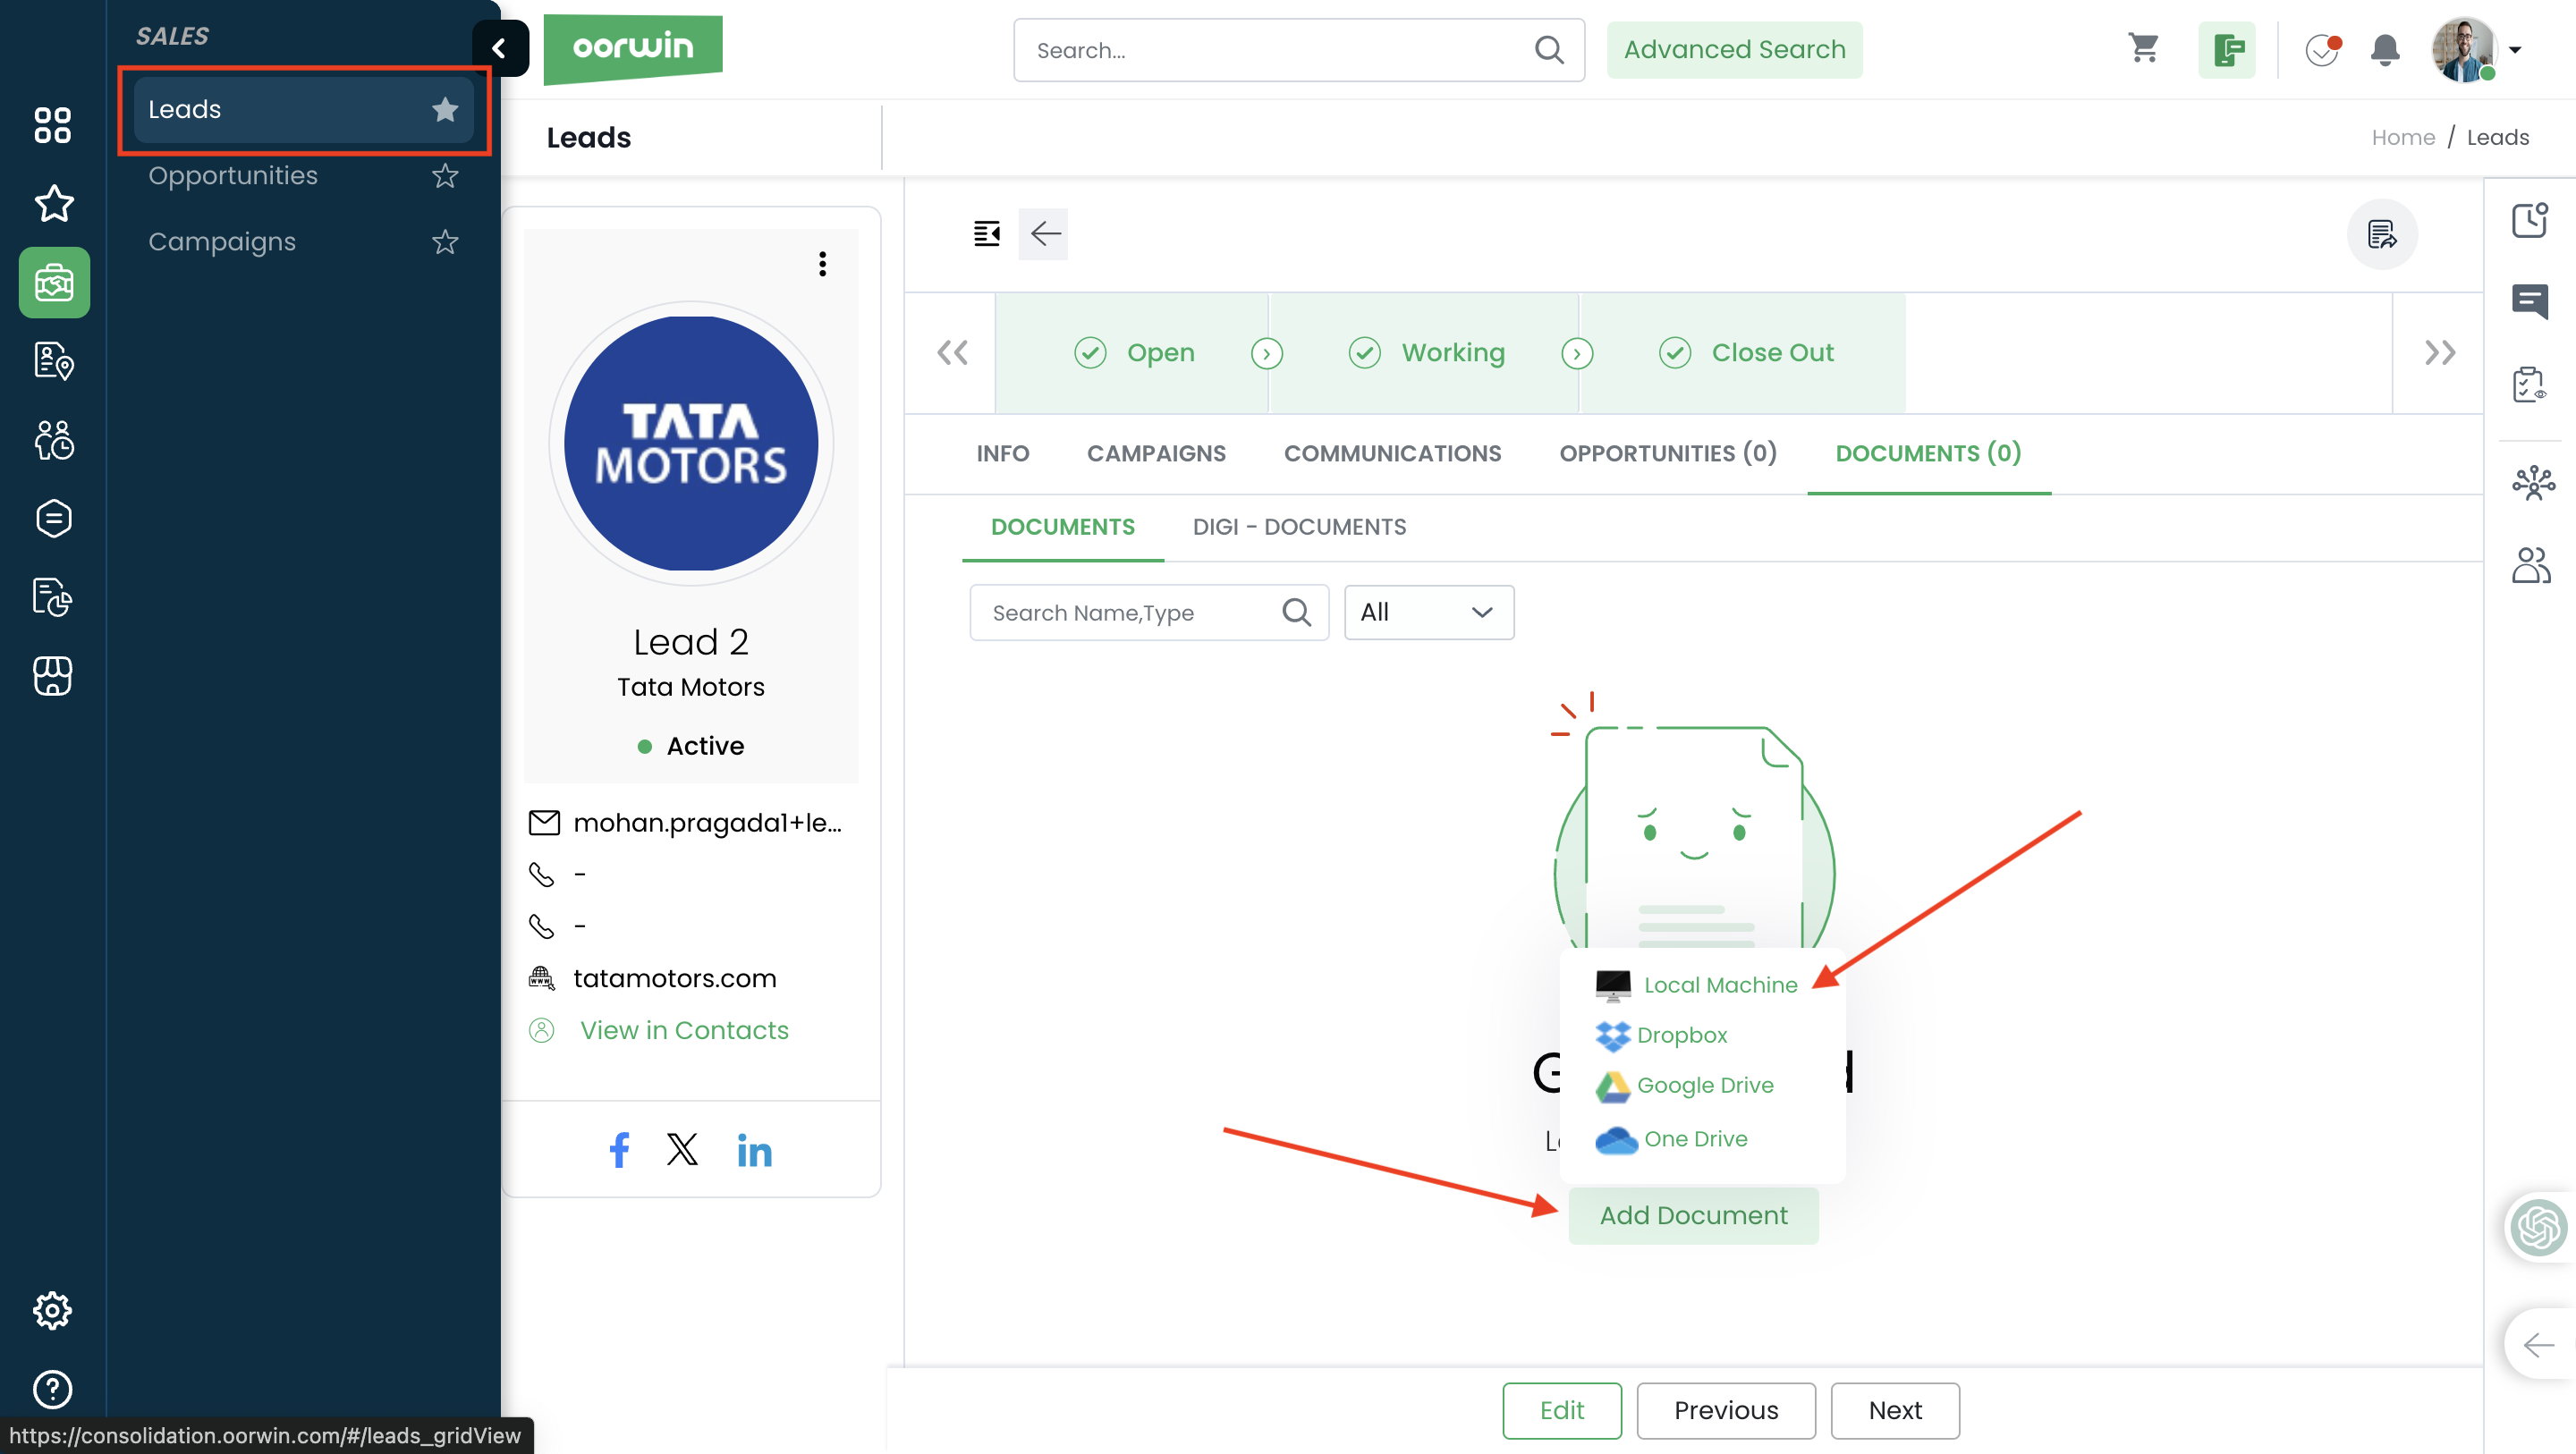
Leads module can hold the multiple type of documents related to particular record.To do this action you need to have add permission enabled for your role from the Settings->Role security
Please follow the below steps to add a document specific to your lead
- Log in to your Oorwin Account and navigate to Leads module from the left menu under Sales Section
- Click on any lead name to whom you wanted to add a document
- Click on Documents on the top header
- Click on Add document button and select any of the option from the source list
- Attach and upload the documents and fill the details and click on Upload button
- All your documents has uploaded and tagged to specific lead record
Was this article helpful?
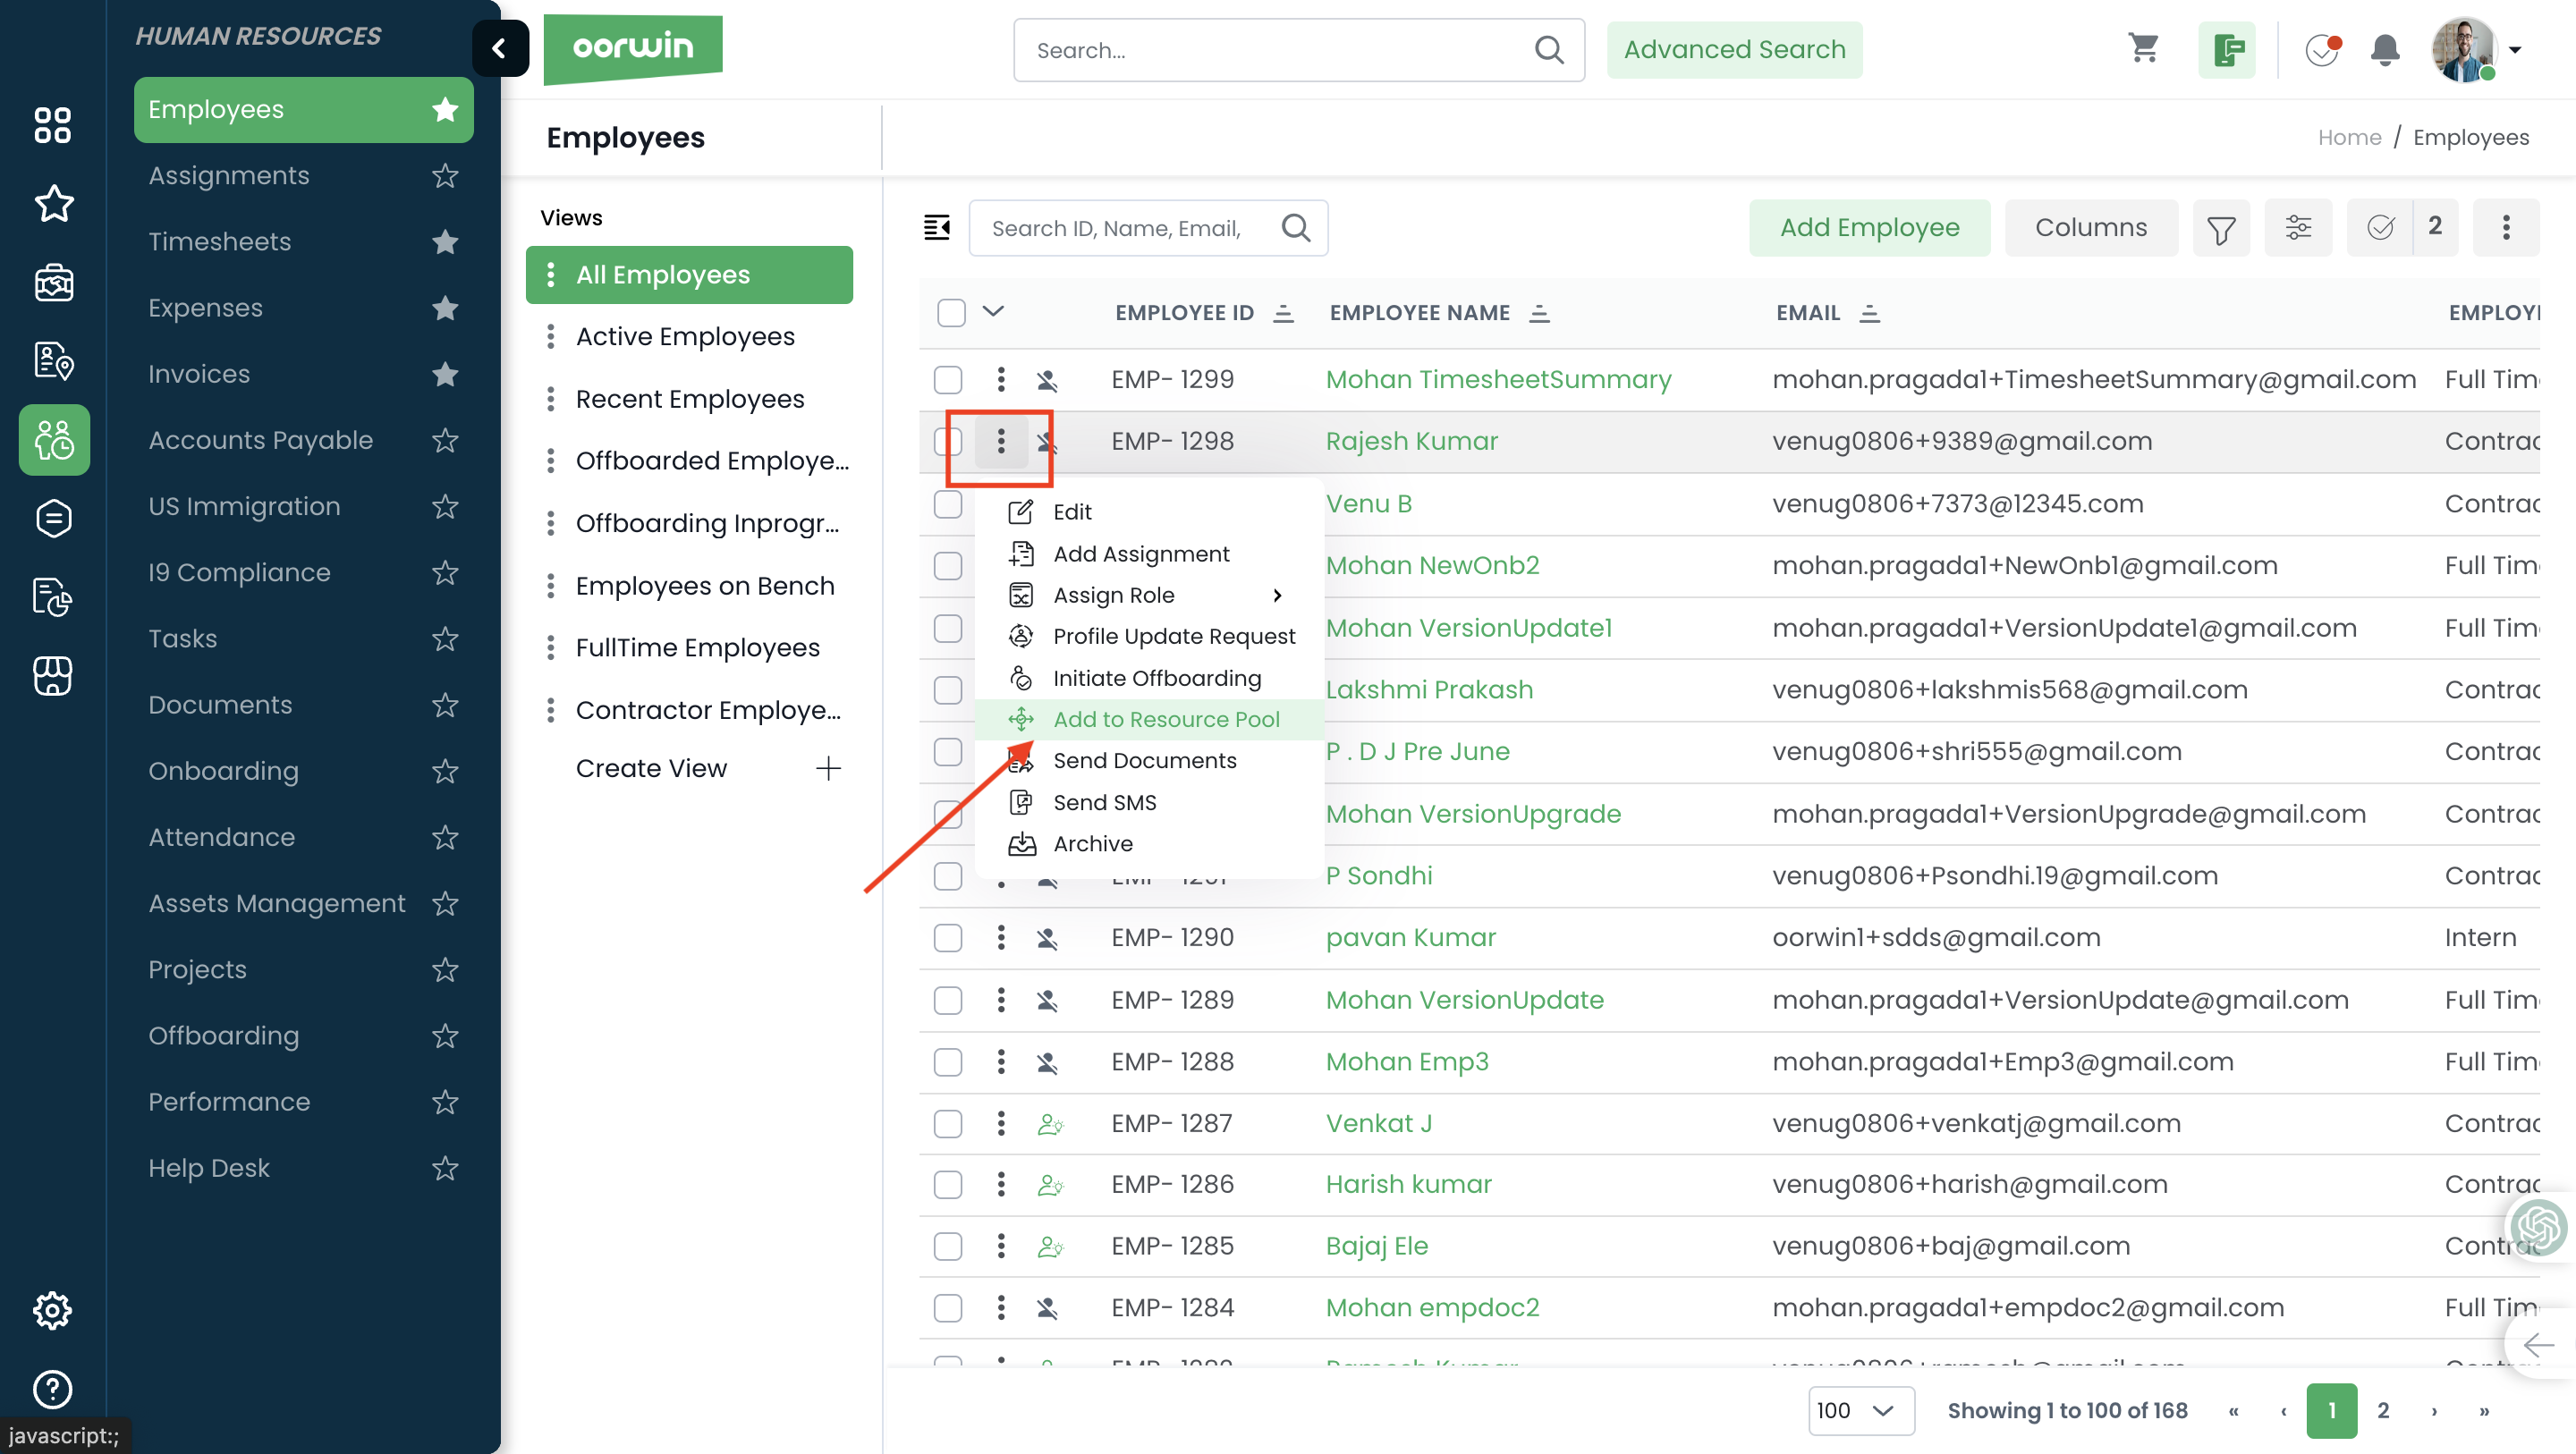
If the consultant doesn’t have any active assignments and is on bench, You can add that employee to resource pool to work on those bench employees
Here is how you can add those employees to Resource pool module
- Log in to your Oorwin Account and navigate to Employees module from the left menu under HRMS Section
- Click on “Actions(three dots)” icon for the employee you wish to update.
- Click on Edit link from the list (You need to have employee edit access to have this link)
- Click on Add to Resource pool option from the list of actions
- Click on Yes on the confirmation popup and a new resource pool record has created with employee details
Was this article helpful?
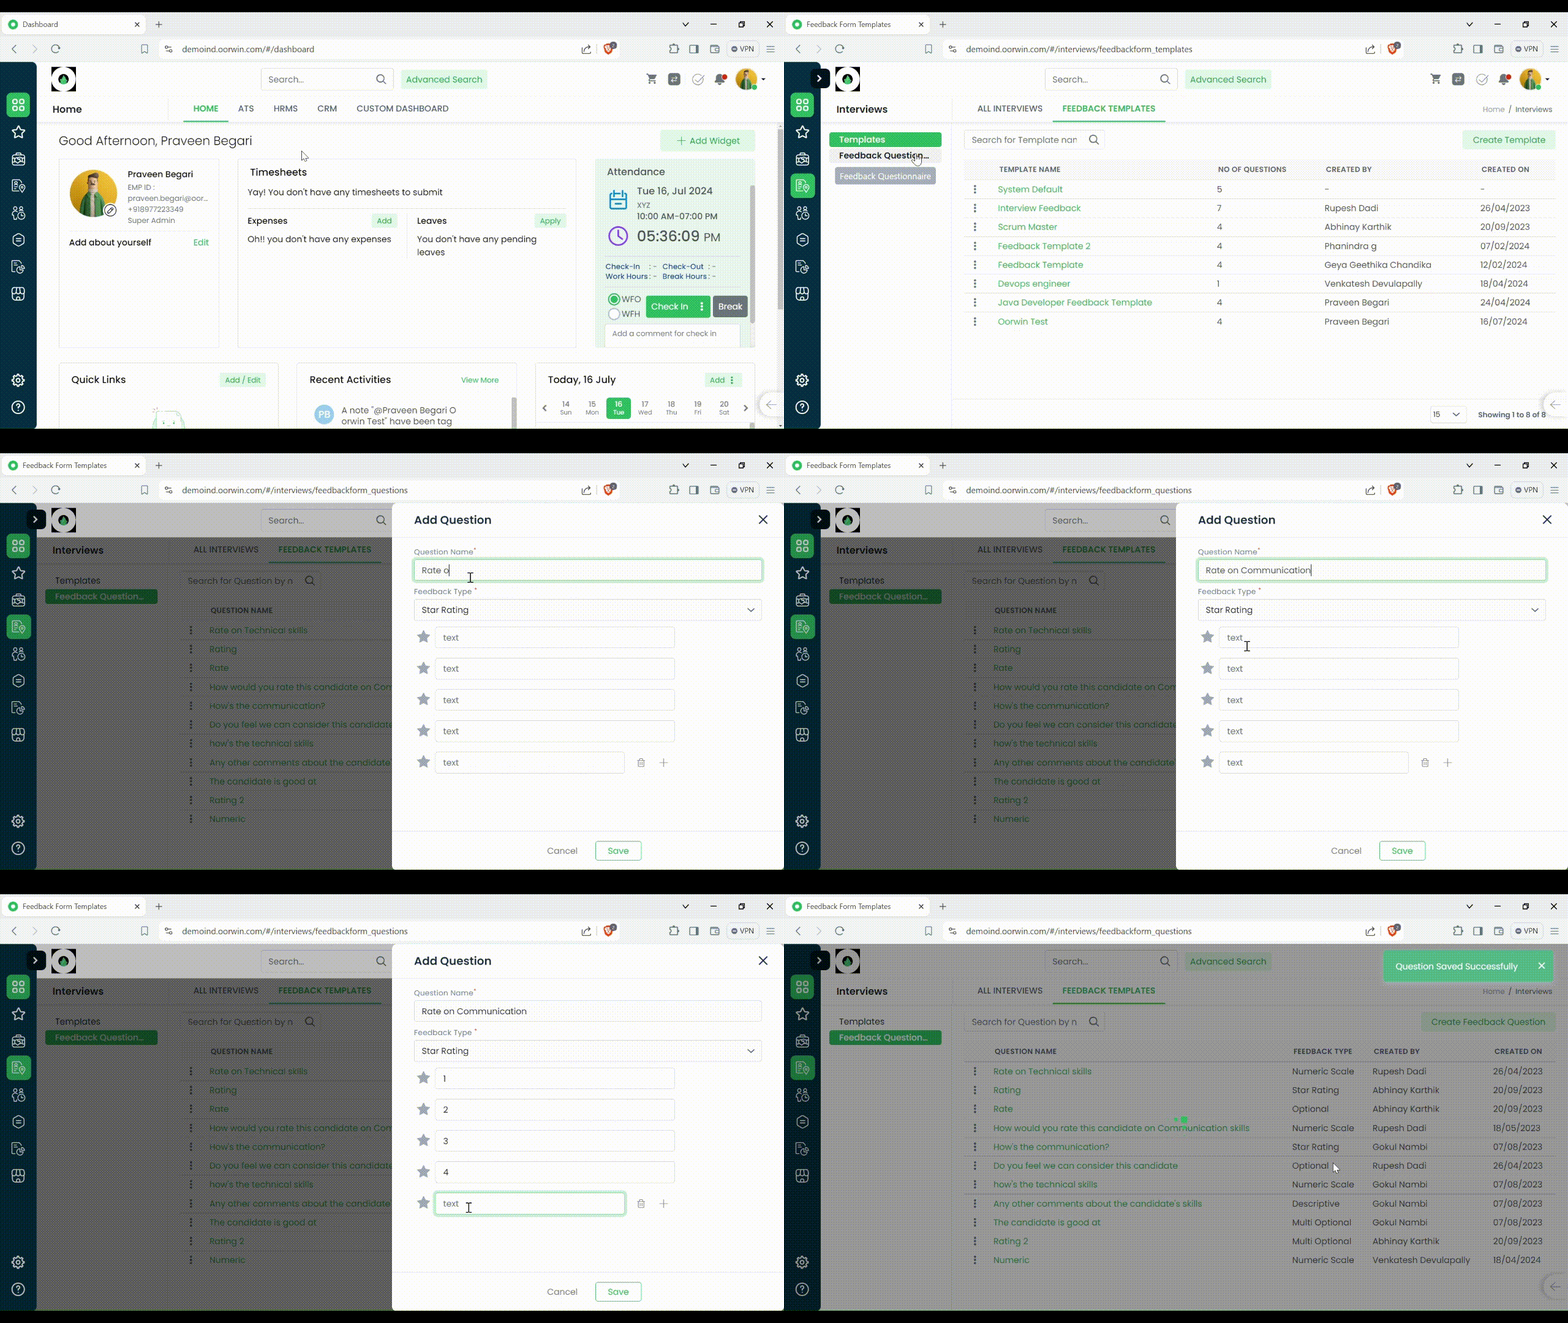
Here’s a guide on how to Add Feedback Questions:
- Login to your “Oorwin account” and Navigate to “Interviews module” on the left menu under the “Recruitment” section.
- Navigate to Feedback templates page from the header.
- Select “Feedback Questions” on the Left hand side
- A pop-up will come up on your screen to Add Question.
- Enter the Question Name, Select the type of Question (ex. Multi-optional, Star rating, Numerical Scale)
- Fill in the Required information after selecting the Question type.
- Click on Save button on the bottom of your screen.
- The Question is now saved to the Feedback Questions List.
Was this article helpful?
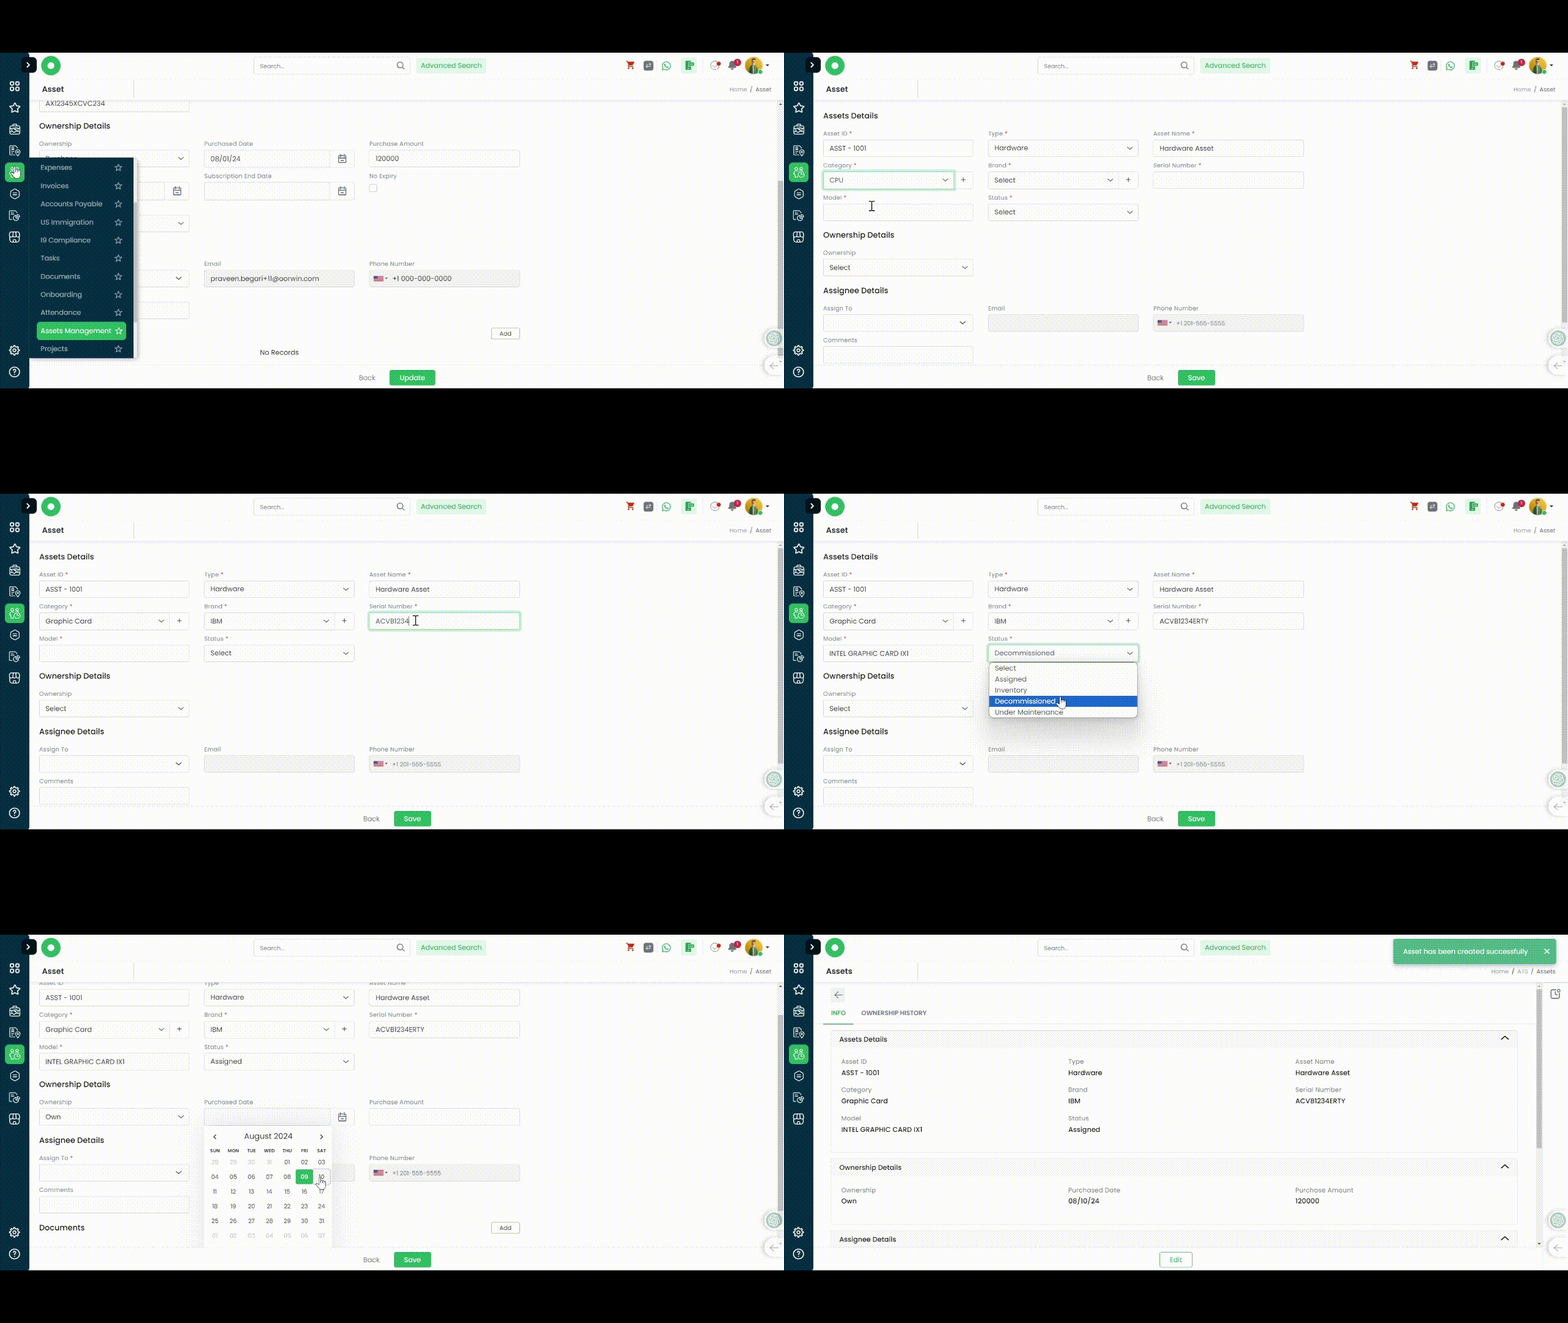
Add Hardware Asset:
- Navigate to Main Menu
- Asset Management
- Add Asset
- Select Type as “Hardware”
- Asset Name
- Category – Select from drop down or click on “+” to create a new category
- Brand – Select from drop down or click on “+” to create a new category
- Serial Number – Mention Serial number of the asset
- Model – Enter the Model number information
- Status –
Assigned: select this status , if the assigned is assigned to any employee
Inventory: Select this status, if the Asset is in the Inventory
Decomissioned: Select this status, if the Asset is Decomissioned or Expired
Under Maintenance: Select this status, if the Asset is Under maintenance/repair - Ownership Details –
- Own: Select Own, if the asset has been purchased by you and you own it
Select Purchased Date and Amount - Rent: Select Rent, if the asset has been rented.
Select Rental date, Rental end date, Vendor from whom you have rented the asset and Rental Amount.
- Own: Select Own, if the asset has been purchased by you and you own it
- Asignee Details – Select “Assign To” drop down and select desired employee to whom it was assigned to
- Comments – Enter Comments
- Add Any Documents/Invoices/Warranty etc in Add Dcouments section
- Save
Was this article helpful?
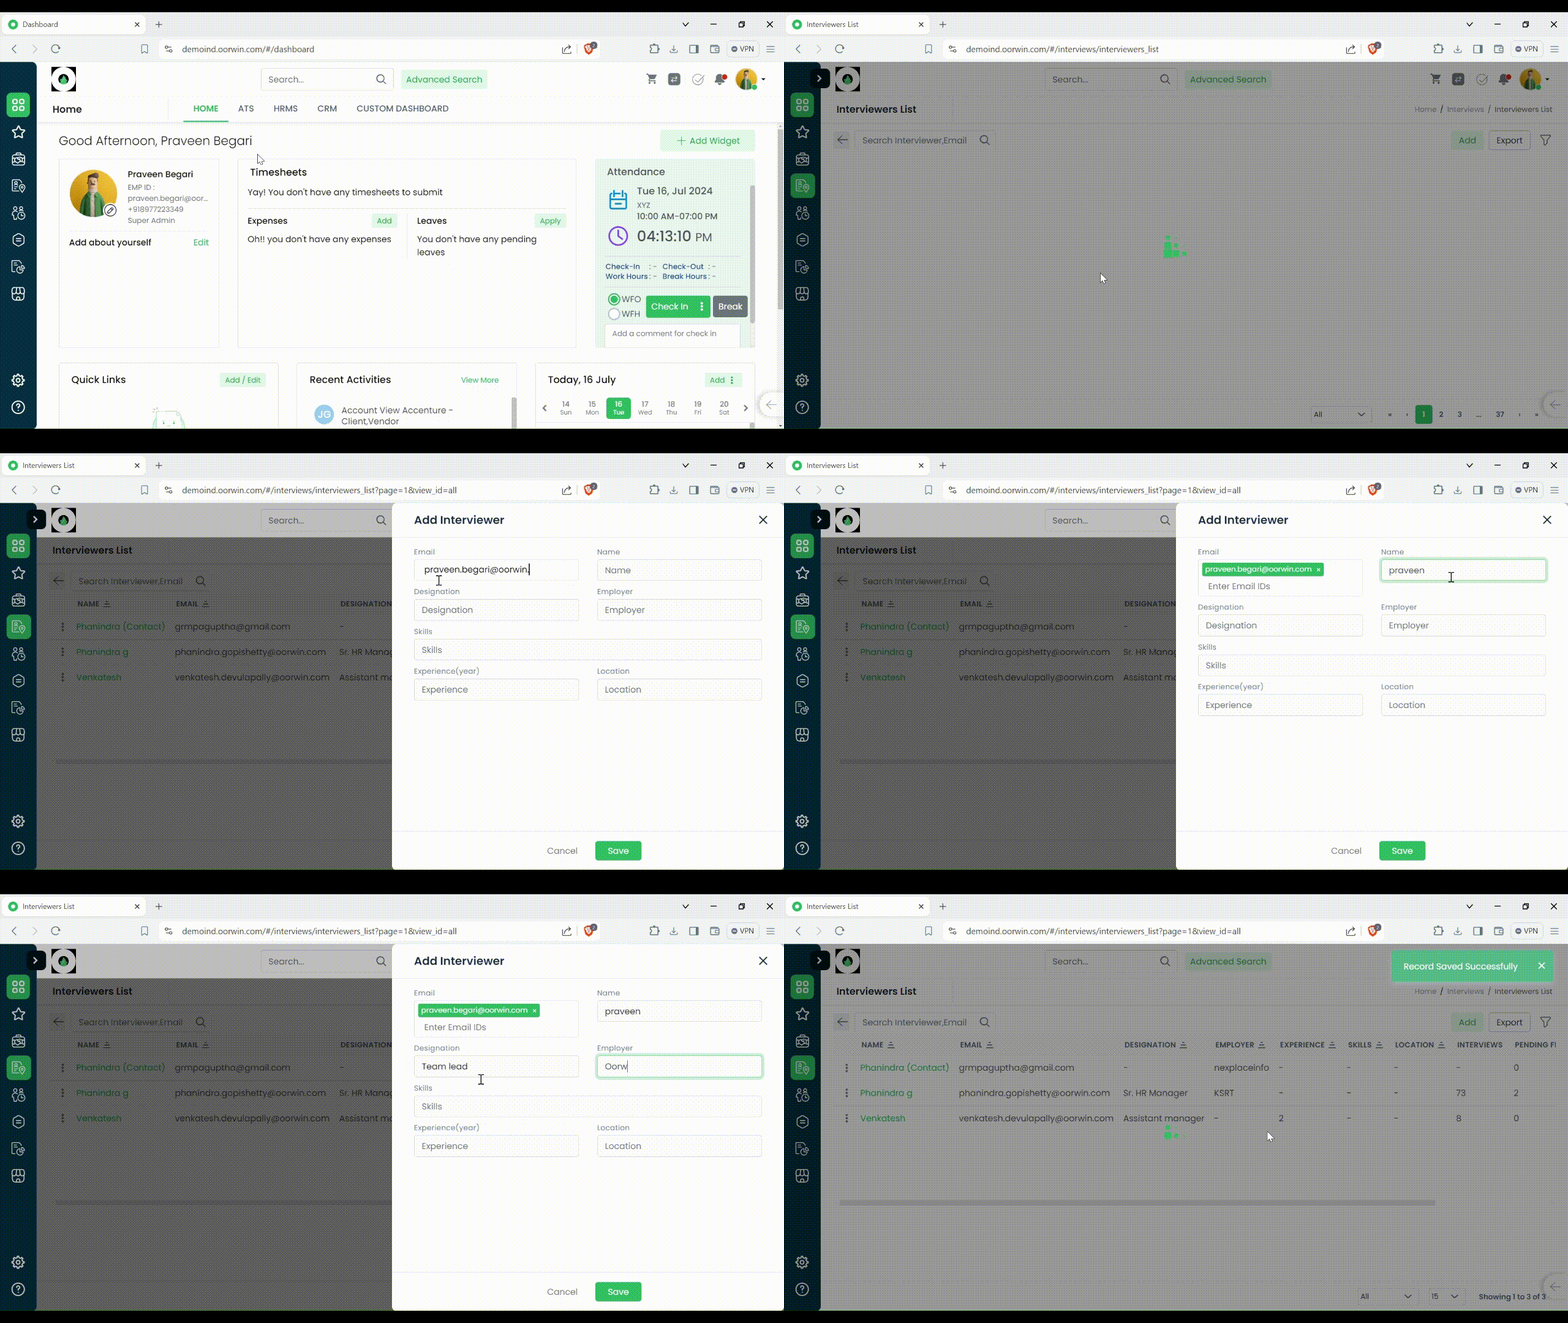
Here’s a guide on how to Add Interviewers:
- Login to your “Oorwin account” and Navigate to “Interviews module” on the left menu under the “Recruitment” section.
- To add an Interviewer, click on 3 dots/More on the top right corner.
- From the drop down select “Interviewers”.
- Once you’re on the Interviewers page, click on ADD button on the top right corner.
- Fill in the Interviewer details and Click on “Save” button on the bottom of your screen.
- The Interviewer will be added to the list.
Was this article helpful?
Organization documents are common documents which are shared throughout the organization based on the locations and the organization entities. So, it is at utmost importance for us to manage organization documents.
All the employees have access to view the documents, but only the Super Admins have the access to edit, delete, download a document. They also can view the history of the document views along with adding a document/ folder.
In this article, the following actions will be discussed to help you understand, how you can manage organization documents in Oorwin.
- View Organization Documents
- Add Documents
View Organization Documents
To view the organization documents, follow the below mentioned steps:
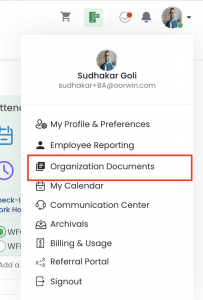
- Go to your profile icon -> Click on Organization Documents -> You will be able to see the list of documents you have access to
- Click on the document you wish to view and you will be able to view the document in your screen itself.
Add Documents
- To add documents in this section, you have to follow the same steps as above to find the organization documents pane.
- Next, you have to click on Add Documents option to upload the documents from your system onto Oorwin’s database.
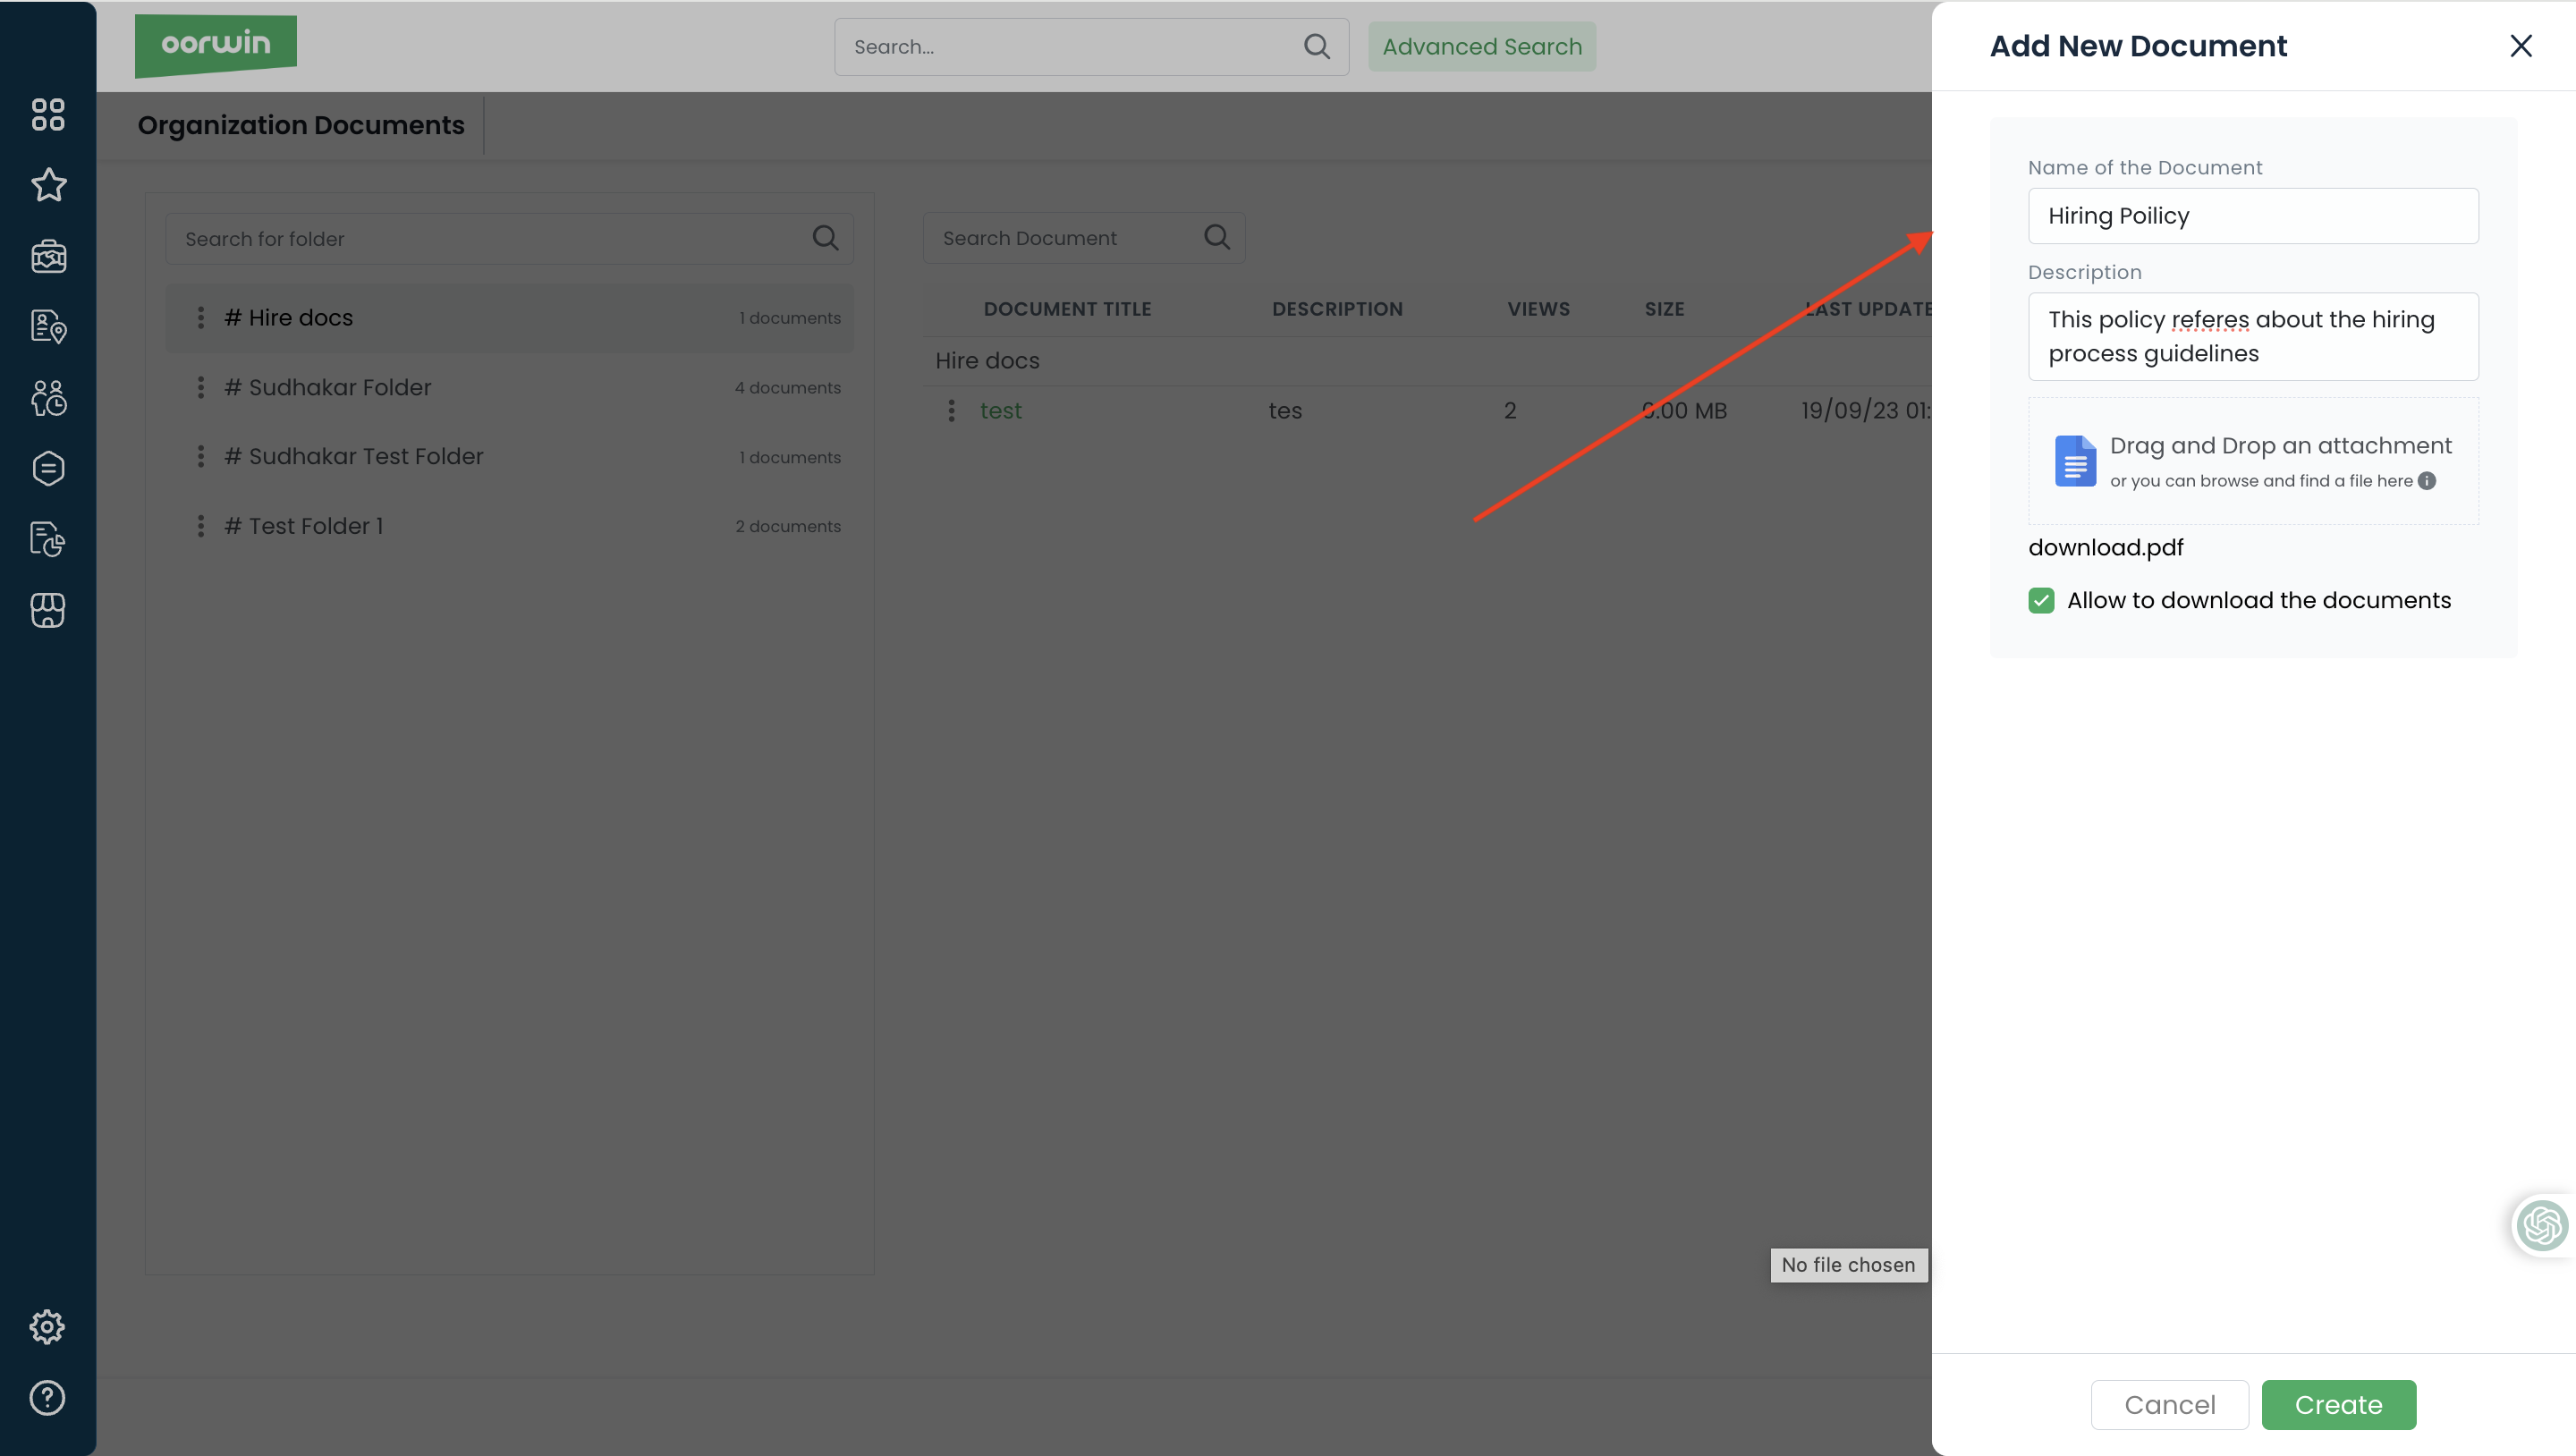
- Once you click on Add Document, you will get the following screen where you can mention the name and description of the document. Then, click on Create.
- Note: You will find an option to allow the documents to be downloaded, which can be chosen accordingly.
- Once uploaded all the employees will be able to see the newly added documents.
Was this article helpful?
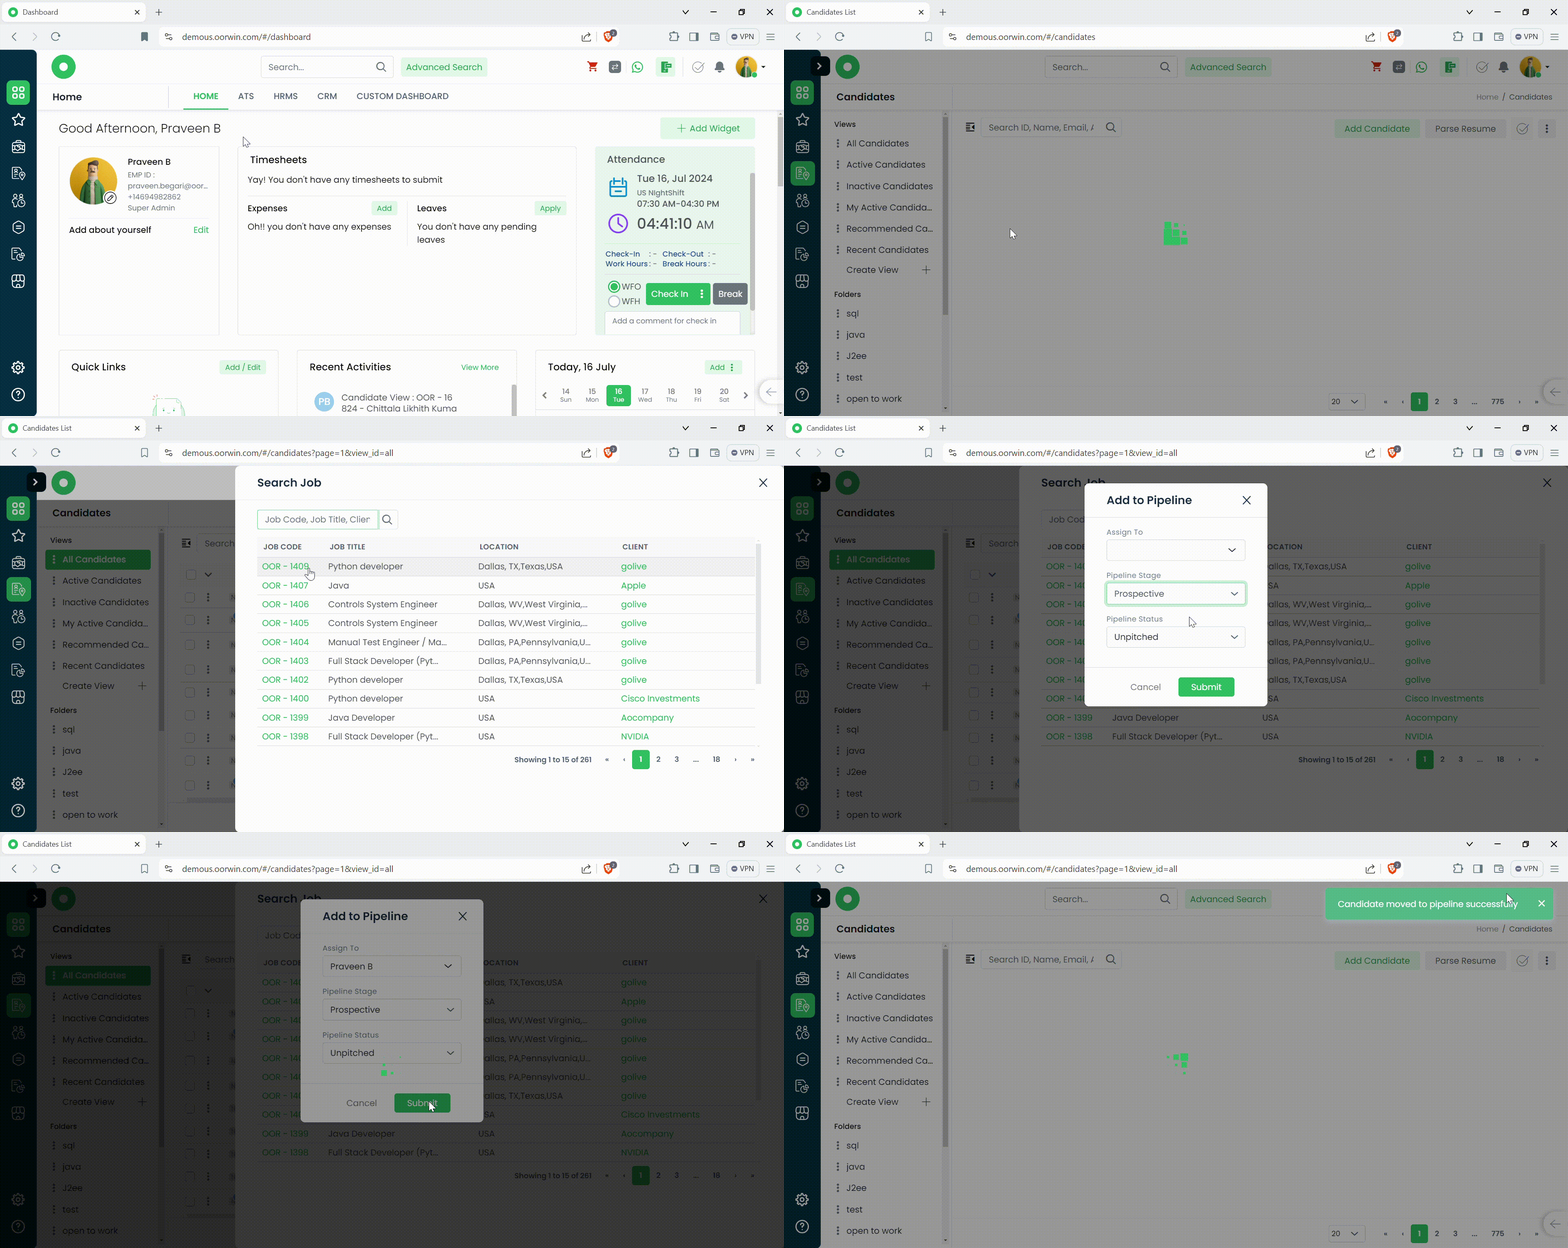
Here’s a guide on how to Add Pipeline from Candidate listing page:
- Login to your “Oorwin account” and Navigate to “Candidates module” on the left menu under the “Recruitment” section.
- Click on the “3 dots/Actions” beside the Candidate ID and from the drop down click on Add Pipeline.
- Jobs Listing page pop-up will come up on your screen.
- Search & Select the Job to which you want to add the Candidate.
- Select the pipeline stage & pipeline status, click on “Submit” button to add the Candidate to the Pipeline.
Was this article helpful?
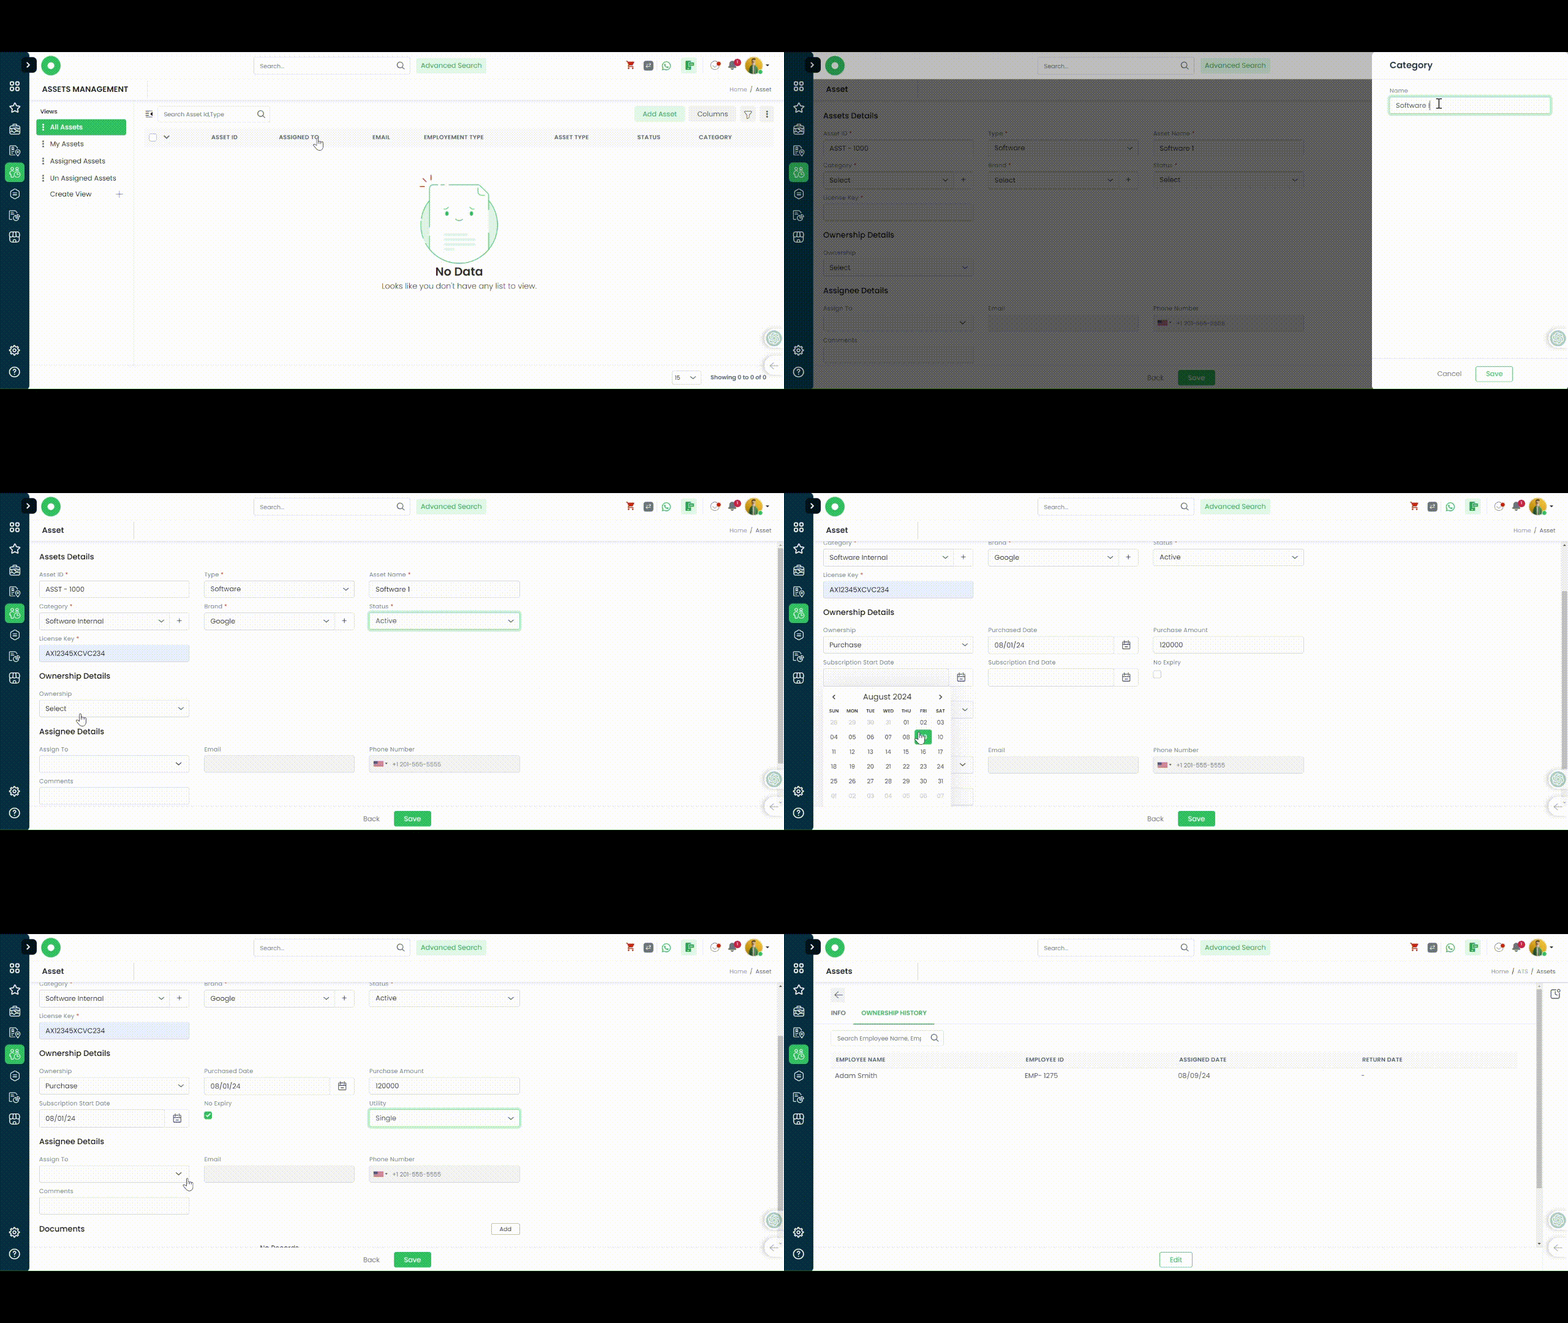
Add Software Asset:
- Navigate to Main Menu
- Assets Management
- Add Asset
- Select Type as “Software”
- Asset Name
- Category – Select from drop down or click on “+” to create a new category
- Brand – Select from drop down or click on “+” to create a new category
- Status – Select Active or Expired
- Licence Key – Enter any Licence key
- Ownership Details –
- Free: Select Free, if the softare is free
Select your subscription start and end dates as needed, If there is no end date select the check box says “No Expiry”. Select Utility as Single or Multiple - Trial: Select Trial, if the Software is in Trial
Select your subscription start and end dates as needed, If there is no end date select the check box says “No Expiry”. Select Utility as Single or Multiple - Purchase: Select Purchase. if the software is purchased
Select your subscription start and end dates as needed, If there is no end date select the check box says “No Expiry”. Select Utility as Single or Multiple.
- Free: Select Free, if the softare is free
- Asignee Details – Select “Assign To” drop down and select desired employee to whom it was assigned to
- Comments – Enter Comments
- Add Any Documents/Invoices/Warranty etc in Add Dcouments section
- Save
Was this article helpful?
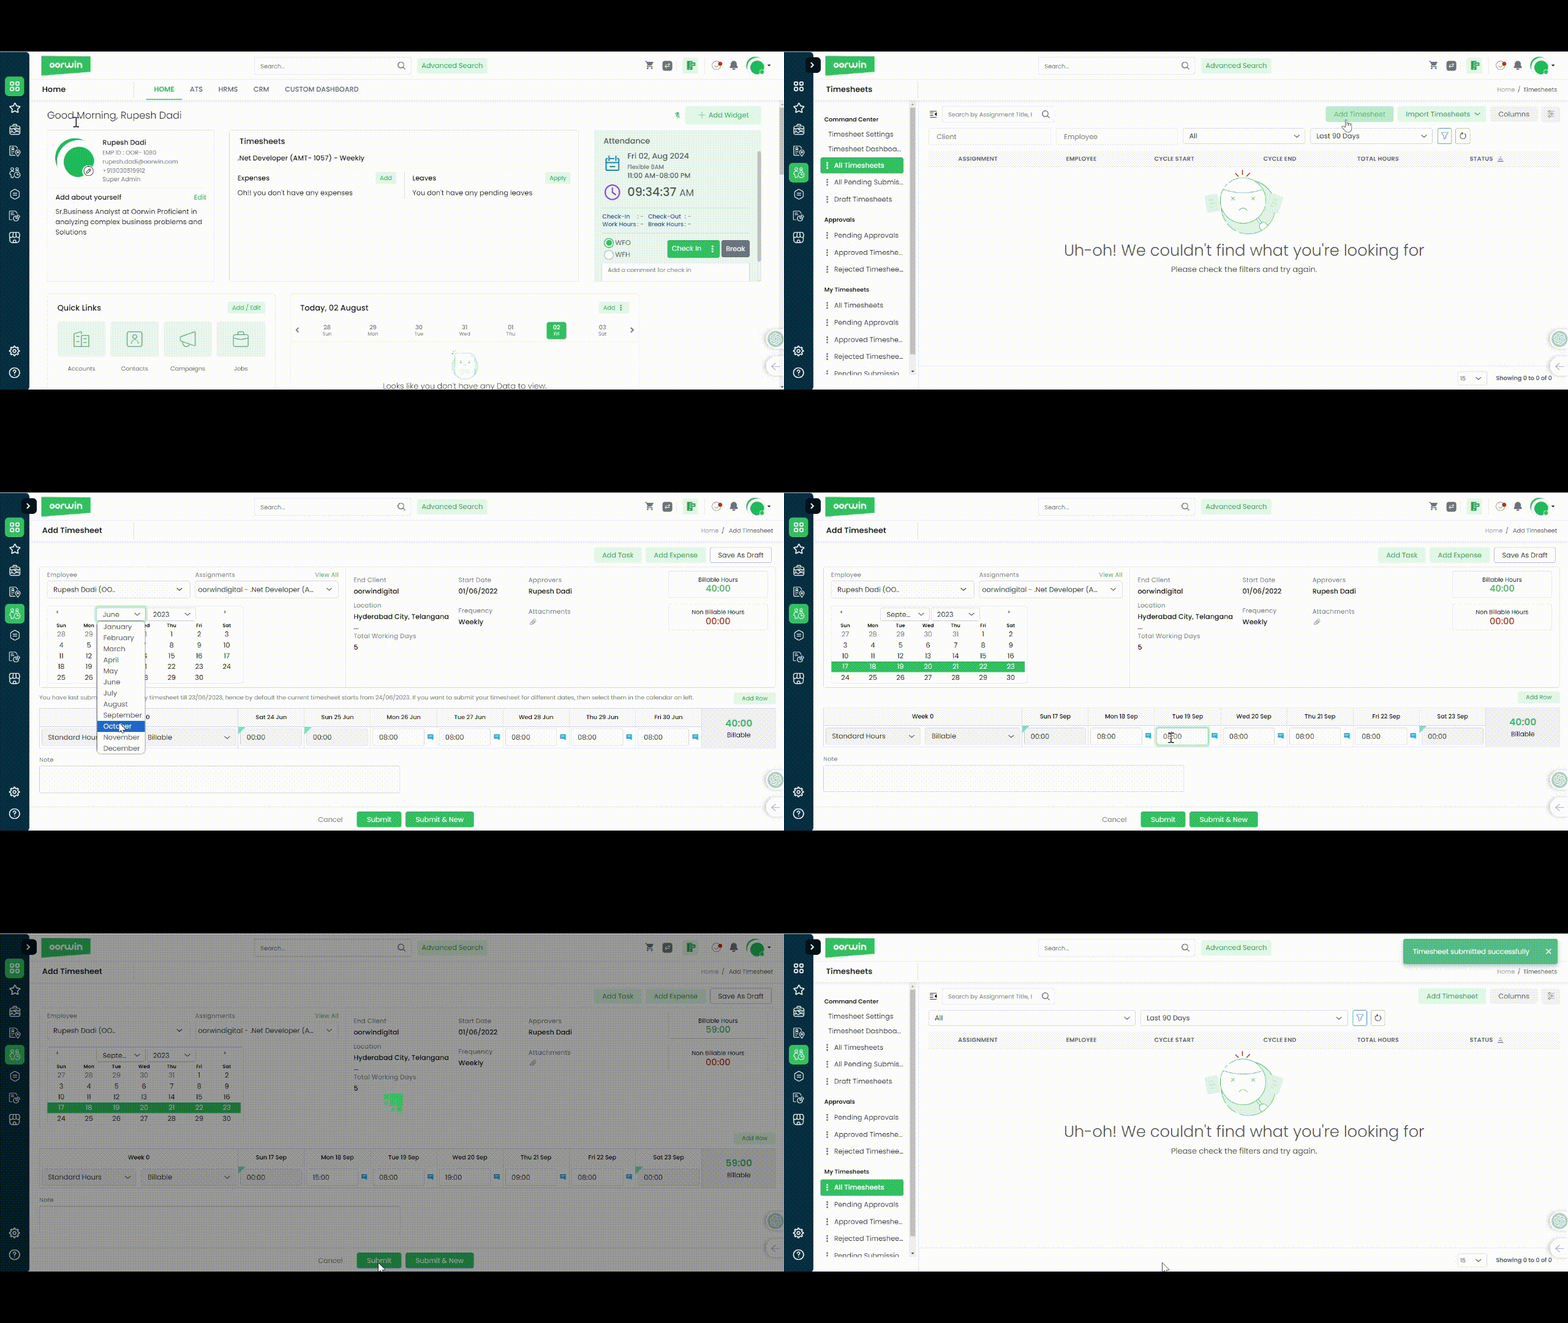
Log your work hours and track project time by adding your timesheets here.
Navigate to Menu -> Timesheets -> Add Timesheet
- Select your Assignment from the drop down
- Select your dates(as per your timesheet cycle)
- Enter your hours worked
- Add Attachments if necessary
- Enter your comments if necessary
- Submit
Was this article helpful?
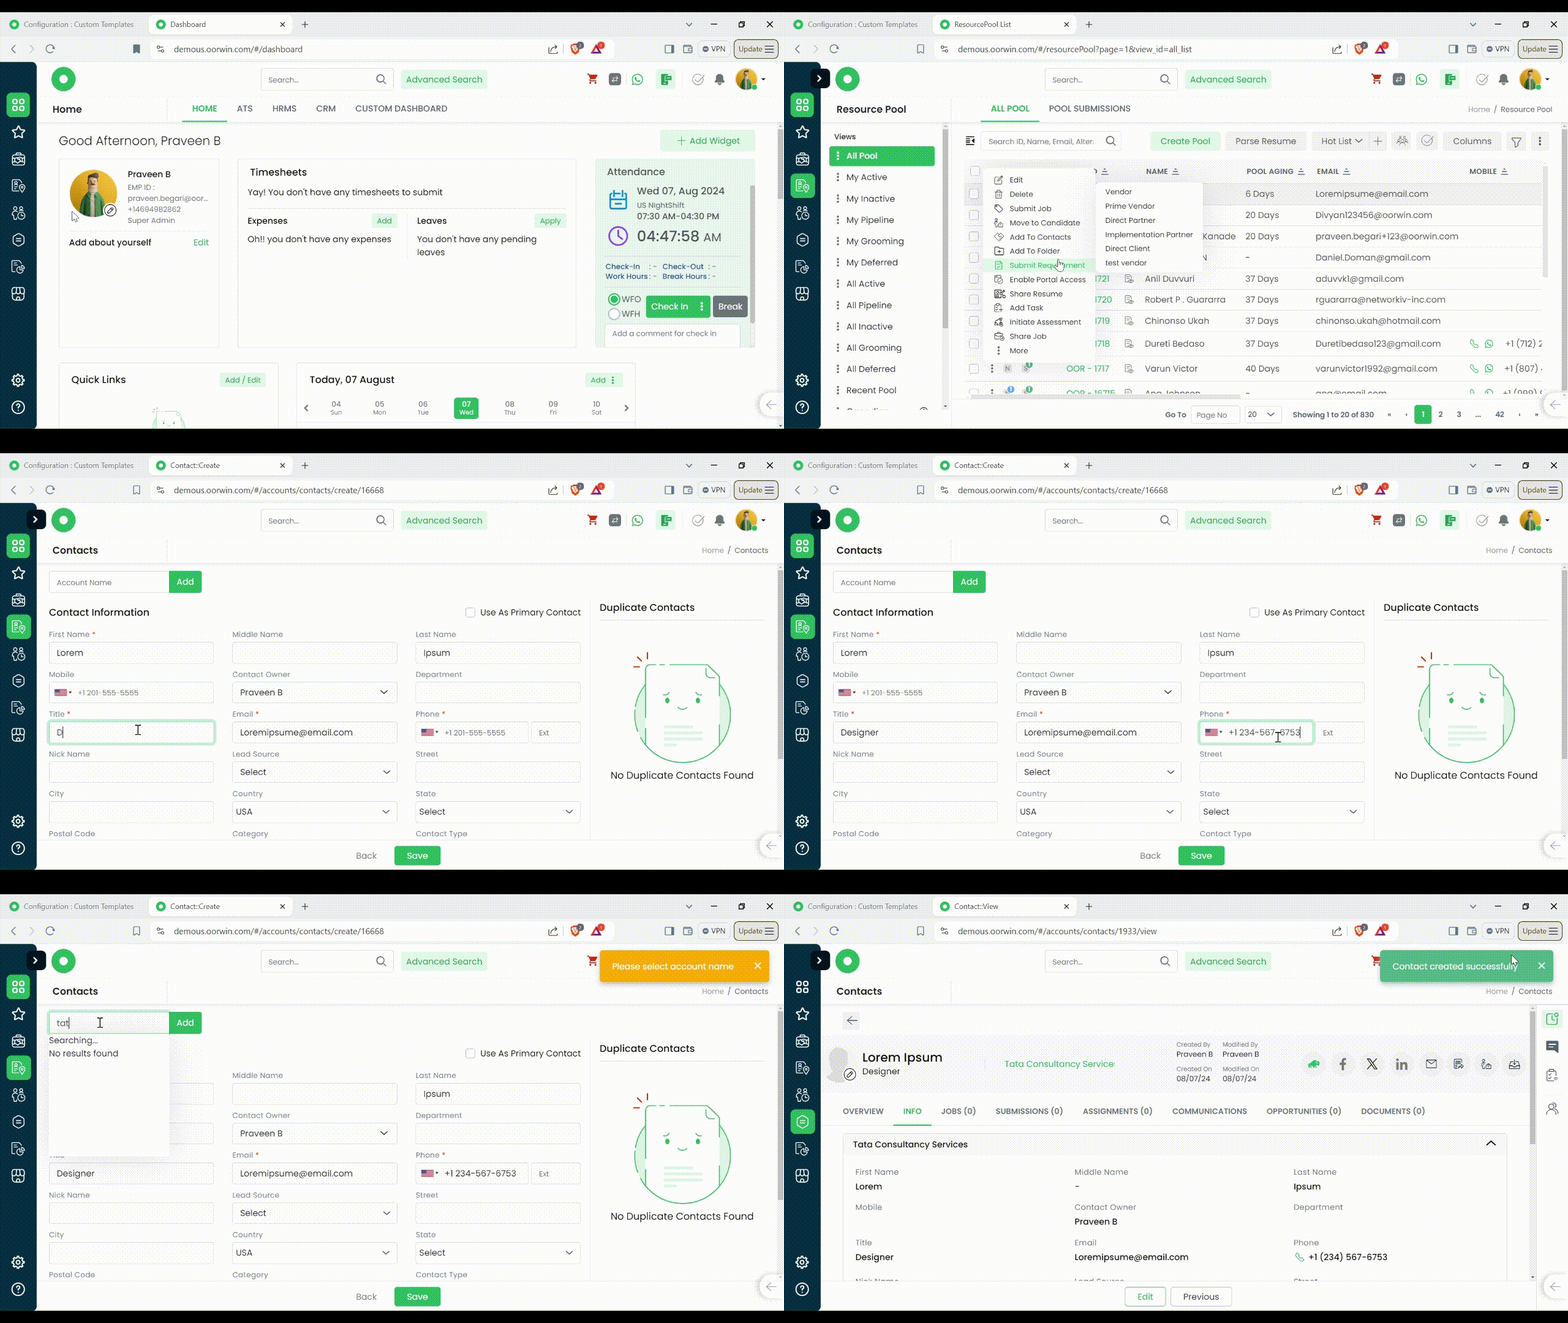
Here’s a guide on how to Add a Candidate as a Contact from Resource Pool Module:
- Login to your “Oorwin account” and Navigate to “Resource Pool module” on the left menu under the “Recruitment” section.
- Click on the “3 dots/Actions” beside the Pool ID and from the drop down click on Add to Contacts.
- The page will be redirected to Contact Information page.
- Tag an Account & fill in the Required Information then click on “Save”.
- The Pool Candidate will be saved as a Contact.
Was this article helpful?
Creating a job within an organization involves several key steps to ensure that the position is well-defined, aligned with organizational goals, and attractive to potential candidates.
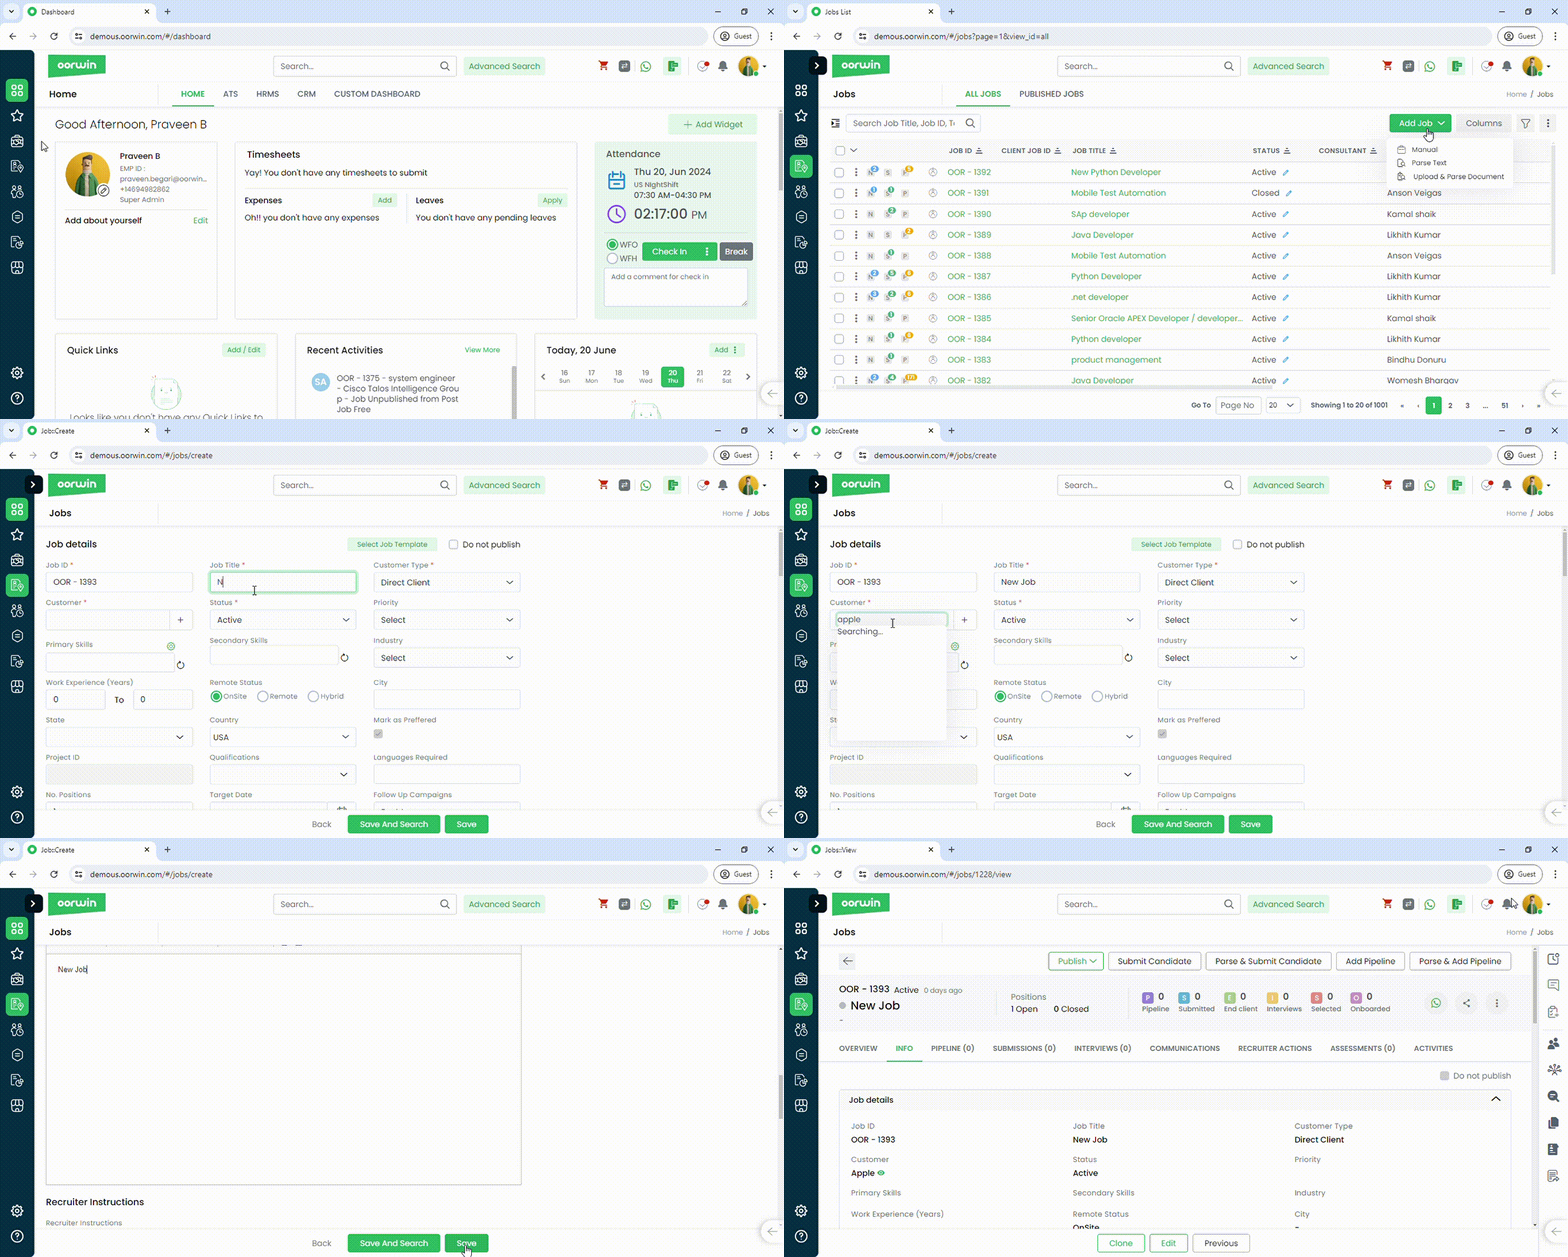
Here’s a detailed guide on how to create a job Manually:
- Log in to your Oorwin Account and navigate to Jobs module from the left menu under Recruitment Section.
- Click on “Add Job” button on the top right corner.
- Select “Manual” option from the drop down menu.
- Fill in all the Required information along with all the Mandatory fields.
- Click on “Save” button below and that’s it, your job is saved into the system
Was this article helpful?
Creating a job within an organization involves several key steps to ensure that the position is well-defined, aligned with organizational goals, and attractive to potential candidates.
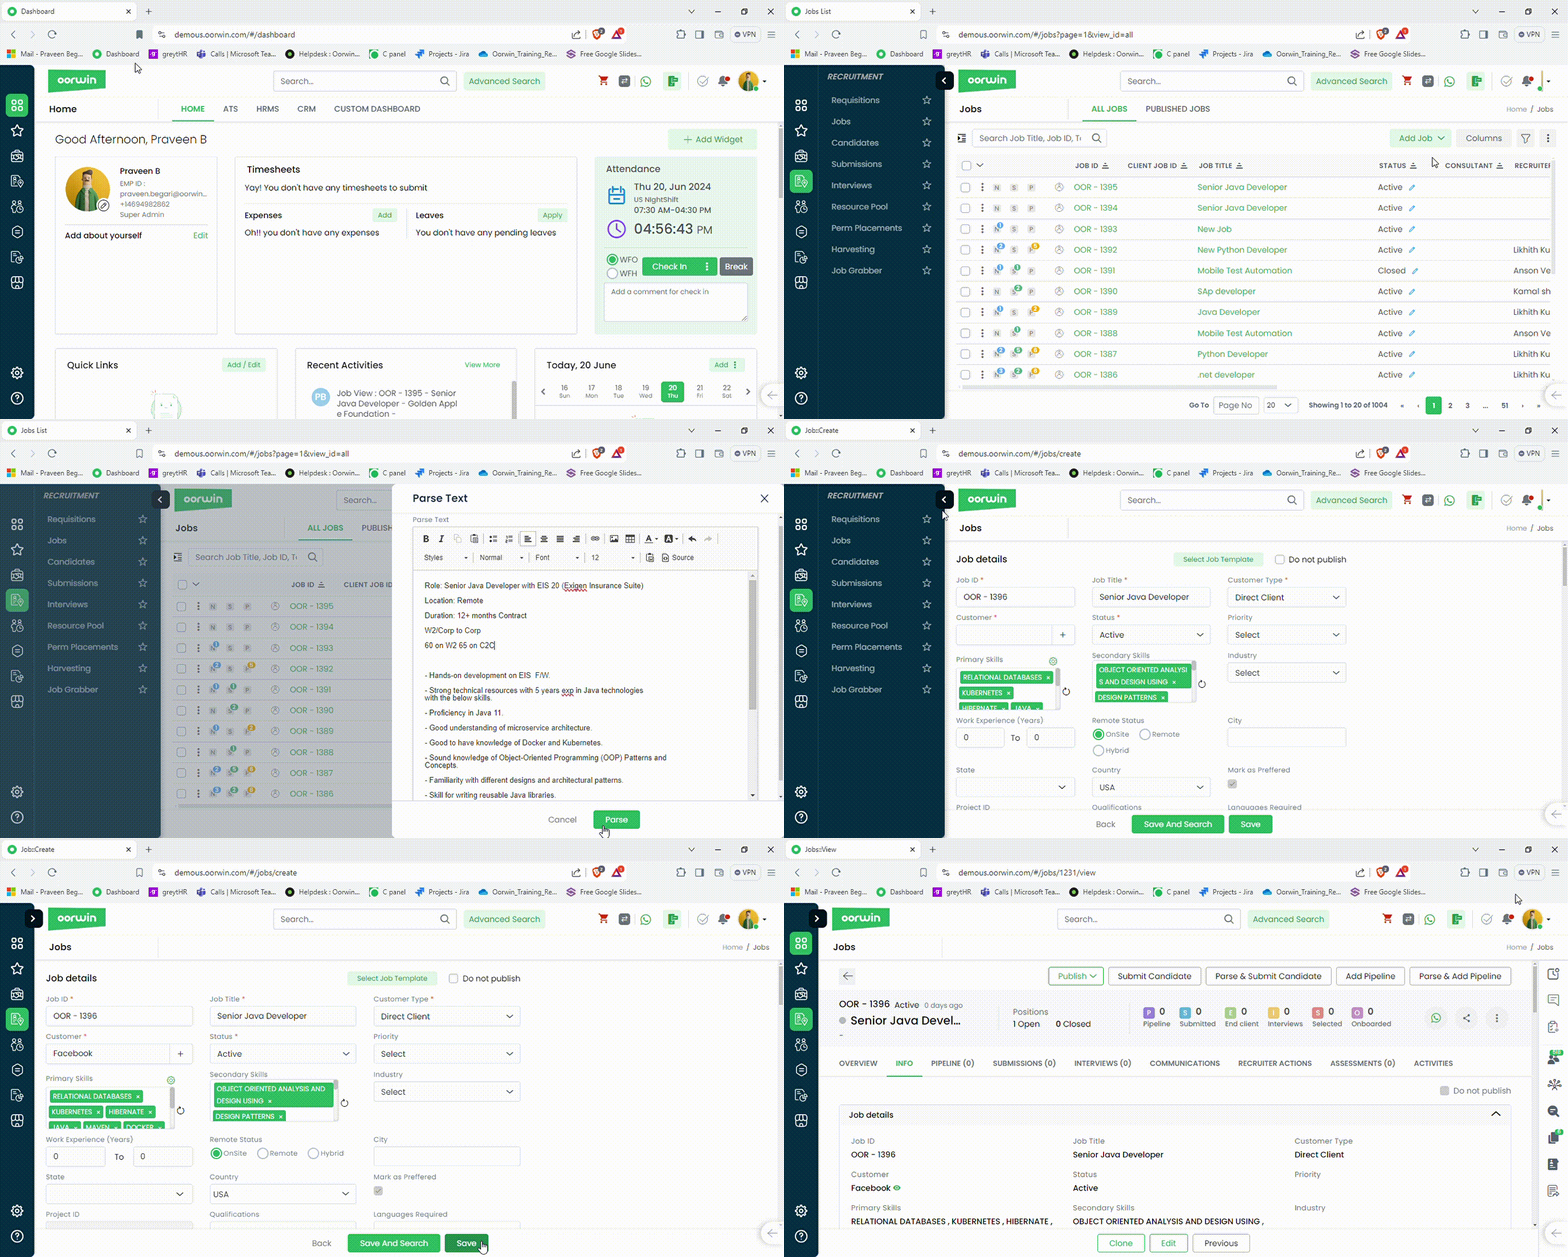
This option allows you to import job details by pasting a text description directly into Oorwin. Here’s a detailed guide on how to create a job using Parse Text :
- Log in to your Oorwin Account and navigate to “Jobs module” from the left menu under “Recruitment” Section.
- Click on “Add Job” on the top right corner.
- Select “Parse Text” from the drop down menu.
- Paste the selected Text in the Pop-up and click on Parse.
- Fill in the Required information along with all the Mandatory fields.
- Finally, Click on “Save” button on the bottom of your screen to add the job.
Was this article helpful?
Using this option you can upload a document containing the job description and Oorwin will extract the relevant information to create a Job.
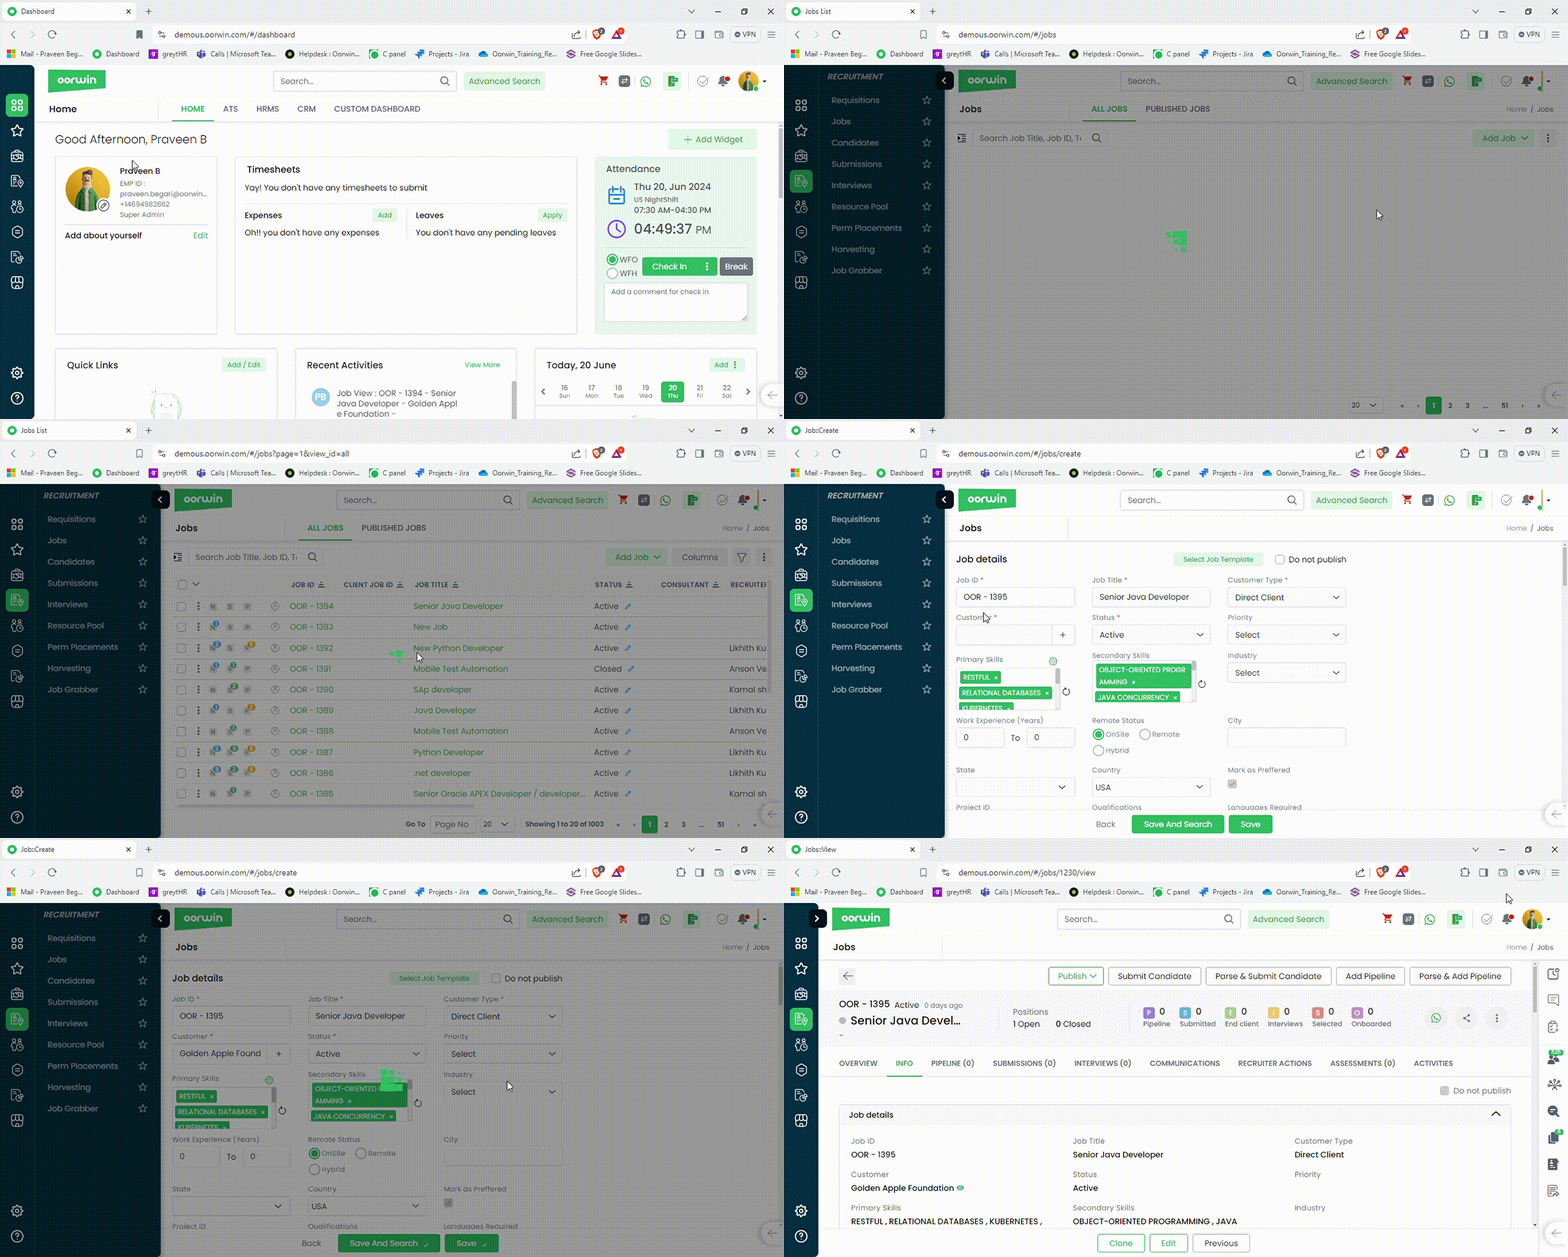
Here’s a detailed guide on how to create a job using “Upload & Parse Text” :
- Log in to your Oorwin Account and navigate to “Jobs module” from the left menu under “Recruitment” Section.
- Click on “Add Job” button on the top right corner.
- Select “Upload & Parse document” option from the drop down menu.
- It opens a popup to select the job desription attachment from your local system
- Select the required document from your local machine and click on parse.
- Fill in the additional information that you wanted to add in the job form
- Now click on “Save” button in the bottom and thats it, Your job is saved!
Was this article helpful?
Related Posts
What is Requisition:
The Requisitions module allows users to initiate new job openings for approval. Once approved, these requisitions move to the open jobs in the Jobs module. This module is typically used for internal or corporate hiring, ensuring an approval hierarchy before releasing any open positions.
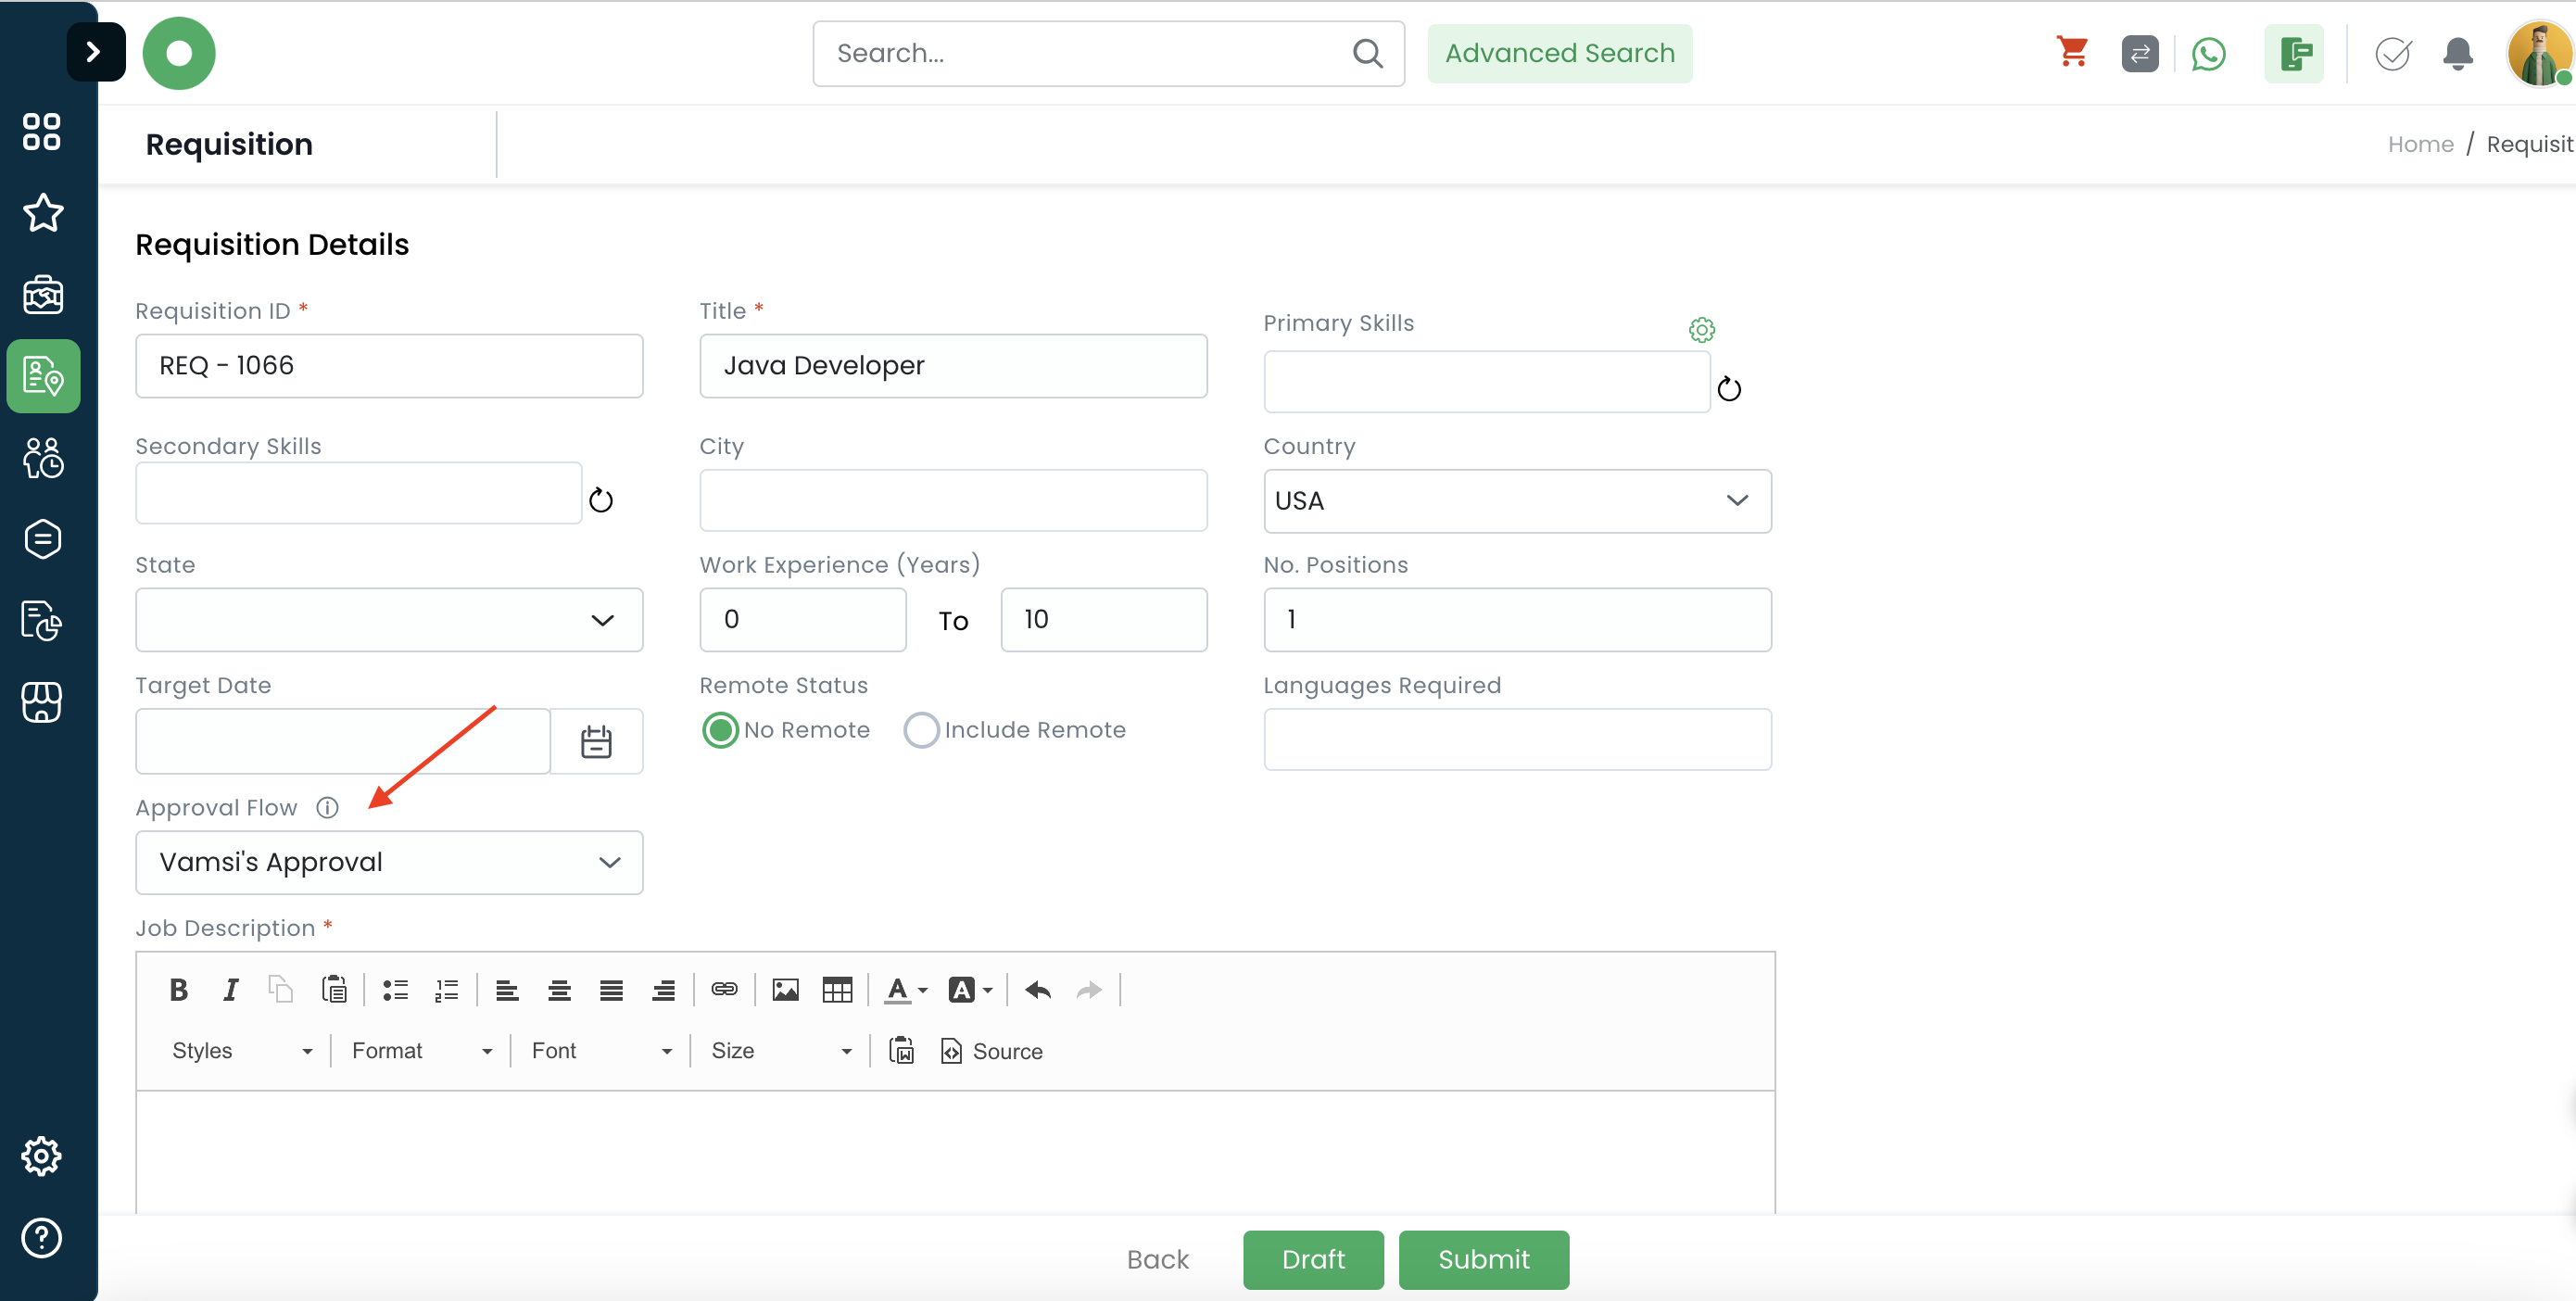
Here’s a detailed guide on how to create a Requisition:
- Log in to your Oorwin Account and navigate to Requisitions module from the left menu under Recruitment Section.
- Click on “Add Requisition” button on the top right corner.
- Fill in all the Required information along with all the Mandatory fields.
- Select the Approval flow and click on “Submit” button below and that’s it, your requisition is submitted for approval.
- Once the approver approves the requisition, a new job will be created.

Was this article helpful?
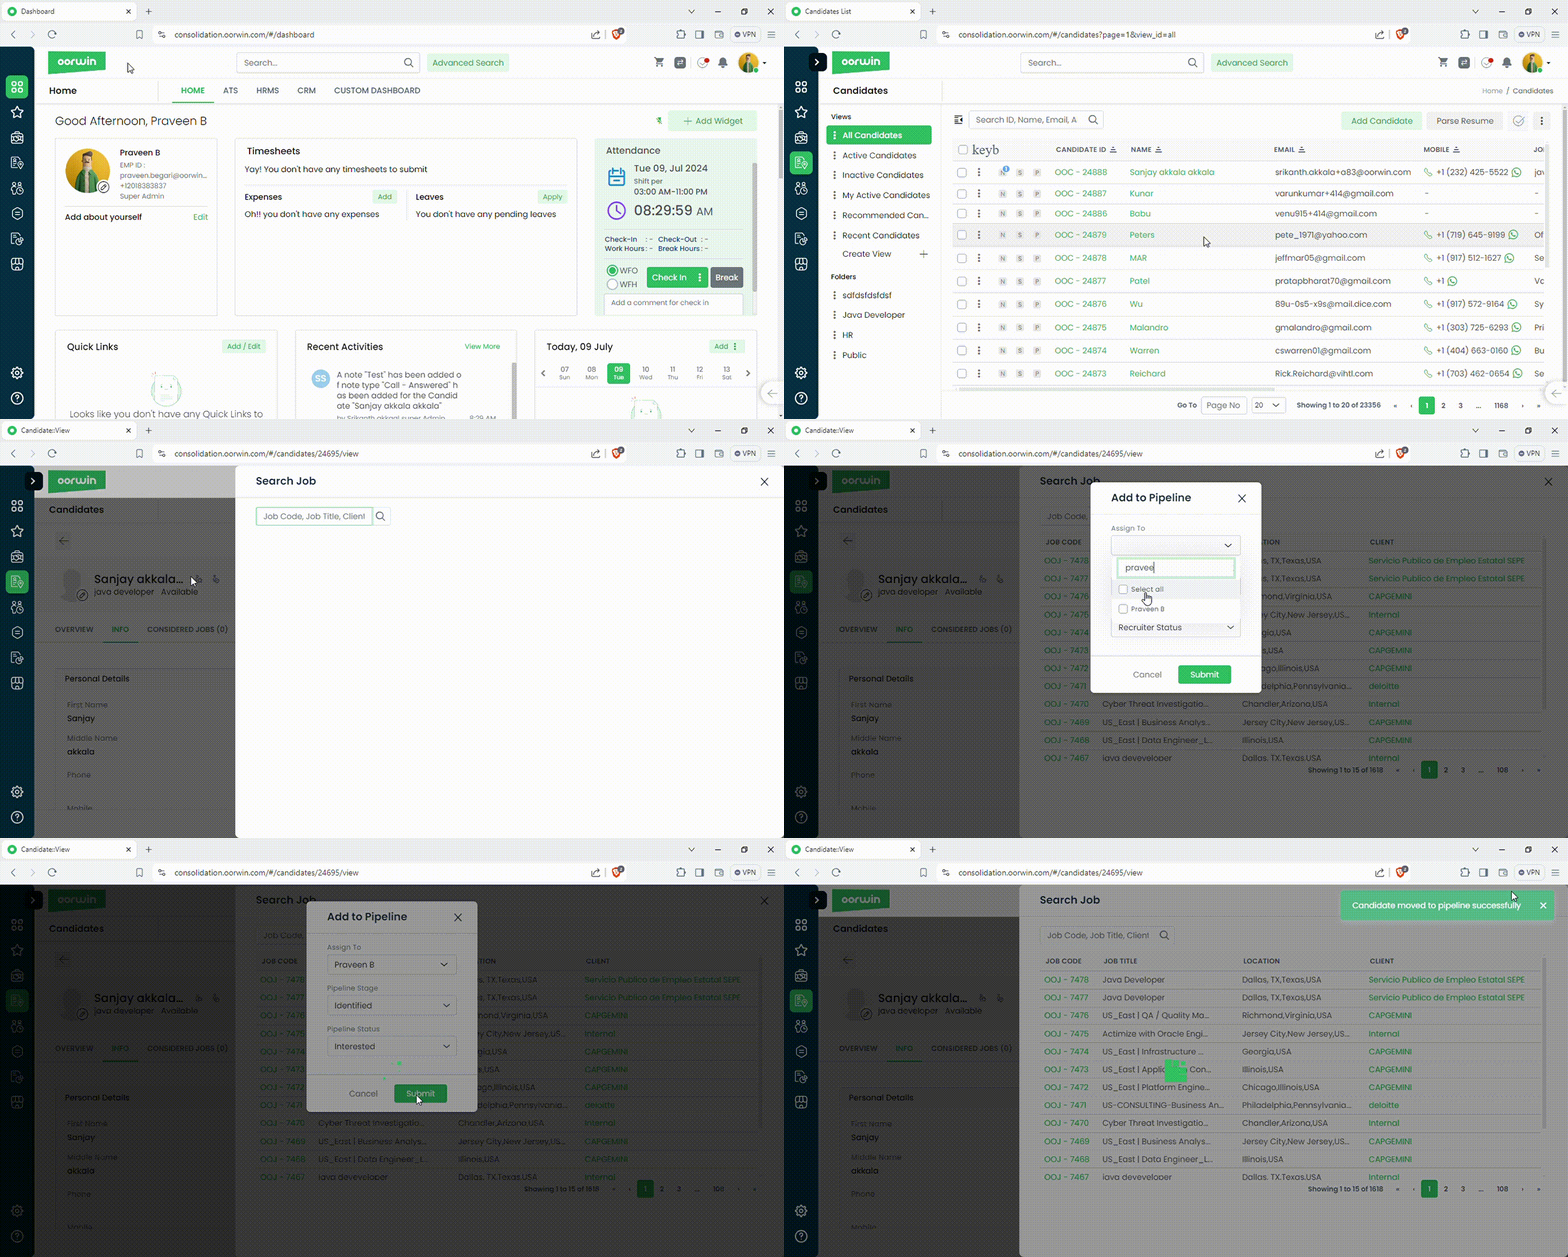
Here’s a guide on how to add a candidate to the pipeline:
- Login to your “Oorwin account” and Navigate to “Candidates module” on the left menu under the “Recruitment” section.
- Click on “Candidate ID/ Name” to open the profile.
- Click on “Add Pipeline” button and a pop-up will come up on your screen.
- From the pop-up search for the “Job” and select the Job.
- Select the pipeline stage & pipeline status, click on “Submit” to add the Candidate to the Pipeline.
- The Candidate will be added the Jobs pipeline.
Was this article helpful?
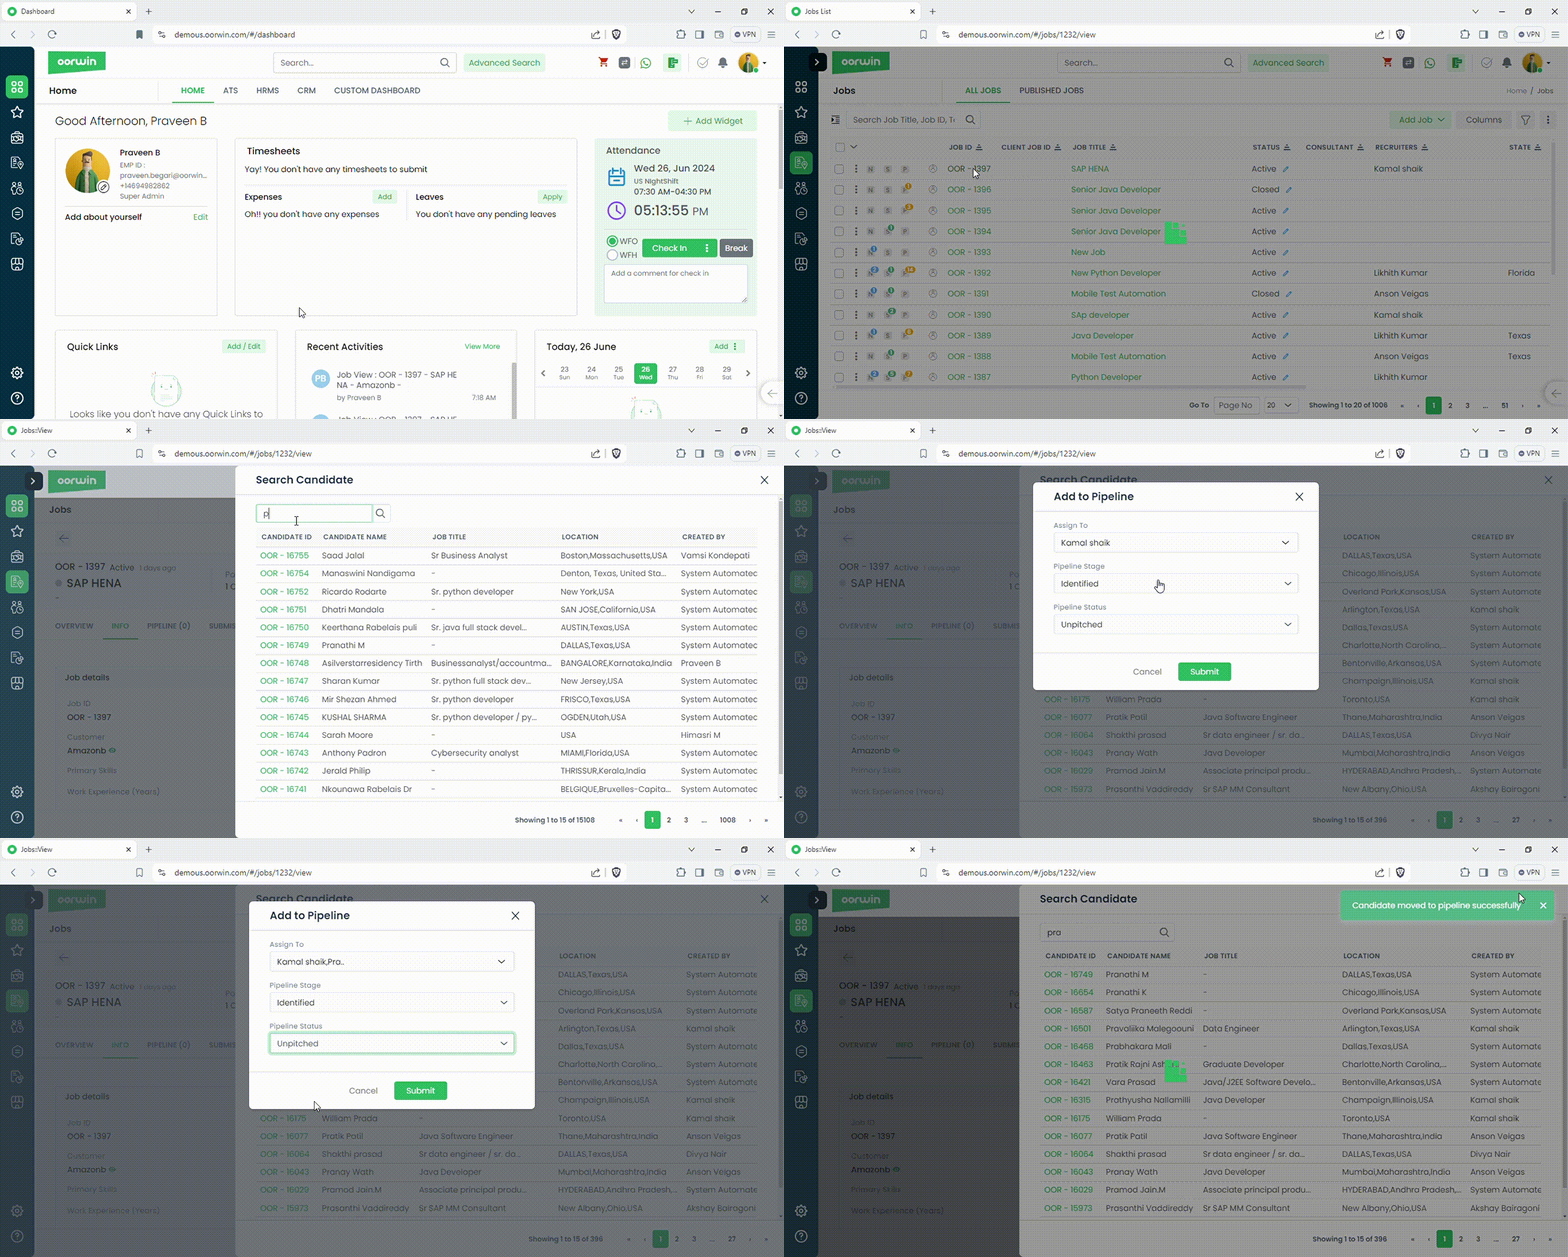
Here’s a detailed guide to add a Candidate to the Pipeline from Jobs Module:
- Login to your “Oorwin account” and Navigate to “Jobs module” on the left menu under the “Recruitment” section.
- Click on the “Job ID/Job Title” and Open the job.
- Click on “Add Pipeline” and from the pop-up search for the candidate and select the candidate.
- Select the pipeline stage & pipeline status, click on “Submit” to add the Candidate to the Pipeline.
Was this article helpful?
Here’s a guide on how to Add/Create a Note on Job detailed view page :
- Login to your “Oorwin account” and Navigate to “Jobs module” on the left menu under the “Recruitment” section.
- Click on the “Job ID/Job Title” and Open the job.
- Click on the “Notes” Icon on the right side panel.
- Select the type of note that you want create.(ex : Add call, Add Meeting, Add Note, etc.)
- Enter the Information that you want to add.
- Click on the “Save” button, note will be added to that Job.
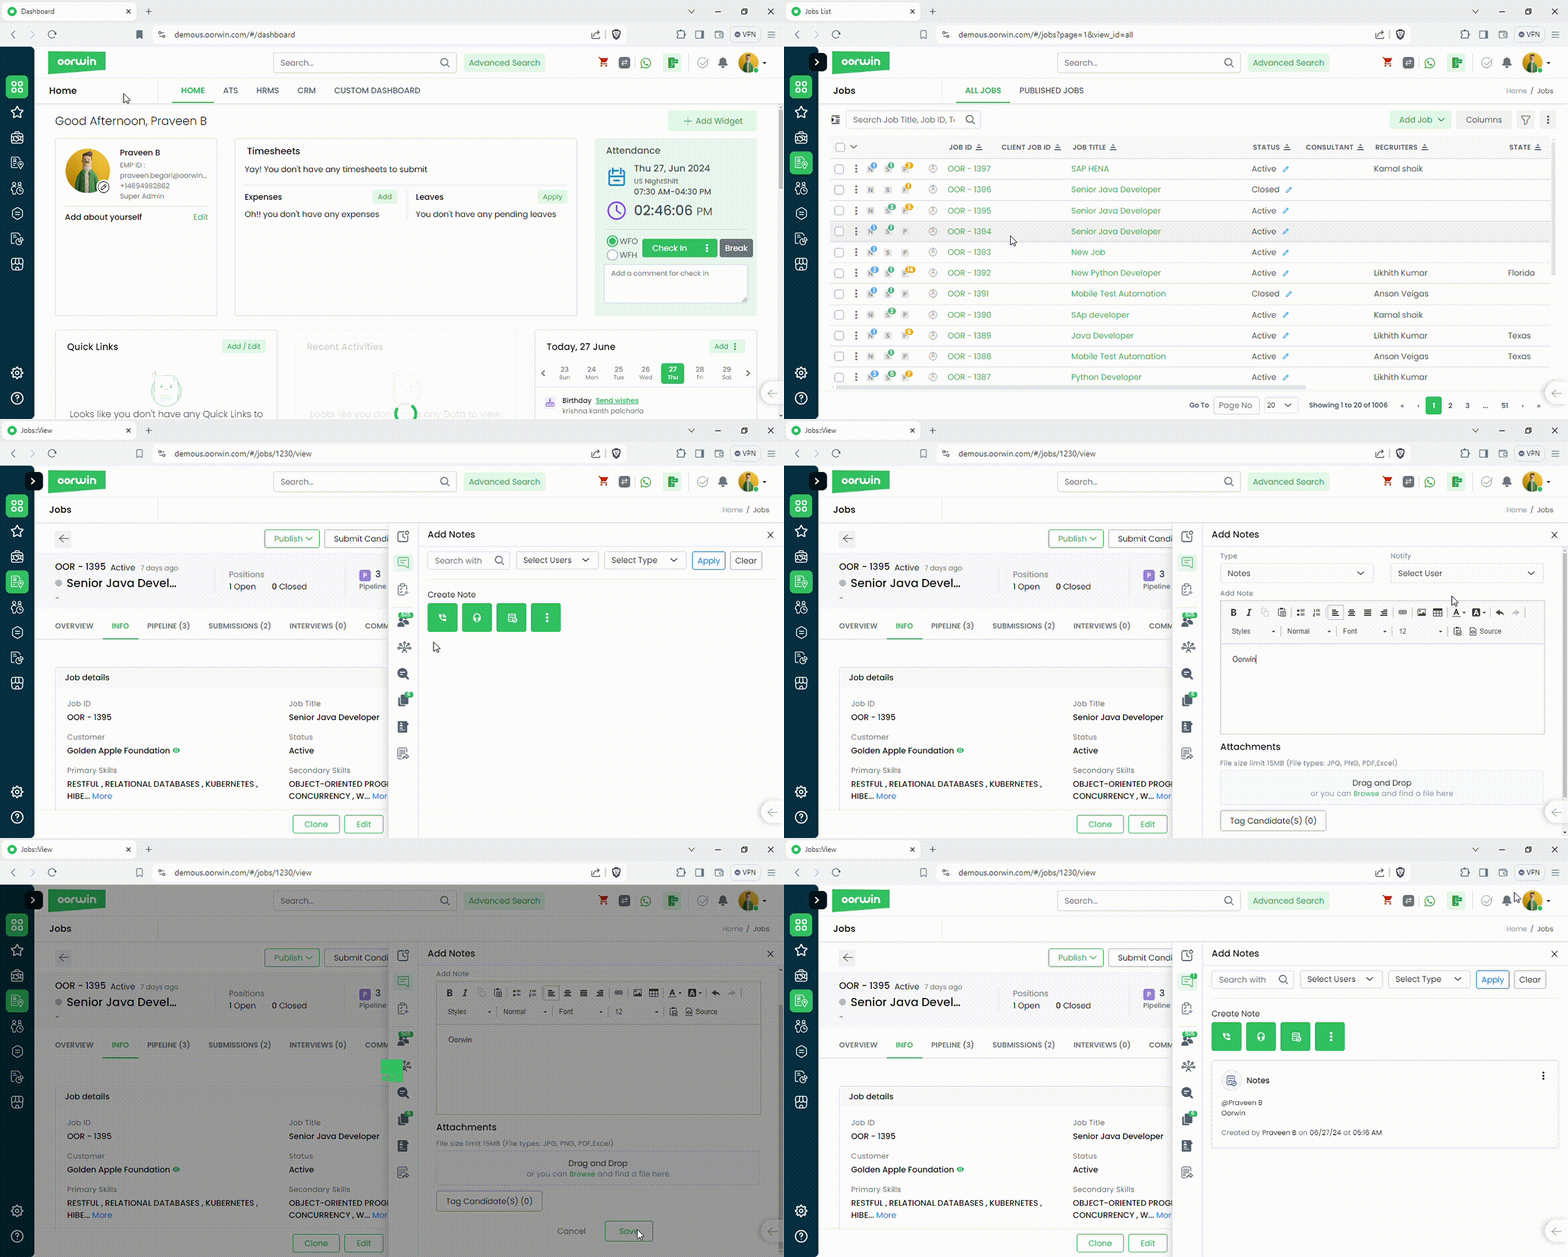
Note: You can tag a Job/ Candidate and also can notify it to other users while adding the notes.
Was this article helpful?
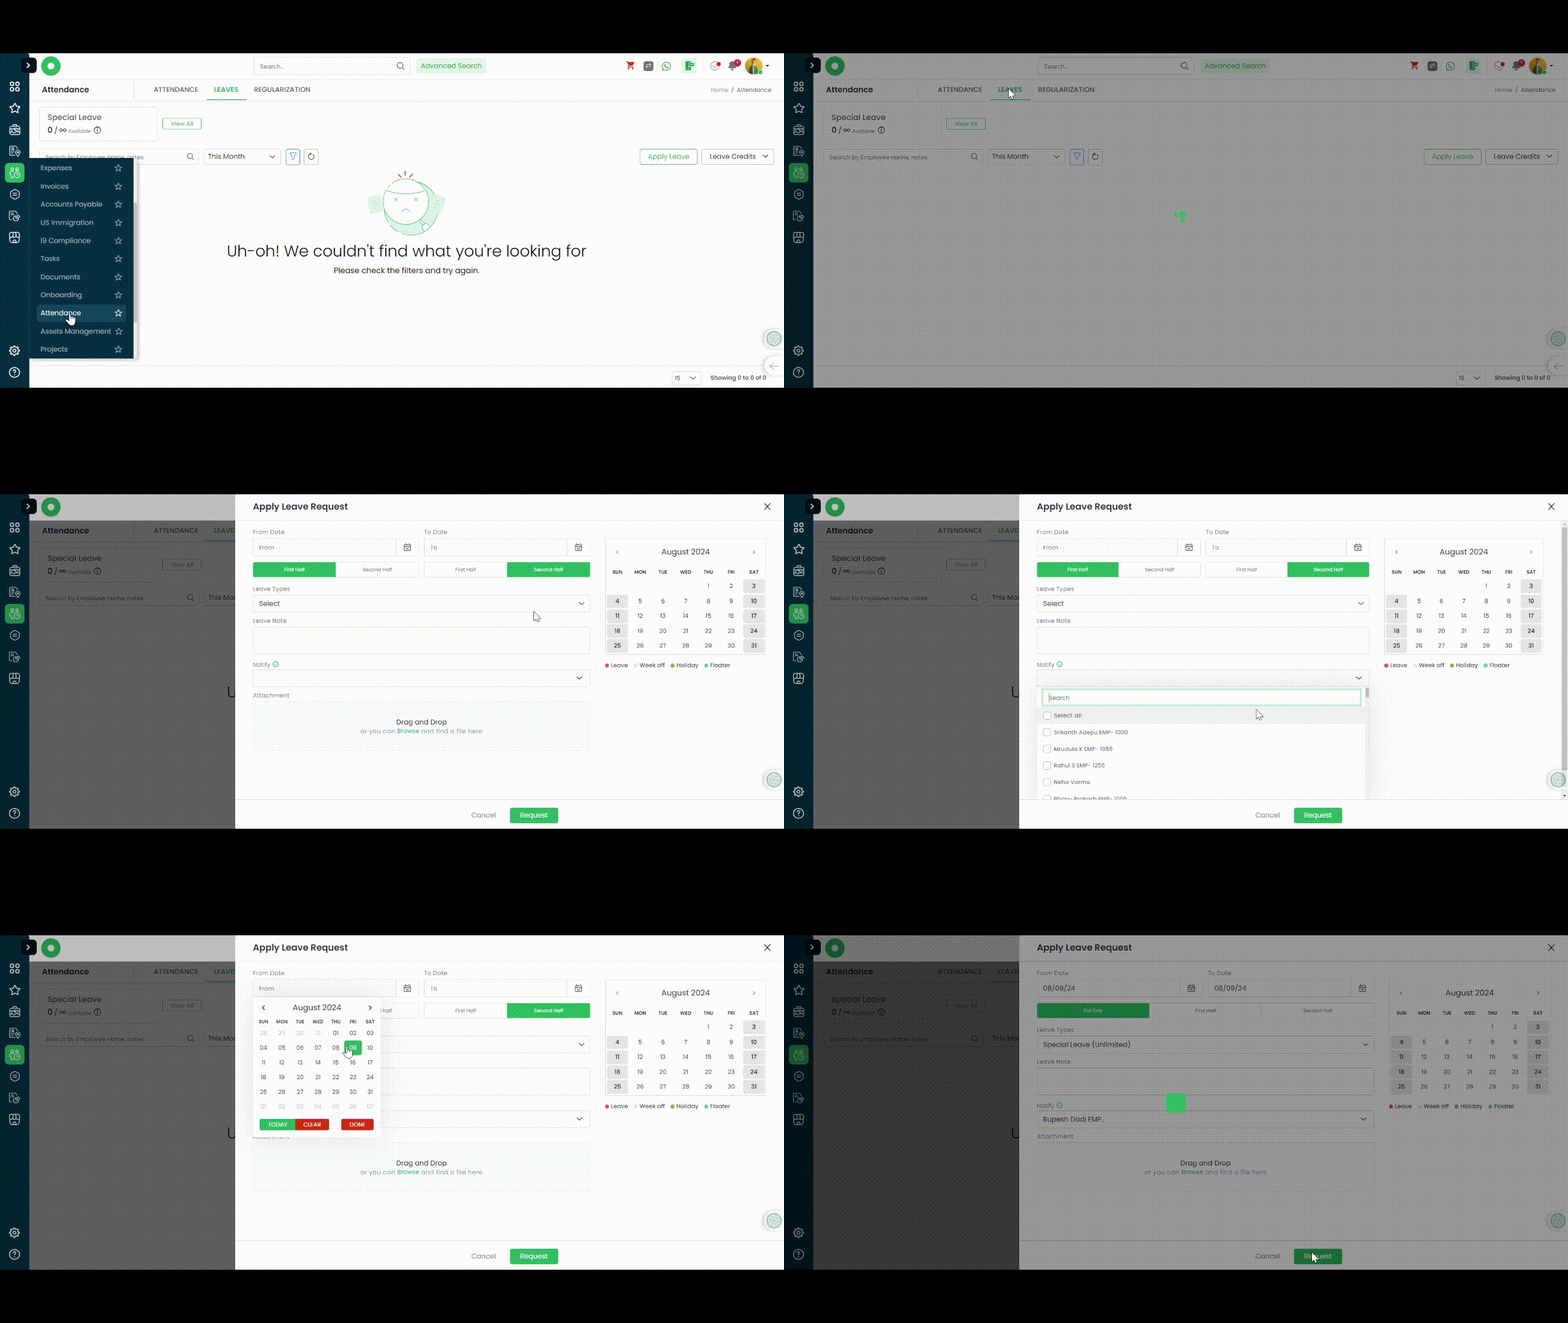
Apply for a Leave:
- Navigate to Main Menu
- Atendance
- Leaves
- Apply Leave
- Enter the required dates for leaves
- Select Leave Type
- Notify any user from the drop down(If needed)
- Add Attachments if shown mandatory
- Request
Was this article helpful?
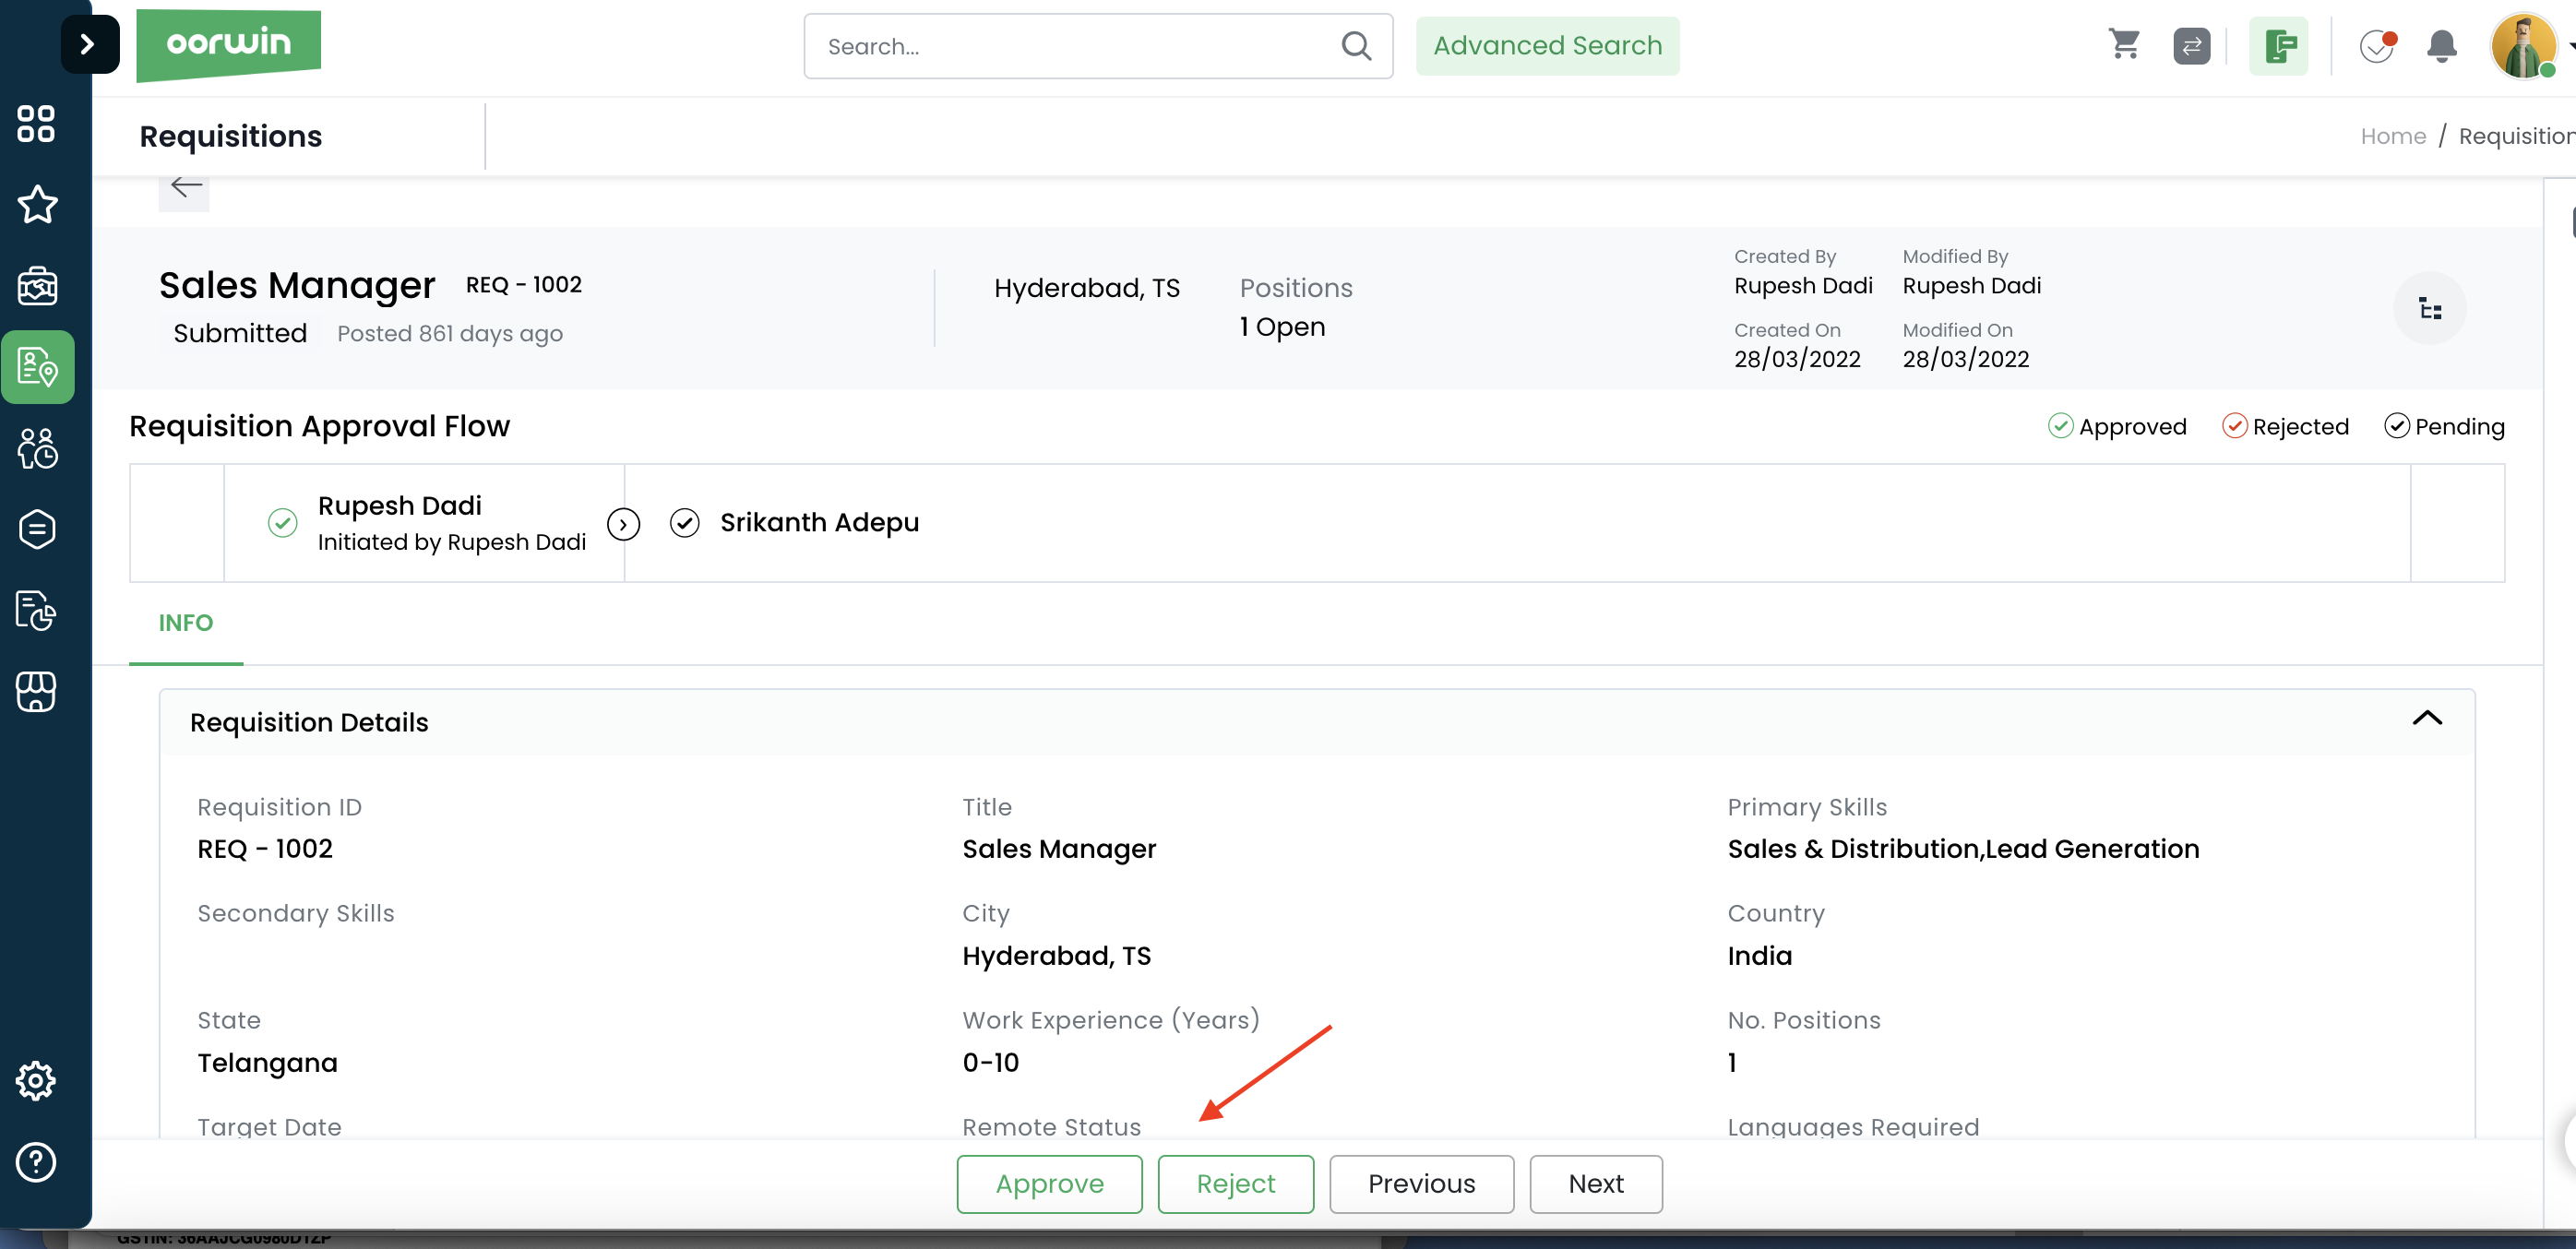
Here’s a guide on how Approver can approve/reject the requisition:
- Log in to your Oorwin Account and navigate to Requisitions module from the left menu under Recruitment Section.
- Click on “Approvals” icon on right corner.
- Click on the requisition id from the list.
- Review the details and click on Approve or Reject button.
- Once the requisition approved, a new job will be created automatically.
- If the requisition is rejected, the initiator will be notified and can access under rejected requisition view.


Was this article helpful?
You can create an approval flow for the invoices that has been raised in the system, so that all the invoices will be triggered to the assigned approvers before it goes to the client’s inbox
Please follow the below steps to approve/reject the invoice
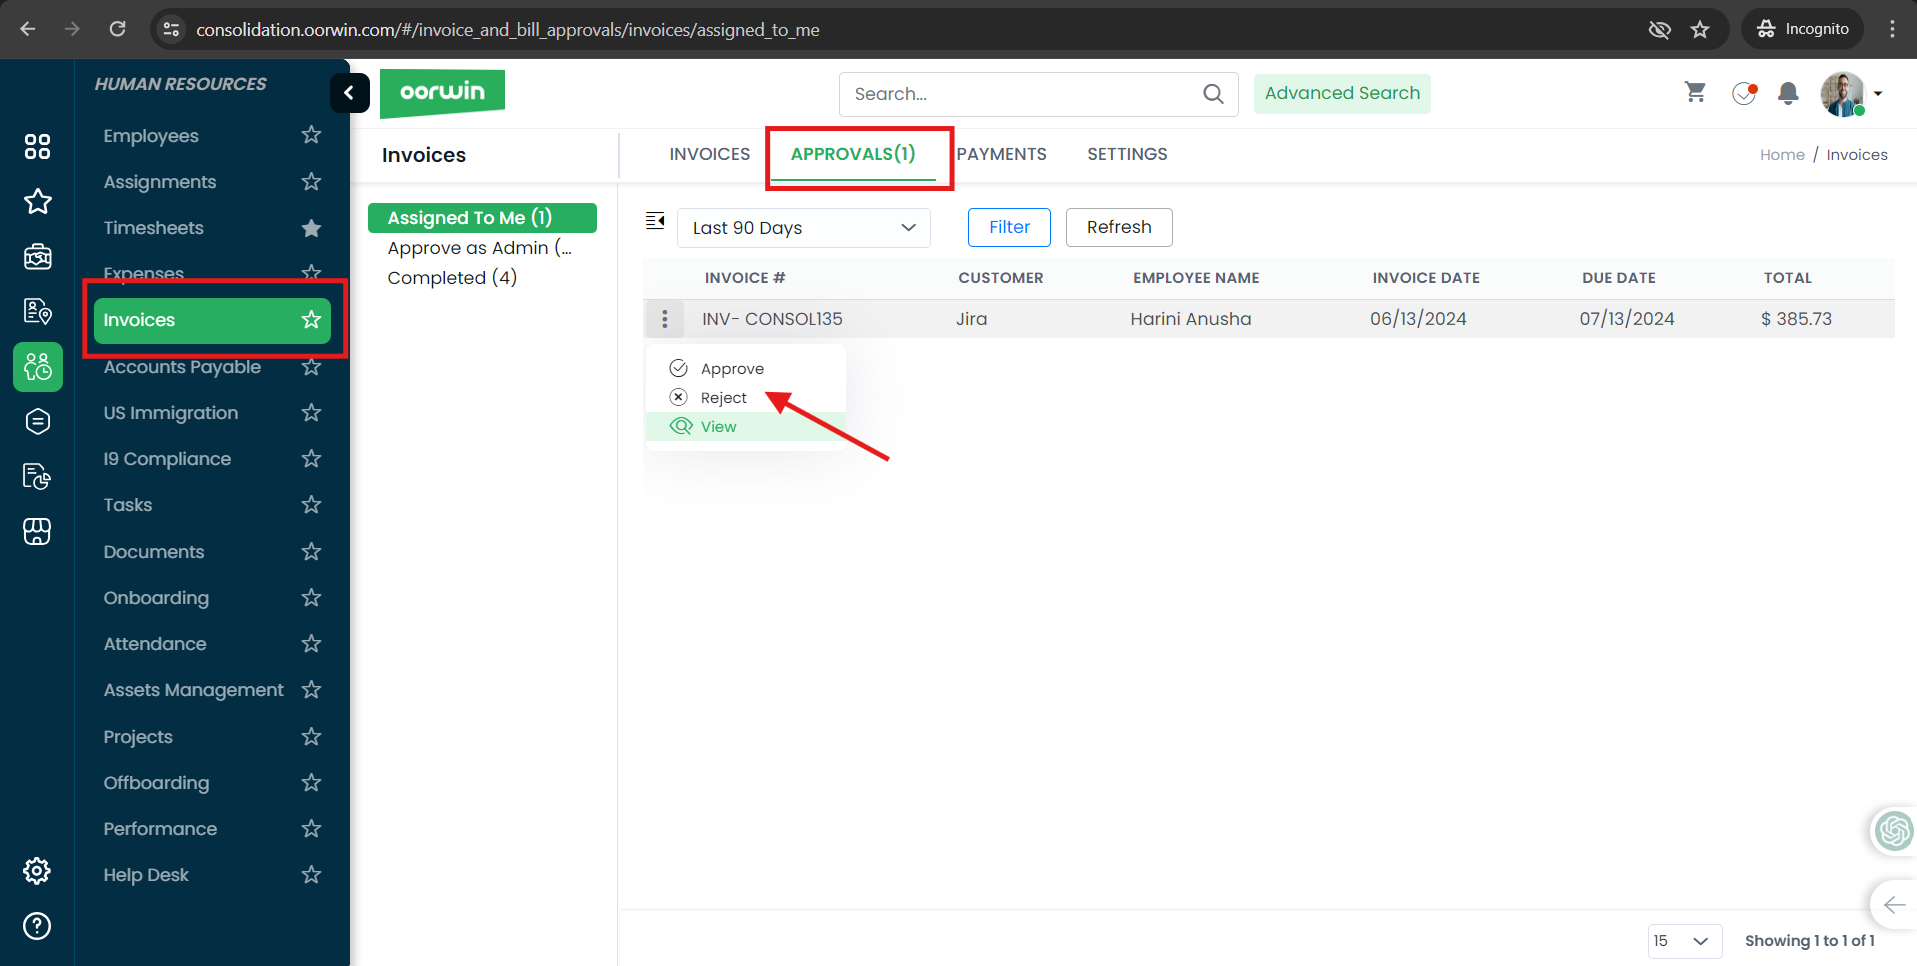
- Log in to your Oorwin Account and navigate to Invoices module from the left menu under Human Resources Section
- You will find a tab called “Approvals” on the top and click on it
- You can find the number of invoices that were pending for approval on your side in the Assigned to me section
- Click on three dots for the specific invoice that you wanted to take an action
- It shows approve or reject buttons and you can click on any of the action on it
- Now your pending invoice has taken care and will be sent to the next level user in the flow
- If you are a system admin you can also find or approve all the pending invoice from the Approve as Admin section
Was this article helpful?
If you are no longer needed a contact then you can archive that contcat which will land in the archivals module. You can restore the same record from there if you needed it again.
To do this action you need to have delete access permission enabled for your role from the Settings->Role security->Contacts
Please follow the below steps to archive the contact
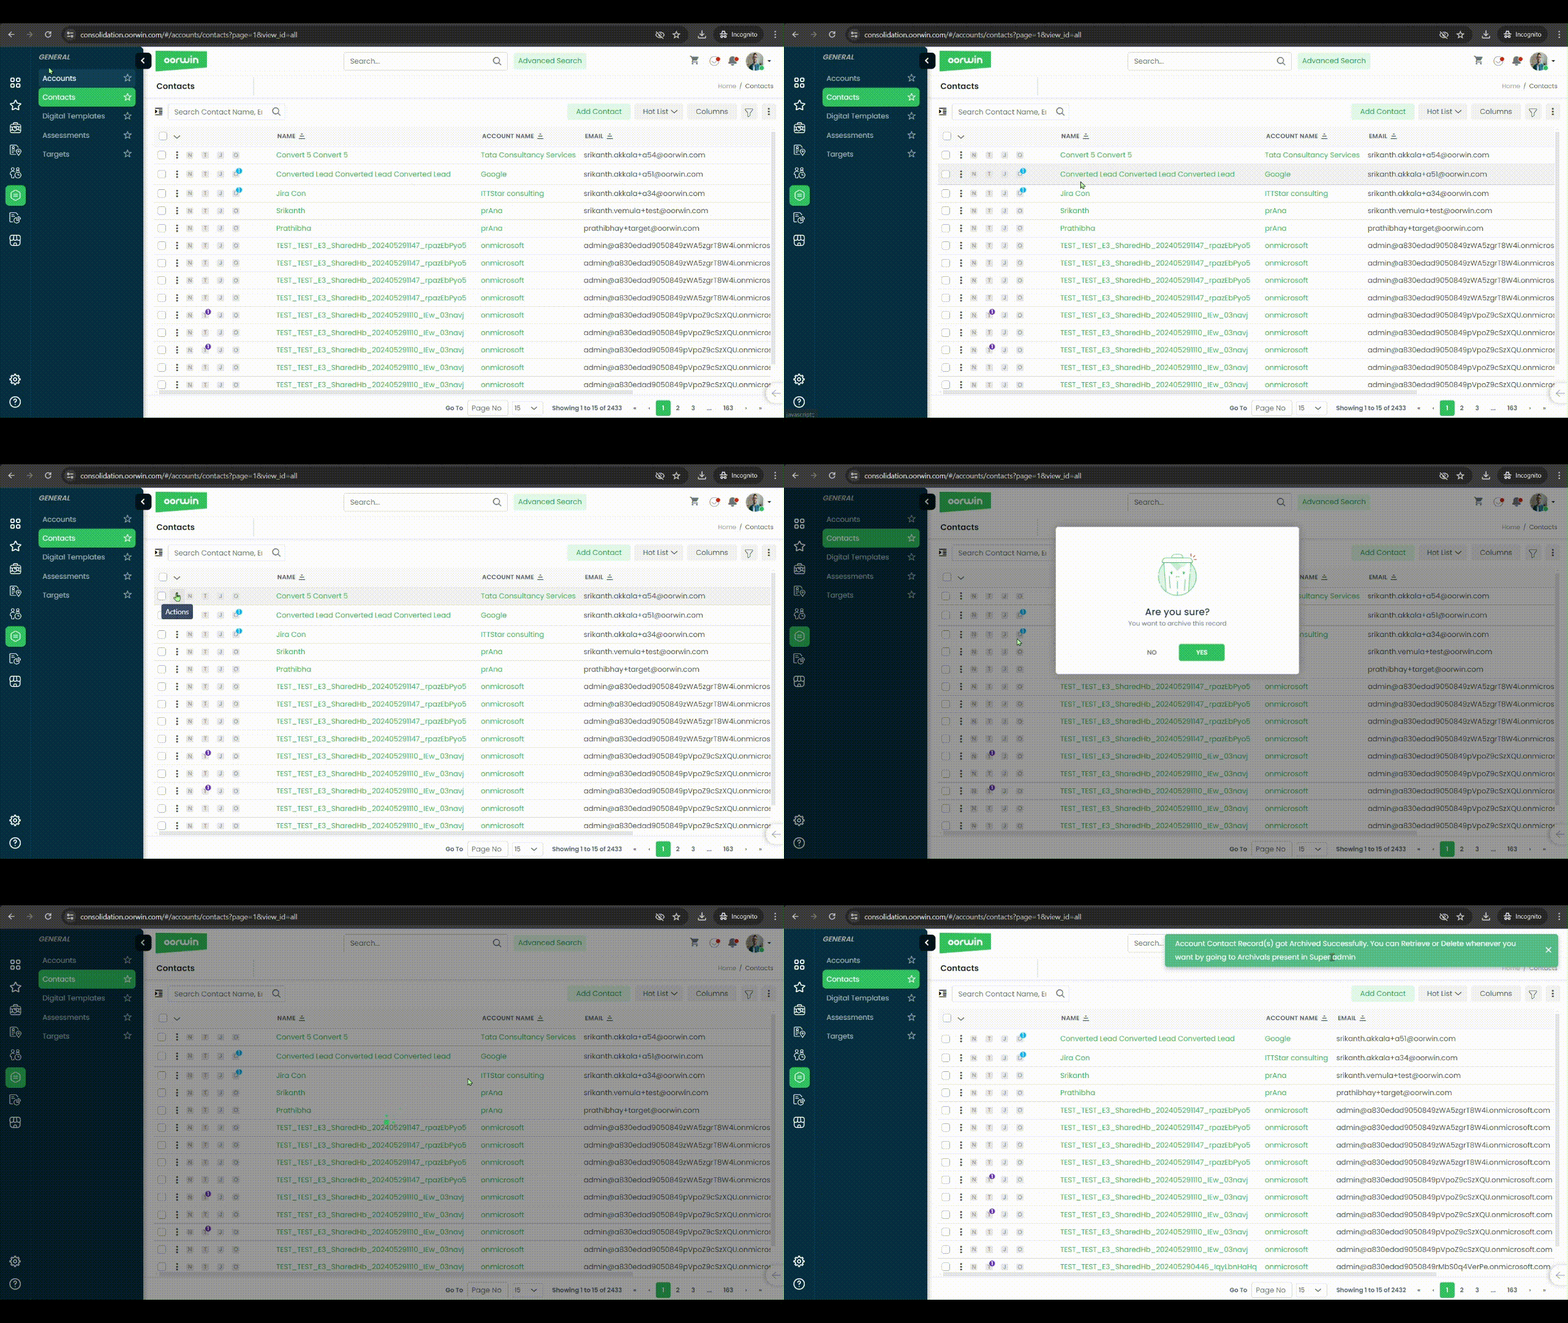
- Log in to your Oorwin Account and navigate to Contacts module from the left menu under General Section
- Click on “Actions(three dots)” icon for the contact you wish to archive.
- Click on Archive link from the list (You need to have contact delete access permission)
- Click on Yes on the confirmation popup
- By this action your contact will be archived and will be landed in the Archivals module
This action will not delete your contact permanently from the system and you can restore the same record again when ever you needed
Was this article helpful?
If you are no longer needed a particular lead then you can archive that lead which will land in the archivals module. You can restore the same record from there if you need it again.
To do this action you need to have delete access permission enabled for your role from the Settings->Role security
Please follow the below steps to archive the Lead
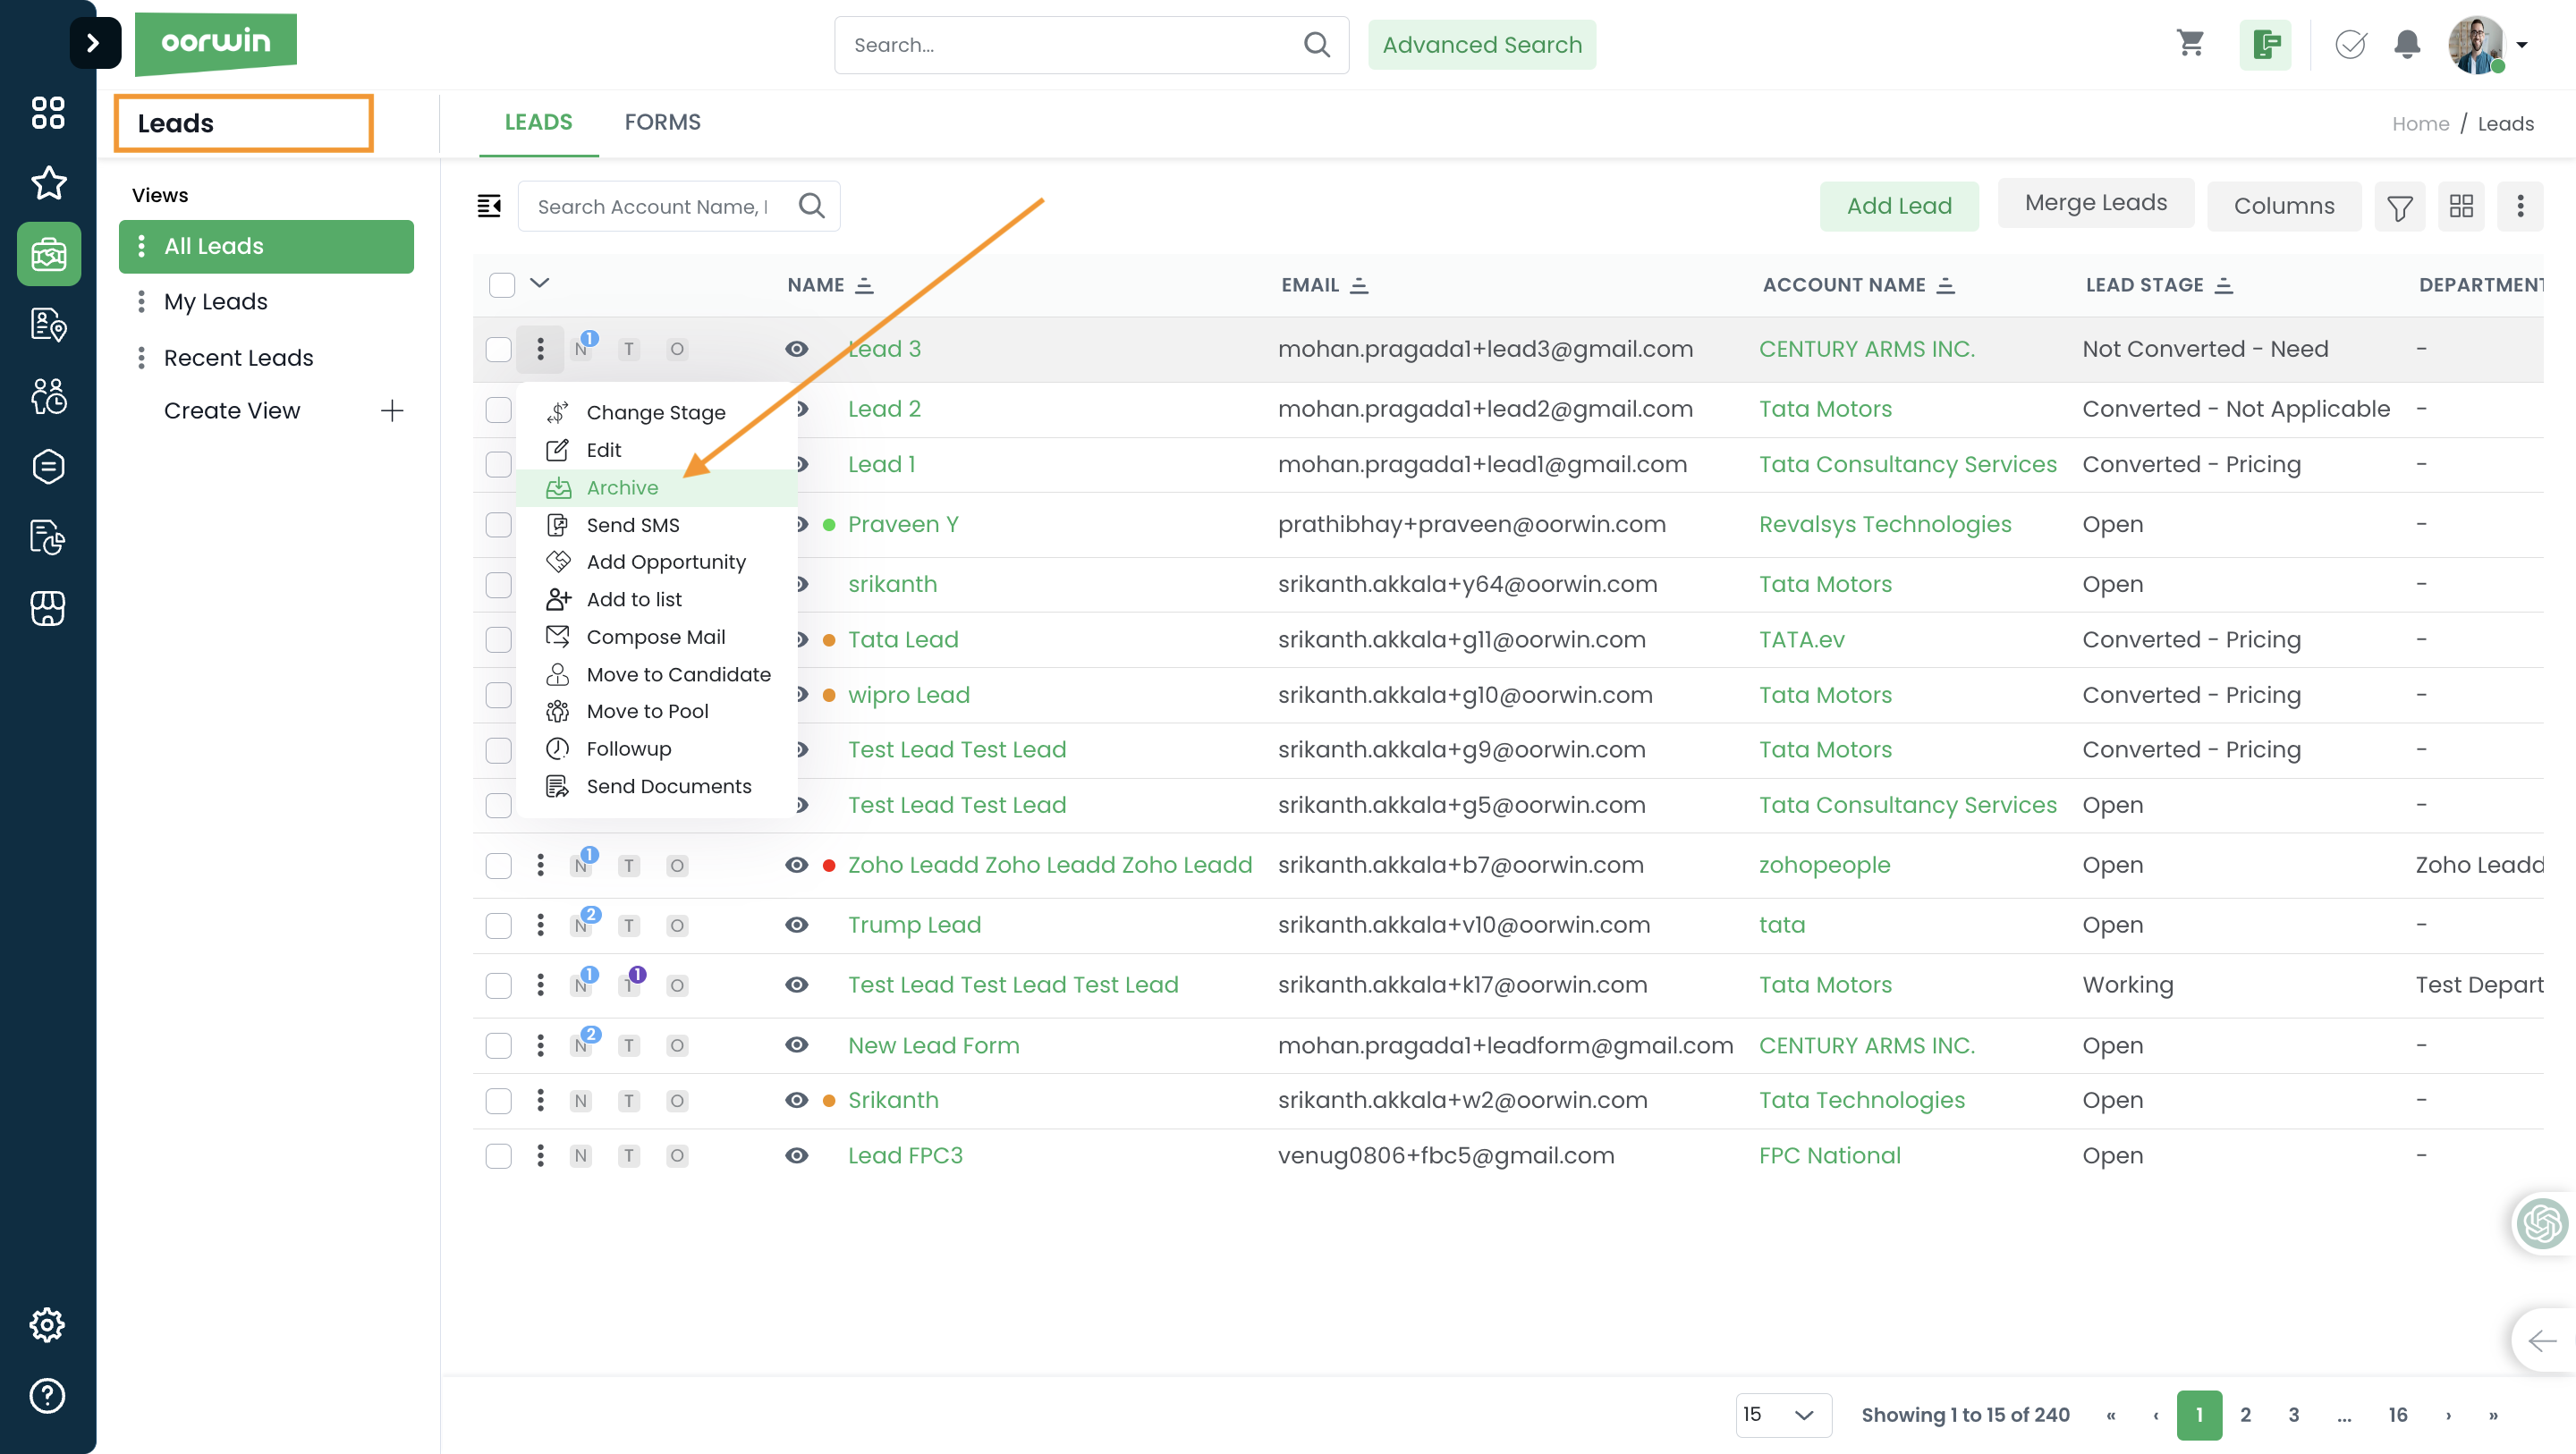
- Log in to your Oorwin Account and navigate to Leads module from the left menu under Sales Section
- Click on “Actions(three dots)” icon for the Lead you wish to archive.
- Click on Archive link from the list (You need to have Lead delete access permission)
- Click on Yes on the confirmation popup
- By this action your Lead record will be archived and will be landed in the Archivals module
This action will not delete your lead permanently from the system and you can restore the same record again when ever you needed
Was this article helpful?
If you are no longer needed a particular account then you can archive that account which will land in the archivals module. You can restore the same record from there if you needed it again.
To do this action you need to have delete access permission enabled for your role from the Settings->Role security
Please follow the below steps to archive the account
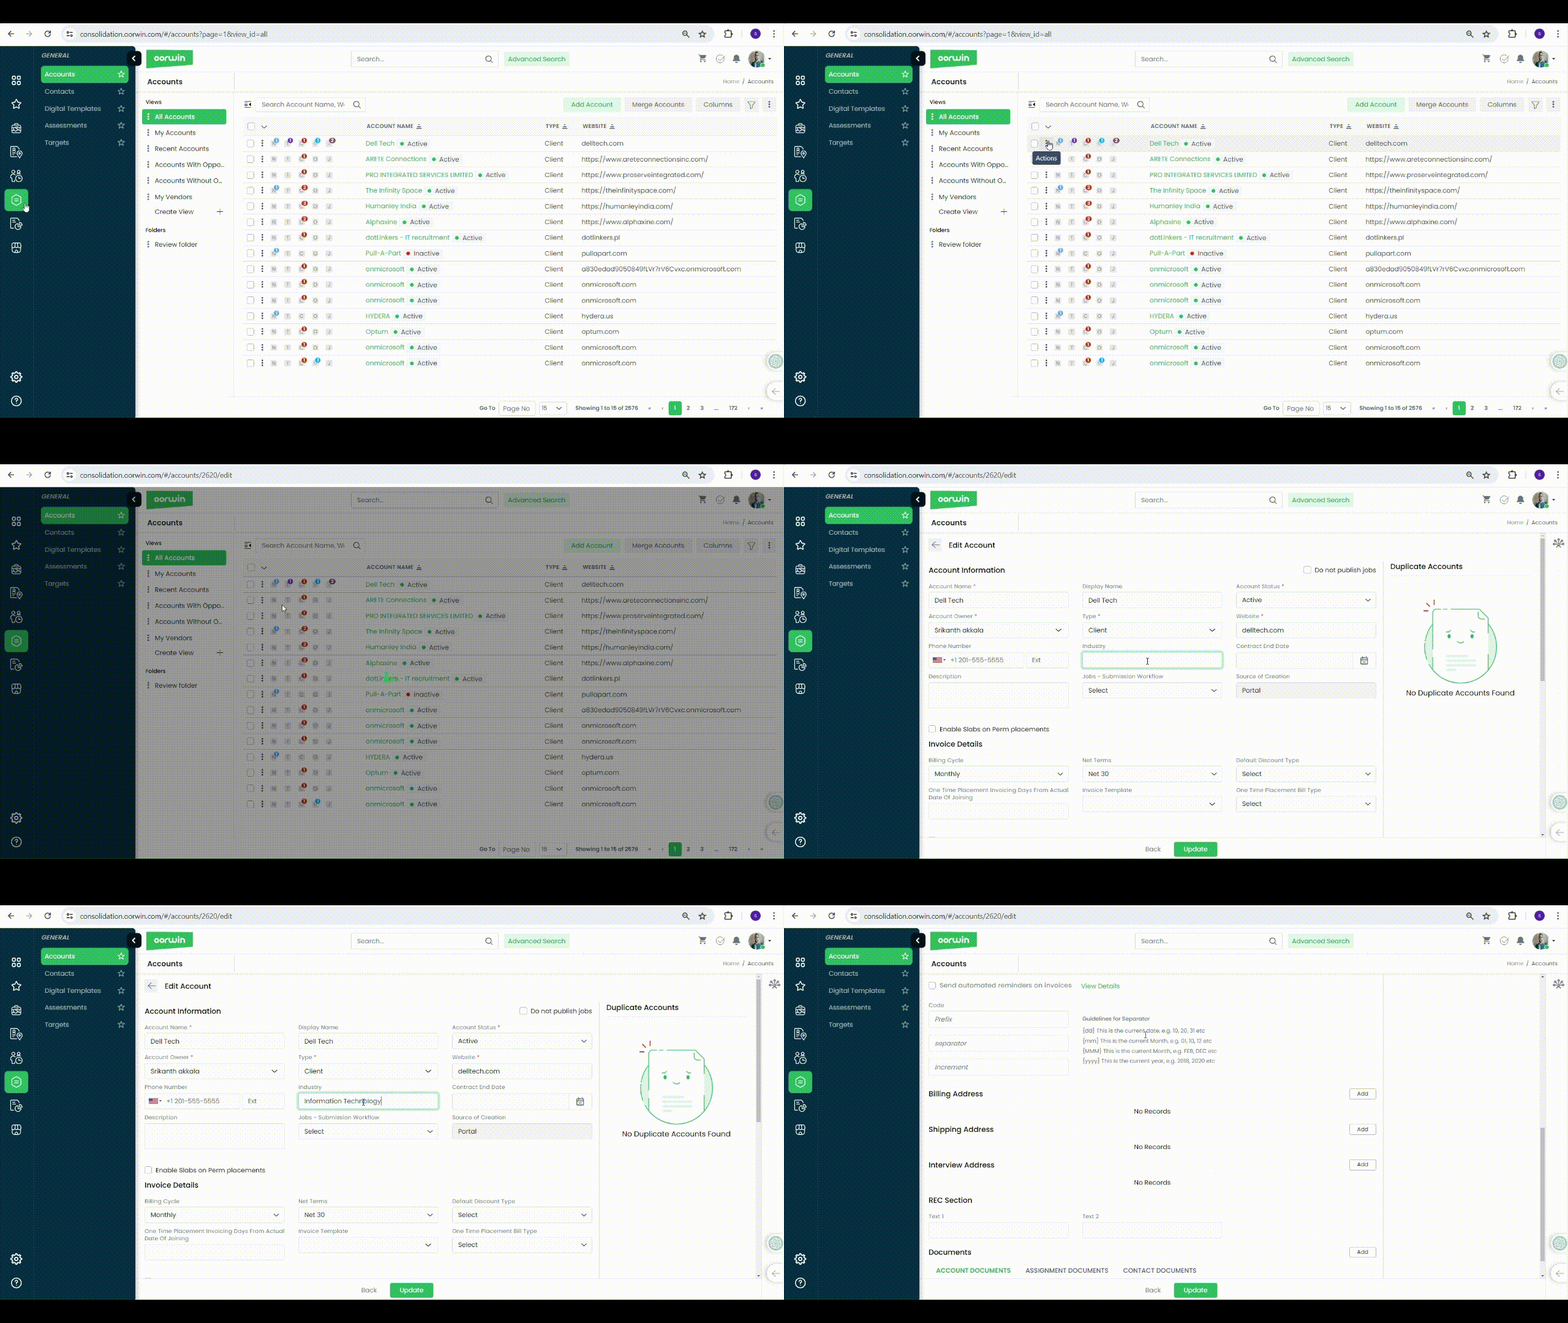
- Log in to your Oorwin Account and navigate to Accounts module from the left menu under General Section
- Click on “Actions(three dots)” icon for the account you wish to archive.
- Click on Archive link from the list (You need to have account delete access permission)
- Click on Yes on the confirmation popup
- By this action your account will be archived and will be landed in the Archivals module
This action will not delete your account permanently from the system and you can restore the same record again when ever you needed
Please note that you cannot delete an account which has associated with any of the modules like jobs, submissions, assignments, candidates, etc
Was this article helpful?
If you are no longer needed an employee then you can archive that employee which will land in the archival module. You can restore the same record from there if you needed it again.
To do this action you need to have archive access permission enabled for your role from the Settings->Role security->Employees
Please follow the below steps to archive an employee
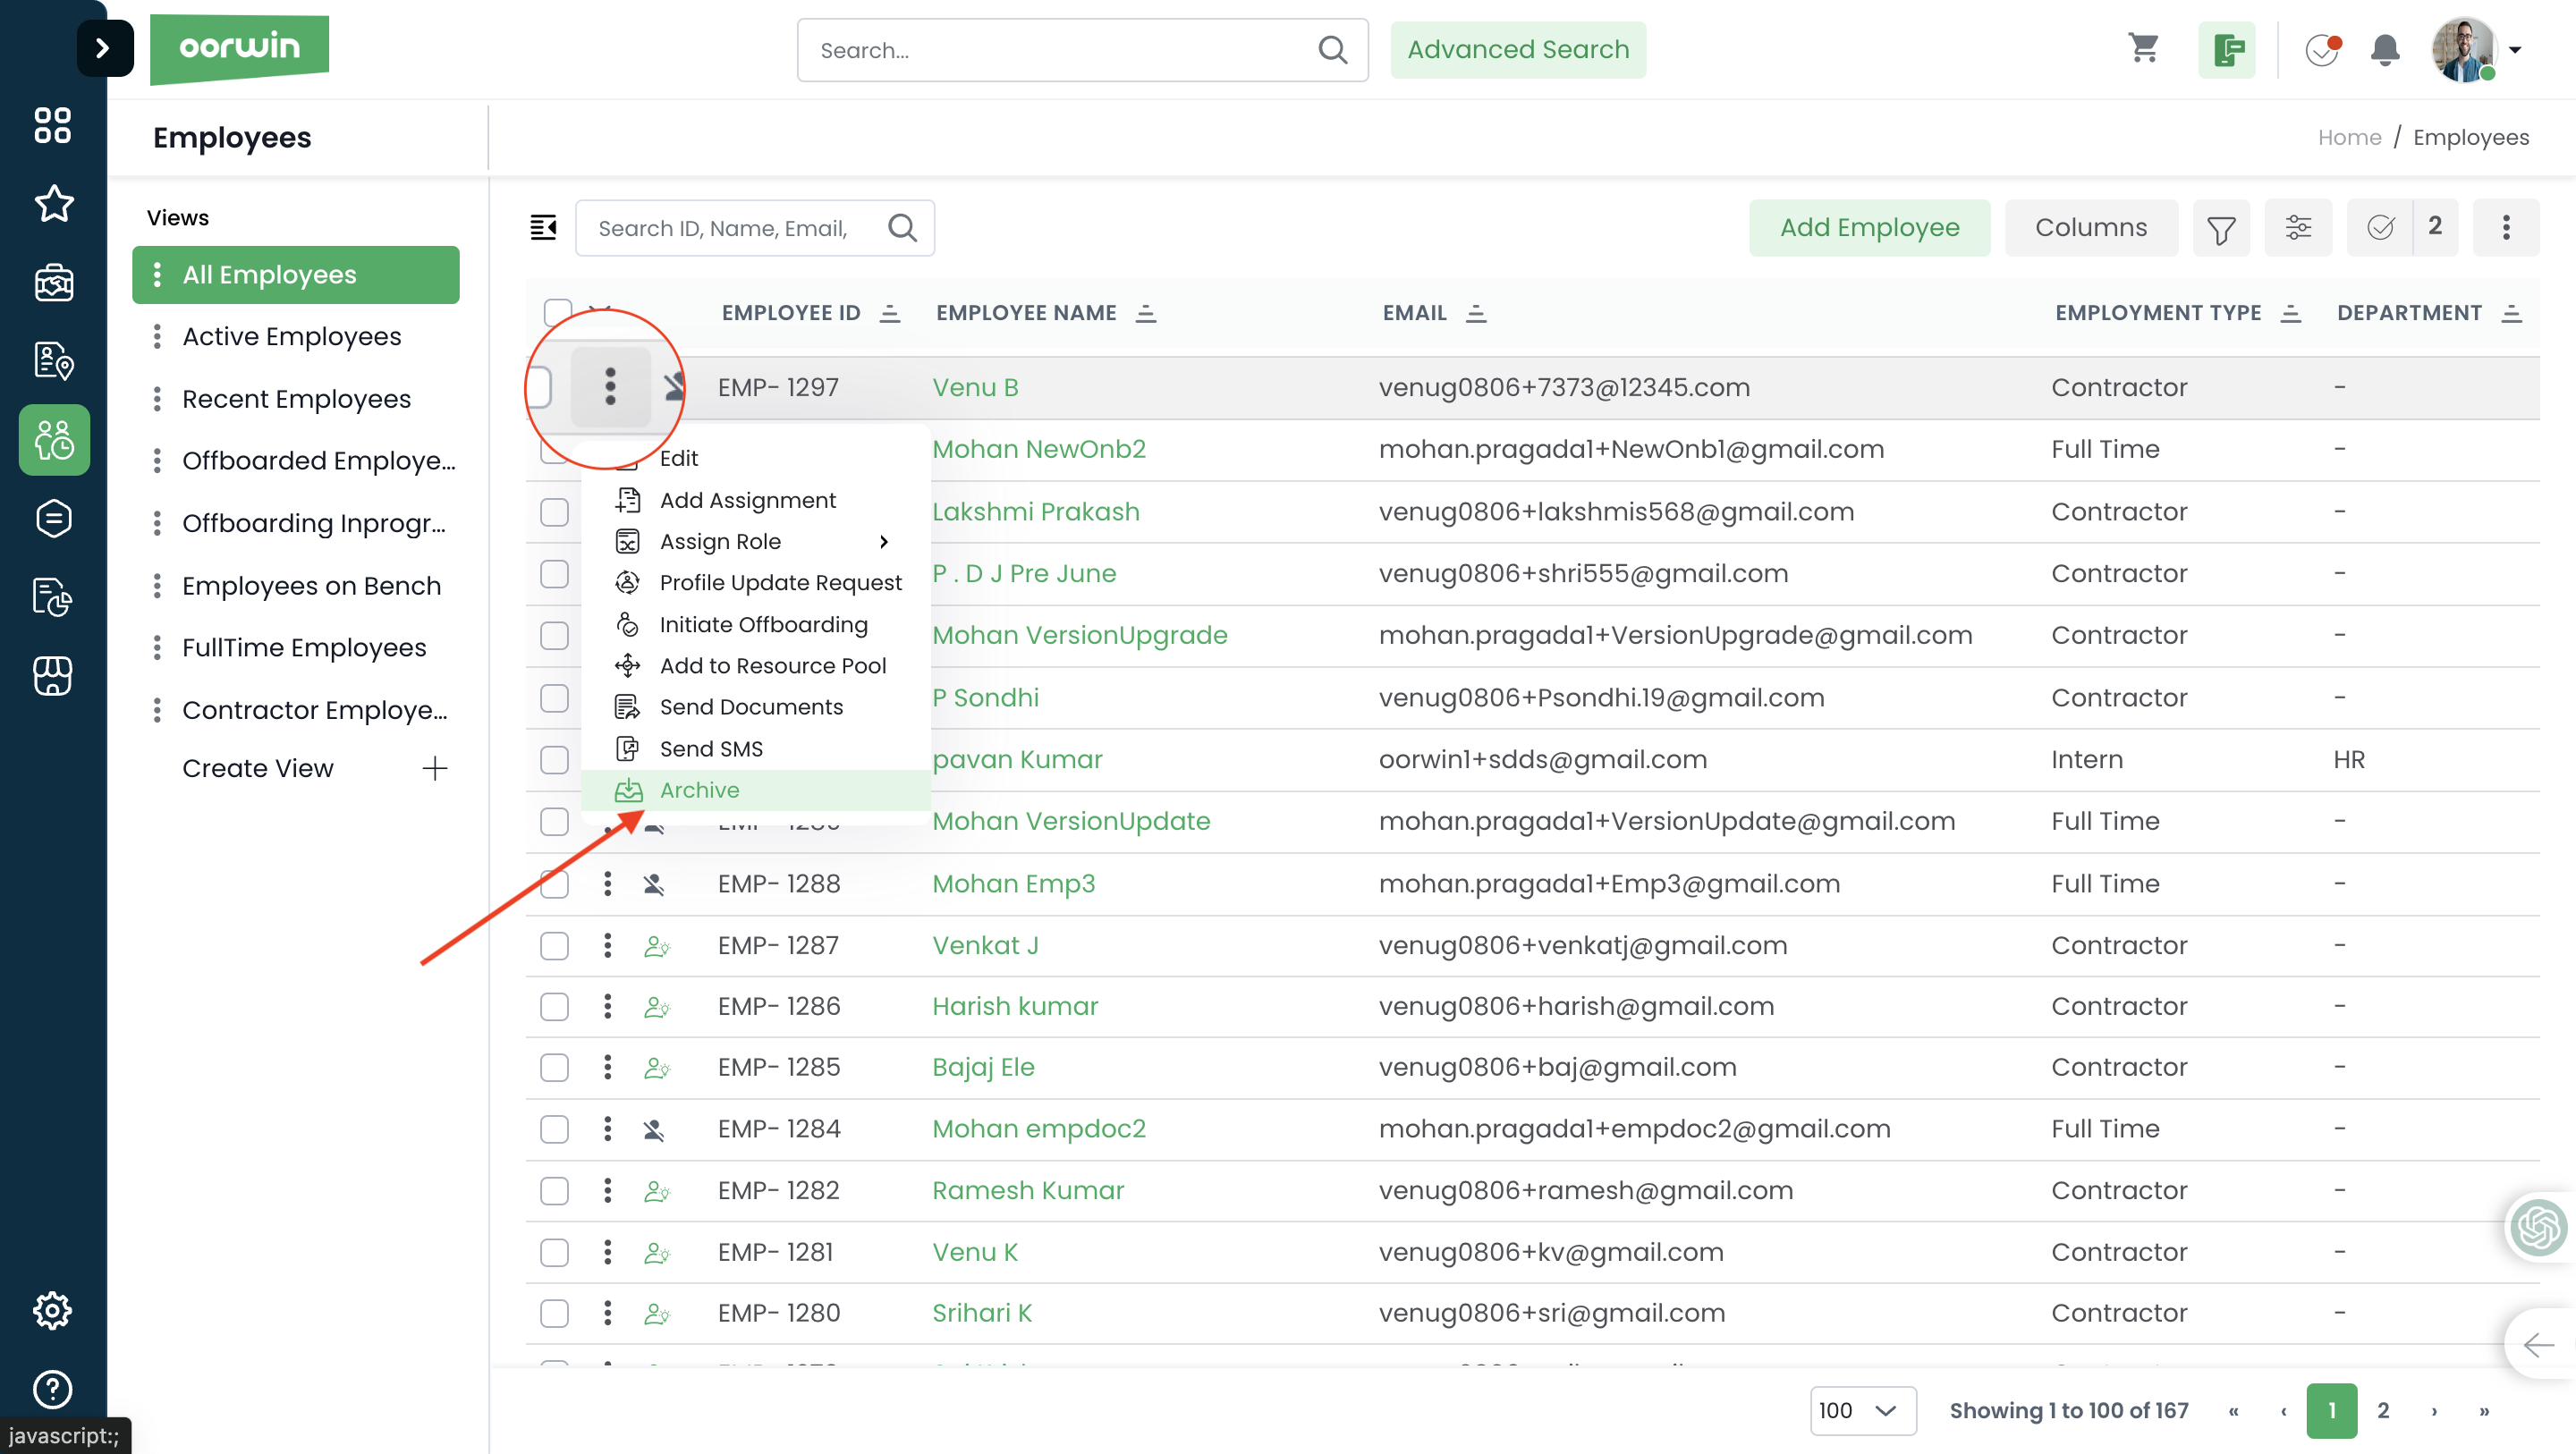
- Log in to your Oorwin Account and navigate to Employees module from the left menu under HRMS Section
- Click on “Actions(three dots)” icon for the employee to whom you wish to archive.
- Click on Archive link from the list (You need to have contact delete access permission)
- Click on Yes on the confirmation popup
- By this action your employee will be archived and will be landed in the Archivals module
This action will not delete your contact permanently from the system and you can restore the same record again when ever you needed
Note: You cannot archive an employee which has associated with any of the module records like timesheets, leaves, expenses, performance etc. Only the employee records which doesn’t have any dependency can be deleted
Was this article helpful?
If you are no longer needed a particular Opportunity then you can archive that Opportunity which will land in the archivals module. You can restore the same record from there if you need it again.
To do this action you need to have delete access permission enabled for your role from the Settings->Role security
Please follow the below steps to archive an Opportunity
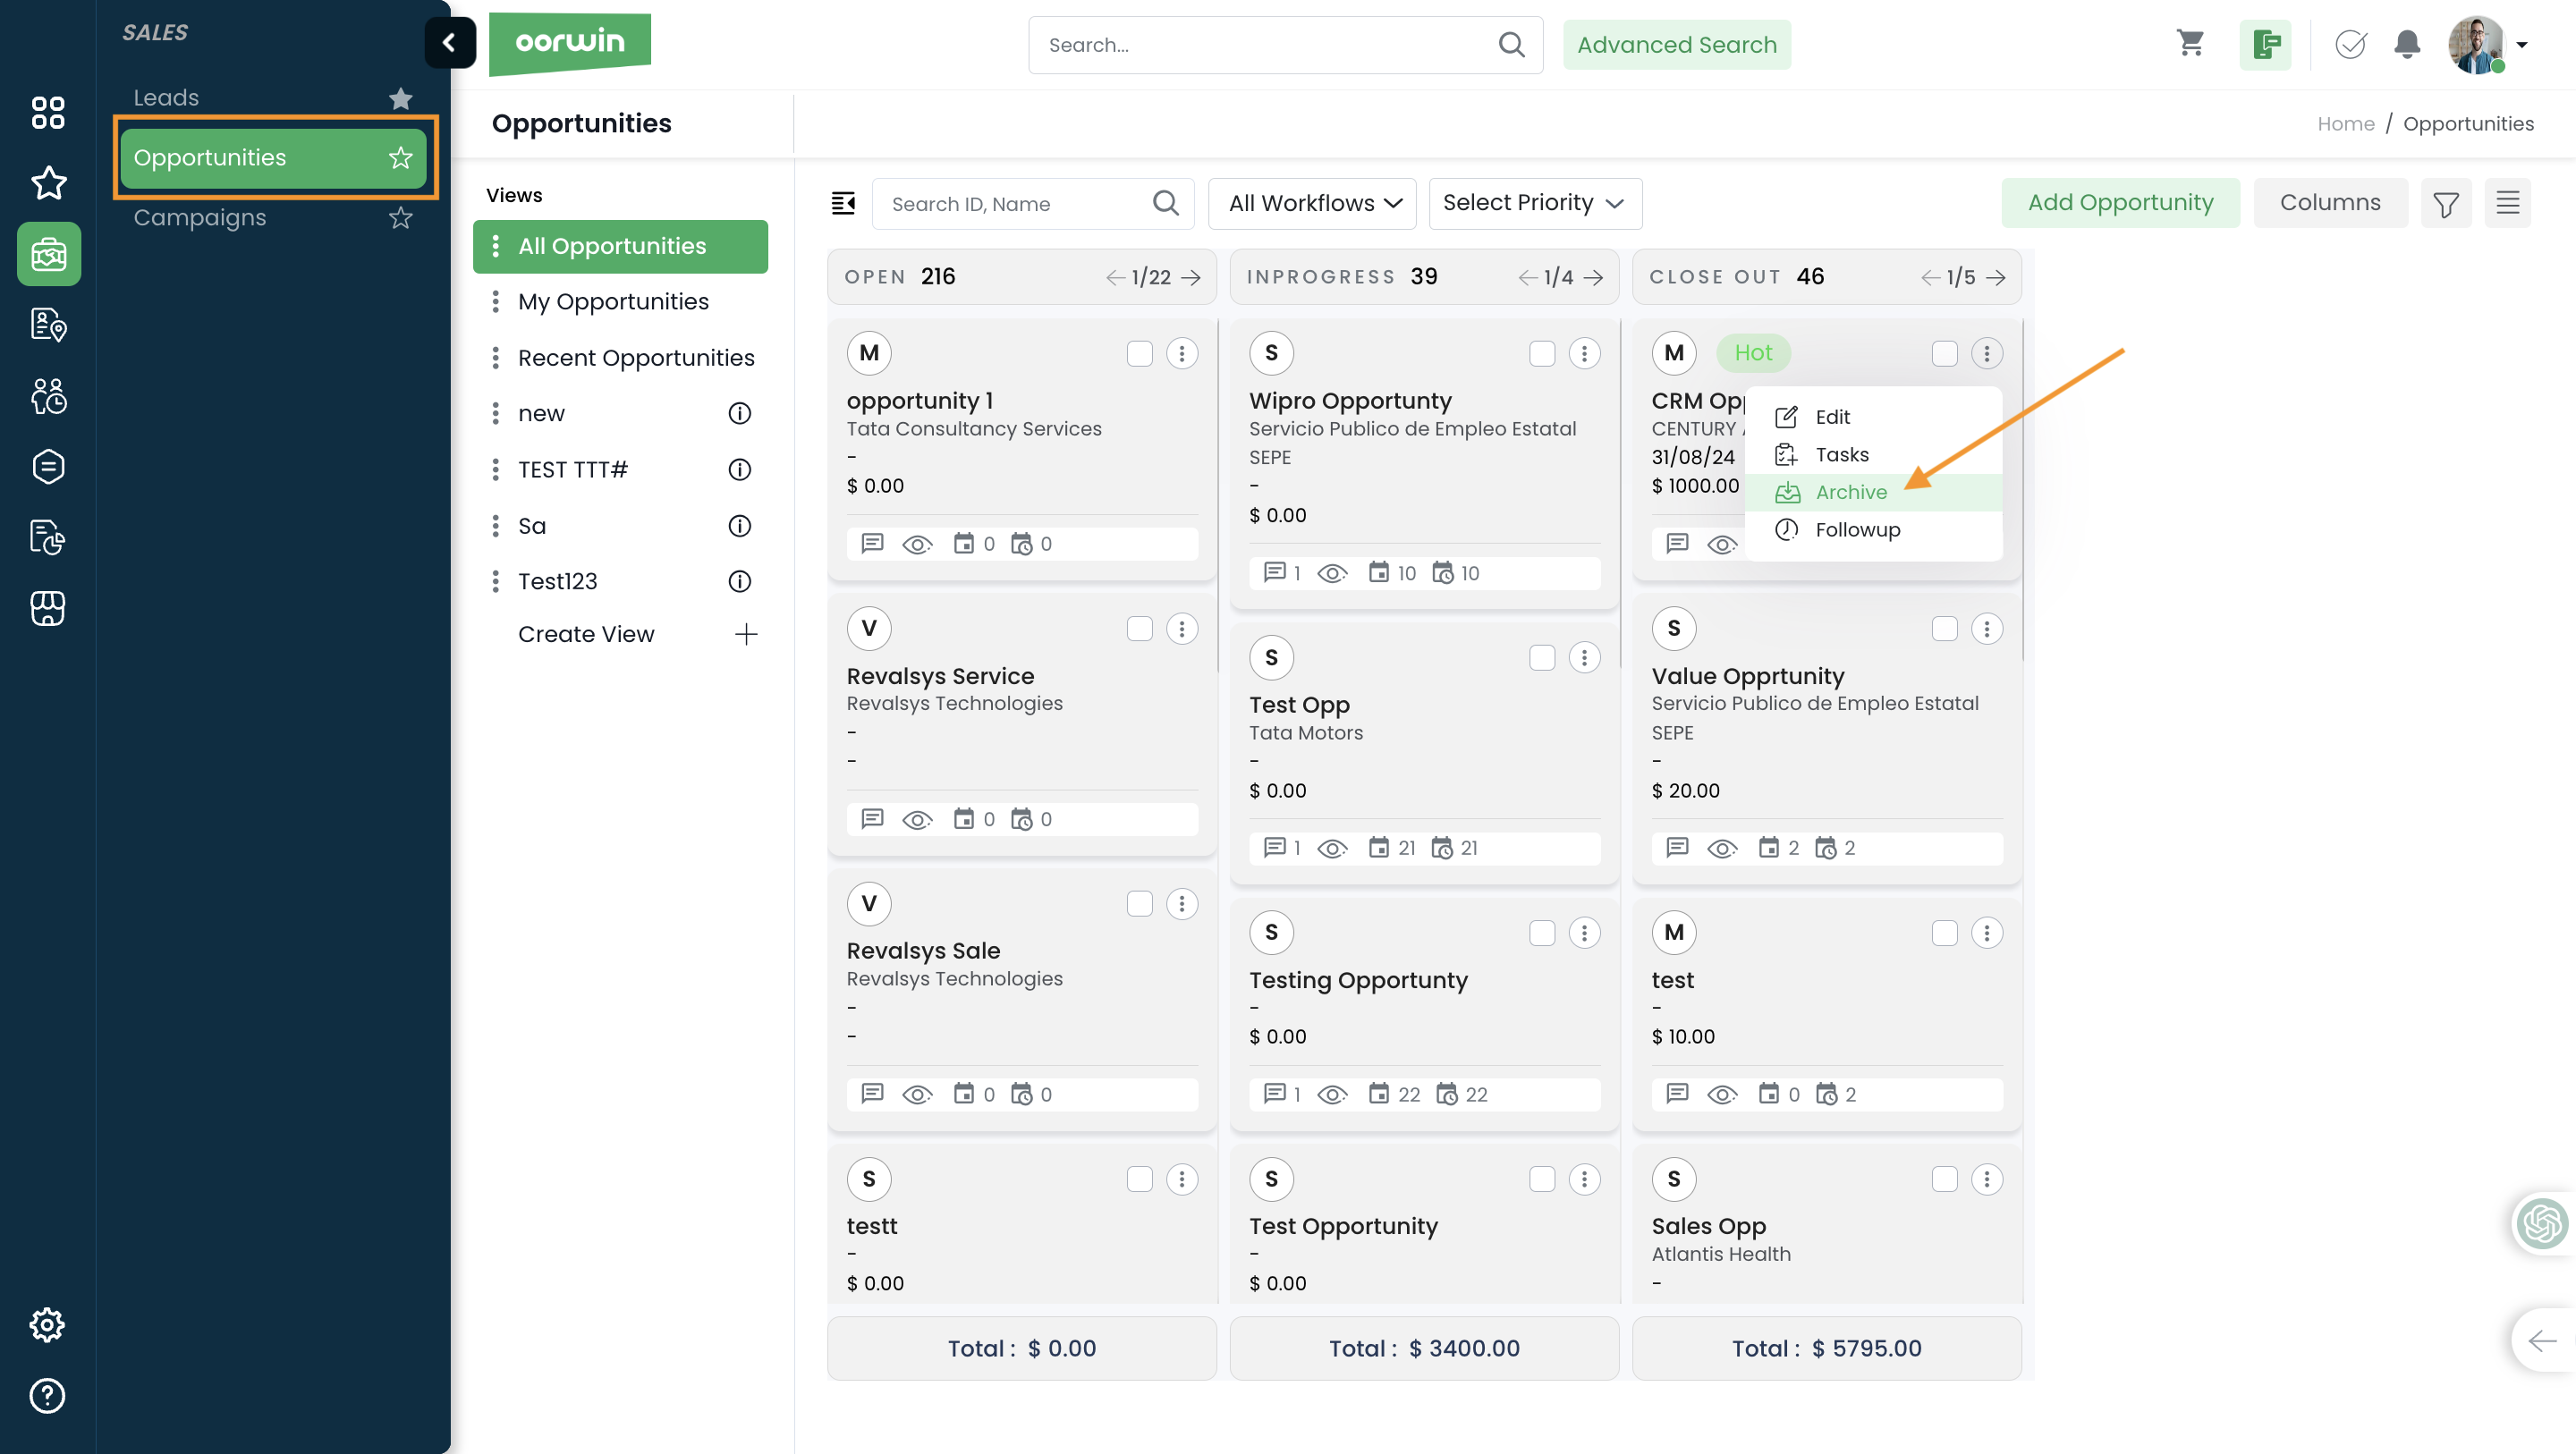
- Log in to your Oorwin Account and navigate to Opportunities module from the left menu under Sales Section
- Click on “Actions(three dots)” icon for the Opportunity you wish to archive.
- Click on Archive link from the list (You need to have Opportunity delete access permission)
- Click on Yes on the confirmation popup
- By this action your Opportunity record will be archived and will be landed in the Archivals module
This action will not delete your Opportunity permanently from the system and you can restore the same record again when ever you needed
Was this article helpful?
Users can assign an employee to an existing project through employee view page and tag the existing assignment of that employee to that project which helps to track the project status at one place
Here is how you can an employee to a project
- Log in to your Oorwin Account and navigate to Employees module from the left menu under HRMS Section
- Click on any employee name to whom you wanted to assign to a project
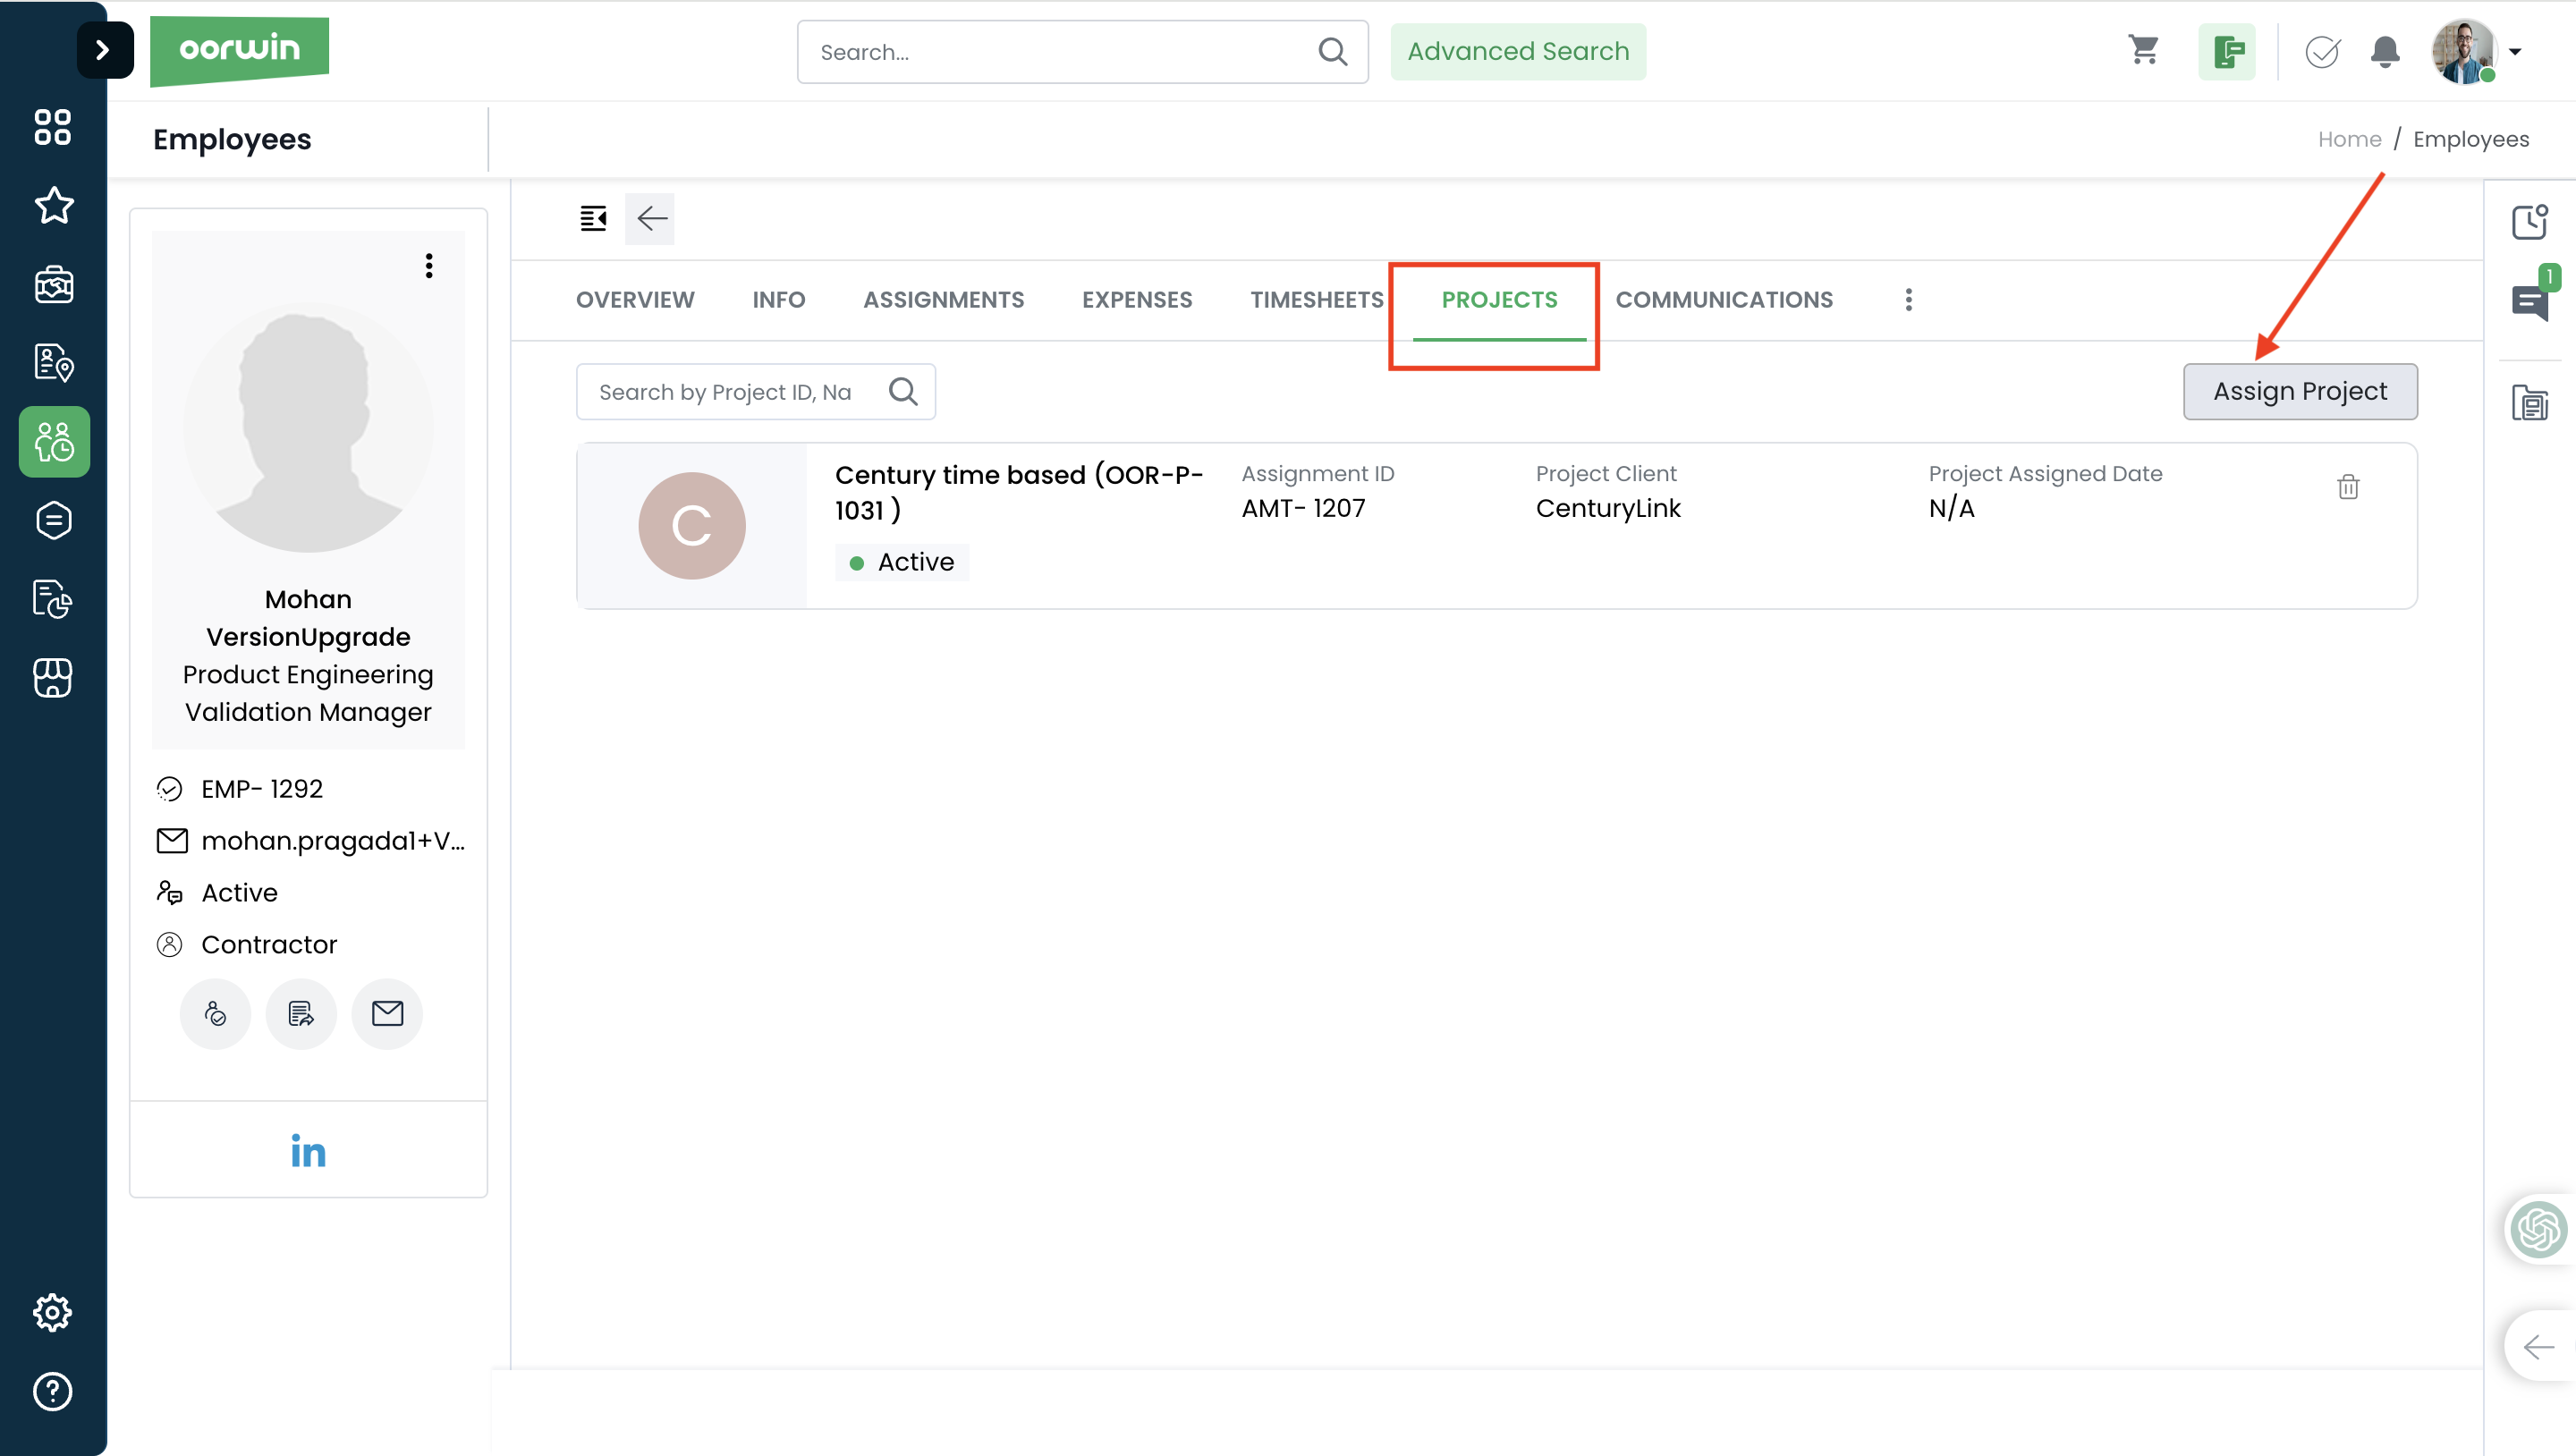
- Search for Projects tab on the top and click on it
- It shows all the previous projects related that employee
- To assign the employee to a project, you need to click on “Assign to project” button which opens a popup to enter the project details
- Type the project name and select it from the suggestions and select the assignment of the employee form the assignments drop down
- Now click on save button and the project has been assigned to the employee and assignment was tagged to that project
- Note: To do this action you need to have project add permission from the Role security->select role->projects add permission
Was this article helpful?
Explain Assignment:
Assignments can be utilized to manage various aspects of job information, including client/vendor details, sales data, recruitment processes, pay and billing information, timesheet records, and invoice details.
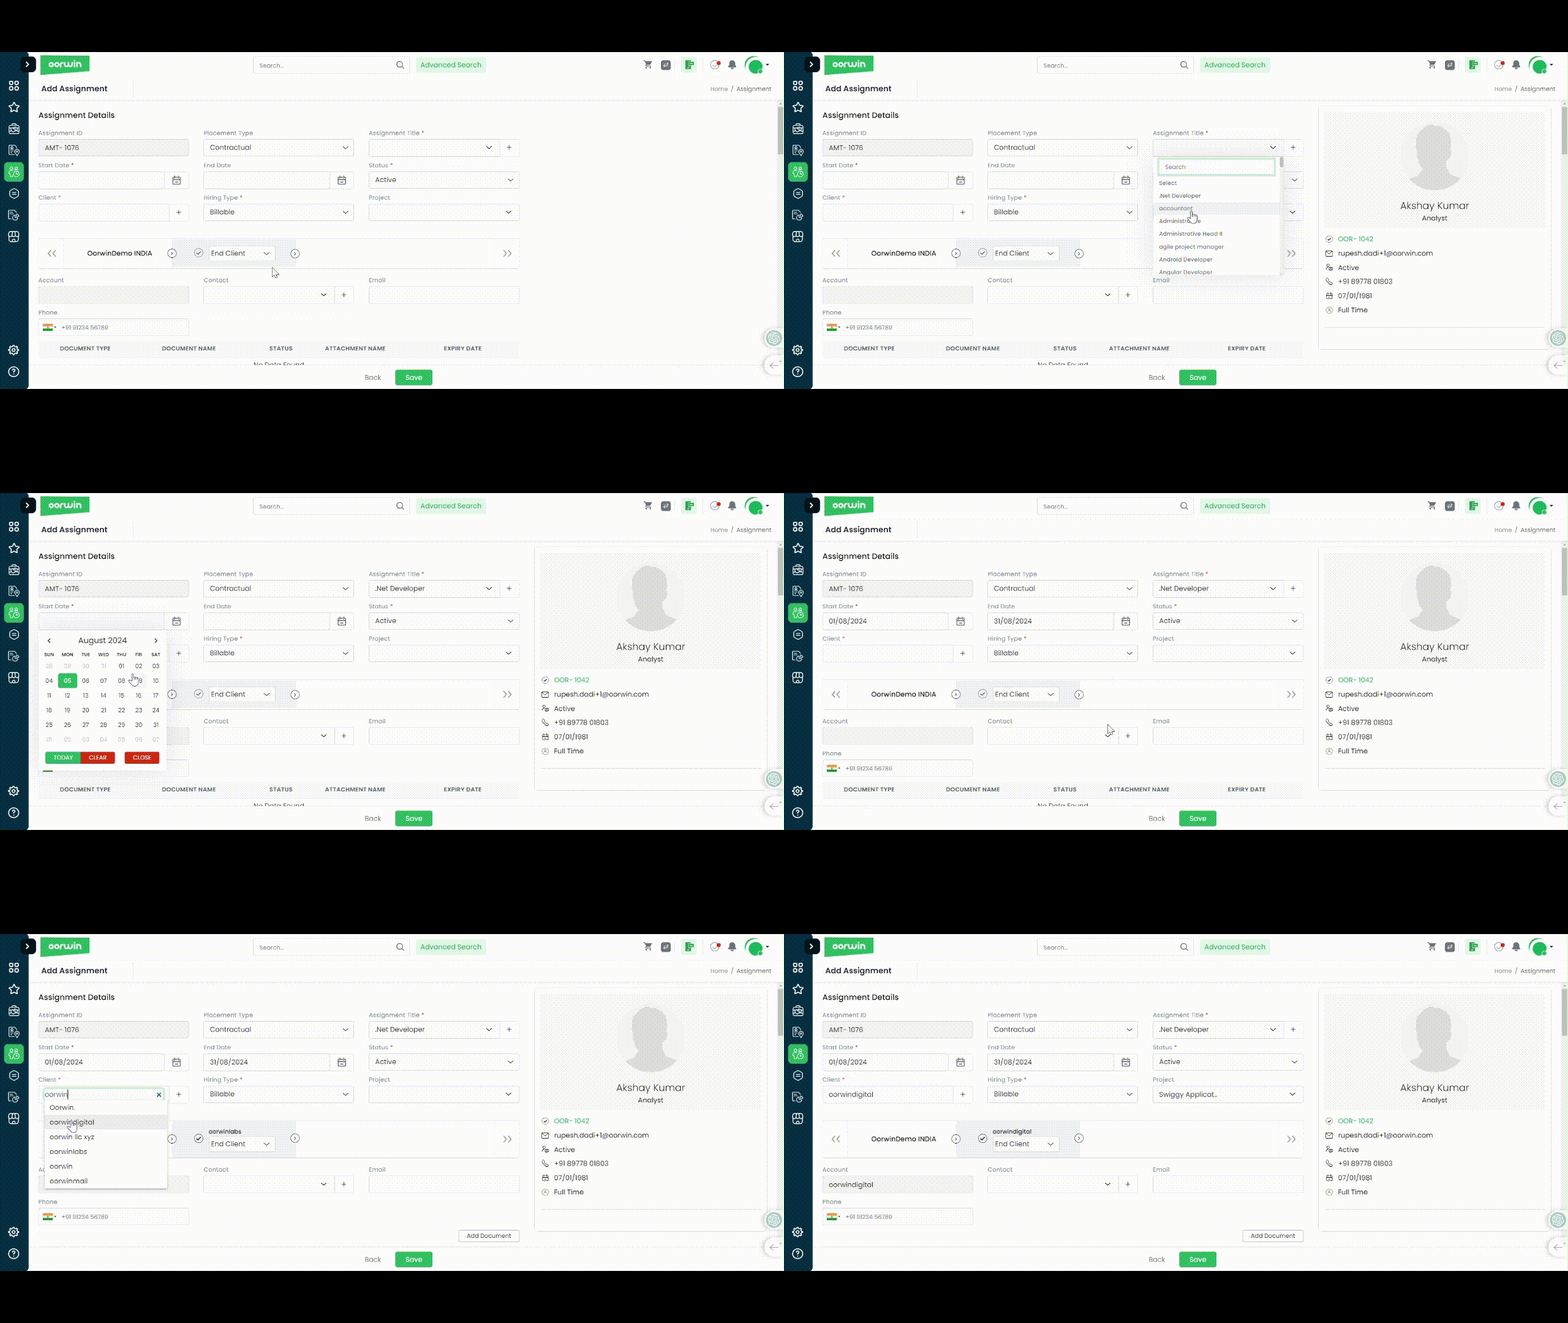
- Assignment Details:
- Assignment ID: Assignment ID is an aauto generated field with an increment in the number(you can customize the ID from Keywords)
- Placement Type: Define your placement type of your Employee
- Assignment Title: Select or add your own Assignment title assigned to your employee by the client
- Start Date: Select the start date of your contract(Mandatory field)
- End Date: Select your end date of your contract (Non-Mandatory field)
- Status: Select your status as needed
Active – States the assignment is active, Users can raise timesheets for an active assignment
Inactive – States the assignment is active, Users cannot raise timesheets for an Inactive assignment
Pipeline – States the assignment is still under pipeline/draft
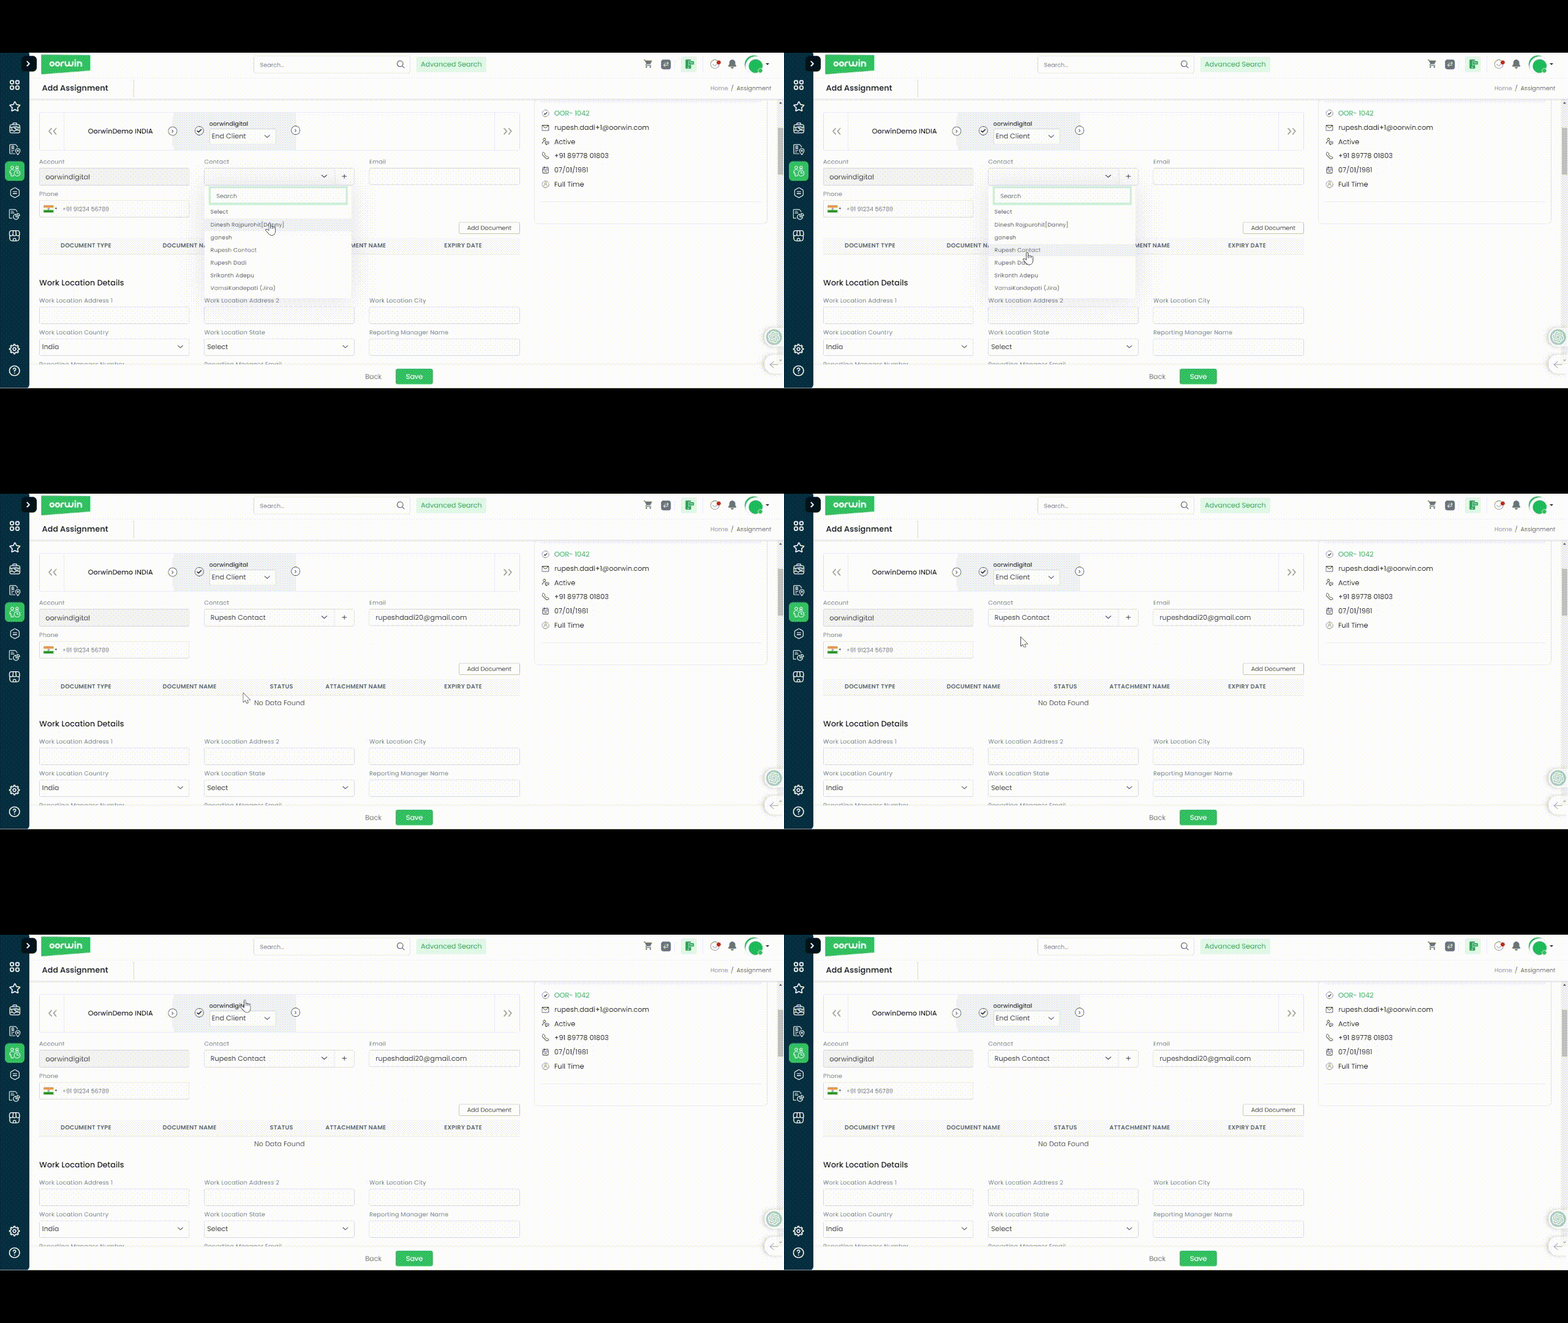
- Select Client Contact Information:
- Select Client contact from the drop down
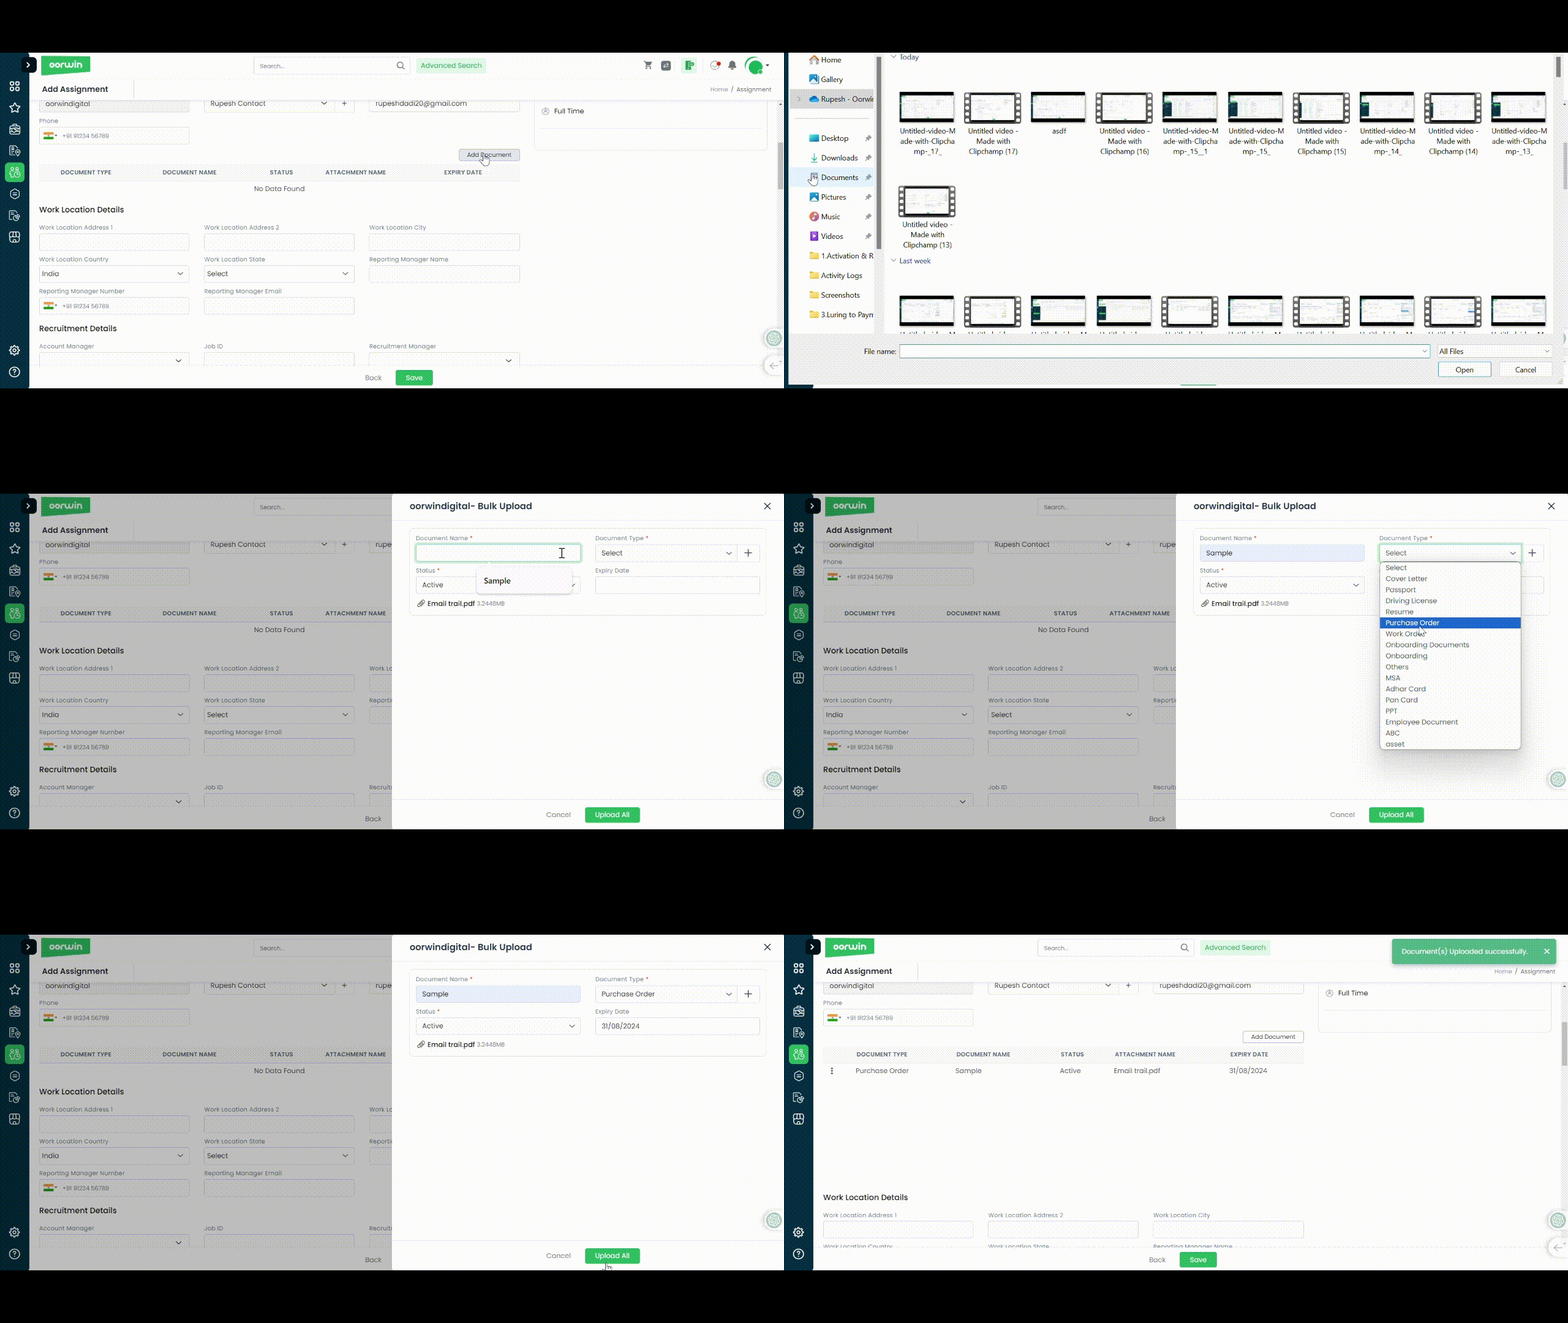
- Add Documents:
- Add required Documents for the assignment such as MSA or any other contract related documents
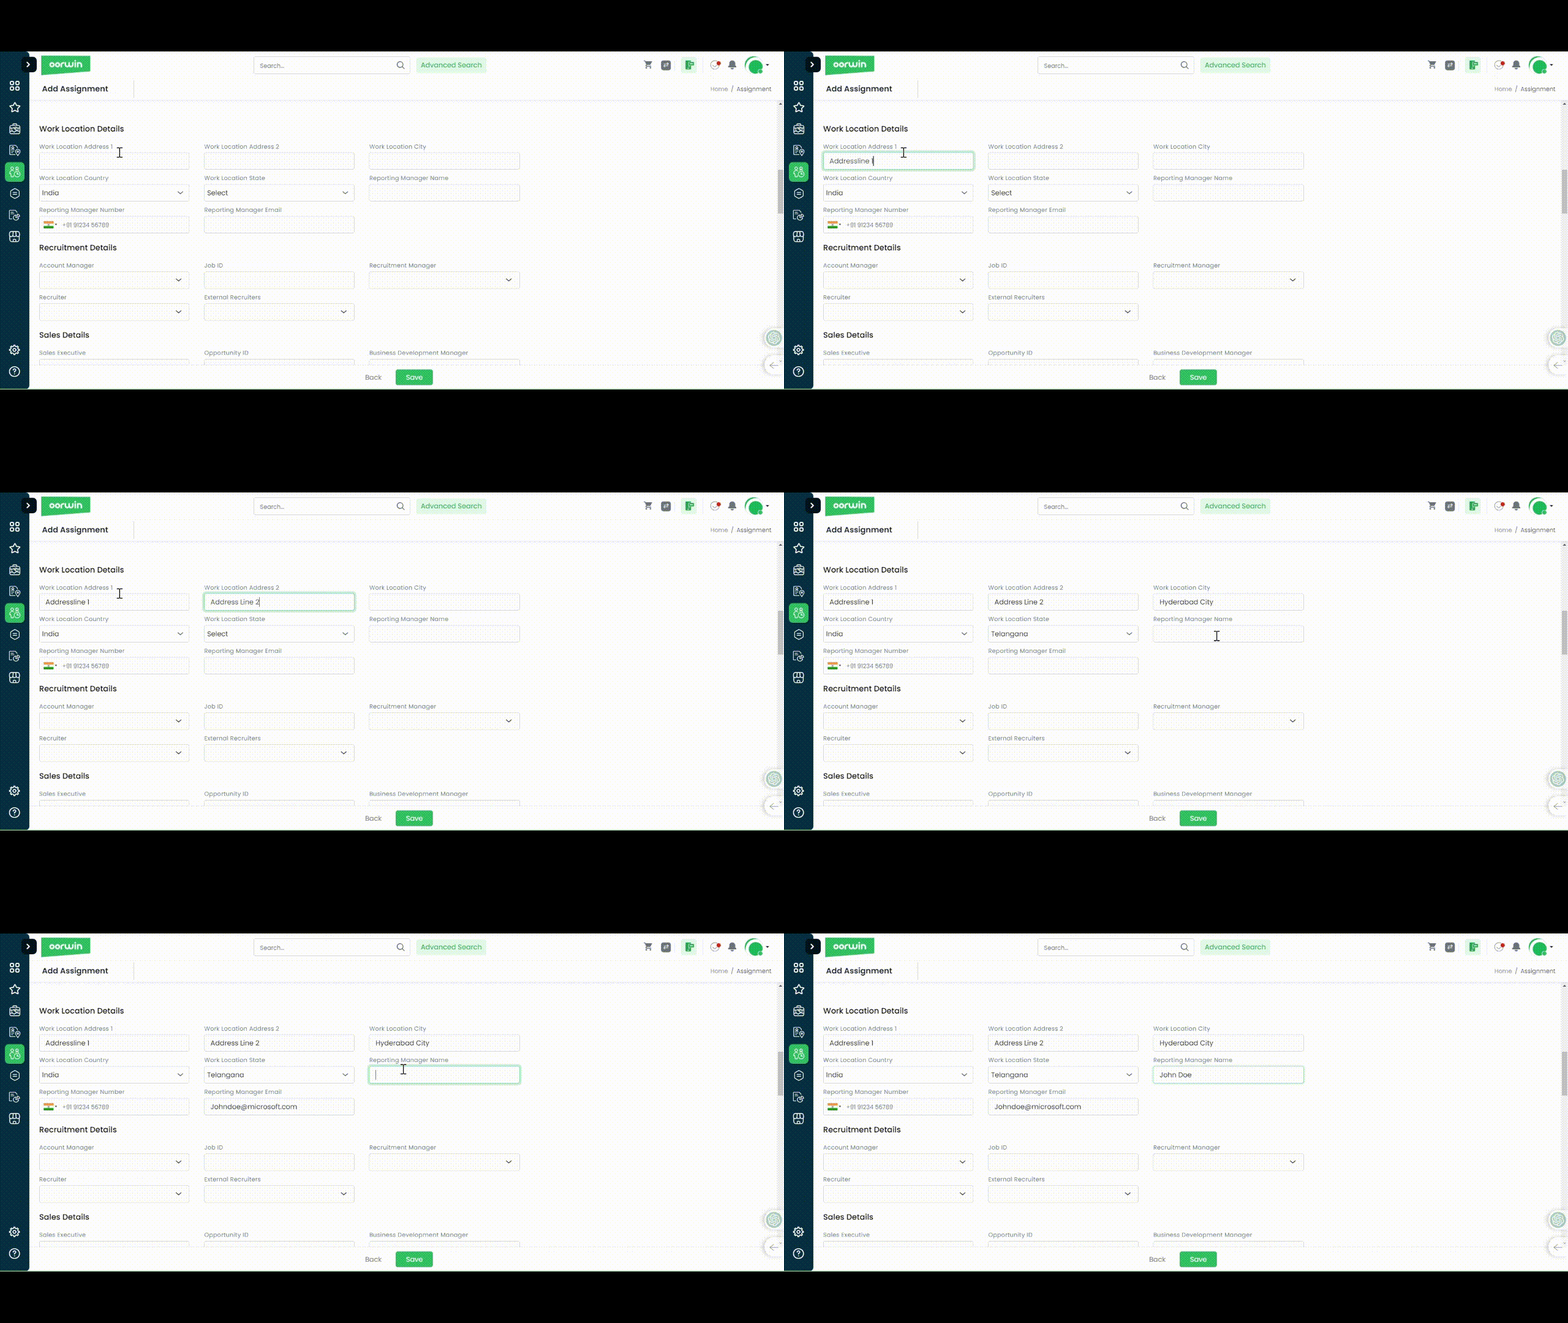
- Work Location Details:
- Enter the address details of your employee wok location information
- Enter the Reporting Manager’s name and contact to whom your employee will be reorting to
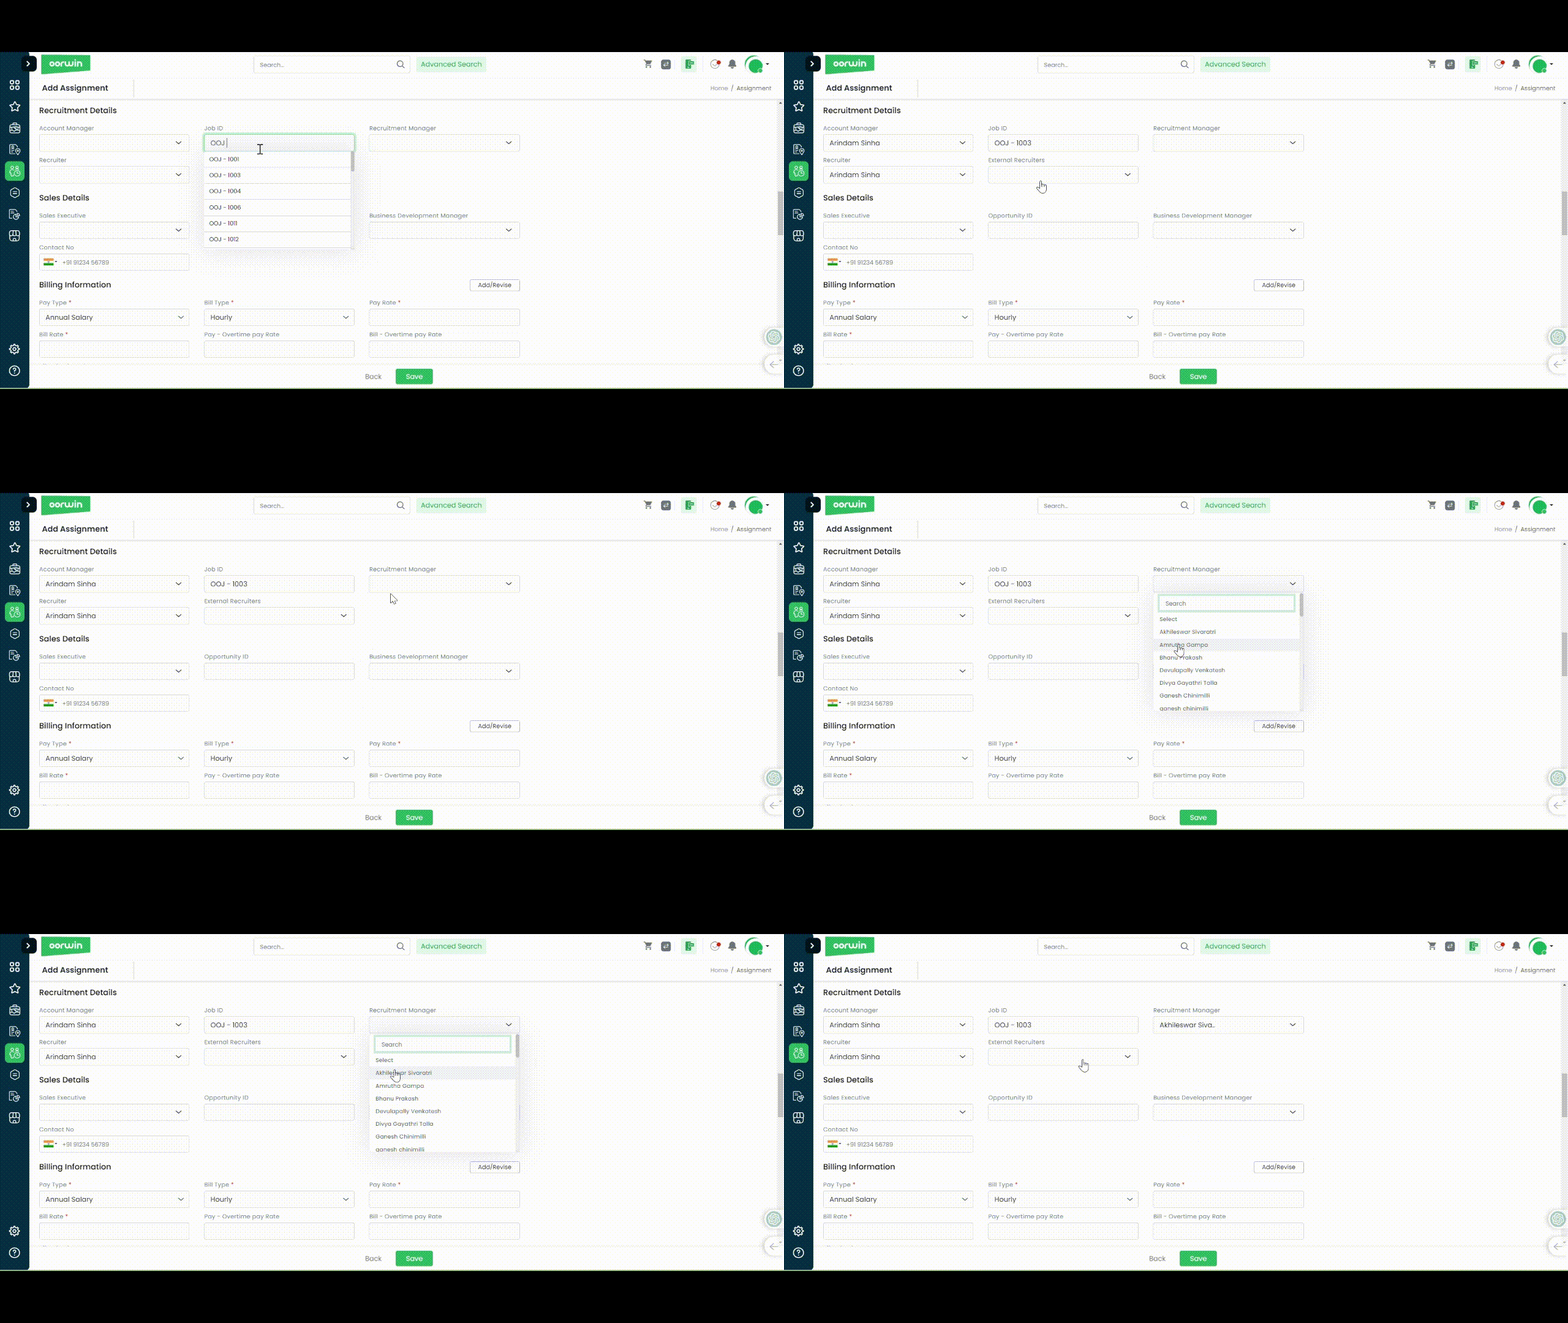
- Recruitment Details:
Enter Job ID and Select the appropriate Job ID from the drop down suggestions.Recruitment team would be automatically picked up from the job’s section.User can also select the team manually searching for users.
- Sales Details:
- Enter Opportunity ID and Select the appropriate Opportunity ID from the drop down suggestions.Sales team would be automatically picked up from the Opportunity’s section.User can also select the team manually searching for users.
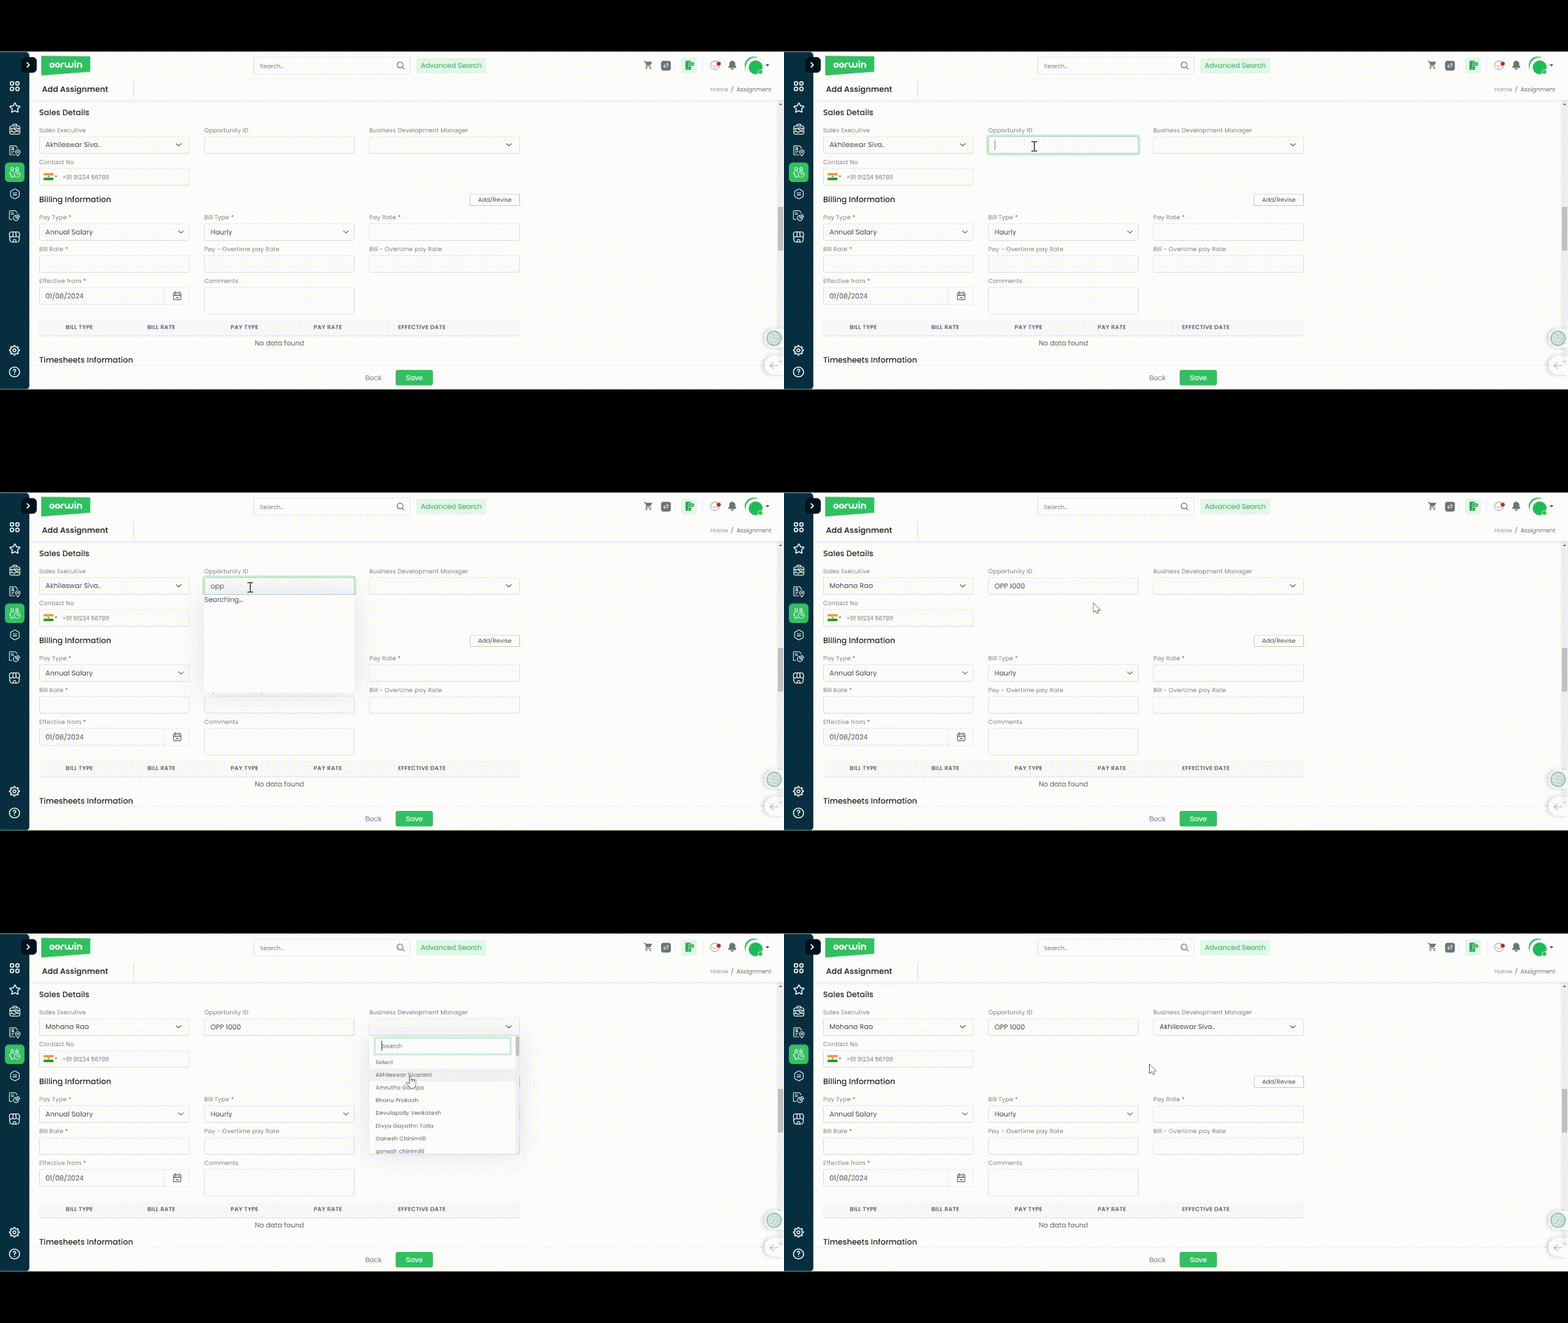
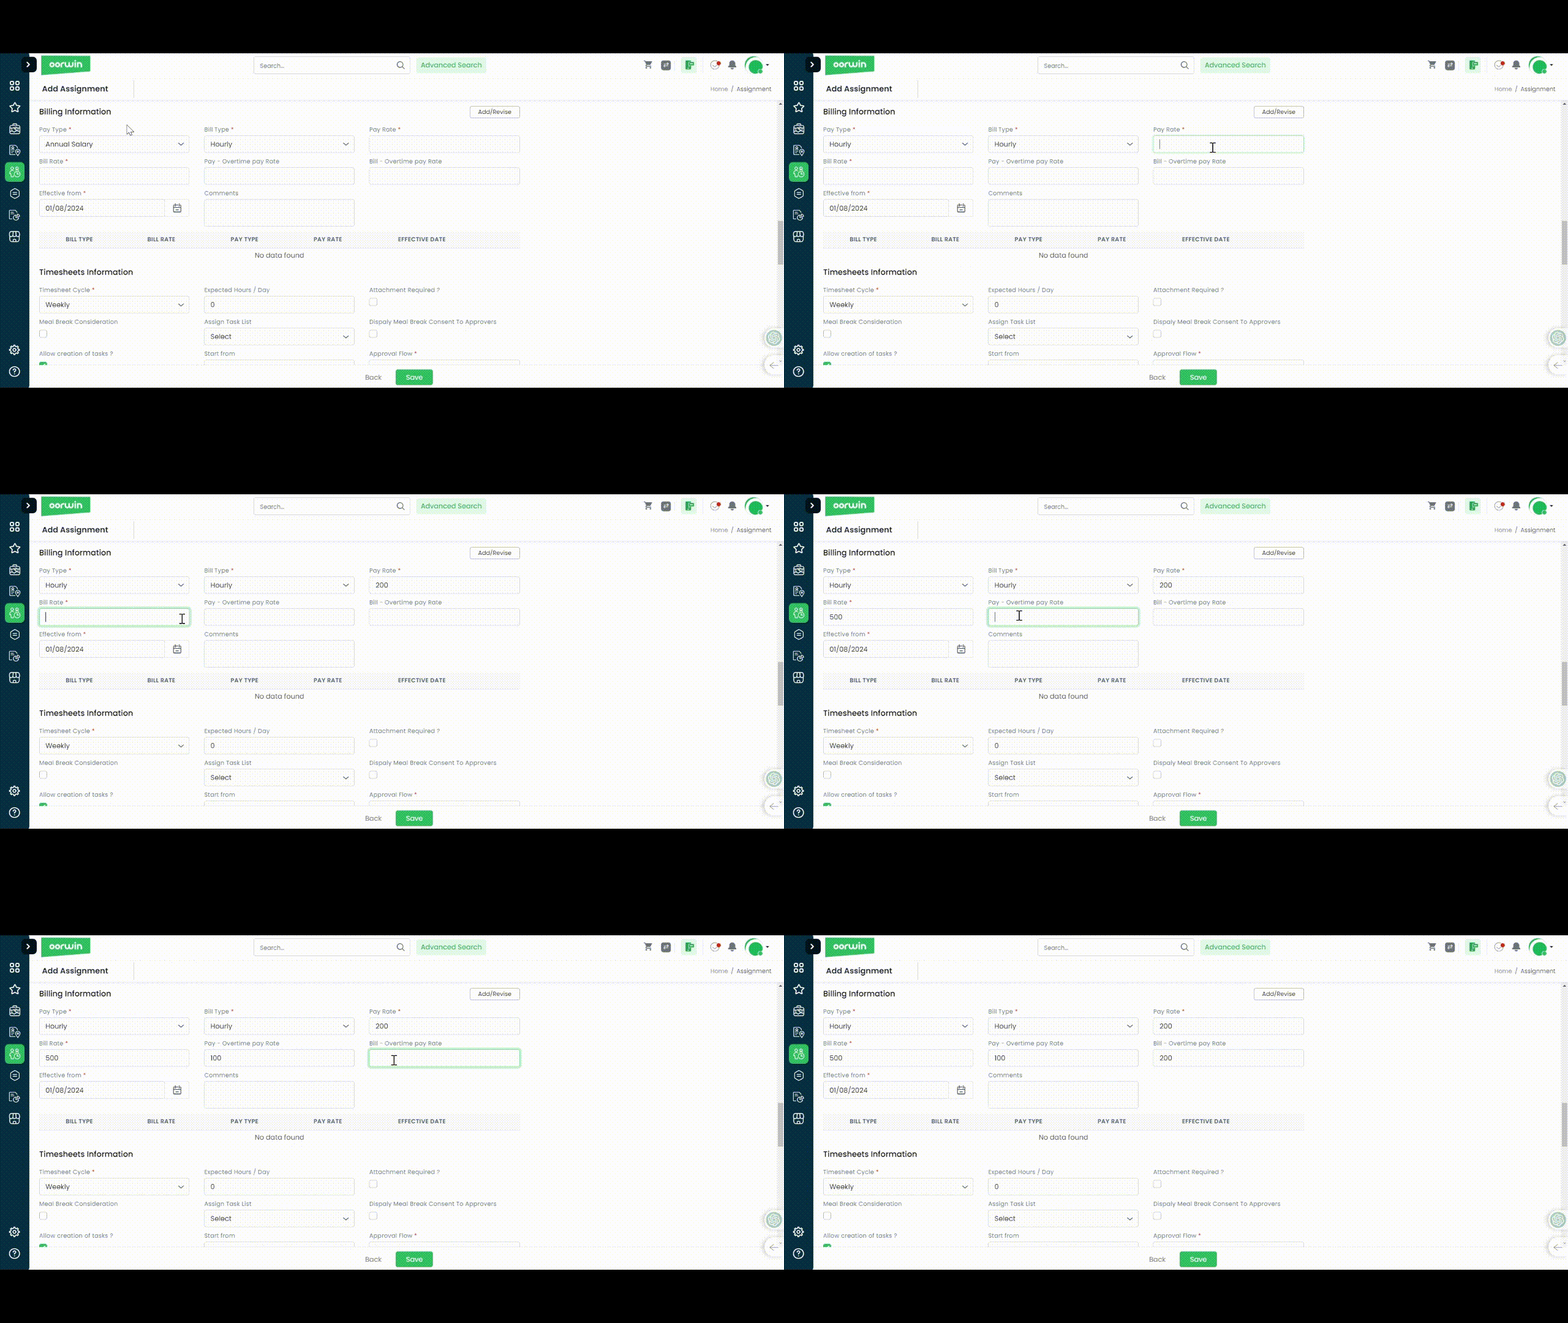
- Billing Information:
- Pay type: Select Pay type (Hourly/Daily,Weekly,Bi-Weekly,Semi-Monthly, Monthly) as per your billing terms with your client.
- Pay Rate: Enter your Pay rate in USD/INR
- Over Time Pay Rate: Enter your Over time pay rate in USD/INR
- Bill type: Select Bill type (Hourly/Daily,Weekly,Bi-Weekly,Semi-Monthly, Monthly) as per your billing terms with your client.
- Bill Rate: Enter your Bill rate in USD/INR
- Over Time Bill Rate: Enter your Over time bill rate in USD/INR
- Effective From: Select your specified date to start billing your client
- Comments: Enter your comments if any
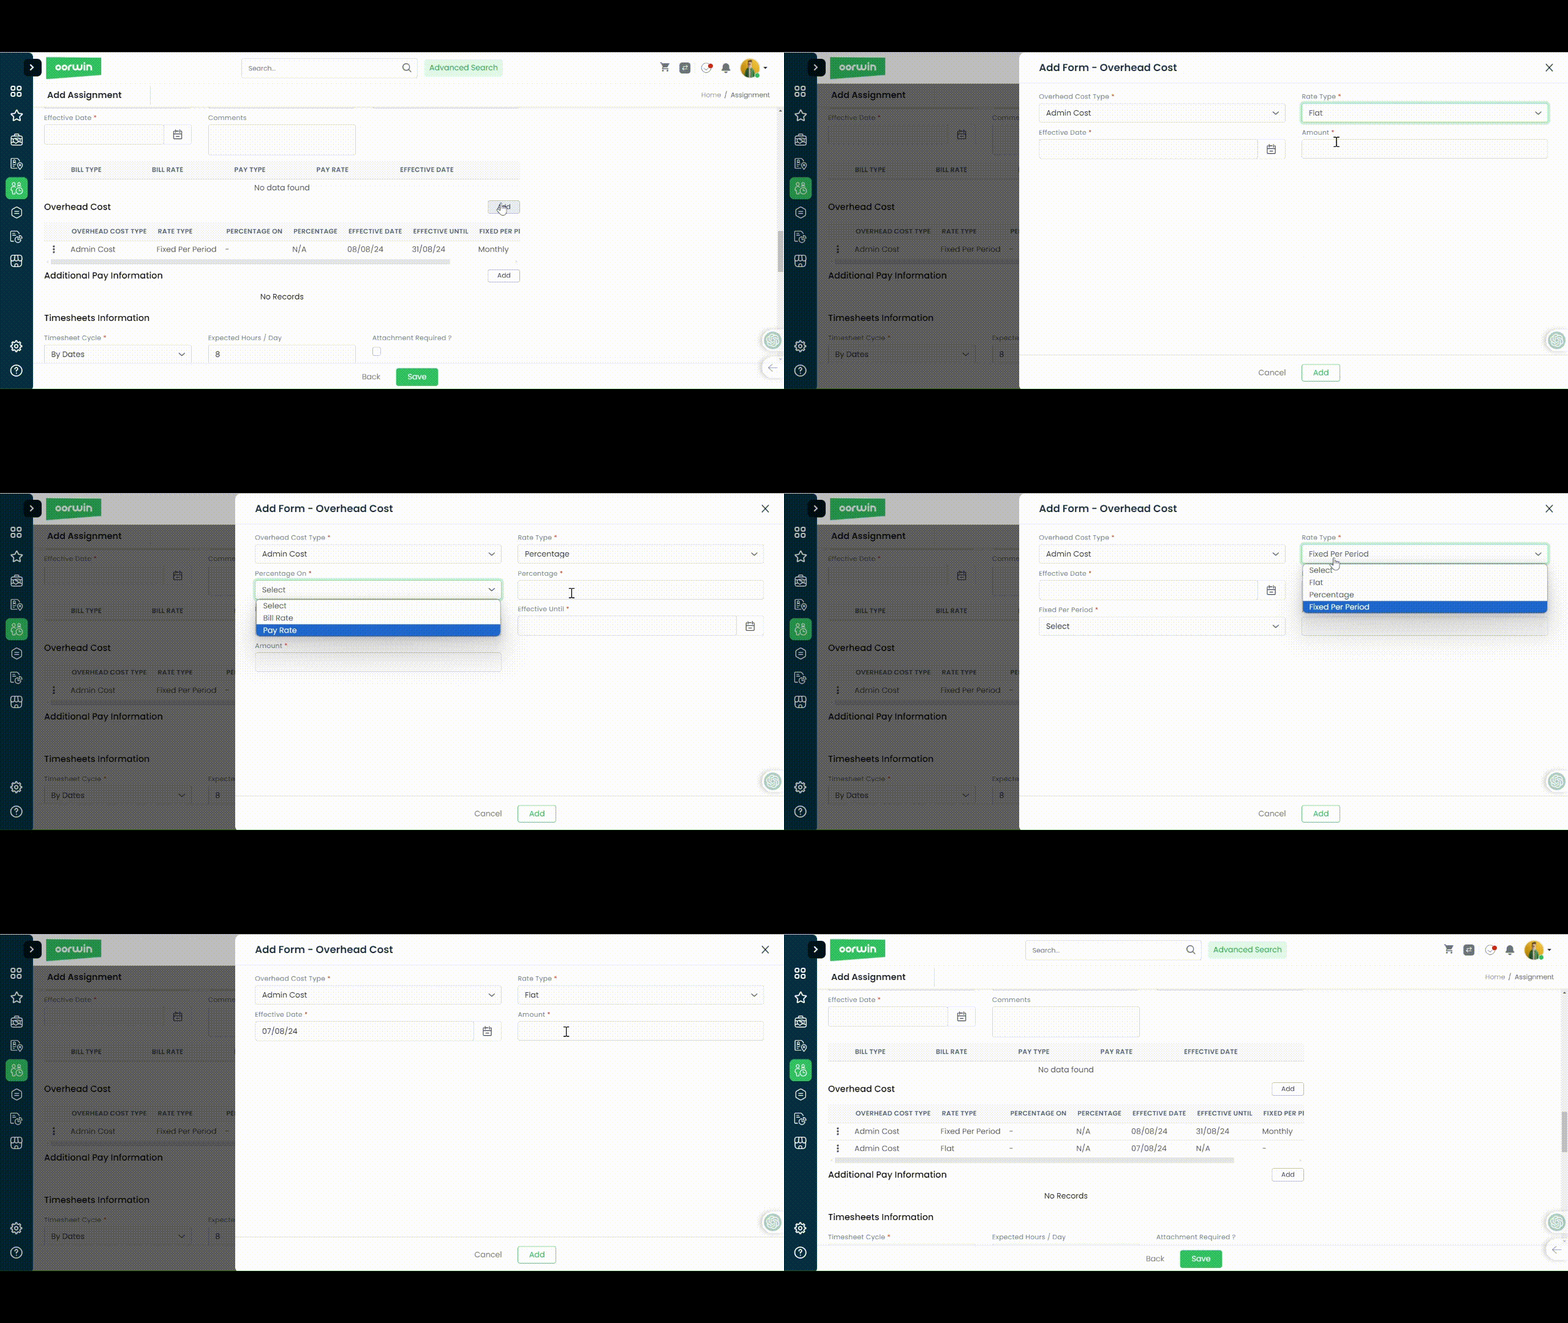
- Over Head Costs:
You can also include overhead costs that are incurred in addition to the pay rate.Overhead costs would change based on Rate Types
- Flat: A fixed overhead cost amount can be added, effective from a specific start date.
- Percentage: An overhead cost calculated as a percentage based on the bill rate or pay rate, with a specified percentage amount and effective start and end dates.
- Fixed per Period: A fixed overhead amount applied for a specific period, defined by start and end dates.
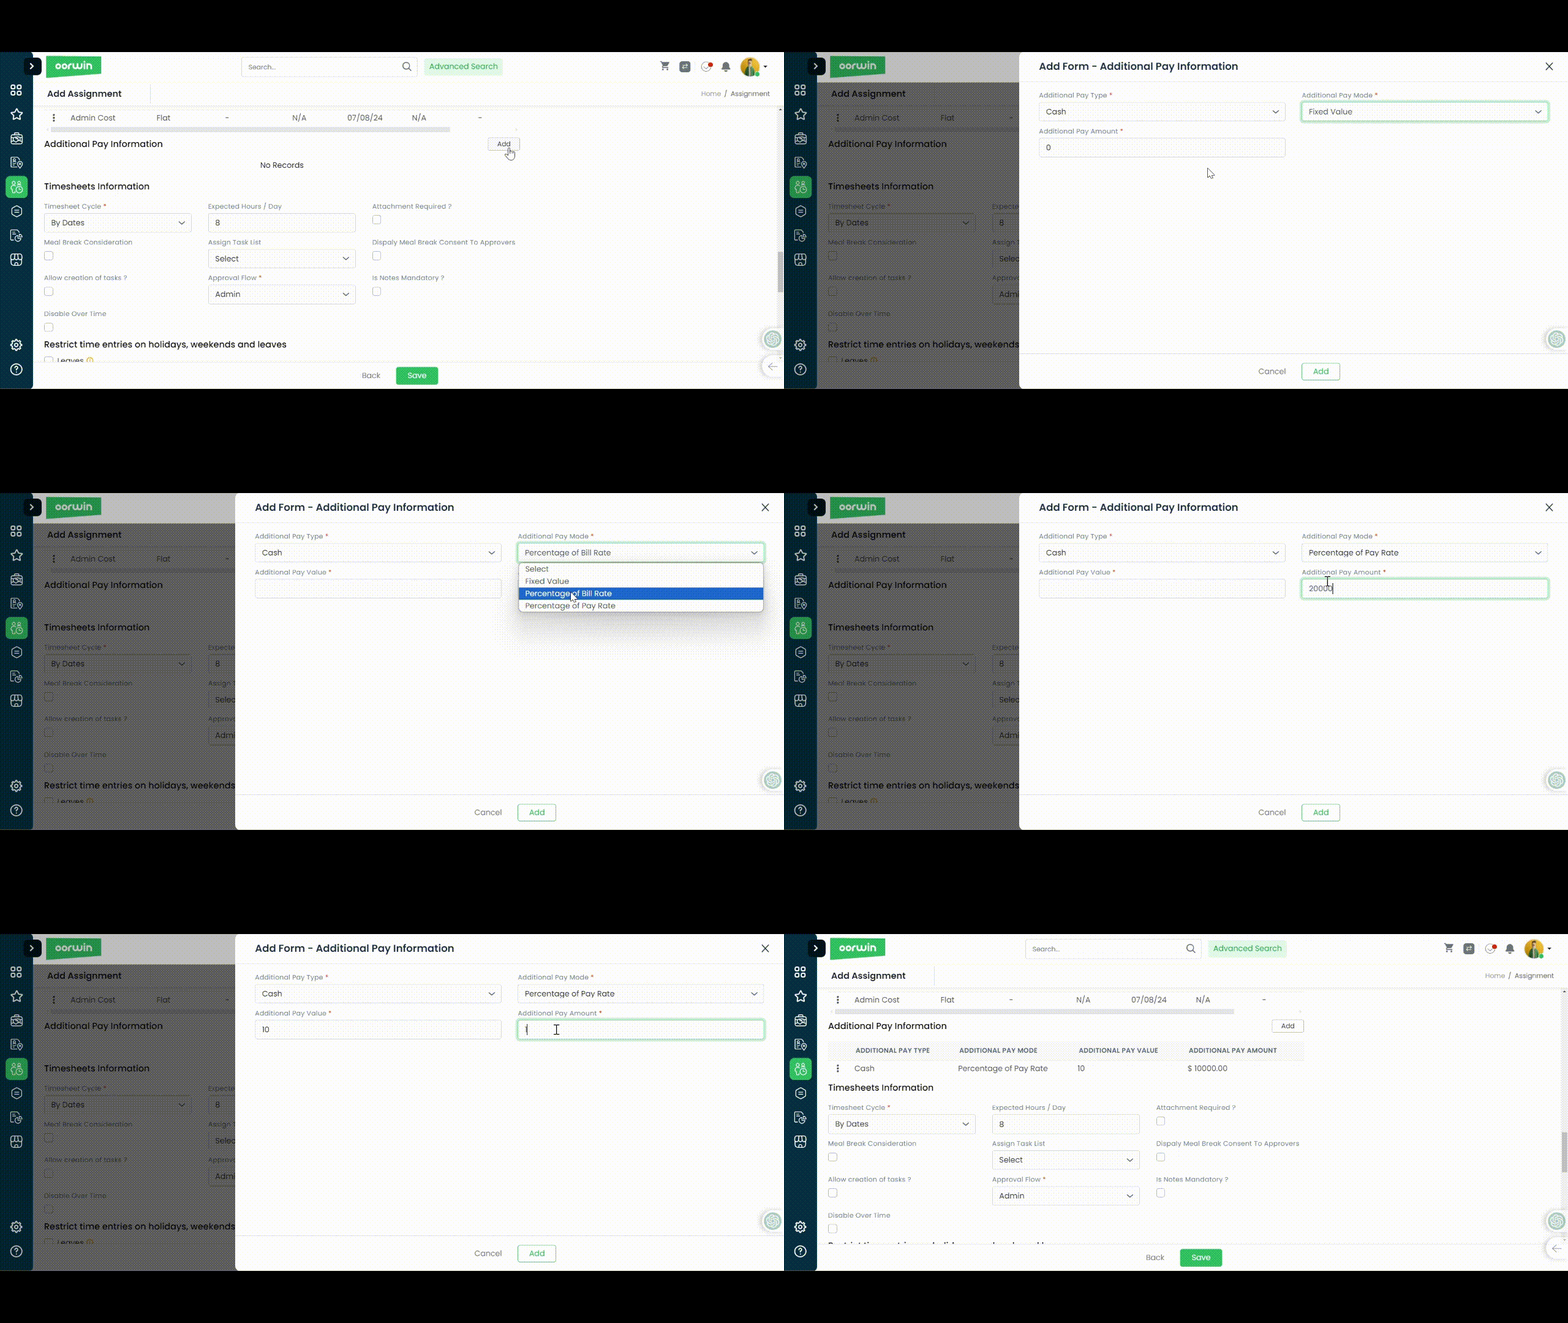
- Additional Pay Information:
Additional pay information can be added bsed on Additional pay mode selection
- Fixed Value: Add a fixed amount for Additional Pay
- Percentage of Bill Rate: Enter your percentage and amount as needed
- Percentage of Pay Rate: Enter your percentage and amount as needed
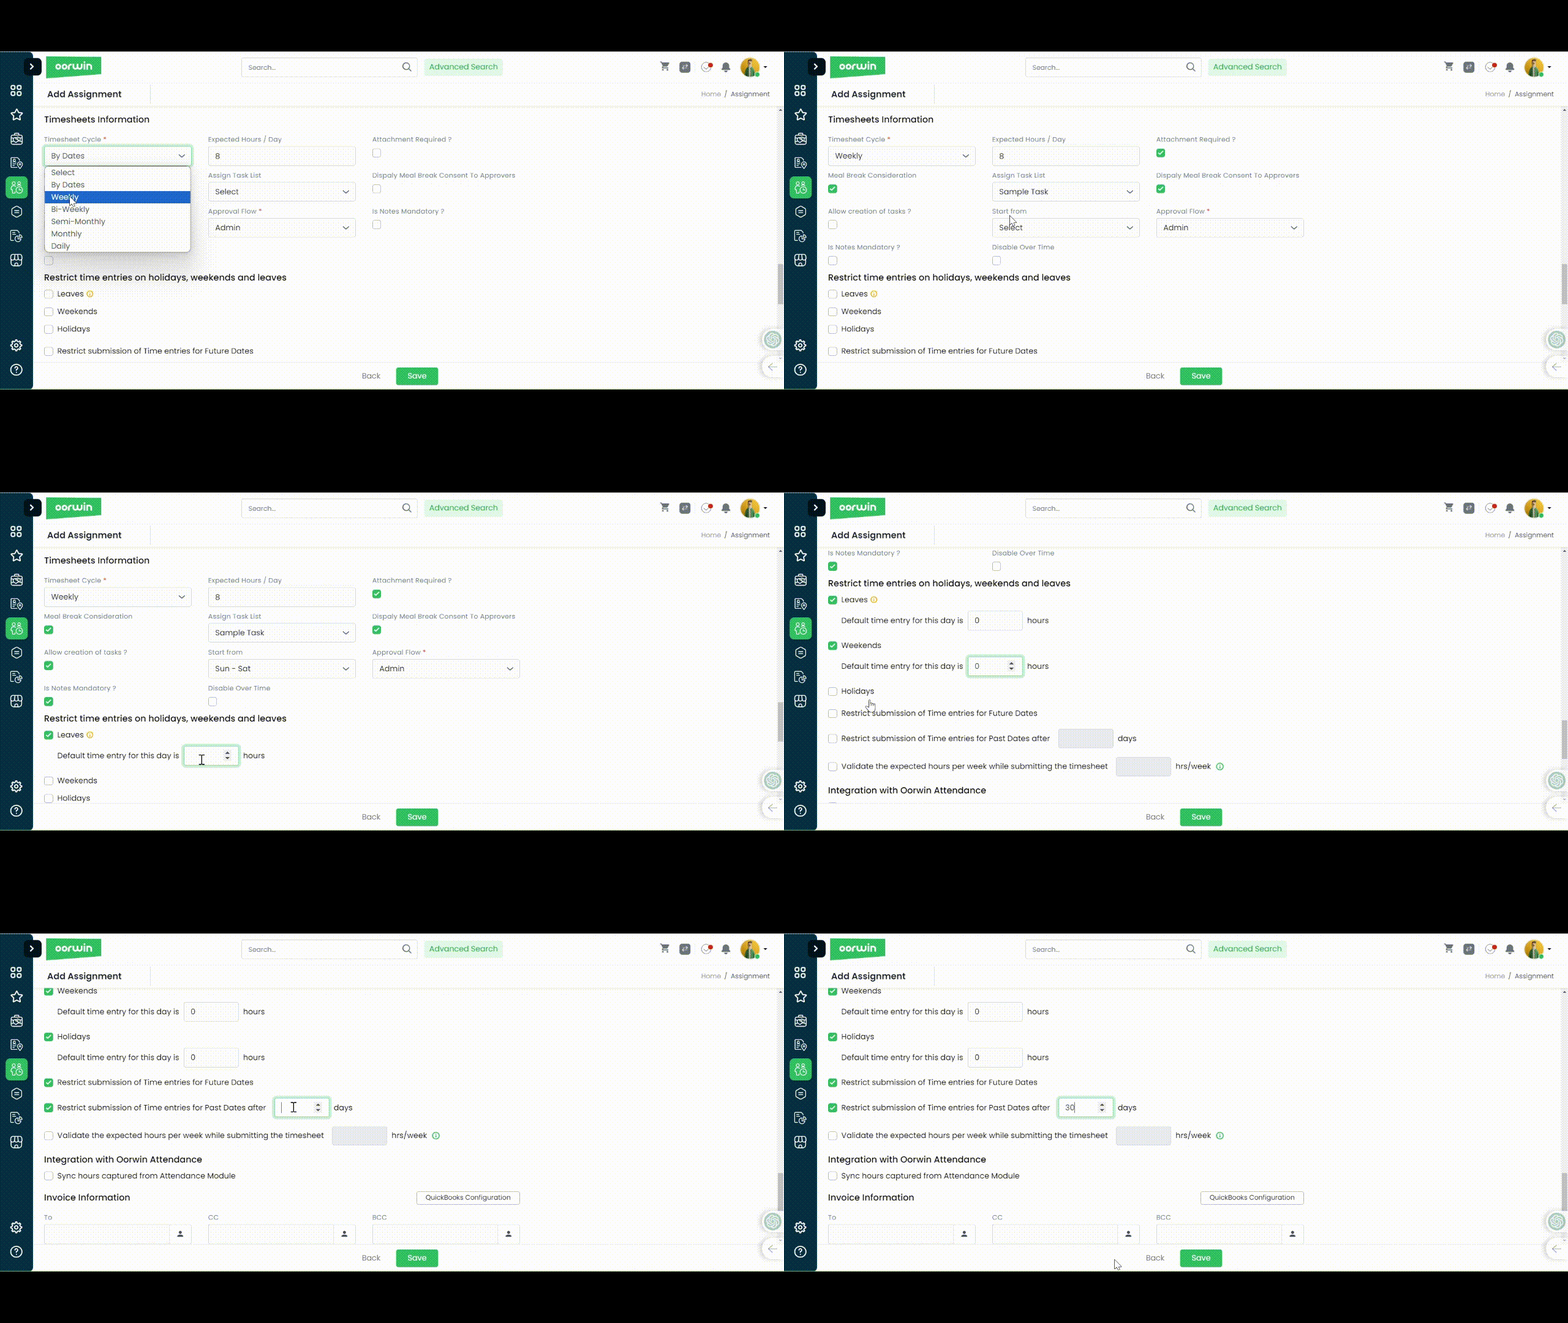
- Timesheet Information:
Enter your Timesheet related configurations against this Assignment.
- Select Timesheet configuration on number of hours for weekdays, Leaves and regular working days
- Select Approval flows for the timesheet approval process
- Select Sync with Attendance , If you wish to have your timesheet hours to be auto picked from Oorwin’s Attendance
- Select your Tasks to enter your Employee to allow addition of hours which could be billable or Non-Billable
- Select your Cycle start and end based on your timesheet cycle
- Invoice Information
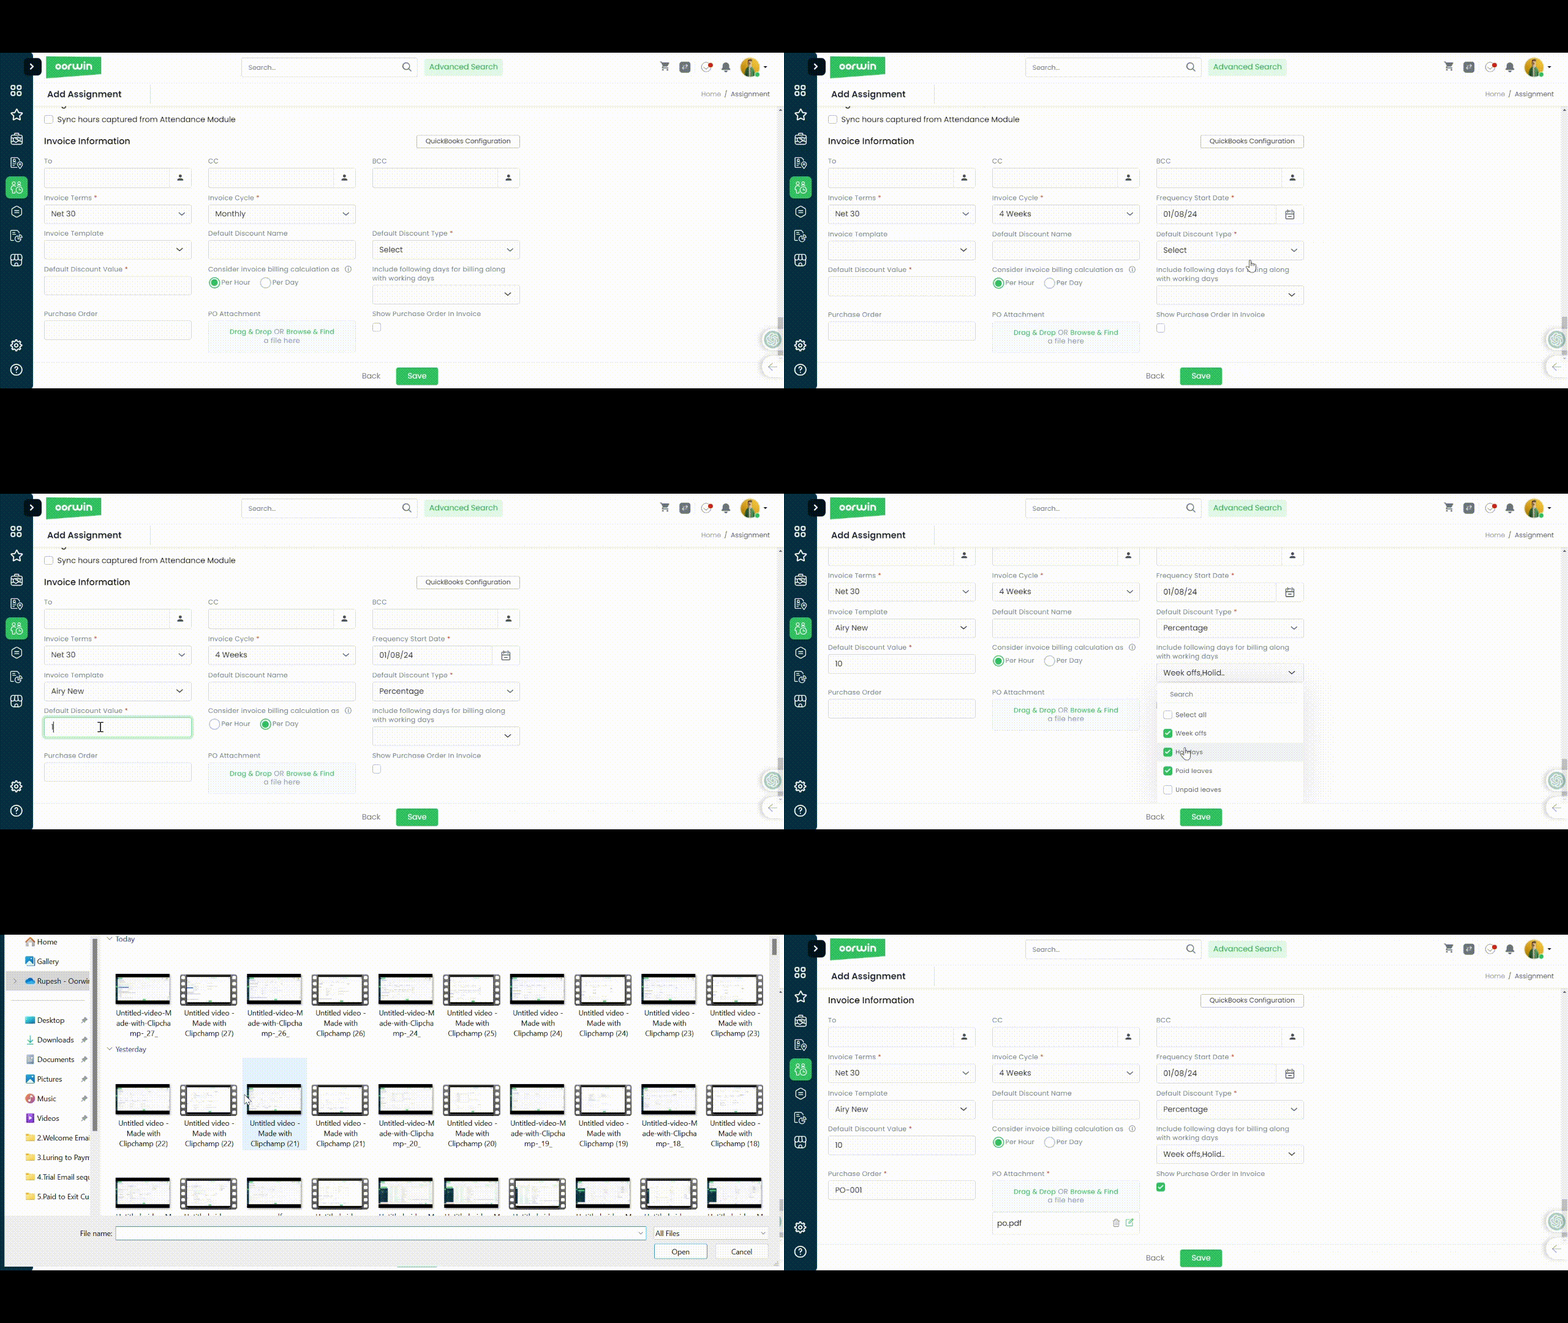
Enter your Invoice information and billing terms for your assignment, Which can further help you at creating draft invoices or regular invoices.
- Enter Net Terms, Billing contacts (To & CC)
- Add your Discounts if any based on type
- Add Purchase order Attachment and PO number
- Select your billable non working days(Weekoffs, Holidays, or other non-working days) which can also be added to bill on your invoice.
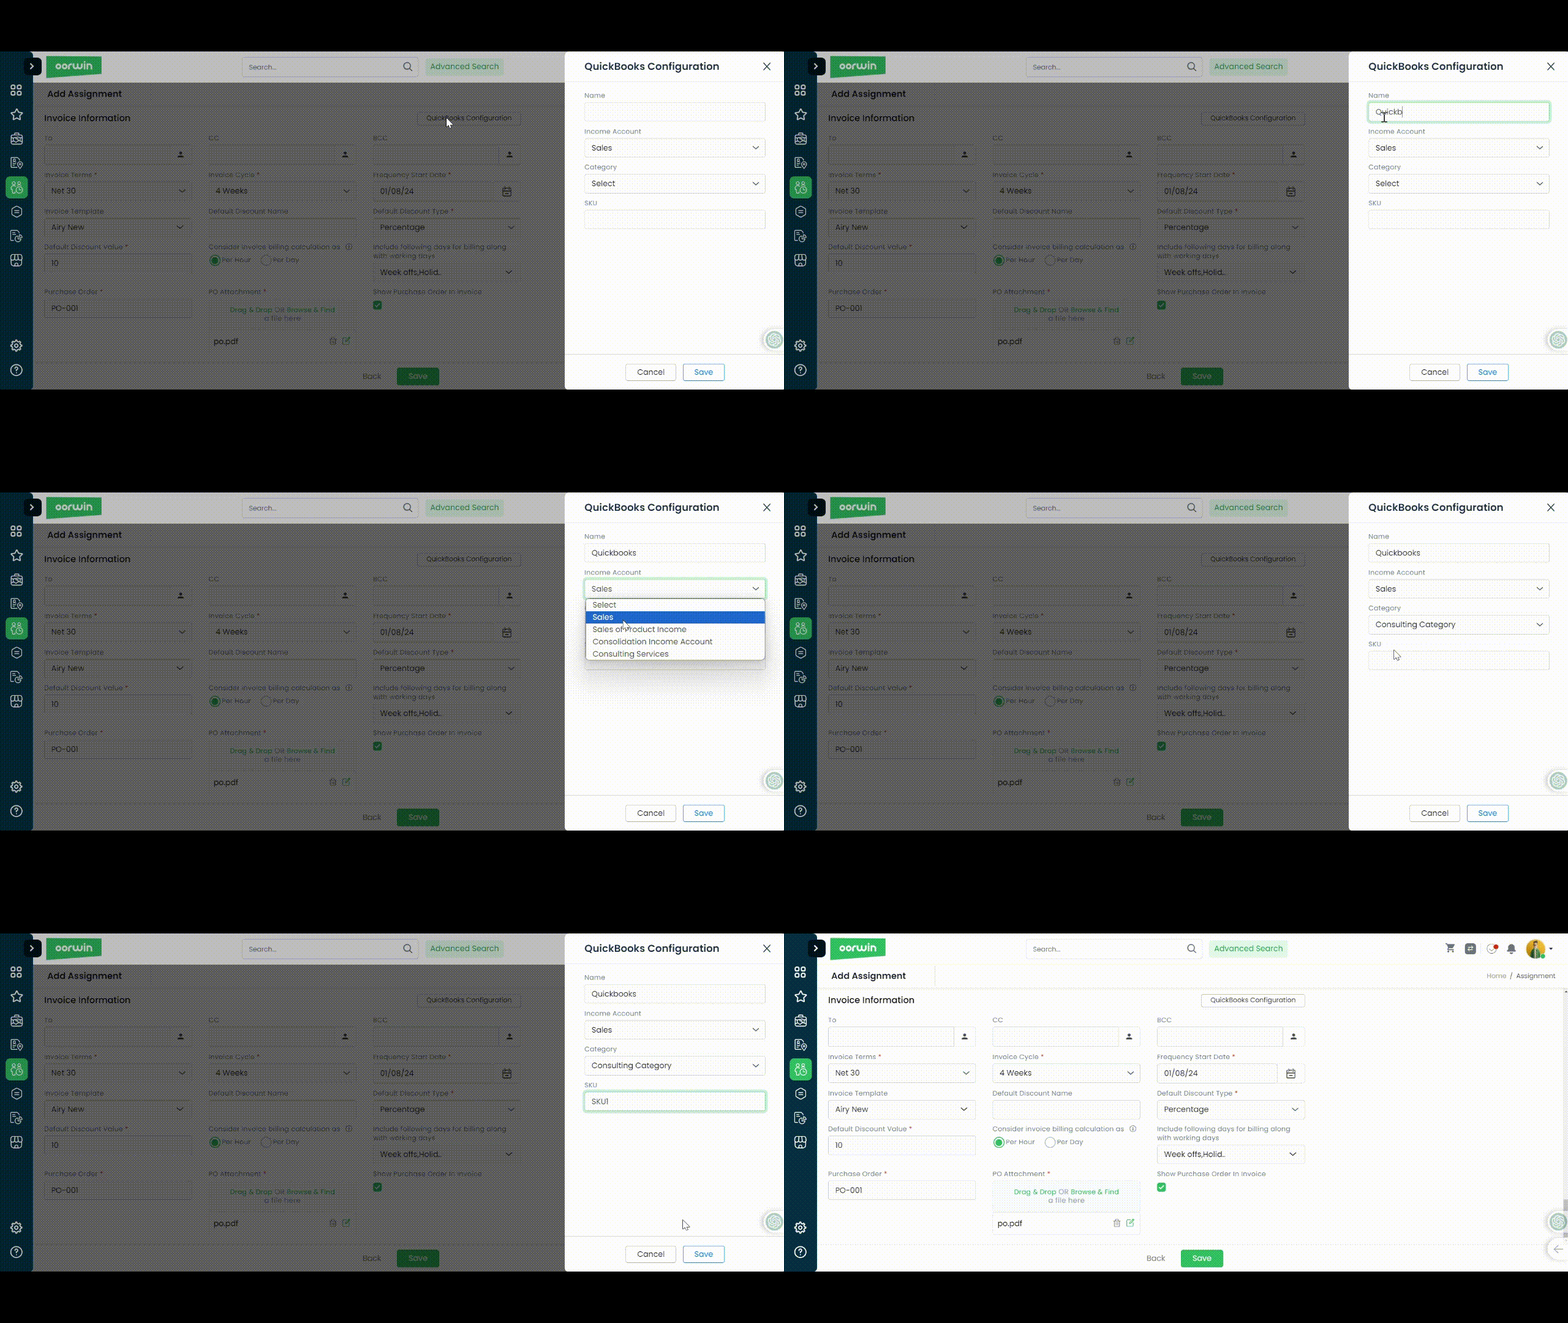
- Sync your Quickbooks
Sync your Quickbooks for the billing information and line items addition to sync along with Oorwin
Was this article helpful?
To award additional leave credits to an employee, you need to configure the leave type to specify who can assign them and how many can be assigned.
Admin Configuration:
Configuration can only be set up from the oorwin user accounts who has an Admin(HR Admin or Super Admin Access) access
Follow the steps below to set it up:
- Navigate to Settings -> Configurations -> Time & Attendance -> Leave Management -> Leave Policy -> Leave Type.
- Edit the desired leave type.
- Expand the “Leave Quota” section.
- Enable the option “Award Leave credit of ___ Additional days excluding the Quota or Accrual”.
- Select who can award the leave credits: either “Admin” or “Admin & Reporting Managers”.
By entering the number of days, you limit the user (Admin/Manager) to allocate only up to that number of credits, not more.
Selecting “Admin” as the authority allows only admins to award leave credits.
Choosing “Admin & Reporting Managers” as the authority permits both users with Admin access (HR Admin & Super Admin) and Reporting managers (those tagged in the Reporting To section in the employee form) to award leave credits.
Was this article helpful?
If you are any business related issues with a particular account then you can blacklist that account which would not showcase that account in all over the application.
To do this action you need to have edit permission enabled for your role from the Settings->Role security
Please follow the below steps to blacklist the account
- Log in to your Oorwin Account and navigate to Accounts module from the left menu under General Section
- Click on any account name to whom you wanted to blacklist, which opens the account view page.
- Click on Blacklist icon on the top right corner
- Click on Yes on the confirmation popup
- By this action your account will be blacklisted and it shows in red colour (blacklisted) in your listing page
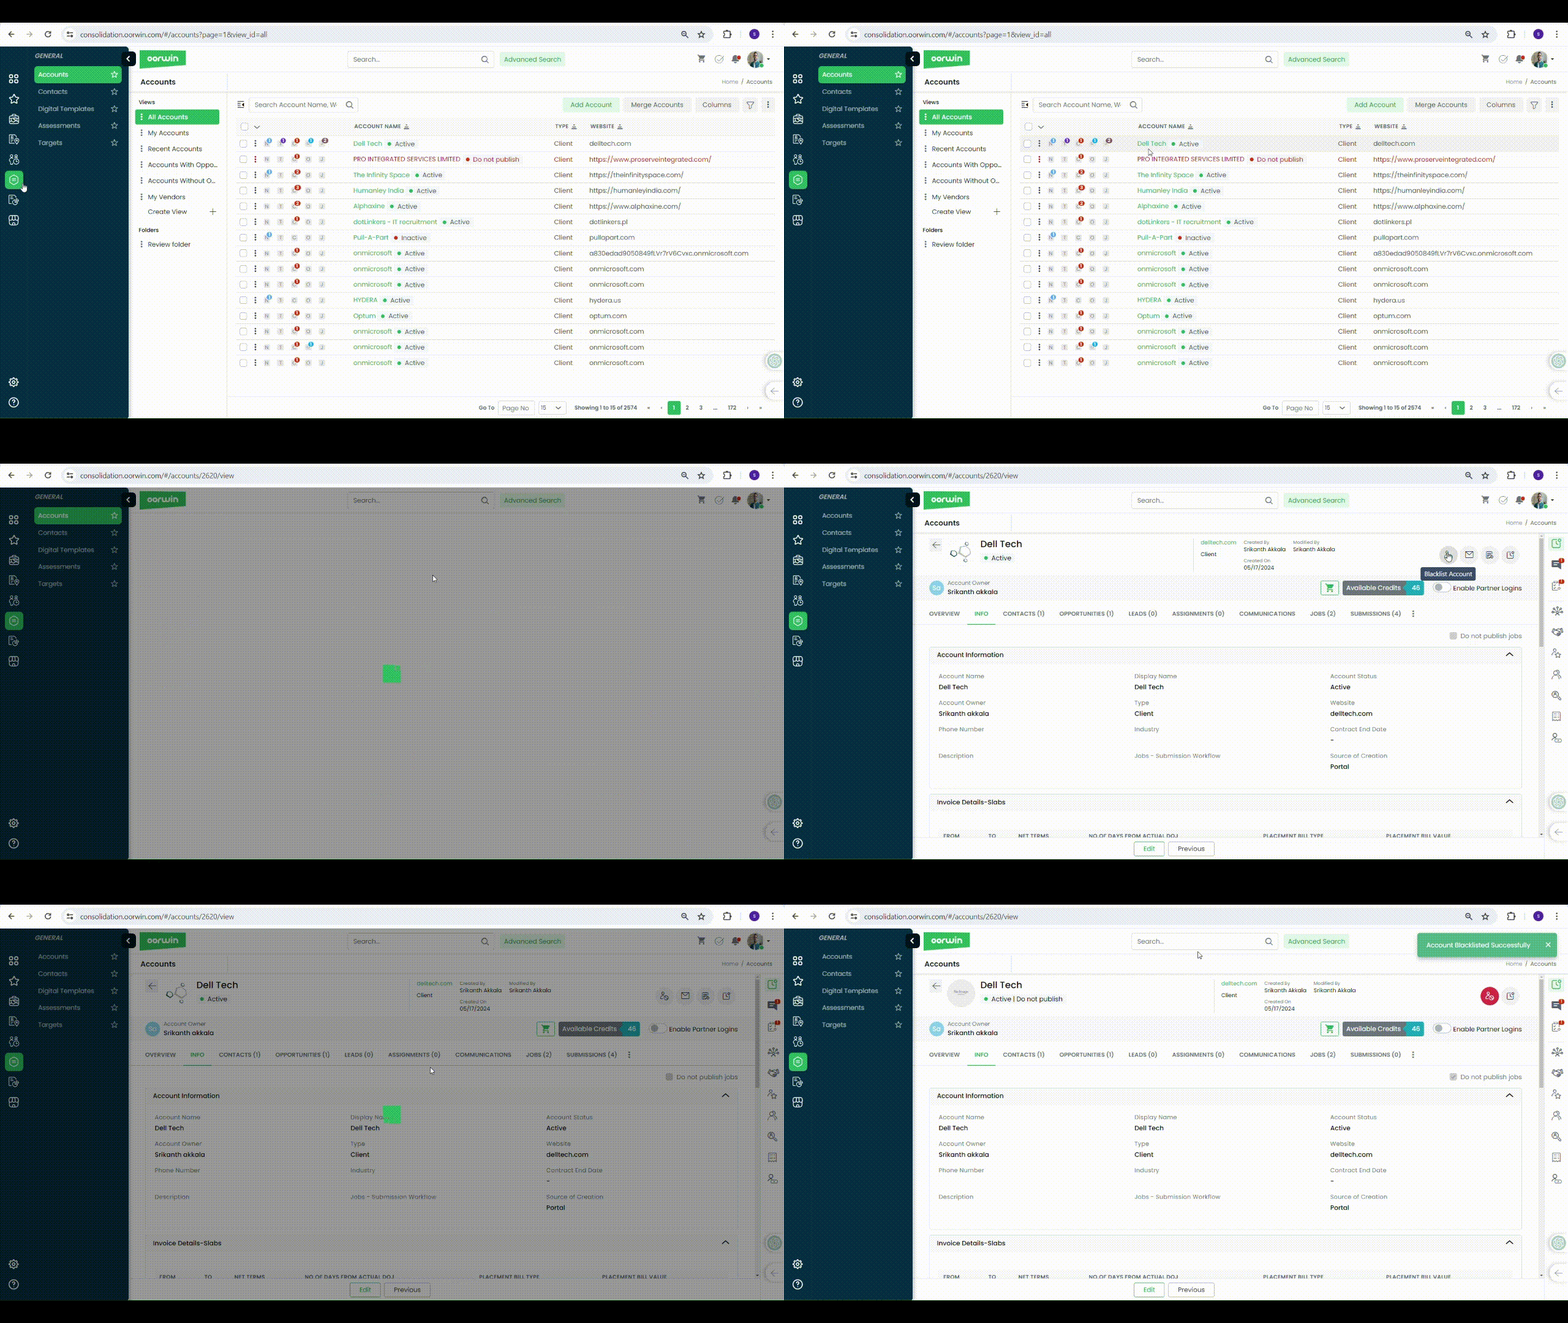
- You can unblock the account from the same option where you can perform all your regular operations on it
Was this article helpful?
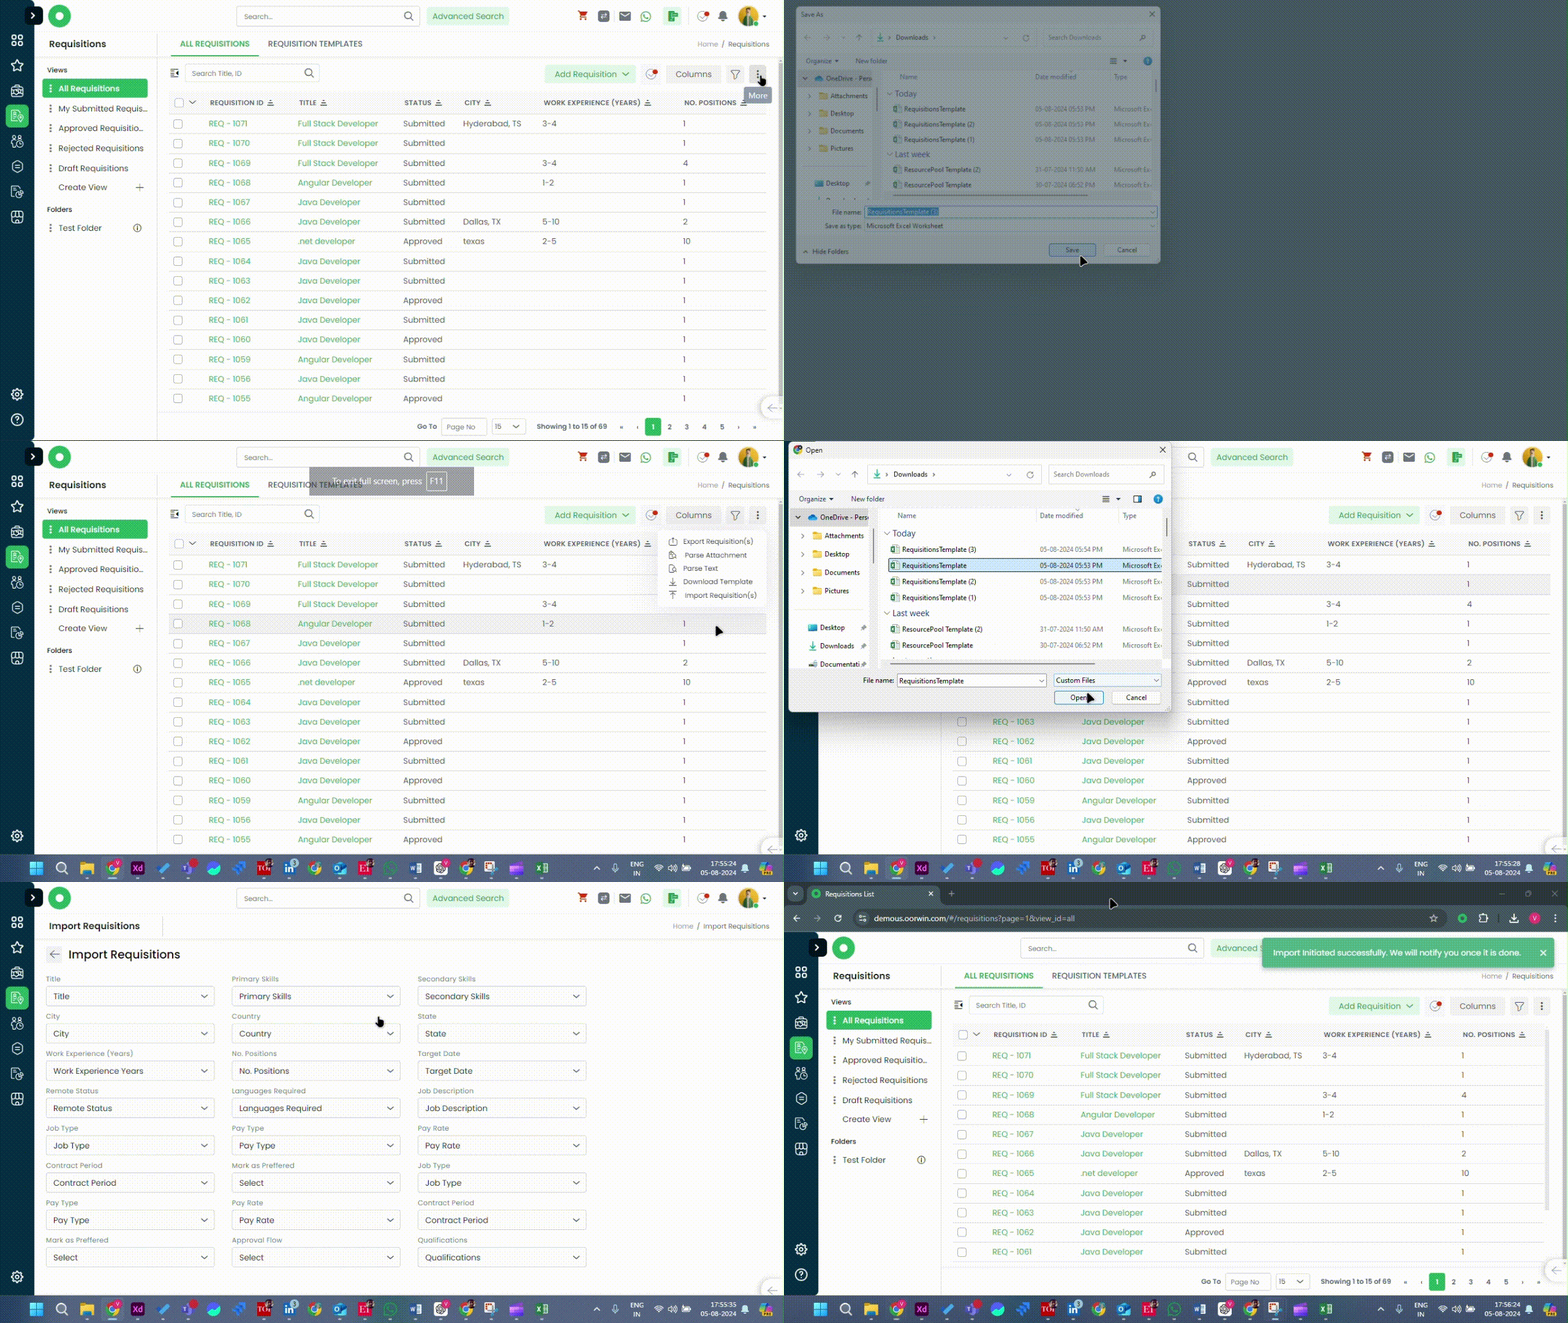
Here’s a detailed guide on how to Bulk import Requisitions:
- Log in to your Oorwin Account and navigate to Requisitions module from the left menu under Recruitment Section.
- Click on “More” option on the right corner.
- Click on Download Template and fill all the required details in the template and save it.
- Click on More > Import requisitions > Attach the filled template and map the relevant fields and submit.
- Once the templates imported, you will receive an status update notification in the notifications icon.
- The imported records will be created in the requisitions.
Was this article helpful?
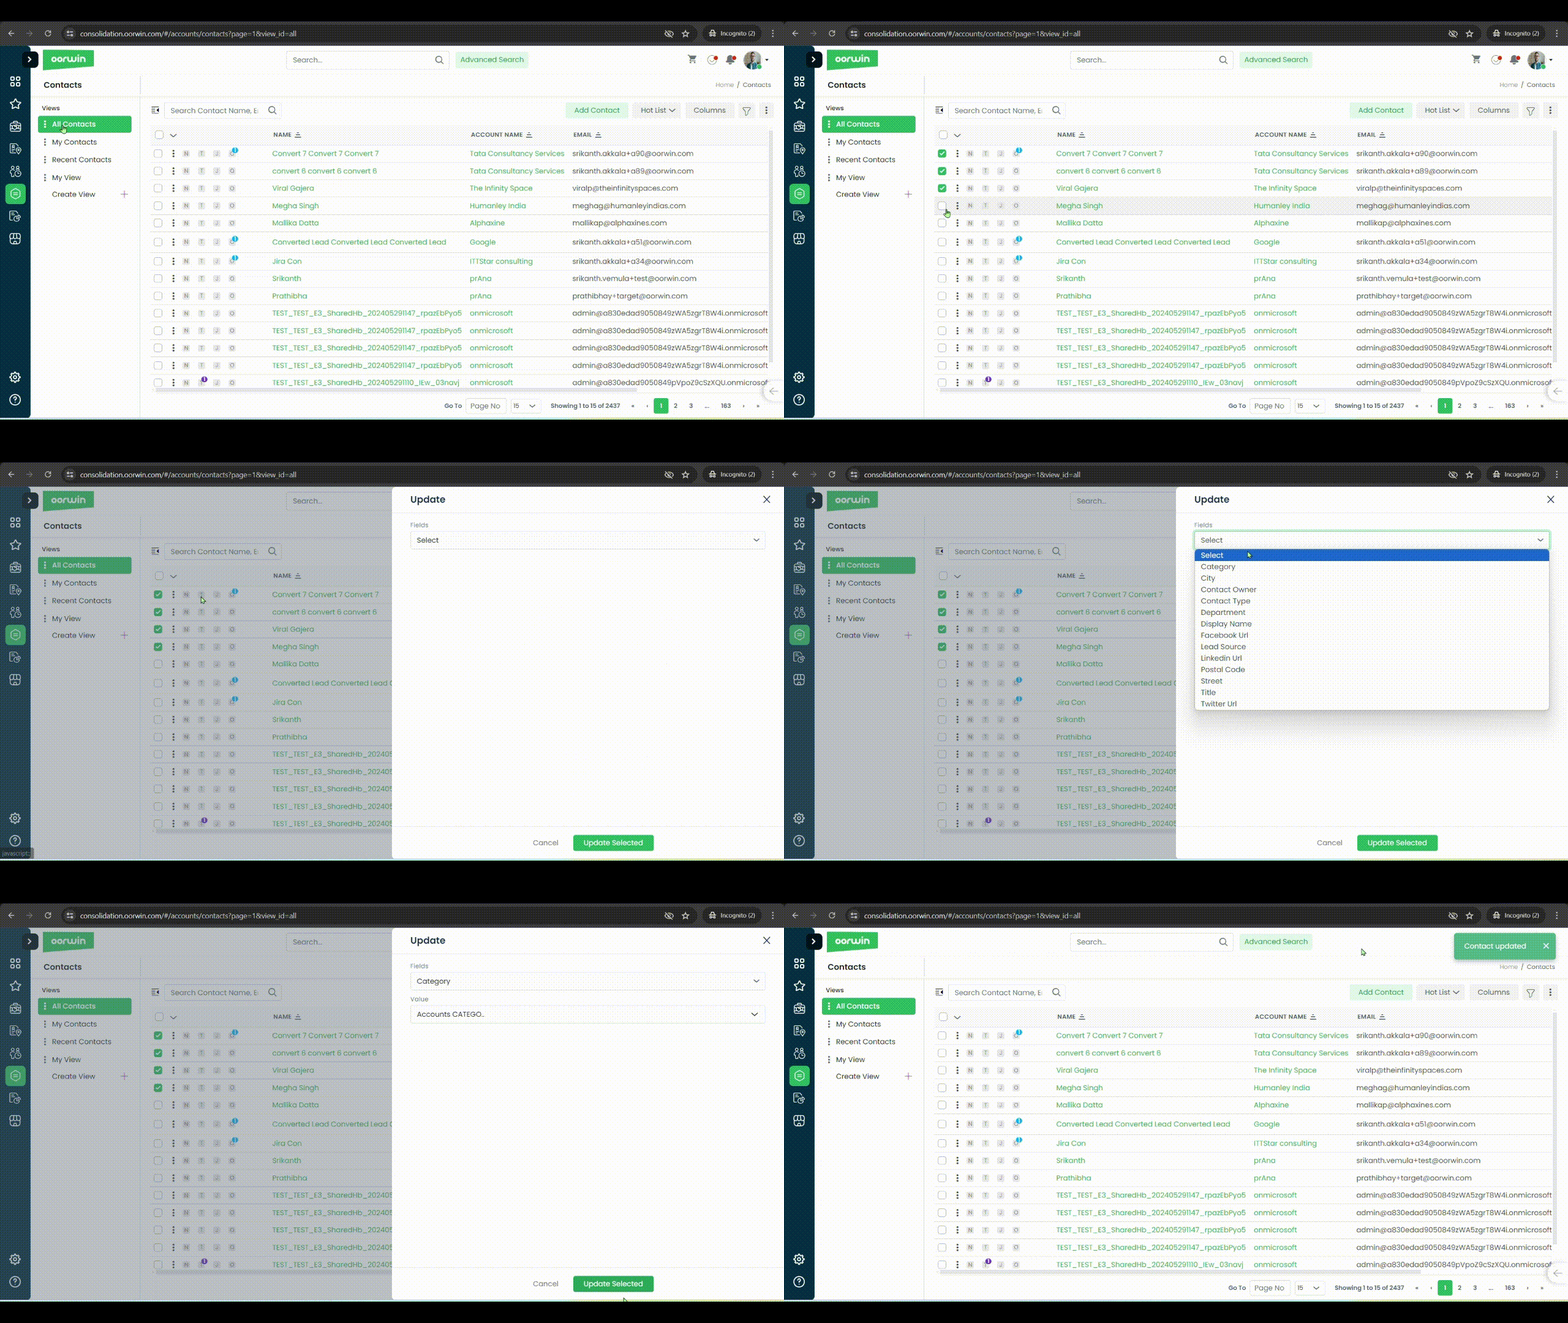
You can bulk update fields for different contacts with the same value and here is how you can do it
- Log in to your Oorwin Account and navigate to Contacts module from the left menu under General Section
- On the contacts listing page select any of the contacts by checking the check box to whom you wish to update the fields
- Click on bulk actions on the top and click on update fields option
- It opens a popup with a drop down to choose the field name to be updated
- Now enter the value field which needs to be updated in the above selected column
- Now click on update selected button below to update the field value in all the selected contacts
Was this article helpful?
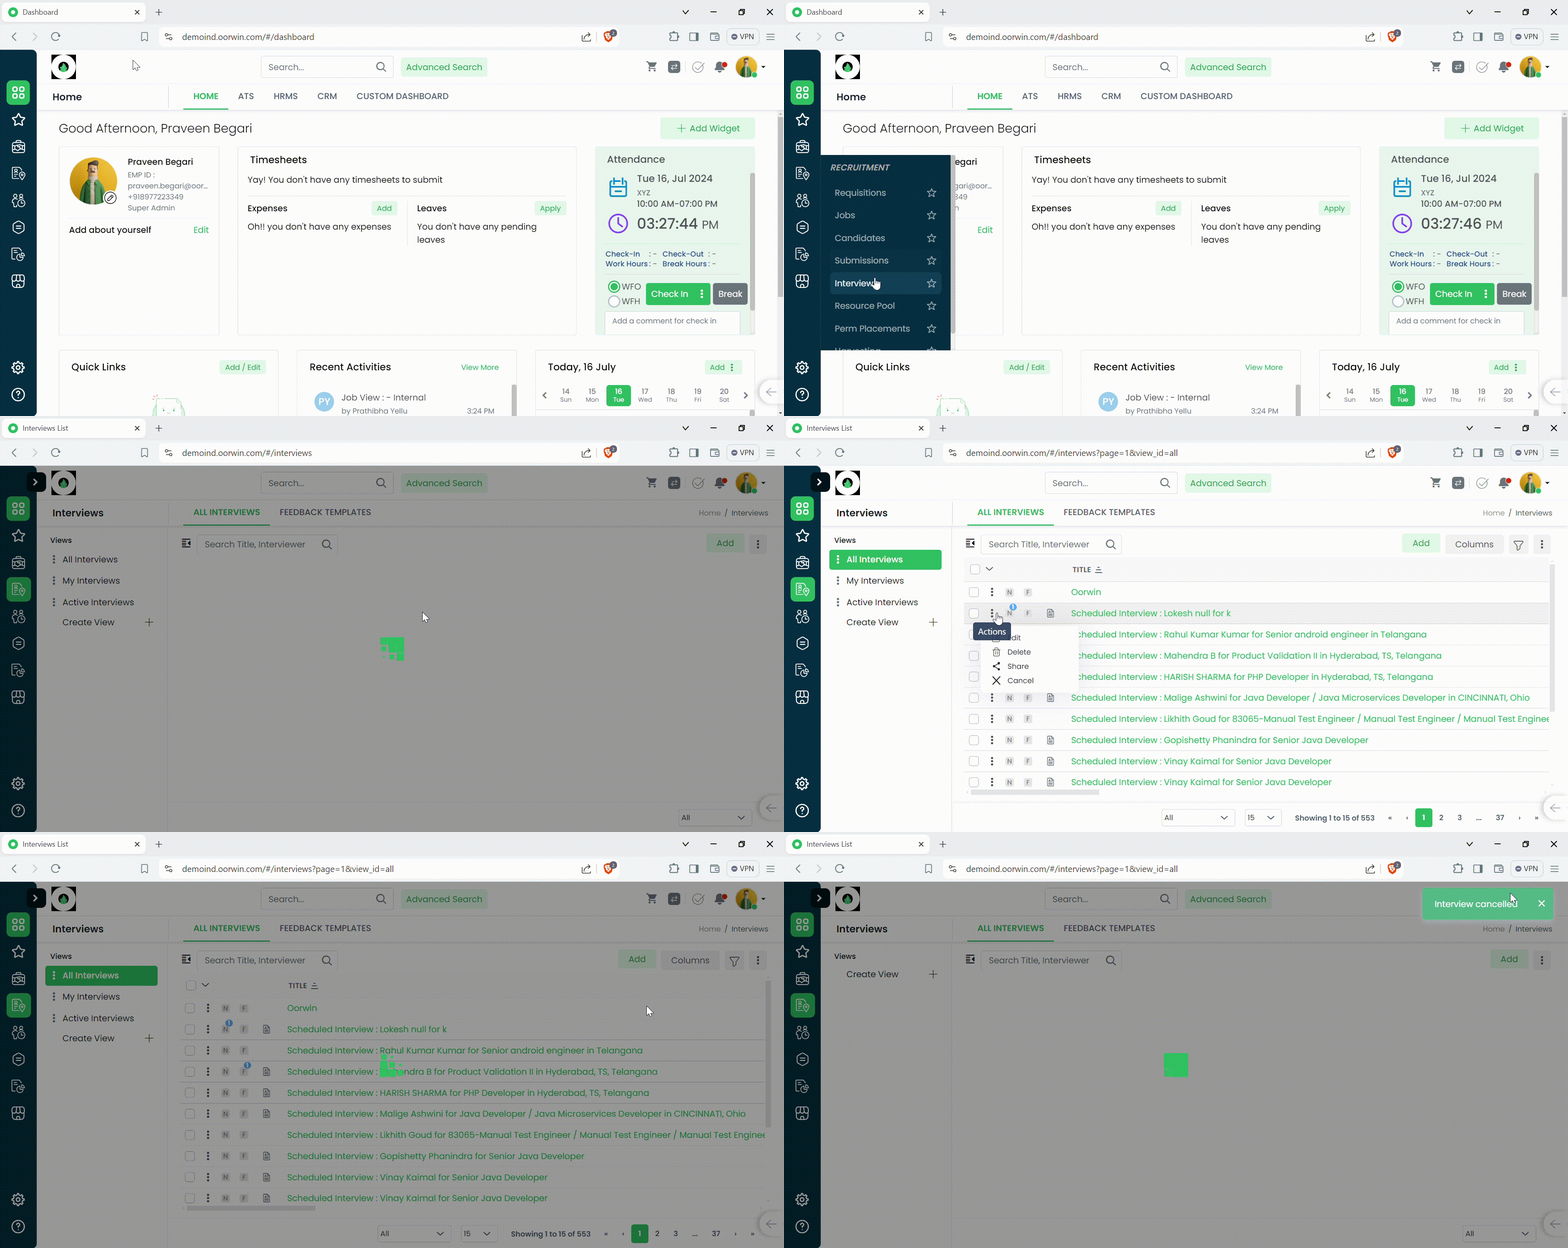
Here’s a guide on how to Cancel an Interview:
- Login to your “Oorwin account” and Navigate to “Interviews module” on the left menu under the “Recruitment” section.
- Click on the “3 dots/Actions” beside the Interview and from the drop down click on Cancel.
- From the pop-up on your screen select Yes to Cancel the Interview.
- The Scheduled Interview will be cancelled.
Was this article helpful?
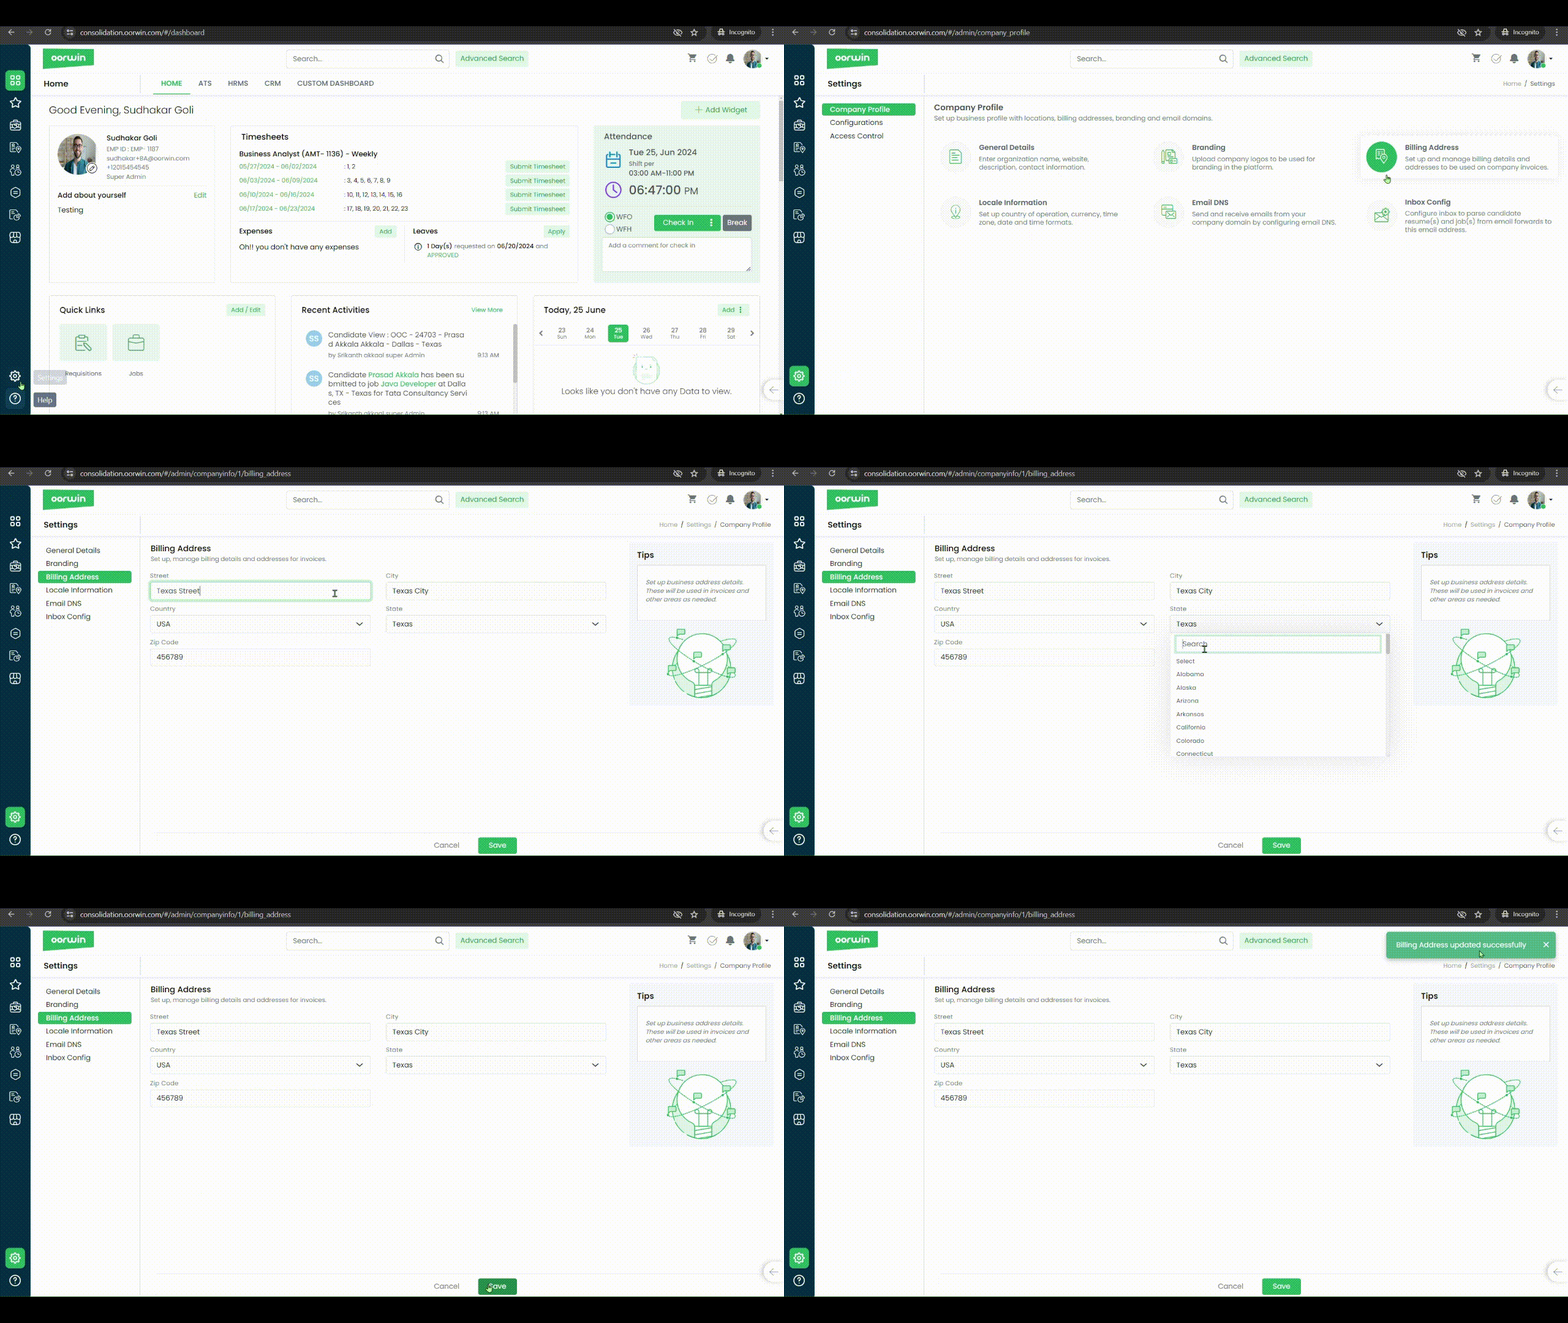
You can update the company billing address details from settings->company profile->billing address details section where these details will be used in invoices and other areas as needed.
Here is how you can do it:
- Log in to your Oorwin Account and navigate to settings page from the left bottom
- It opens the company profile page with multiple sections in it
- Click on Billing Address section under company profile page
- Enter or update the details of billing adress like city,state,country,zipcode,etc
- Now click on save on the bottom and your company address details were updated in the system
Was this article helpful?
Here’s a guide on how to Compose Mail from Submission record page:
- Login to your “Oorwin account” and Navigate to “Submissions module” on the left menu under the “Recruitment” section.
- Click on the Submission ID to open the Submission record.
- Click on the Compose Mail Icon on the top right side of the page.
- Select the Template and Enter the receivers Email address.
- Please check the email content and update if needed and add attachments if required.
- Click on Send button on the bottom of your screen to share the Email.
Was this article helpful?
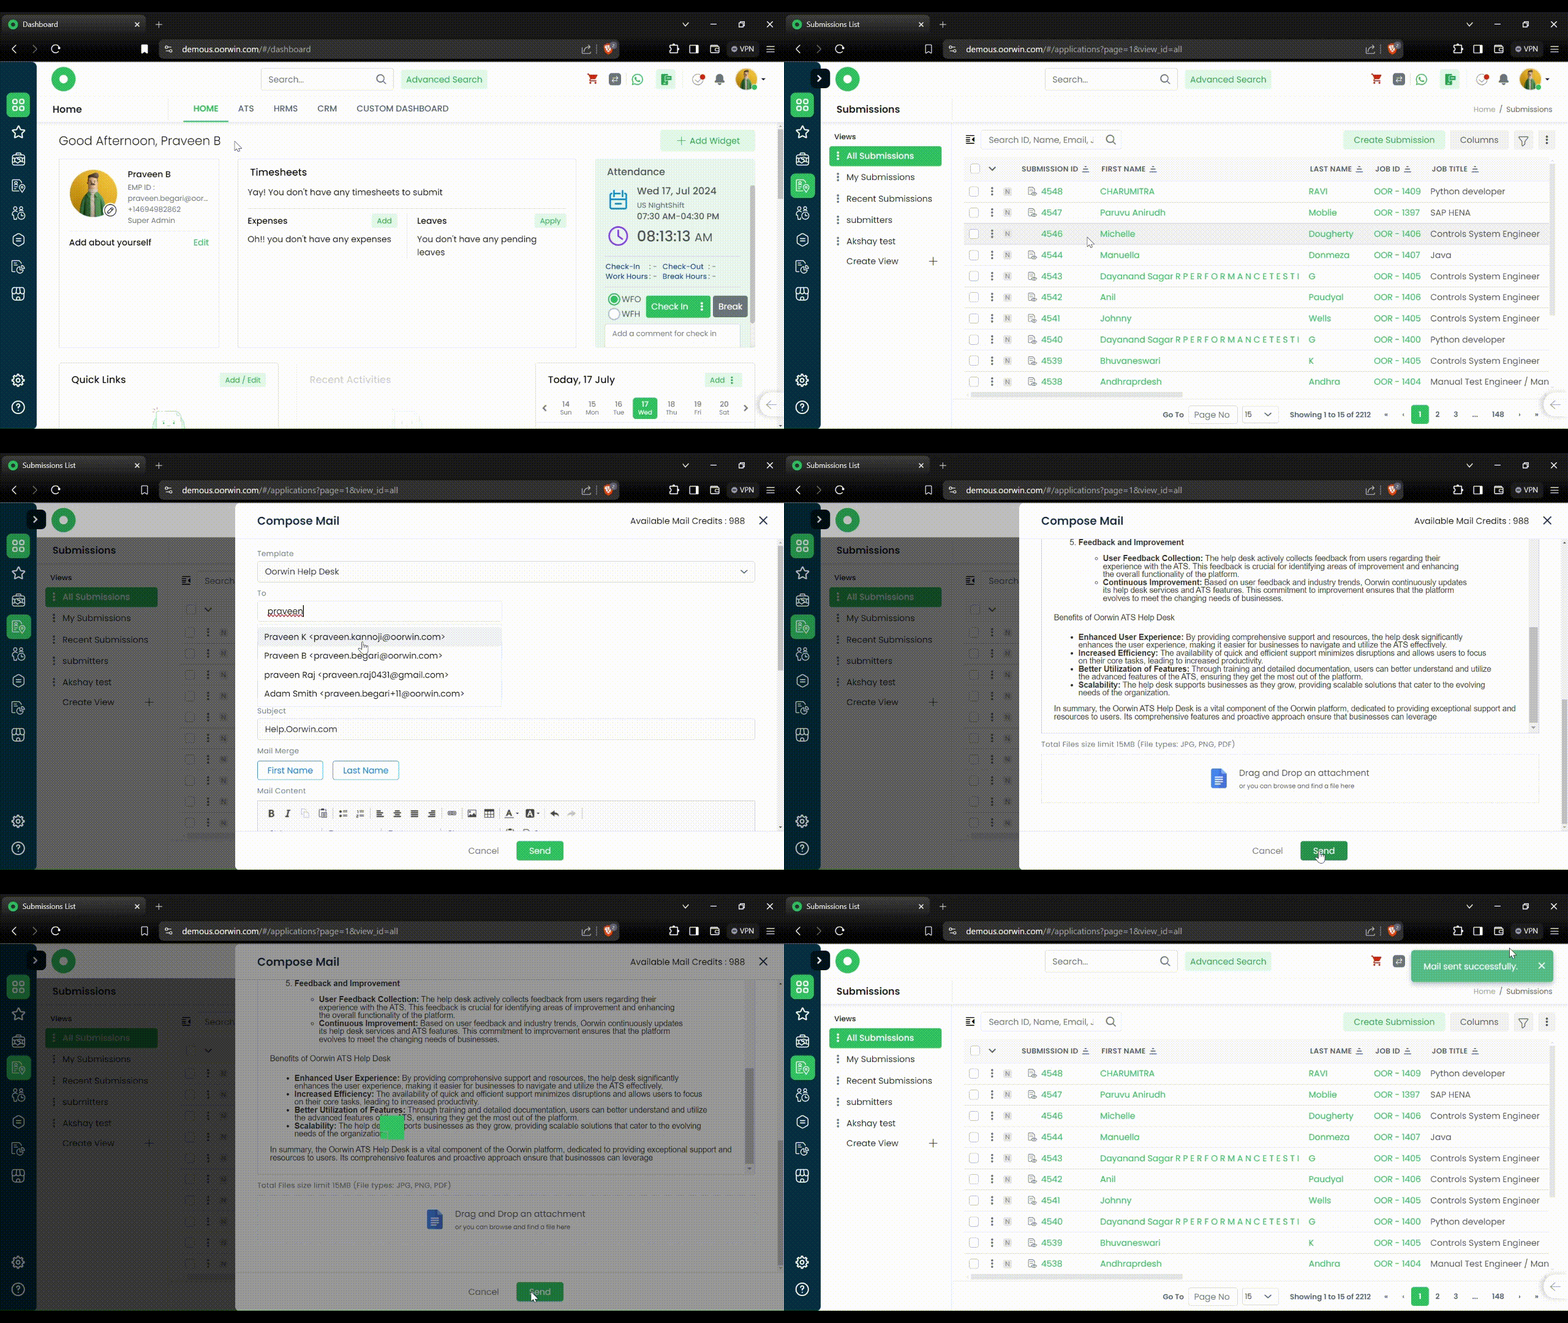
Here’s a guide on how to Compose Mail from Submissions:
- Login to your “Oorwin account” and Navigate to “Submissions module” on the left menu under the “Recruitment” section.
- Click on the “3 dots/Actions” beside the submission ID and from the drop down click on Compose Mail.
- It’ll redirect you to an Email Template.
- Select the Template and Enter the receivers Email address.
- Please check the email content and update if needed and add attachments if required.
- Click on Send button on the bottom of your screen to share the Email.
Was this article helpful?
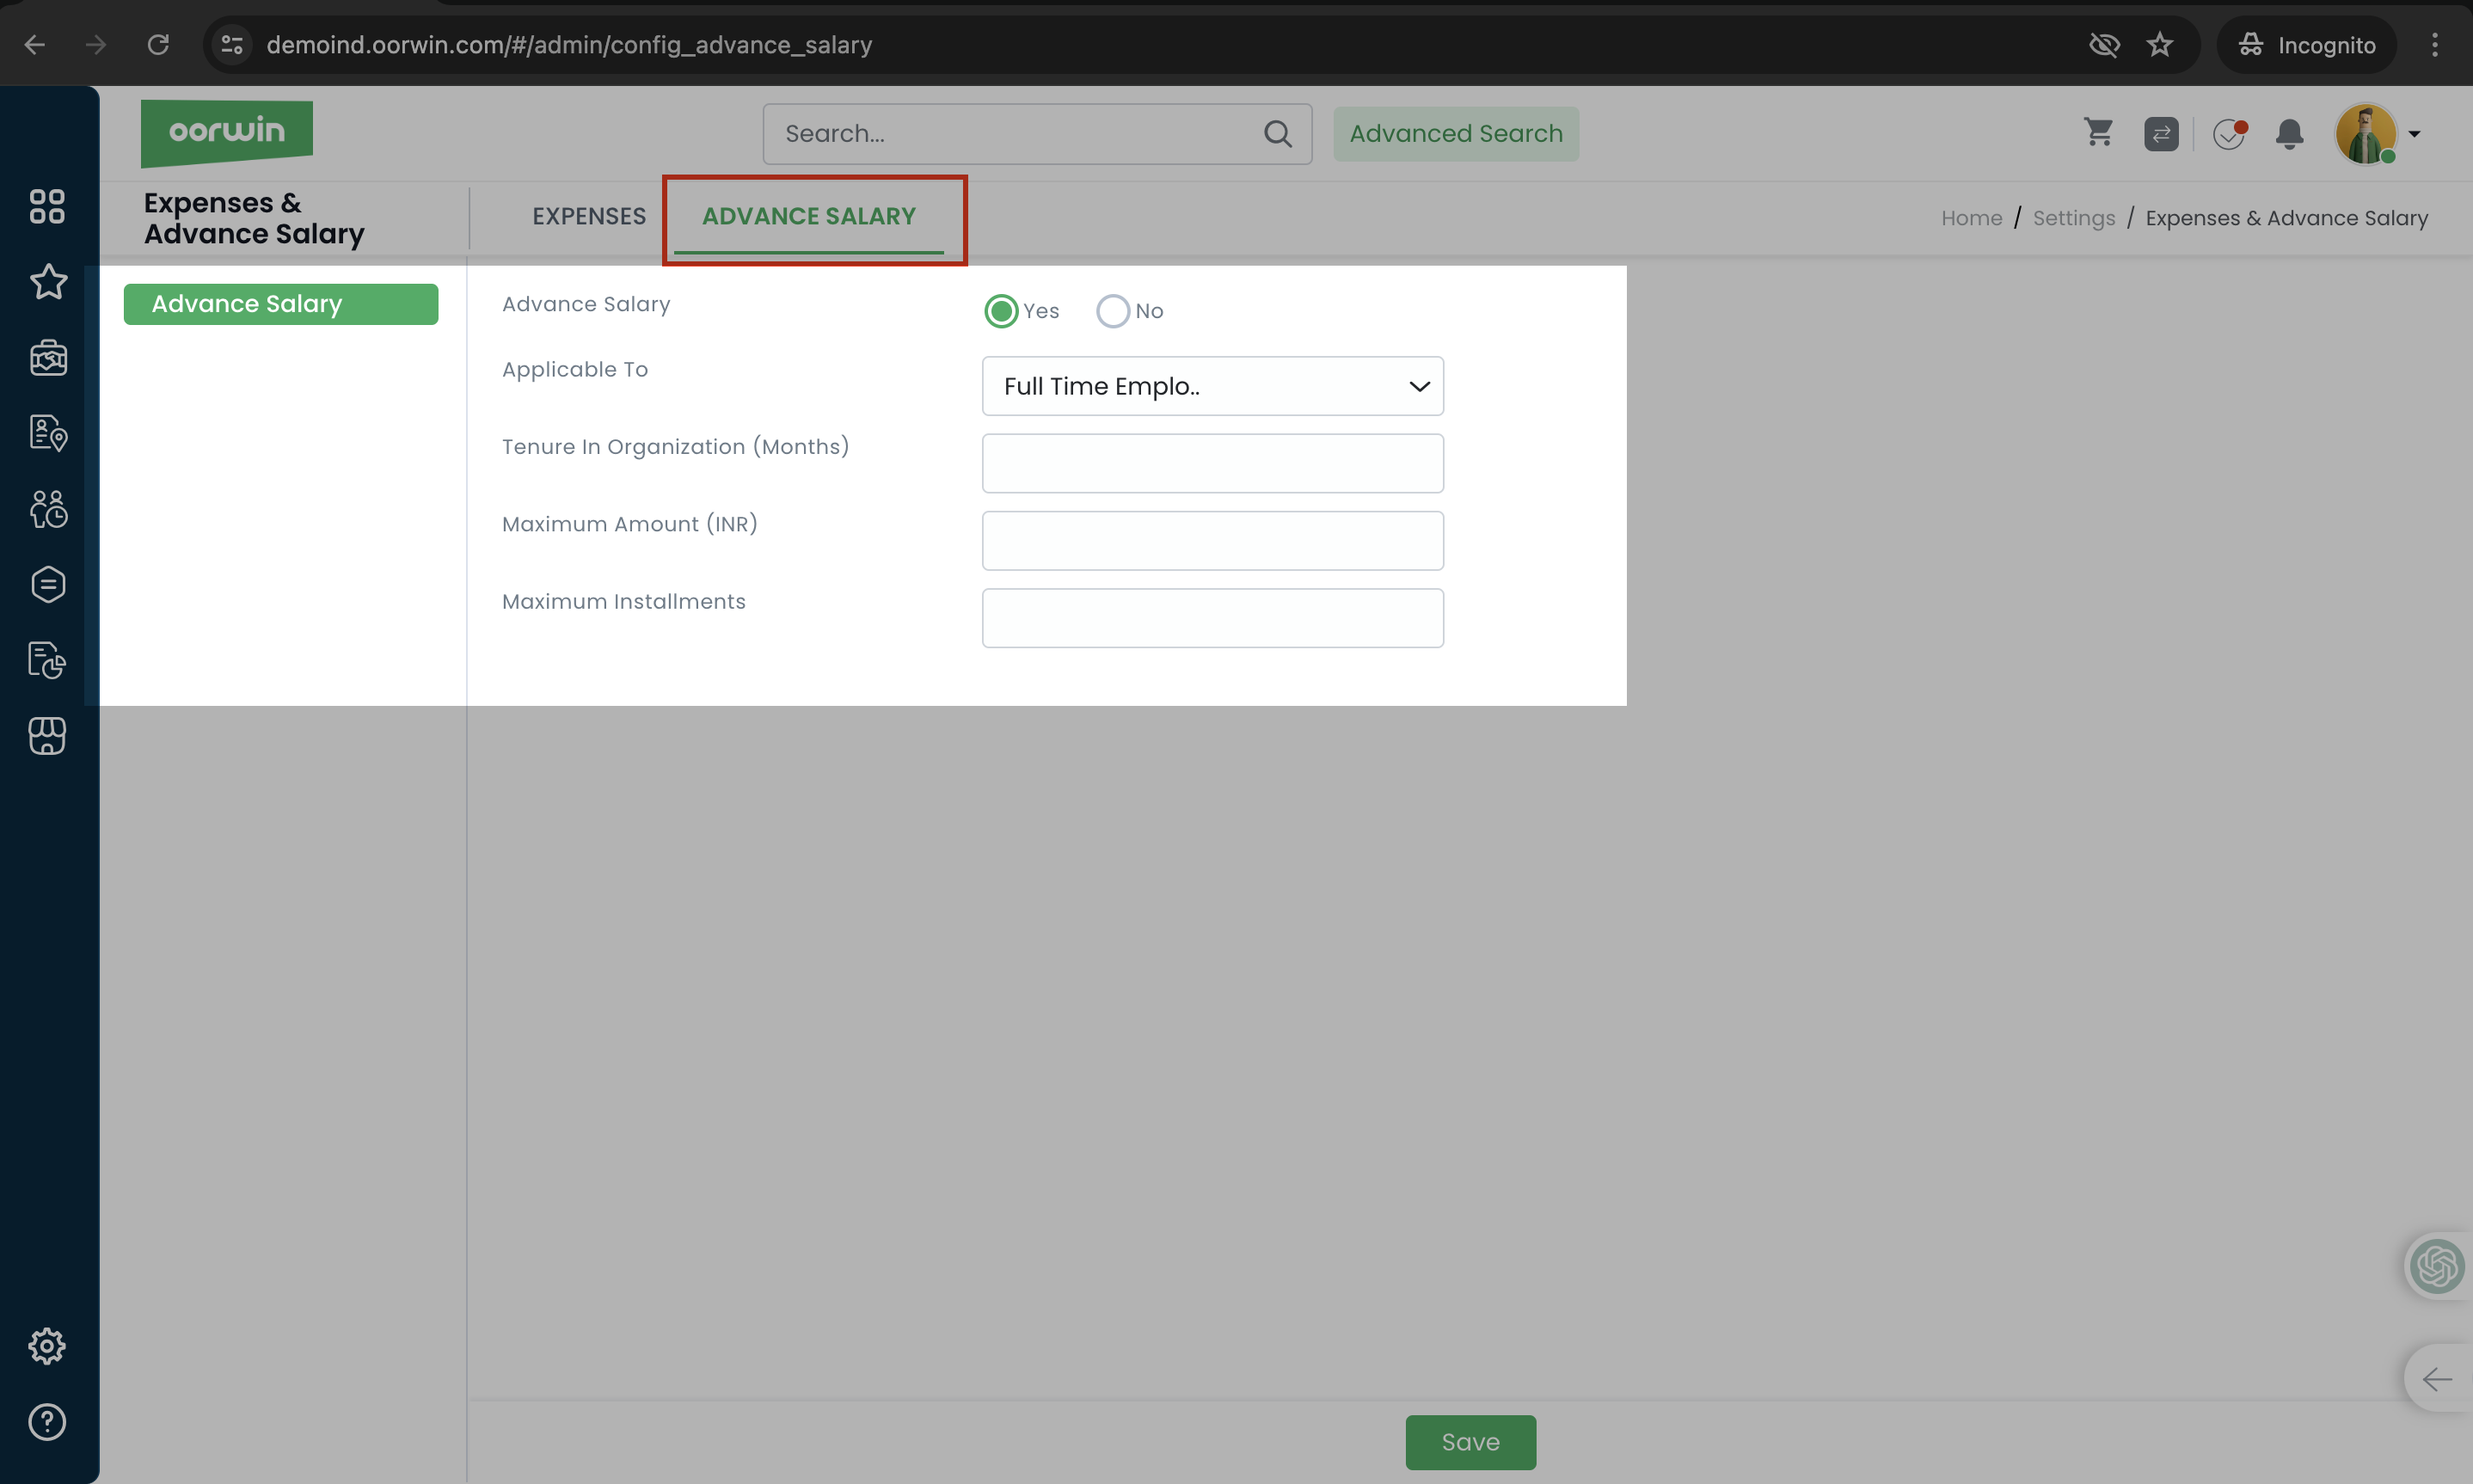
Oorwin Admin can configure advance salary requirements on whom to provide advance salary and how maximum amount that can be released and can configure the maximum installments
Follow below steps to configure the advance salary settings
- Log in to your Oorwin Account and navigate to settings page from the left bottom
- Go to Configurations on the left menu and click on Expense & Advance Salary section
- Now go to advance salary section on the top and select the advance salary can be provided or not by clicking on Yes or NO
- Upon clicking on Yes, it will enable the fields like applicable type of employment, tenure, max amount etc
- Select the employment type from the drop down to whom advance salaries will be processed and enter the tenure of the employment in days
- Now enter the maximum amount and max installments and click on save below
- This will save the configuration and check these criteria when the user tries to provide advance salary to the employees
Was this article helpful?
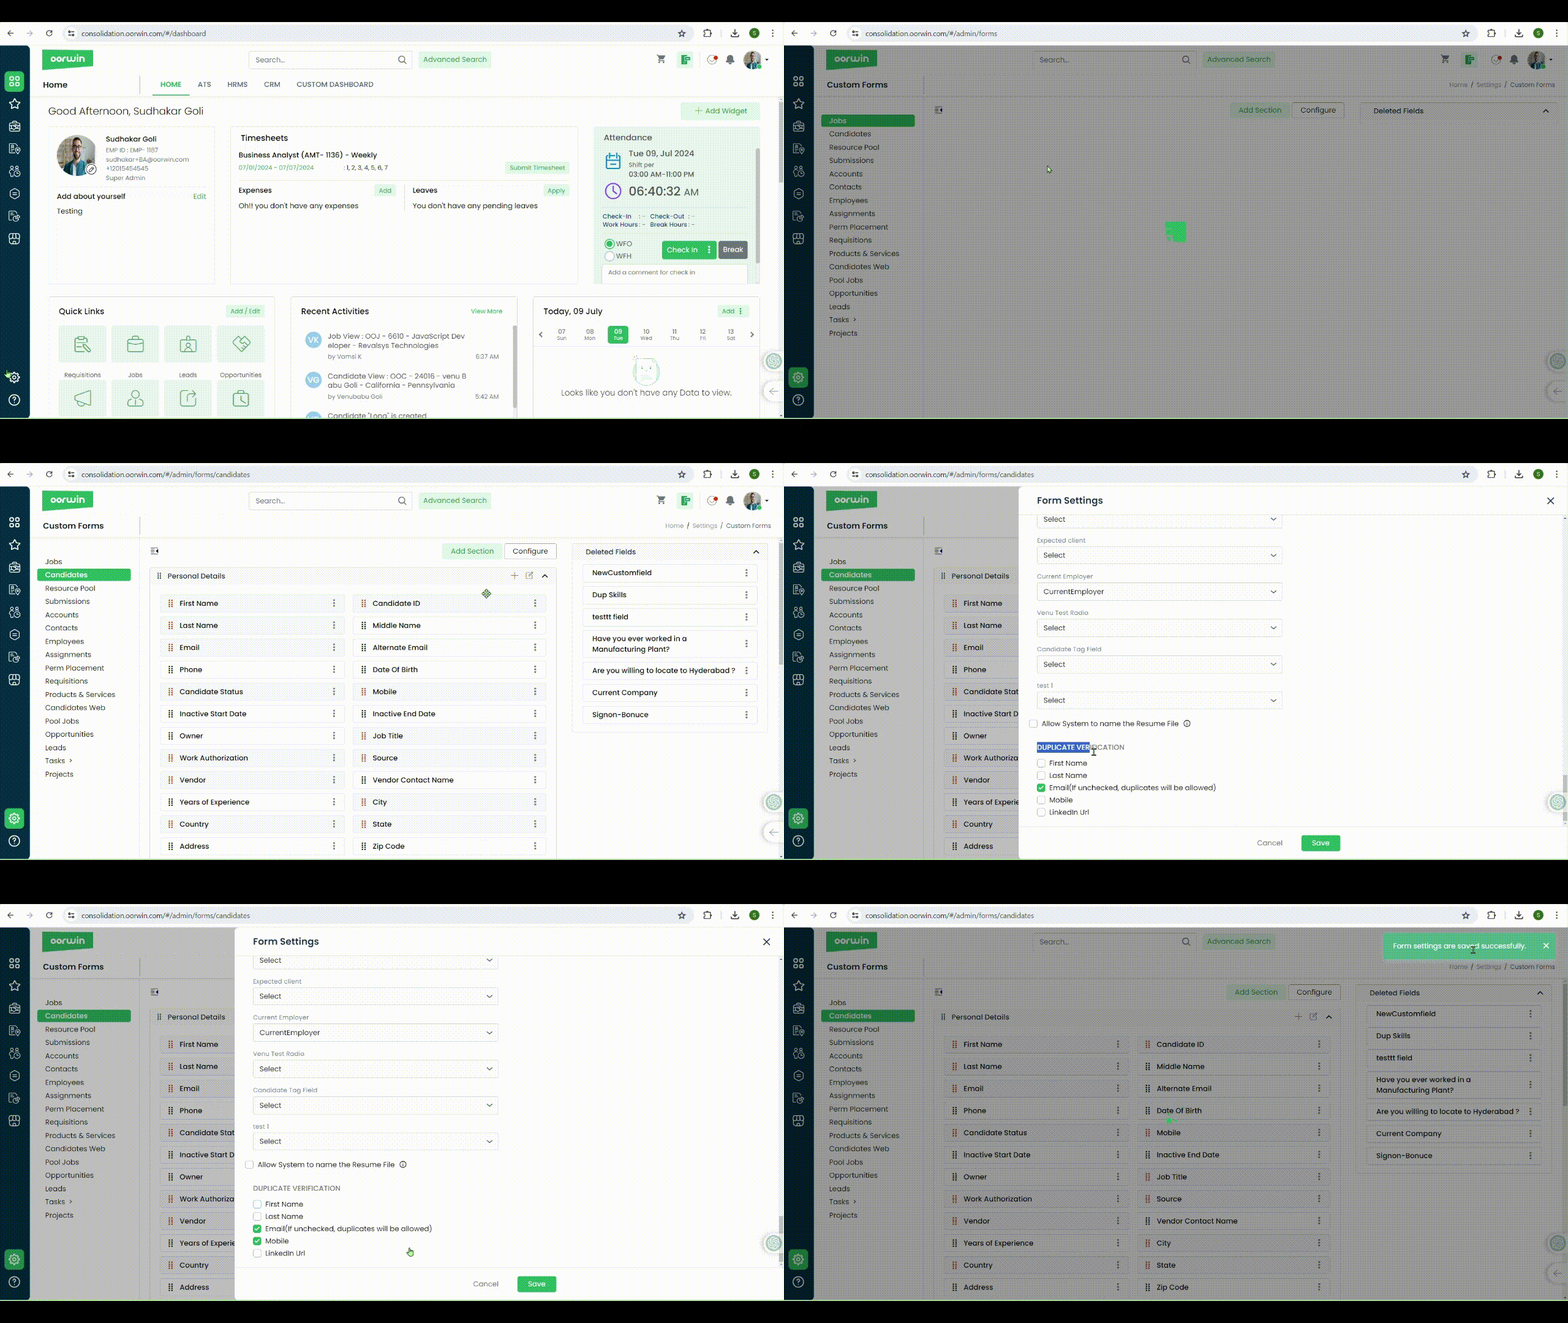
Custom forms allows you to customize all your module forms based on your business needs. Here you can also customize the configuration of duplication check of the candidates/resource pool with different criteria
Here is how you can do it:
- Log in to your Oorwin Account and navigate to settings page from the left bottom
- Go to Configurations on the left menu which opens multiple sections in it
- Click on Custom Forms section under configurations page
- It opens all the modules on the left pane which opens the module specific form on the right pane upon clicking on it
- Click on candidates/resource pool module that you wanted to configure the duplication
- Click on configure button on the top header which helps you to configure the fields while parsing the resumes
- Now scroll down and check for the Duplicate Verification section
- You can select the criteria based on the name, email, mobile etc. If multiple selected, then system will consider it as AND condition and check for both the values
- Now click on Save button on the bottom which will save the configuration
- Based on this setting system will check for the duplicate record and will give you the validation while saving it
Was this article helpful?
You can configure the default greeting text for the job shares and hotlist share emails which reduces you to enter every time you share these emails.System will automatically fetch this text on the top while you start click on share option
Here is how you can create default greeting text
- Log in to your Oorwin Account and navigate to settings page from the left bottom
- Go to Configurations on the left menu and click on Default Settings module
- Now go to Greeting Text on the left menu which opens both hotlist and job share greeting text content
- You can create the new greeting text content or change the existing content on both hotlist and job share editors
- There also an option to make this text as default for all user by clicking the radio button “Restrict/Freeze the configuration” or enable the user to create their own greeting text by enabling the radio button “Allow users to configure“
- User can also configure the recipient name by clicking on the mail merge options of first name & last name which will fetch the recipient name on these fields when you send these emails
- Now click on Save button which will save the configuration and from next time onwards this greeting text will automatically fetch while sending the hotlist and job share emails

Was this article helpful?
- Connecting your Gmail Account to Oorwin will have number of benifits like sending mails from your email account directly, Tracking the communications done with the Candidates, Contacts etc.
- In this blog, lets see how we can connect Gmail Account to Oorwin
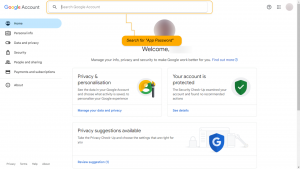
- Go to your “Google account” or click here
- Locate “Search” bar and start entering “App Passwords”
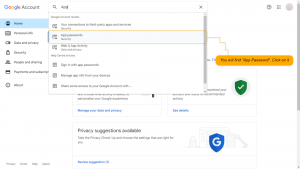
- You will find “App Passwords”
- Click on the option
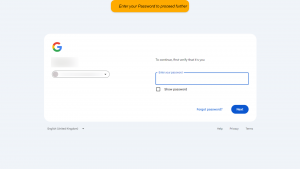
- Enter you Gmail Account Password and click on “Next”
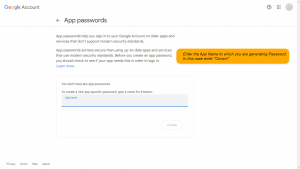
- You will be redirected to the page shown above
- Enter “Oorwin” in “App Name” field. If you already used “Oorwin” try using any other App name
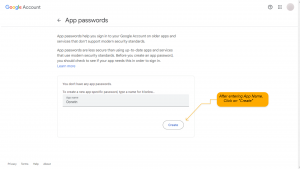
- Once you enter the App Name, Click on “Create” button
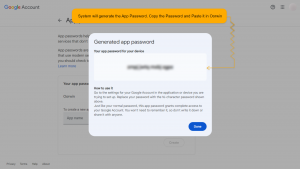
- Google will provide “App Password”. Copy the “App Password”
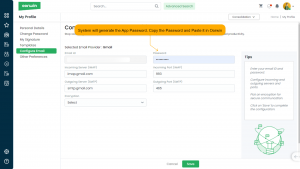
- In Oorwin, Enter the generated App password in “Password” field
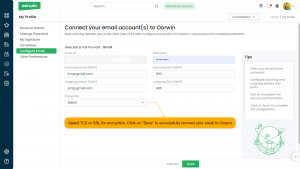
- Select the encryption “TLS” or “SSL” and click on “Save”, your Gmail Account will be connected to Oorwin
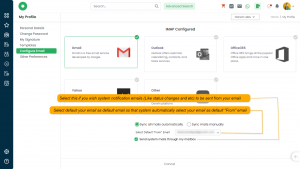
- If you wish your email should be selected by default as “From”, while sending mails from Oorwin, then select your configured email address in “Select Default “From” Email”
- If you wish to send system notification mails (Like Pipeline status changes you made) to be made by you, then select “Send System Mails through my mail box”
Was this article helpful?
Linking your Outlook account with Oorwin offers several advantages such as sending emails directly from your email account and tracking communications with candidates, contacts, and more.
Here’s a guide on how to Configure Outlook to Oorwin :
- Login to your “Oorwin account” and click on the display picture on the top right corner.
- From the drop down select “My Profile & Preferences“.
- Select “Configure Email” on the left-hand side and Click on Proceed button on the bottom of your screen.
- Select Outlook from the available options and Proceed.
- In the Configuration type Select “Oauth” from the drop down.
- A pop-up will come on your screen asking you to Sync your email, Select Yes.
- Enter your login credentials and Sync your Outlook.
- Thats it your email will be Configured to Oorwin.
Was this article helpful?
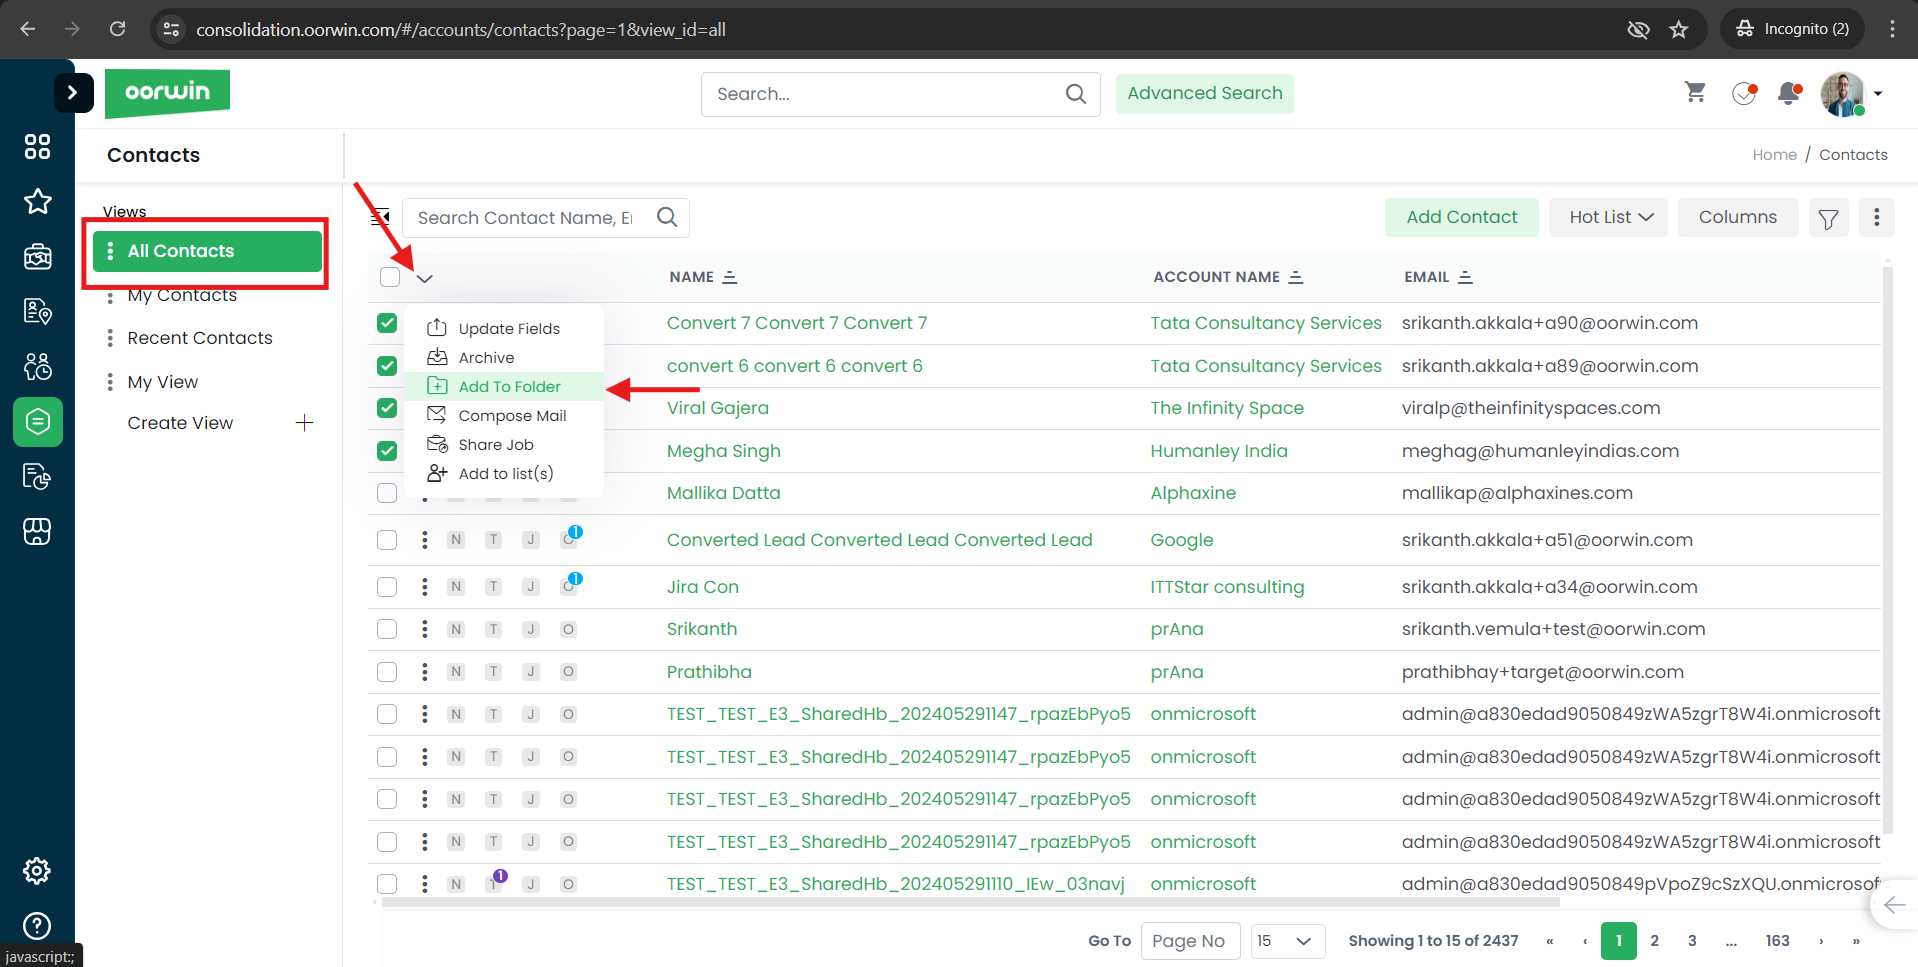
You can create a folder and add similar contacts to that folder for easy navigation and identification. User can set the created folder as default view also
Below are the steps to add a folder and create a custom view
- Log in to your Oorwin Account and navigate to Contacts module from the left menu under General Section
- On the contacts listing page select any of the contacts by checking the check box
- Click on bulk actions on the top and click on add to folder option
- Click on “+” icon to create a new folder or select the existing folder to add these contacts to the existing one
- Now click on Save button, Thats it!you have cretaed a new folder with multiple contacts in it
- You can also make this folder as default by clicking on three dots->set as default option
Was this article helpful?
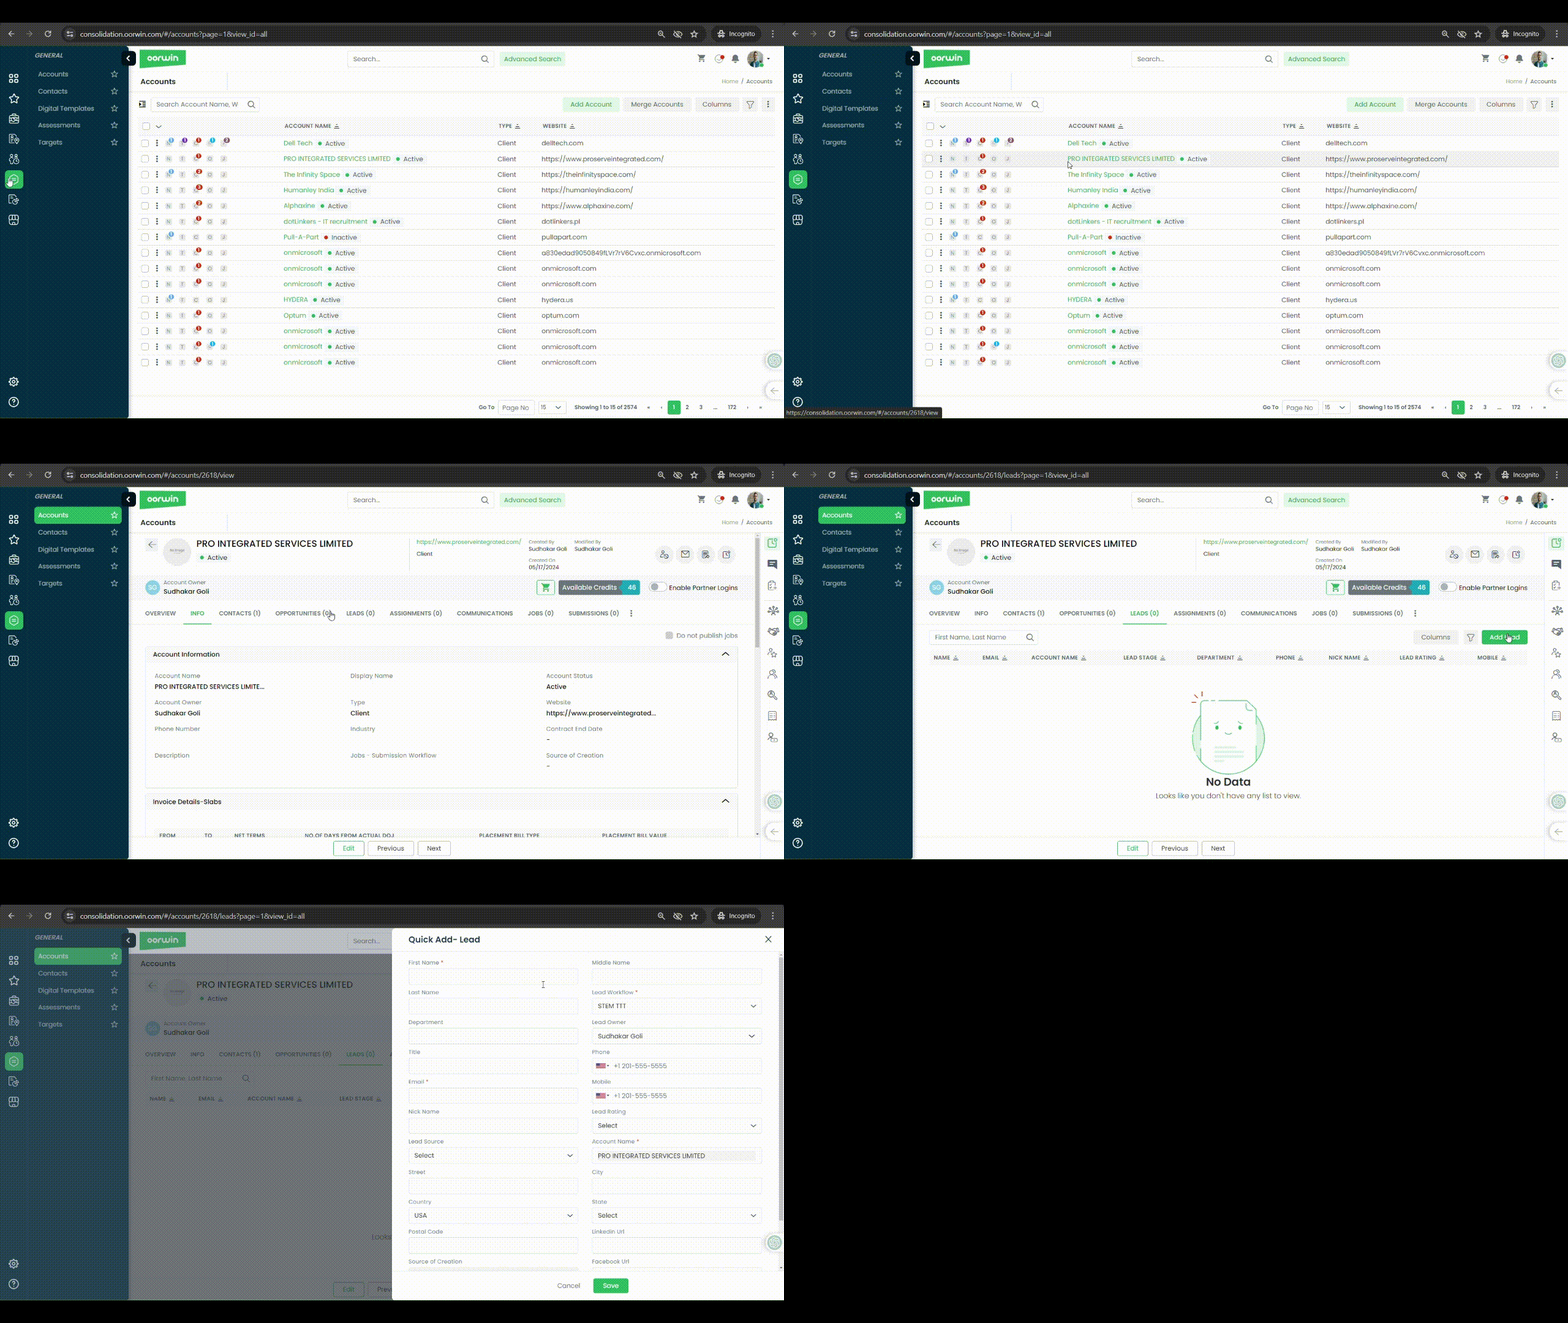
User can create a lead from account page which will be tagged to that particular account.
To do this action you need to have add lead permission enabled for your role from the Settings->Role security
Please follow the below steps to create a lead from account view page
- Log in to your Oorwin Account and navigate to Accounts module from the left menu under General Section
- Click on any account name to whom you wanted to create a new lead
- Click on Leads tab on the top header which shows all the leads tagged to that account
- Click on Add Lead button on the top right corner
- Fill all the mandatory information and click on Save button
- Thats it! Your Lead has been created and tagged to the particular account
Was this article helpful?
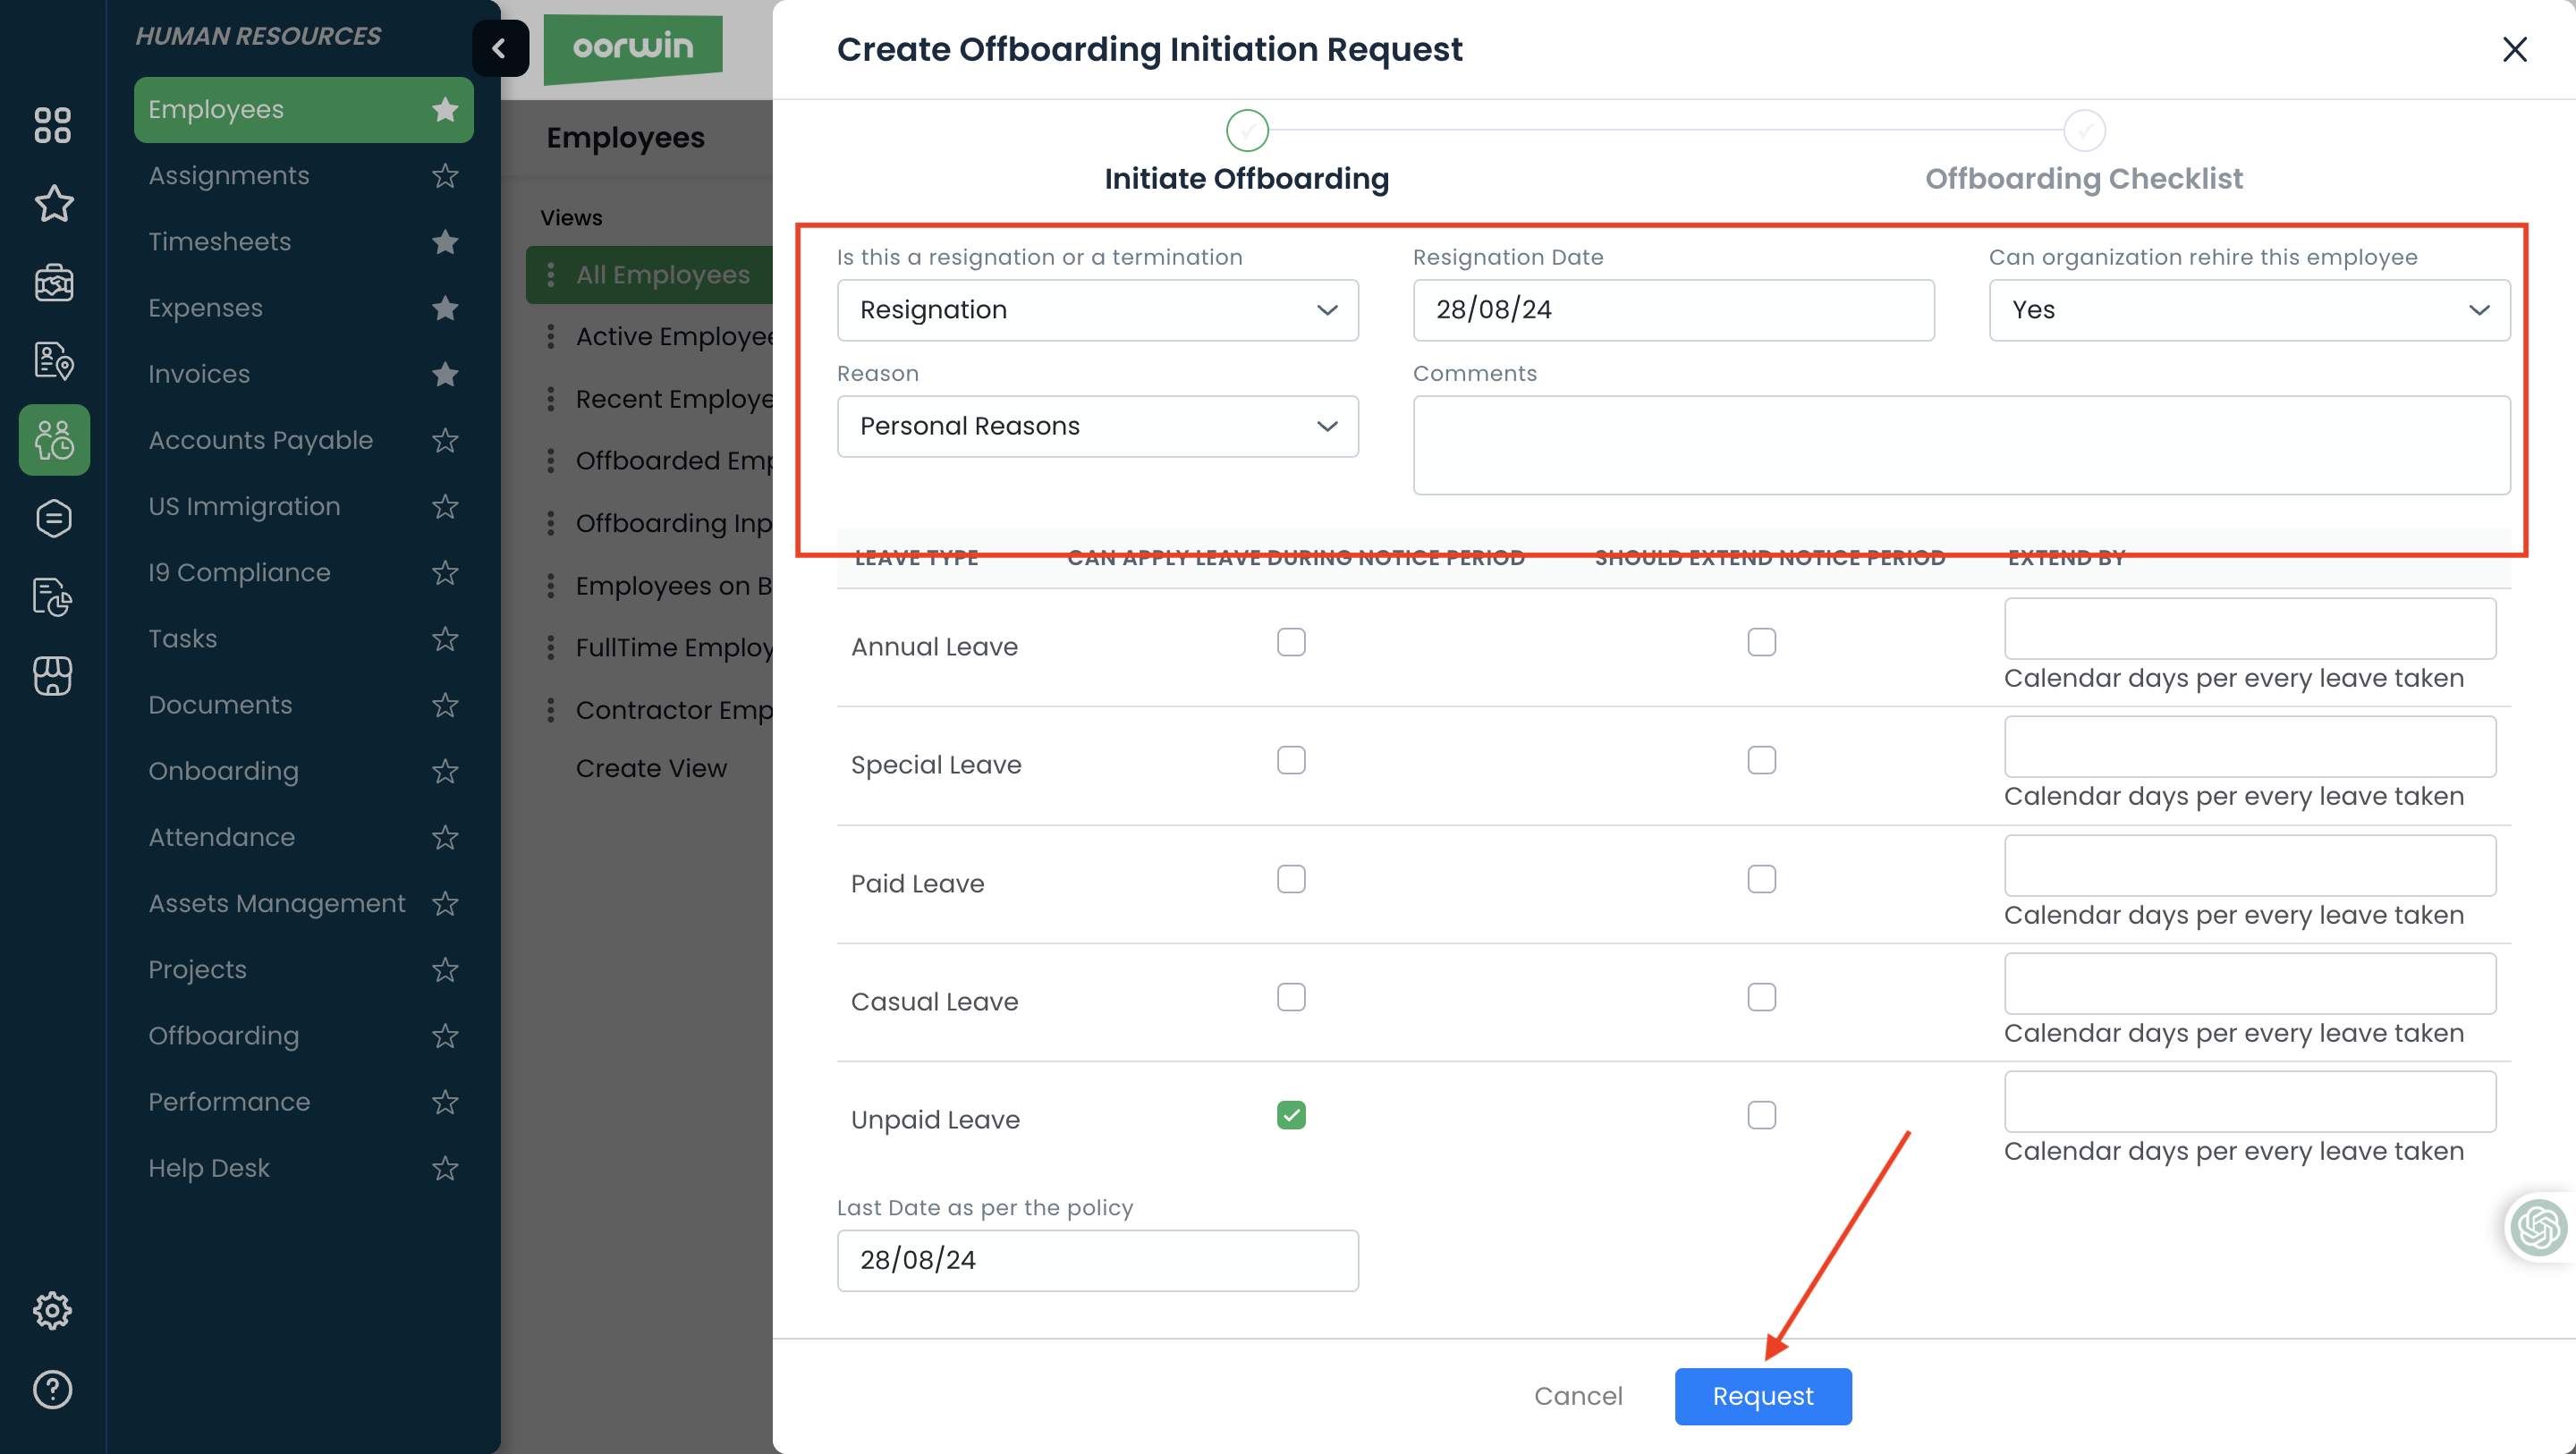
Initiate off boarding from employee module involves following steps
- Log in to your Oorwin Account and navigate to Employees module from the left menu under HRMS Section
- Click on “Actions(three dots)” icon for the employee you wish to update.
- Click on Edit link from the list (You need to have employee edit access to have this link)
- Select the type “Is this a resignation or Termination”
- Resignation: When Resignation is selected, Select Resignation date, Can Organization rehire, Comments and Last date per the policy.
- Termination: When Termination is selected, Can Organization rehire, Reasons, Comments and Last date per the policy.
- Enter all other details like can he apply the leave, last date of the employment etc and click on Request
Was this article helpful?
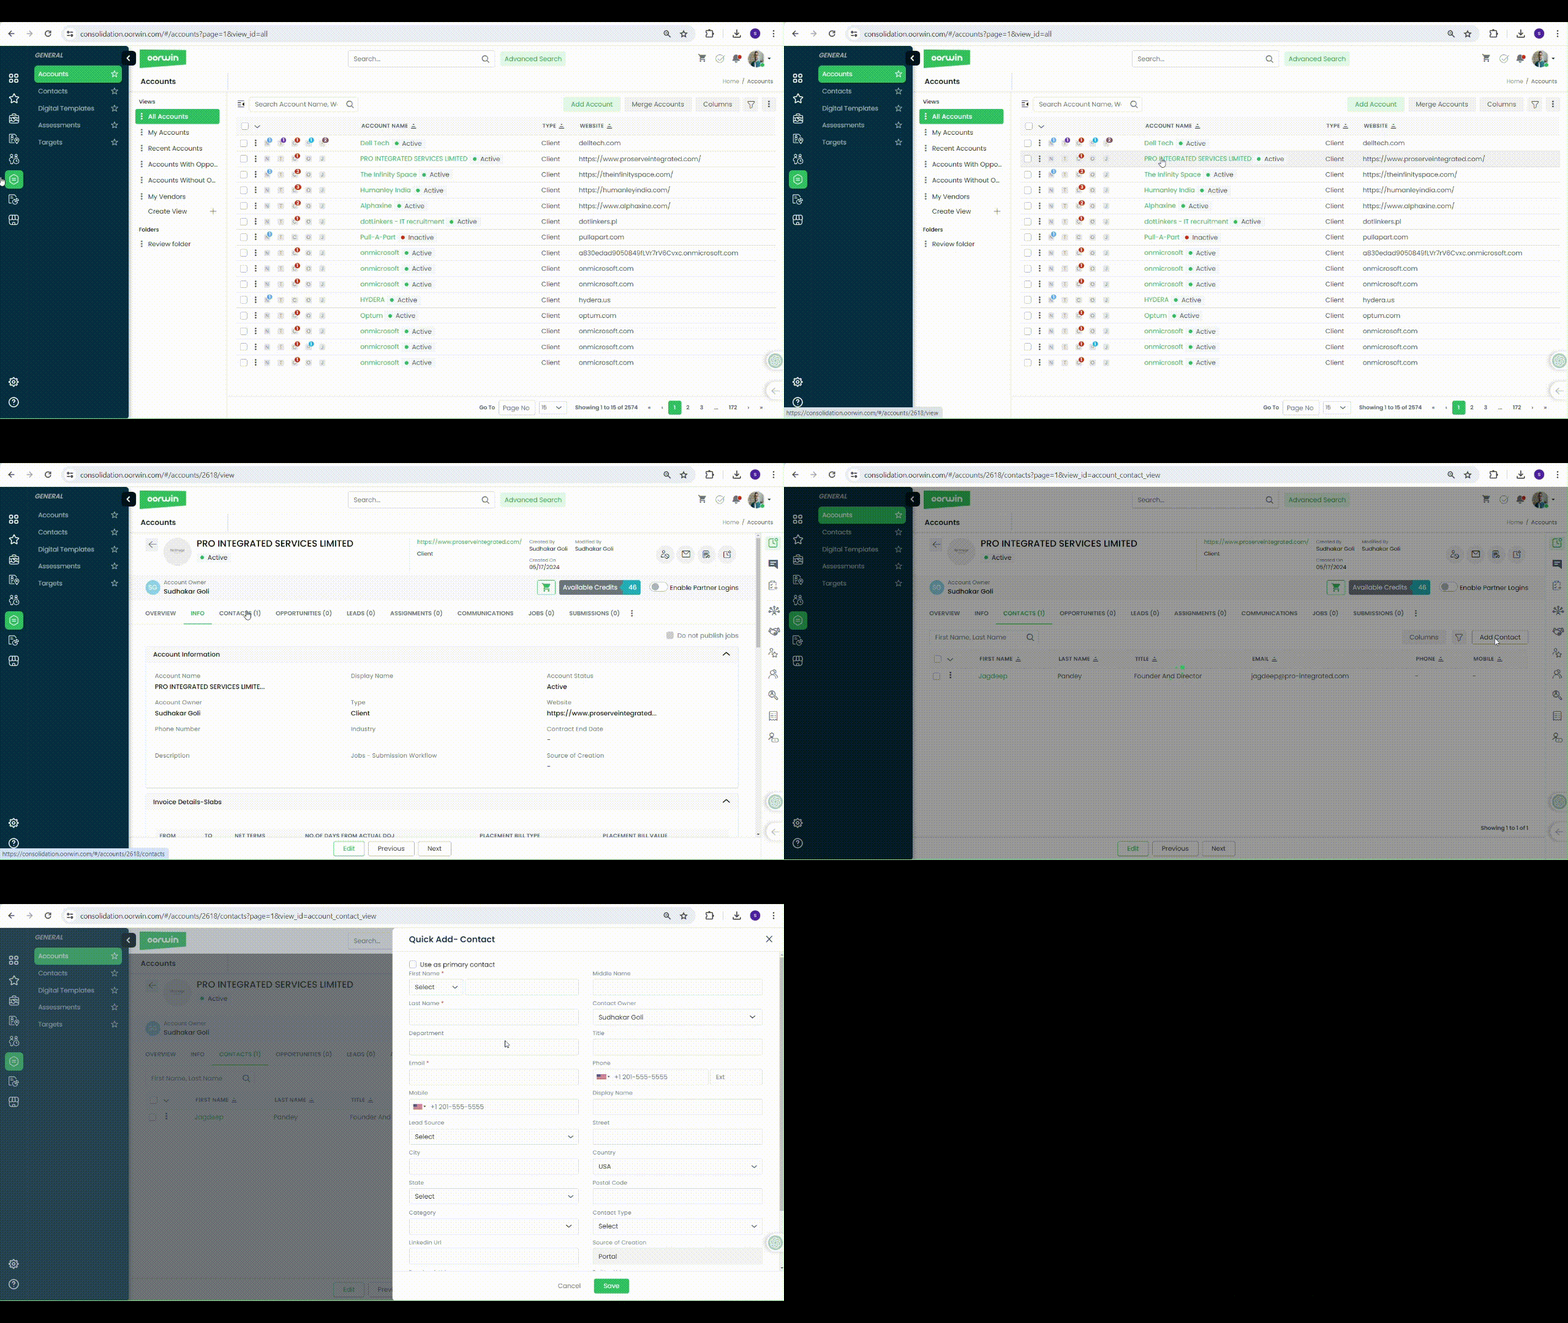
If you want to add a contact tagged to a particular account, then yoou can do it from the account view page which will tag to the same account.
To do this action you need to have add contact permission enabled for your role from the Settings->Role security
Please follow the below steps to create a contact from account view page
- Log in to your Oorwin Account and navigate to Accounts module from the left menu under General Section
- Click on any account name to whom you wanted to create a new conatct
- Click on contacts tab on the top header which shows all the contacts available to that account
- Click on Add Contact button on the top right corner
- Fill all the mandatory information and click on Save button
- Thats it! Your contact has been created and tagged to the particular account
Was this article helpful?
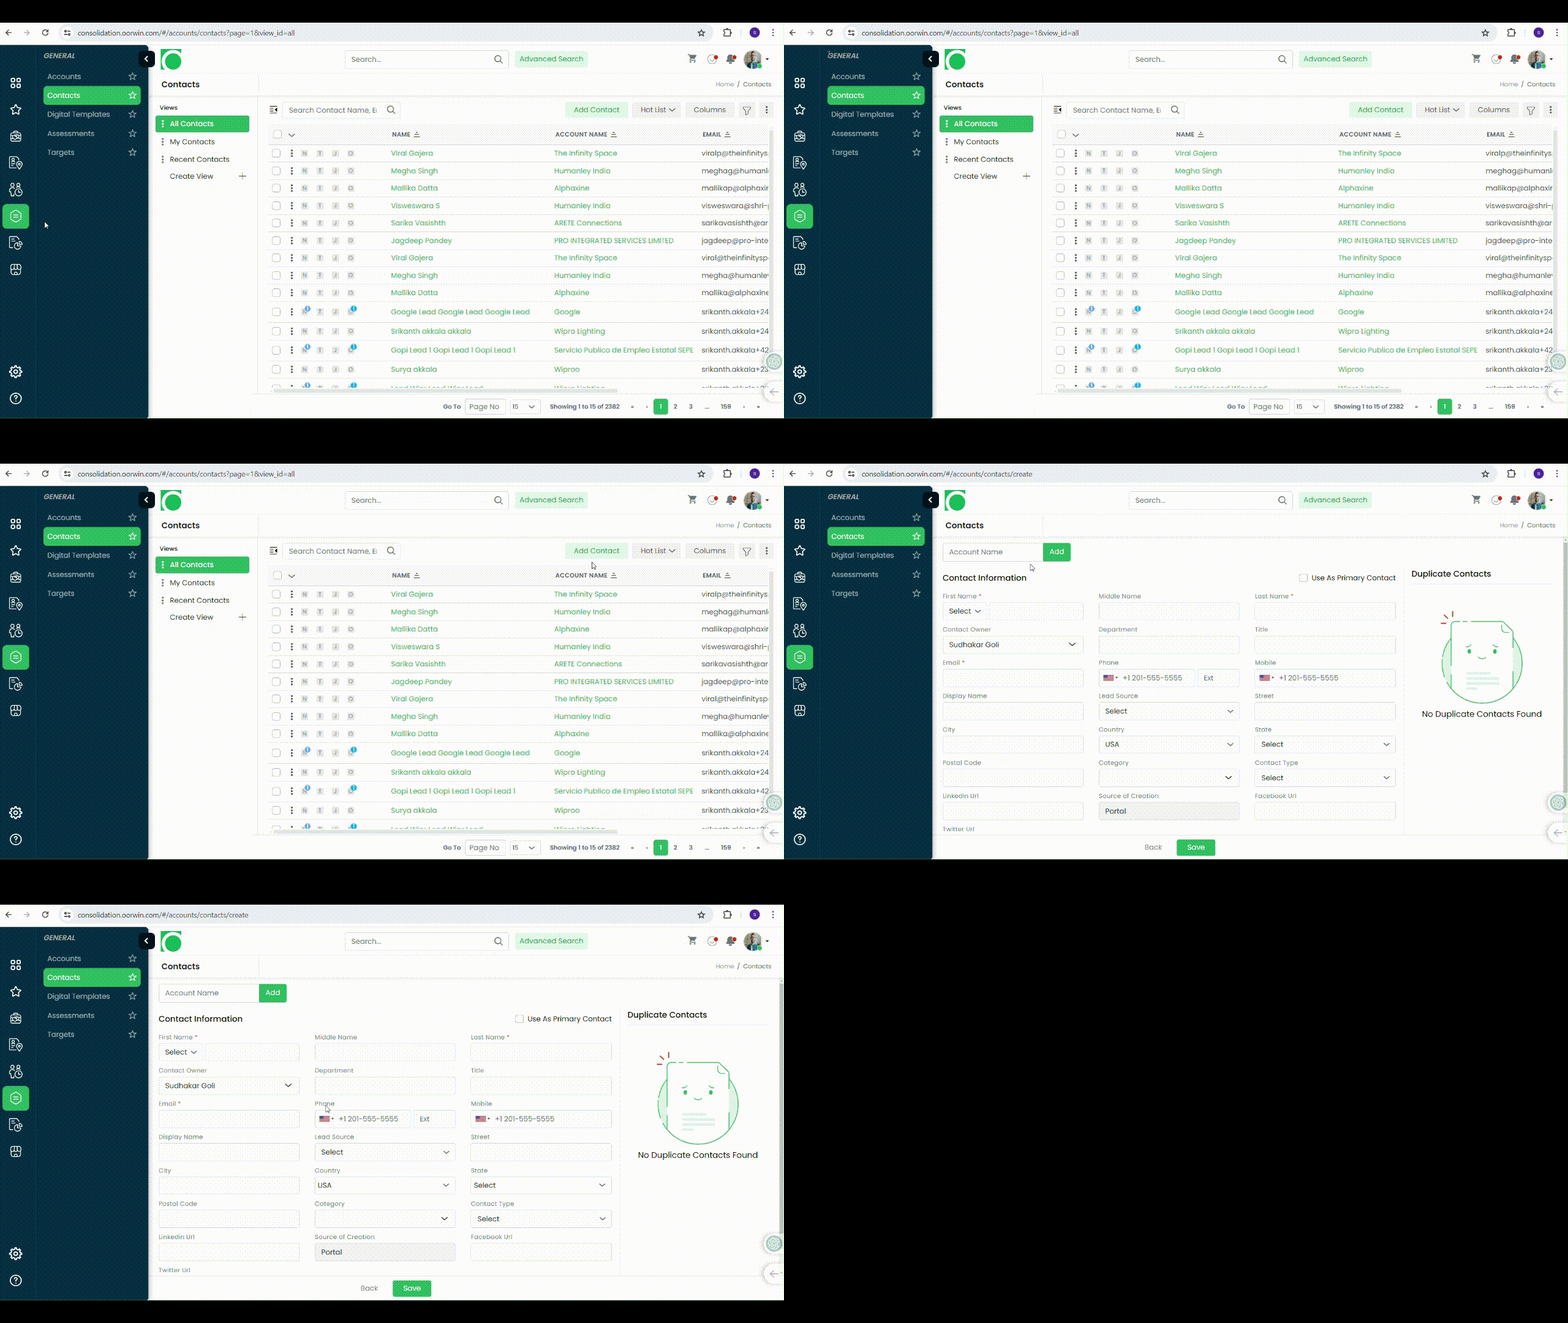
Creating a contact record in Oorwin is like adding a new friend to your phonebook. Here’s how you can do it:
- Log in to your Oorwin Account and navigate to Contacts module from the left menu under General Section
- Click on “Add Contact” button on the top right corner.
- Fill all the mandatory details like name,email,phone number, etc.
- Once you’ve filled in all the necessary information, click on the “Save” button on the bottom
- And that’s it! You’ve just added a new contact record in Oorwin.
Was this article helpful?
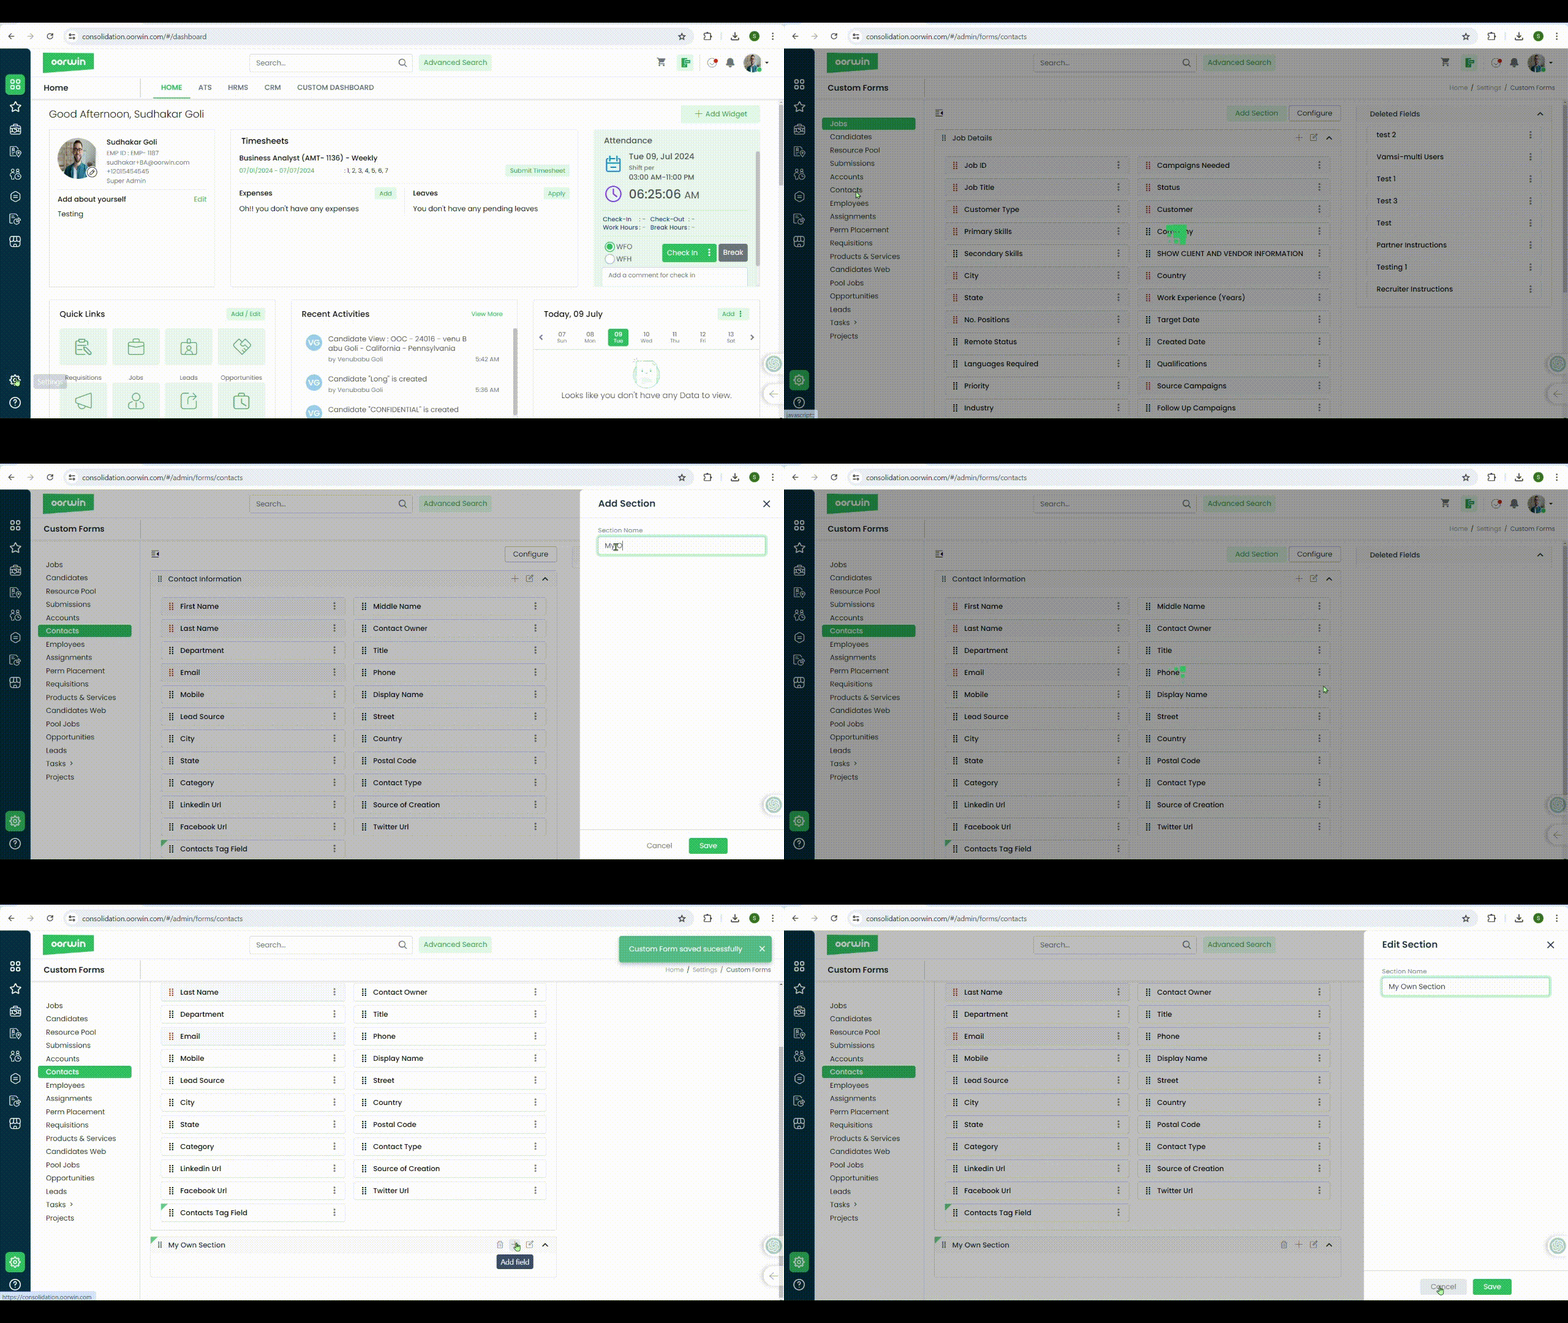
Custom forms allows you to customize all your module forms based on your business needs. Here you can customize the forms like adding a new section, new field,and remove the section or a field. This can be done for all the major modules in Oorwin
Here is how you can create a custom section:
- Log in to your Oorwin Account and navigate to settings page from the left bottom
- Go to Configurations on the left menu which opens multiple sections in it
- Click on Custom Forms section under configurations page
- It opens all the modules on the left pane which opens the module specific form on the right pane upon clicking on it
- Click on any of the module that you wanted to add a custom section or a field
- Click on Add Section button on the top header to create a new custom section
- Now enter the section name in the text box on the popup
- Now click on Save button on the bottom which will create a new section in your form
- Now you can create the custom fields inside the section by following the procedure of creating the custom form fields
Was this article helpful?
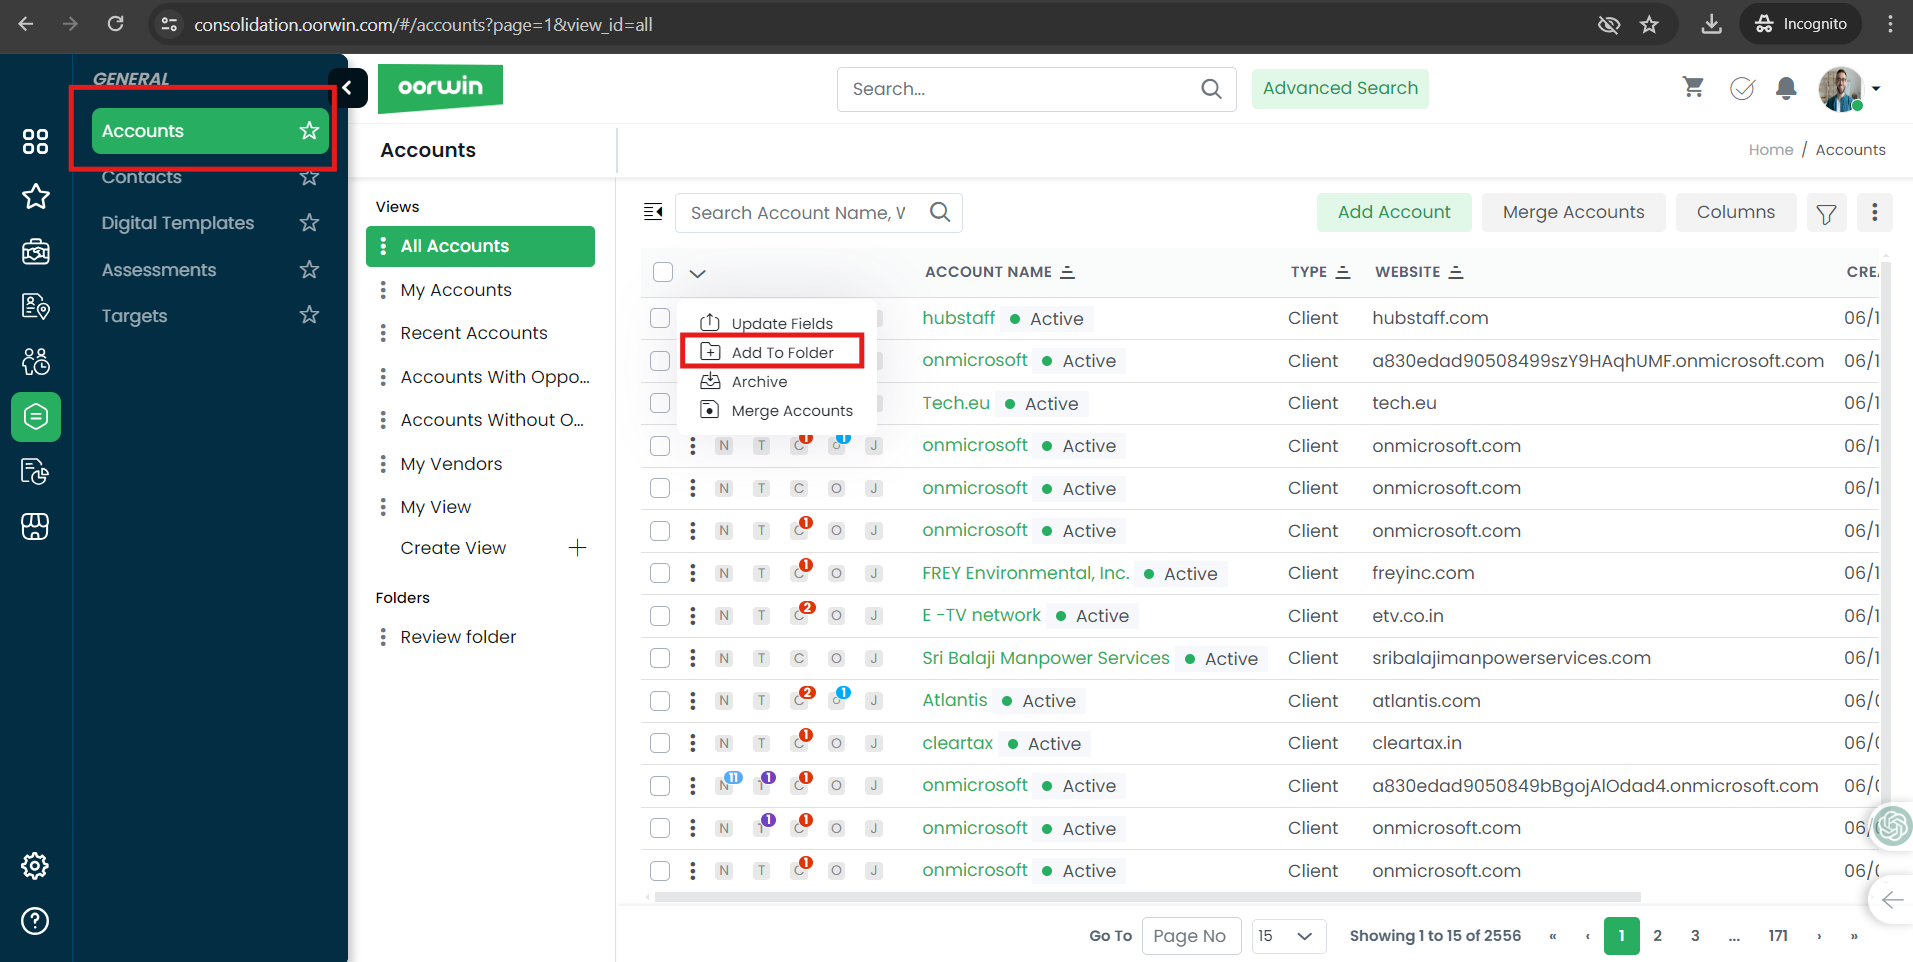
You can create a folder and add similar accounts to that folder for easy navigation and identification in the accounts. User can set the created folder as default view also
Below are the steps to add a folder and create a custom view
- Log in to your Oorwin Account and navigate to Accounts module from the left menu under General Section
- On the account listing page select any of the accounts by checking the check box
- Click on bulk actions on the top and click on add to folder option
- Click on “+” icon to create a new folder or select the existing folder to add these accounts to the existing one
- Now click on Save button, Thats it!you have cretaed a new folder with multiple acocunts init
- You can also make this folder as default by clicking on three dots->set as default option
Was this article helpful?
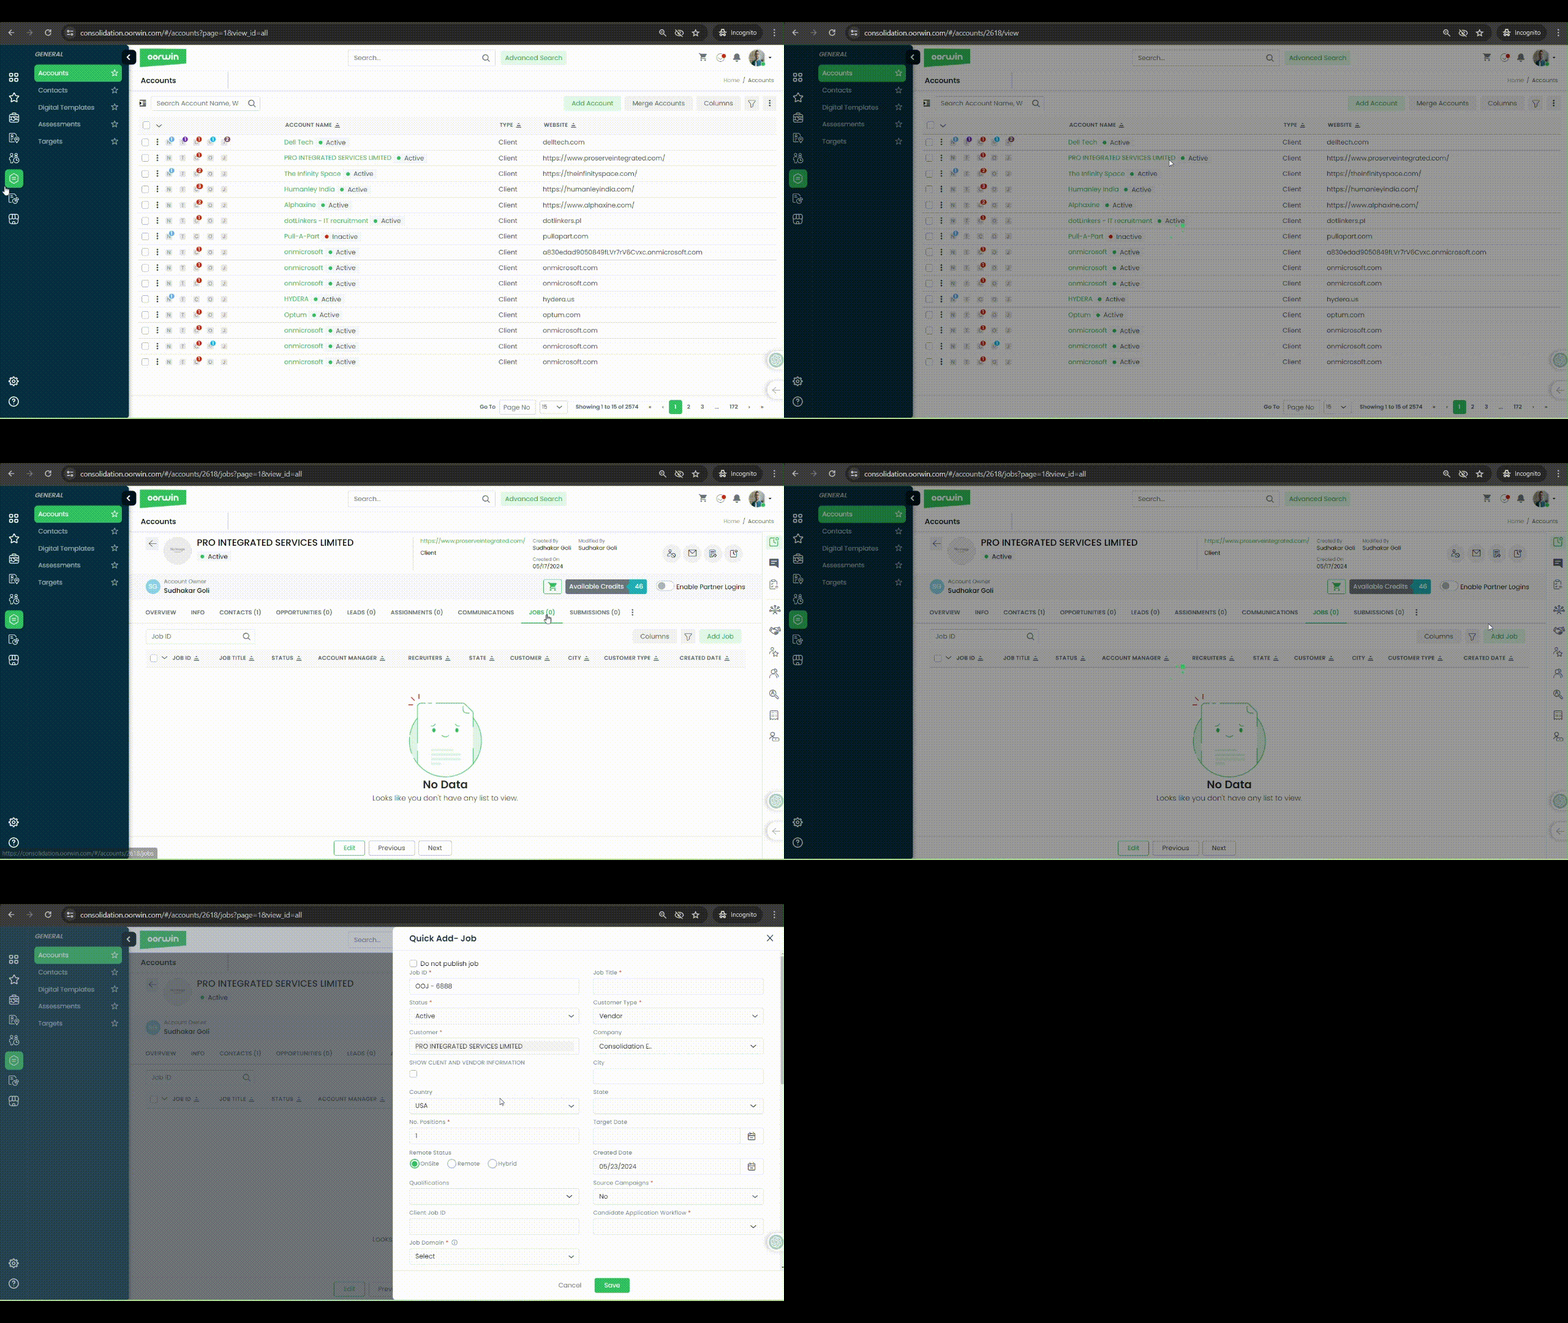
User can create a Job requirement from account page which will be tagged to that particular account.
To do this action you need to have add Job permission enabled for your role from the Settings->Role security
Please follow the below steps to create a Job from account view page
- Log in to your Oorwin Account and navigate to Accounts module from the left menu under General Section
- Click on any account name to whom you wanted to create a new job
- Click on Jobs tab on the top header which shows all the jobs tagged to that account
- Click on Add Job button on the top right corner
- Fill all the mandatory information and click on Save button
- Thats it! Your new job has been created and tagged to the particular account
Was this article helpful?
User can create a Job requirement from contact view page which will be tagged to that particular contact & account.
To do this action you need to have add Job permission enabled for your role from the Settings->Role security->Jobs
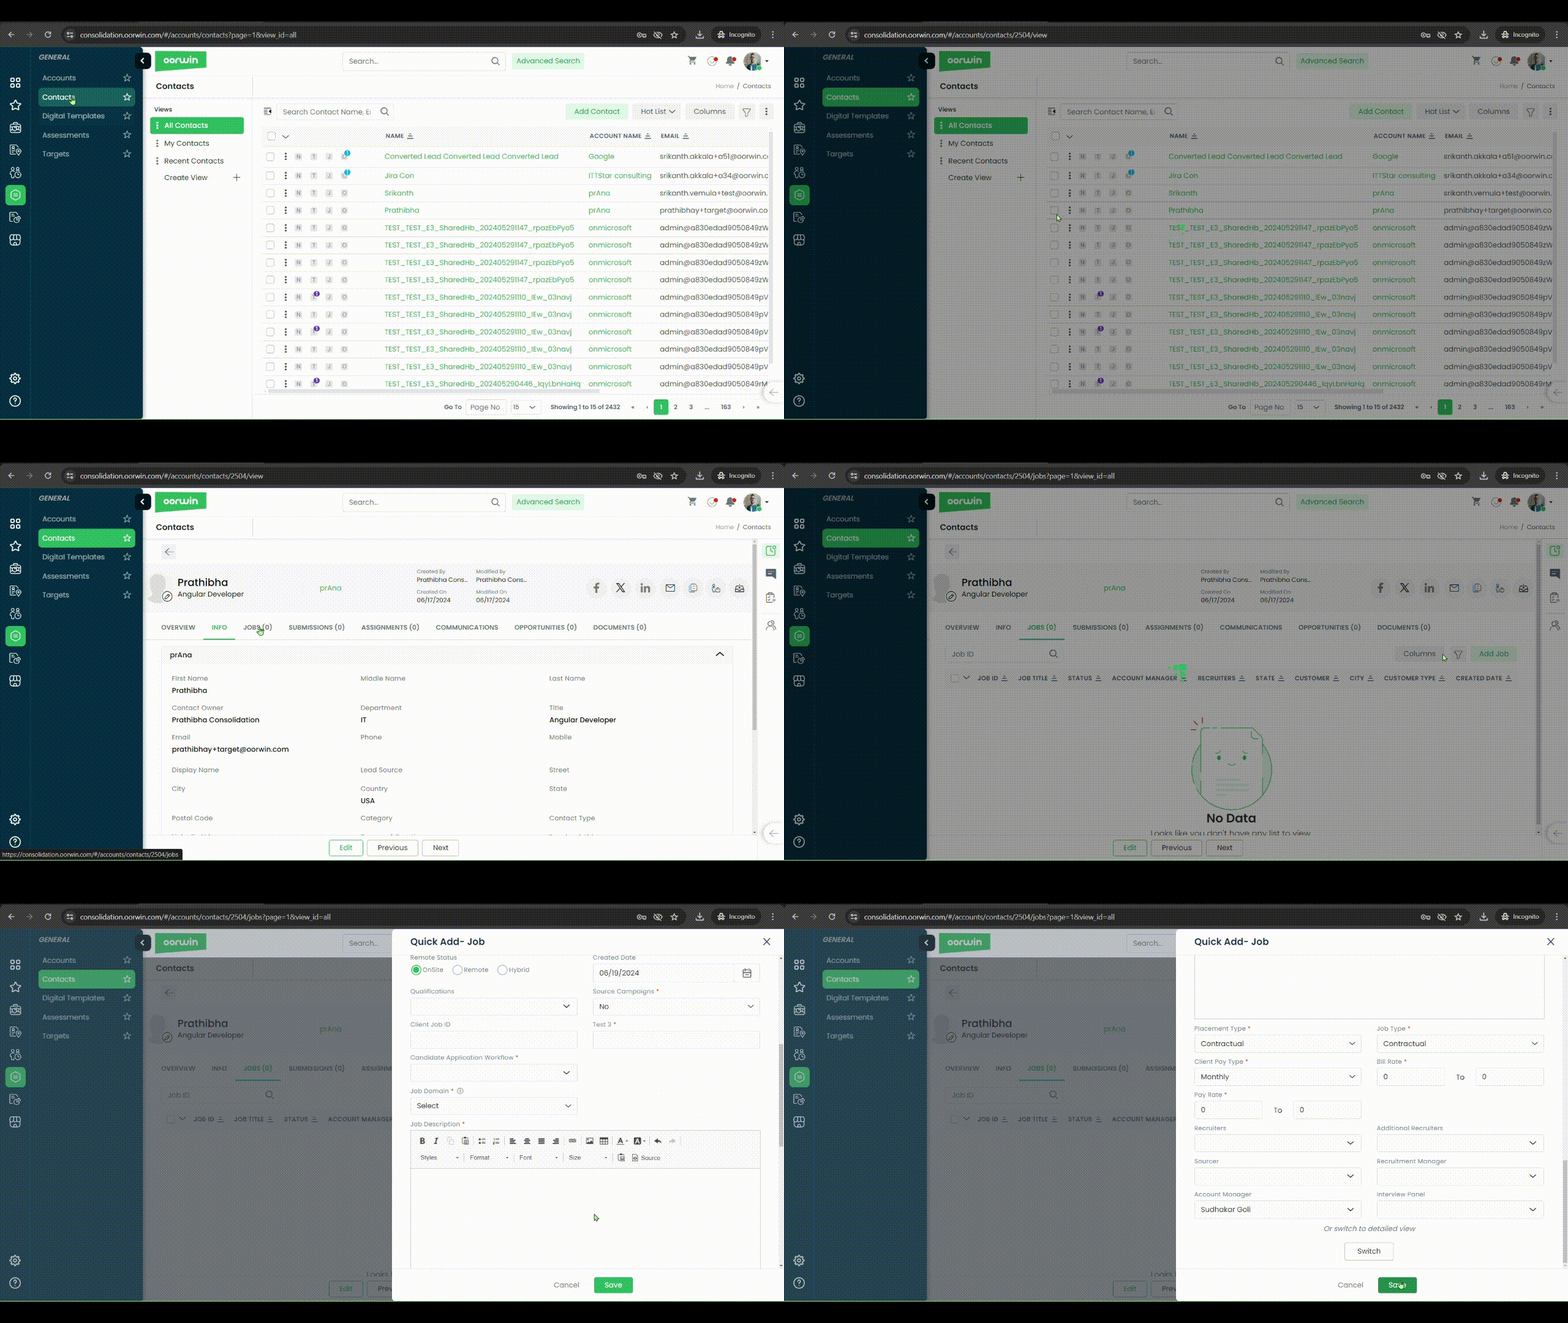
Please follow the below steps to create a Job from contact view page
- Log in to your Oorwin Account and navigate to Contacts module from the left menu under General Section
- Click on any contact name to whom you wanted to create a new job
- Click on Jobs tab on the top header which shows all the jobs tagged to that account
- Click on Add Job button on the top right corner
- Fill all the mandatory information and click on Save button
- Thats it! Your new job has been created and tagged to the particular account & contact
Was this article helpful?
Oorwin allows you to create custom workflows for each modules based on your business needs which helps you to create custom stages and statuses in each of the workflow
Here is how you can create a lead workflow
- Log in to your Oorwin Account and navigate to settings page from the left bottom
- Go to Configurations on the left menu and click on workflows module
- Now click on Leads module from the left menu which shows list of existing lead workflows
- To create a new custom workflow click on “Add Lead Workflow Type” on the top right corner
- Now enter the workflow name and check the below checkbox to make this workflow as default while creating a lead record and click then on Save
- A new workflow will be created with the standard stages, to configure the stages click on three dots and click on configure from the list of actions
- User can edit the existing stage or they can create a new stage by clicking on the actions under three dots in each stage
- You can also drag and drop the stages by moving the stage in between the workflow

Was this article helpful?
Users can rely on tasks for assigning work to specific modules, tracking progress, and ensuring notification to each team member.
Here is how you can create a task for the lead and get it tracked
- Log in to your Oorwin Account and navigate to Leads module from the left menu under Sales Section
- Click on any Lead name to whom you want to Create a task
- Search for Tasks icon on the right panel and click on it
- It opens a popup with all the tasks that all your team created
- Click on Add task button on the top right corner
- Enter all the required fields like title, description, due date, reminder, assigned to, etc
- Now click on save on the bottom and thats it, your task has created and notified to the assigned user
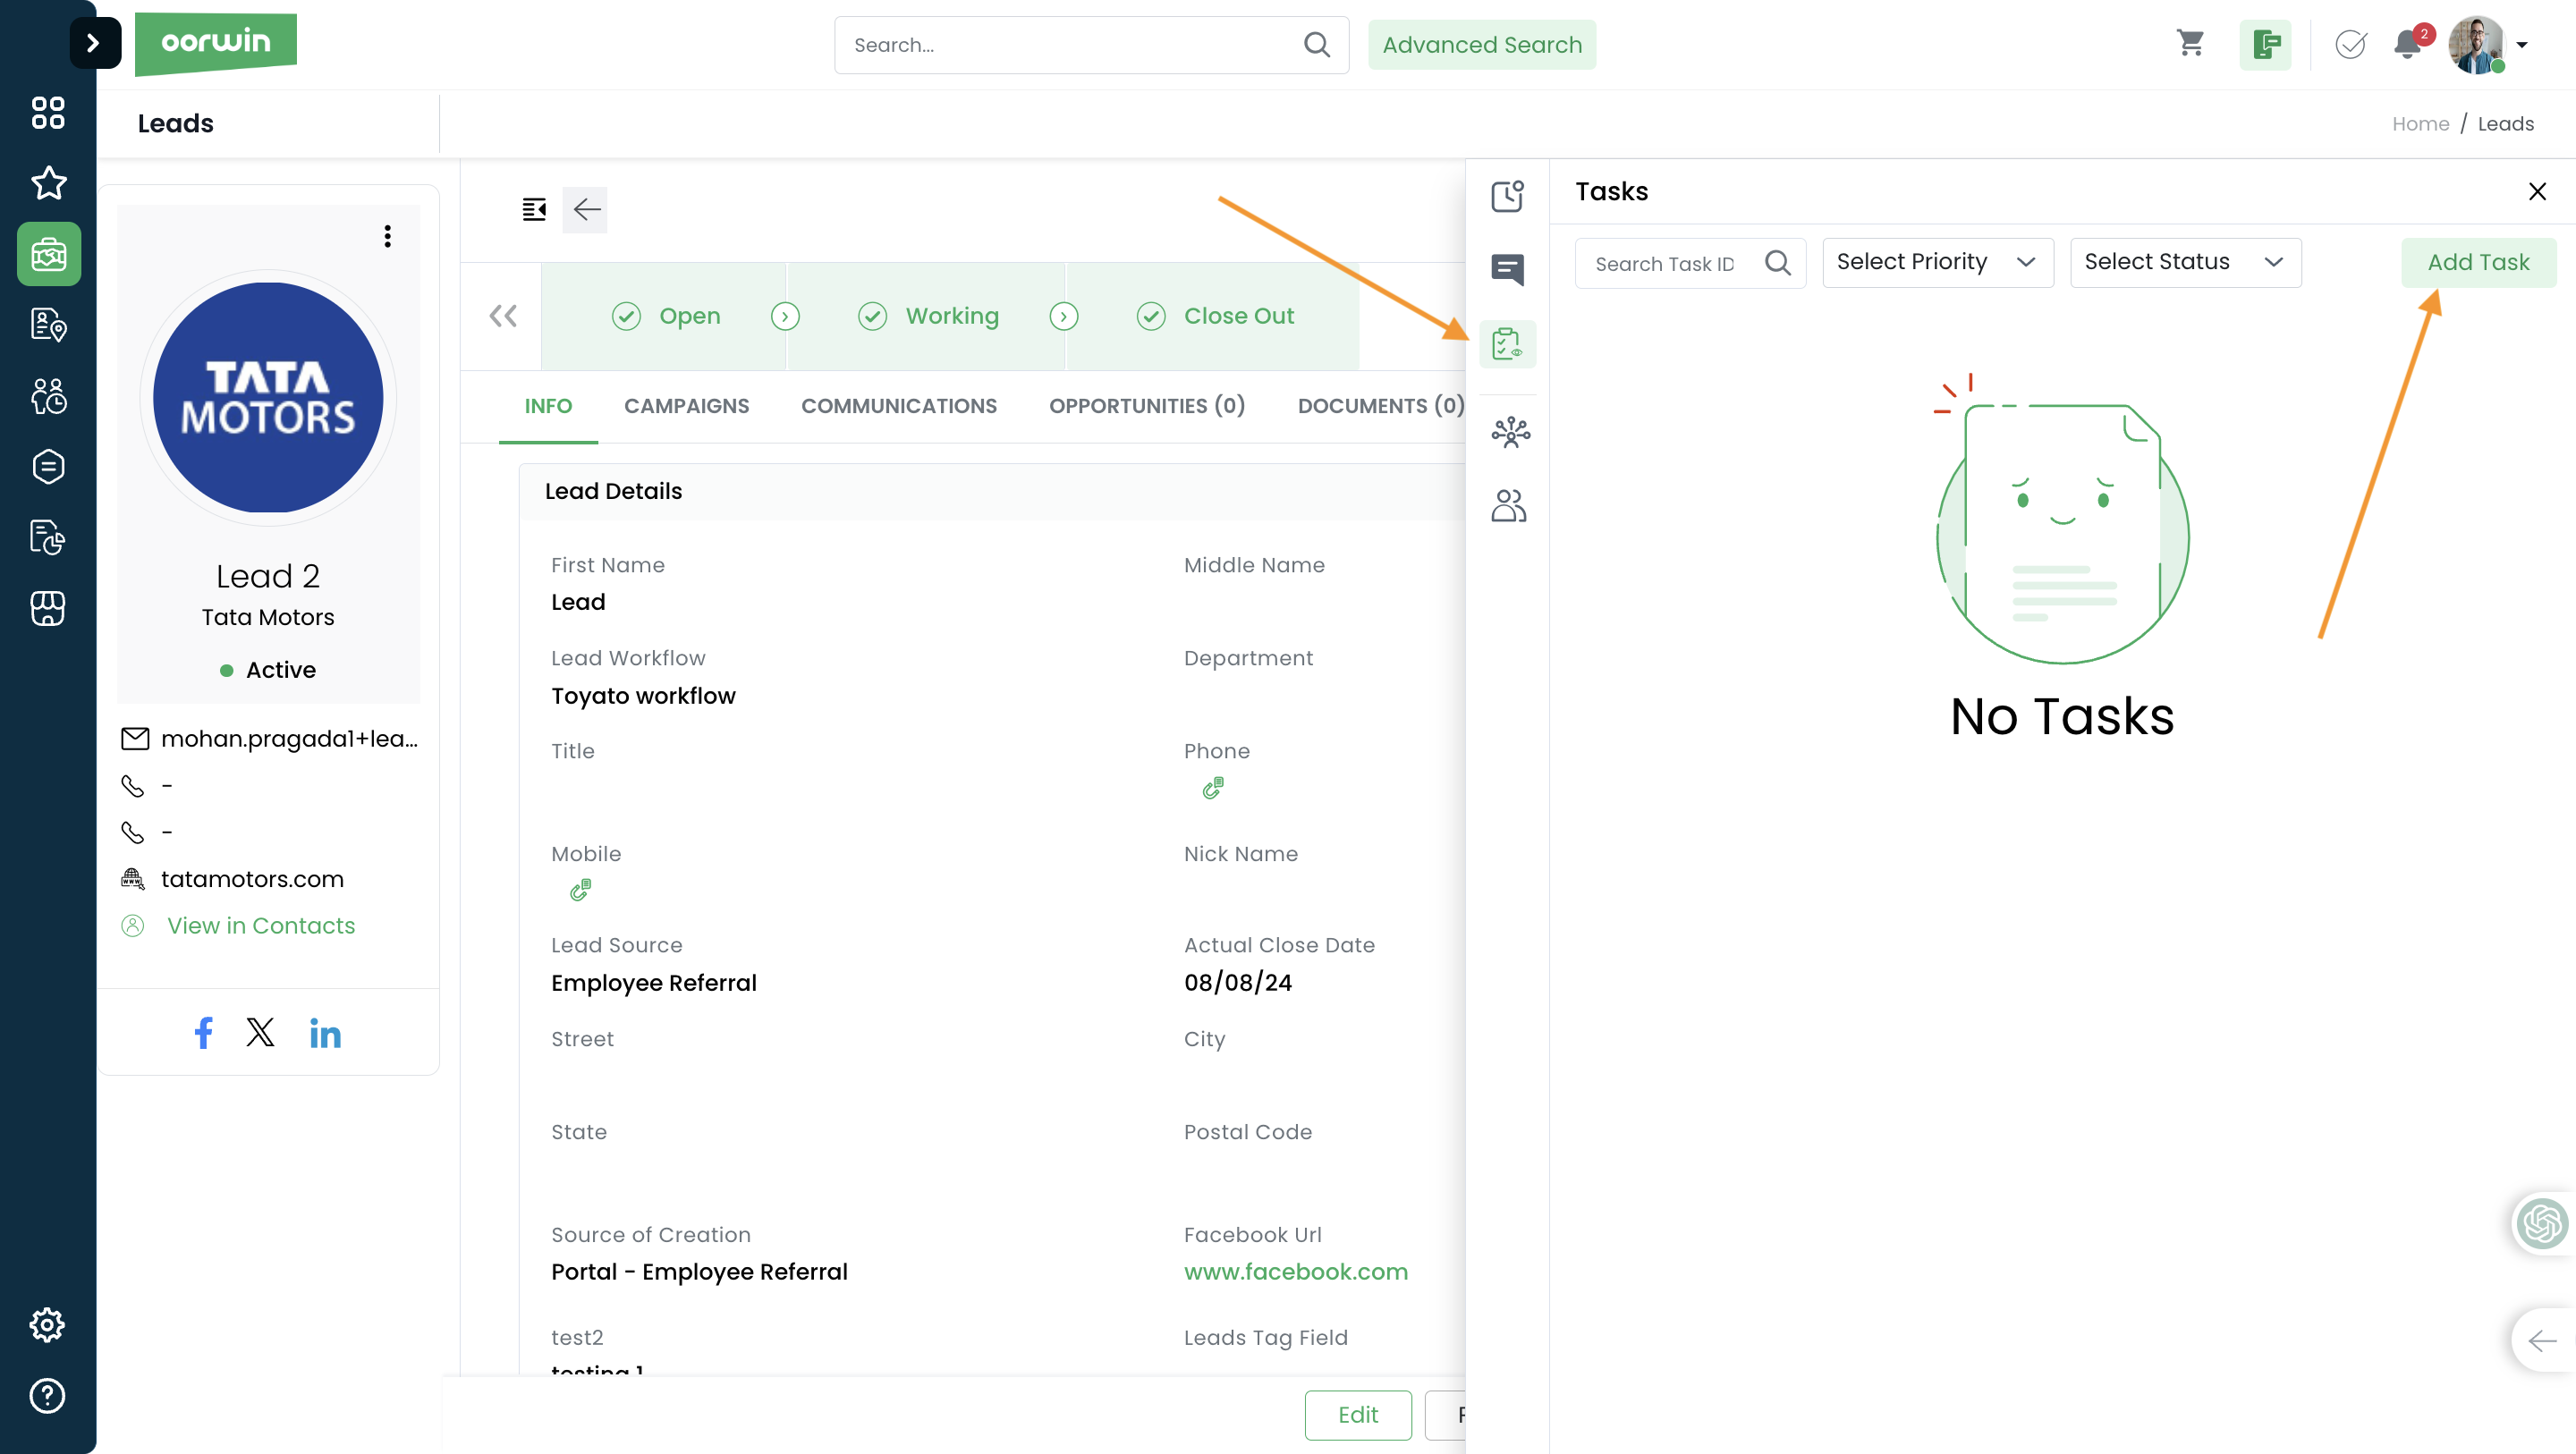
Note: You can also create the task from the list view, grid view and on the quick view which you can see from the actions under three dots icon
Was this article helpful?
User can create a note in multiple ways for a contact. Here is the simple way to create a note
Create a note from the Contacts list page:
- Log in to your Oorwin Account and navigate to Contacts module from the left menu under General Section
- Select any Contact name whom you wanted to create a note
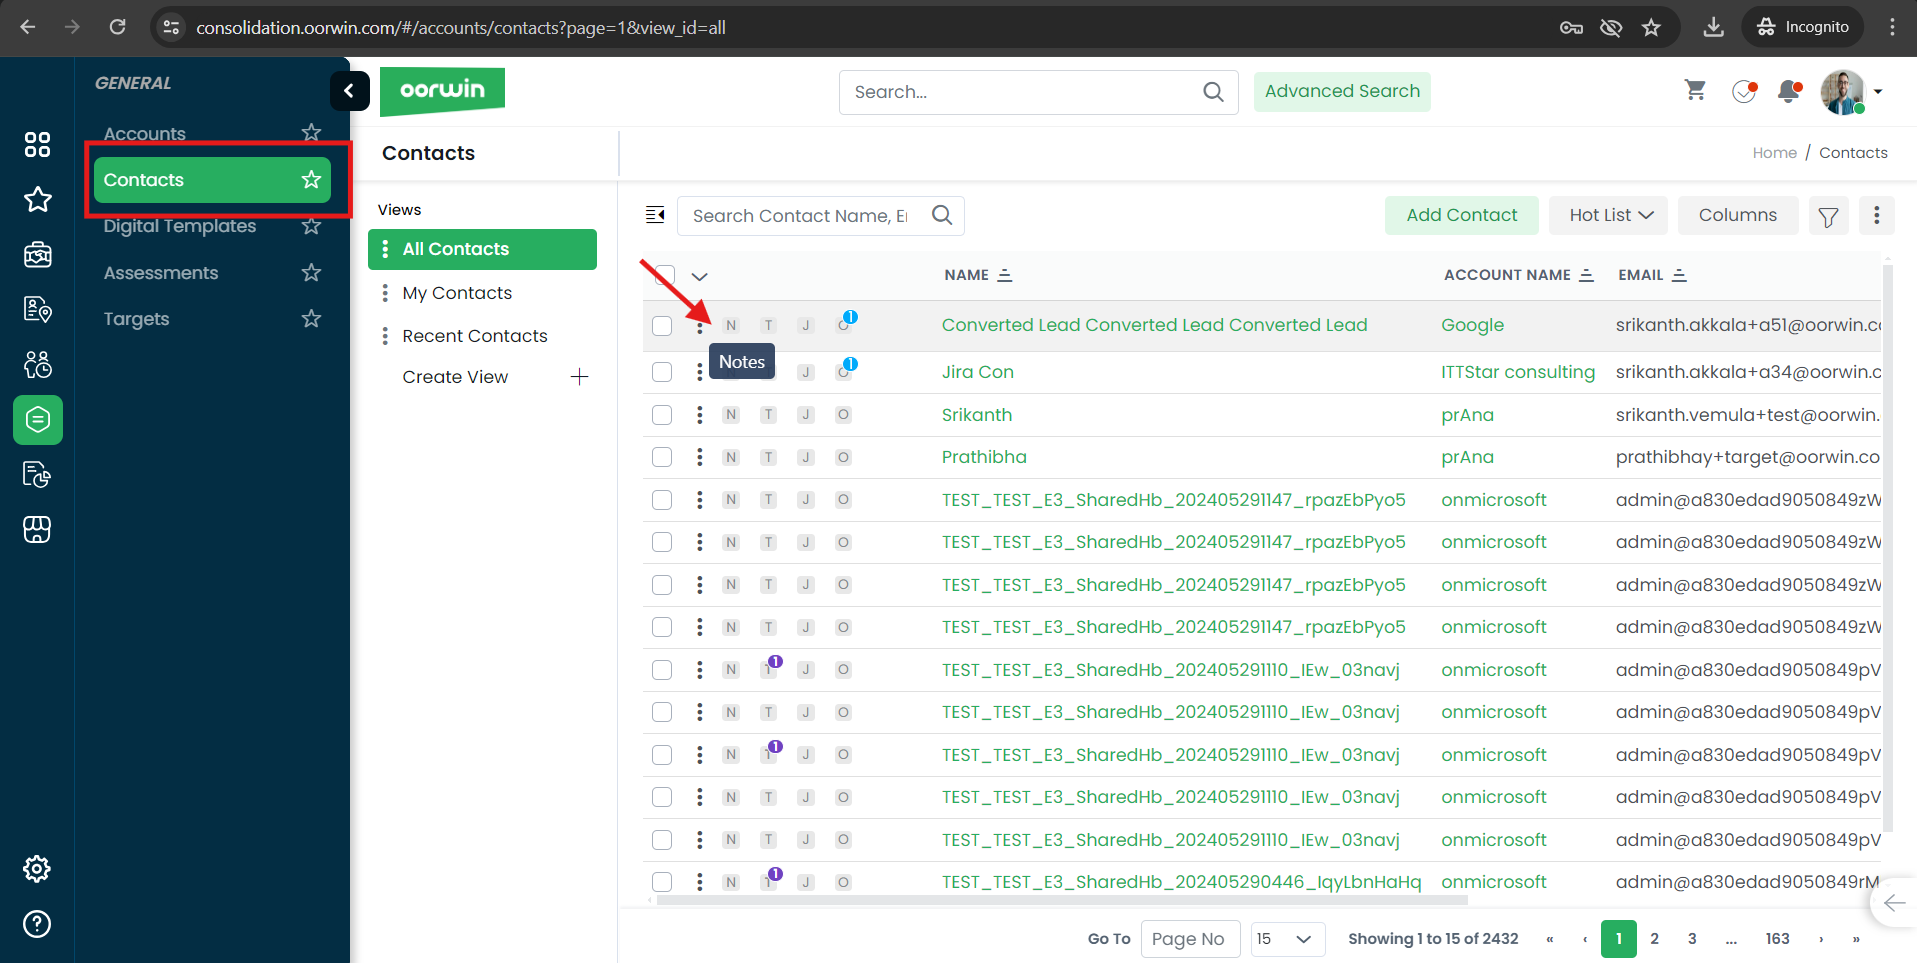
- Click on “N(Notes) symbol” for the contact you wanted to create note
- It opens a popup with the existing notes listed
- Click on any type(call,note,meeting) of the note
- Enter all the required fields like name, description, etc
- Click on Save button below
- Thats it! Your Note has been created and tagged to the particular contact
Create a note from the contact view page:
- Open any contact by clicking on name to whom you wanted to create a note
- Check for “Notes symbol” on the right panel for the contact you wanted to create note
- Click on that icon and it opens a popup with the existing notes listed
- Click on any note type(call,note,meeting) that you wanted create
- Enter all the required fields like name,description,etc
- Click on Save button below
- Thats it! Your Note has been created and tagged to the particular contact

Was this article helpful?
User can create a note in multiple ways for an account. Here is the simple way to create a note
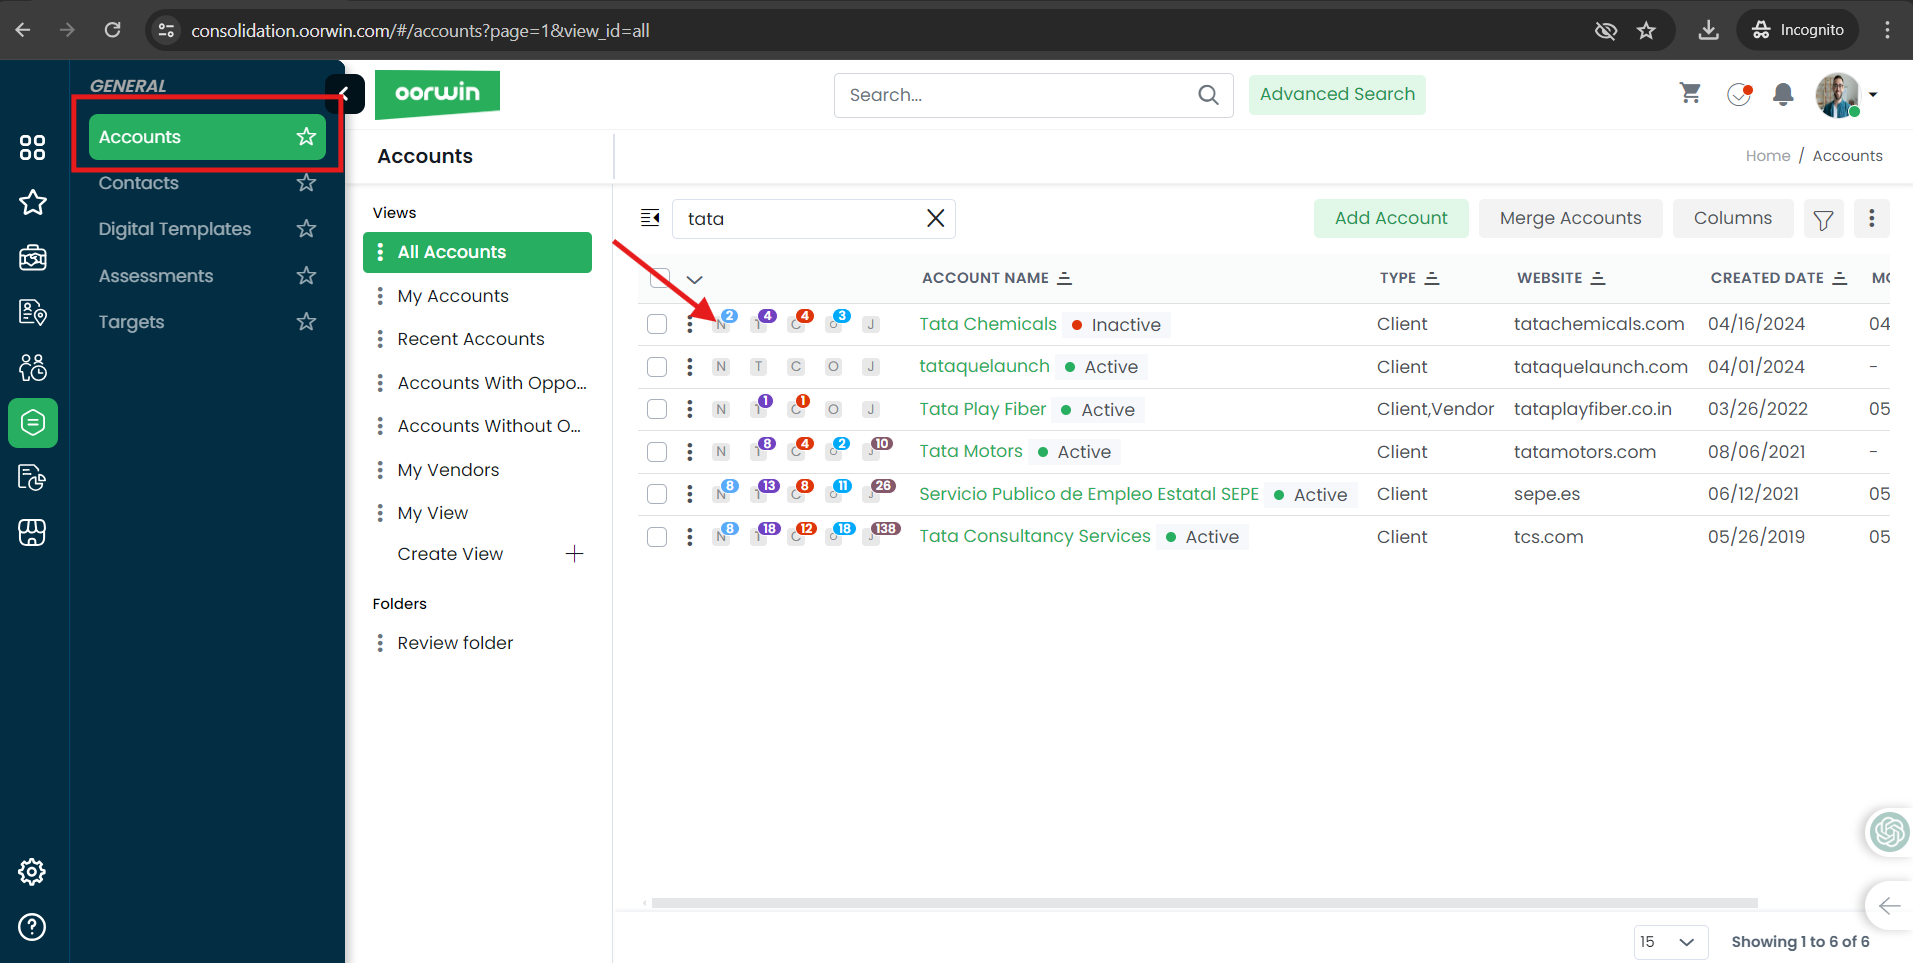
Create a note from the accounts list page:
- Log in to your Oorwin Account and navigate to Accounts module from the left menu under General Section
- Select any account name whom you wanted to create a note
- Click on “N(Notes) symbol” for the account you wanted to create note
- It opens a popup with the existing notes listed
- Click on any type(call,note,meeting) of the note
- Enter all the required fields like name, description, etc
- Click on Save button below
- Thats it! Your Note has been created and tagged to the particular account
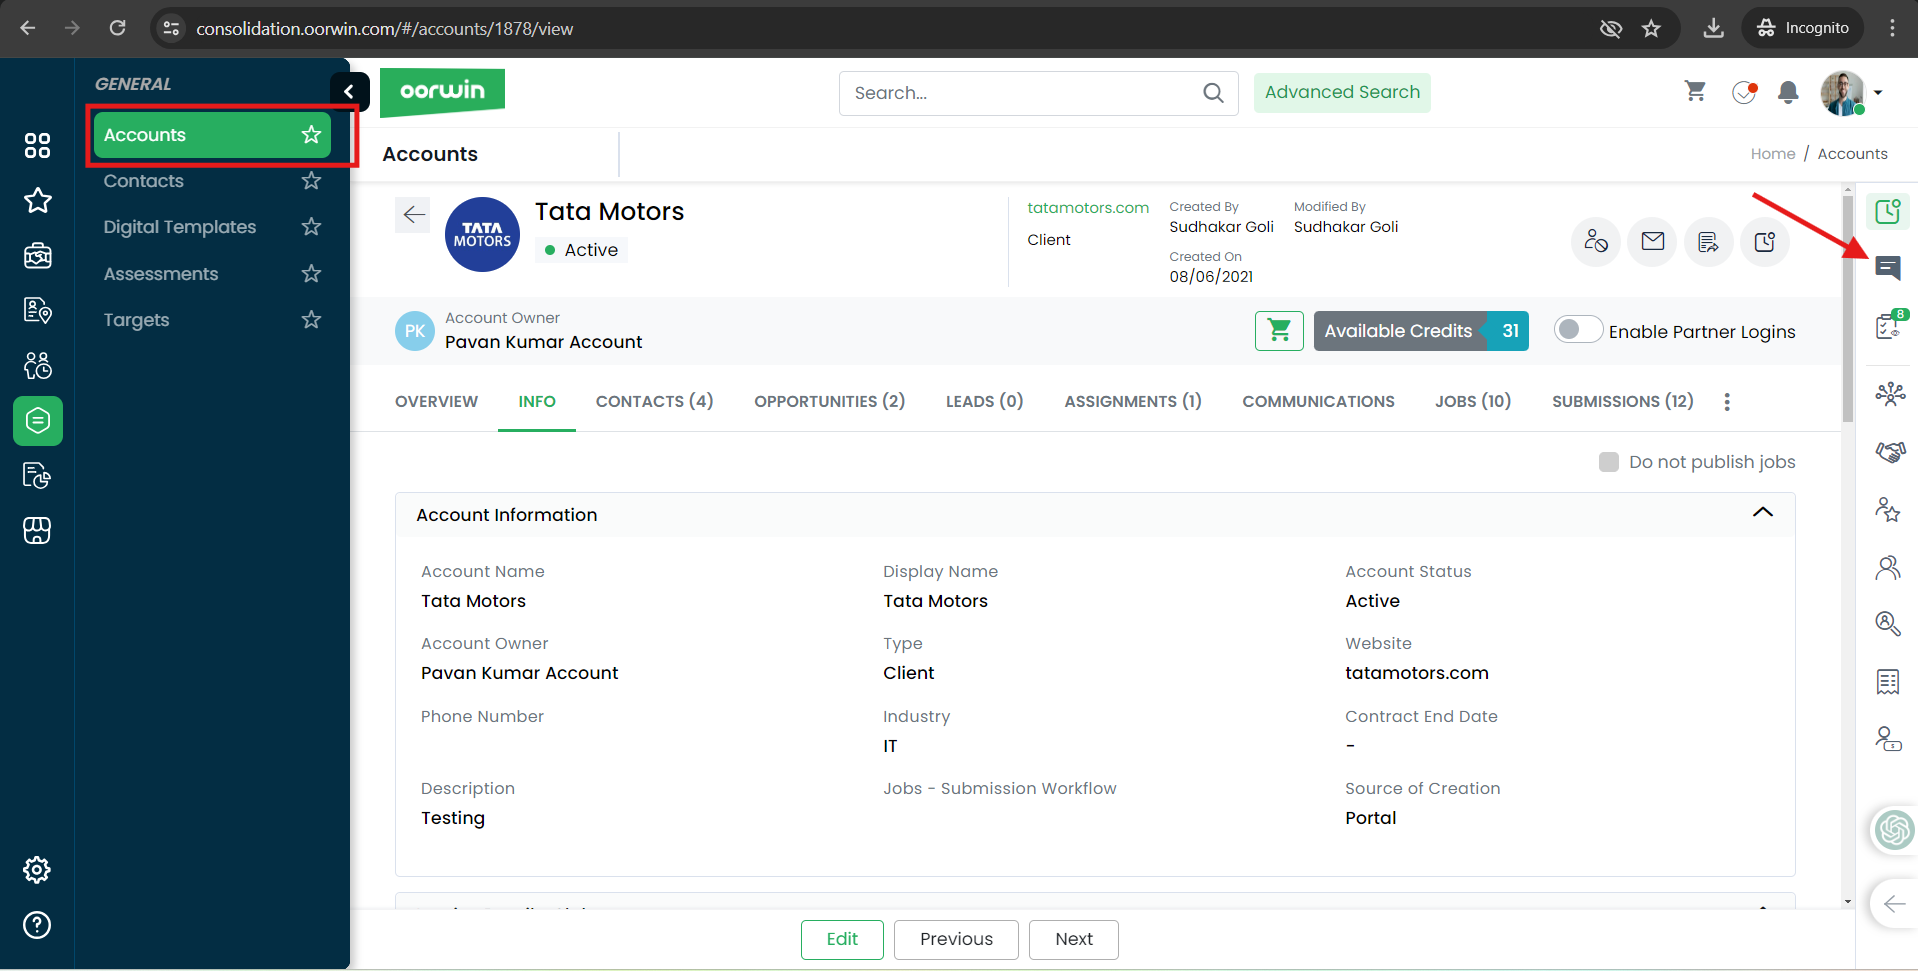
Create a note from the accounts view page:
- Open any account name whom you wanted to create a note
- Check for “Notes symbol” on the right panel for the account you wanted to create note
- Click on that icon and it opens a popup with the existing notes listed
- Click on any note type(call,note,meeting) that you wanted create
- Enter all the required fields like name,description,etc
- Click on Save button below
- Thats it! Your Note has been created and tagged to the particular account
Was this article helpful?
User can create a note in multiple ways for an opportunity. Here is the simple way to create a note
Create a note from the Opportunity list page:
- Log in to your Oorwin Account and navigate to Opportunity module from the left menu under CRM Section
- Select any Opportunity name whom you wanted to create a note
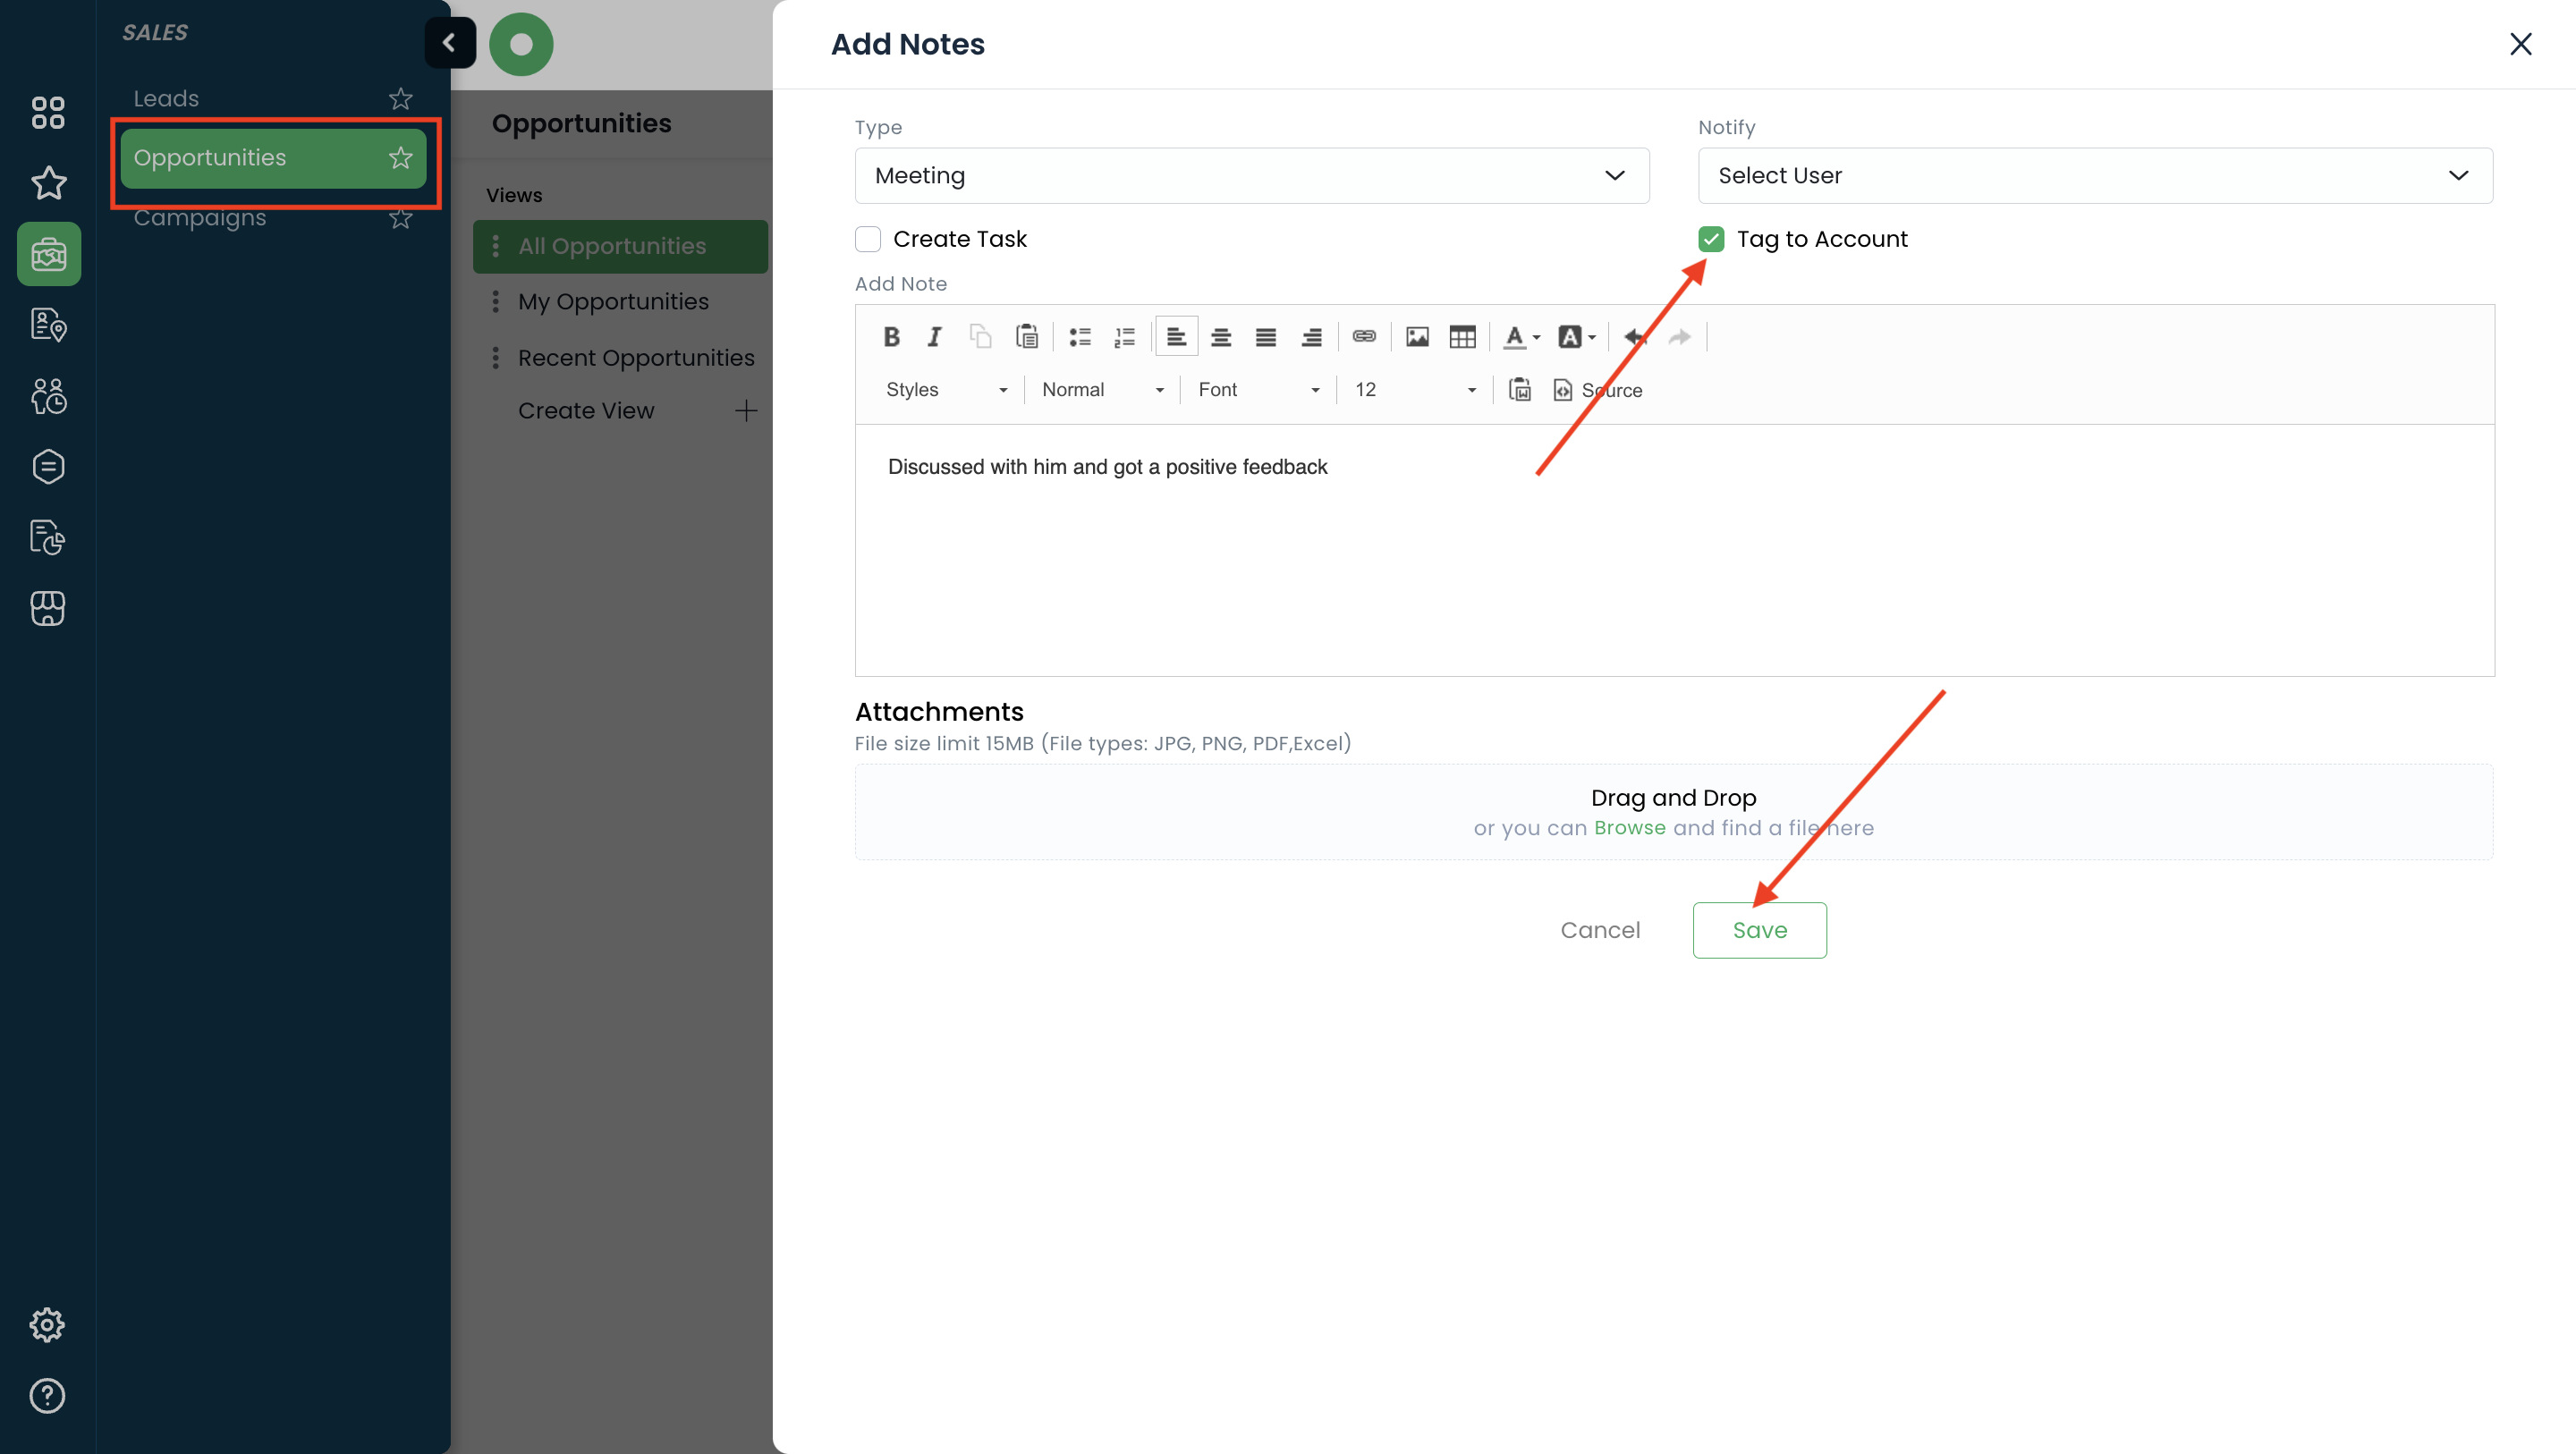
- Click on “Notes symbol” for the opportunity you wanted to create note

- It opens a popup with the existing notes listed
- Click on any type(call, note, meeting) of the note and select any notifiers if you wish in the notify section
- Enter all the required fields like name, description, etc
- Click on Save button below
- Thats it! Your Note has been created and tagged to the particular opportunity
Note: User can also tag the note to account so that it will be displayed in that particular account
Was this article helpful?
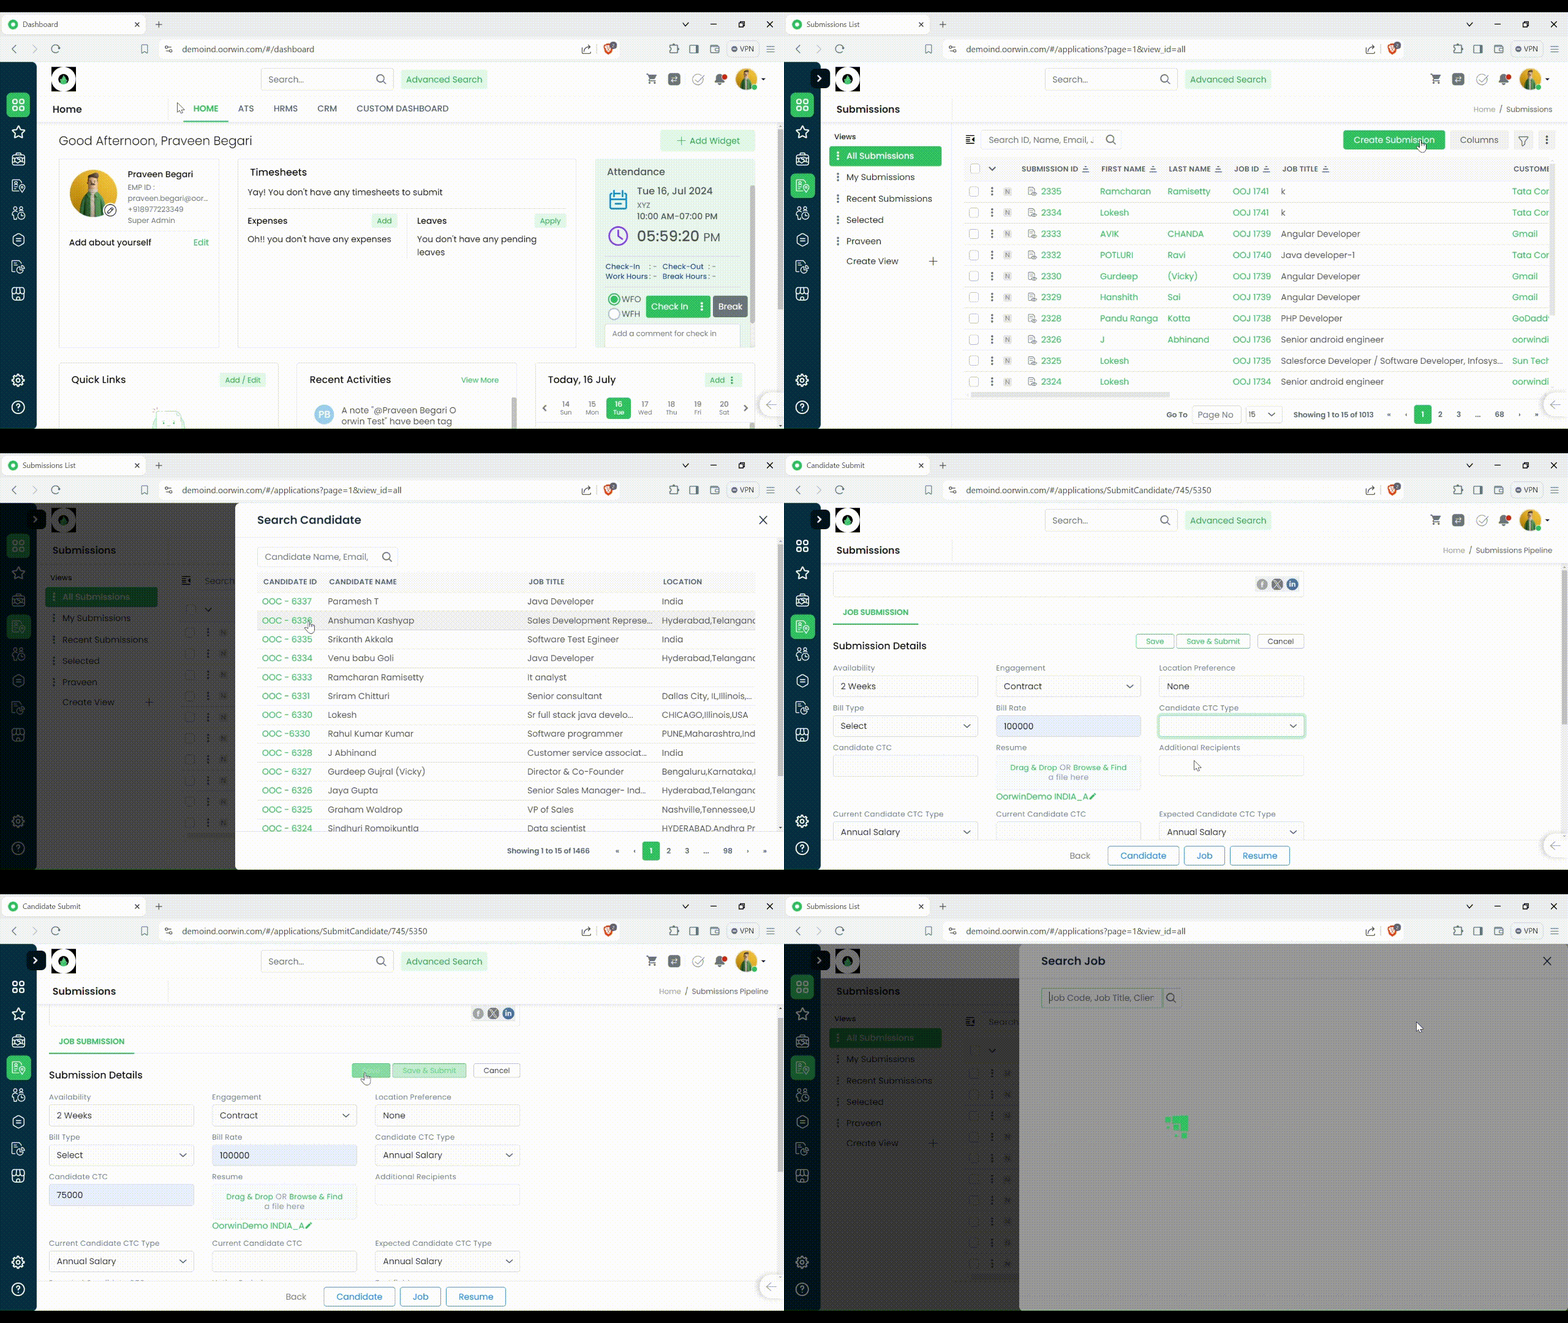
Here’s a guide on how to create a Submission:
- Login to your “Oorwin account” and Navigate to “Submissions module” on the left menu under the “Recruitment” section.
- Click on Create Submission button on the top right corner.
- From the Job listing pop-up, search and select the Job.
- Once you’re redirected to the candidate listing page search & select the Candidate and it’ll redirect you to the Job Submission form.
- Fill in the submission details (ex: Availability, Engagement, Bill rate, Pay rate)
- Once the details are filled in click on “Save” or “Save & Submit”.
- The Submission record will be saved.
Was this article helpful?
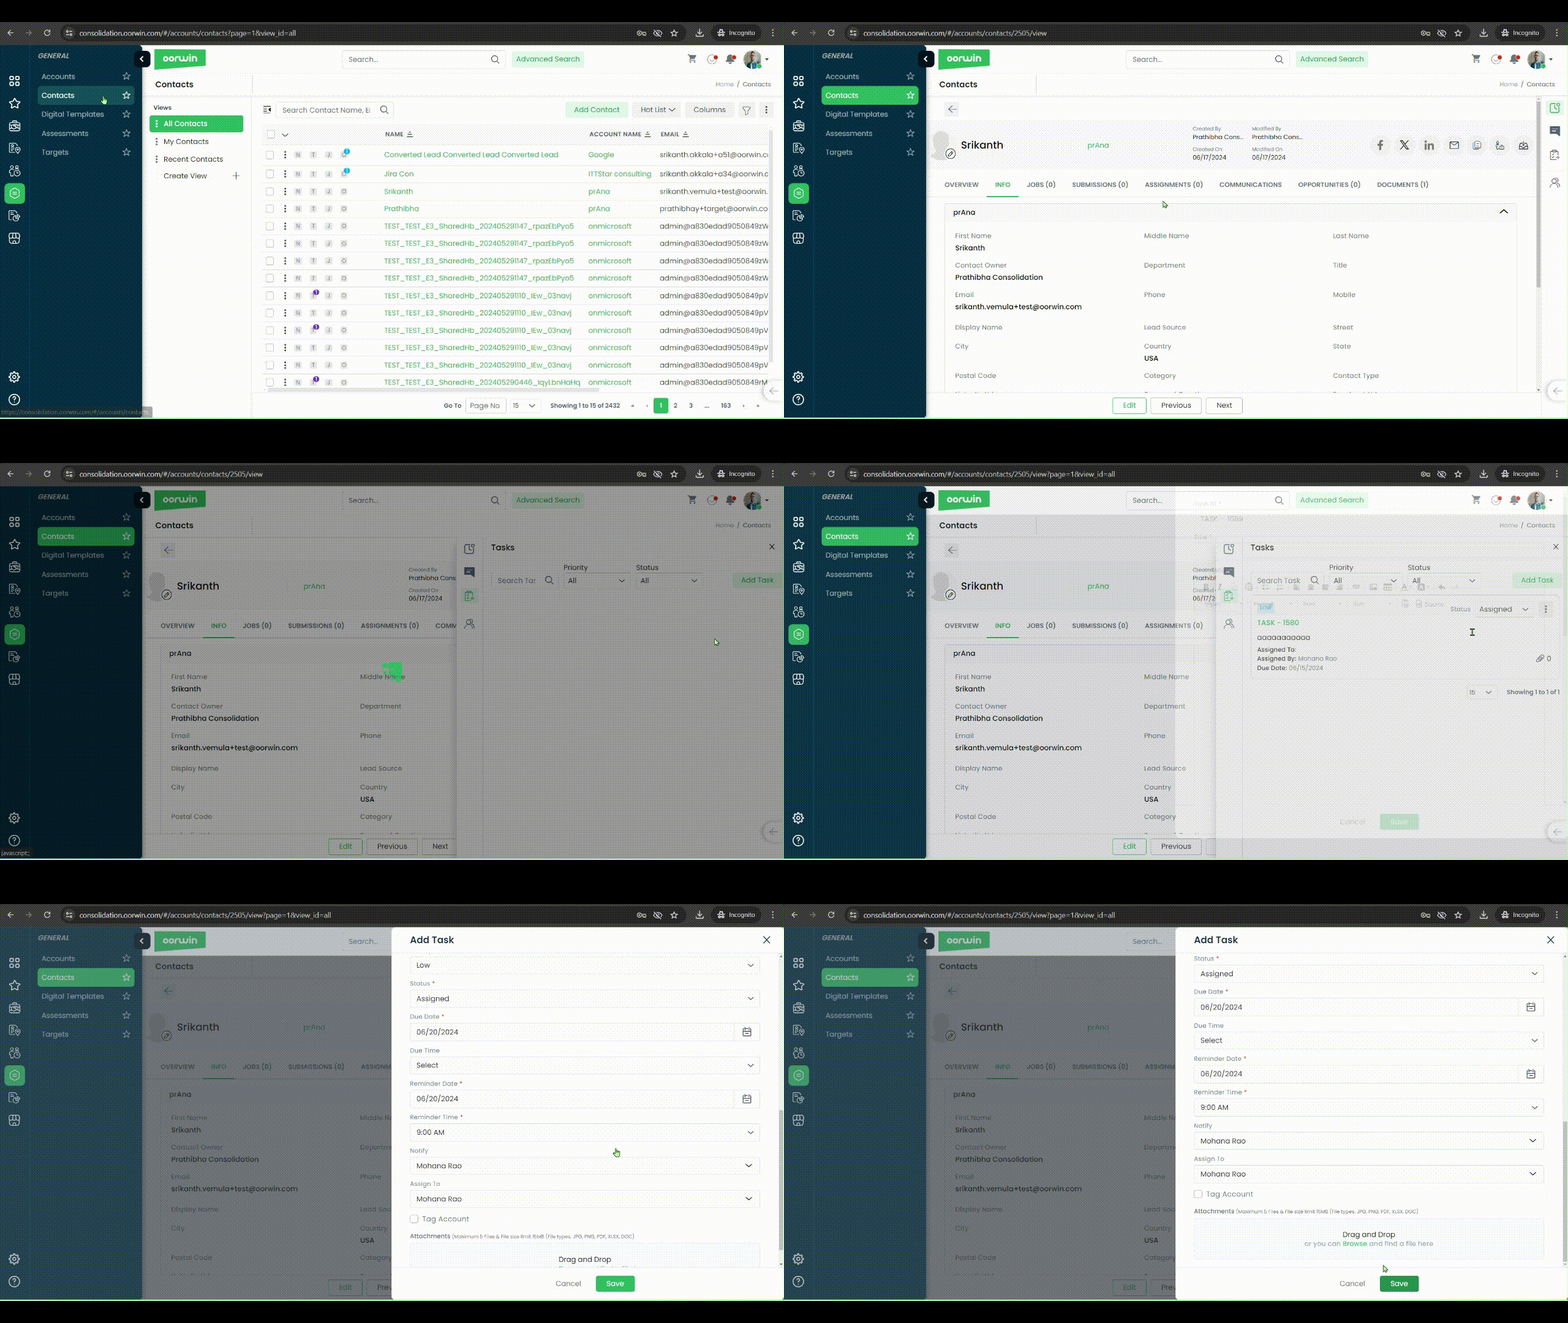
Users can rely on tasks for assigning work to specific modules, tracking progress, and ensuring notification to each team member. You can also create the task on a contact and assign it to the members of your team
Here is how you can create a task for a contact and get it tracked
- Log in to your Oorwin Account and navigate to contacts module from the left menu under General Section
- Open any contact by clicking on contact name to whom you want to Create a task
- Search for Tasks icon on the right panel and click on it
- It opens a popup with all the tasks that all your team created
- Click on Add task button on the top right corner
- Enter all the required fields like title, description, due date, reminder, assigned to, etc
- User can also tag this task to an account available on this contact
- Now click on save on the bottom and thats it, your task has created and notified to the assigned user
Was this article helpful?
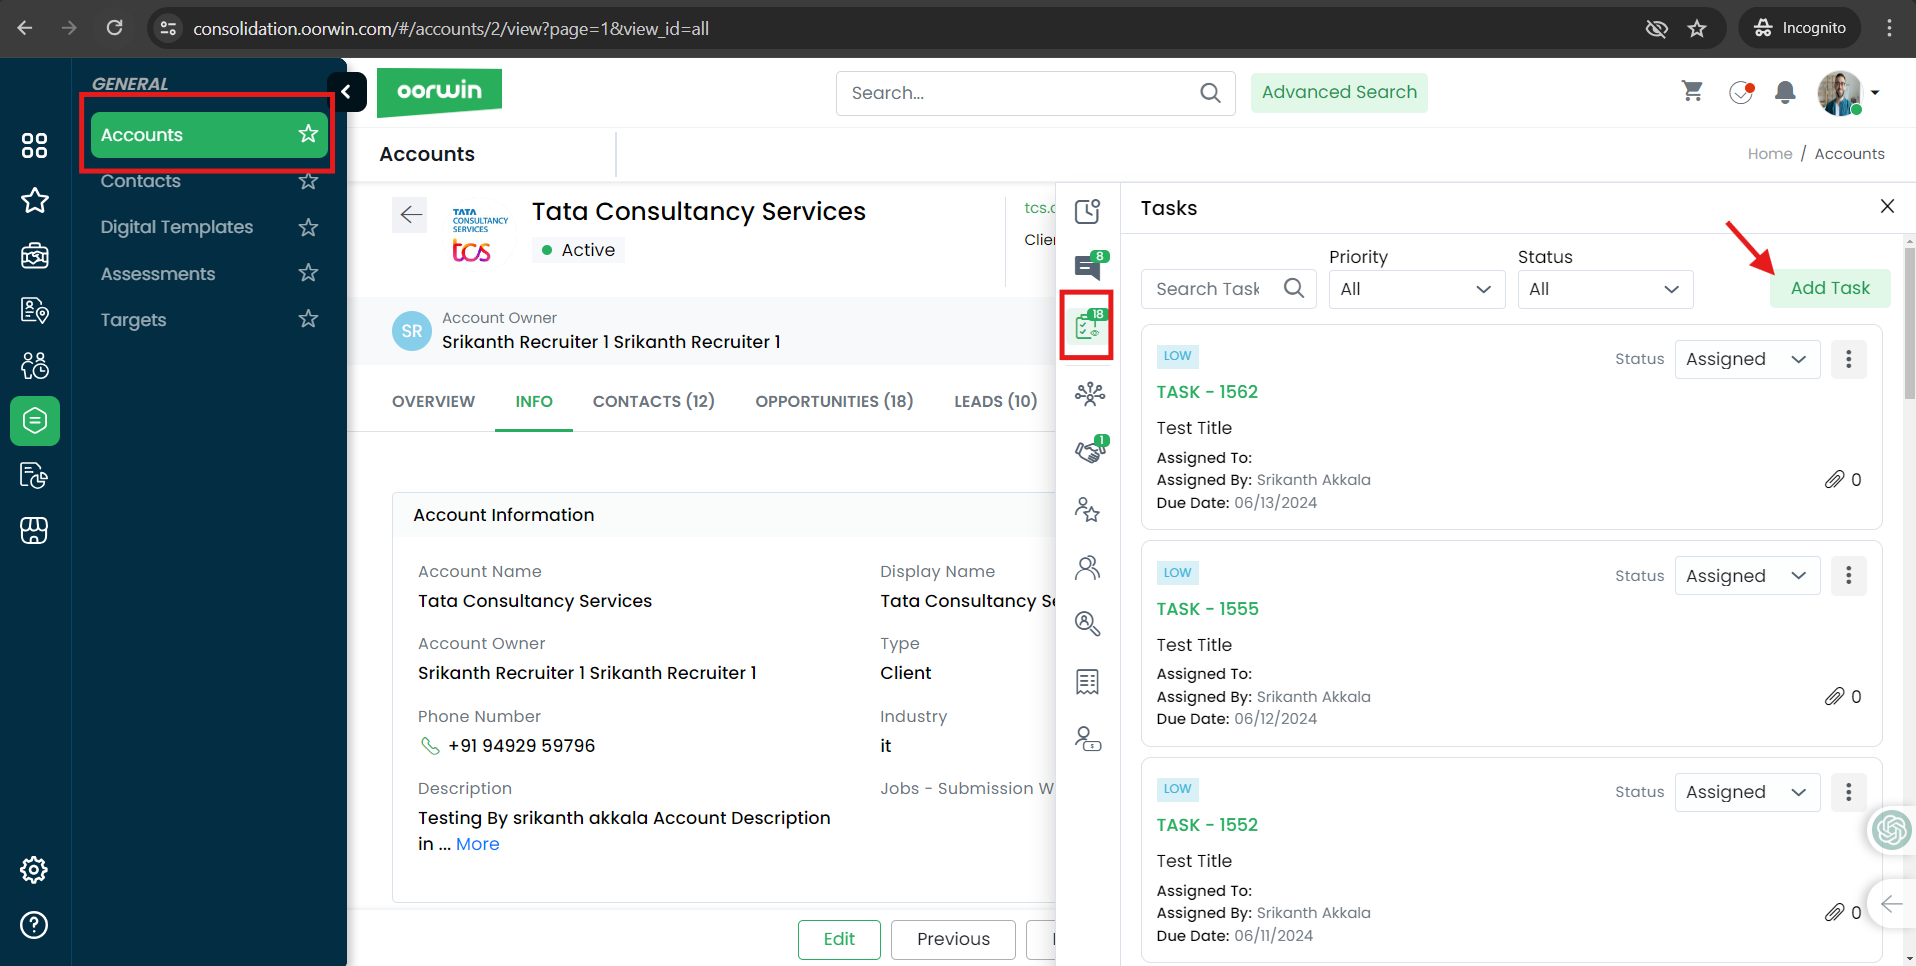
Users can rely on tasks for assigning work to specific modules, tracking progress, and ensuring notification to each team member.
Here is how you can create a task for an account and get it tracked
- Log in to your Oorwin Account and navigate to Accounts module from the left menu under General Section
- Click on any account name to whom you want to Create a task
- Search for Tasks icon on the right panel and click on it
- It opens a popup with all the tasks that all your team created
- Click on Add task button on the top right corner
- Enter all the required fields like title, description, due date, reminder, assigned to, etc
- User can also tag this task to a contact available on this account
- Now click on save on the bottom and thats it, your task has created and notified to the assigned user
Was this article helpful?
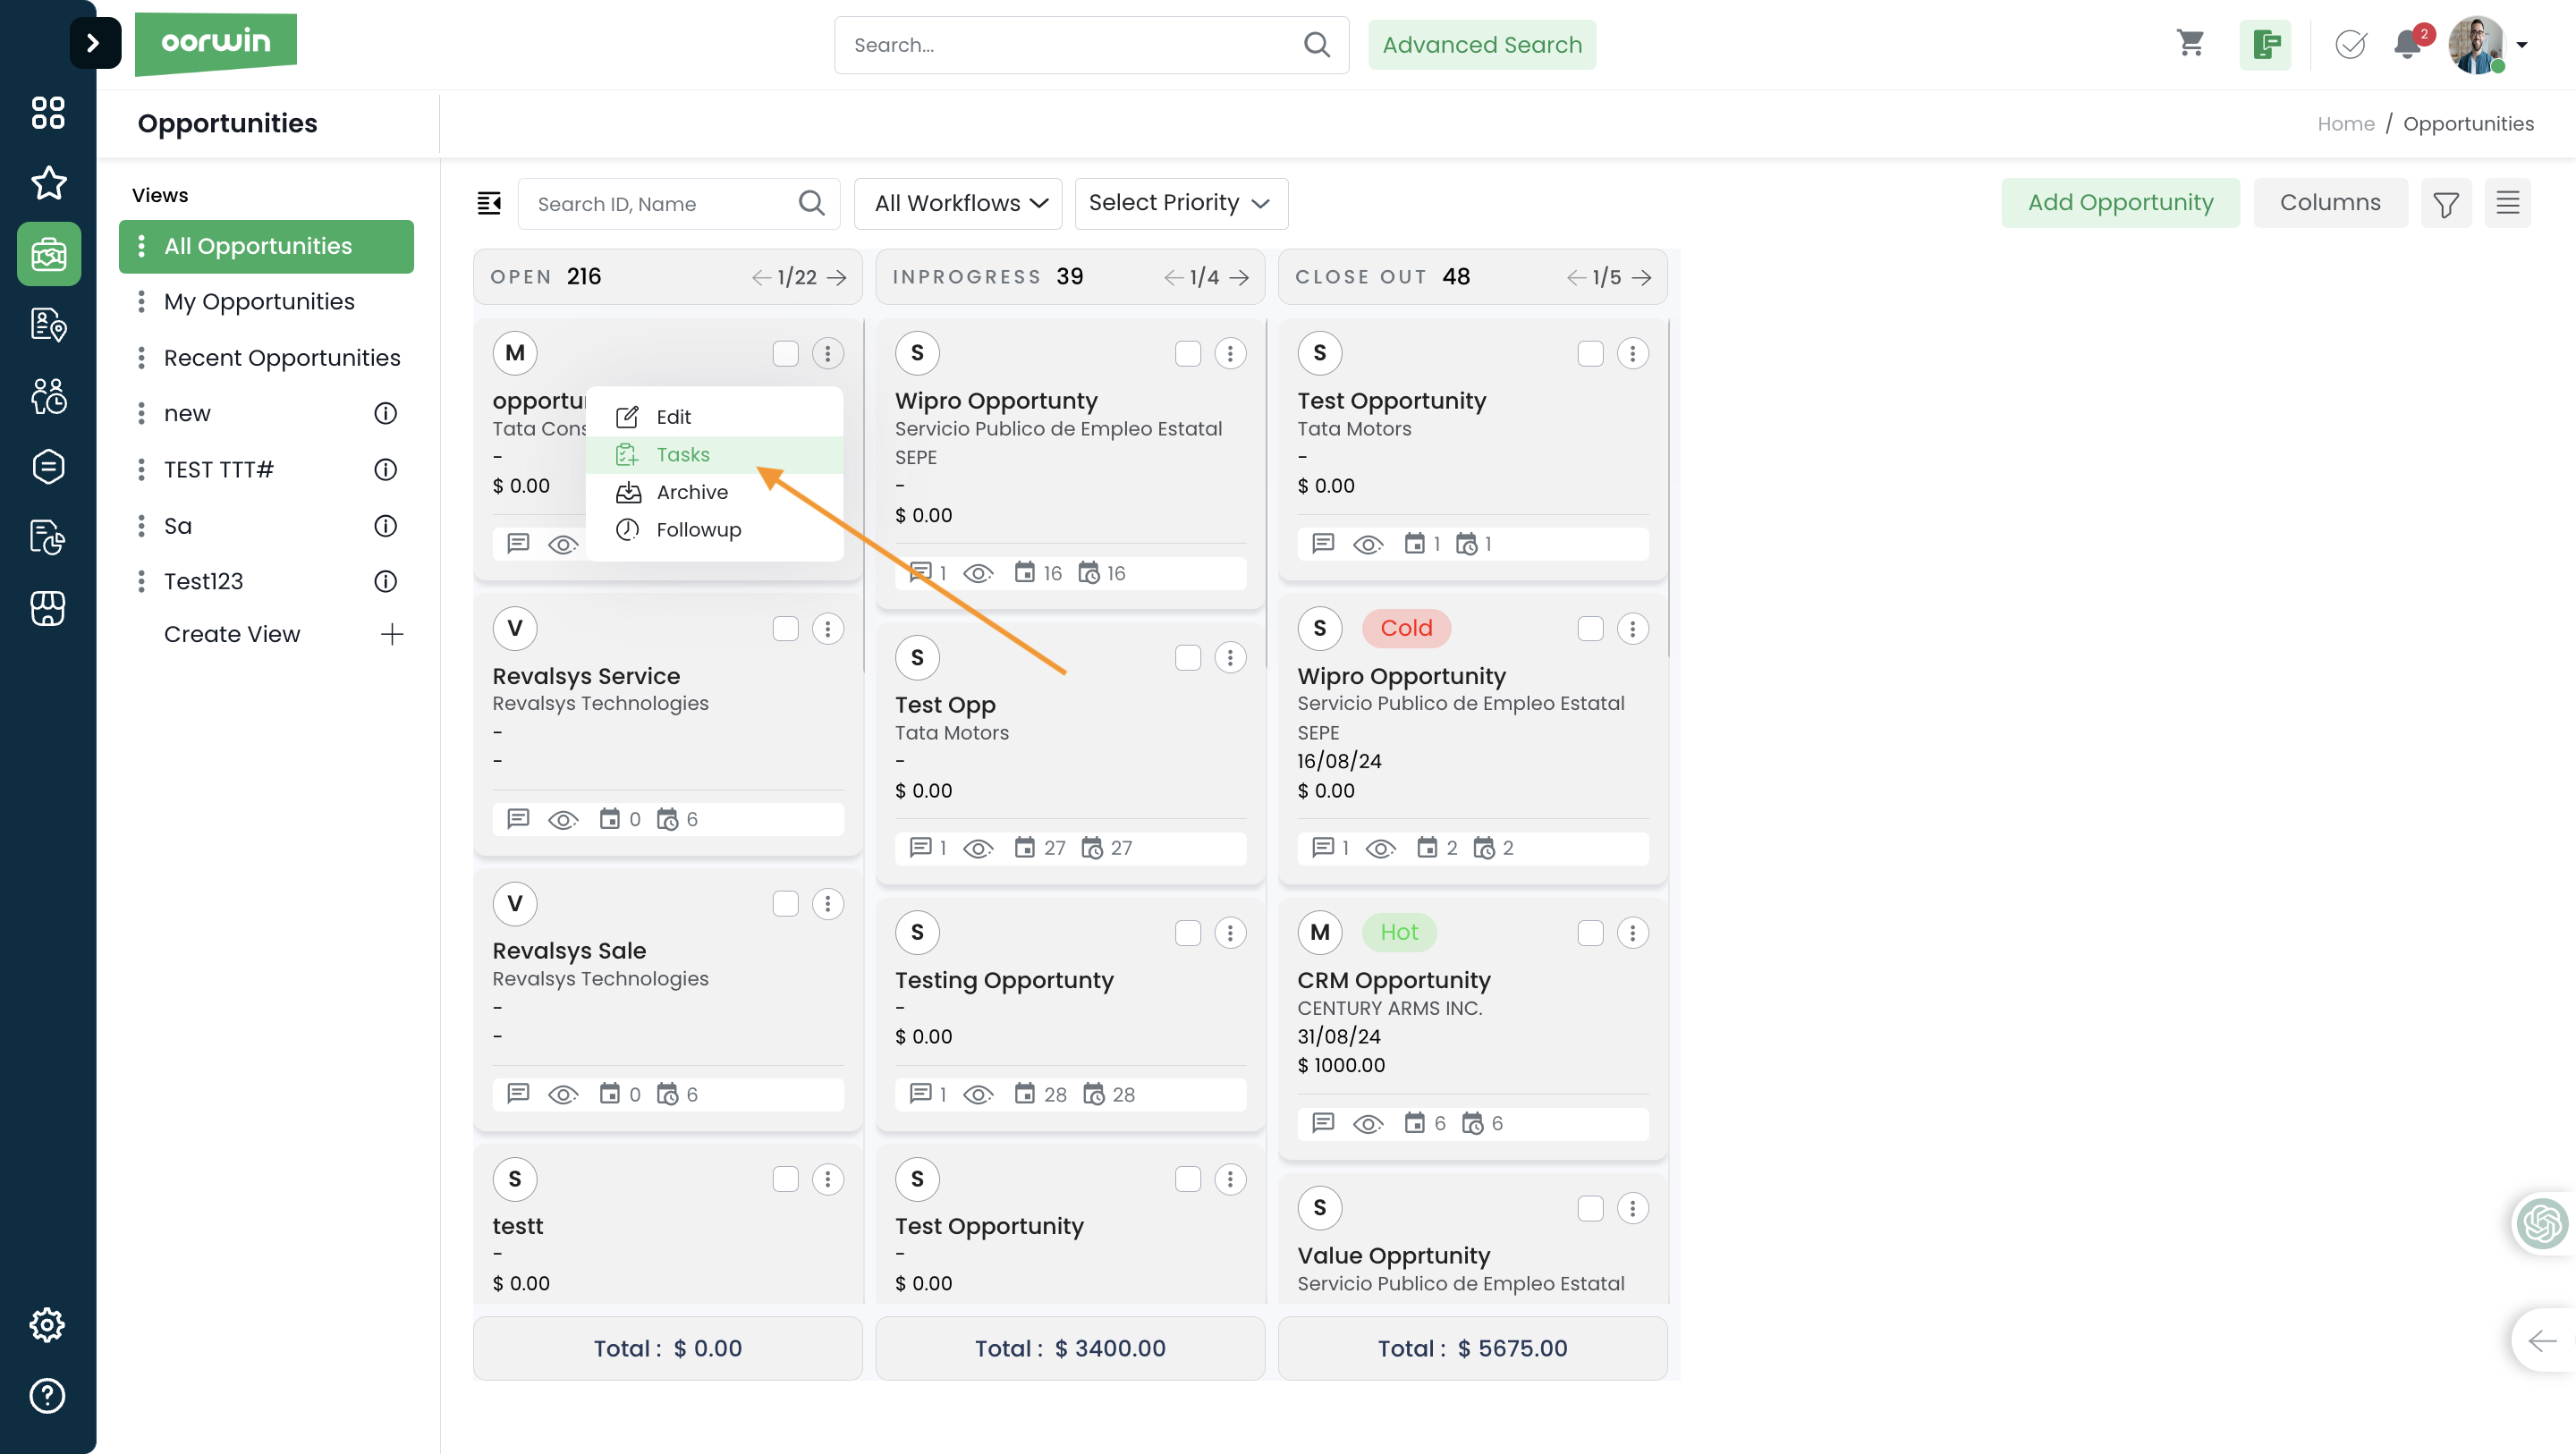
Users can rely on tasks for assigning work to specific modules, tracking progress, and ensuring notification to each team member.
Here is how you can create a task for the Opportunity and get it tracked
- Log in to your Oorwin Account and navigate to Opportunity module from the left menu under Sales Section
- Click on any Opportunity name to whom you want to Create a task
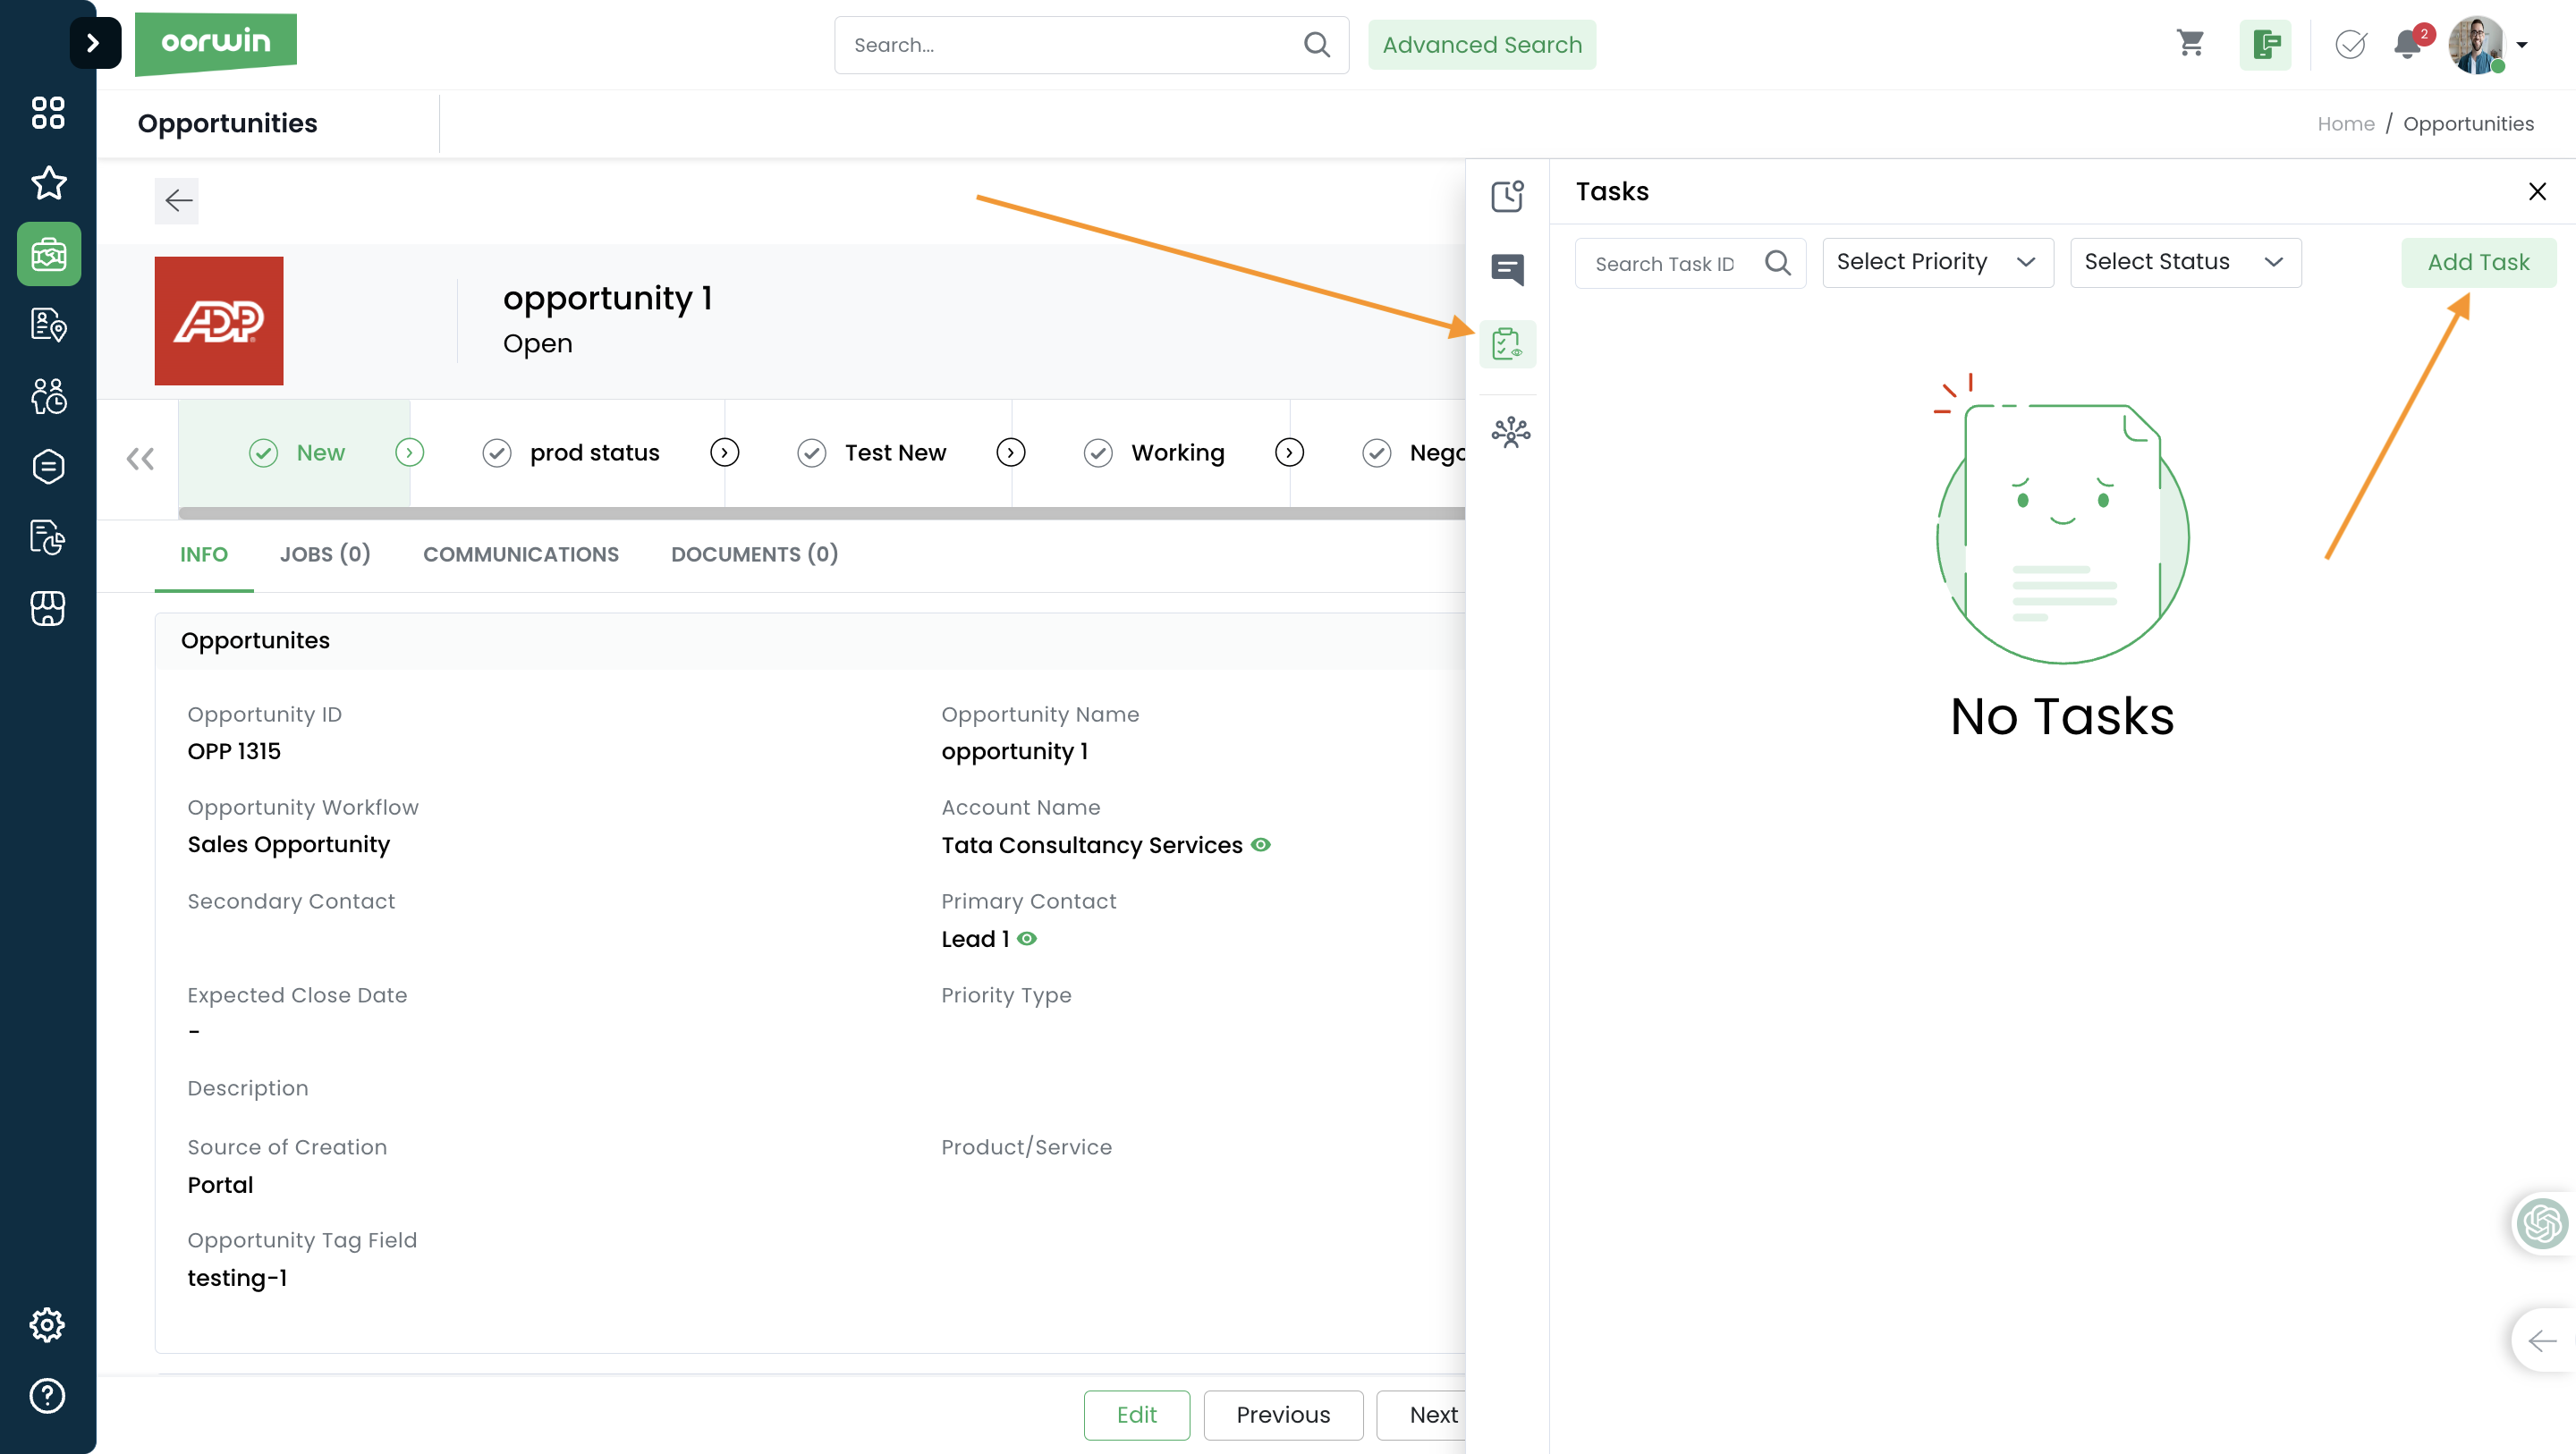
- Search for Tasks icon on the right panel and click on it
- It opens a popup with all the tasks that all your team created
- Click on Add task button on the top right corner
- Enter all the required fields like title, description, due date, reminder, assigned to, etc
- Now click on save on the bottom and thats it, your task has created and notified to the assigned user
Note: You can also create the task from the list view, grid view and on the quick view which you can see from the actions under three dots icon
Was this article helpful?
Users can add their own timesheets or they can add other employee timesheets also through on-behalf option. As an admin/reporting manager you can also add your team timesheets from this page
Here is how you can create an timesheet from employee view page
- Log in to your Oorwin Account and navigate to Employees module from the left menu under HRMS Section
- Click on any employee name to whom you wanted to add a timesheet
- Search for Timesheets tab on the top and click on it
- It shows all the previous timesheets related that employee along with the status
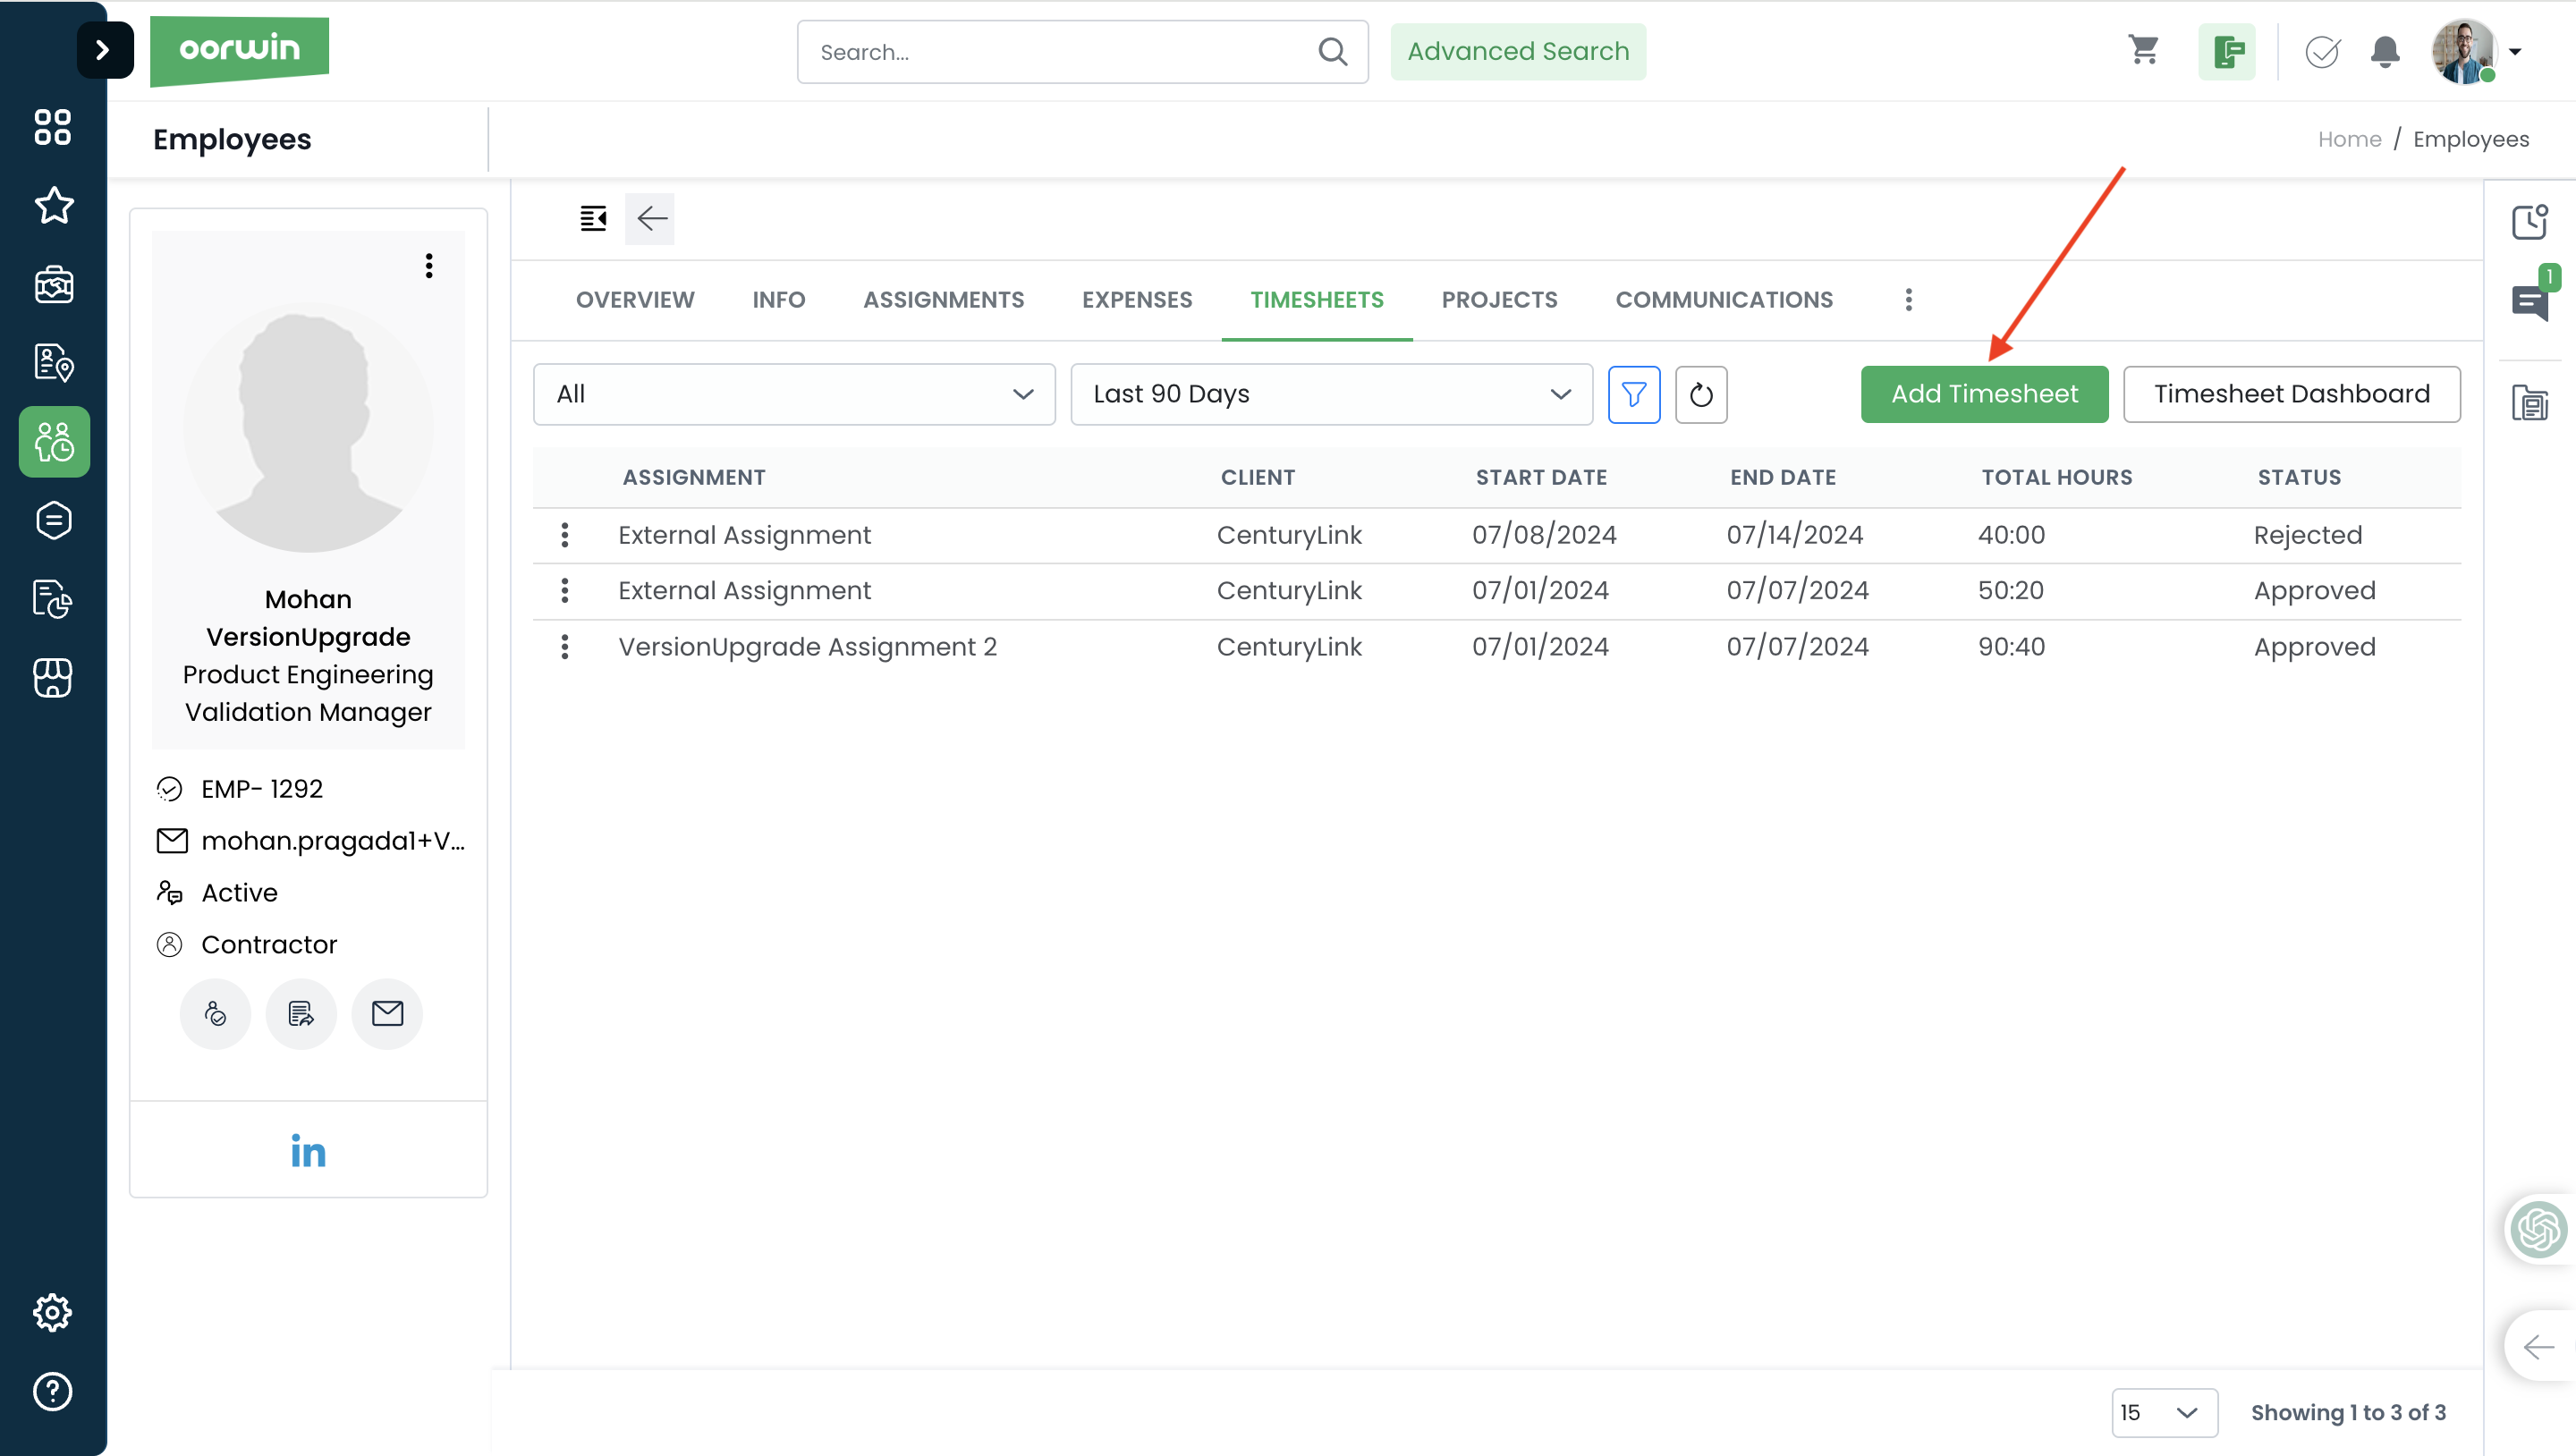
- To add a new timesheet, you need to click on “Add Timesheet” button which opens the add timesheet form
- Select the time period from the calendar and fill all the details related to that timesheet like each day hours , notes, attachments etc and click on Submit
- This actions creates a new timesheet on the name of employee and an automatic email will be triggered to the approvers
Note: To do this action you need to have add timesheet permission from the Role security->select role->timesheet add permission
Was this article helpful?
To import accounts through an excel sheet first you need download the accounts template fromat through below steps
- Log in to your Oorwin Account and navigate to Accounts module from the left menu under General Section
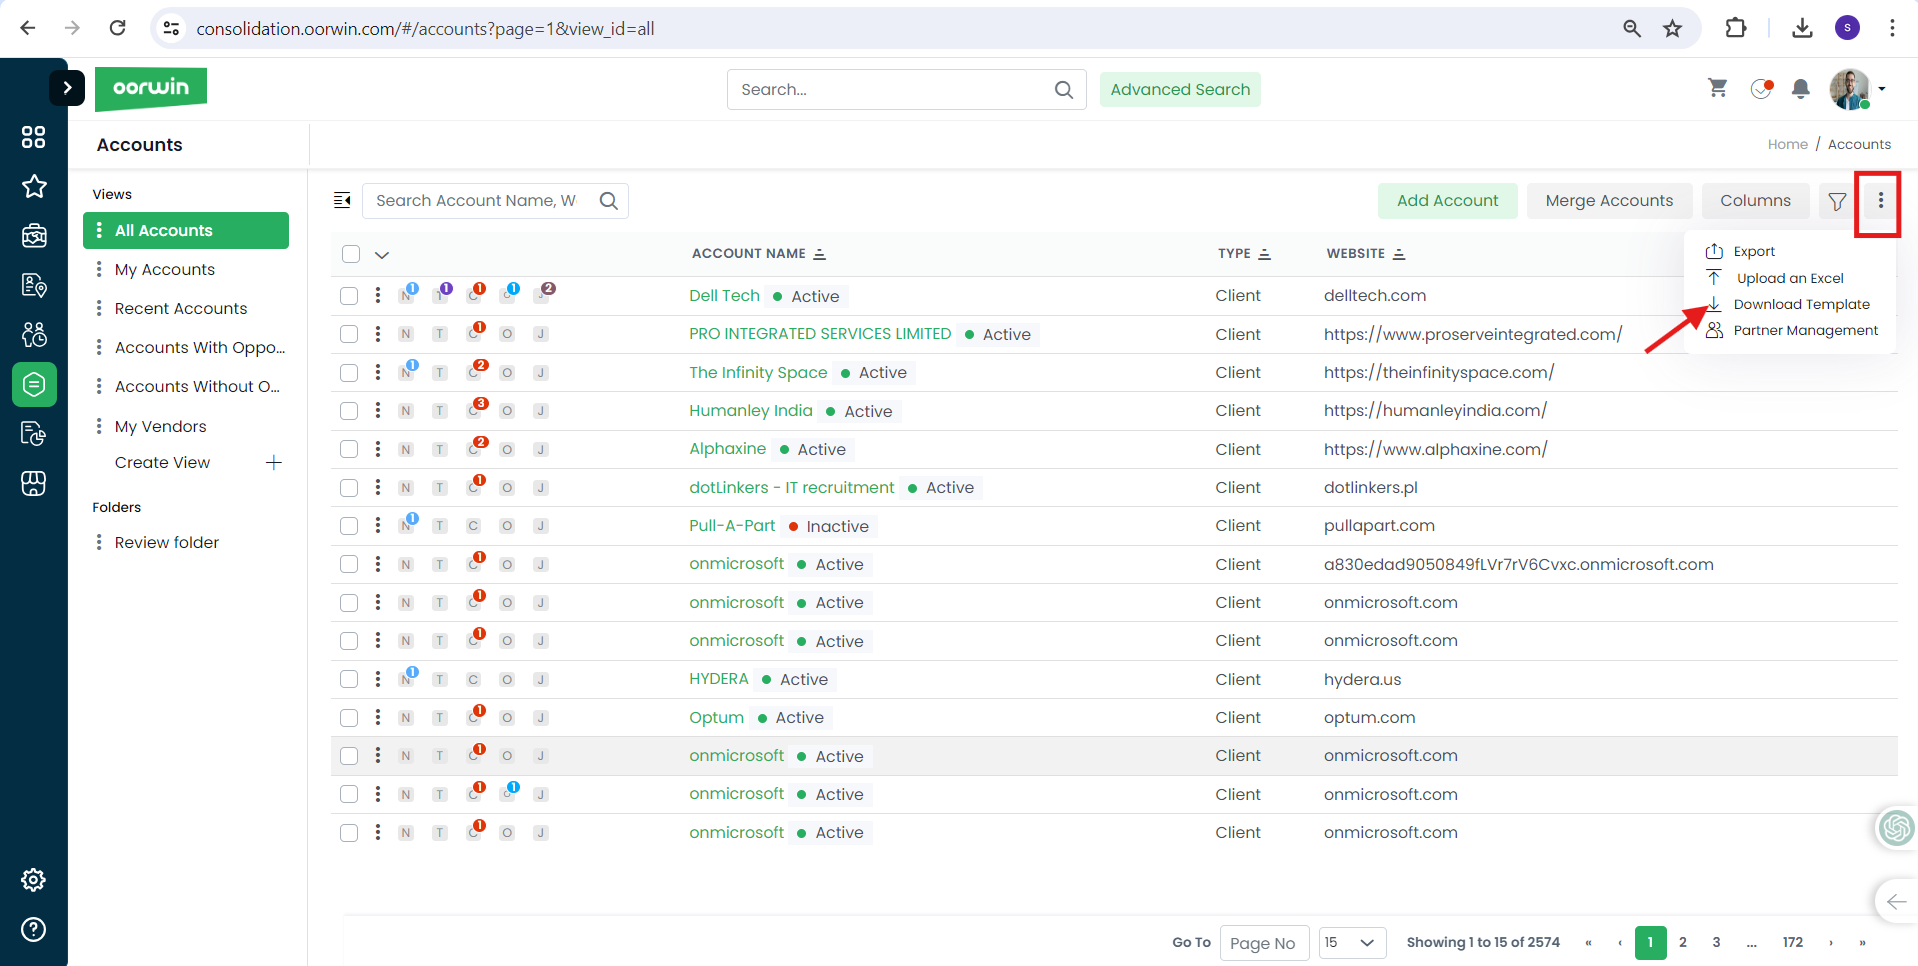
- Click on “More(three dots)” icon on the top right corner
- Click on Downaload Template option from the drop down list
- An excel template will be downloaded with all the account field coluns which you need to fill all the accounts data in it
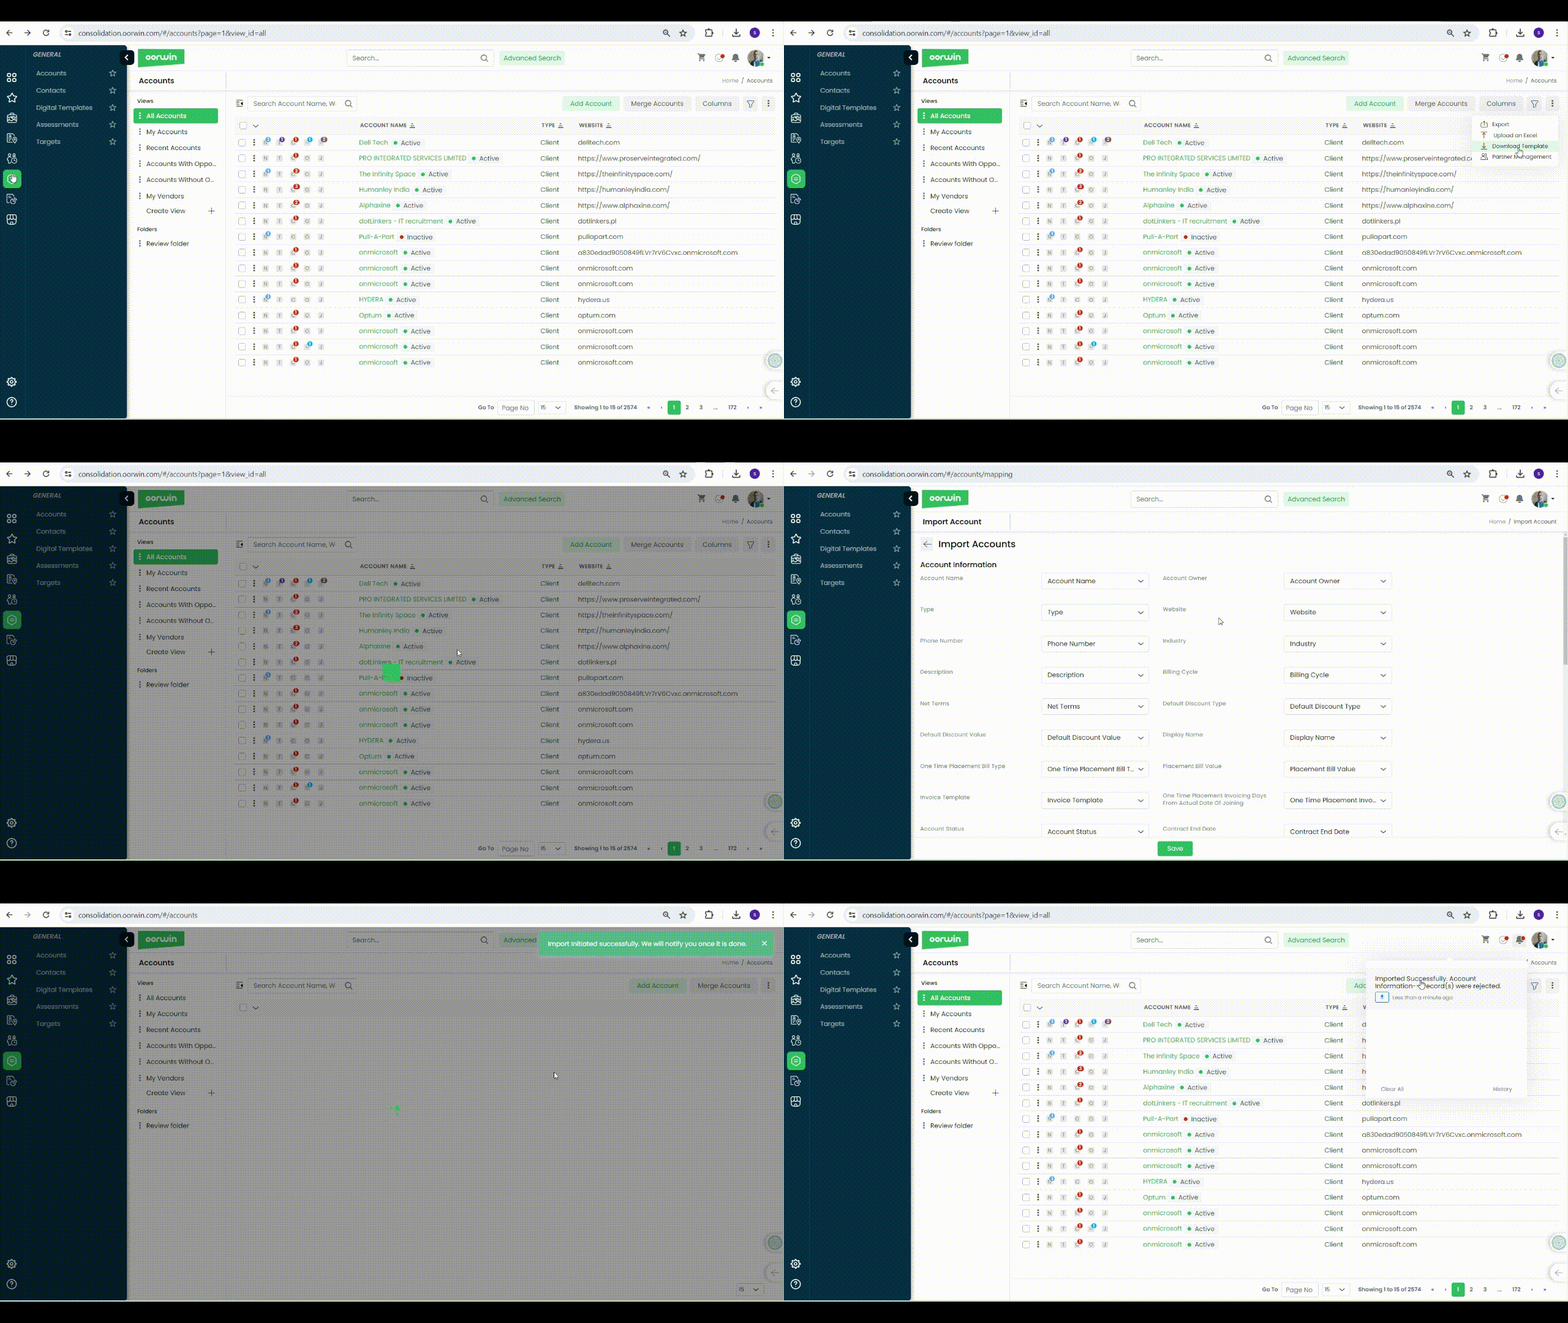
- Once you have filled all the account details in the excel sheet you need to upload it through Upload Excel option
- Now system will ask you to check all the details mapped exactly with the excel fields
- Then click on Save button on the bottom to export all the data to Accounts module
- Once it is exported, a success notification will be displayed in the Notifications section on the top
Was this article helpful?
Creating an Account record in Oorwin is as simple as below:
- Log in to your Oorwin Account and navigate to Accounts module from the left menu under General Section
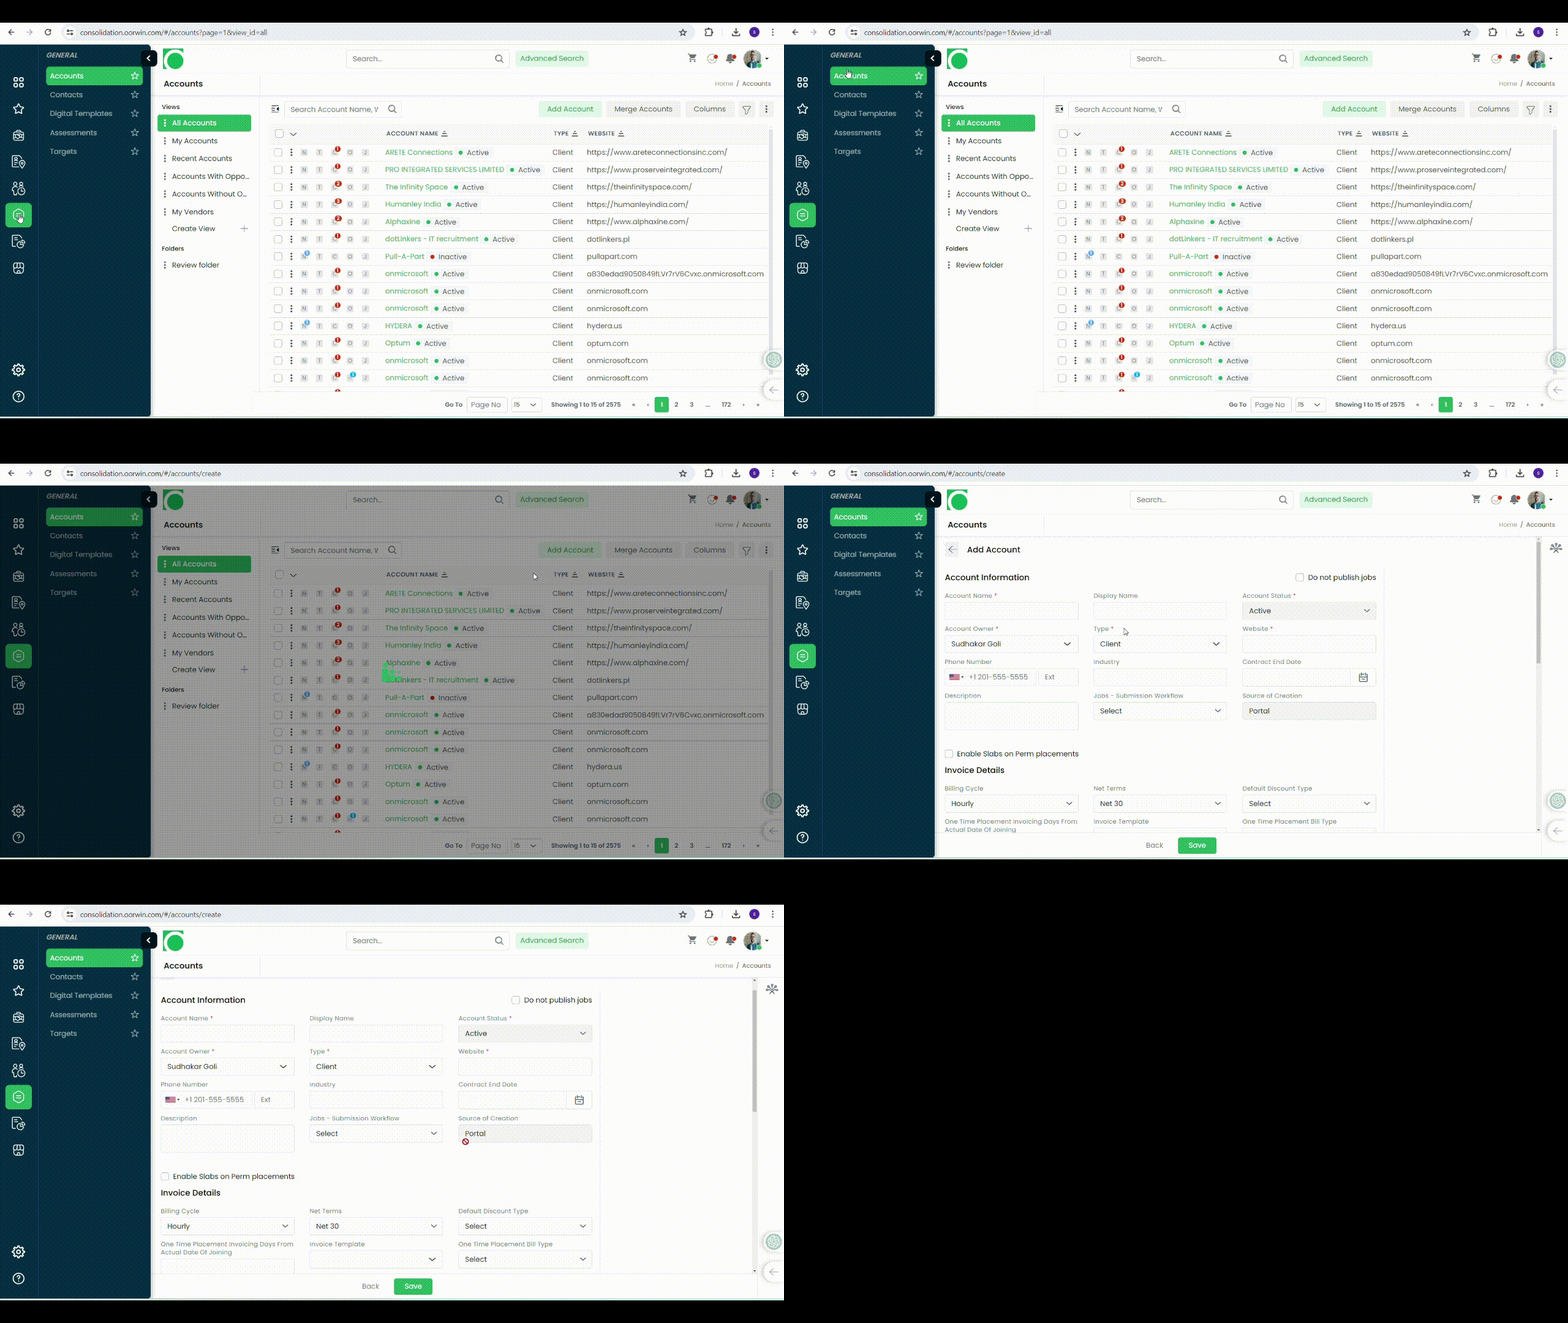
- Click on “Add Account” button on the top right corner.
- Fill all the required information like Account Name,type,Phone number, etc.
- Then click on “Save” button on the bottom
- And that’s it! Your account has created
Was this article helpful?
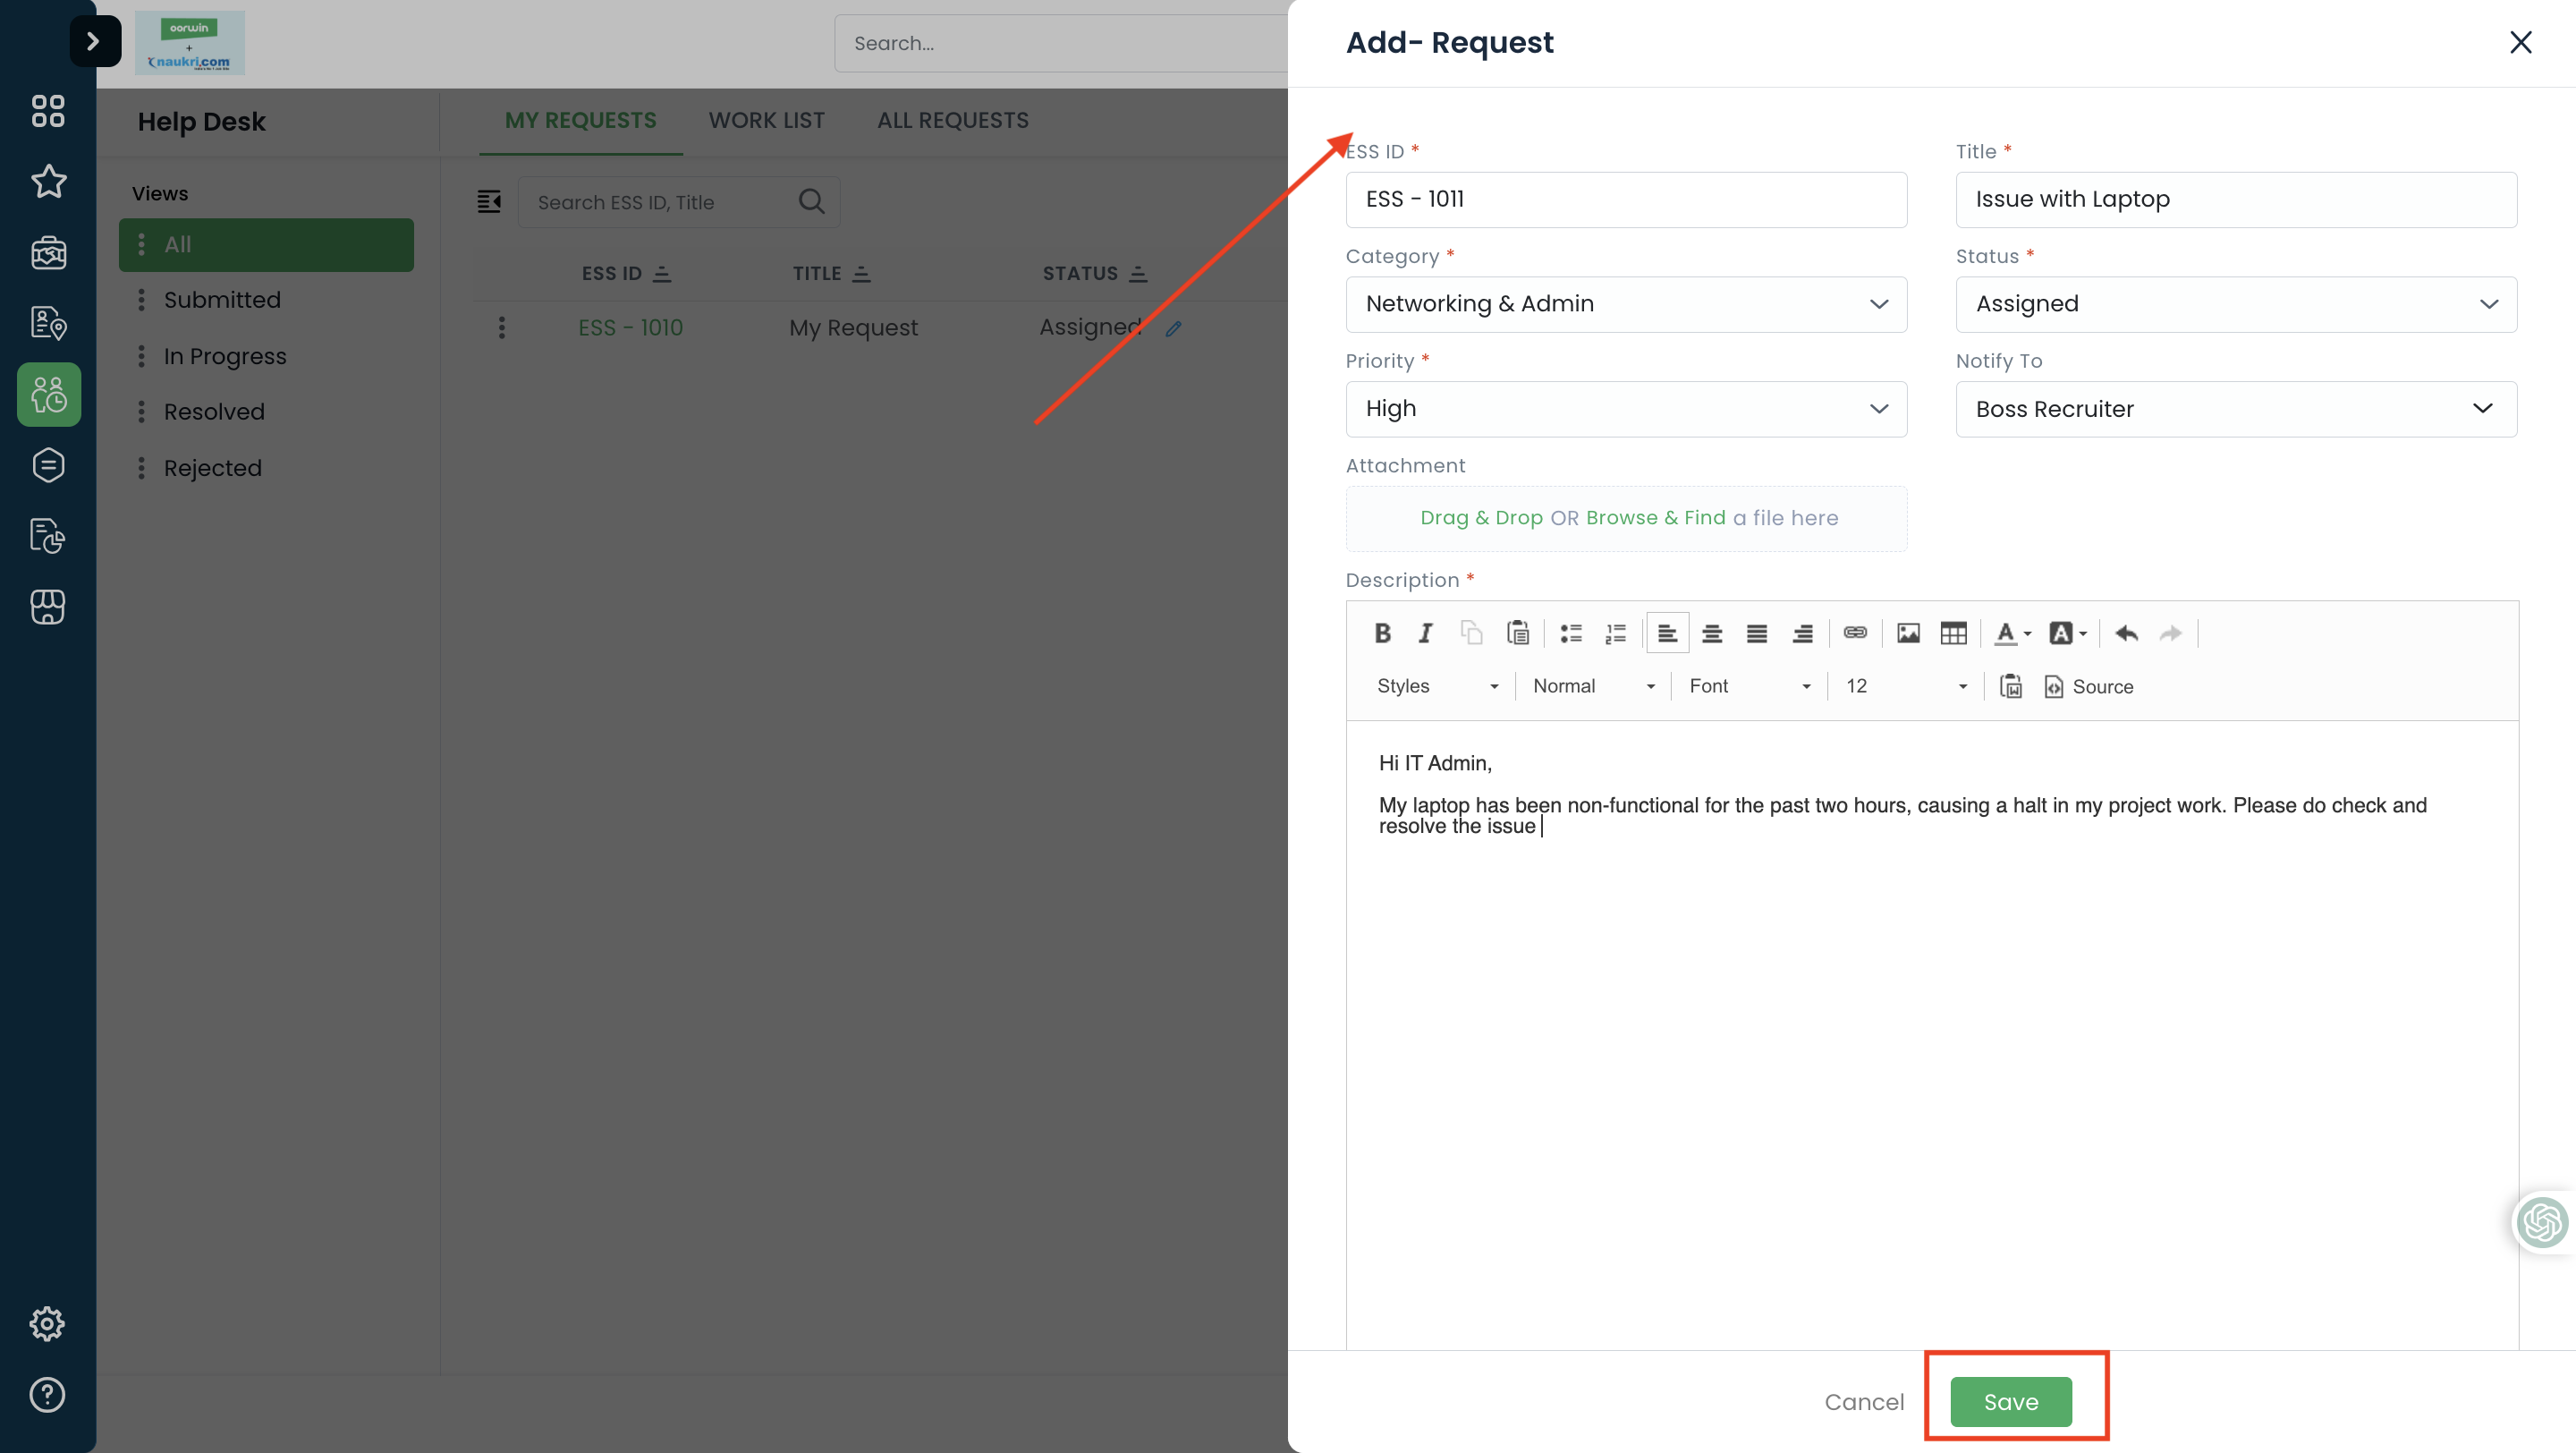
In Oorwin, ESS services will help to automate the employee concerns and issues in multiple departments and it also helps to the employees to create, assign and track the tickets that were assigned to specific departments in their organization for better resolution
Follow the below steps to create a ESS request
- Go to Help Desk module from the left menu under Human Resources Section
- This will list all the available tickets that were created and assigned previously
- Now click on Create Request button on the top right corner to create a new ESS request
- Enter the information like title, category, description etc and attach any screenshot for reference
- Now click on Save button and your ticket will be created, assigned and a mail notification will be sent to the respective assignee
Was this article helpful?
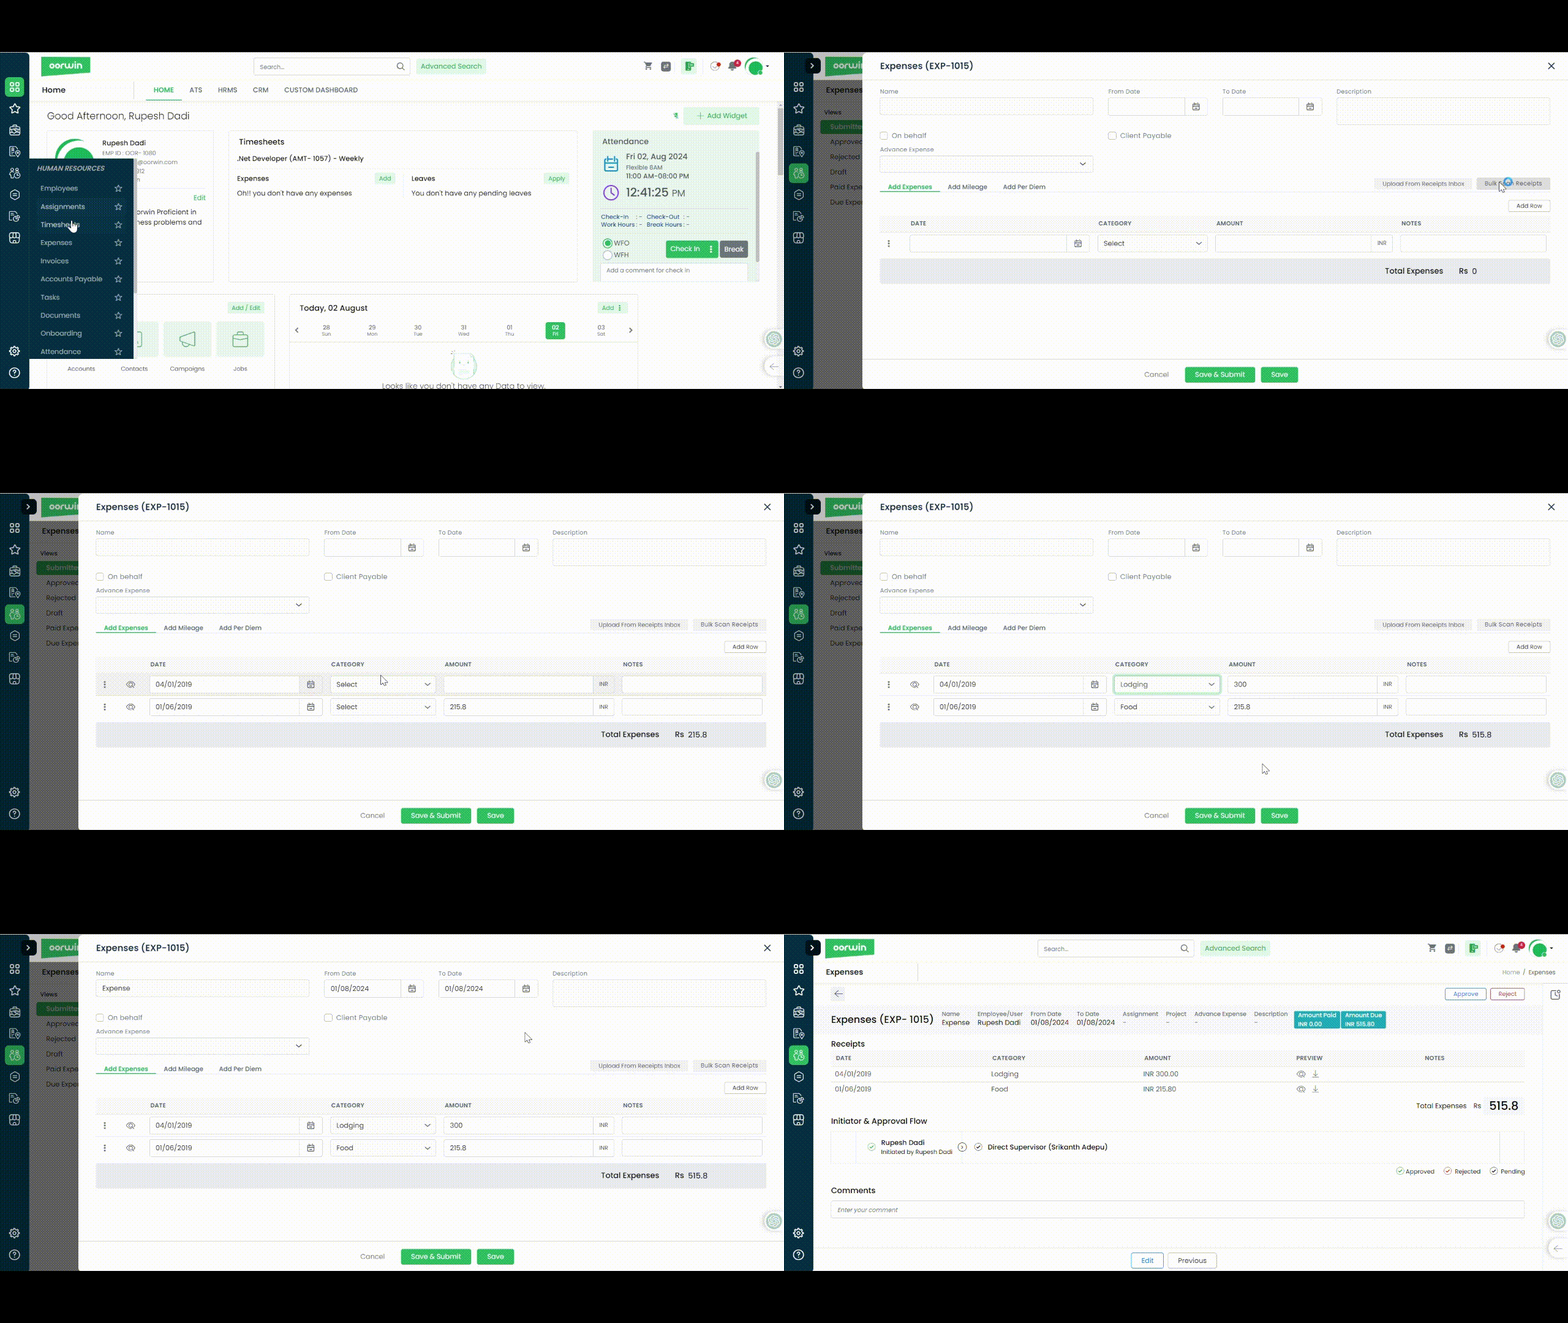
Create and track all your expenses seamlessly
- Navigate to Menu
- Select Expenses
- Click on Add Expense
- Enter the name of the Expense
- Select the dates
- Upload Receipts from inbox or Upload and bulk scan receipts
- System would automatically pick up the Amount and dates mentioned on the bills
- Check your bill amount and click on “Save and Submit”
Was this article helpful?
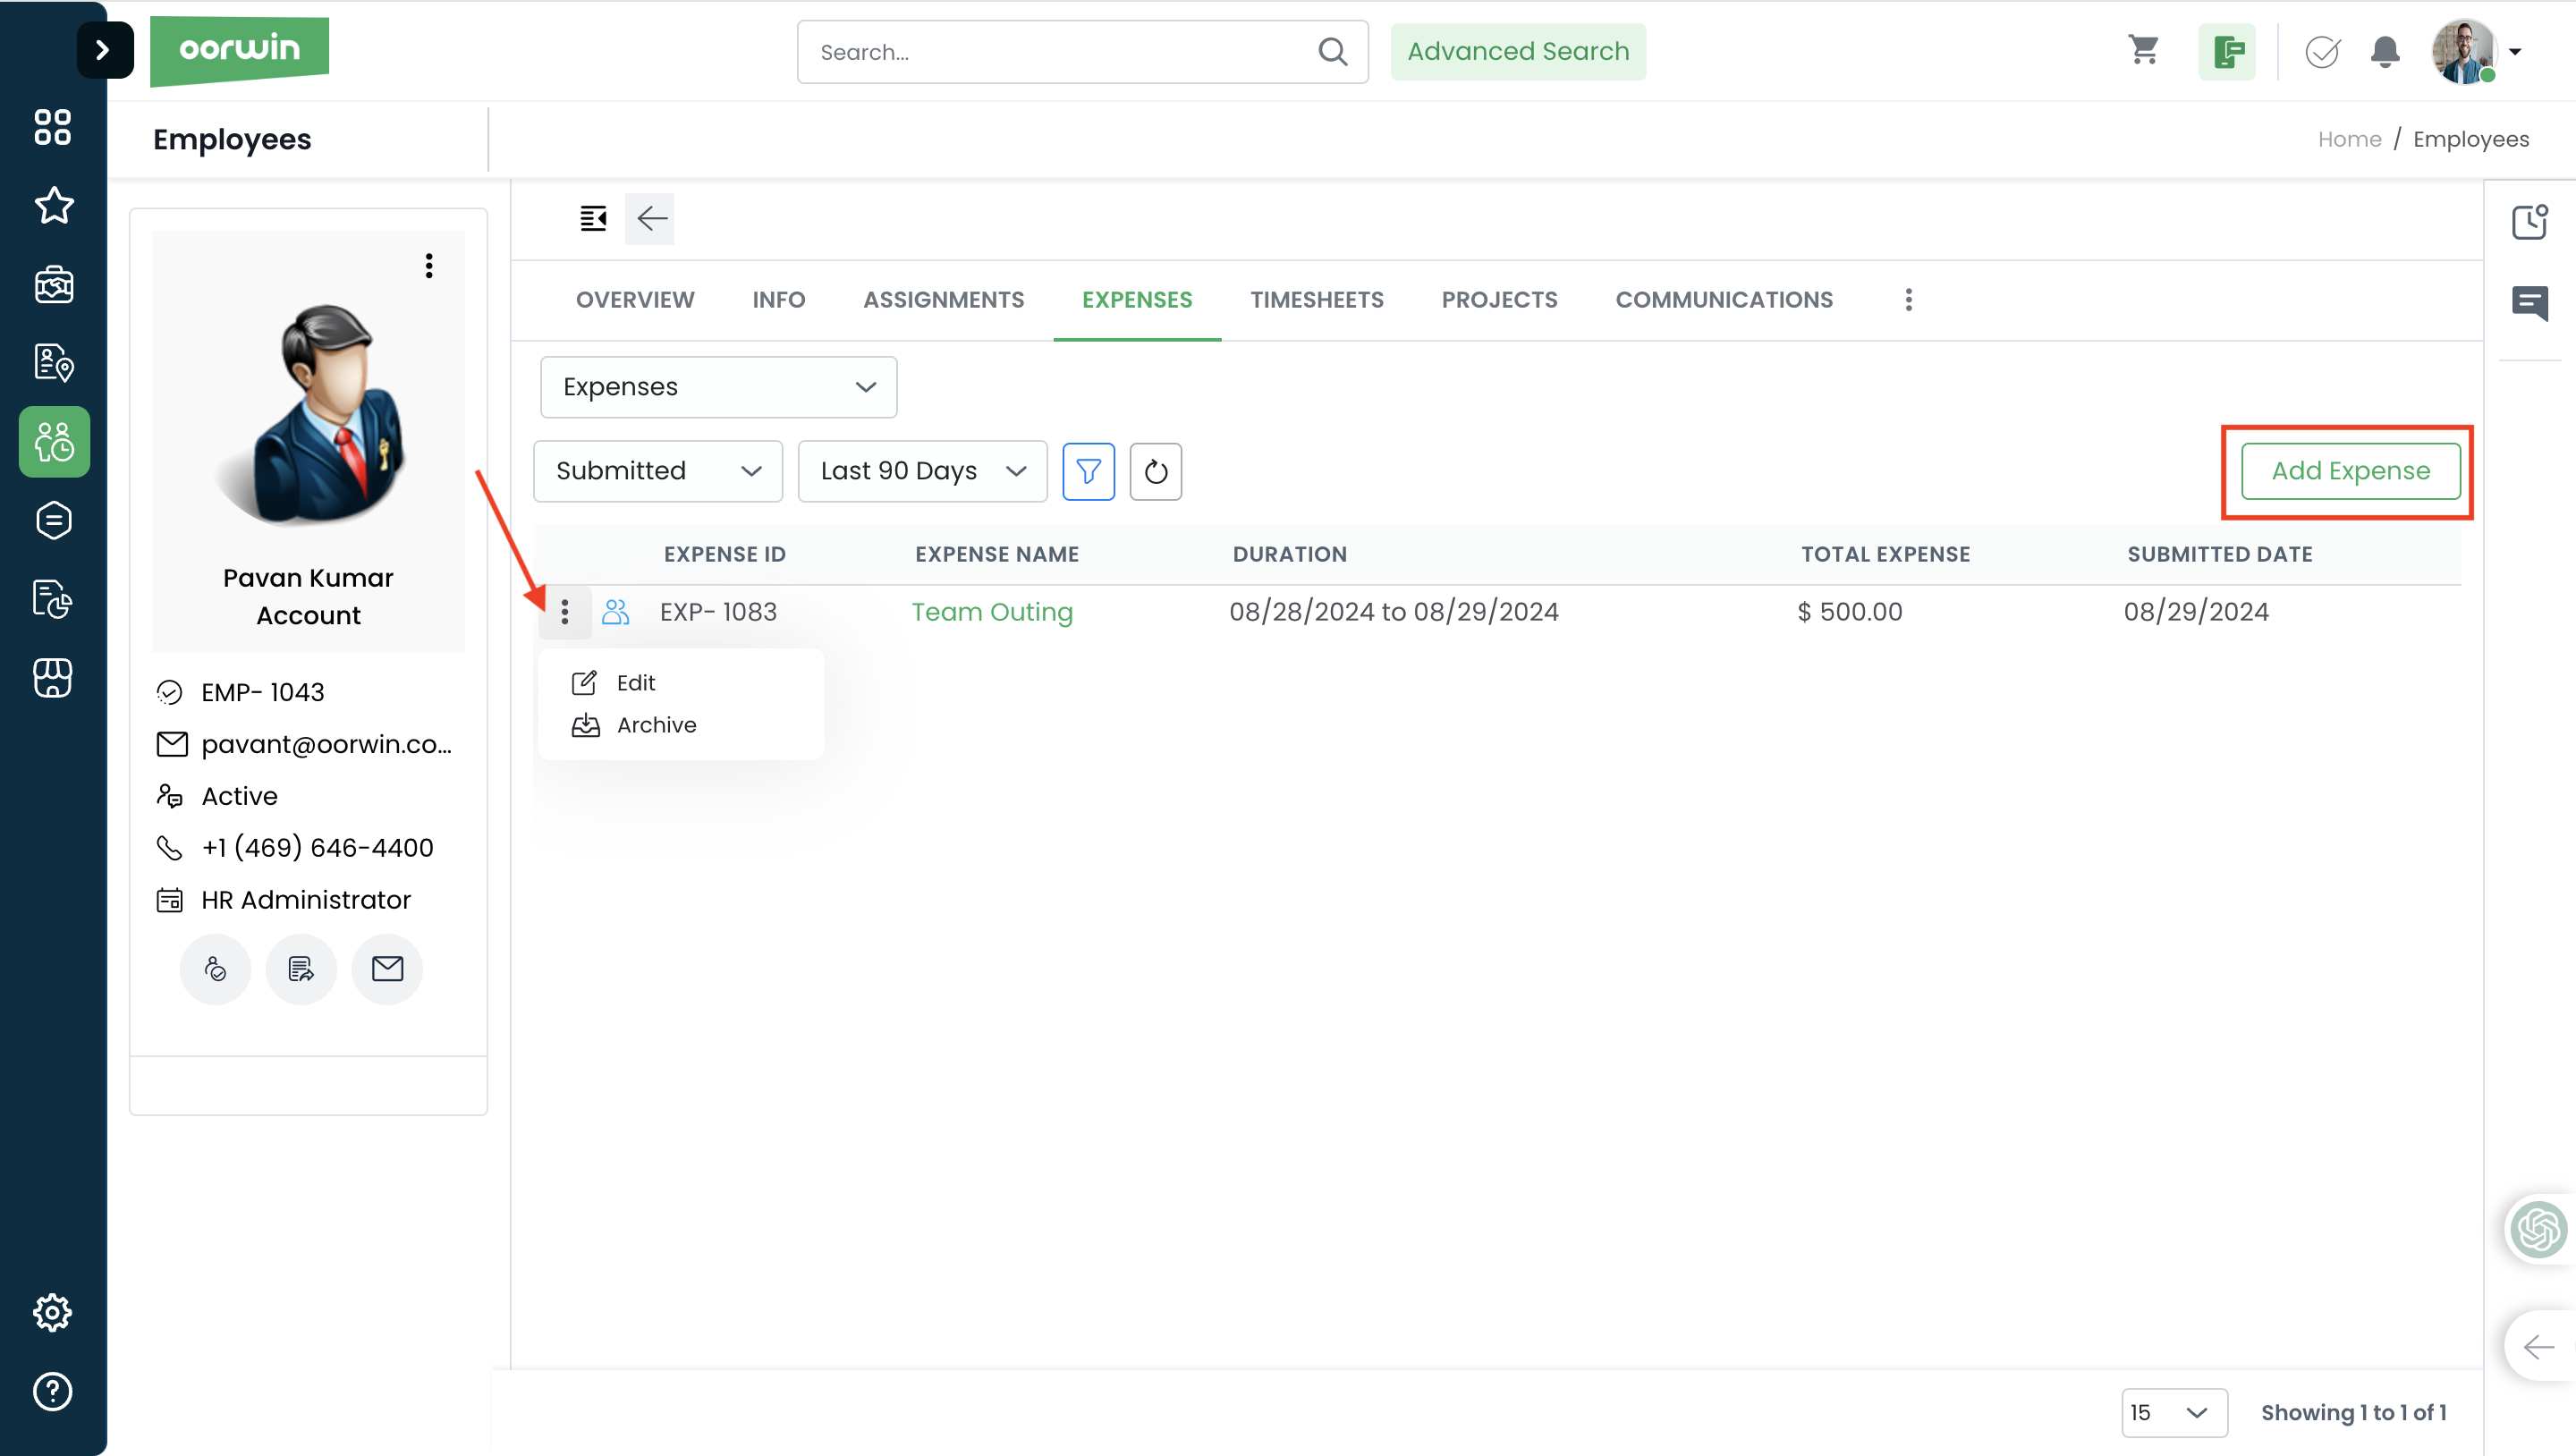
Users can add their own expenses or they can add other employee expenses also through on-behalf option. As an admin/reporting manager you can also add your team expenses from this page
Here is how you can create an expense from employee view page
- Log in to your Oorwin Account and navigate to Employees module from the left menu under HRMS Section
- Click on any employee name to whom you wanted to add an expense
- Search for Expenses tab on the top and click on it
- It shows all the previous expenses related that employee along with the status
- To add an expense, you need to click on “Add Expense” button which opens the add expense form
- Fill all the details related to that expense like name, date, amount etc and click on Submit
- This actions creates a new expense on the name of employee and an automatic email will be triggered to the approvers
Note: To do this action you need to have add expense permission from the Role security->select role->expense add permission
Was this article helpful?
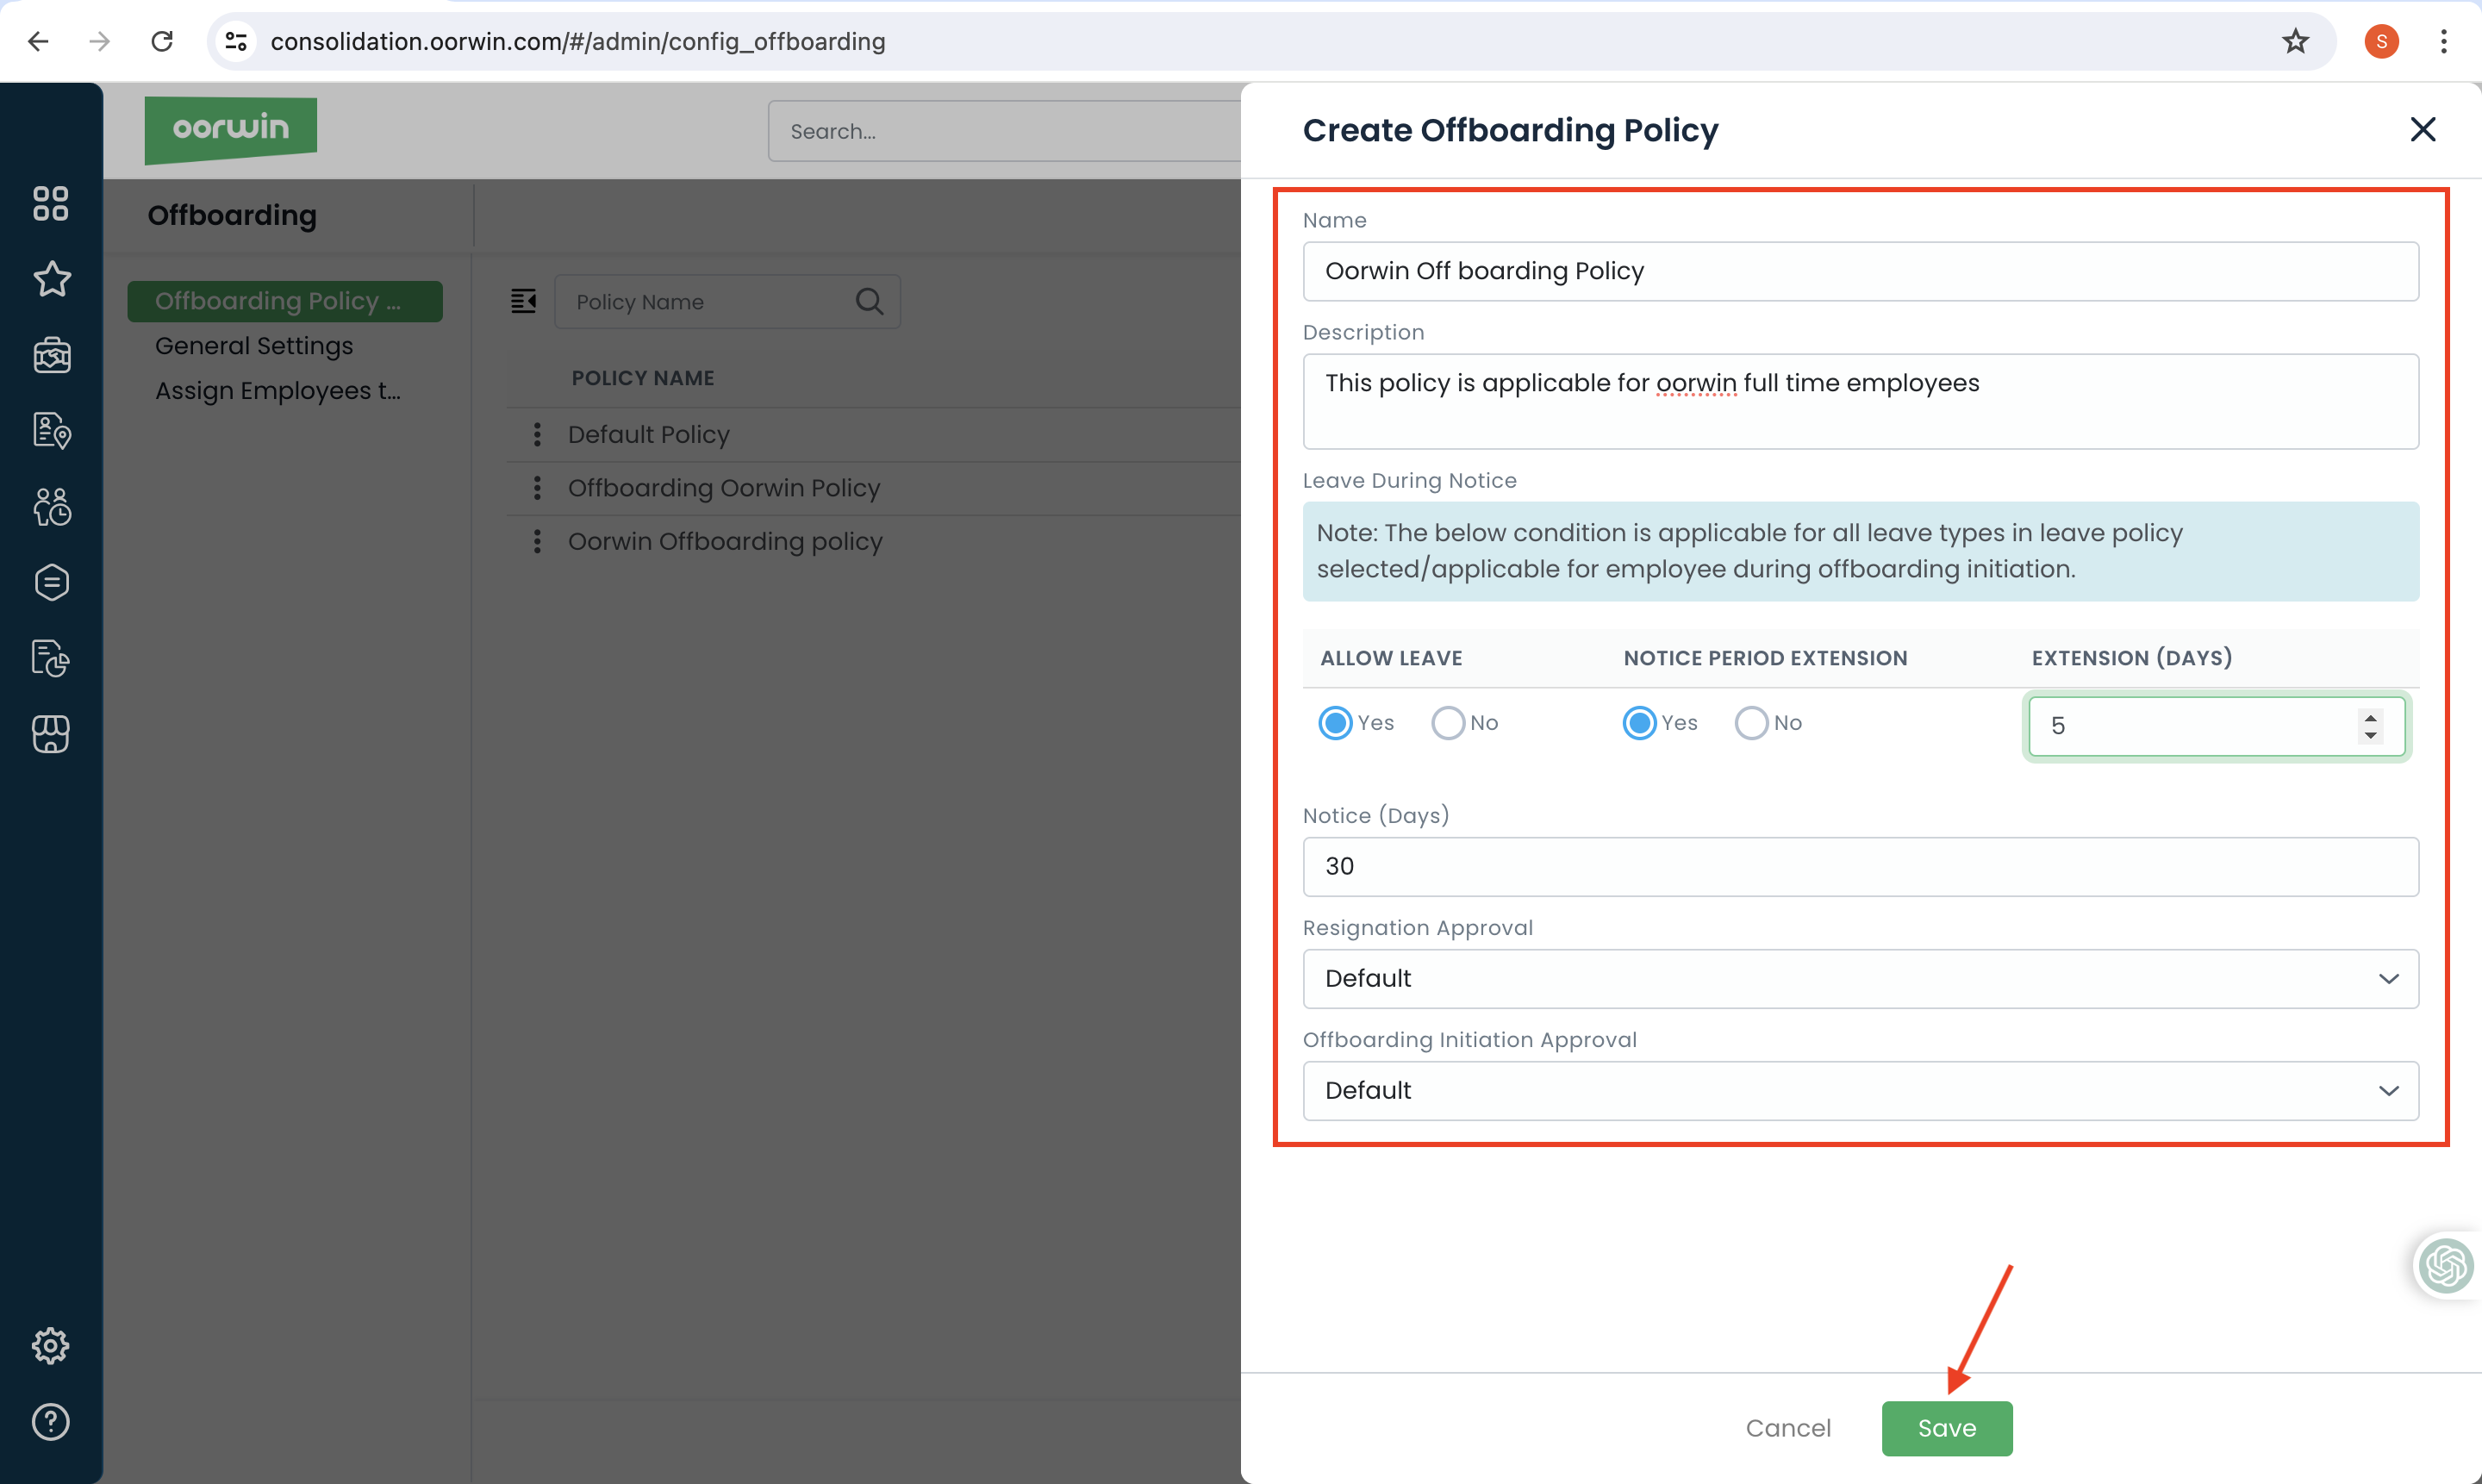
User can create multiple off boarding policies for with different configurations for different employees
Below are the steps to create a new off boarding policy
- Log in to your Oorwin Account and navigate to Settings page from the left bottom
- Go to Off boarding under Configurations section and click on “Add Policy” button on the top right
- Enter the Policy Name and description and configure the sections like notice period, approval flow and leave access etc
- Now click on save, and your new off boarding policy has been created and will be available to assign the employees
Was this article helpful?
Managing opportunities effectively can significantly enhance a company’s sales processes and overall customer relationship management.
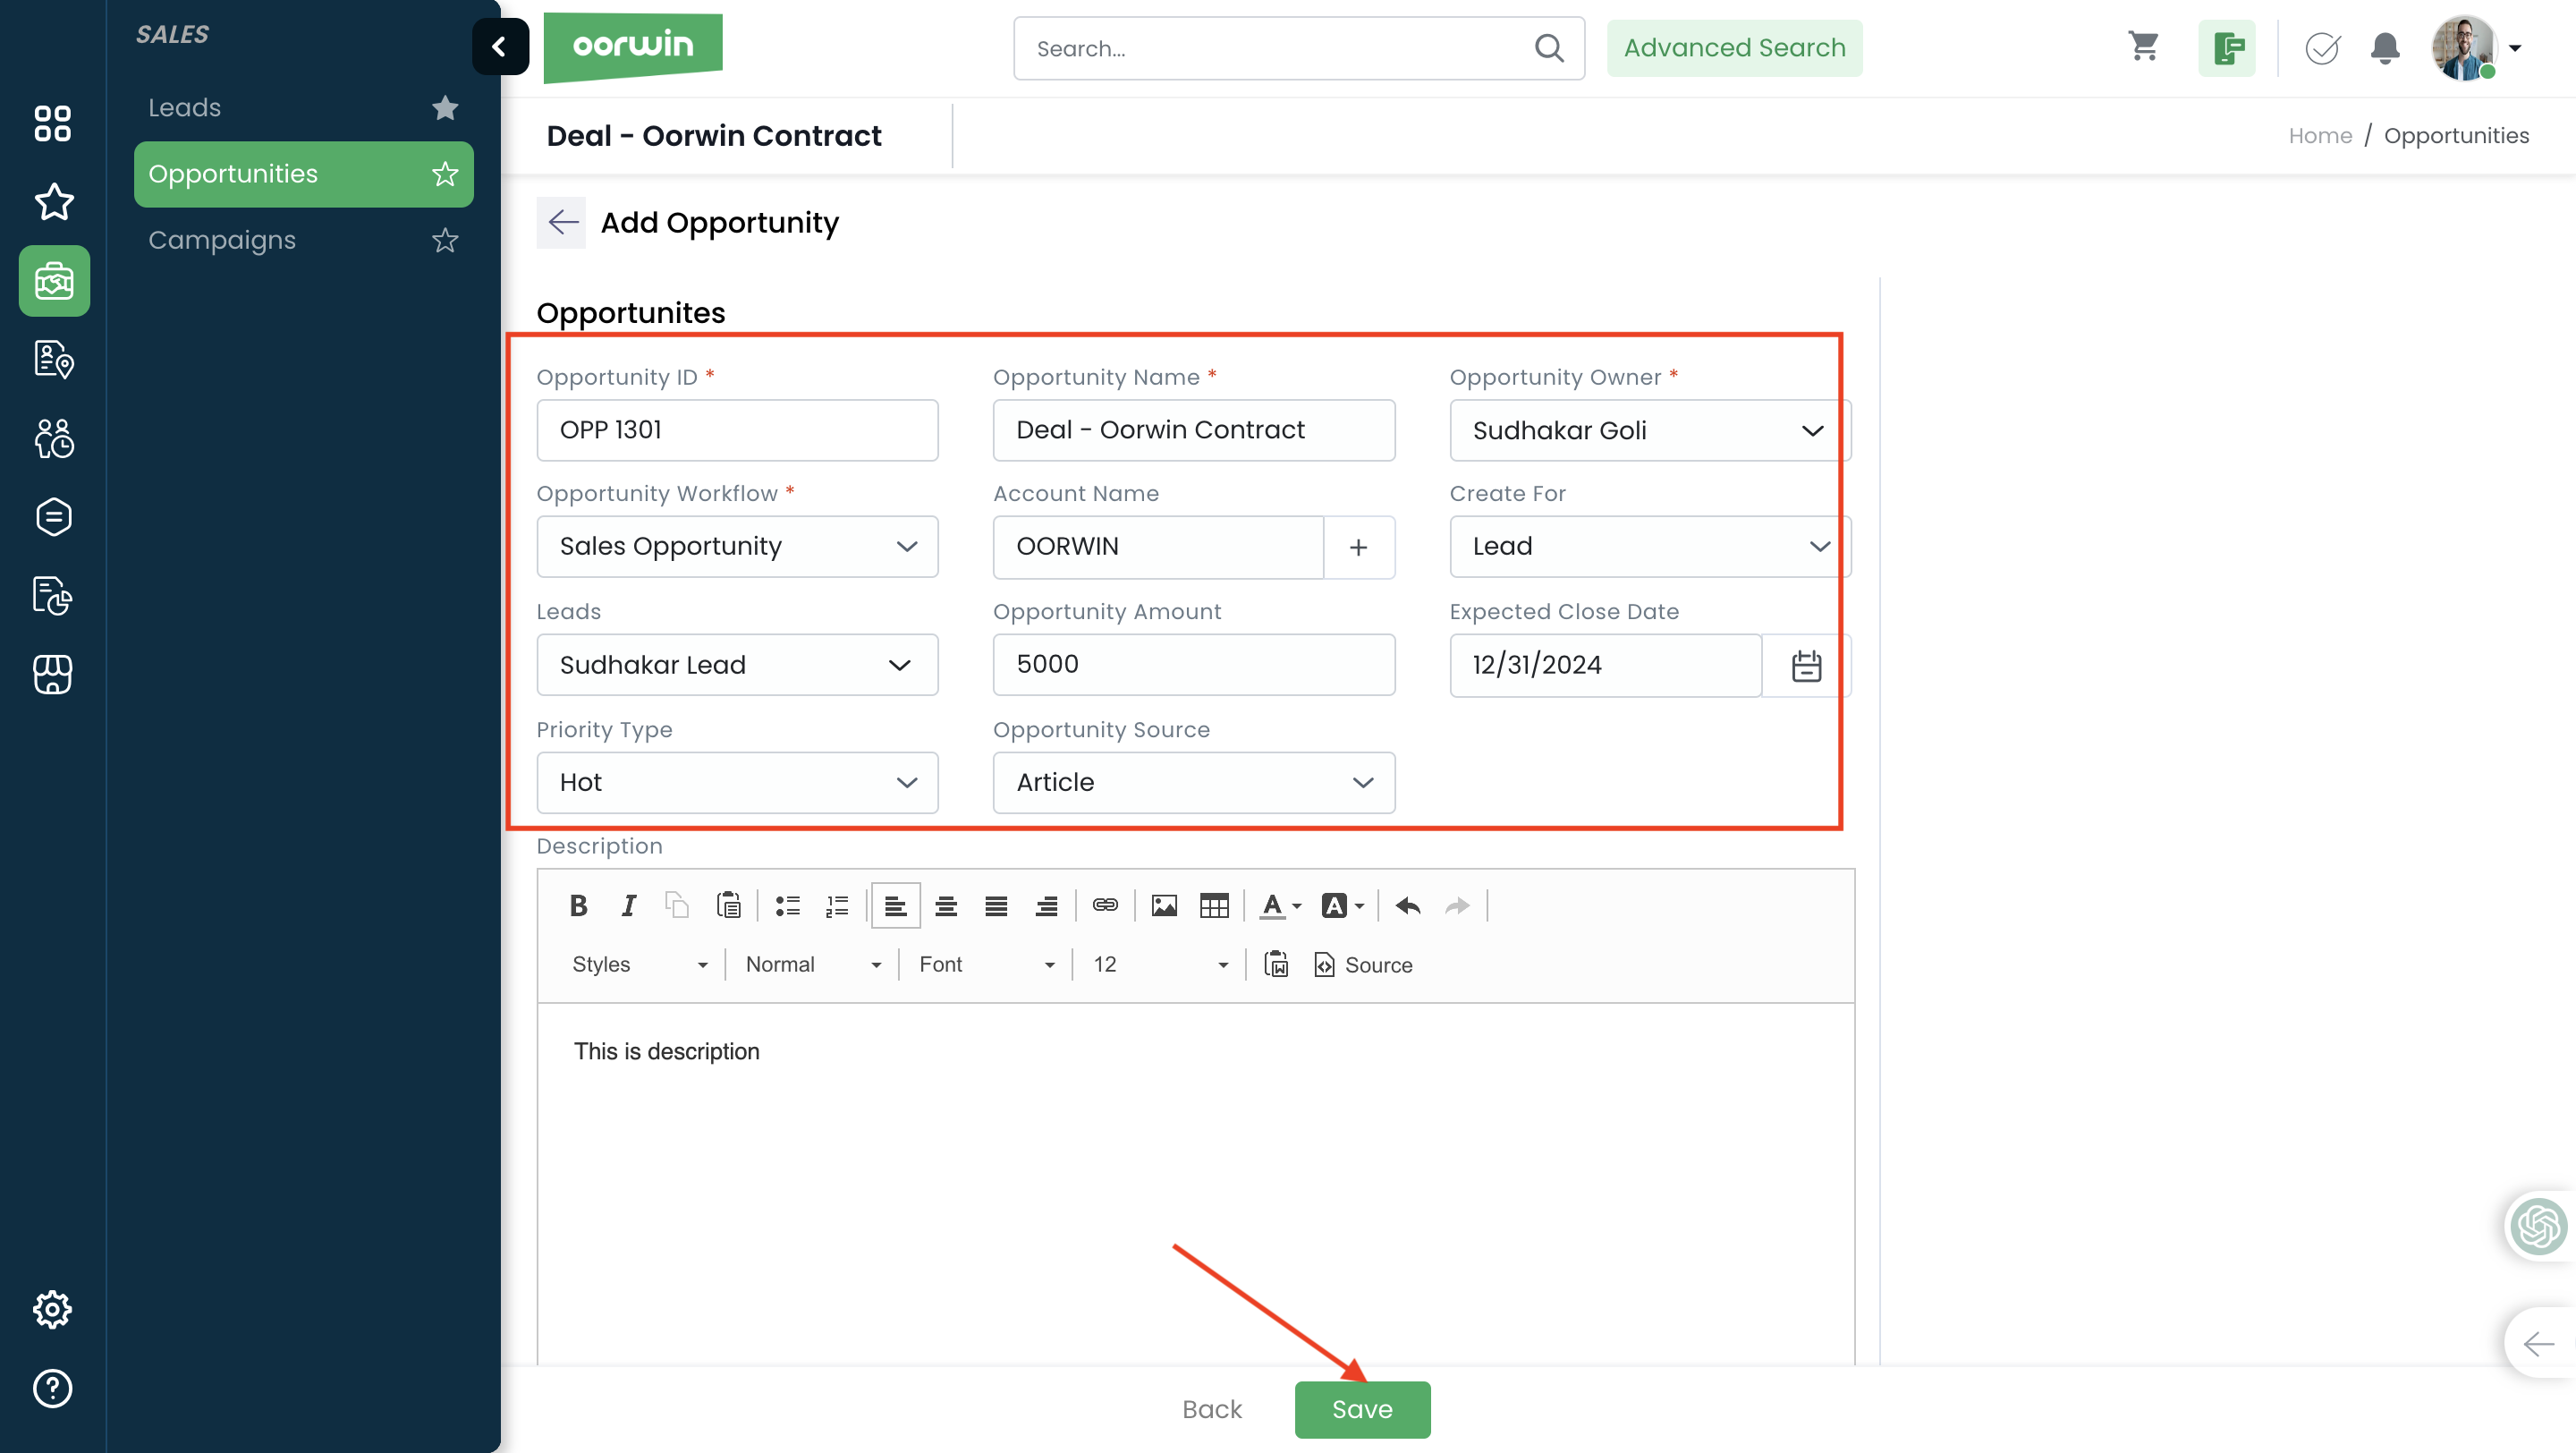
You can create an opportunity in Oorwin in multiple ways.Here is how you can create an opportunity
- Go to Opportunties module from the left menu under CRM Section
- Click on Add Opportunity button on the top right corner
- Enter all the required fields like opportunity name, client name, deal value and description etc
- Now click on Save button below and your opportunity has created in your CRM
Was this article helpful?
If you want to add an Opportunity tagged to a particular lead, then you can do it from the Lead list/view page which will tag it to the same lead.
To do this action you need to have add opportunity permission enabled for your role from the Settings->Role security
Please follow the below steps to create an opportunity from List view page
- Log in to your Oorwin Account and navigate to Leads module from the left menu under Sales Section
- Click on any Lead name to whom you wanted to create a new opportunity
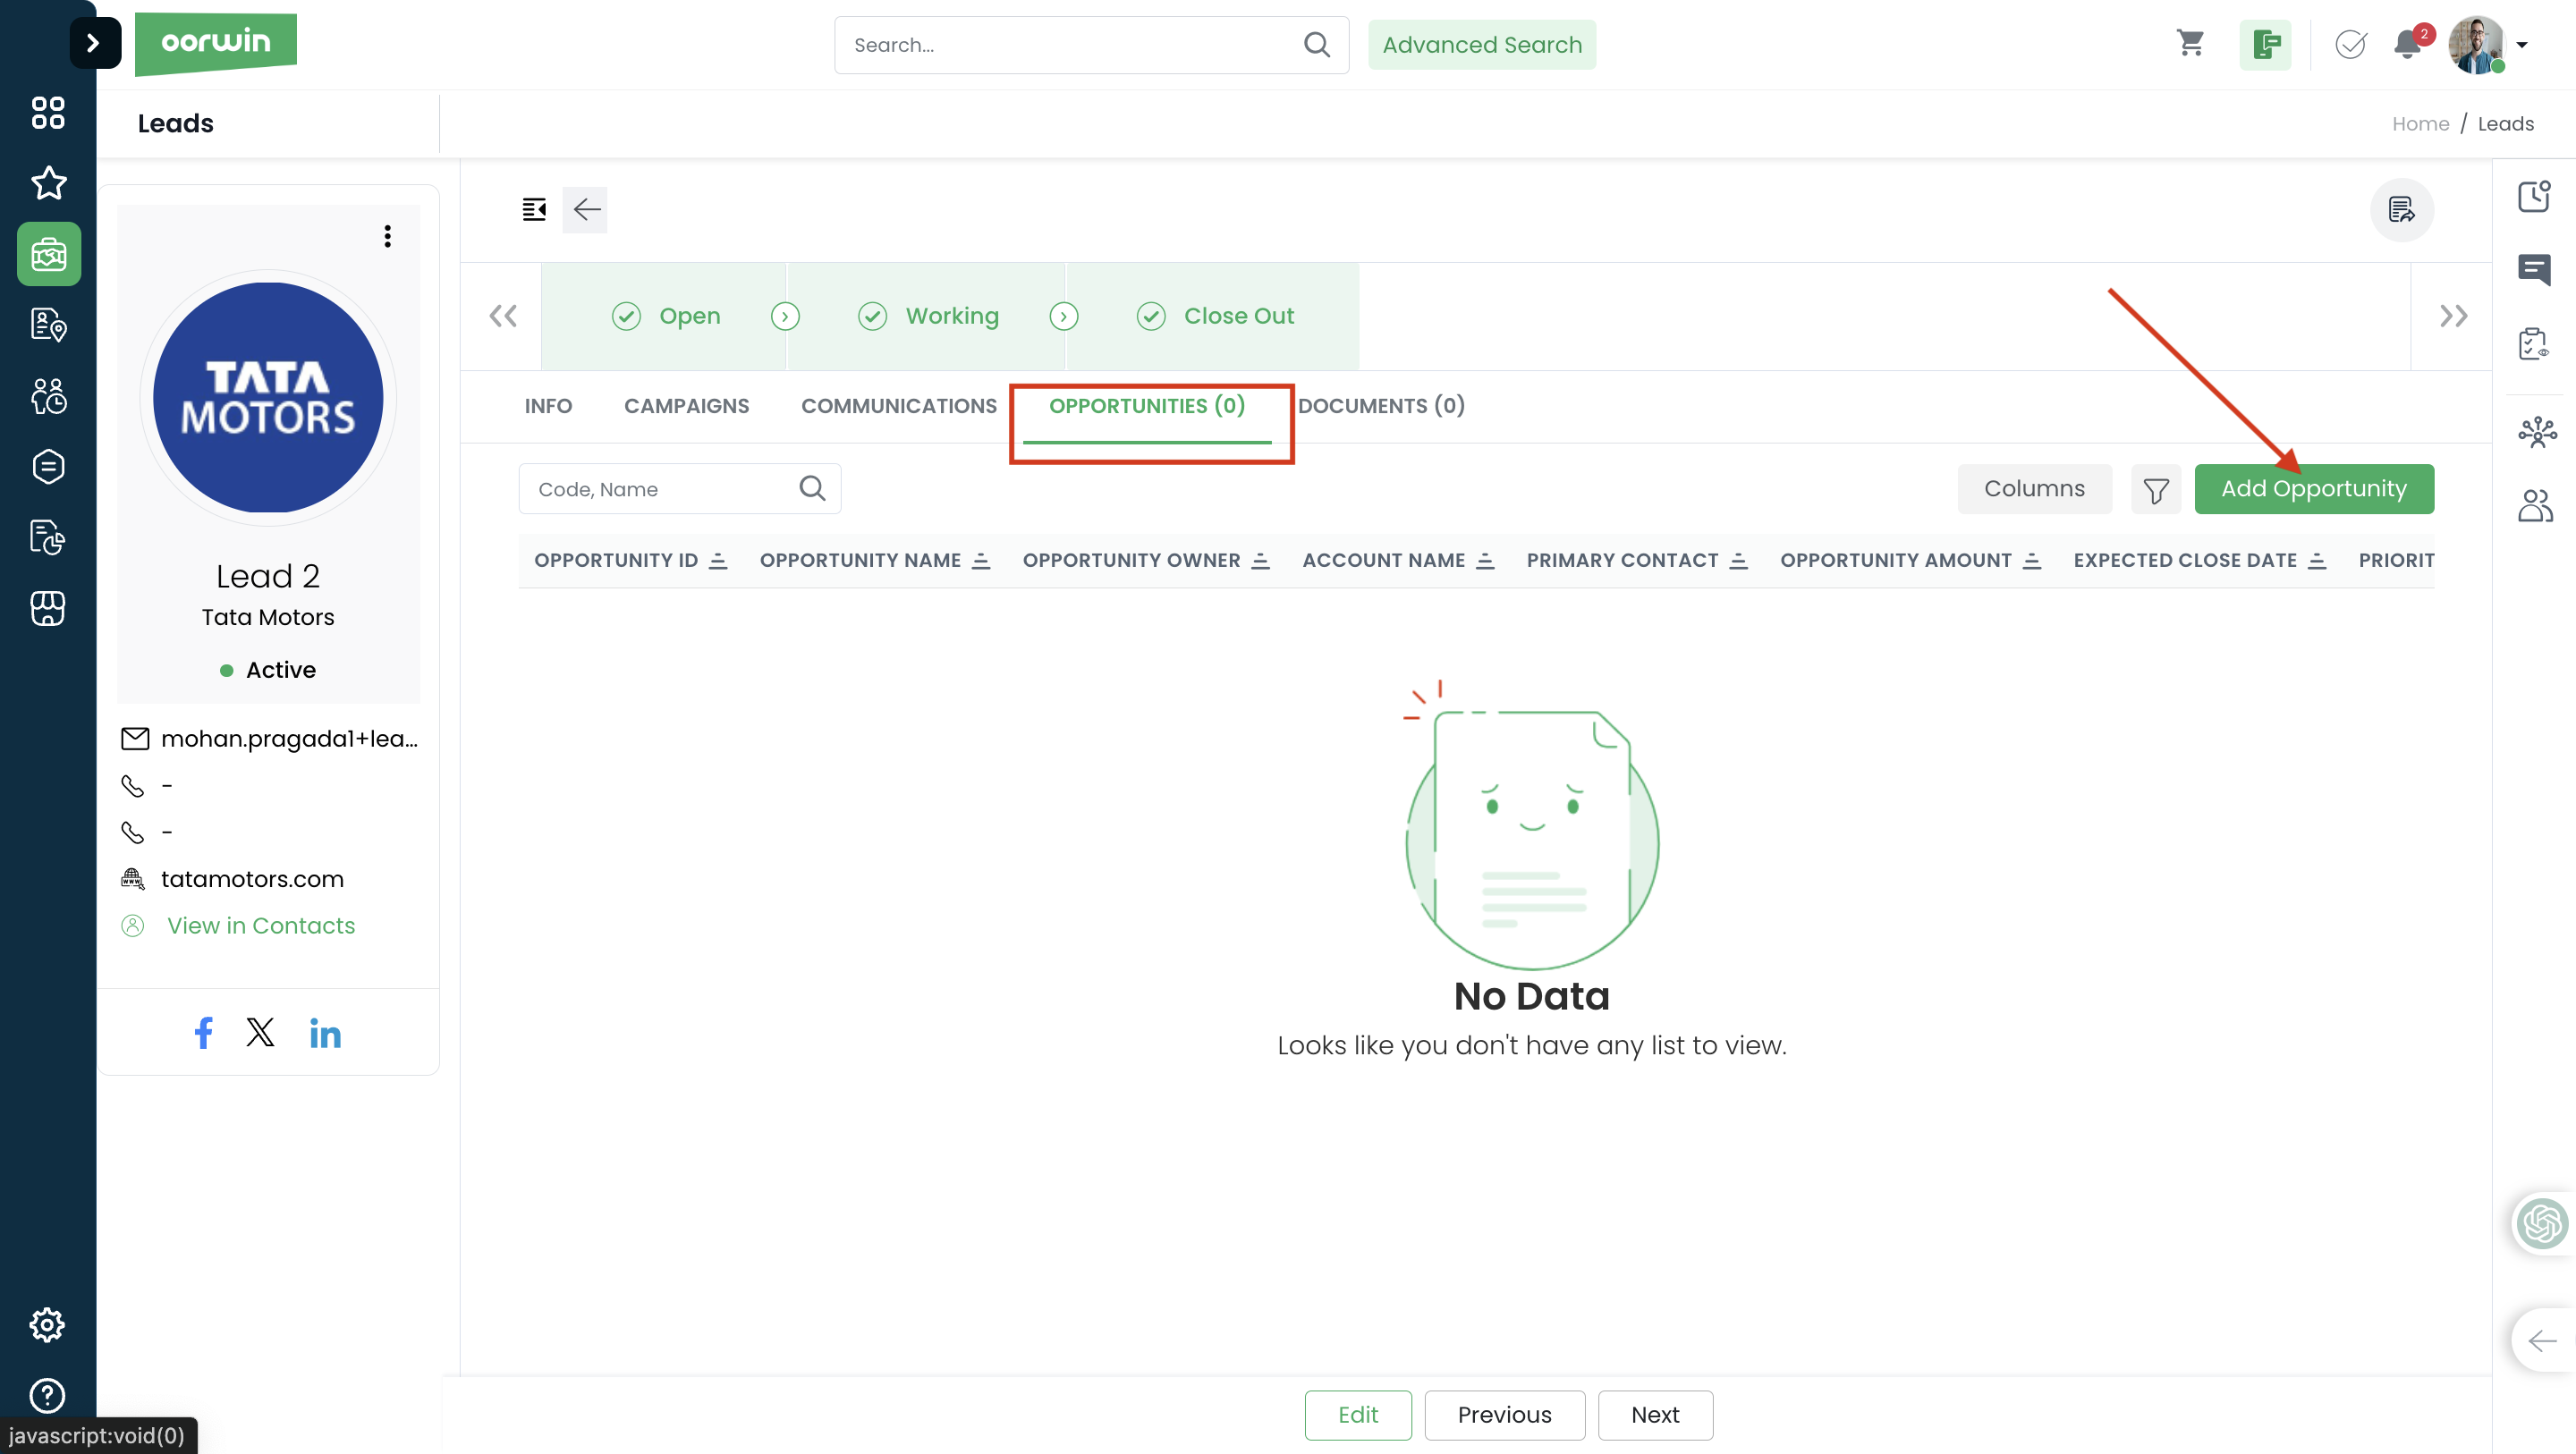
- Click on Opportunities tab on the top header which shows all the opportunities tagged to that Lead
- Click on Add Opportunity button on the top right corner
- Fill all the mandatory information and click on Save button
- Thats it! Your opportunity has been created and tagged to the particular lead
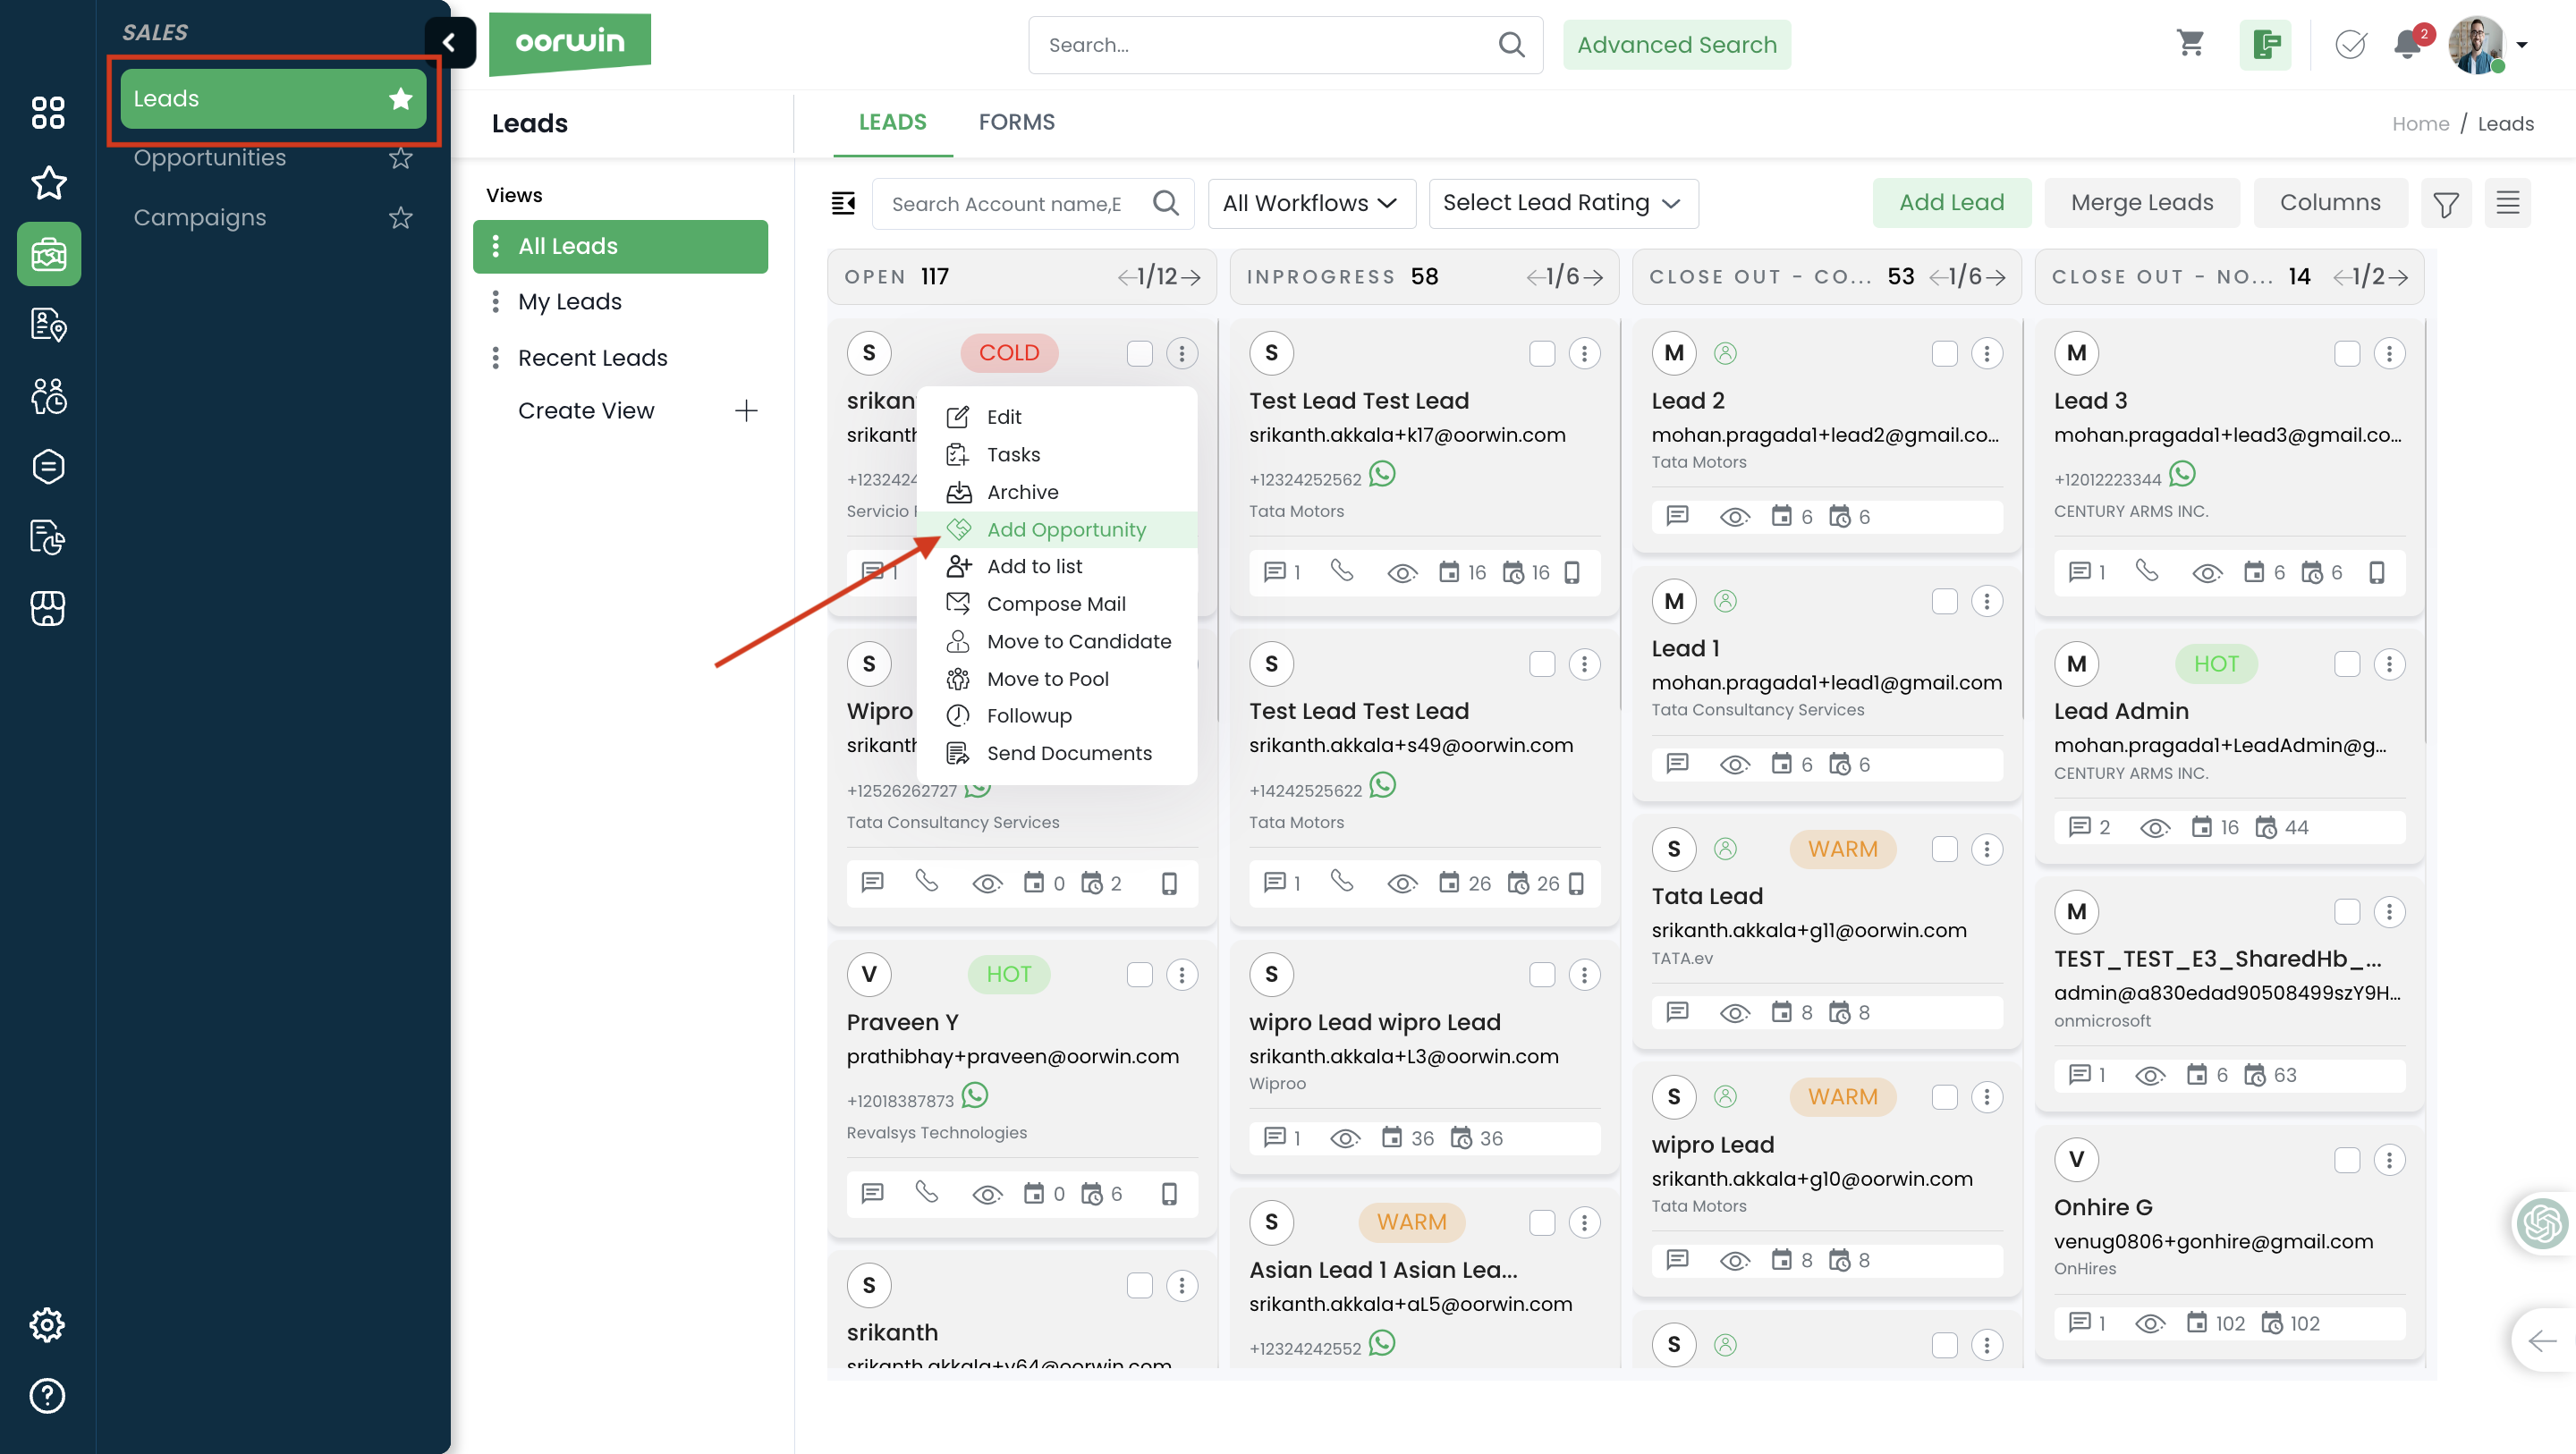
Note: You can also create an opportunity from the lead listing page under the actions upon clicking on three dots icon
Was this article helpful?
If you want to add an Opportunity tagged to a particular account, then yoou can do it from the account view page which will tag it to the same account.
To do this action you need to have add opportunity permission enabled for your role from the Settings->Role security
Please follow the below steps to create an opportunity from account view page
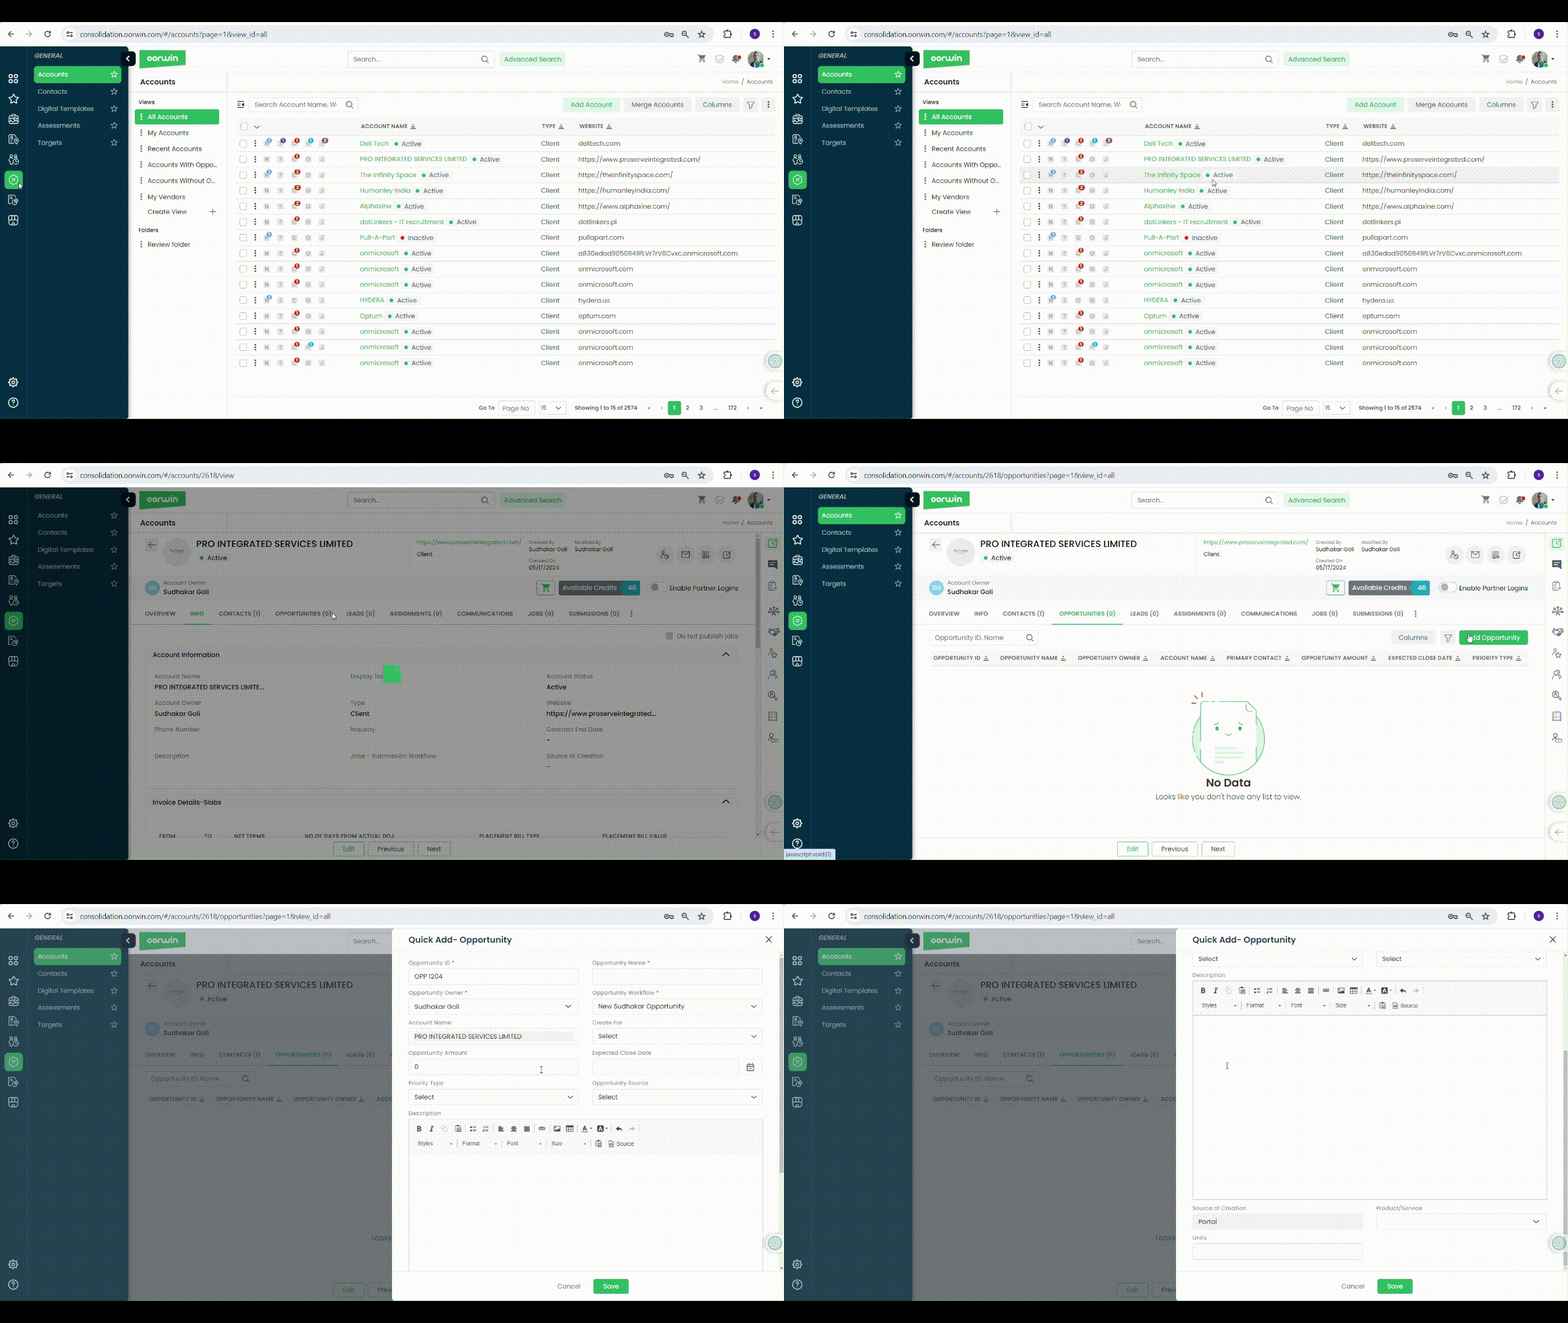
- Log in to your Oorwin Account and navigate to Accounts module from the left menu under General Section
- Click on any account name to whom you wanted to create a new opportunity
- Click on Opportunities tab on the top header which shows all the opportunities tagged to that account
- Click on Add Opportunity button on the top right corner
- Fill all the mandatory information and click on Save button
- Thats it! Your opportunity has been created and tagged to the particular account
Was this article helpful?
If you want to add an Opportunity tagged to a particular contact, then yoou can do it from the contact list and view pages which will tag it to the same contact.
To do this action you need to have add opportunity permission enabled for your role from the Settings->Role security->Opportunities
You can create an opportunity from the contacts module in two ways
- Contact List page
- Contact view page
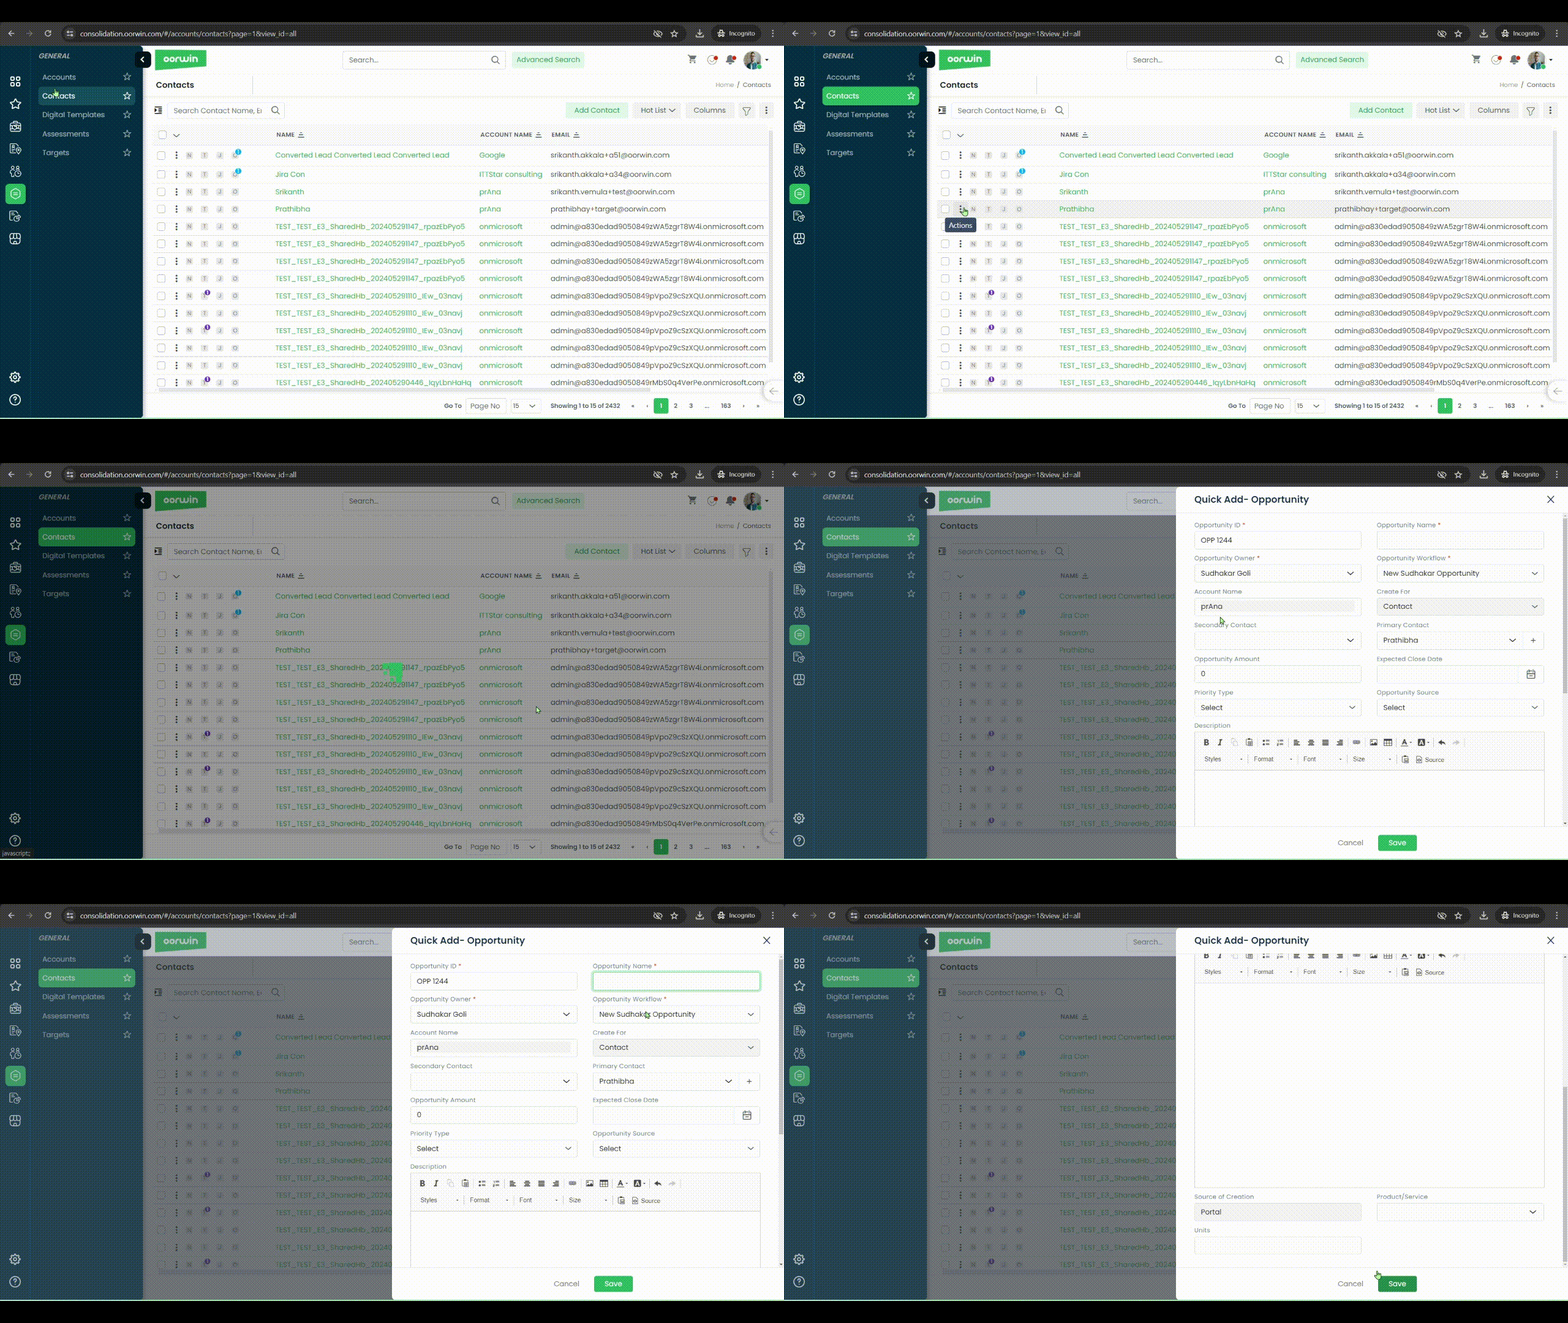
Please follow the below steps to create an opportunity from contact list page
- Log in to your Oorwin Account and navigate to Contacts module from the left menu under General Section
- Click on “Actions(three dots)” icon for the contact you wish to add opportunity.
- Click on Create Opportunity link from the list of actions
- It opens a add opportunity form in a popup along with account and contact tagged
- Enter all other required fields and click on save button
- Thats it! Your opportunity has been created and tagged to the particular contact
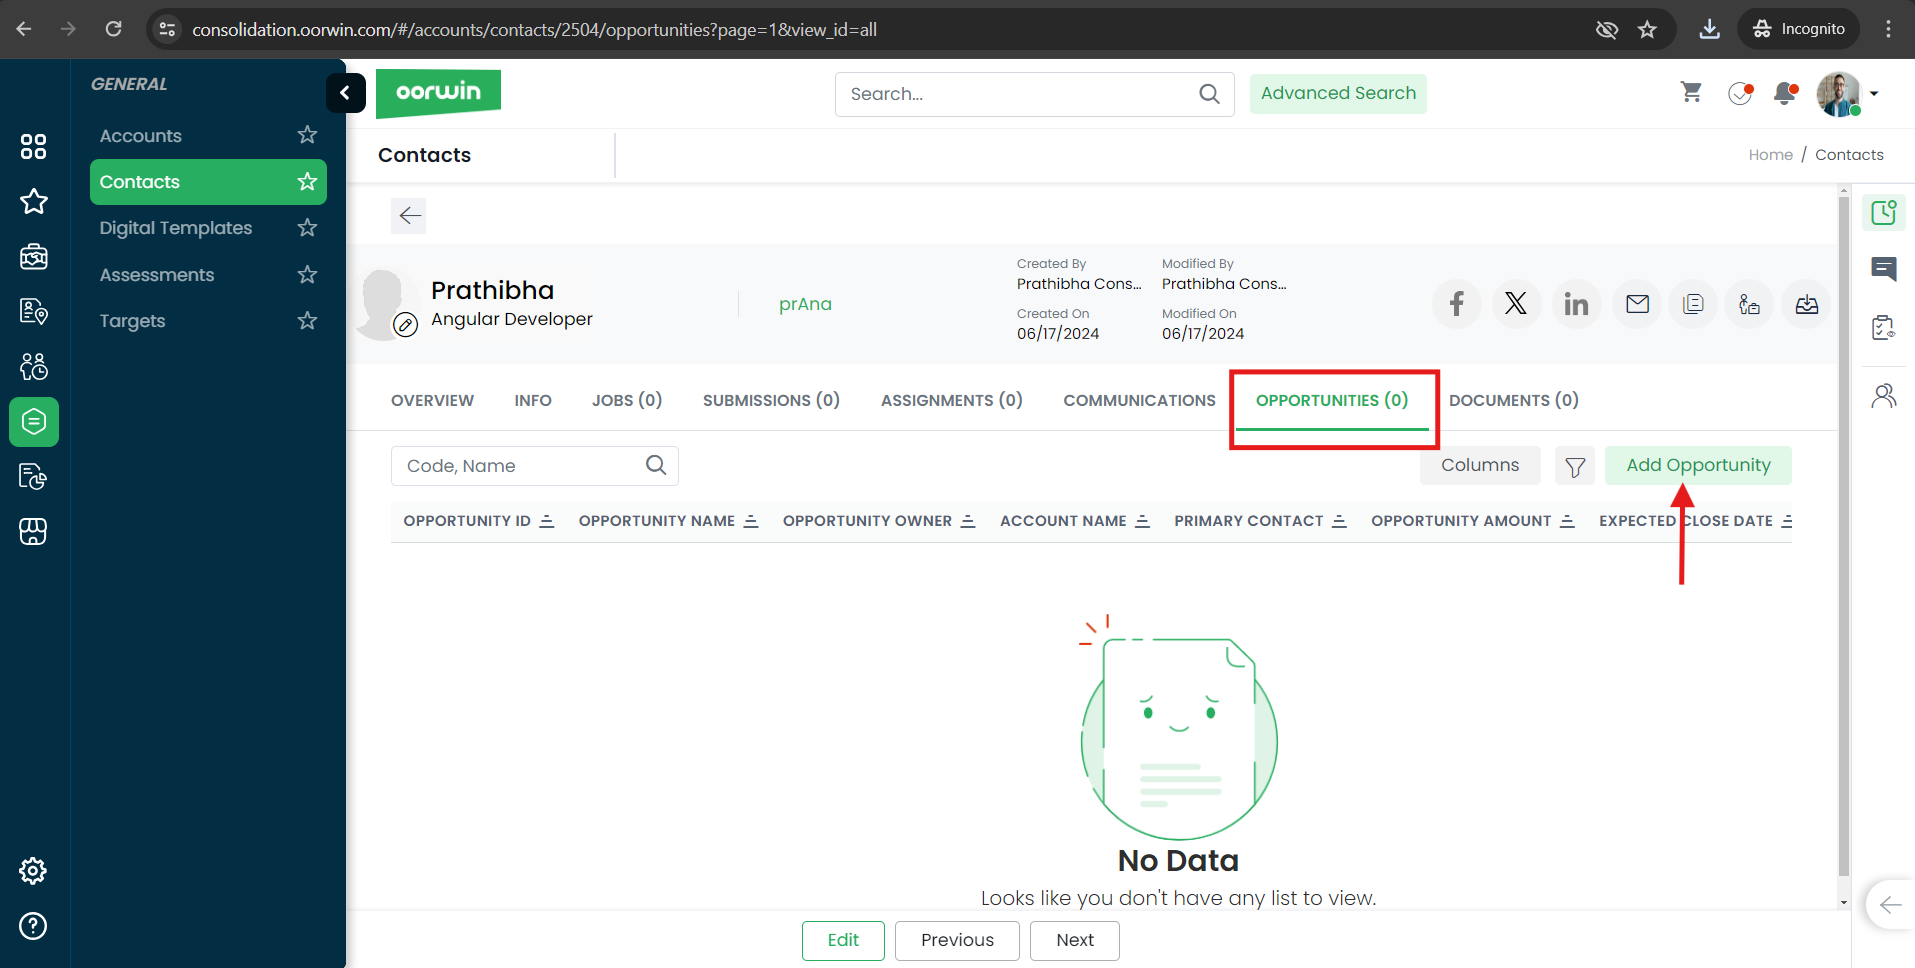
Please follow the below steps to create an opportunity from contact view page
- Log in to your Oorwin Account and navigate to Contacts module from the left menu under General Section
- Click on any contact to whom you wanted to create a new opportunity
- Click on Opportunities tab on the top header which shows all the opportunities tagged to that contact
- Click on Add Opportunity button on the top right corner
- Fill all the mandatory information and click on Save button
- Thats it! Your opportunity has been created and tagged to the particular contact
Was this article helpful?
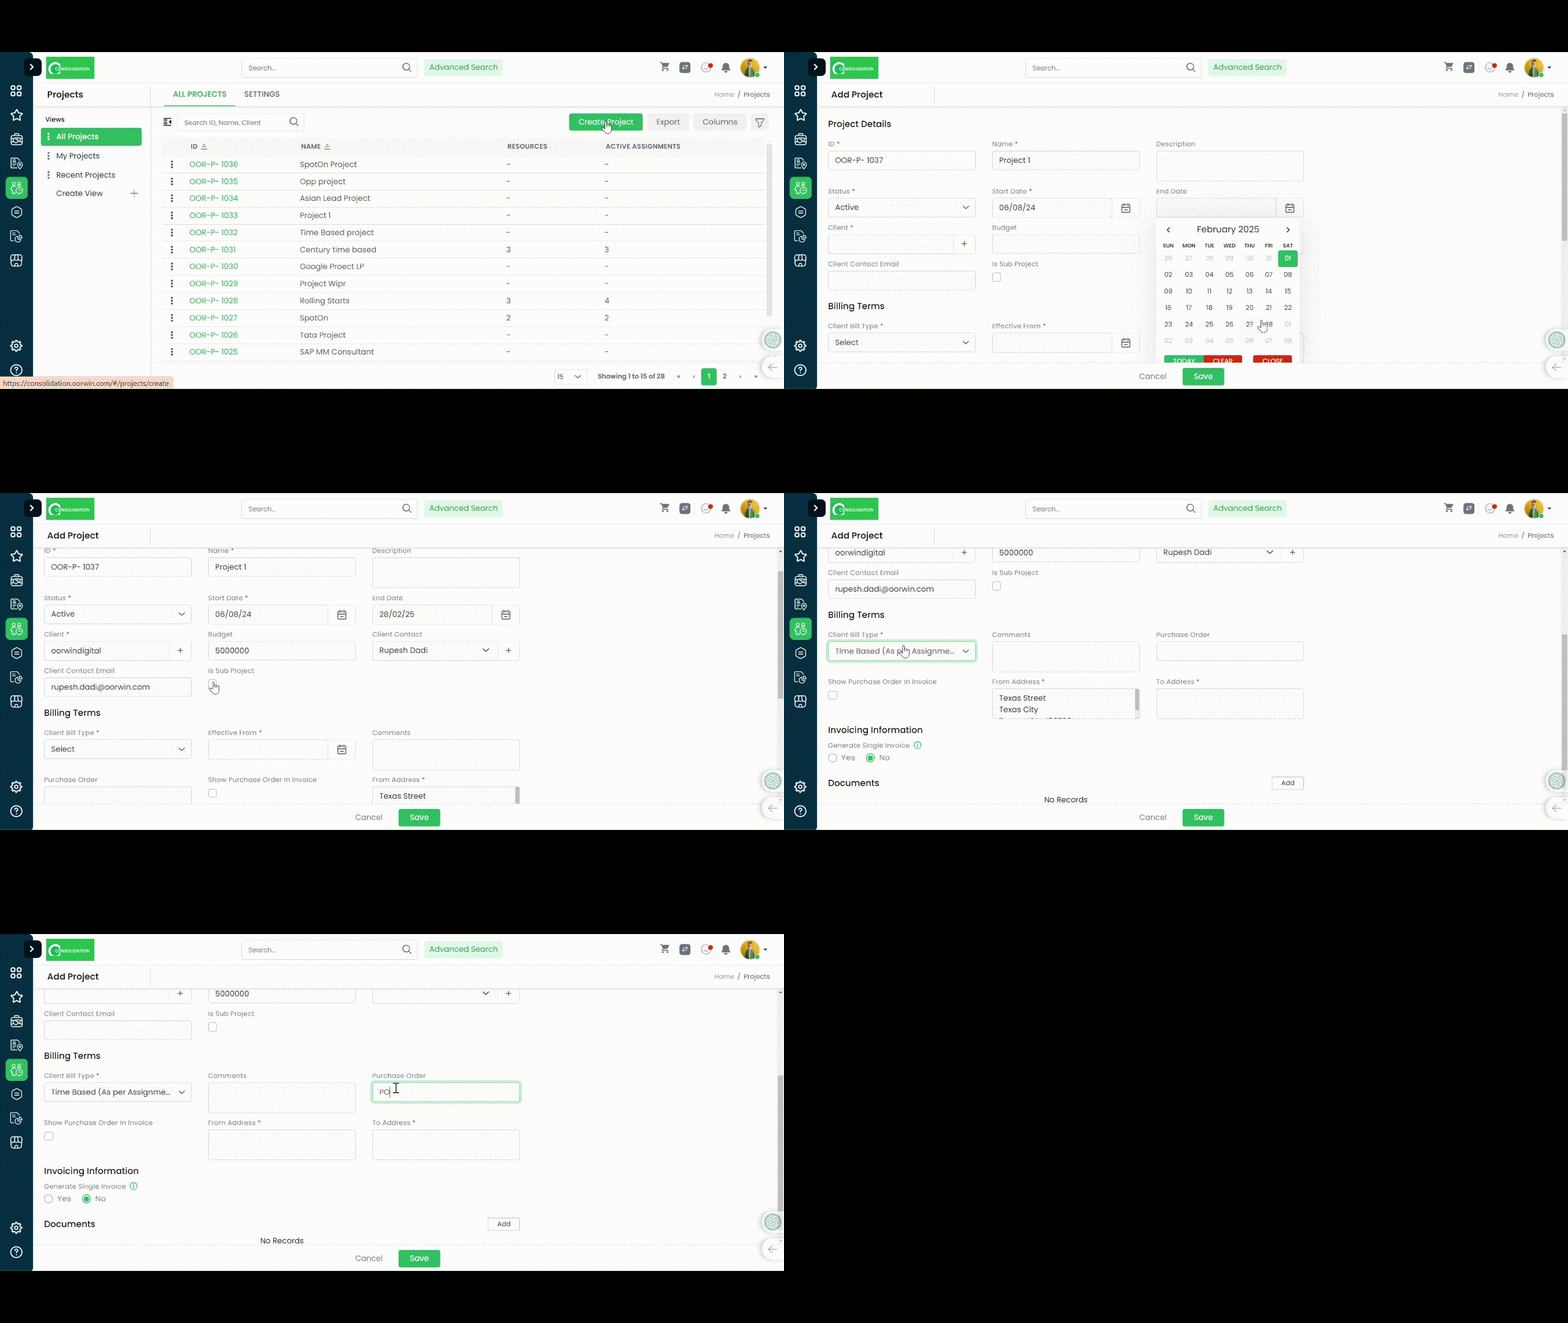
Create and Explain a Project:
- Navigate to Main Menu
- Projects
- Create Project
- Enter your details as needed
- Save
Important Explination:
- Project Type: Projects Billing Would be decided based on the type of Project defined.Below are the types:
-
- Non Billable: This is a project type where there is no billing needed, Rather it would be an internal Poject
- Time Based (As Per Assignments): Billing can be done based on the number of hours your team has put in, calculating based on the bill rates mentioned in the Assignments created against the project
- Deliverables: Based on the project deliverables which has been delivered in bits and pieces and billed as per the deliveries.
- Fixed Recurring: Can be billed based on definite intervals such as weekly,Monthly and other type of cycles.
Was this article helpful?
Create Assignment:
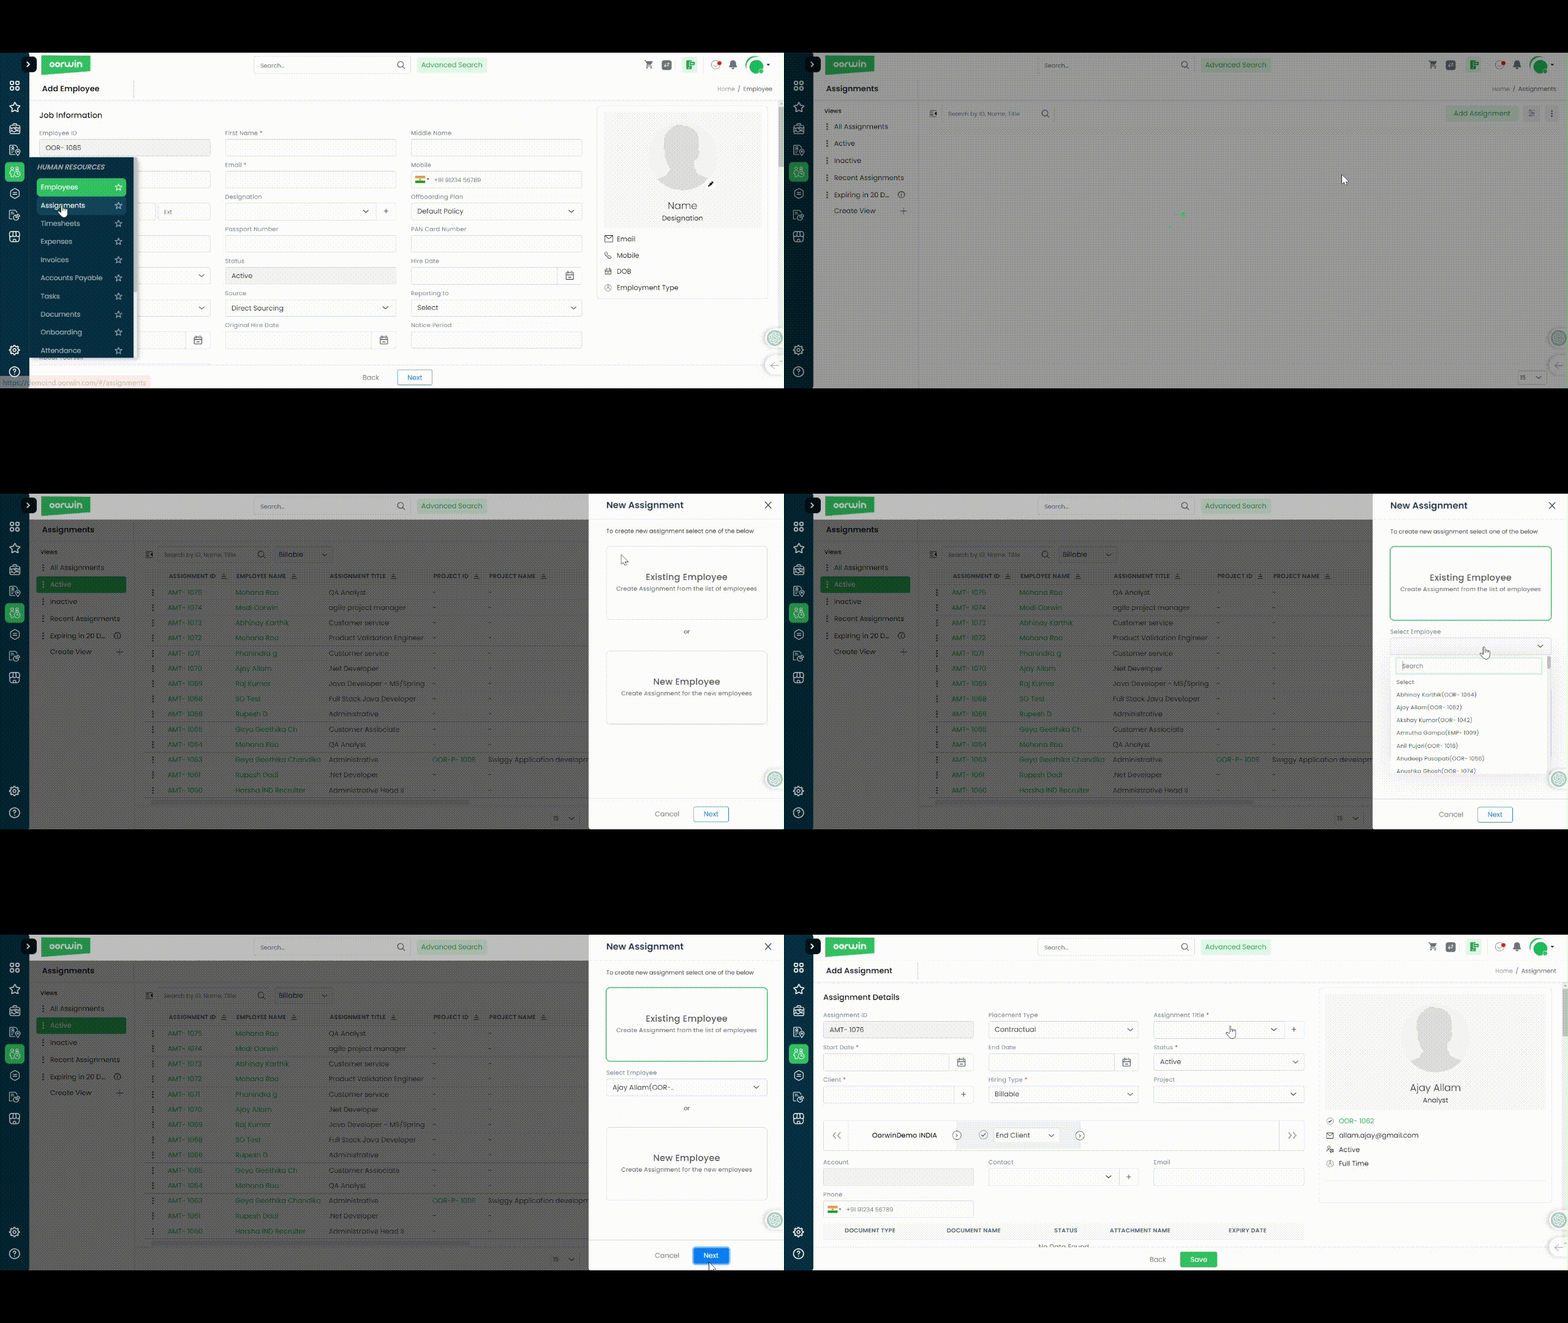
Assignment can be created for 2 different purposes.
- Existing Employee
- Navigate to Menu
- Assignments
- Click on Add Assignment
- Existing Employee
- Select your Existing Employee from the drop down
- Mention the details
- Save
- New Employee
- Navigate to Main Menu
- Select Assignments
- Click on Add Assignment
- Select New Employee
- Mention the details
- Save
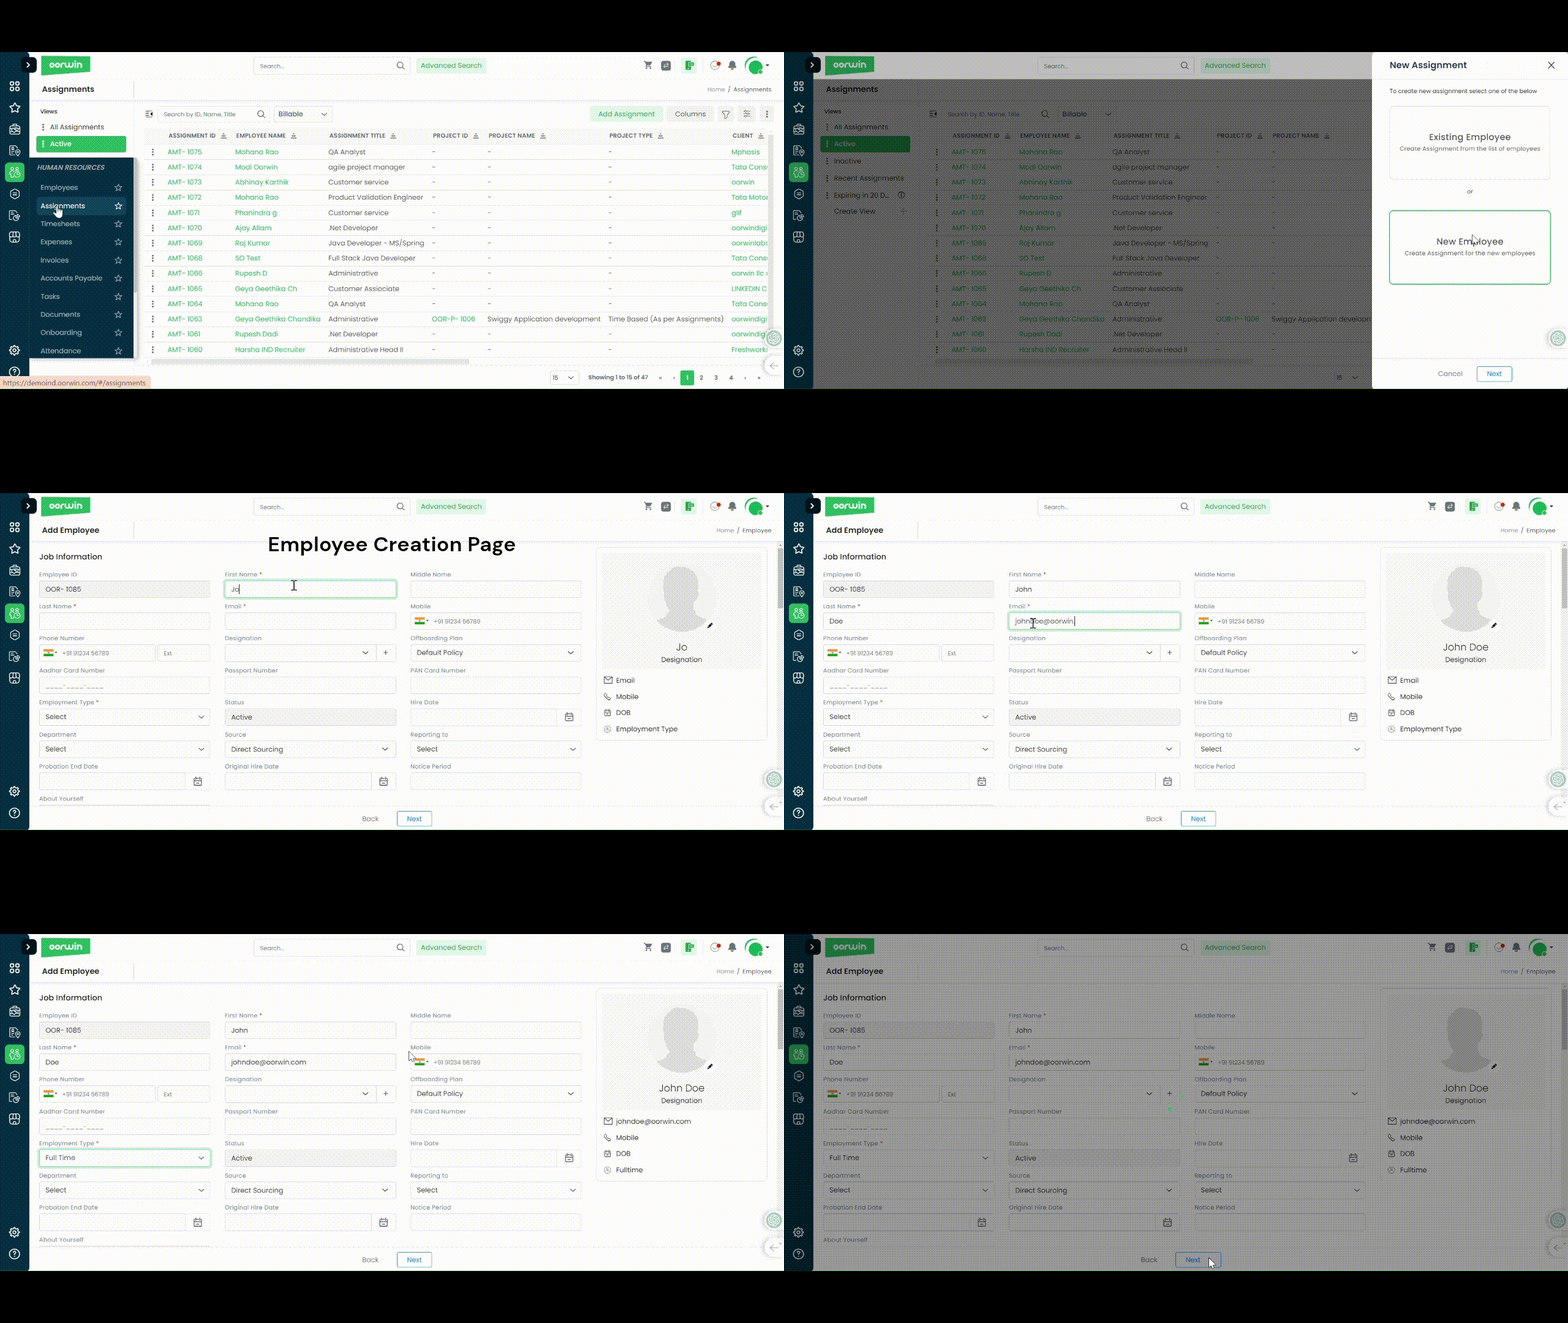
Understand Assignment in detail –
Was this article helpful?
- Log in to your Oorwin Account and navigate to settings page from the left bottom
- Go to Configurations on the left menu which opens multiple sections in it
- Click on Reminders section under configurations page
- It opens list of all the existing reminders that you have set previously
- To create a new reminder click on “Add Reminder” button on the top right corner
- Give the reminder name and select type as Assignment expiry reminder
- Select the from email from the list of oorwin users from which email that you want to get the reminder
- Now select the roles to consider to which roles it should consider the assignments
- Now in the set schedule tab, configure the expiring days/weeks to consider to start the reminder along with time interval, time and timezone
- Now in the set notifications section, select the checkbox to whom you want to send the notification (Employee/ Consolidated users) and click on Next
- Based on the notification selection the mail templates will be displayed with the default content and user can change the content except the table
- Now click on Save on the bottom and your reminder has created and the notifiers will get the Assignment Expiry reminders based on the configuration
Was this article helpful?
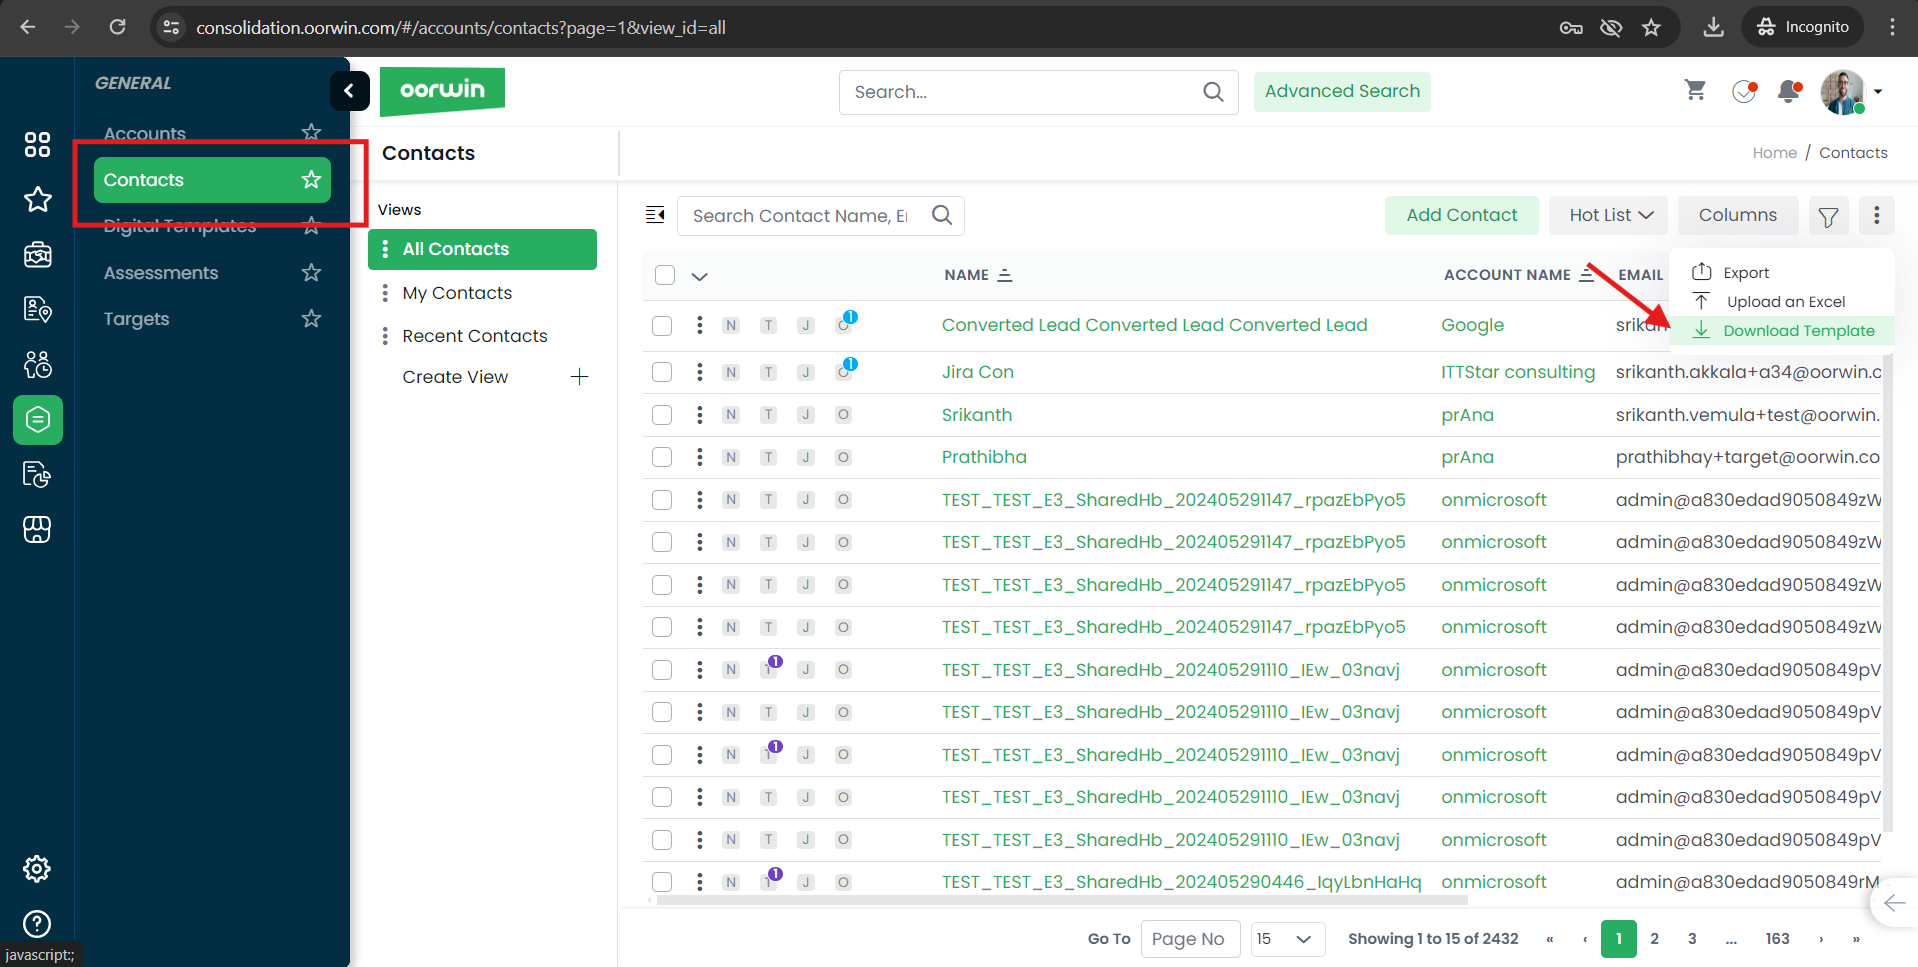
To import contacts through an excel sheet first you need download the contacts template fromat through below steps
- Log in to your Oorwin Account and navigate to Contacts module from the left menu under General Section
- Click on “More(three dots)” icon on the top right corner
- Click on Downaload Template option from the drop down list
- An excel template will be downloaded with all the contacts field columns which you need to fill all the contacts data in it
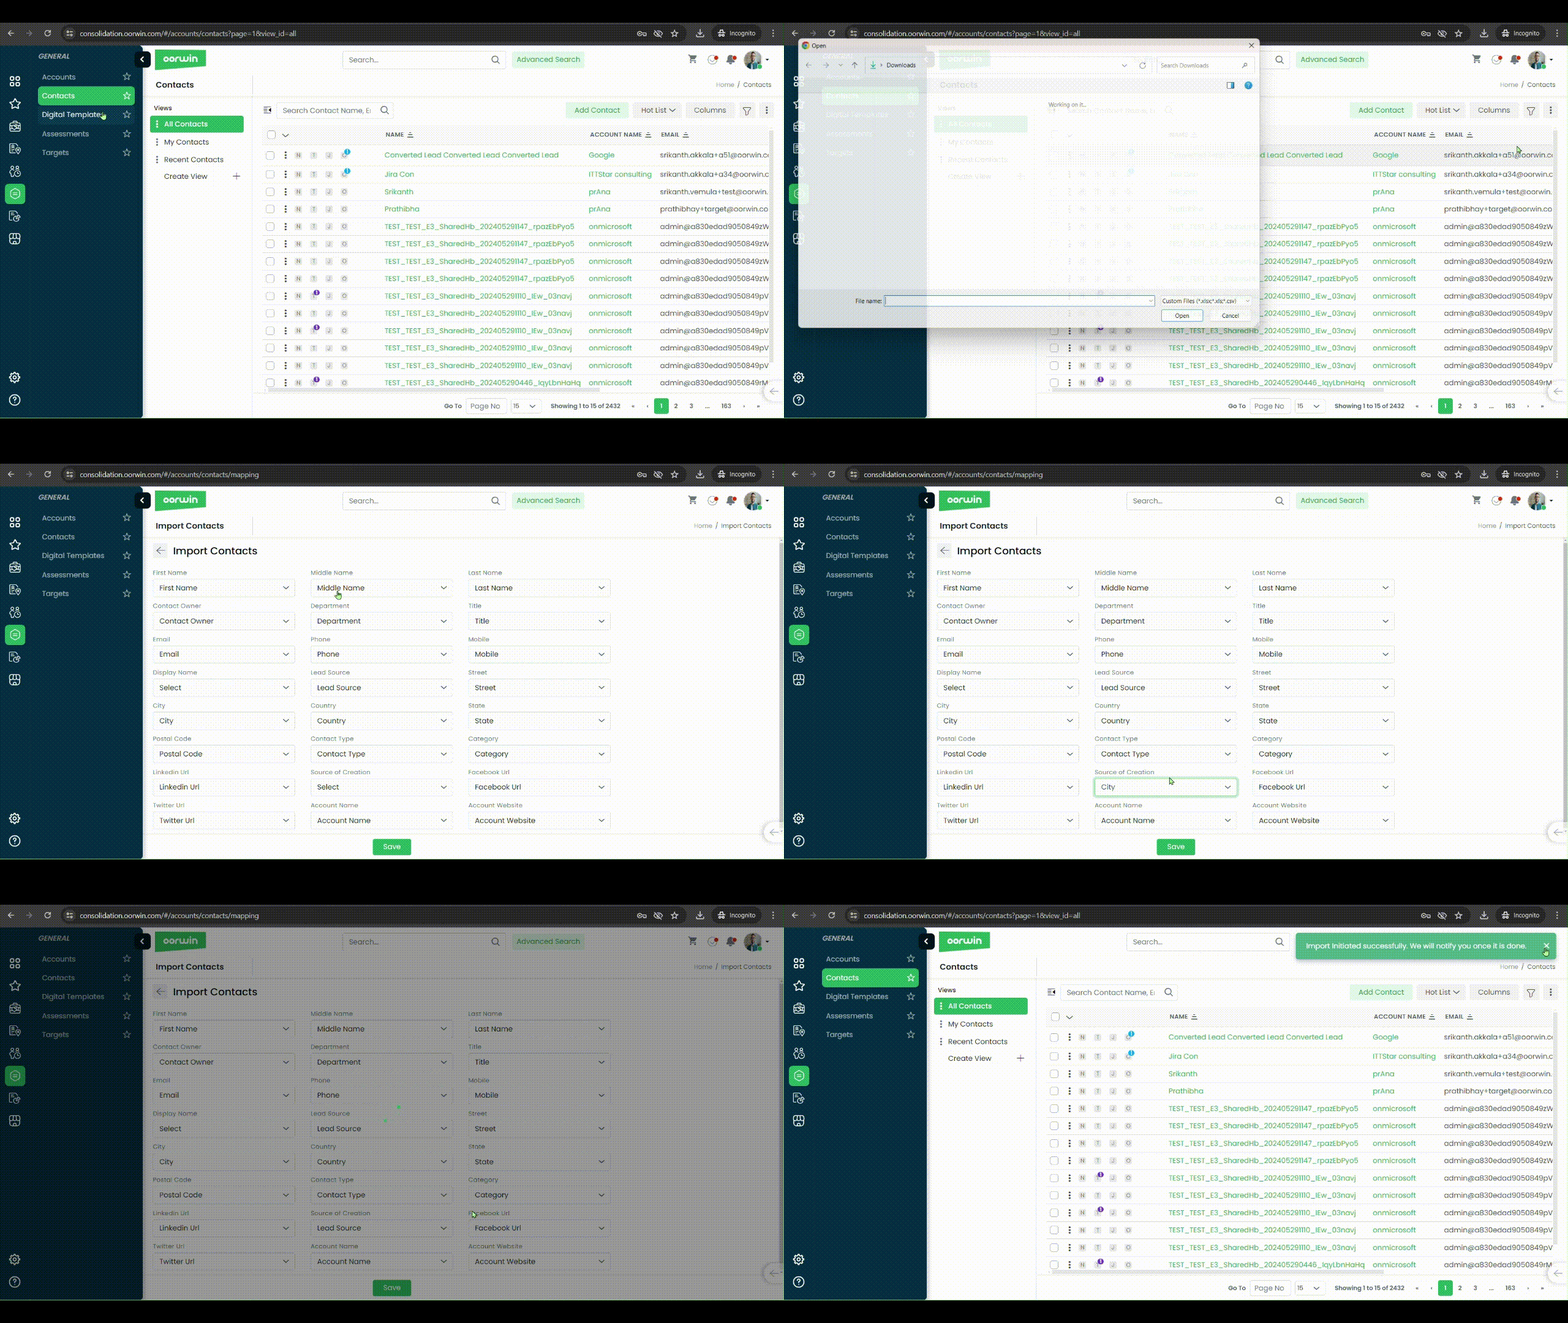
- Once you have filled all the contact details in the excel sheet you need to upload it through Upload Excel option
- Now system will ask you to check all the details mapped exactly with the excel fields
- Then click on Save button on the bottom to export all the data to Contacts module
- Once it is exported, a success notification will be displayed in the Notifications section on the top
Was this article helpful?
Approvals is a place where you can configure multiple set of approvals with different type of approval levels on the same approval flow
Here is how you can create approval flow from Employee Information
- Log in to your Oorwin Account and navigate to settings page from the left bottom
- Go to Configurations on the left menu and click on Approvals module
- Now go to Employee Information tab which opens the new form to create a approval flow

- Enter the New Category Name and select applicable option from drop Down
- Now select the access levels or users from the drop down which acts as the first approver
- If you want to add multiple approvers then click on “+” icon which opens another row to select another user/access level as a next approver
- Likewise you can add multiple approvers on the same flow and click on Save button
- This will save your approval flow for Employee Information.
Was this article helpful?
Approvals is a place where you can configure multiple set of approvals with different type of approval levels on the same approval flow
Here is how you can create approval flow for Employee Offboarding
- Log in to your Oorwin Account and navigate to settings page from the left bottom
- Go to Configurations on the left menu and click on Approvals module
- Now go to Employee Offboarding tab which opens the new form to create a approval flow

- Enter the New Category for Employee Offboarding
- Now select the access levels or users from the drop down which acts as the first approver
- If you want to add multiple approvers then click on “+” icon which opens another row to select another user/access level as a next approver
- Likewise you can add multiple approvers on the same flow and click on Save button
- This will save your approval flow for timesheets and will be available to add as a approver flow while creating the Employee Offboarding.
Was this article helpful?
Approvals is a place where you can configure multiple set of approvals with different type of approval levels on the same approval flow
Here is how you can create approval flow from Expenses
- Log in to your Oorwin Account and navigate to settings page from the left bottom
- Go to Configurations on the left menu and click on Approvals module
- Now go to Expenses tab which opens the new form to create a approval flow

- Enter the New Category for Expenses and select applicable option from drop Down
- Now select the access levels or users from the drop down which acts as the first approver
- If you want to add multiple approvers then click on “+” icon which opens another row to select another user/access level as a next approver
- Likewise you can add multiple approvers on the same flow and click on Save button
- This will save your approval flow for Expenses.
Was this article helpful?
Approvals is a place where you can configure multiple set of approvals with different type of approval levels on the same approval flow
Here is how you can create approval flow for Invoices
- Log in to your Oorwin Account and navigate to settings page from the left bottom
- Go to Configurations on the left menu and click on Approvals module
- Now go to Invoices tab which opens the new form to create a approval flow

- Enter the Invoice approval flow name and select any applicable option ( Specifically like Amount & Clients)
- Now select the access levels or users from the drop down which acts as the first approver and also enable the DIGI SIGN for the approvals
- If you want to add multiple approvers then click on “+” icon which opens another row to select another user/access level as a next approver
- Likewise you can add multiple approvers on the same flow and click on Save button
- This will save your approval flow for Invoices and will be available to add as a approver flow while creating the Invoices.
Was this article helpful?
Approvals is a place where you can configure multiple set of approvals with different type of approval levels on the same approval flow
Here is how you can create approval flow from Leave & Attendance.
- Log in to your Oorwin Account and navigate to settings page from the left bottom
- Go to Configurations on the left menu and click on Approvals module
- Now go to Leave & Attendance. tab which opens the new form to create a approval flow

- Enter the New Category name for Leave & Attendance by clicking on New approval
- Now select the access levels or users from the drop down which acts as the first approver
- If you want to add multiple approvers then click on “+” icon which opens another row to select another user/access level as a next approver
- Likewise you can add multiple approvers on the same flow and click on Save button
- This will save your approval flow for Leave & Attendance and will be available to add as a approver flow while creating the approval process for Leave & Attendance.
Was this article helpful?
Approvals is a place where you can configure multiple set of approvals with different type of approval levels on the same approval flow
Here is how you can create approval flow fro timesheets
- Log in to your Oorwin Account and navigate to settings page from the left bottom
- Go to Configurations on the left menu and click on Approvals module
- Now go to timesheets tab which opens the new form to create a approval flow

- Enter the approval flow name and select any users or enter emails in the notify section which notifies them on the timesheet creation for this approval flow
- Now select the access levels or users from the drop down which acts as the first approver
- If you want to add multiple approvers then click on “+” icon which opens another row to select another user/access level as a next approver
- Likewise you can add multiple approvers on the same flow and click on Save button
- This will save your approval flow for timesheets and will be available to add as a approver flow while creating the assignments

Was this article helpful?
- Log in to your Oorwin Account and navigate to settings page from the left bottom
- Go to Configurations on the left menu and click on Reminders section which opens the list of all the existing reminders
- To create a new reminder click on “Add Reminder” button on the top right corner

- Give the reminder name as you wish and select type as Draft invoice reminder
- Select the from email from the list of Oorwin users from which email that you want to get the reminder
- Now select the roles to consider to which roles it should consider the invoices and select the from date from which the system should consider the draft invoices
- Now in the set schedule tab, select the time cycle, time along with the timezone on which you want to trigger the emails and click on Next
- Now in set notifications tab select the consolidated roles or users to whom the system should consider the draft invoices and click on Next
- Now in the write content tab the mail template will be displayed with the default content and user can change the content except the table
- Now click on Save on the bottom and your Draft Invoice reminder has created and will start triggering the draft invoices notifications to the users

Was this article helpful?
To import employees through an excel sheet first you need download the employees template format through below steps
- Log in to your Oorwin Account and navigate to Employees module from the left menu under HRMS Section
- Click on “More(three dots)” icon on the top right corner
- Click on Download Template option from the drop down list
- An excel template will be downloaded with all the Employee field columns which you need to fill all the Employees data in it
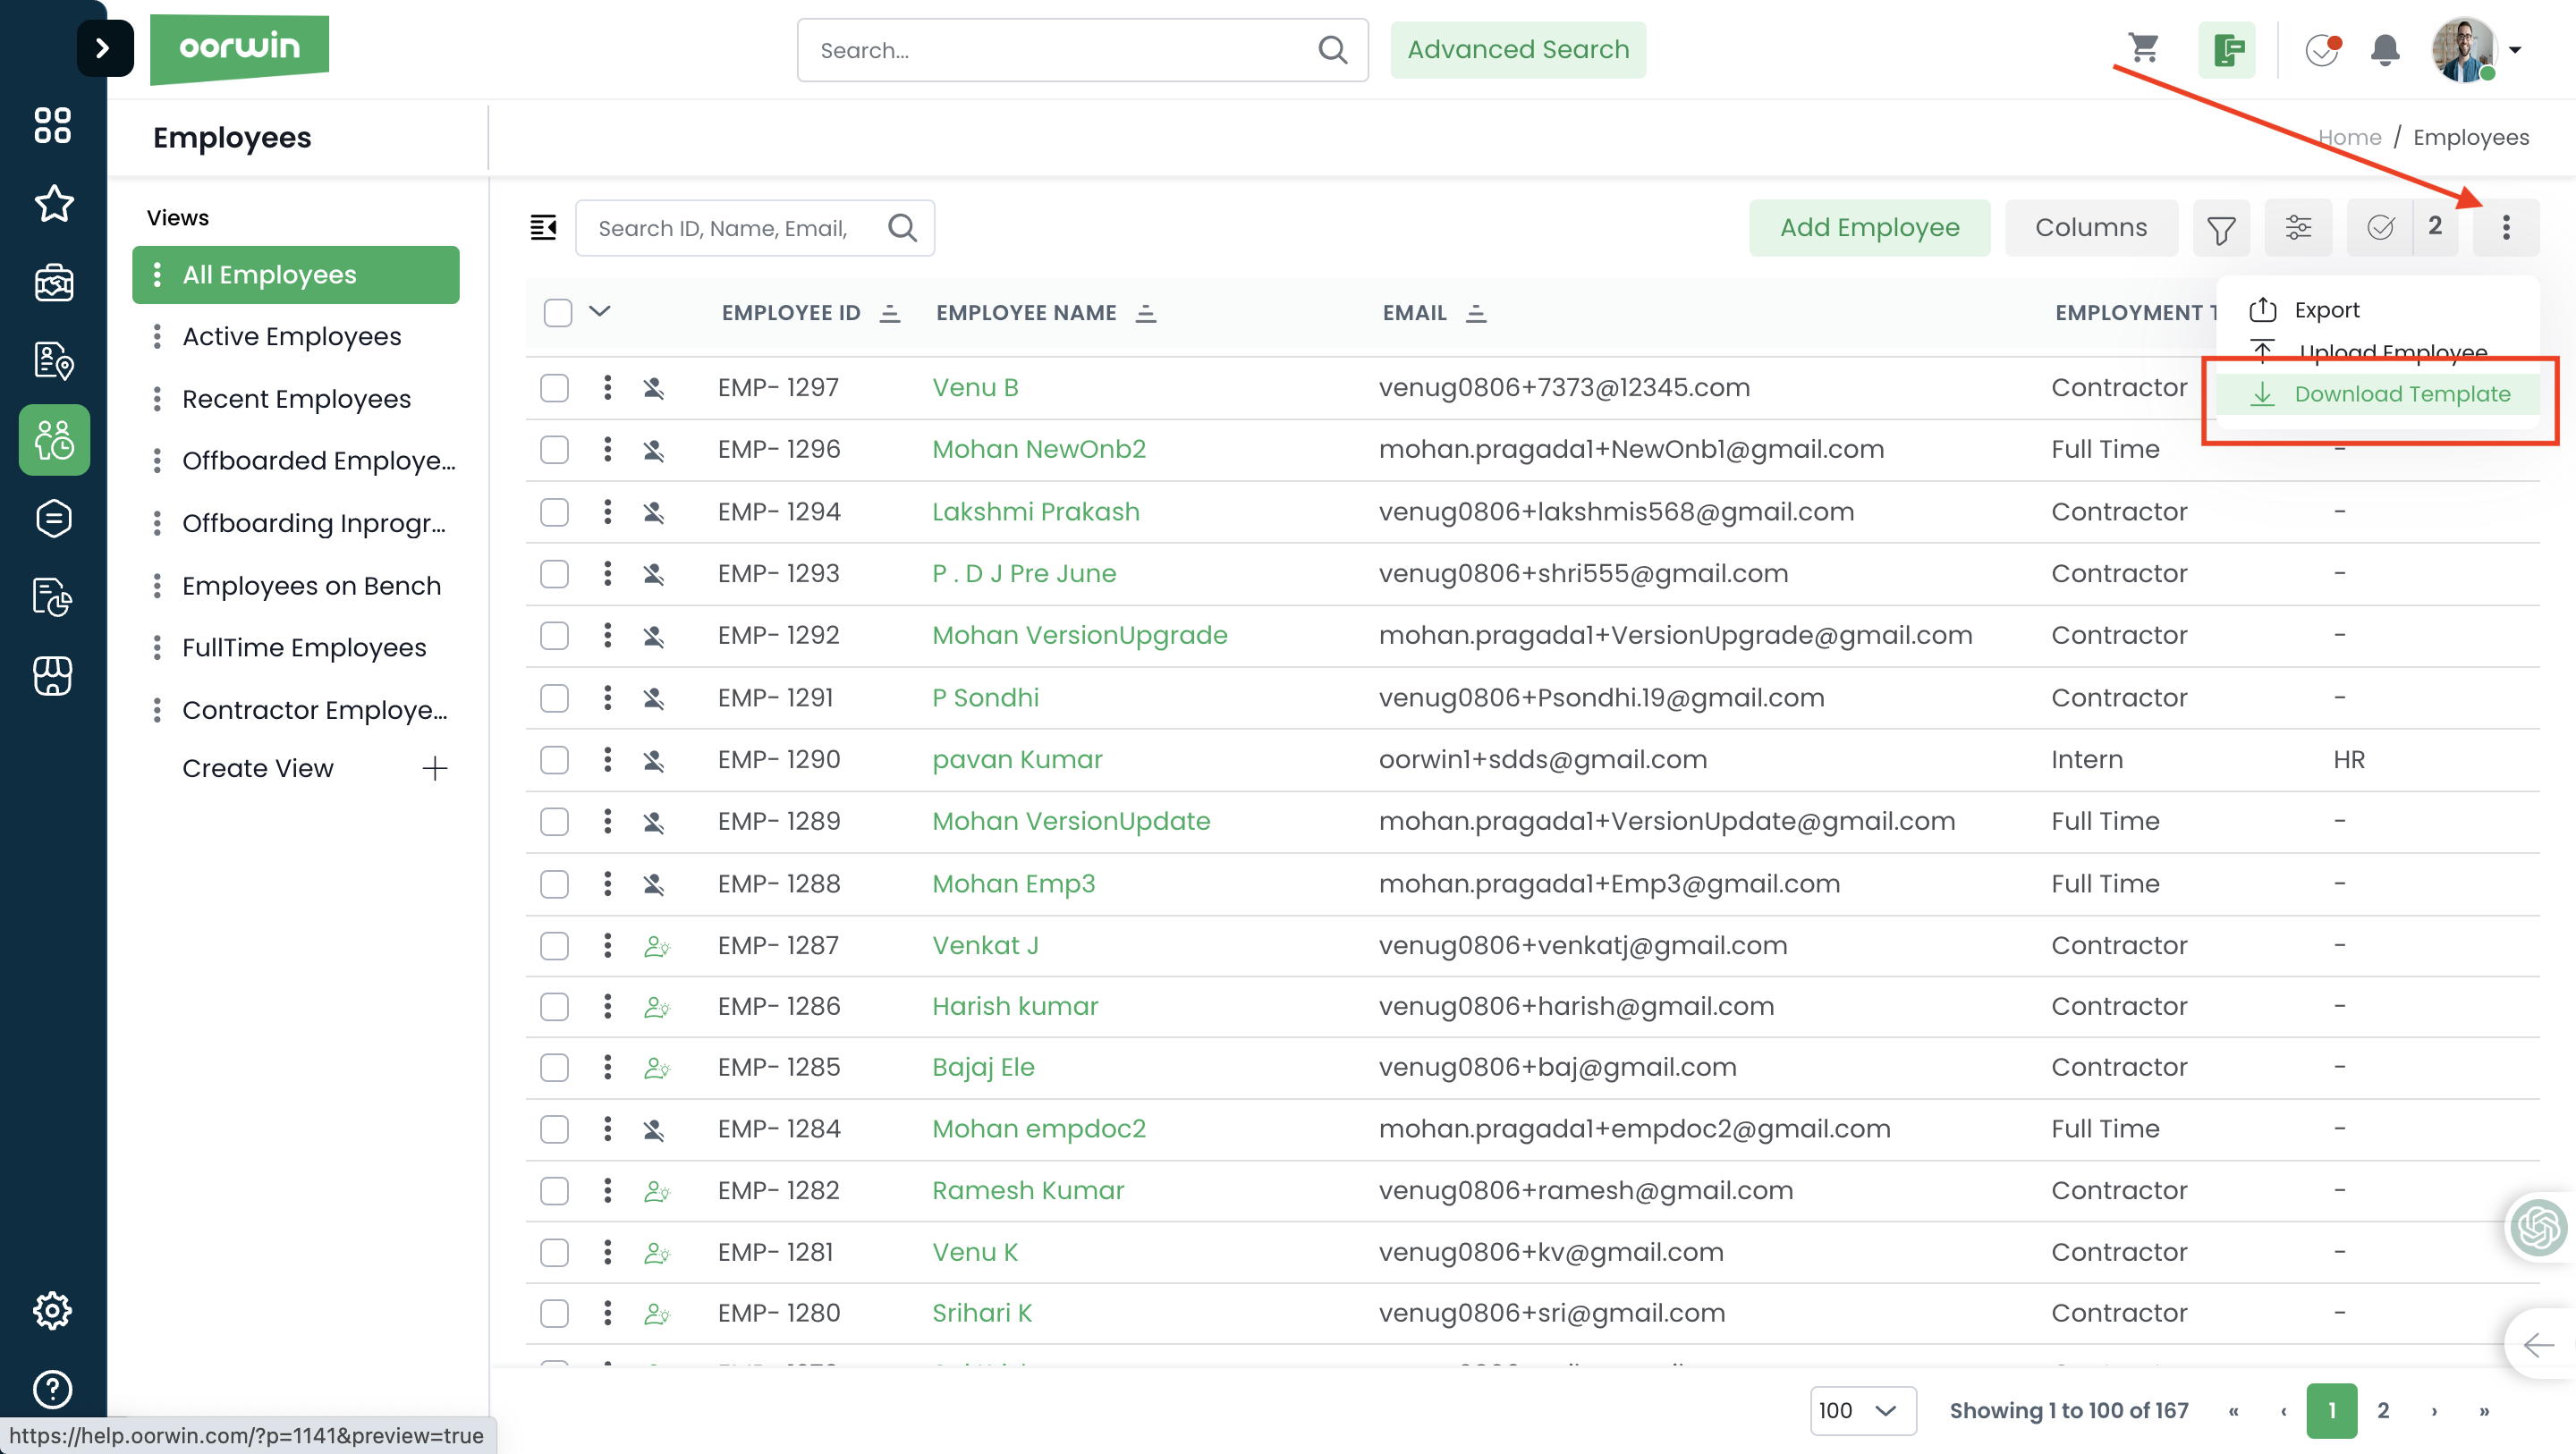
- Once you have filled all the employee details in the excel sheet you need to upload it through Upload Excel option
- Now system will ask you to check all the details mapped exactly with the excel fields
- Then click on Save button on the bottom to export all the data to employees module
- Once it is exported, a success notification will be displayed in the Notifications section on the top
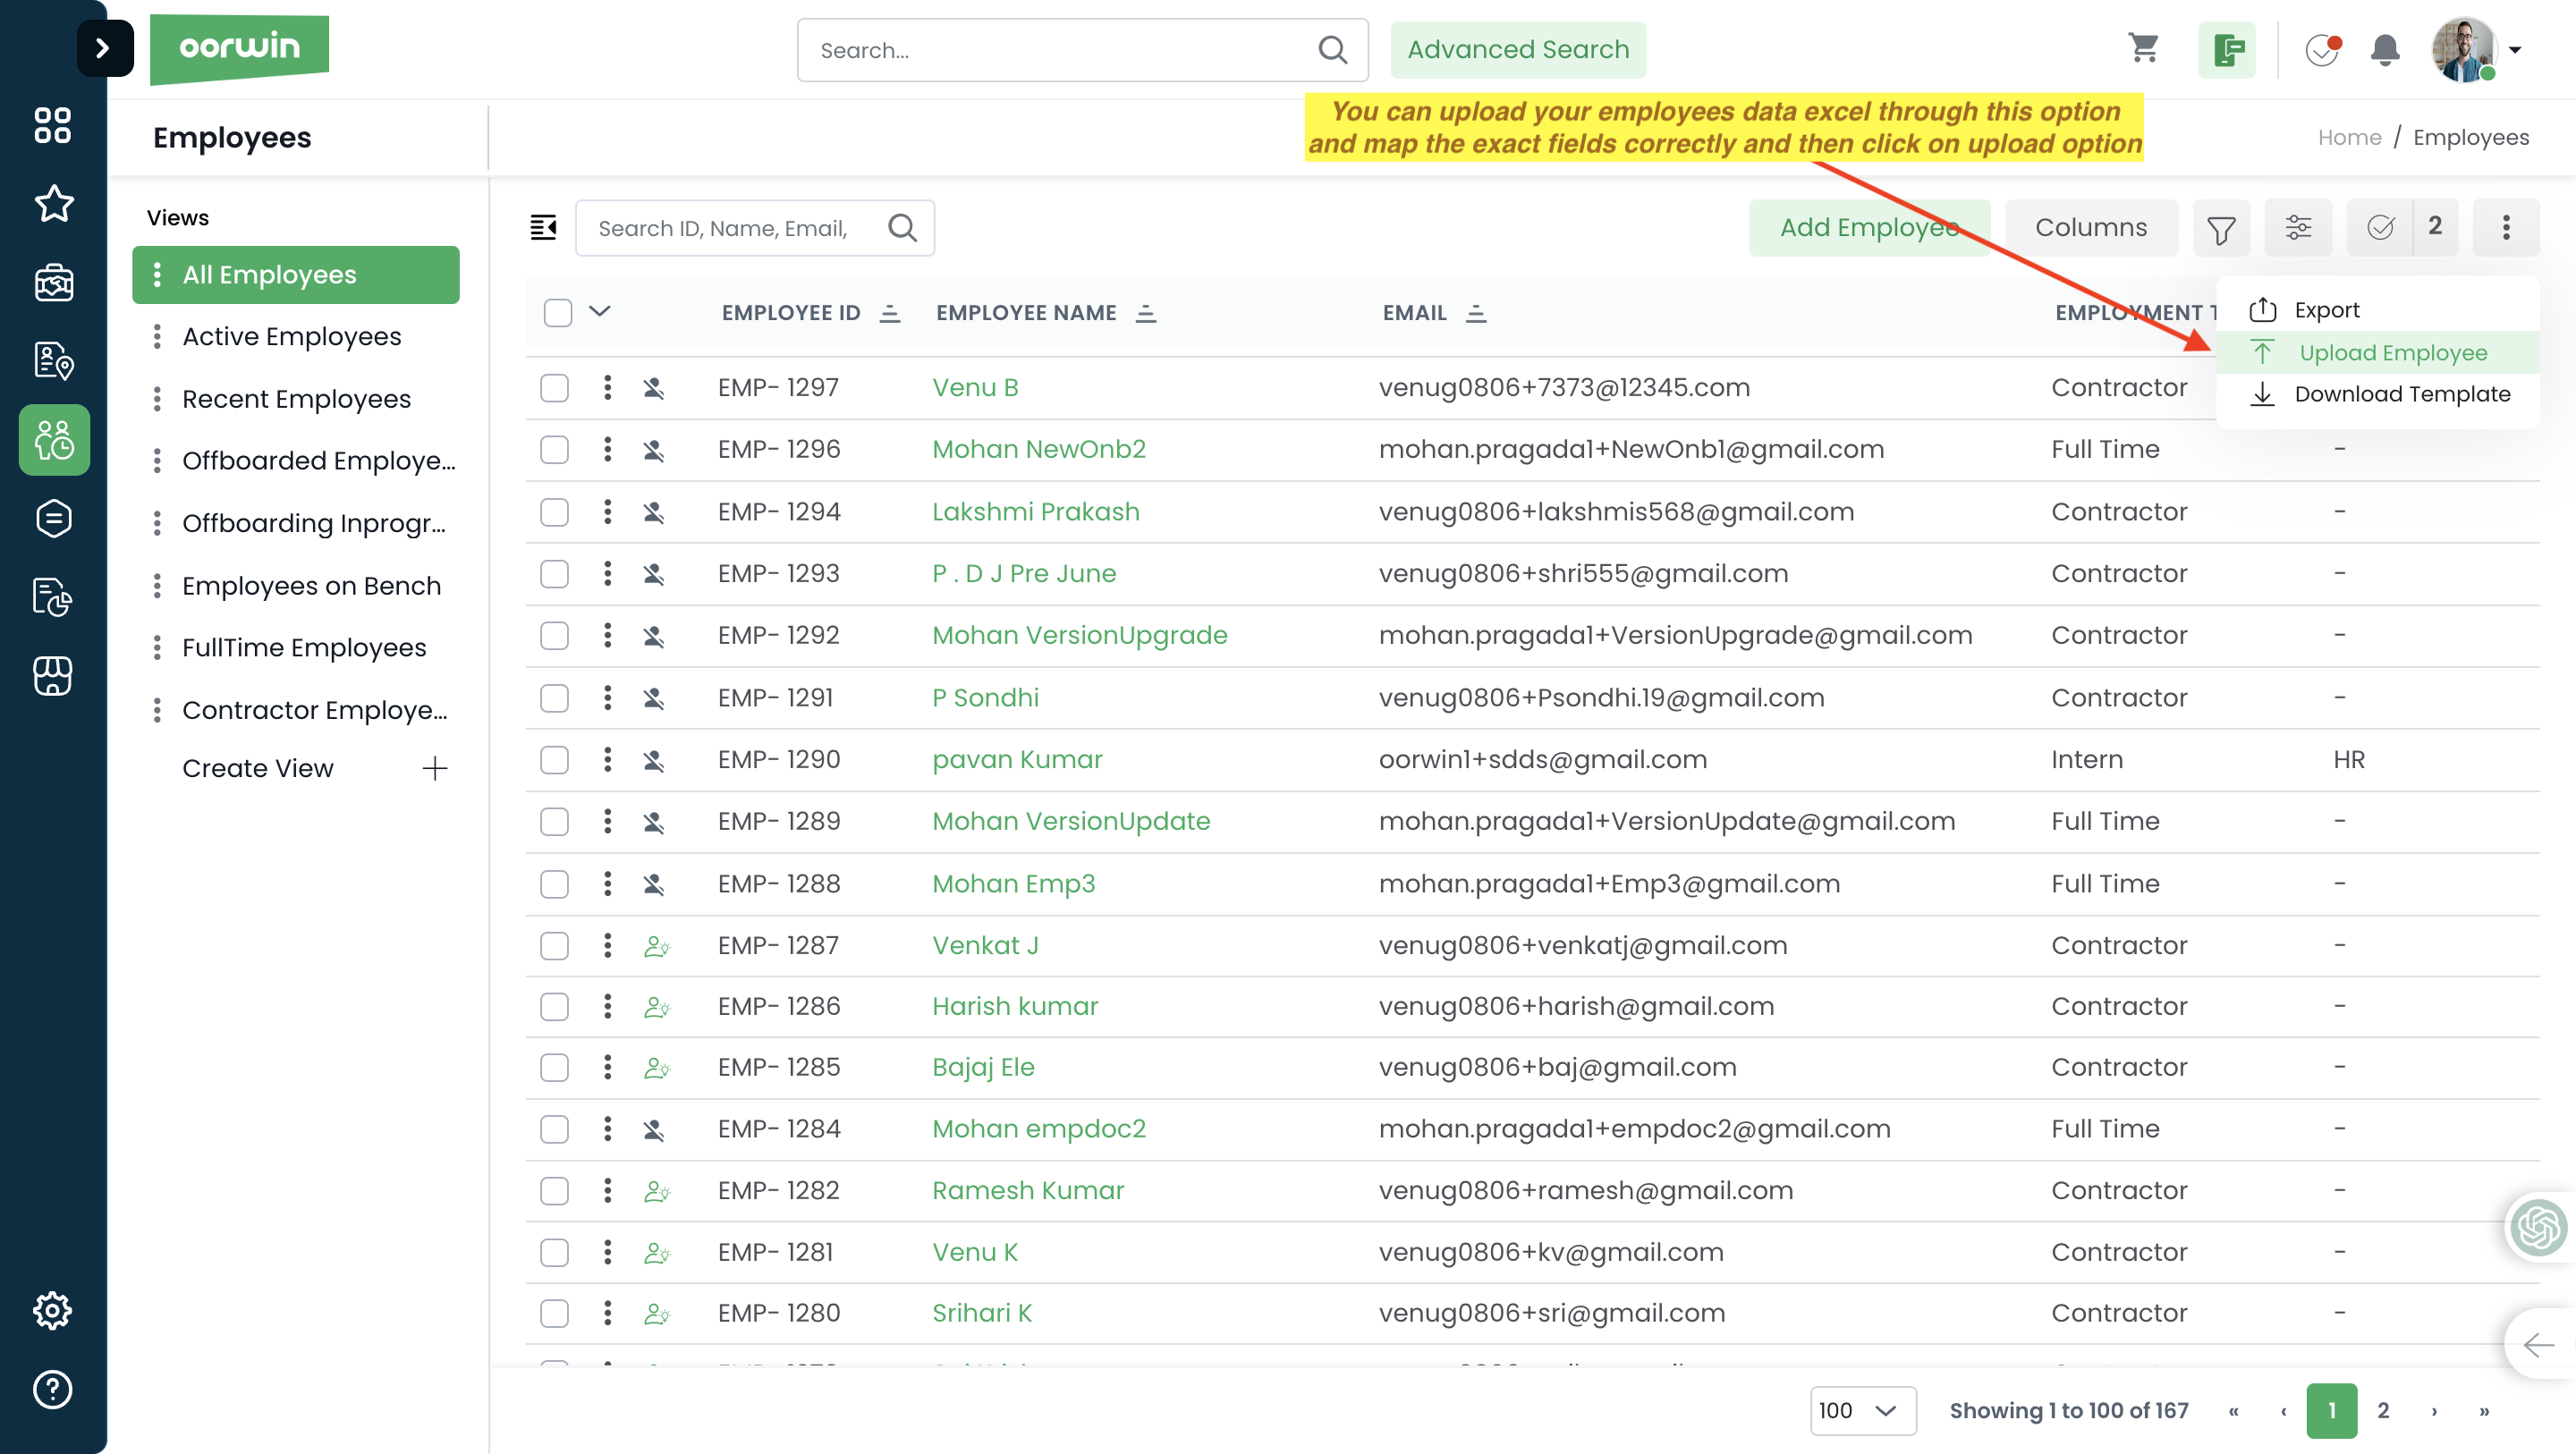
Was this article helpful?
To import leads through an excel sheet first you need download the leads template format through below steps and then upload it again once you have filled all the data in the downloaded template
- Log in to your Oorwin Account and navigate to Leads module from the left menu under Sales Section
- Go to list view and click on “More(three dots)” icon on the top right corner
- Click on Download Template option from the drop down list
- An excel template will be downloaded with all the lead field columns which you need to fill all the leads data in it
- Once you have filled all the lead details in the excel sheet you need to upload it through Upload Excel option
- Now system will ask you to check all the details mapped exactly with the excel fields
- Then click on Save button on the bottom to export all the data to Leads module
- Once it is exported, a success notification will be displayed in the Notifications section on the top
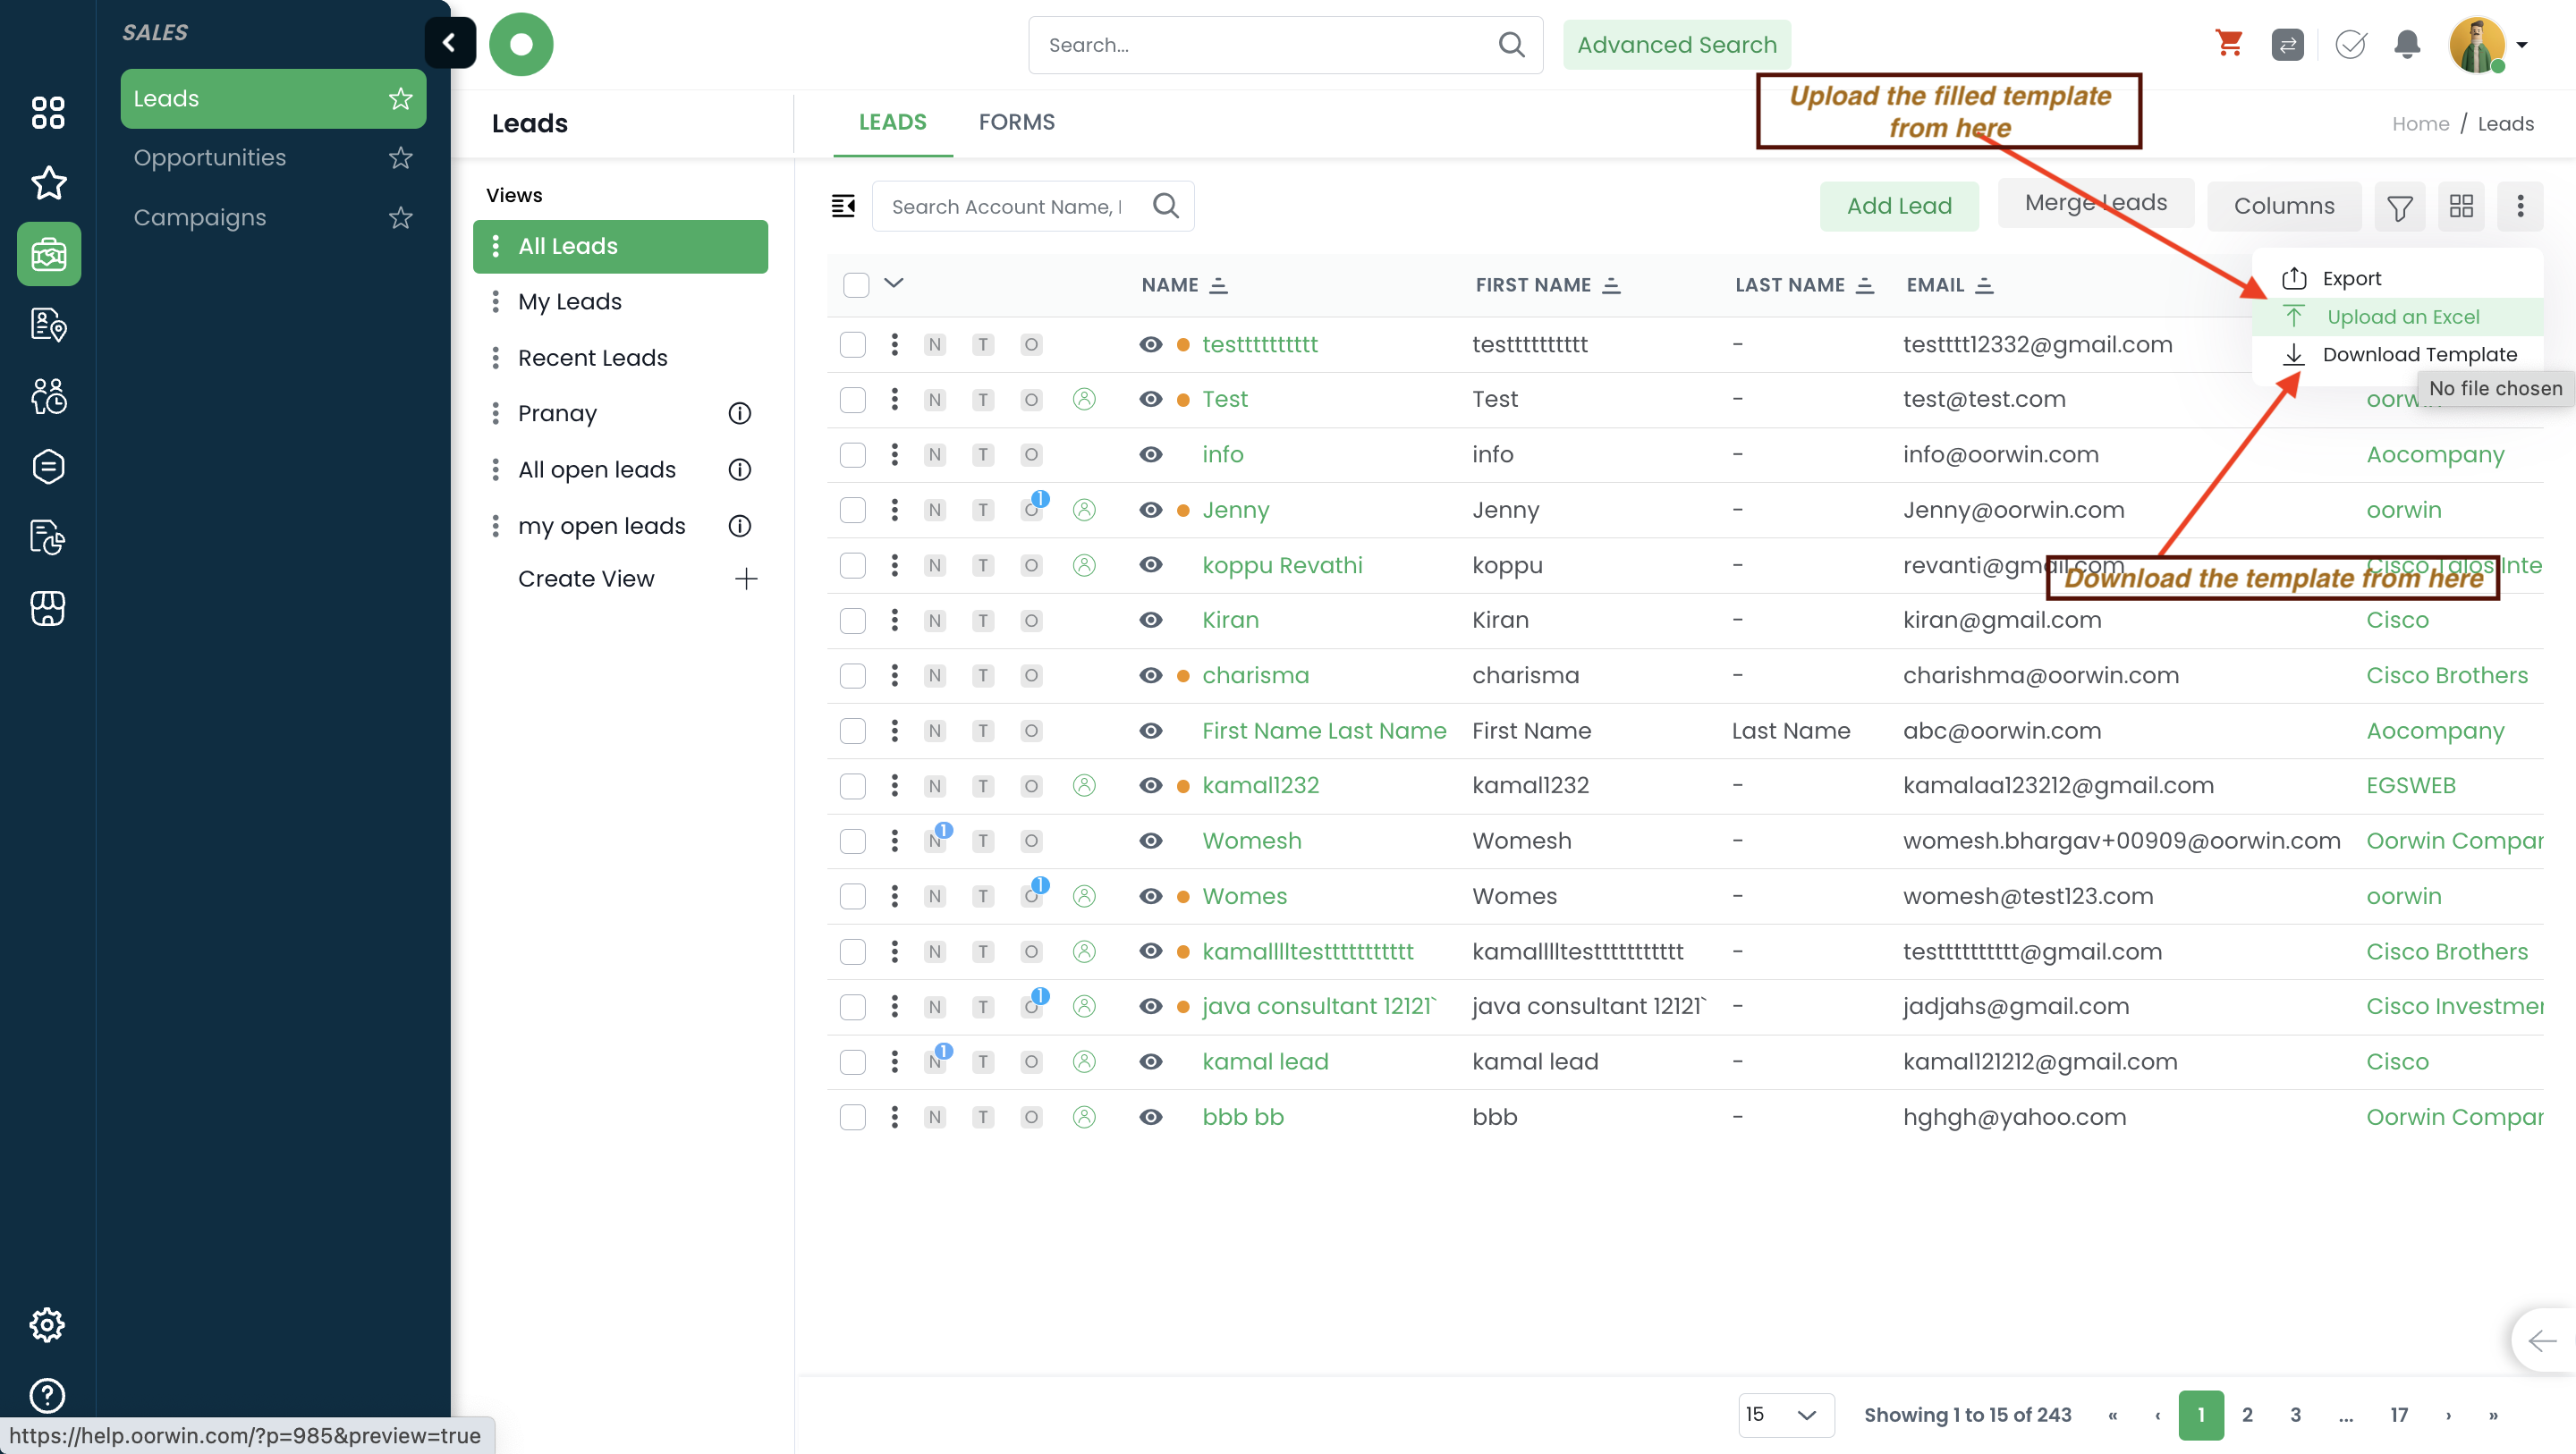
Was this article helpful?
User can create a note in multiple ways for a lead. Here is the simple way to create a note
Create a note from the Lead list page:
- Log in to your Oorwin Account and navigate to Leads module from the left menu under CRM Section
- Select any Lead name whom you wanted to create a note
- Click on “Notes symbol” for the lead you wanted to create note
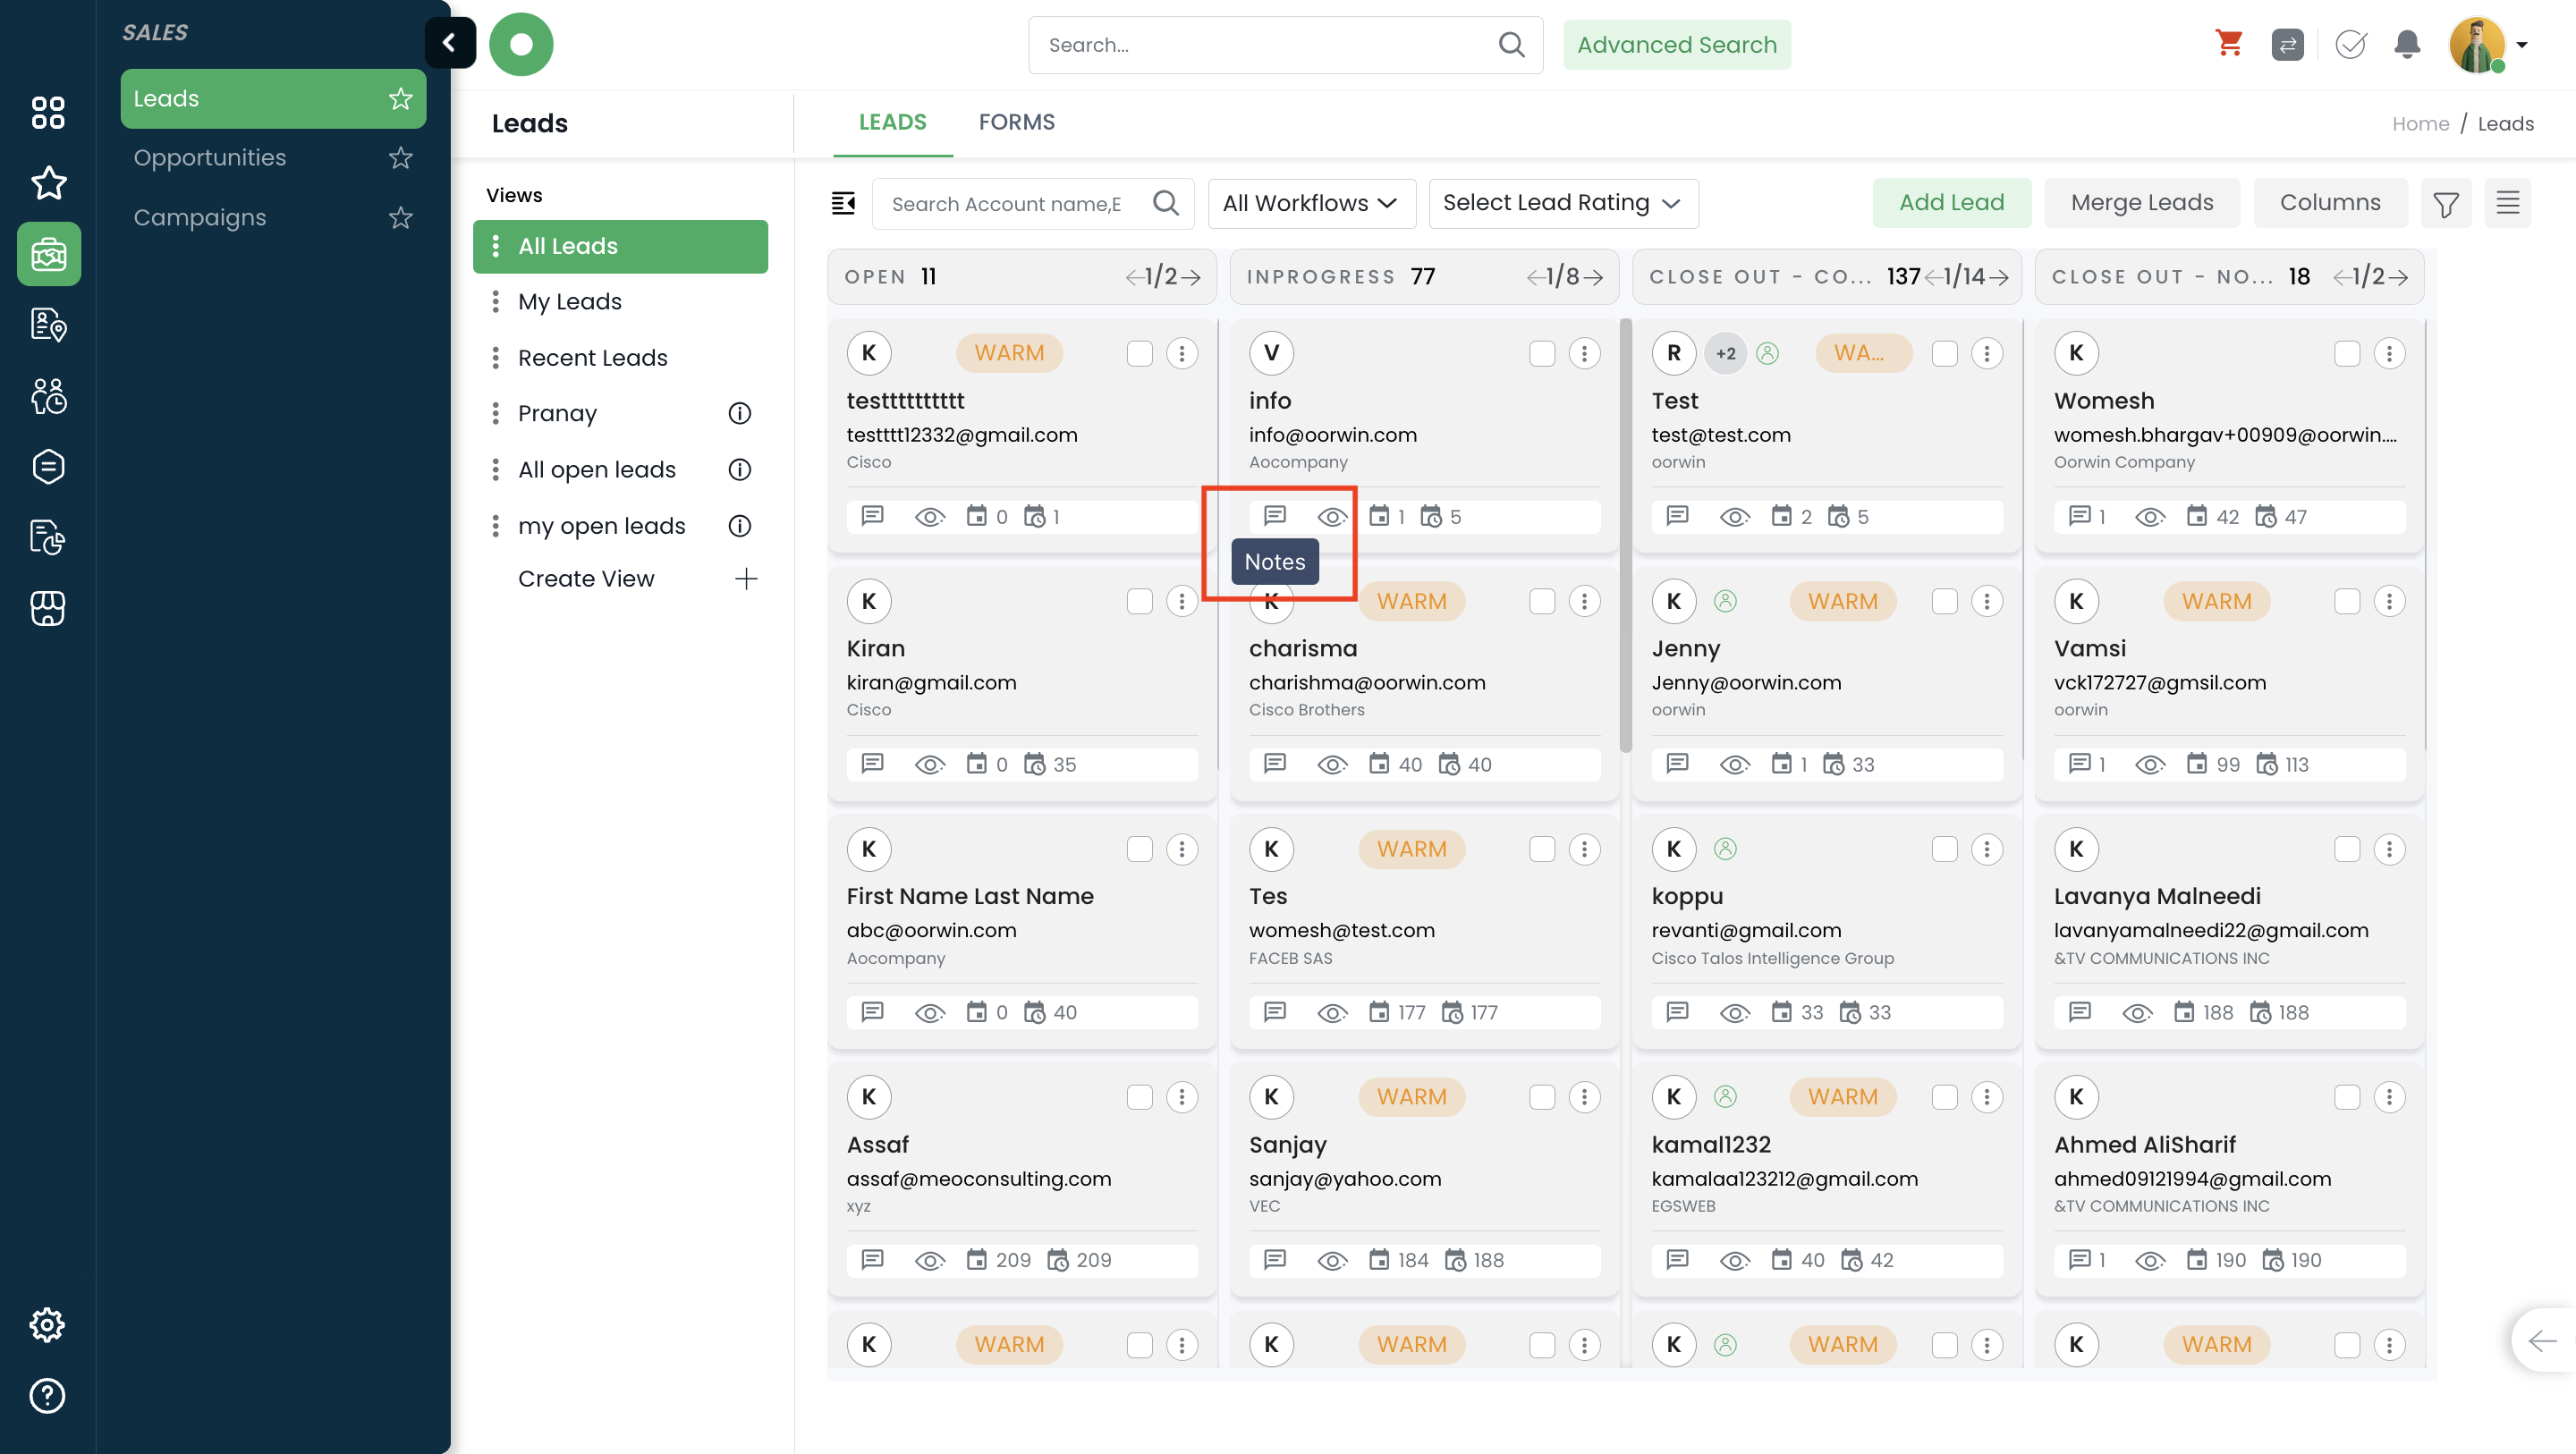
- It opens a popup with the existing notes listed
- Click on any type(call, note, meeting) of the note and also change the lead status if you wish
- Enter all the required fields like name, description, etc
- Click on Save button below
- Thats it! Your Note has been created and tagged to the particular lead
Note: User can also tag the note to account so that it will be displayed in that particular account
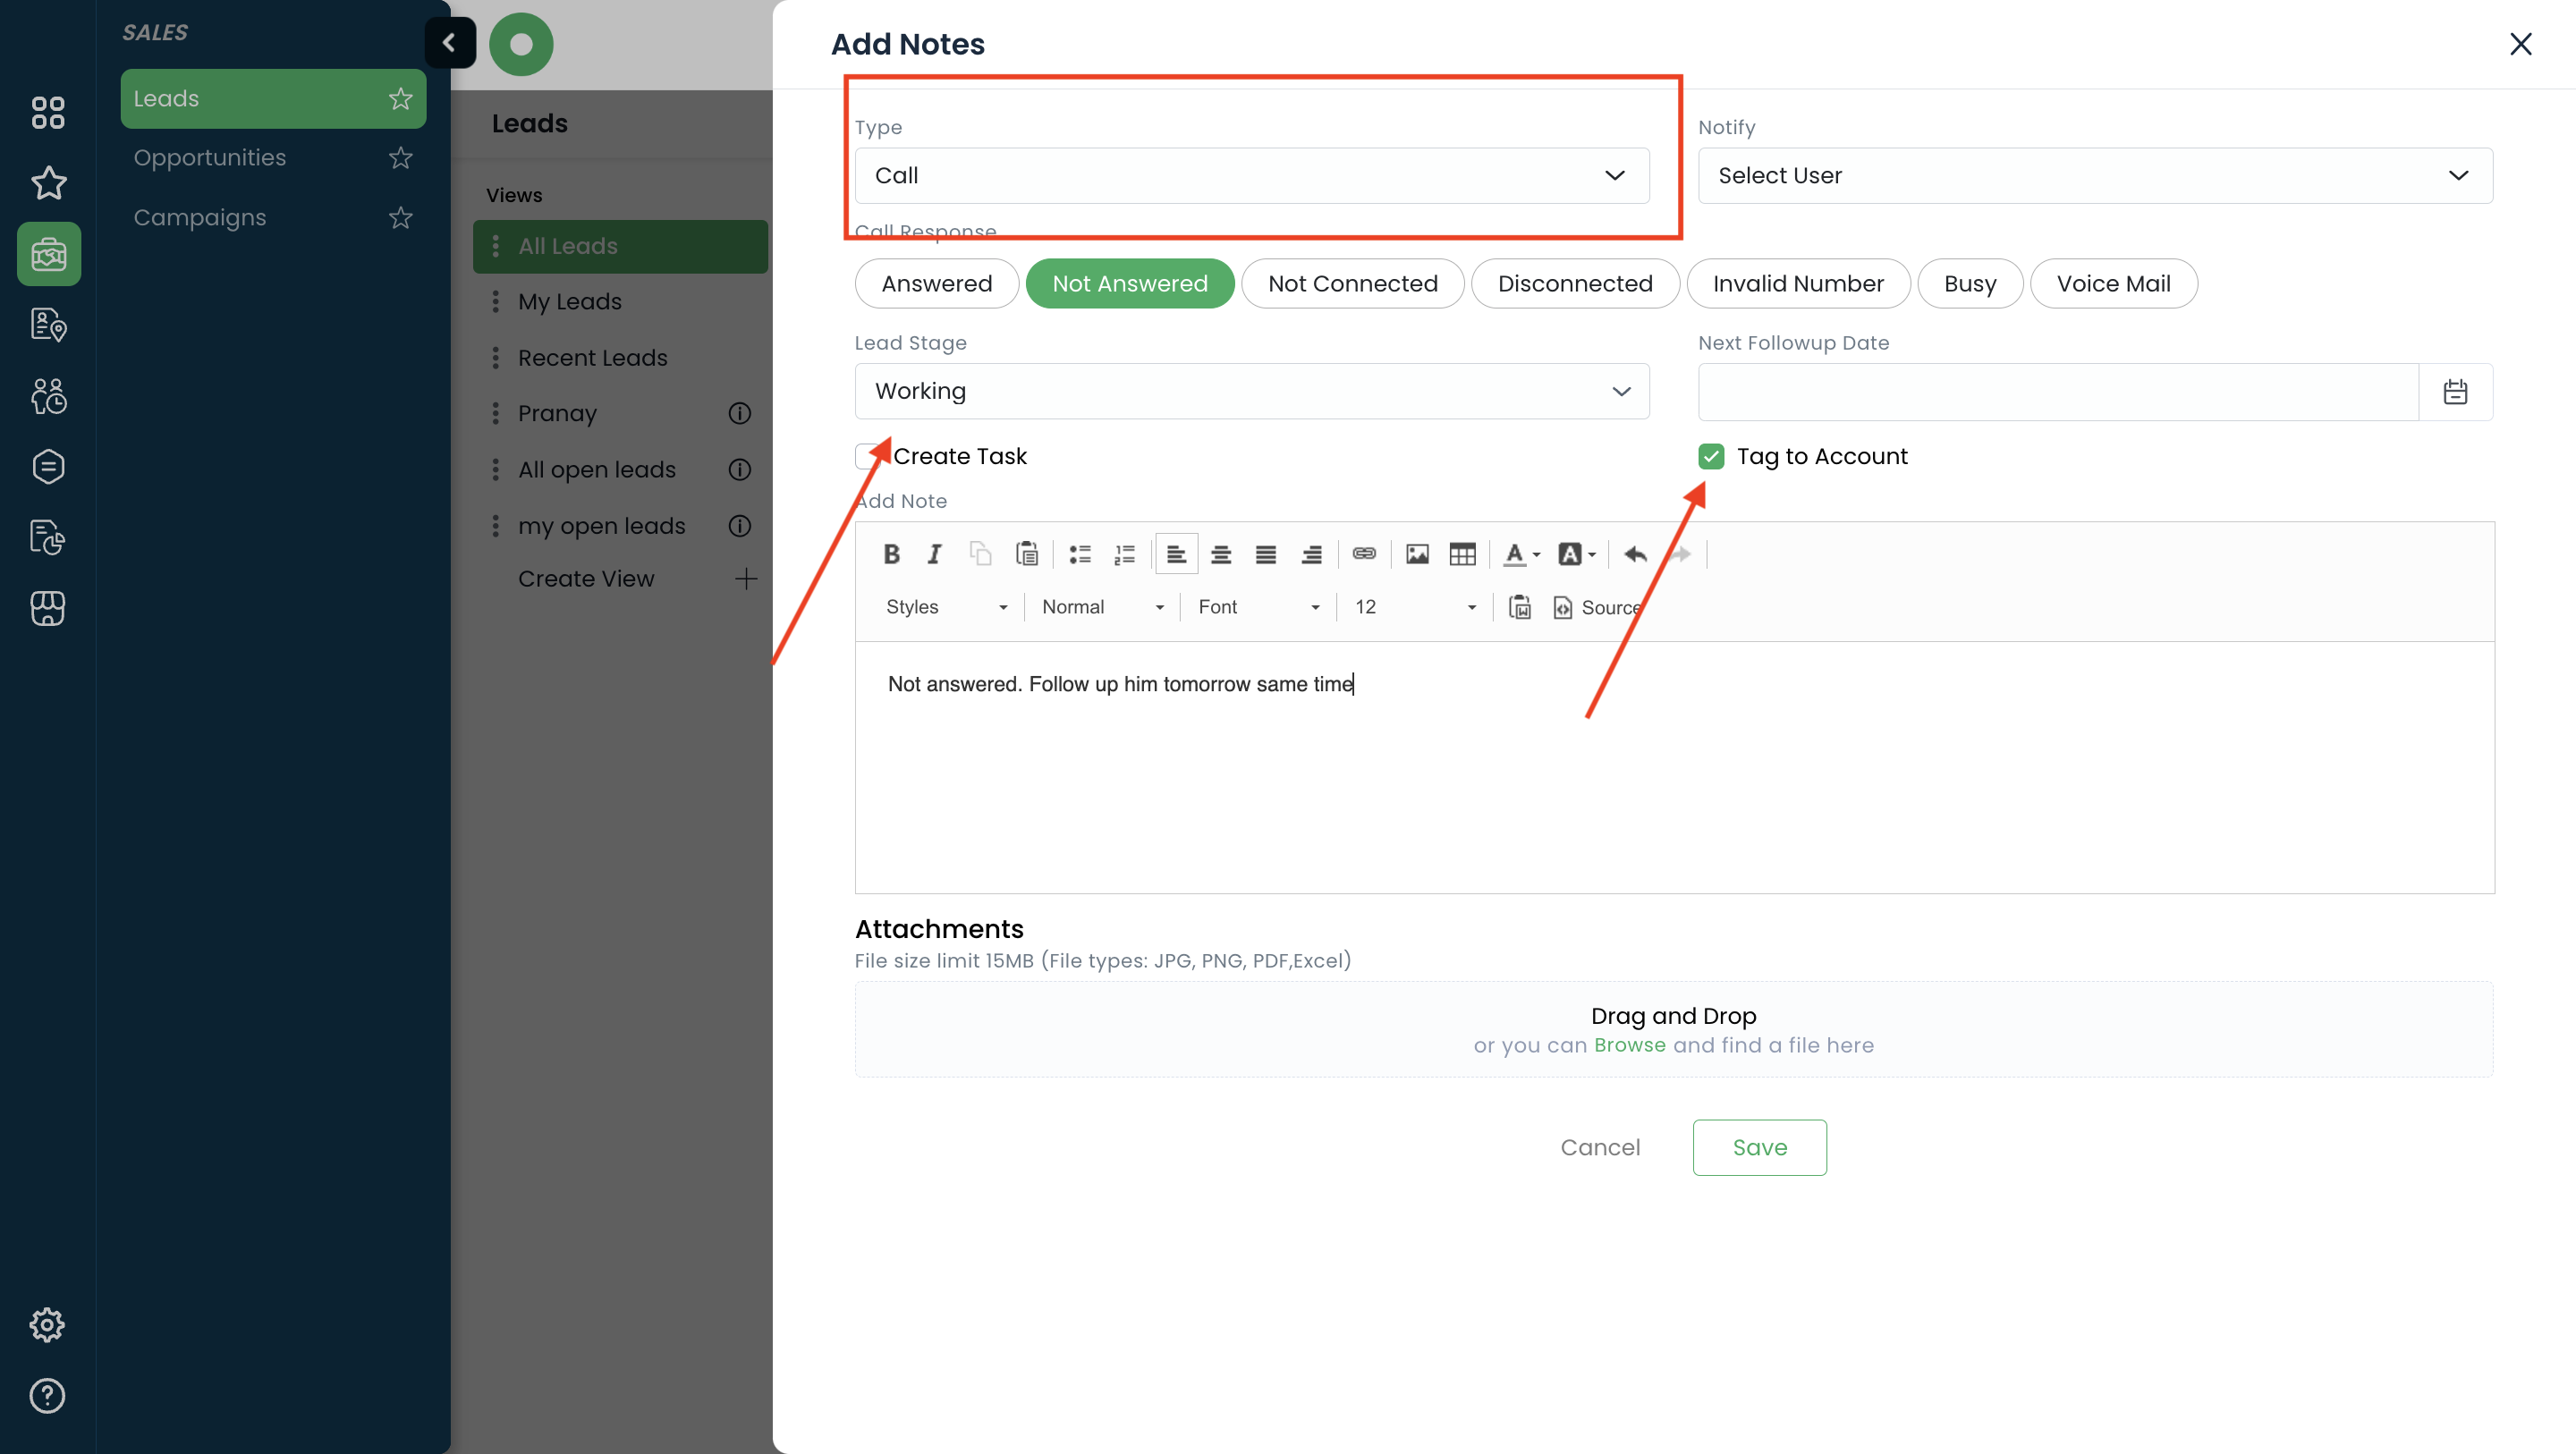
Was this article helpful?
To import Opportunities through an excel sheet first you need download the Opportunities template format through below steps and then upload it again once you have filled all the data in the downloaded template
- Log in to your Oorwin Account and navigate to Opportunities module from the left menu under Sales Section
- Go to list view and click on “More(three dots)” icon on the top right corner
- Click on Download Template option from the drop down list
- An excel template will be downloaded with all the Opportunity field columns which you need to fill all the Opportunities data in it
- Once you have filled all the Opportunity details in the excel sheet you need to upload it through Upload Excel option
- Now system will ask you to check all the details mapped exactly with the excel fields
- Then click on Save button on the bottom to export all the data to Opportunities module
- Once it is exported, a success notification will be displayed in the Notifications section on the top
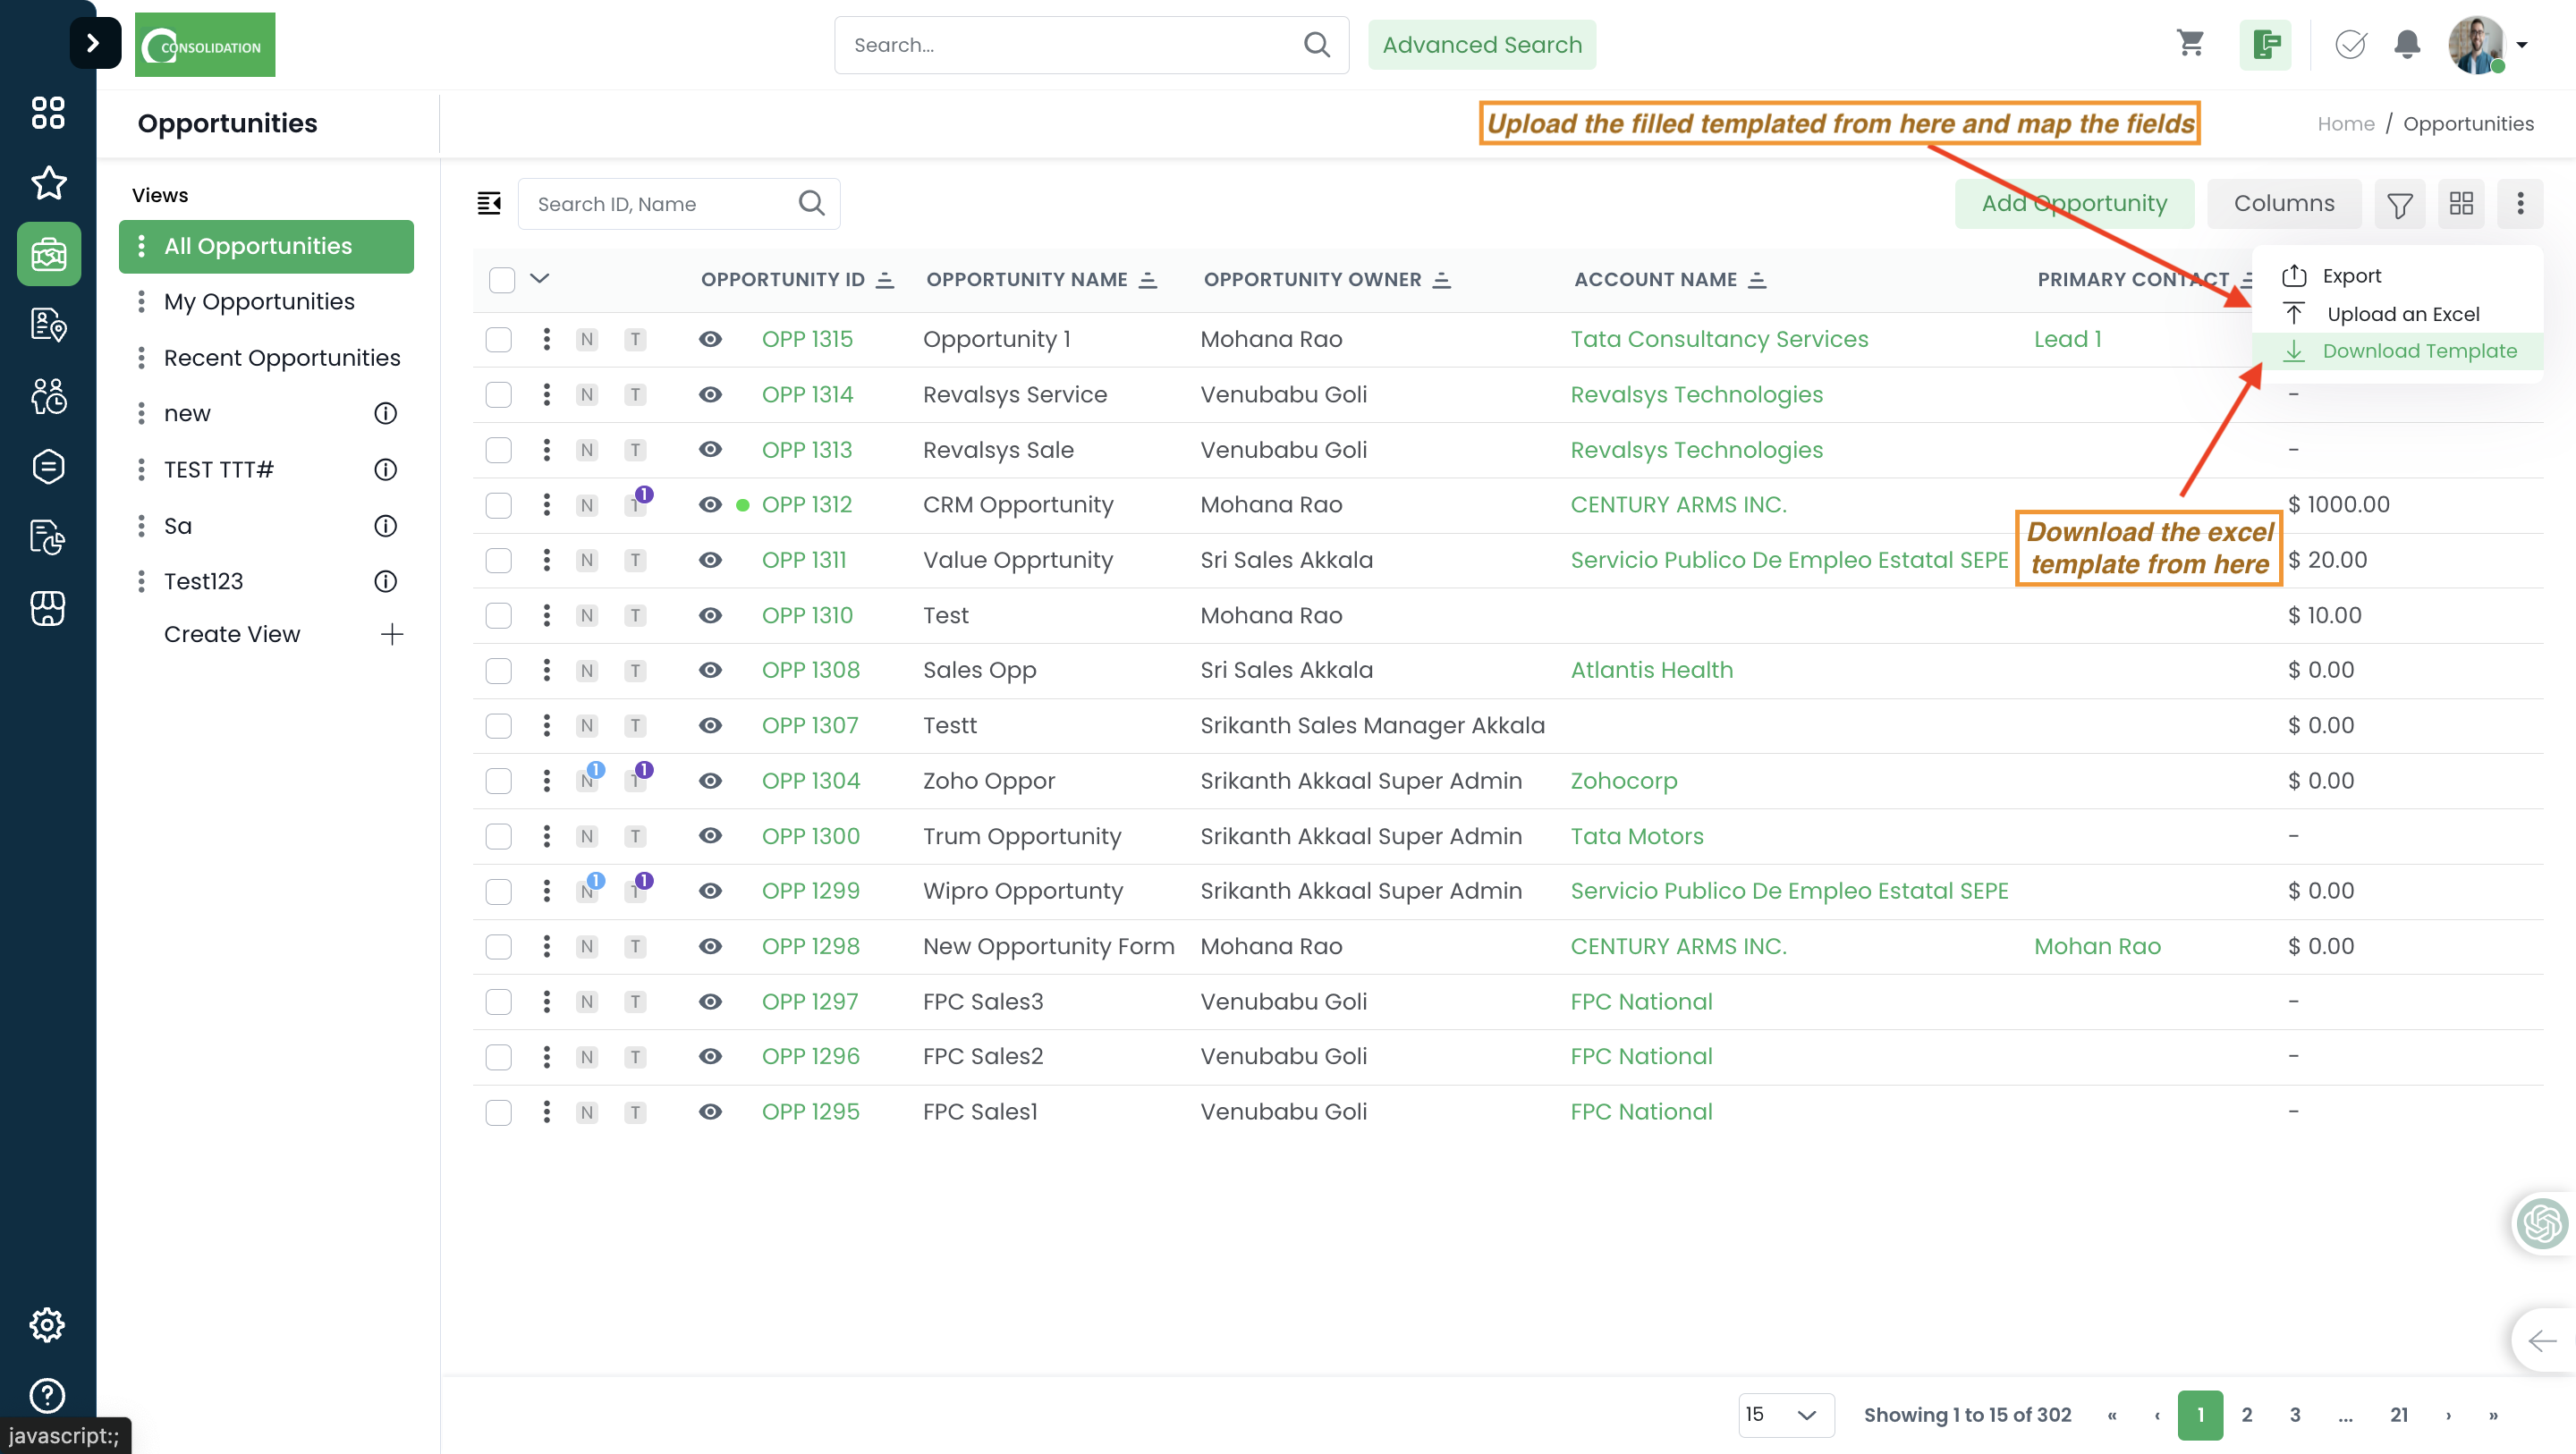
Was this article helpful?
- Log in to your Oorwin Account and navigate to settings page from the left bottom
- Go to Configurations on the left menu which opens multiple sections in it
- Click on Reminders section under configurations page
- It opens list of all the existing reminders that you have set previously
- To create a new reminder click on “Add Reminder” button on the top right corner
- Give the reminder name and type as Pending approval reminder.Pending Approval reminder will applicable to get the pending approvals for timesheets, expenses & employee info requests
- Select the from email from the list of oorwin users from which email that you want to get the reminder
- Now select the roles to consider to which roles it should consider the pending approval reminder
- Now in the set schedule tab, select the Reminder cycle(Daily, weekly, monthly), time along with the timezone
- Based on the configuration the mail template will be displayed with the default content and user can change the content except the table
- Now click on Save on the bottom and your reminder has created and the notifiers will get the Pending approval reminders for the mentioned modules
Was this article helpful?
- Log in to your Oorwin Account and navigate to settings page from the left bottom
- Go to Configurations on the left menu which opens multiple sections in it
- Click on Reminders section under configurations page
- It opens list of all the existing reminders that you have set previously
- To create a new reminder click on “Add Reminder” button on the top right corner
- Give the reminder name and type as Pending timesheet reminder
- Select the from email from the list of oorwin users from which email that you want to get the reminder
- Now select the roles to consider to which roles it should consider the pending reminder
- And select the from date from which the system should consider the pending timesheets and click on next button
- Now in the set schedule tab, select the Reminder cycle(Daily,weekly,monthly), time along with the timezone
- Now in the set notifications section, select the checkbox to whom you want to send the notification(Employee/Consolidated users) and cick on Next
- Based on the notification selection the mail templates will be displayed with the default content and user can change the content except the table
- Now click on Save on the bottom and your reminder has cretaed and the notifiers will get the Pending timesheet reminders based on the time configured
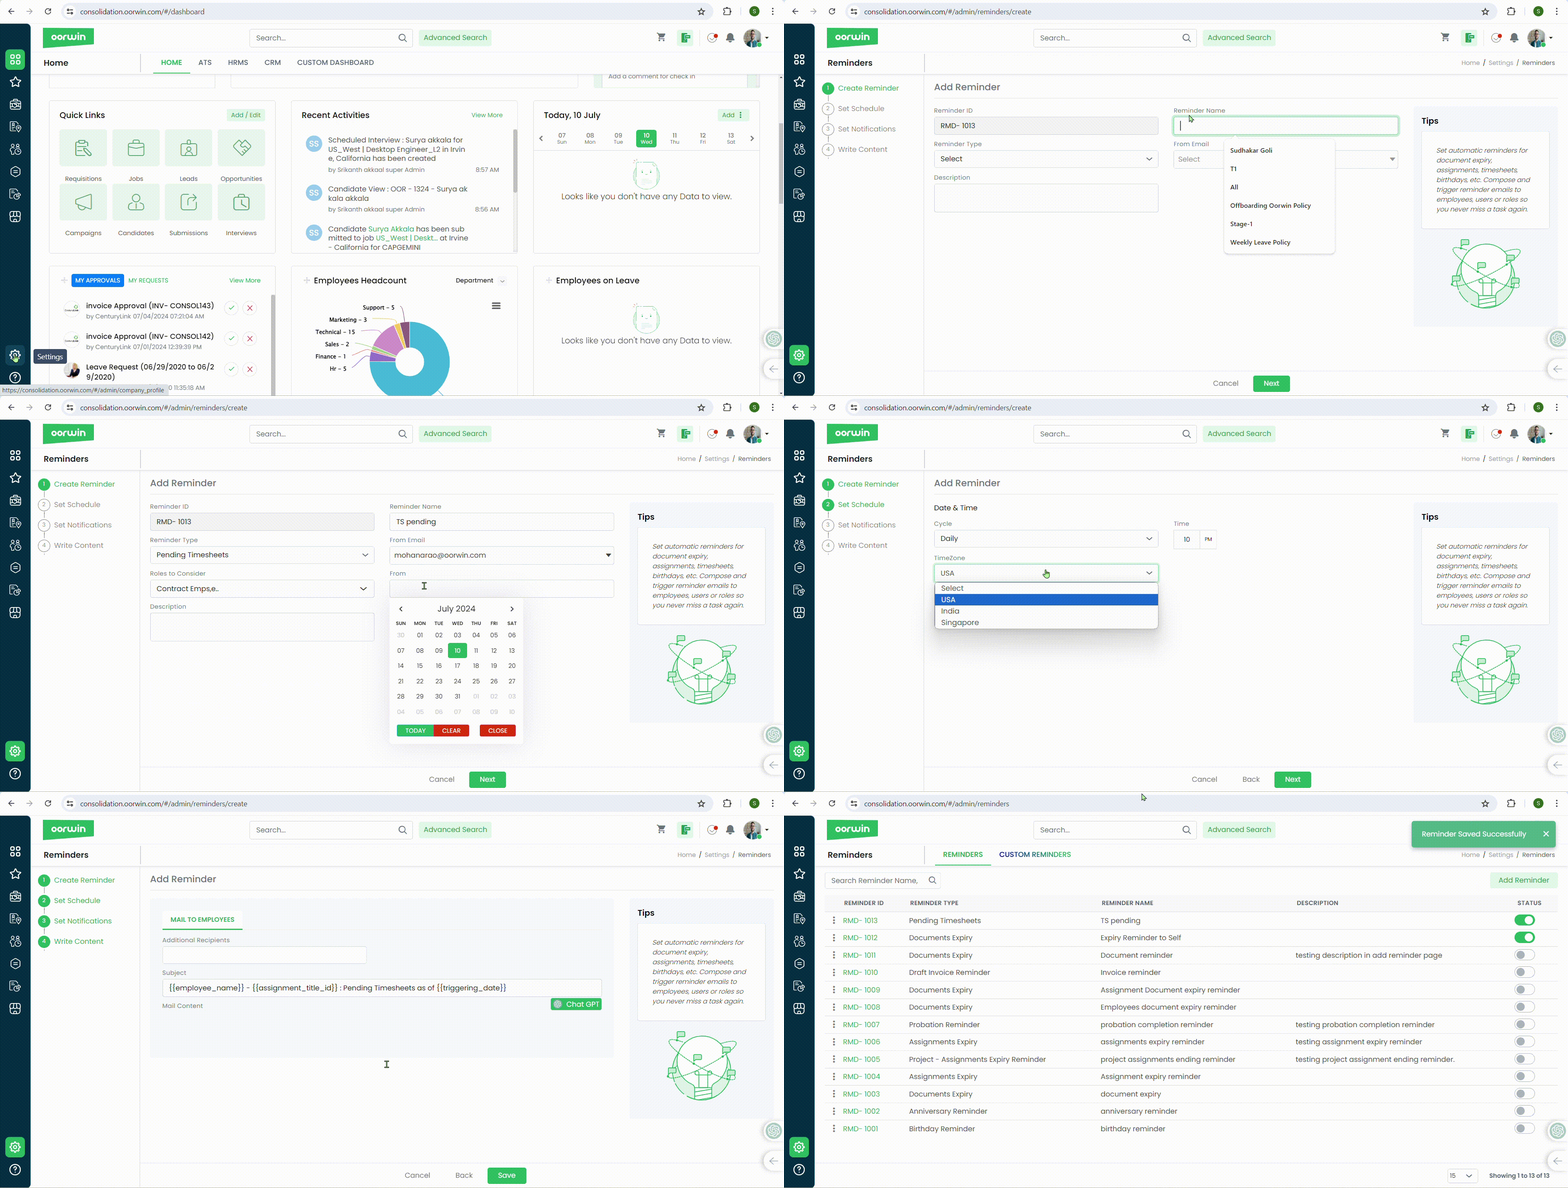
Was this article helpful?
Here’s a guide on how to Create Pool:
- Login to your “Oorwin account” and Navigate to “Resource Pool module” on the left menu under the “Recruitment” section.
- Click on “Create Pool” button.
- Fill in the Candidate information and add the required attachments.
- Click on the “Save” button on the bottom of the screen.
- The profile is now added to the “Resource Pool Module”.
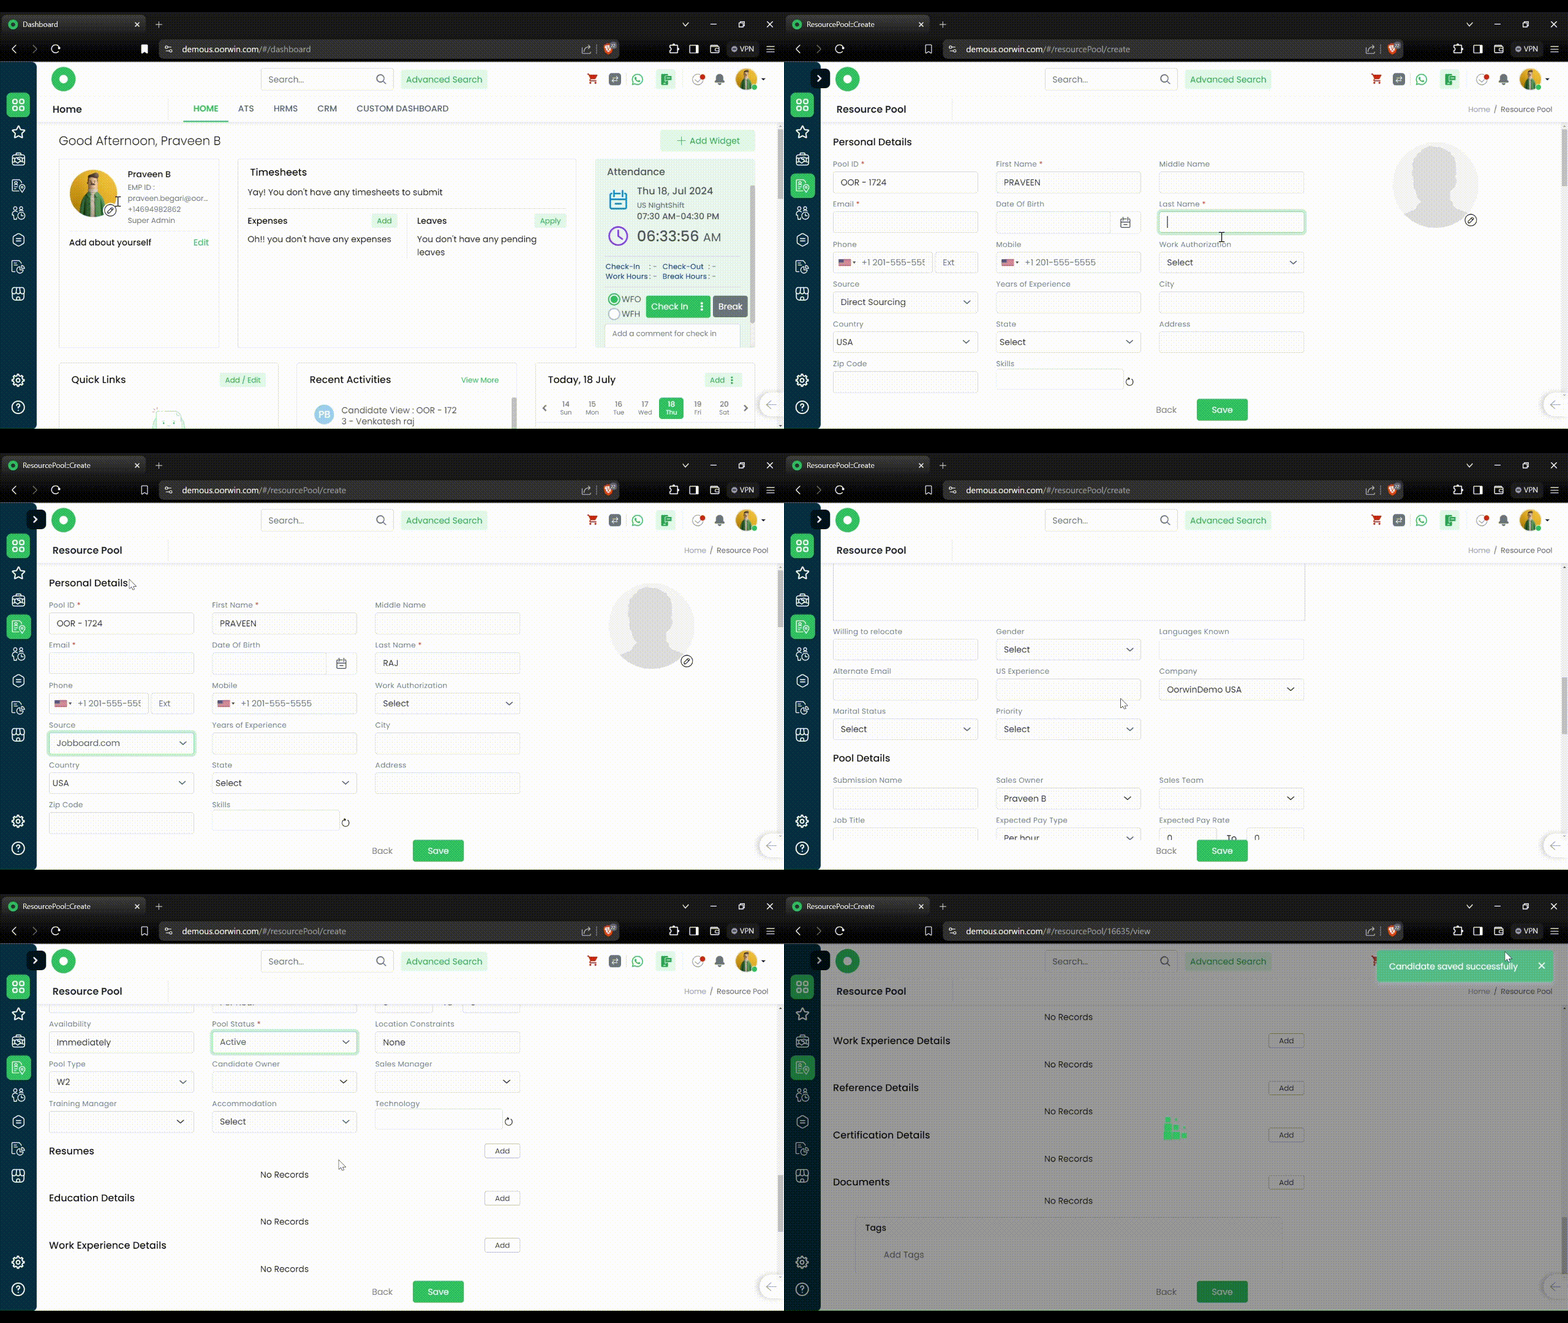
Was this article helpful?
- Log in to your Oorwin Account and navigate to settings page from the left bottom
- Go to Configurations on the left menu which opens multiple sections in it
- Click on Reminders section under configurations page which opens the list of all the existing reminders
- To create a new reminder click on “Add Reminder” button on the top right corner
- Give the reminder name and select type as Timesheet reminder
- Select the from email from the list of Oorwin users from which email that you want to get the reminder
- Now select the roles to consider to which roles it should consider the pending timesheet submissions
- Now in the set schedule tab, configure the timesheet cycles for which you want to trigger the emails and select the day on which you want to trigger the email for each timesheet cycles and click on Next
- Now in the write content tab the mail template will be displayed with the default content and user can change the content except the table
- Now click on Save on the bottom and your timesheet reminder has created which will notify the employees on the pending timesheet submissions
Was this article helpful?
Here’s the guide on how to Create/Add a Note:
- Login to your “Oorwin account” and Navigate to “Jobs module” on the left menu under the “Recruitment” section.
- Select the job where you want to Add/Create a note.
- Click on “N” (Notes Icon) on the landing page in Jobs, a pop-up will appear on your screen with all the previous notes added.
- Select the type of note that you want create.(ex : Add call, Add Meeting, Add Note, etc.)
- Enter the Information that you want to add.
- Click on the “Save” button, note will be added to that Job.
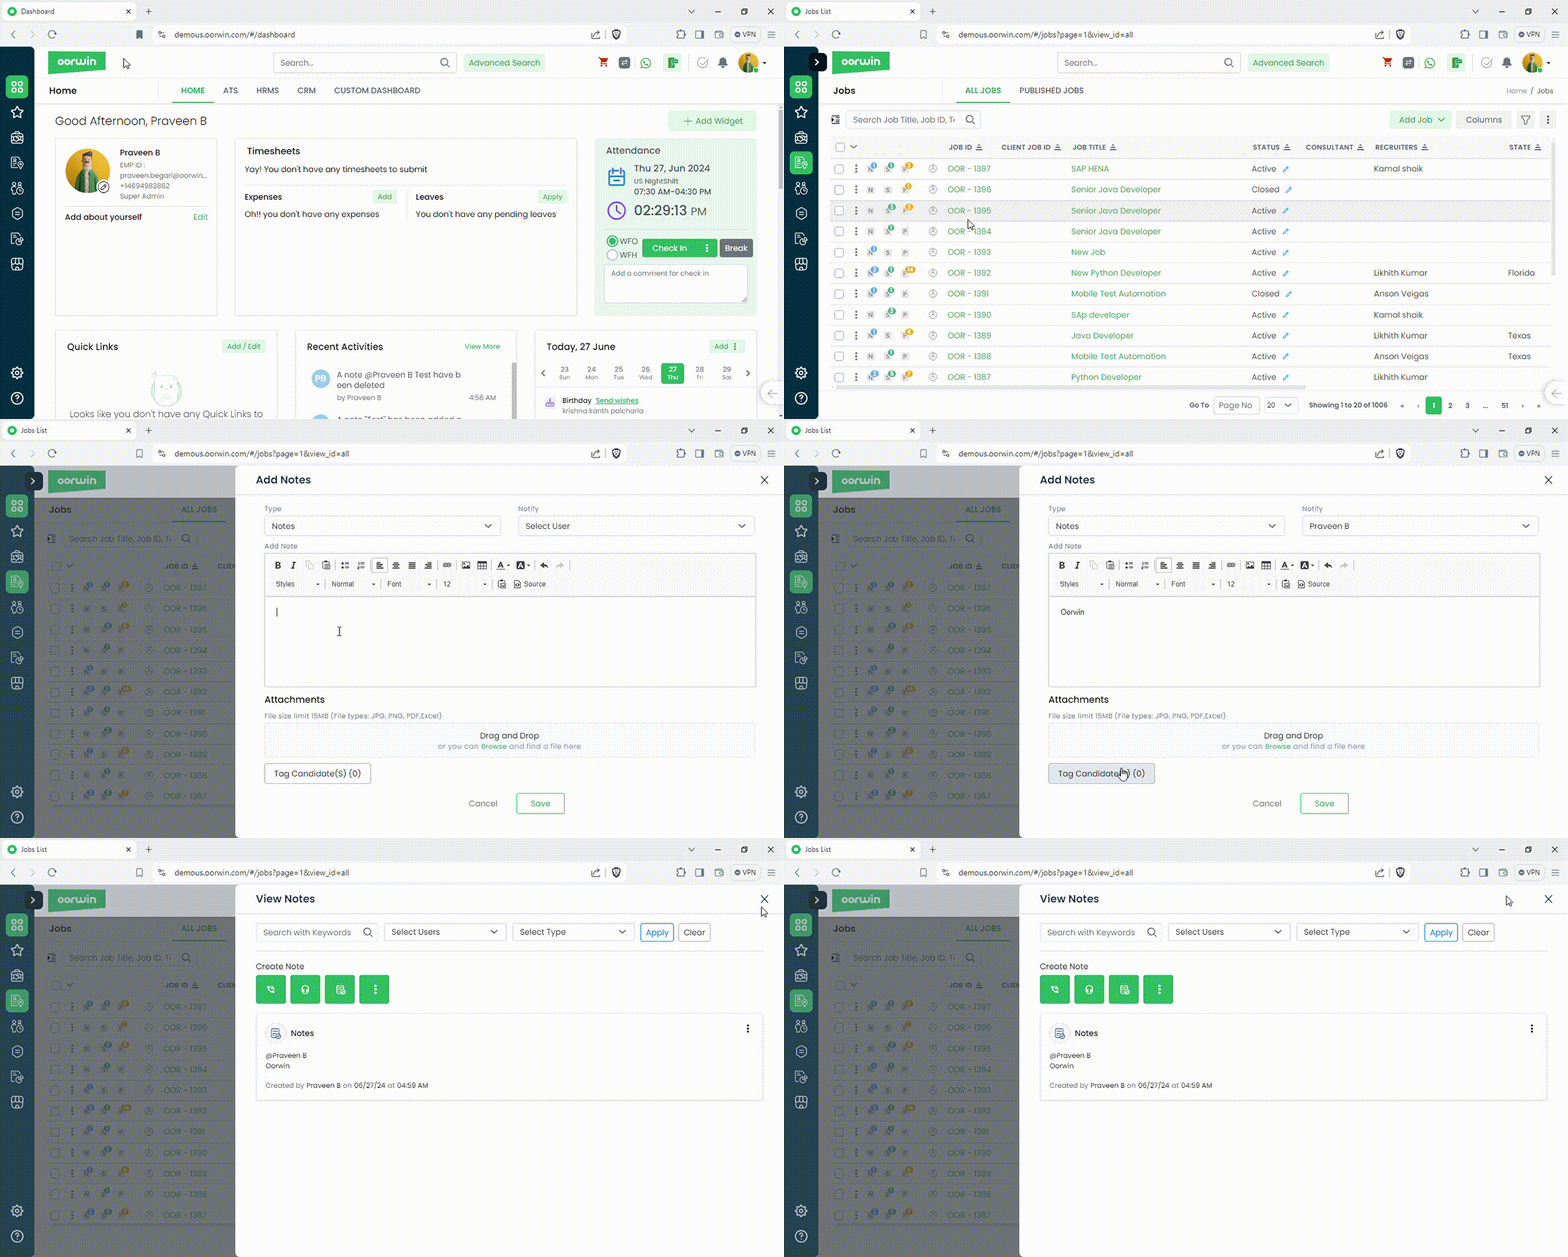
Note: You can tag a Job/ Candidate and also can notify it to other users while adding the notes.
Was this article helpful?
Creation of Onboarding Workflow – Explained in Detail
You can create different onboarding workflows tailored to specific needs.
For example, you can have unique workflows for various internal departments, ensuring each department’s specific requirements are met.
Similarly, if you are in staffing or consulting, you can design distinct workflows for employees on your payroll who serve different clients.
Only Admins (HR Admin/Super Admin) can create onboarding workflows.
To create an onboarding workflow, follow these steps:
1. Navigate to Settings -> Configurations -> Workflows -> Onboarding -> Create New Workflow.
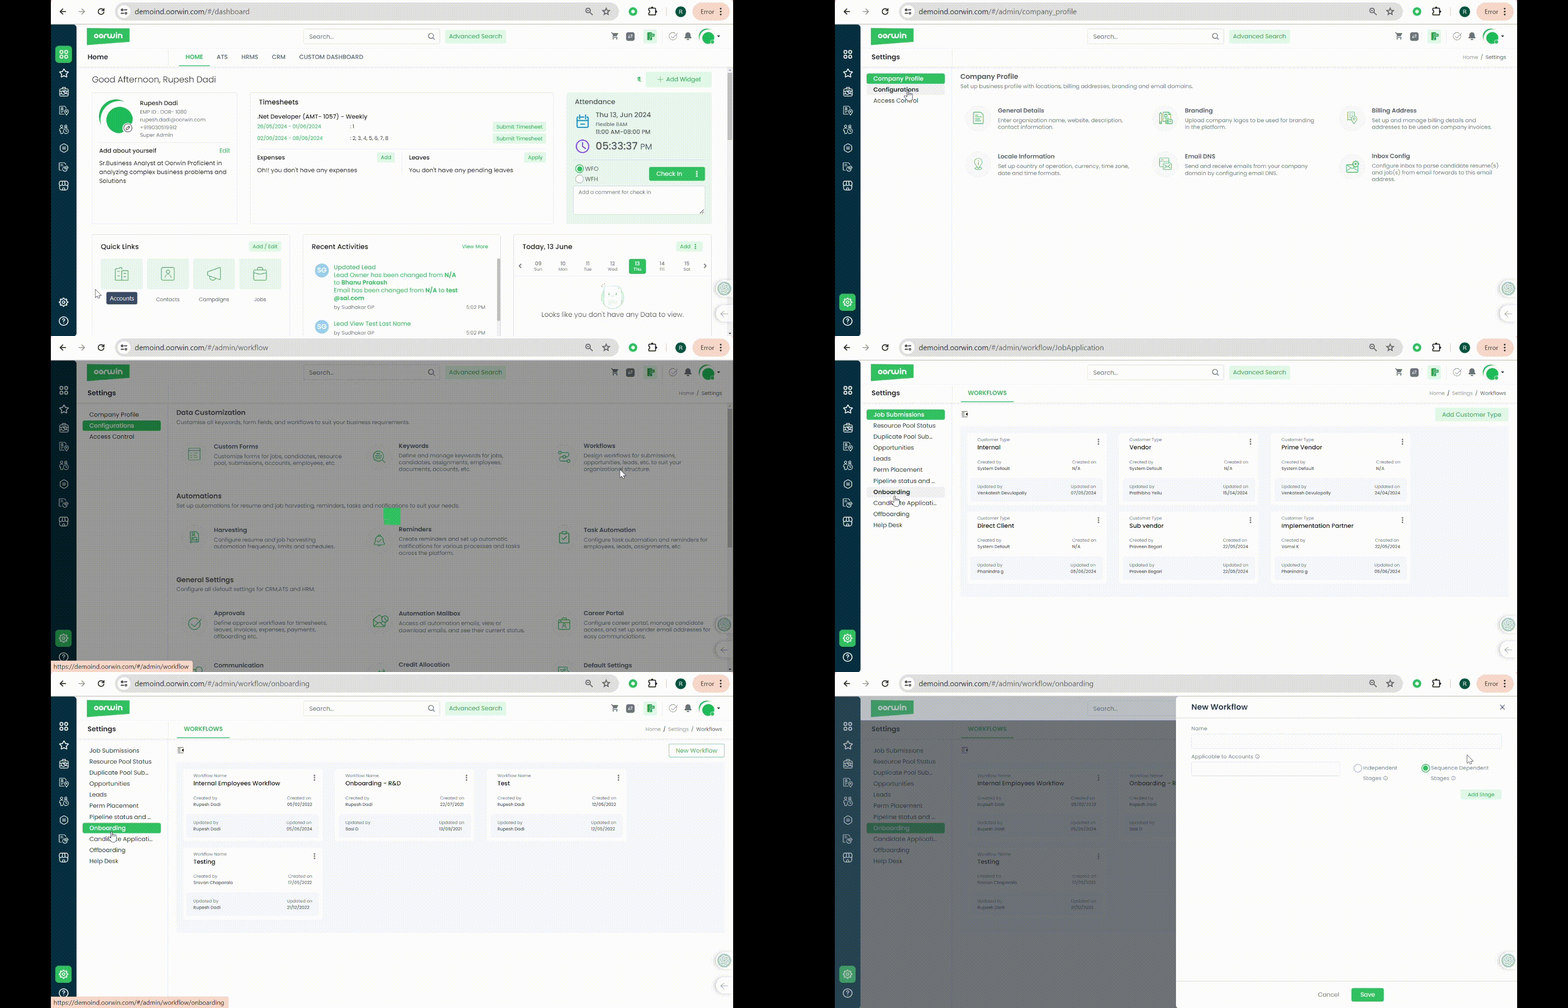
2. Name:
Enter the name you want to assign to this workflow.
3. Applicable Accounts:
This selection is optional. It is useful if you have a consulting or staffing business where your employees work for specific clients while remaining on your payroll. Search by account name, and select the desired company from the suggestions.
4. Independent Stages & Sequence Dependent Stages:
This will be a radio button selection where you can choose your workflow type.
- Independent Stages: Allows a user to initiate any workflow stage at any time without needing to complete the previous stage.
- Sequence Dependent Stages: Requires a user to complete the previous stage before initiating the next one. There are no restrictions for initiating the first workflow stage.
5. Add Workflow Stage:
Workflow stages can be added and edited at any time.When a user clicks on “Add Stage,” a pop-up will appear with the following information:
Name: Name the workflow stage as needed.
Owner: Assign owners responsible for the stage, such as a person responsible for document collection and verification. Ensure this person has Oorwin access with onboarding permissions.
Notify Checkbox: Select this checkbox to notify the owners or users when the workflow stage is initiated and completed.
Color: Choose colors for the workflow stages to identify them easily.
6.Actions in Onboarding Workflows:
Sending Digital Documents:
Users can select pre-designed digital documents from **Menu -> General -> Digital Templates**. These templates can include Manual Documents, FYI, Advanced Digi Signatures, and Digi Signature documents. Select the documents to send to the candidate.
Employee Upload Documents:
This requests the candidate (prospective employee) to upload the required documents. The candidate receives an email with a link to upload the necessary documents. You can select the document types from the list provided. If the required document type is not listed, you can create one in **Settings -> Configurations -> Keywords -> Documents -> Add**.
Profile Update Request:
This requests the candidate to provide the selected field data. The candidate receives an email with a link to update the necessary information. You can select the fields from the dropdown list.
Email Body Customization:
When this stage is initiated, you can send a customized email along with the mentioned actions.
Candidate Email: Customize the email to your candidate using the merge fields on the right. The final email sent to the candidate will include the customized content and the fields replaced by the merge fields.
Email to Others: You can also send updates to other employees, such as the IT manager, by customizing emails using the merge fields. The final email sent to the desired employees will include the customized content and the fields replaced by the merge fields.
Click Save to save this onboarding workflow stage.
If you want to create a new stage (Stage 2), click on the Add Stage button on your Workflow creation page. Follow the above steps to customize the stage and save.
Track Progress:
After adding all the required stages, you can enable “Track Progress through workflow.” Once enabled, you can enter numerical values to track progress for each stage. For example, if you have five stages, you can allocate percentages as follows:
– Stage 1: 20%
– Stage 2: 30%
– Stage 3: 10%
– Stage 4: 10%
– Stage 5: 30%
This should sum up to 100%.
You can also enable “Distribute Equally,” which will distribute all workflow stages with equal percentages.
Click Save to save this onboarding workflow.
Was this article helpful?
Here’s a detailed guide on how to create a requisition templates:
- Log in to your Oorwin Account and navigate to Requisitions module from the left menu under Recruitment Section.
- Click on “REQUISITION TEMPLATES”.
- Click on “Create Template” button on right corner.
- Fill in all the Required information along with all the Mandatory fields.
- Click on “Save” button below and that’s it, your requisition template saved into the system and can access under My Templates view.
- Choose the template while creating a new requisition.

Was this article helpful?
Here’s a guide on how to Delete a Candidates profile:
- Login to your “Oorwin account” and Navigate to “Candidates module” on the left menu under the “Recruitment” section.
- Click on the “3 dots/Actions” beside the Candidate ID and from the drop down click on Delete.
- A pop-up will come up on your screen, select Yes.
- The profile will be deleted from the Candidates Module.
Was this article helpful?
Custom forms allows you to customize all your module forms and fields based on your business needs. Here you can also customize the fields by adding or removing them
Here is how you can you remove a custom field:
- Log in to your Oorwin Account and navigate to settings page from the left bottom
- Go to Configurations on the left menu which opens multiple sections in it
- Click on Custom Forms section under configurations page
- It opens all the modules on the left pane which opens the module specific form on the right pane upon clicking on it
- Click on any module that you wish to remove the custom field and click on three dots on the custom field
- Now click on delete action and click on Yes on the conformation box
- The field will be moved to the deleted list on the right which you can restore it again by dragging it to any of the section
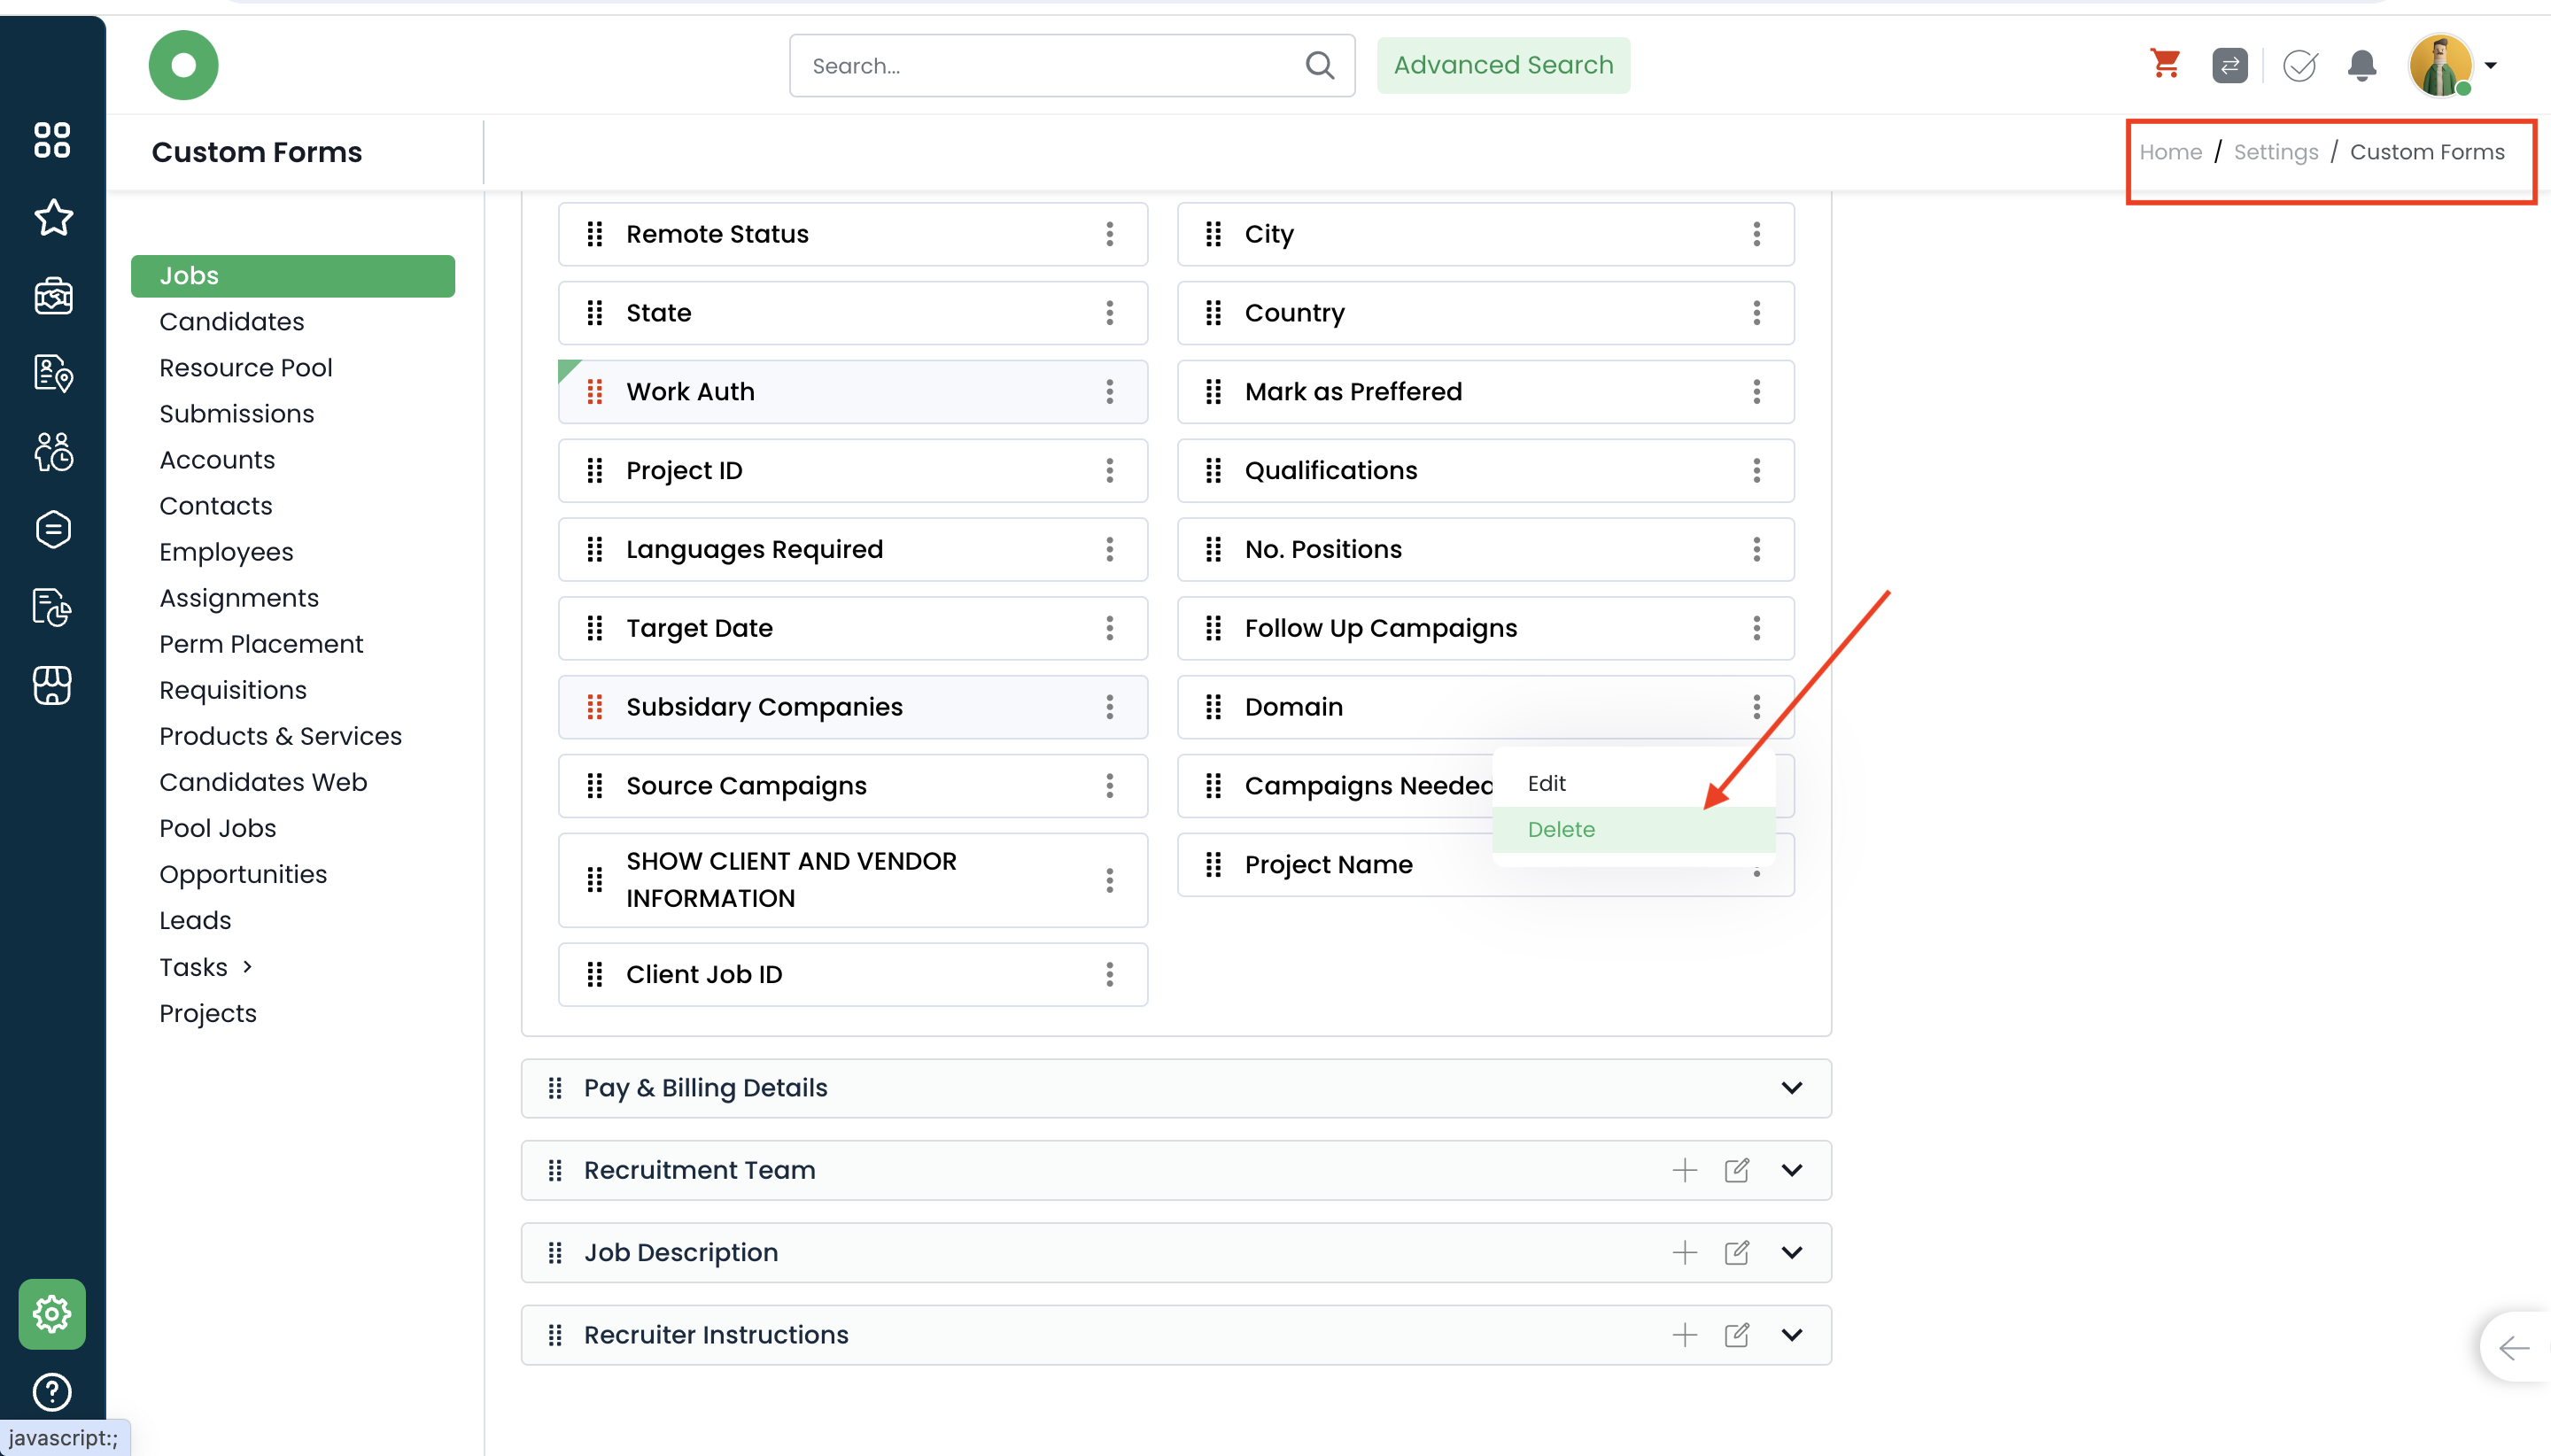
Note: You cannot delete the system default field in any of the form
Was this article helpful?
Here’s a guide on how to Delete a Profile from Resource Pool:
- Login to your “Oorwin account” and Navigate to “Resource Pool module” on the left menu under the “Recruitment” section.
- Click on the “3 dots/Actions” beside the Pool ID and from the drop down click on Delete.
- A pop-up will come up on your screen, select Yes.
- The profile will be deleted from the Resource Pool module.
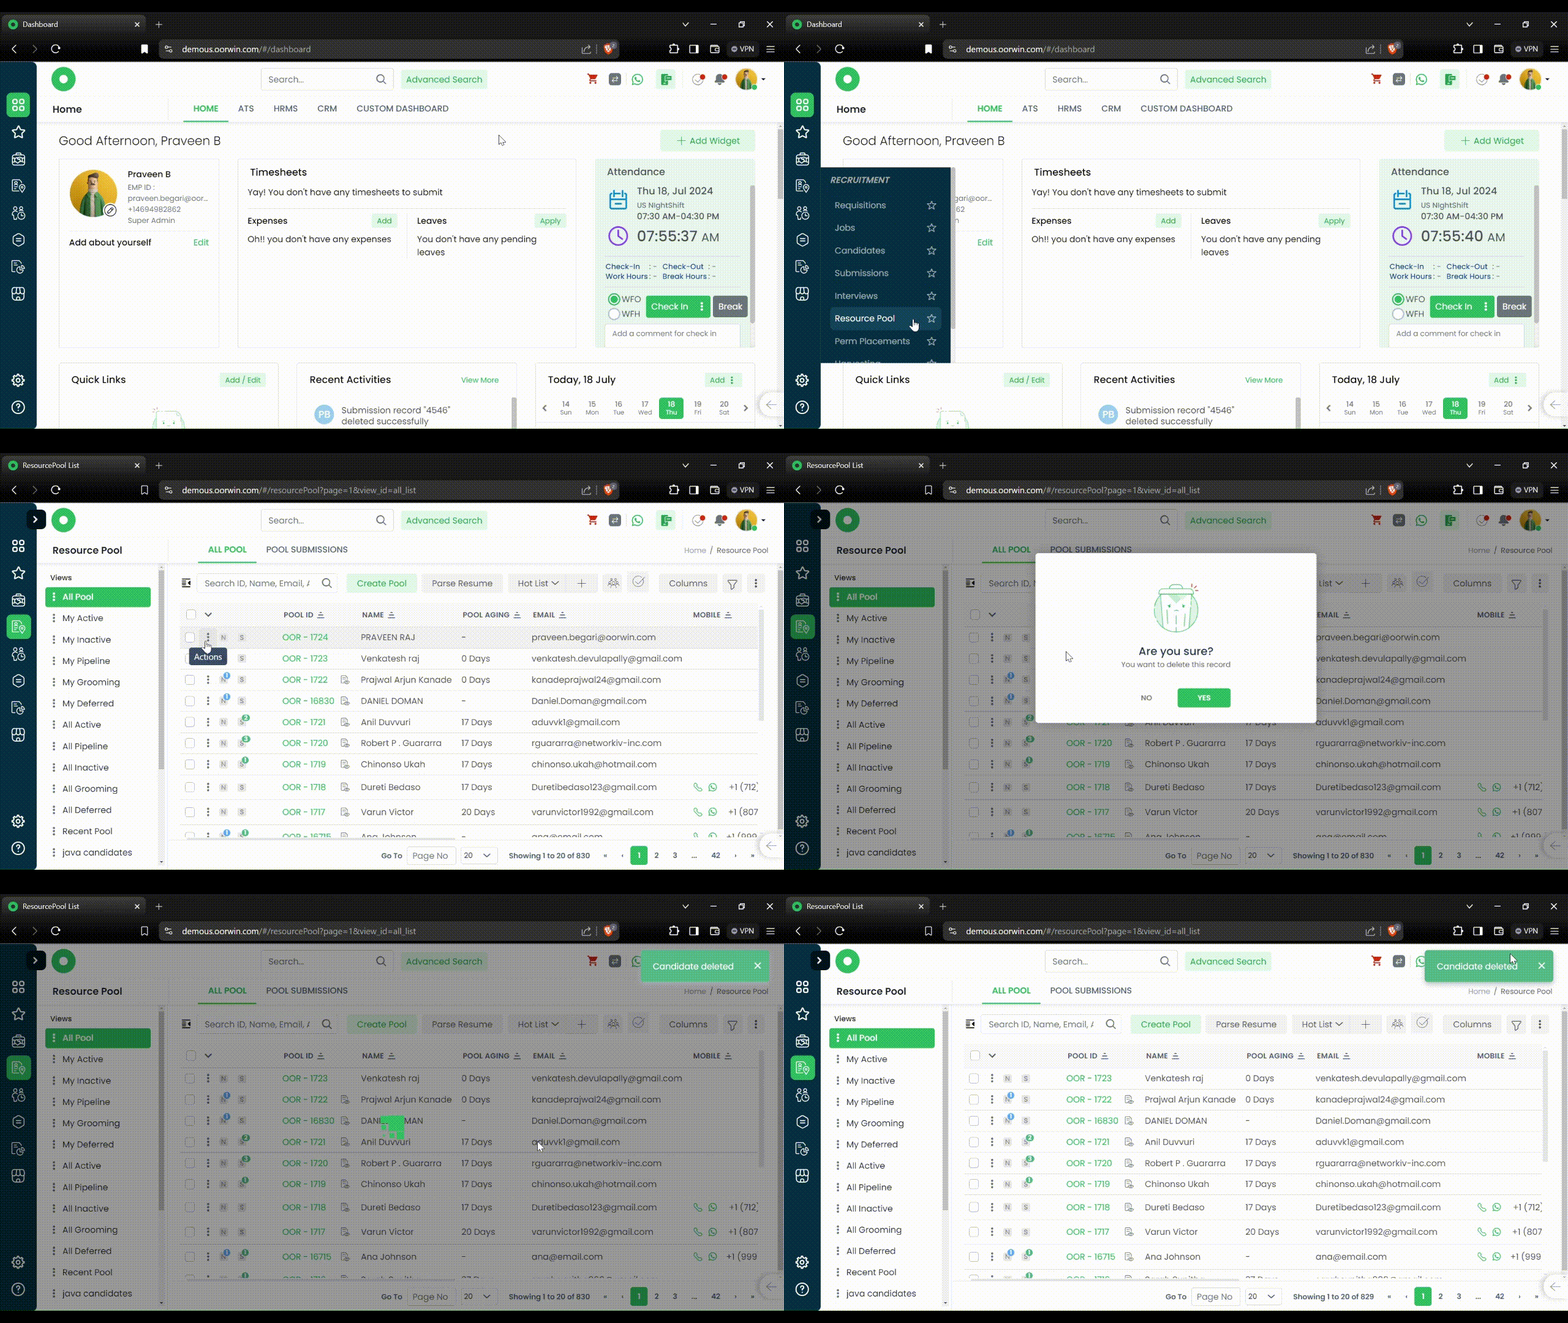
Was this article helpful?
Here’s a guide on how to Delete a Submission Record:
- Login to your “Oorwin account” and Navigate to “Submissions module” on the left menu under the “Recruitment” section.
- Click on the “3 dots/Actions” beside the Submission ID and from the drop down click on Delete.
- Click on Yes on the Pop-up.
- The Submission record will be deleted.
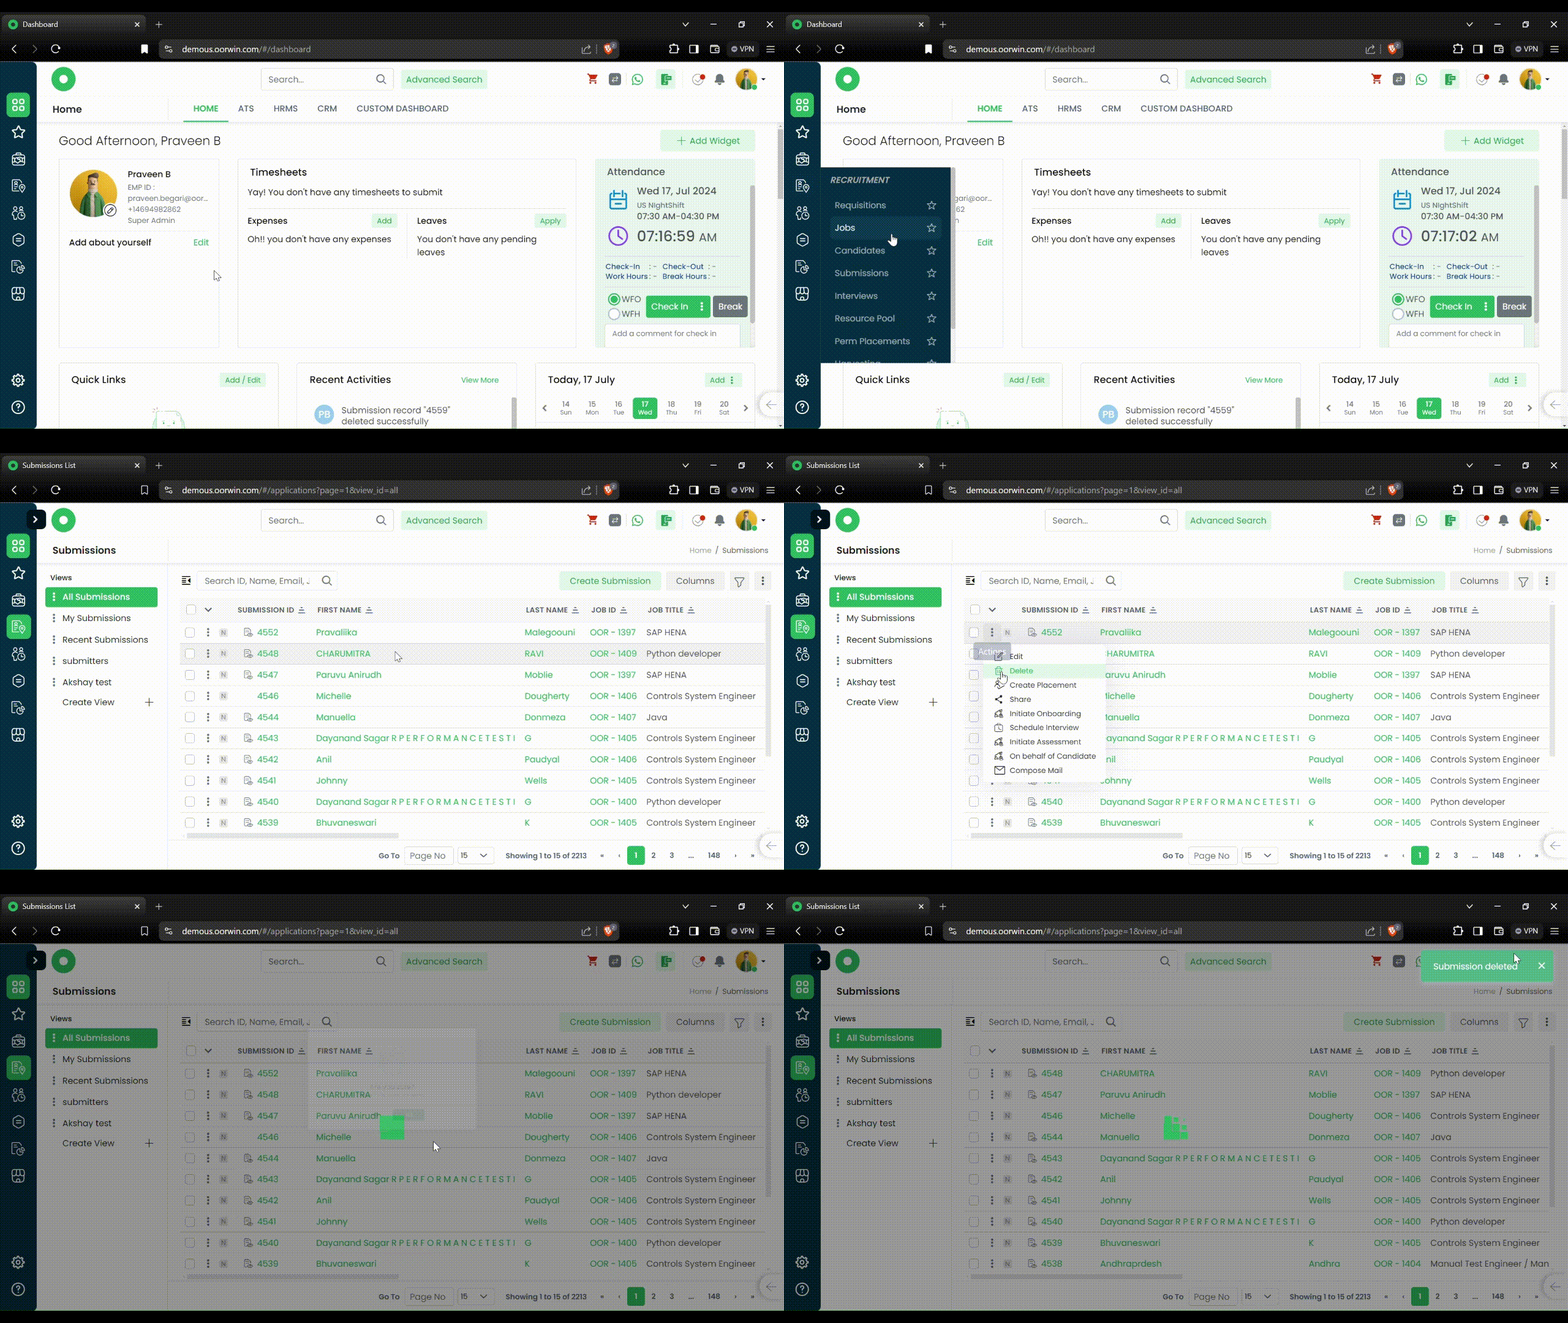
Was this article helpful?
Here’s a guide on how to Delete an Interview:
- Login to your “Oorwin account” and Navigate to “Interviews module” on the left menu under the “Recruitment” section.
- Click on the “3 dots/Actions” beside the Interview and from the drop down click on Delete.
- From the pop-up on your screen select Yes.
- Interview Record will be Deleted.
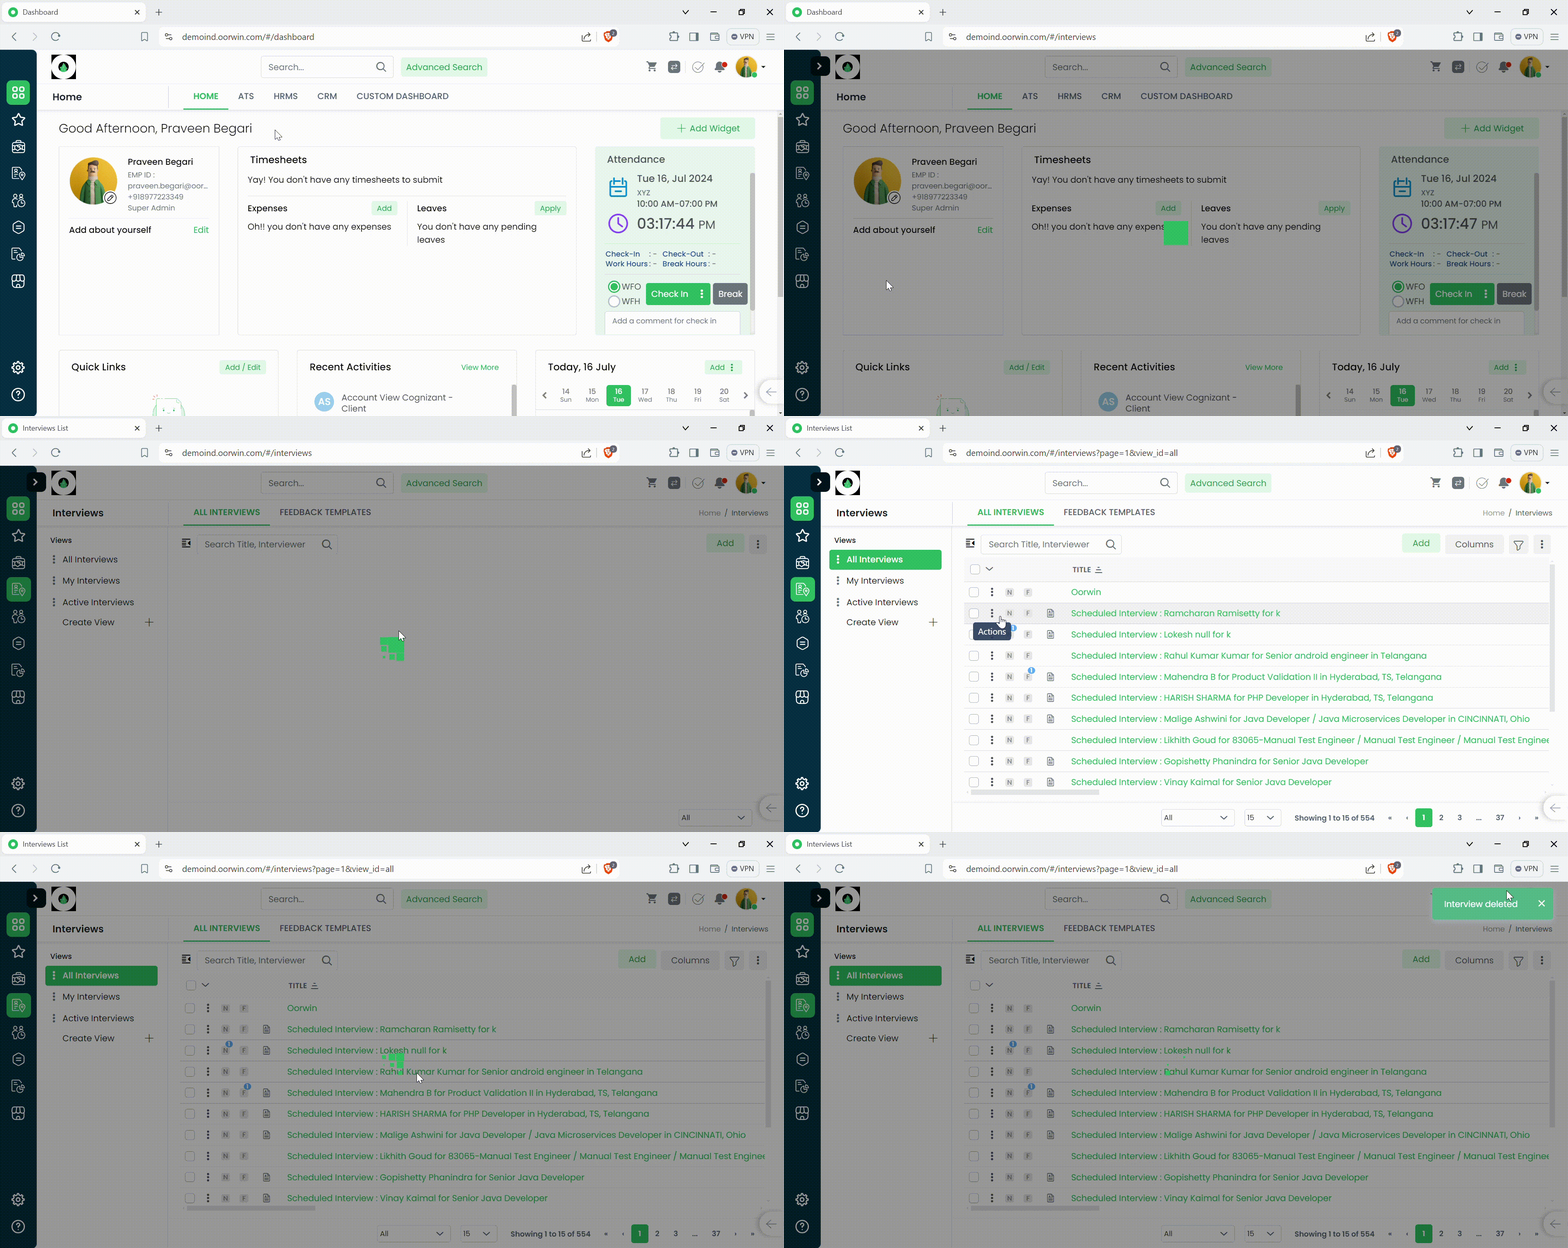
Was this article helpful?
Here’s a guide on how to Edit a Candidate Profile:
- Login to your “Oorwin account” and Navigate to “Candidates module” on the left menu under the “Recruitment” section.
- Click on the “3 dots/Actions” beside the Candidate ID and from the drop down click on Edit.
- It’ll open-up the Candidates profile page to edit.
- Fill in the required information.
- Click on “Update” button on the bottom of the screen, the added information will updated to the Candidate Profile.
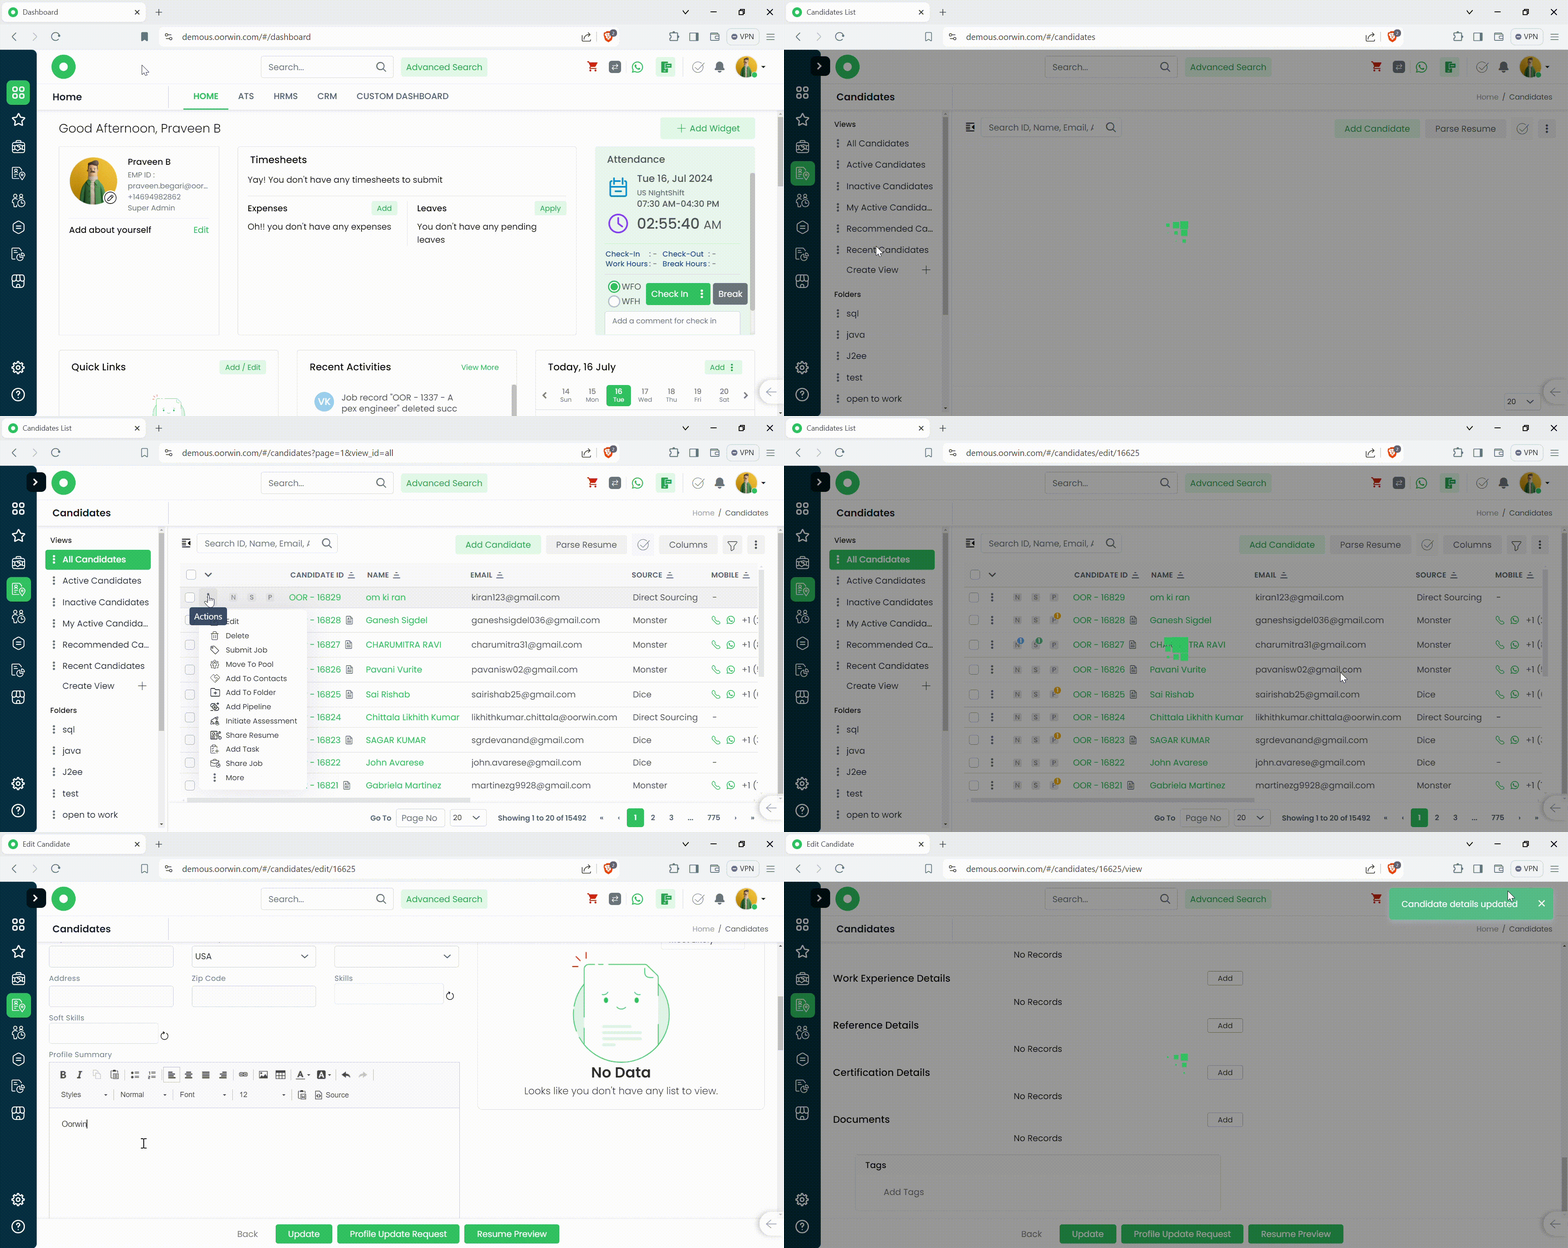
Was this article helpful?
Here’s a guide on how to Edit a Pool record:
- Login to your “Oorwin account” and Navigate to “Resource Pool module” on the left menu under the “Recruitment” section.
- Click on the “3 dots/Actions” beside the Pool ID and from the drop down click on Edit.
- It’ll open-up the Pool profile to edit.
- Fill in the required information.
- Click on “Update” button on the bottom of the screen, the added information will updated to the Candidate Profile.
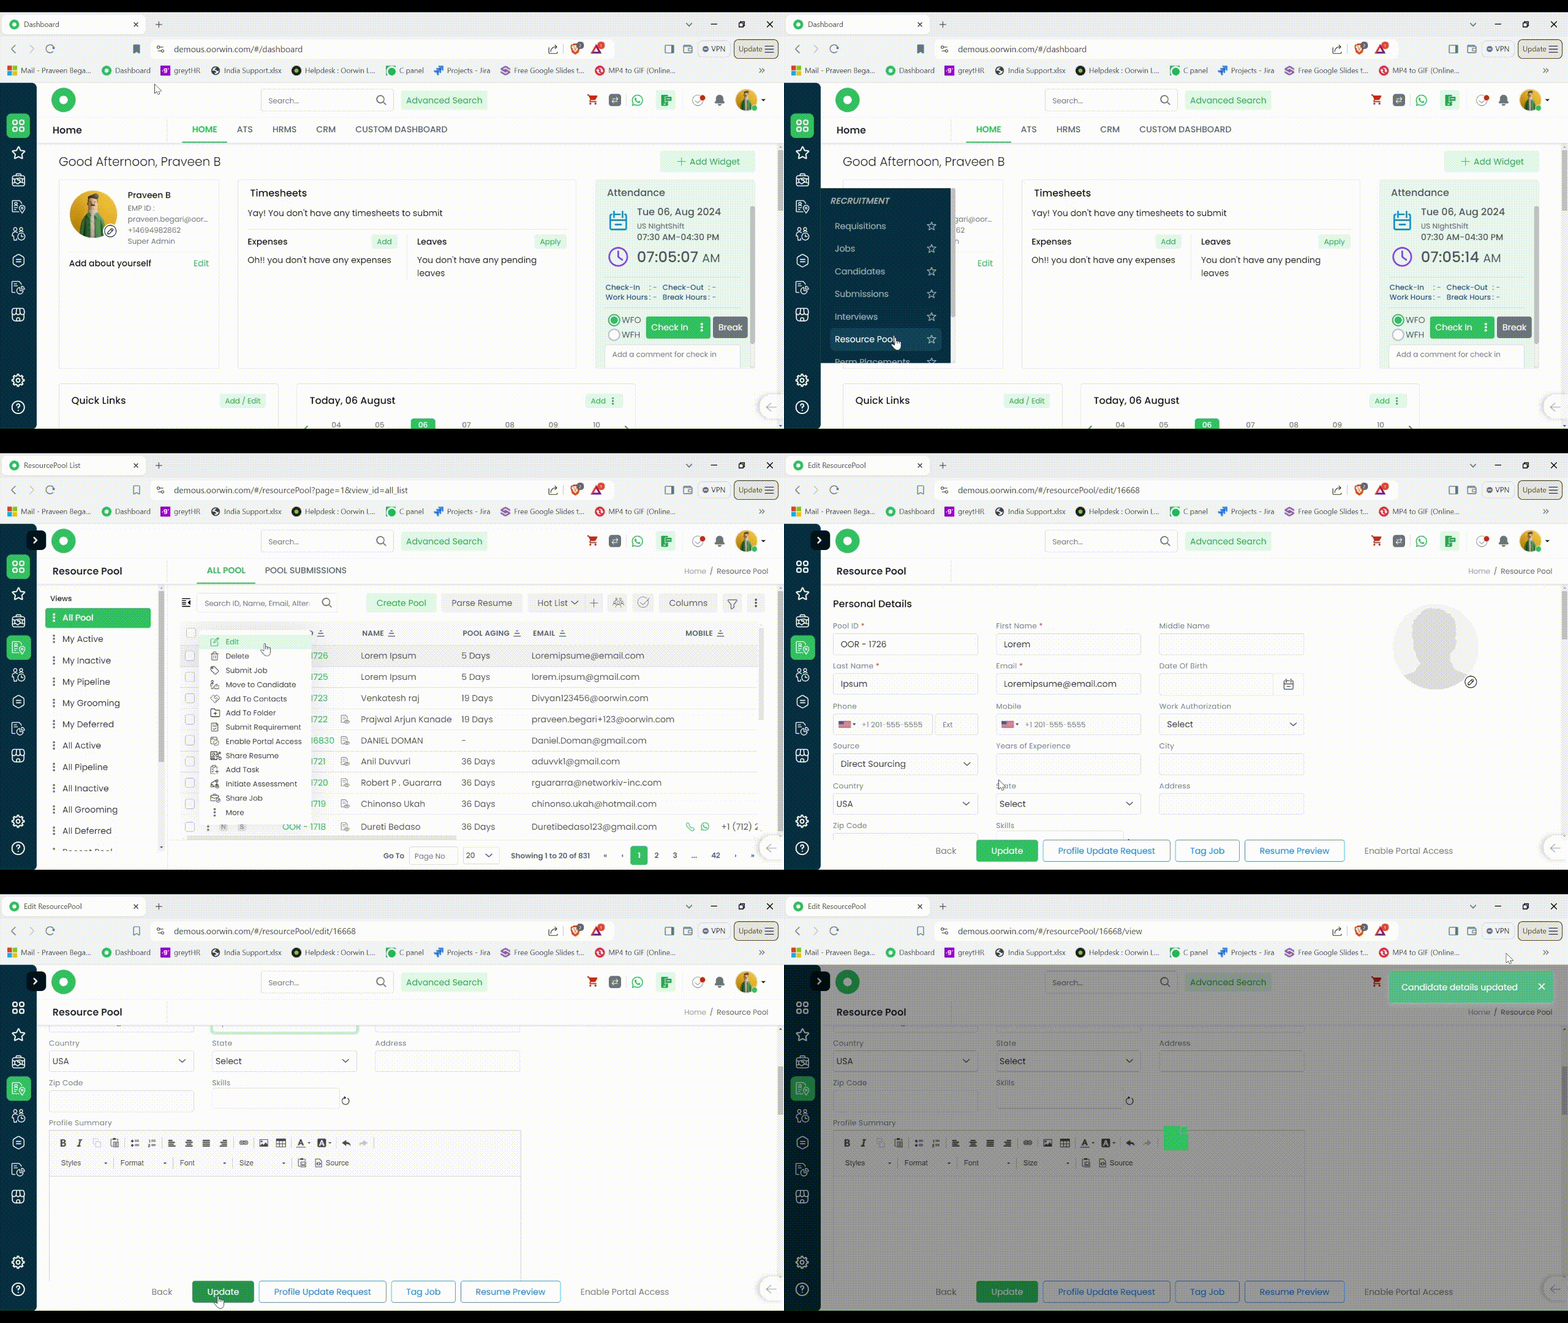
Was this article helpful?
Here’s a guide on how to Edit a Submission:
- Login to your “Oorwin account” and Navigate to “Submissions module” on the left menu under the “Recruitment” section.
- Click on the “3 dots/Actions” beside the submission ID and from the drop down click on Edit.
- It’ll redirect you to the Submission form.
- Update the required details and click on Save.
- The Submission record will be updated.
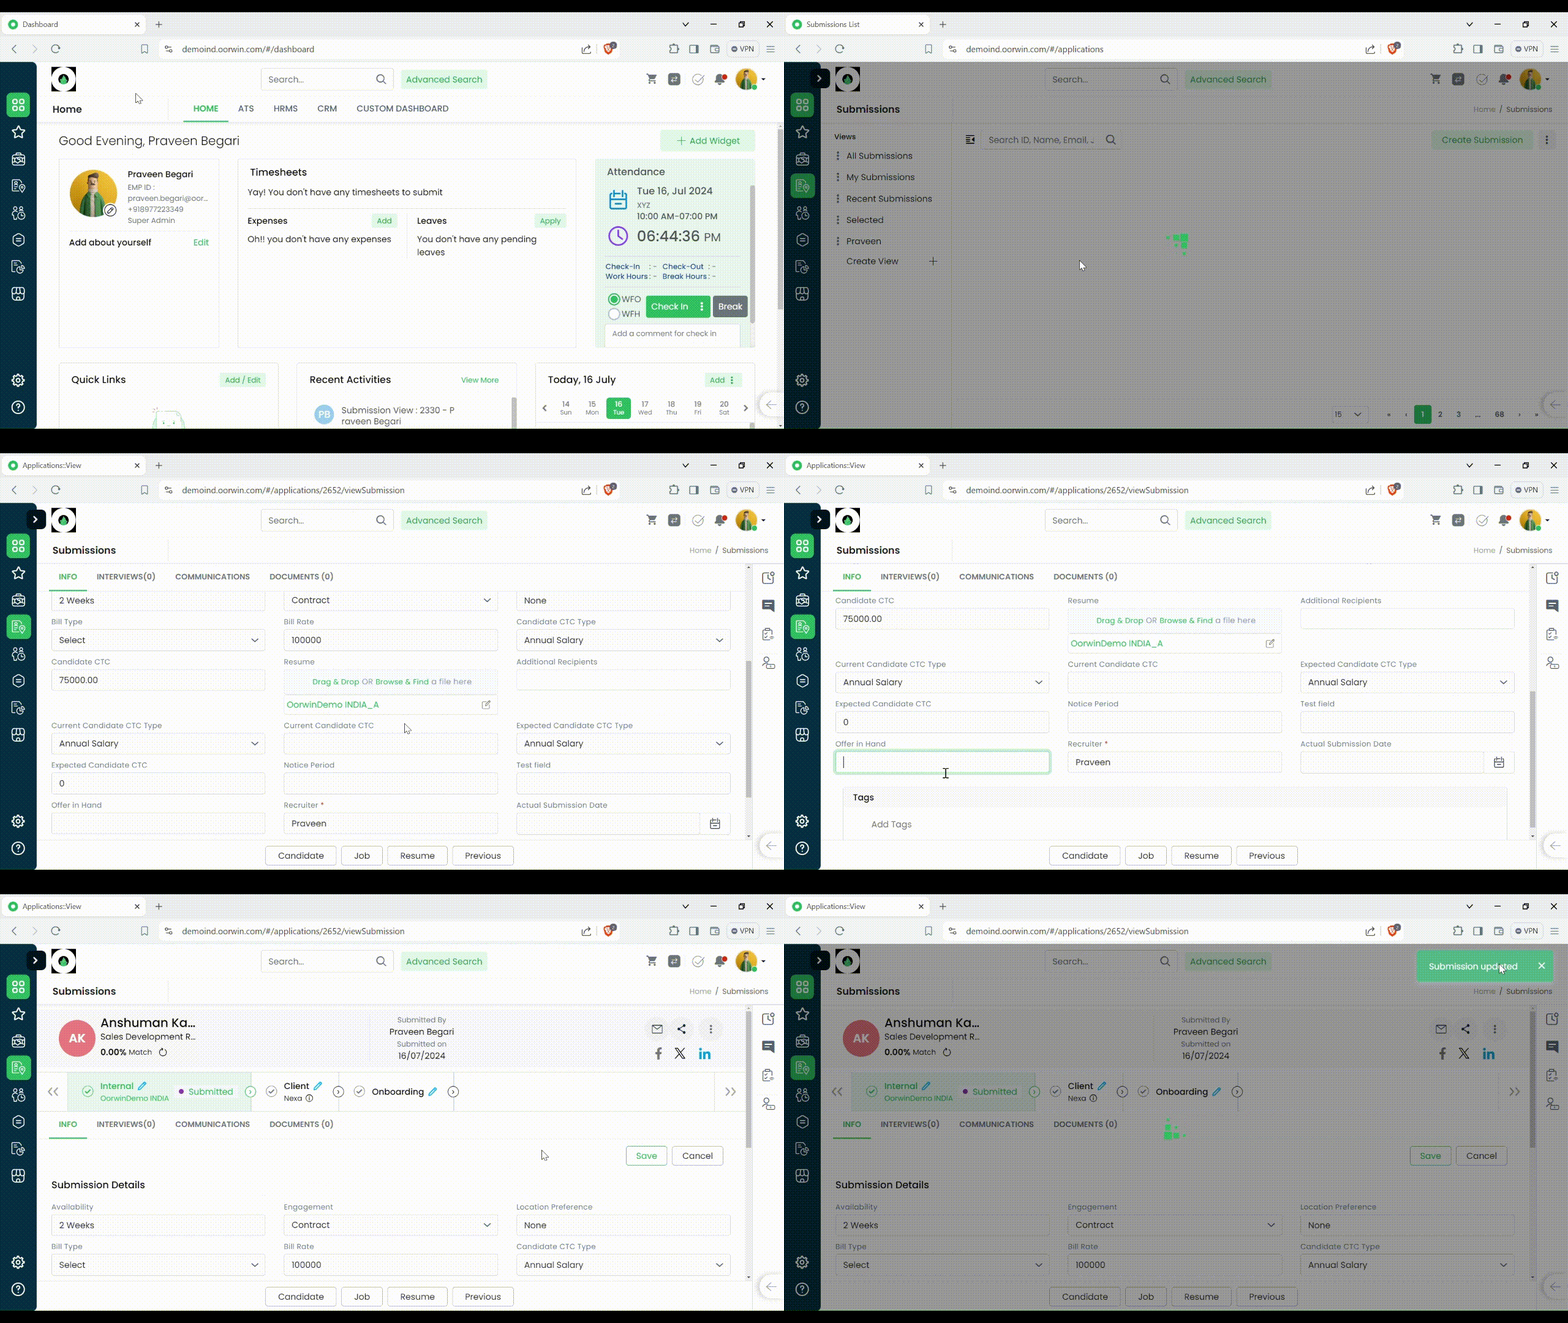
Was this article helpful?
Here’s a guide on how to Edit an Interview:
- Login to your “Oorwin account” and Navigate to “Interviews module” on the left menu under the “Recruitment” section.
- Click on the “3 dots/Actions” beside the Interview and from the drop down click on Edit.
- A pop-up will come upon your screen, from which you can make the changes and edit the Interview record.
- Once the required changes are made, click on Update or Update & Schedule.
- The interview record will be updated and will be saved.
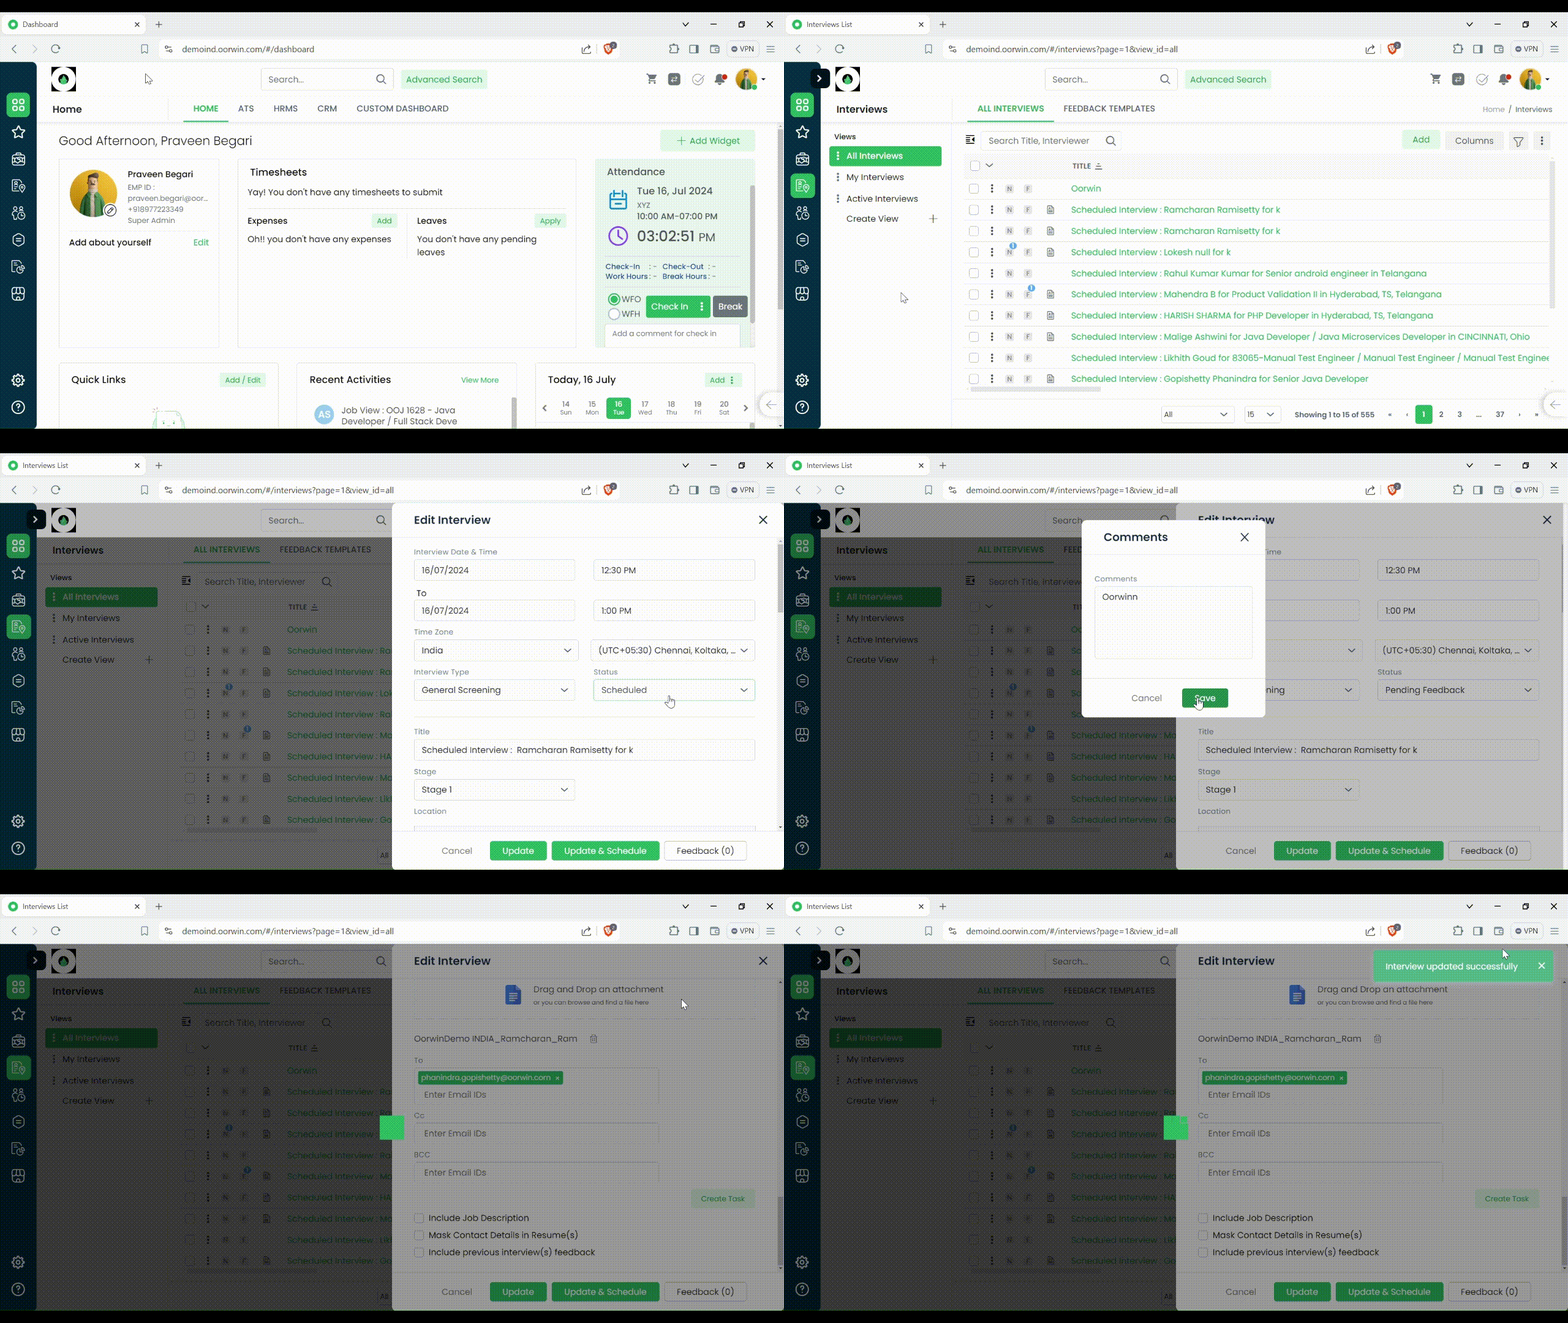
Was this article helpful?
If you would like to update a contact information you need to have a edit access for the contact module which can be enabled from the Settings->Role security by the Admin
Follow the below steps to edit and update the contact record
- Log in to your Oorwin Account and navigate to Contacts module from the left menu under General Section
- Click on “Actions(three dots)” icon for the contact you wish to update.
- Click on Edit link from the list (You need to have account edit access to have this link)
- Enter all the details you wish to update in the respective fields
- Then click on “Update” button on the bottom
- And that’s it! Your Contact has been updated with the new details
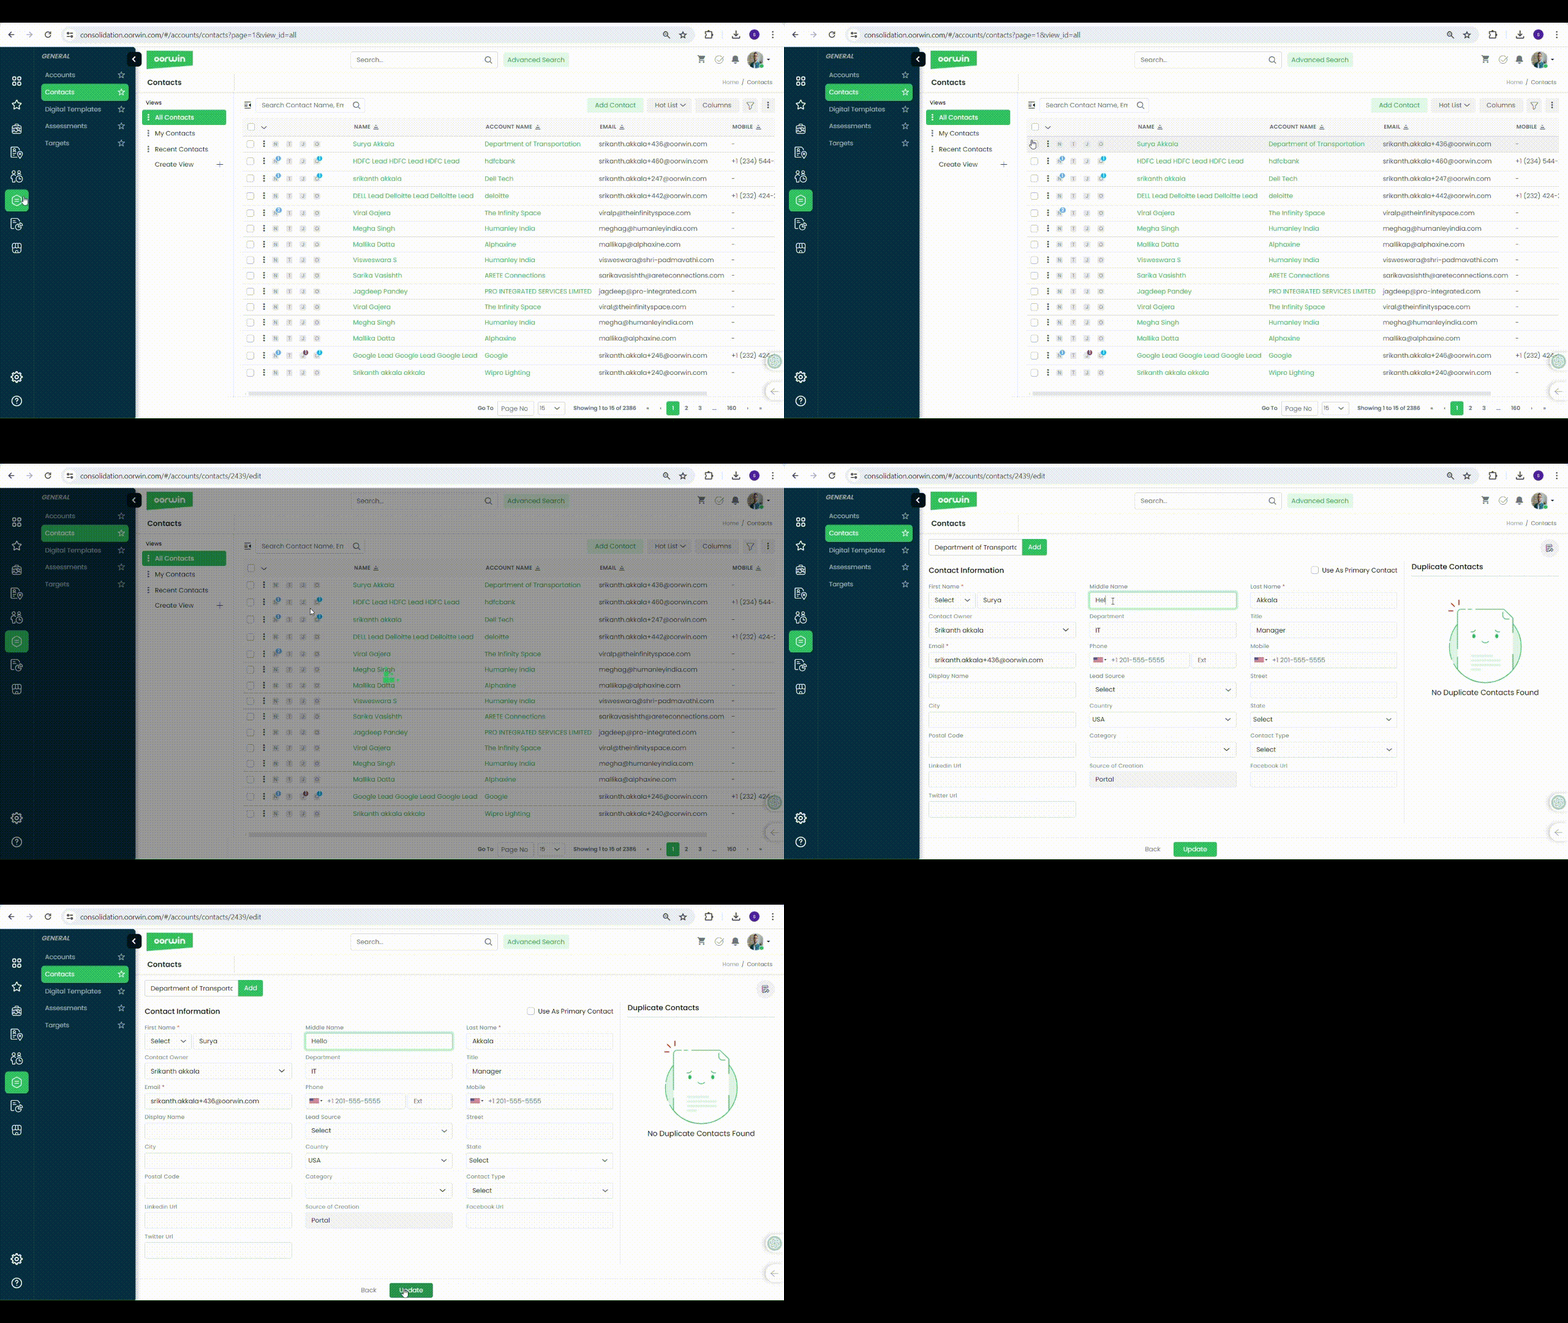
Was this article helpful?
Follow the below steps to edit and update the account record
- Log in to your Oorwin Account and navigate to Accounts module from the left menu under General Section
- Click on “Actions(three dots)” icon for the account you wish to update.
- Click on Edit link from the list (You need to have account edit access to have this link)
- Enter all the details you wish to update
- Then click on “Update” button on the bottom
- And that’s it! Your account has been updated with the new details
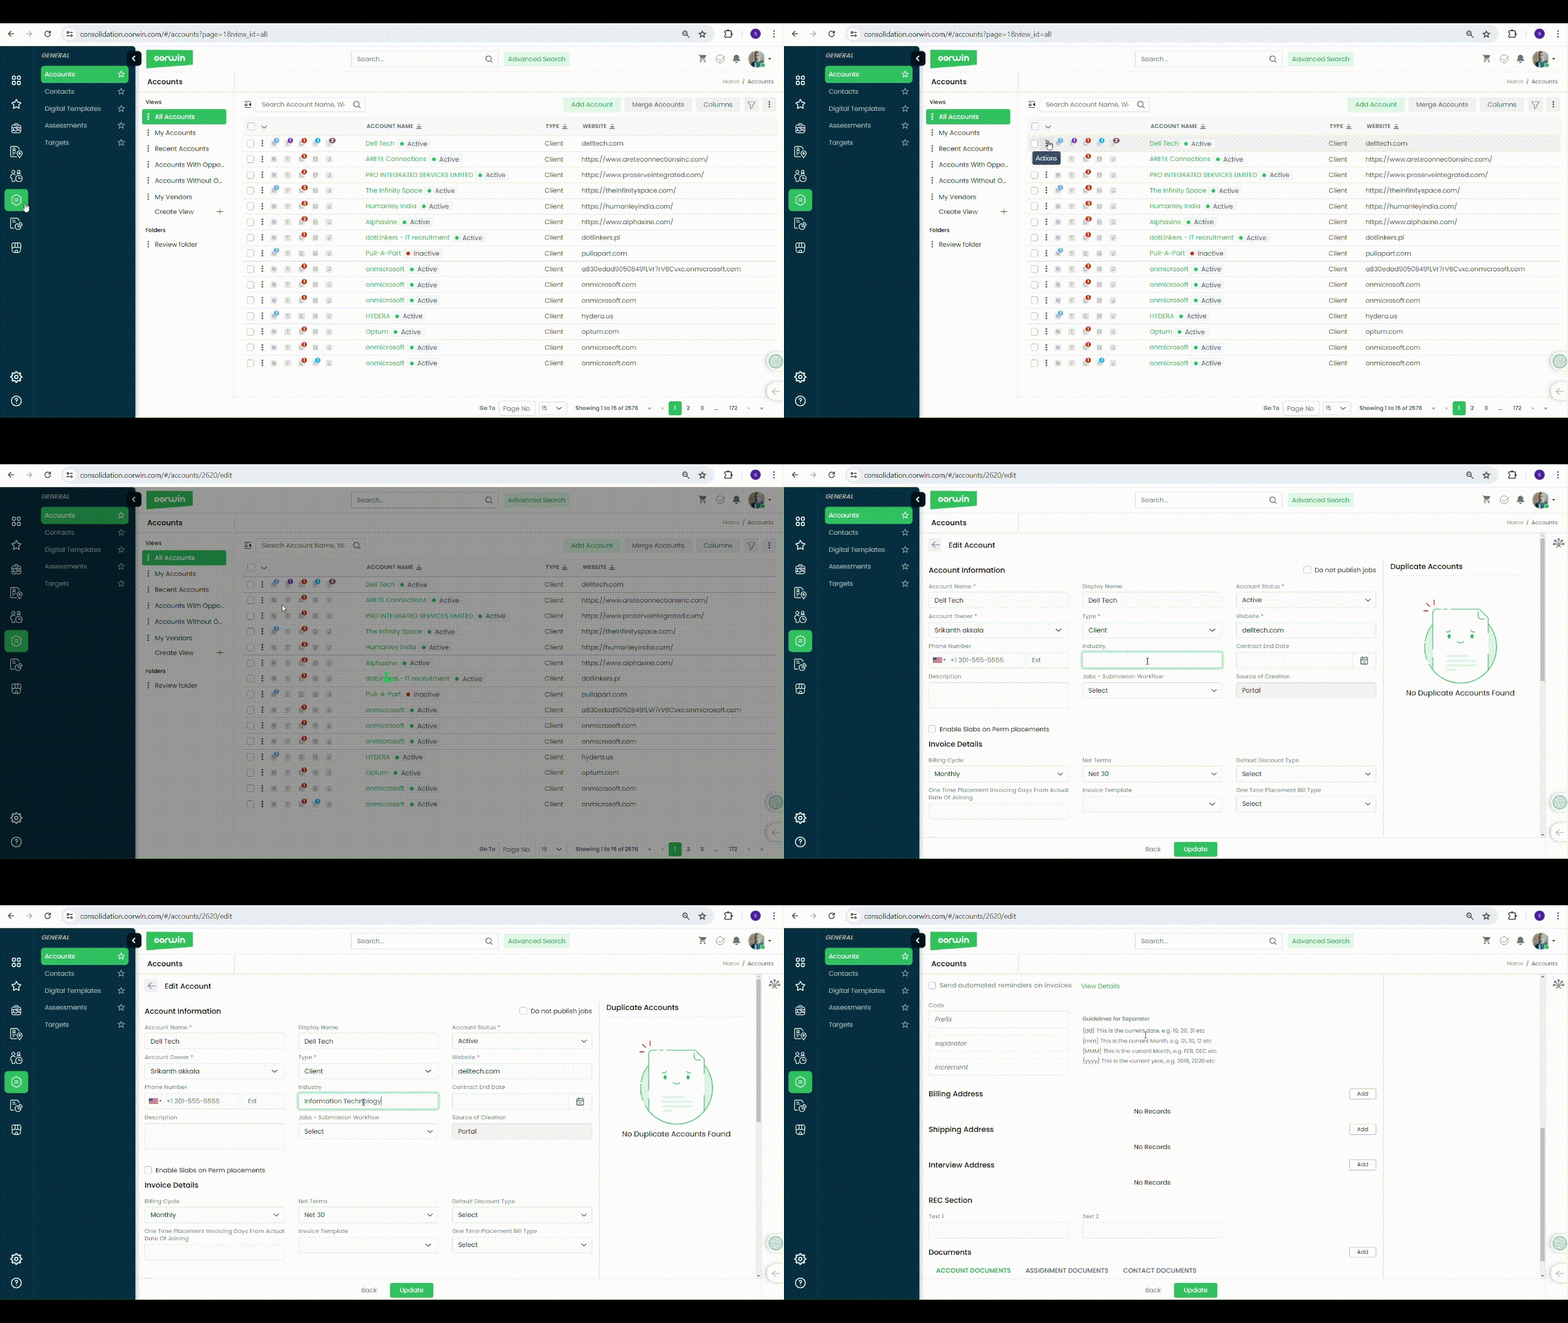
Was this article helpful?
Follow the below steps to edit and update the employee record
- Log in to your Oorwin Account and navigate to Employees module from the left menu under HRMS Section
- Click on “Actions(three dots)” icon for the employee you wish to update.
- Click on Edit link from the list (You need to have employee edit access to have this link)
- Enter all the details you wish to update
- Then click on “Update” button on the bottom
- And that’s it! Your employee record has been updated with the new details
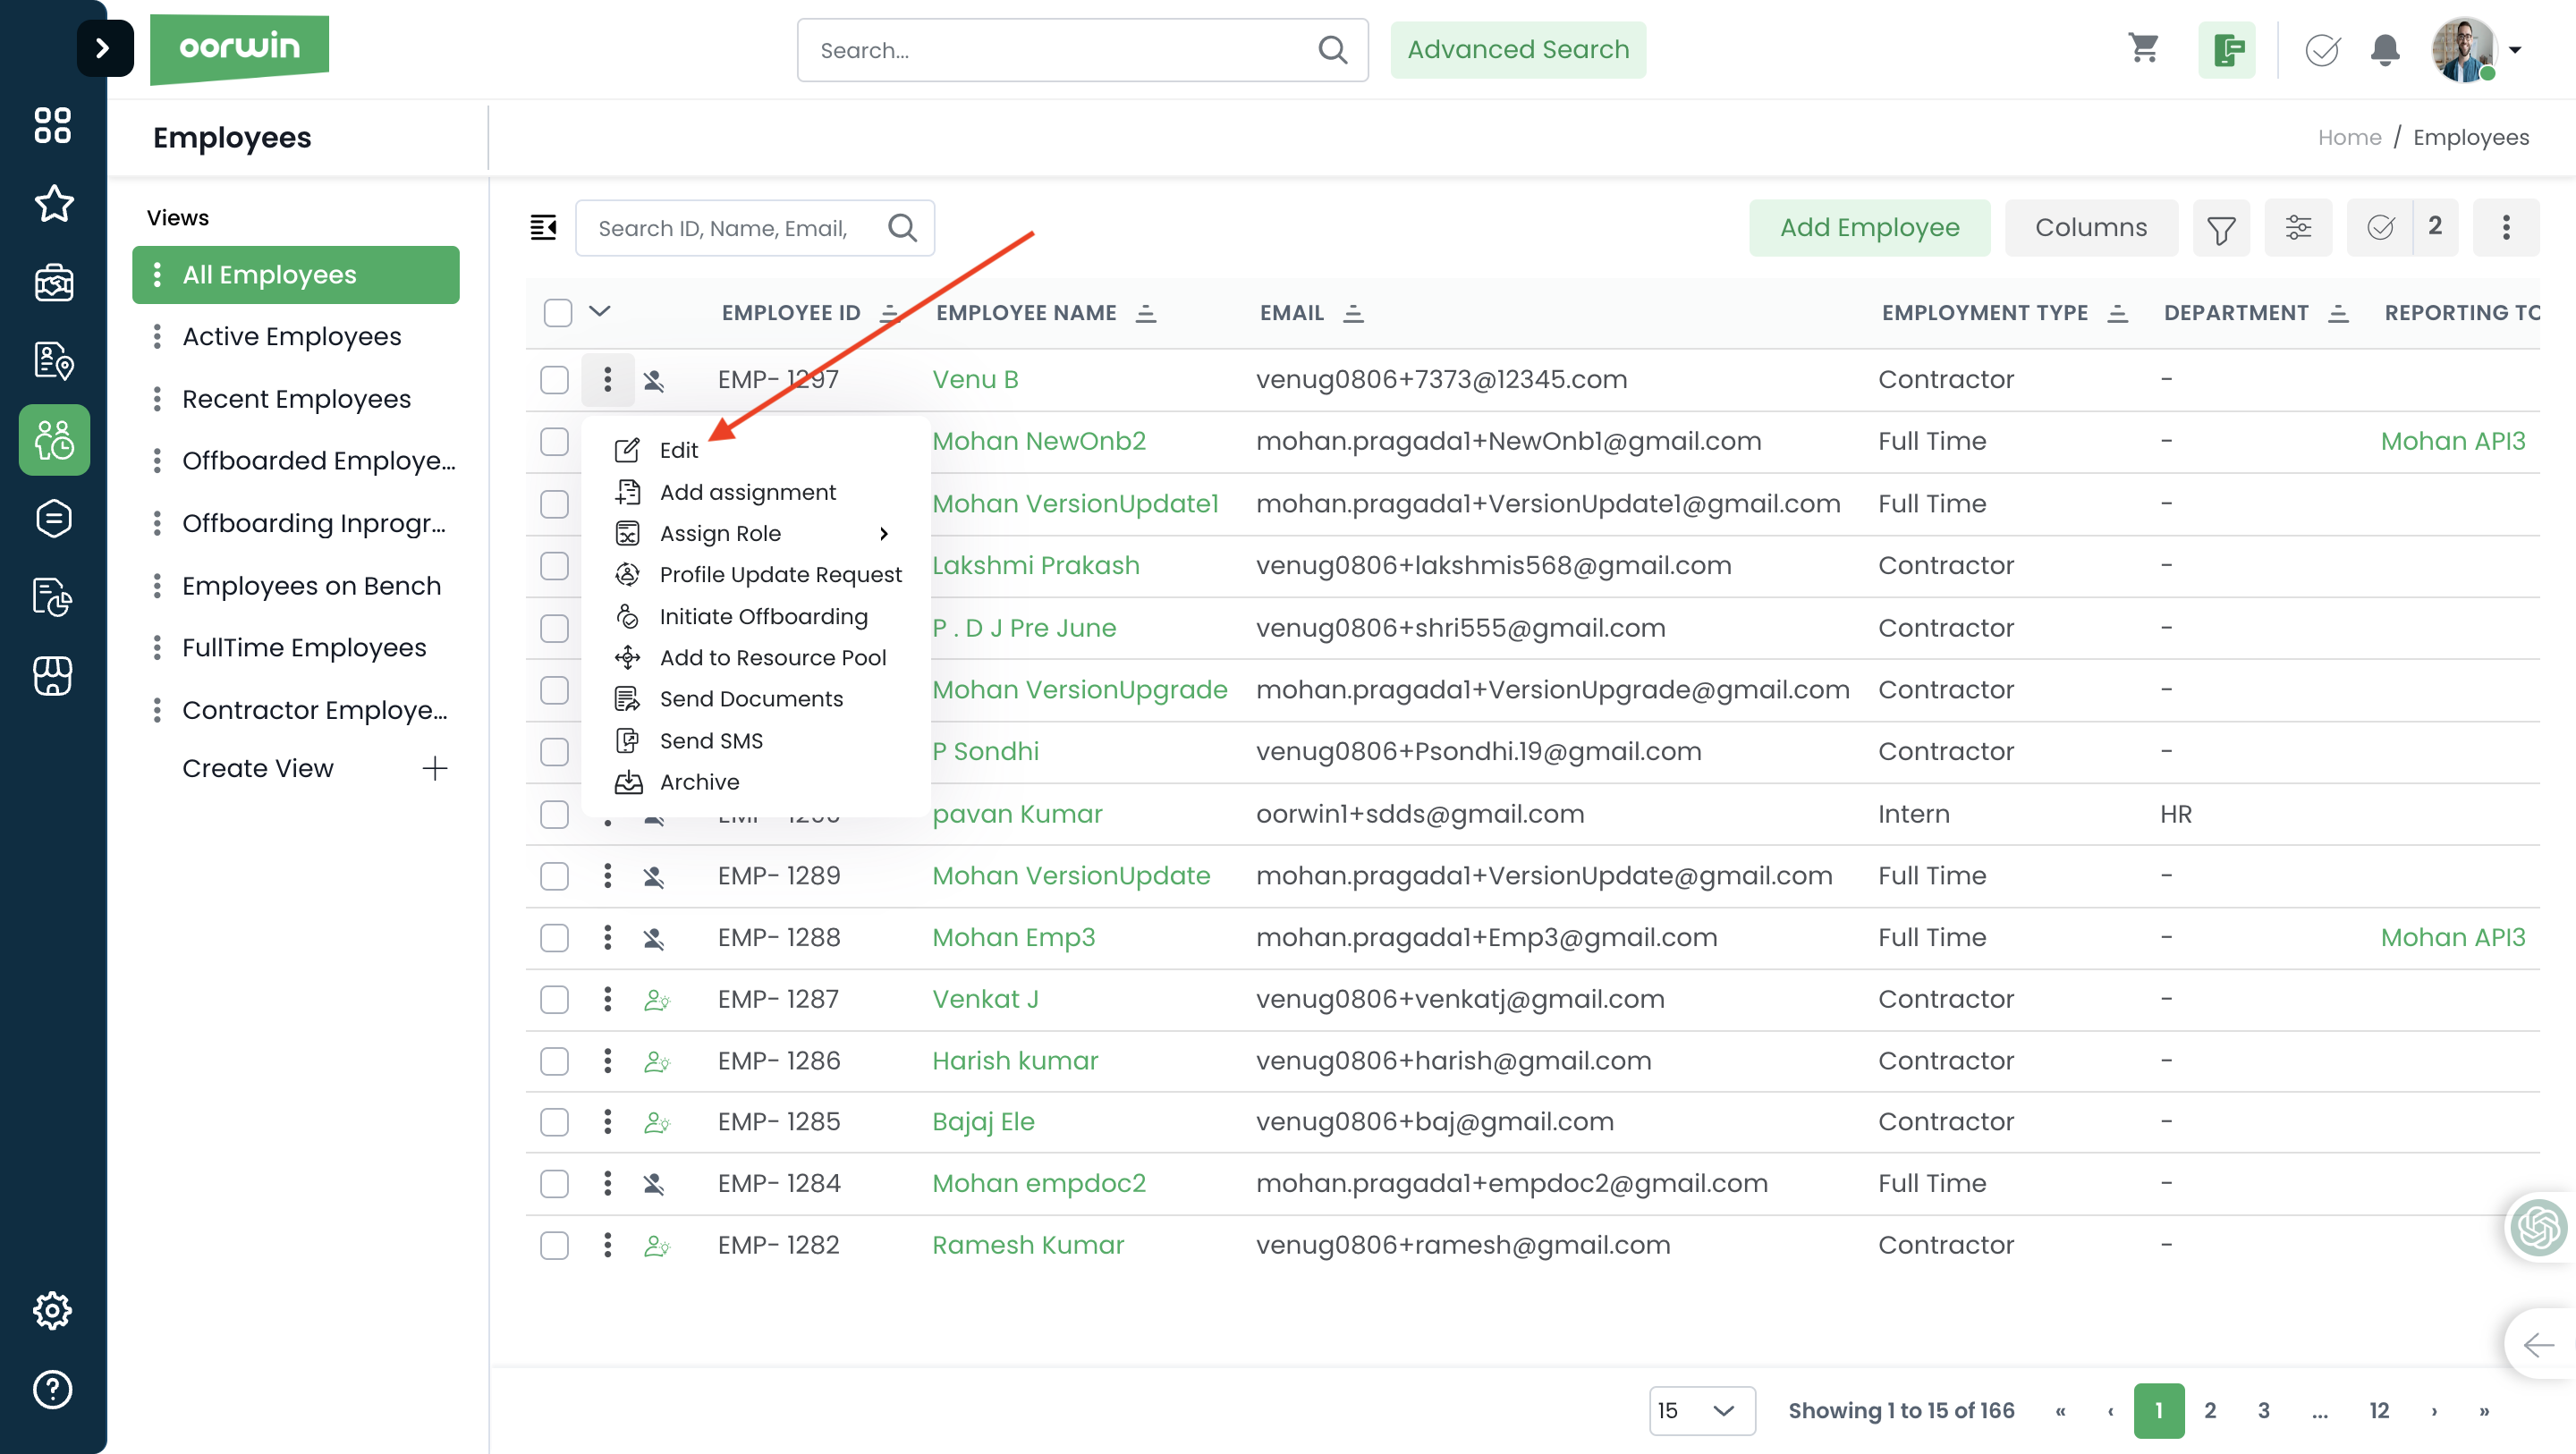
Was this article helpful?
Admin can enable or disable the access to module activities for a role or a user from the security section. Also he can restrict displaying the organizational documents to the specific users/roles
Below are the steps to do the same
- Log in to your Oorwin Account and navigate to settings page from the left bottom
- Go to Access Control on the left menu and click on Security section
- There will be two sections called “Activities” and “Organization Documents” where we can enable/disable the access to these sections in the portal
- To enable/disable click on three dots and click on edit which opens a popup to add/remove the role or user from the drop down fields
- Add roles and users from the drop down and click on save to enable the activities and organization documents access

Was this article helpful?
Oorwin allows you to enable water mark on resumes with text and logo types. Water marking is a premium feature and it can be enabled by purchasing the water marking add on through billing section
Below are the steps to enable and configure image watermark
- Log in to your Oorwin Account and navigate to settings page from the left bottom
- Go to Configurations on the left menu and click on water marking section
- Now enable the toggle on for Water marking on Resumes/Cvs
- Select the image watermark and upload the logo from upload section
- Now adjust the settings like resizing the image, opacity, page range etc
- Adjust the rotation and position settings on the right and verify the positioning in the preview section
- Once everything is configured, then click on save. now on system will insert the water mark on the resumes in all the places
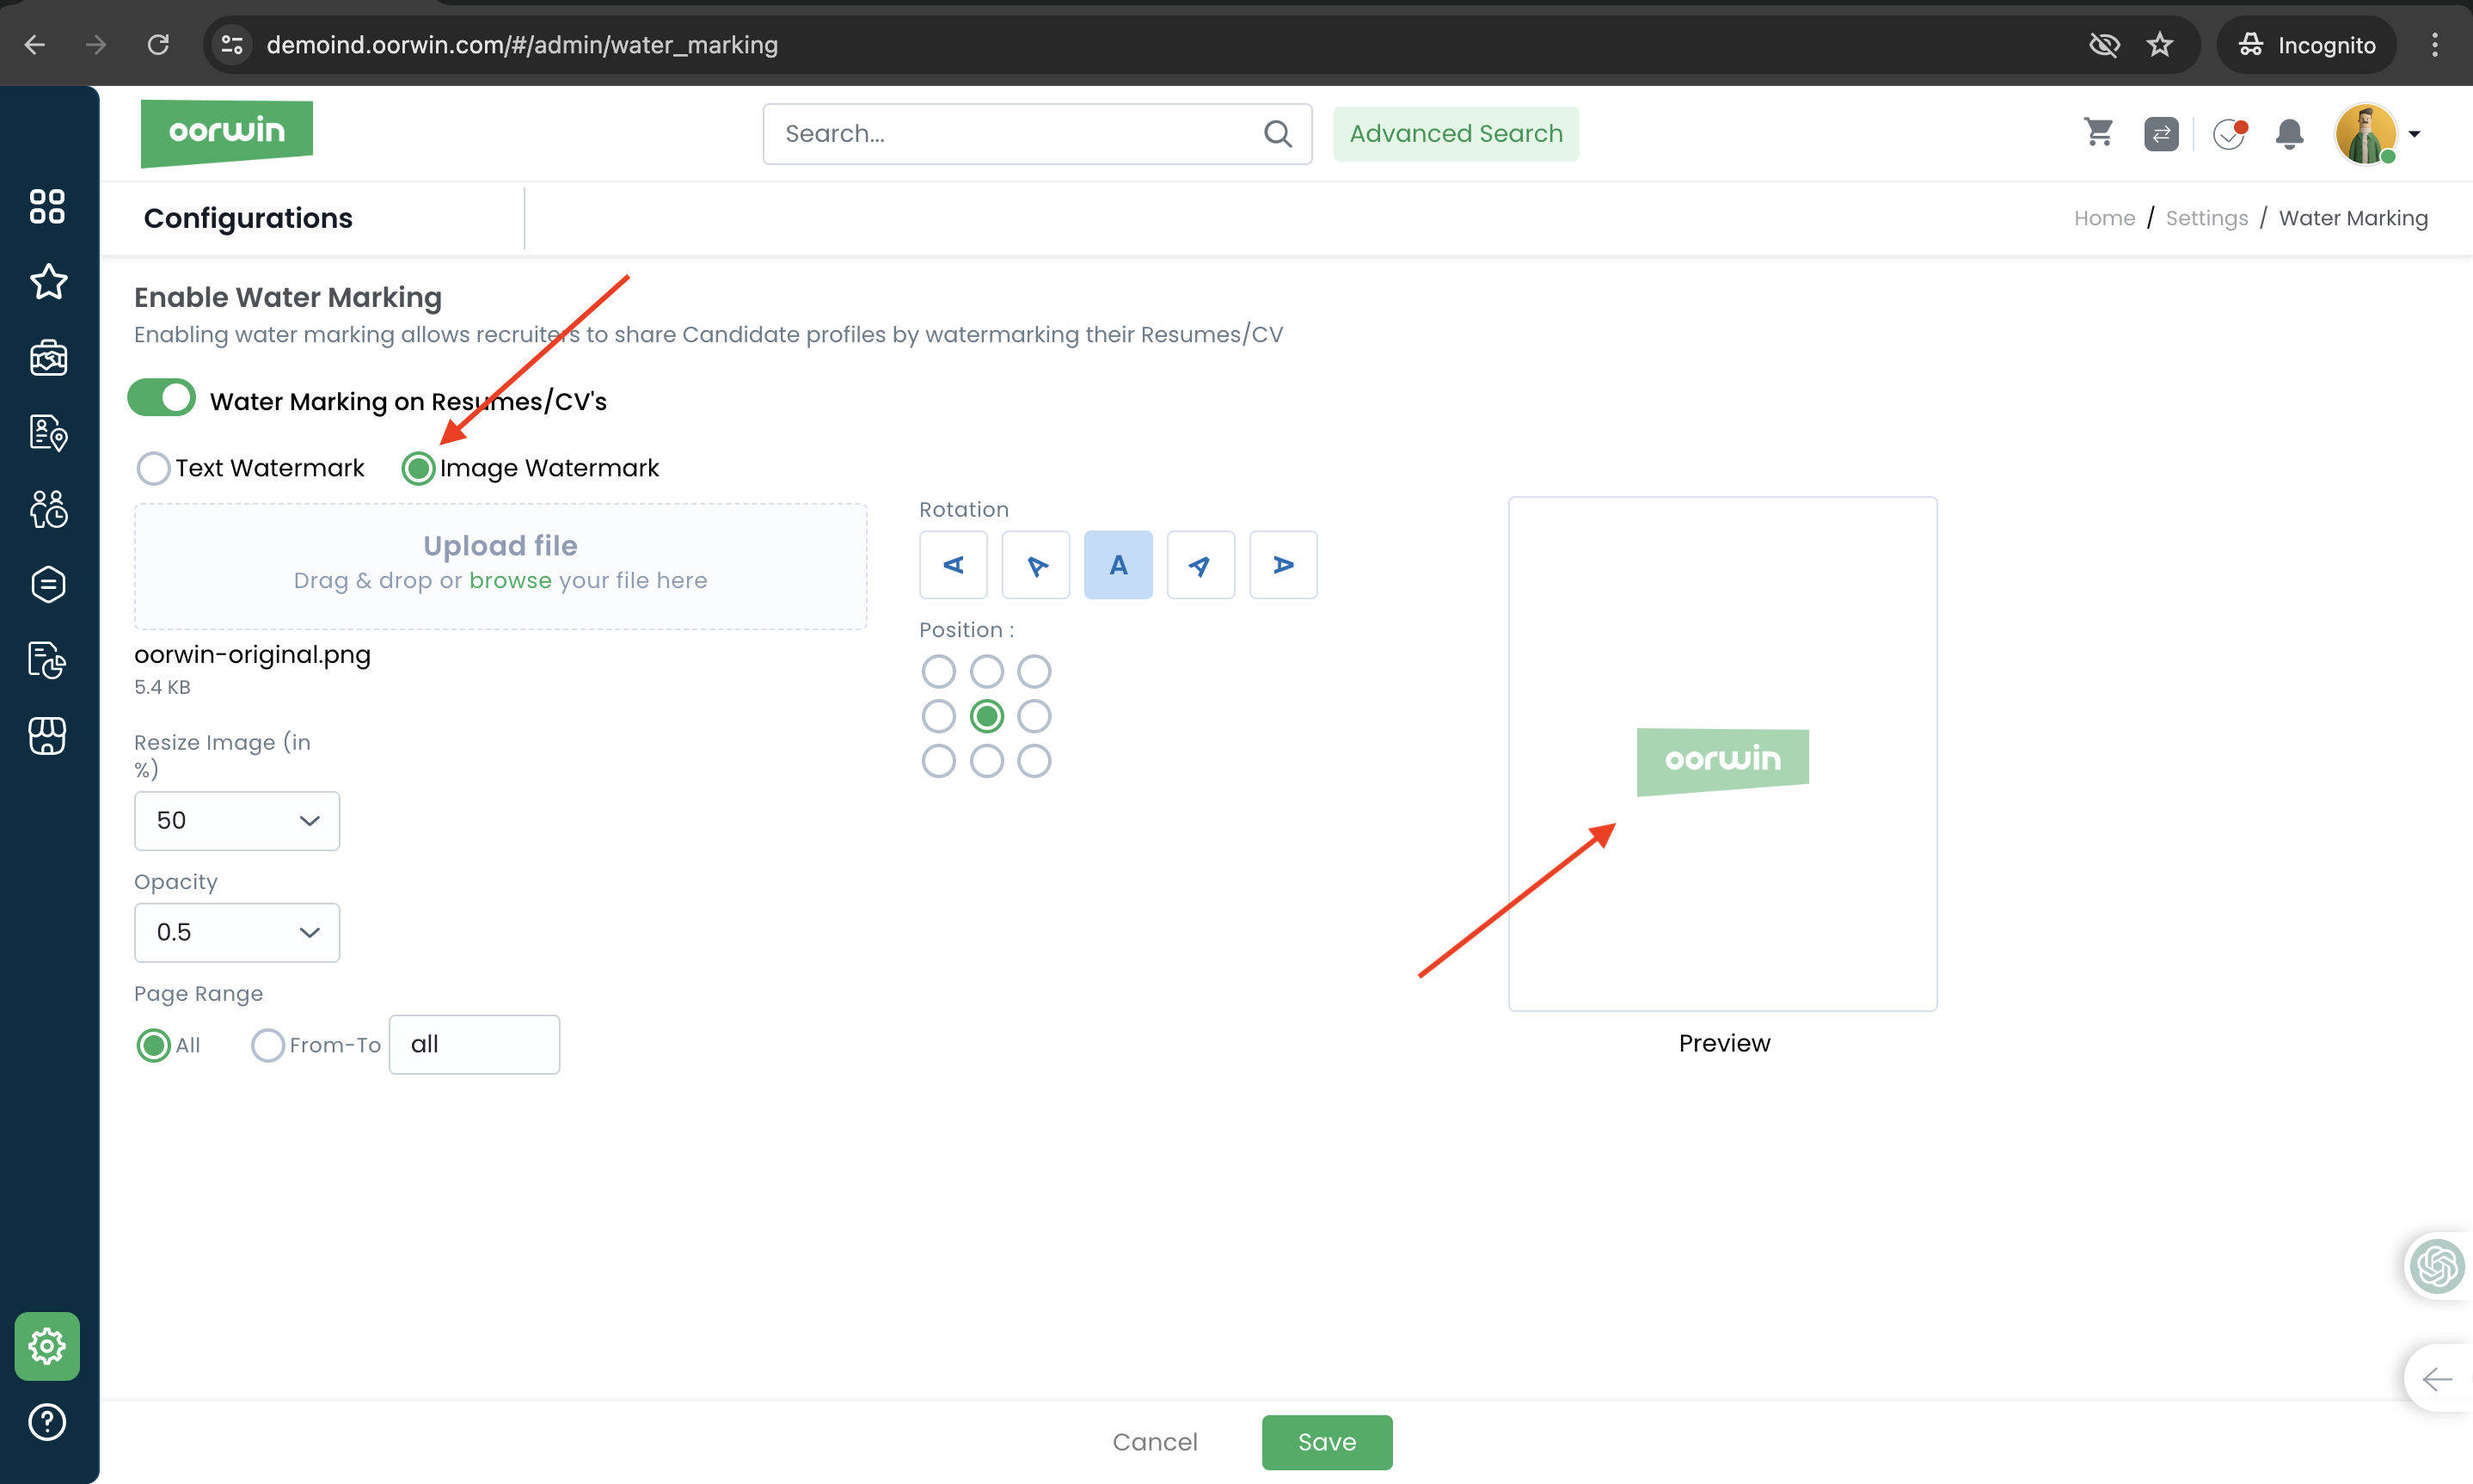
Was this article helpful?
Here’s a guide on how to Enable Portal Access to Pool candidates:
- Login to your “Oorwin account” and Navigate to “Resource Pool module” on the left menu under the “Recruitment” section.
- Click on the “3 dots/Actions” beside the Pool ID and from the drop down click on Enable Portal Access.
- Click on Yes to enable the portal access to Pool candidates.
- The Candidate will Receive an email to Activate their Oorwin Account from which they can keep a track of Interviews scheduled, Submission records.
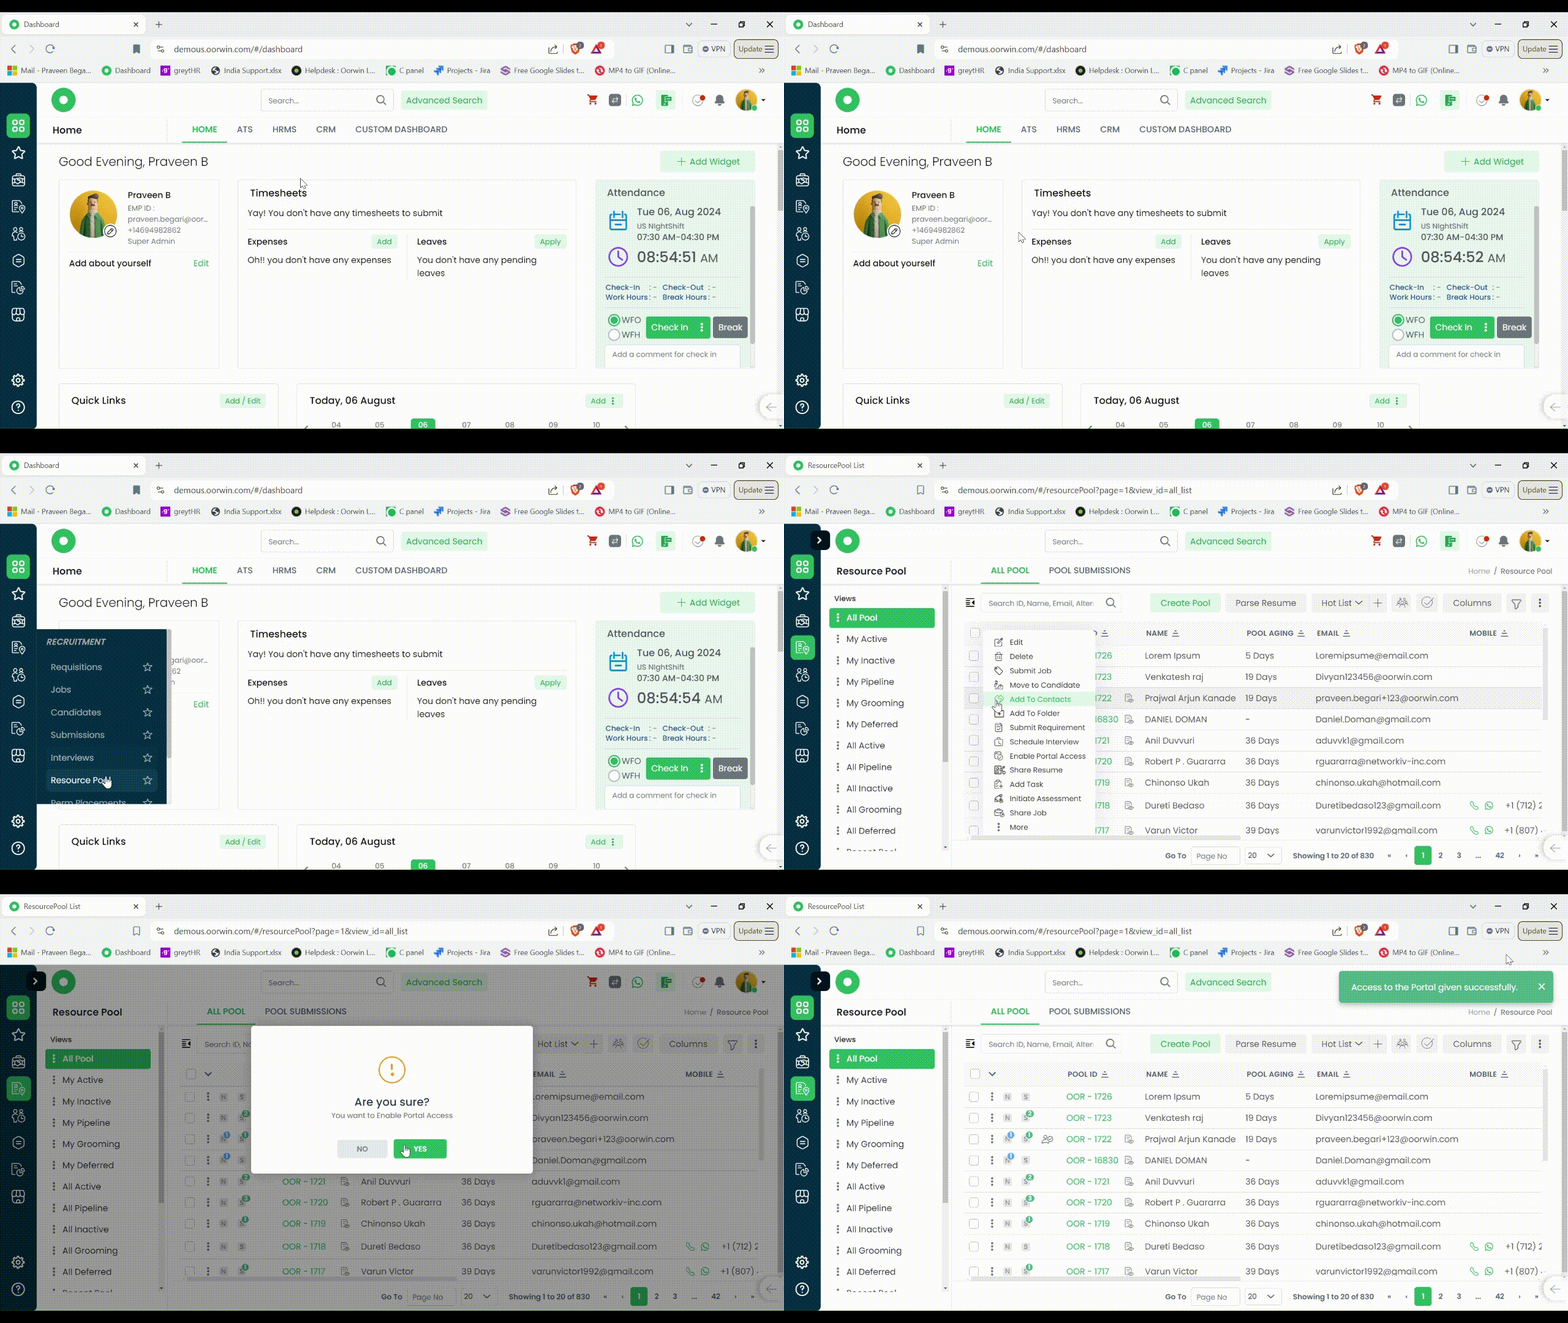
Was this article helpful?
Here’s a guide on how to Enable Portal Access to Resource Pool Candidates:
- Login to your “Oorwin account” and Navigate to “Candidates module” on the left menu under the “Recruitment” section.
- Click on the “3 dots/Actions” beside the Candidate ID and from the drop down select Enable Portal Access.
- Click on Yes to confirm when the pop-up comes up on your screen.
- The selected candidate will receive an email to activate their account from which they can track Submissions, Interviews.

Was this article helpful?
Oorwin allows you to enable water mark on resumes with text and logo types. Water marking is a premium feature and it can be enabled by purchasing the water marking add on through billing section
Below are the steps to enable and configure text watermark
- Log in to your Oorwin Account and navigate to settings page from the left bottom
- Go to Configurations on the left menu and click on water marking section
- Now enable the toggle on for Water marking on Resumes/Cvs
- Select the Text watermark and enter the text on the below field and adjust the font style, size, opacity etc
- Adjust the rotation and position settings on the right and verify the positioning in the preview section
- Once everything is configured, then click on save. now on system will insert the water mark on the resumes in all the places

Was this article helpful?
Oorwin allows you to refer a candidate that an employee knows and who fits for a position,they can refer that candidate through Oorwin portal. So that, further steps will be taken care by the recruiter throug the portal
Below are the configurations for referral settings
- Log in to your Oorwin Account and navigate to settings page from the left bottom
- Go to Configurations on the left menu and click on Referral Settings section
- select the radio buttons of each section says who can refer and allows to change the referrer
- Enter the referral expiry days in number and click on save, and all these settings will be considered while referring a candidate to a position
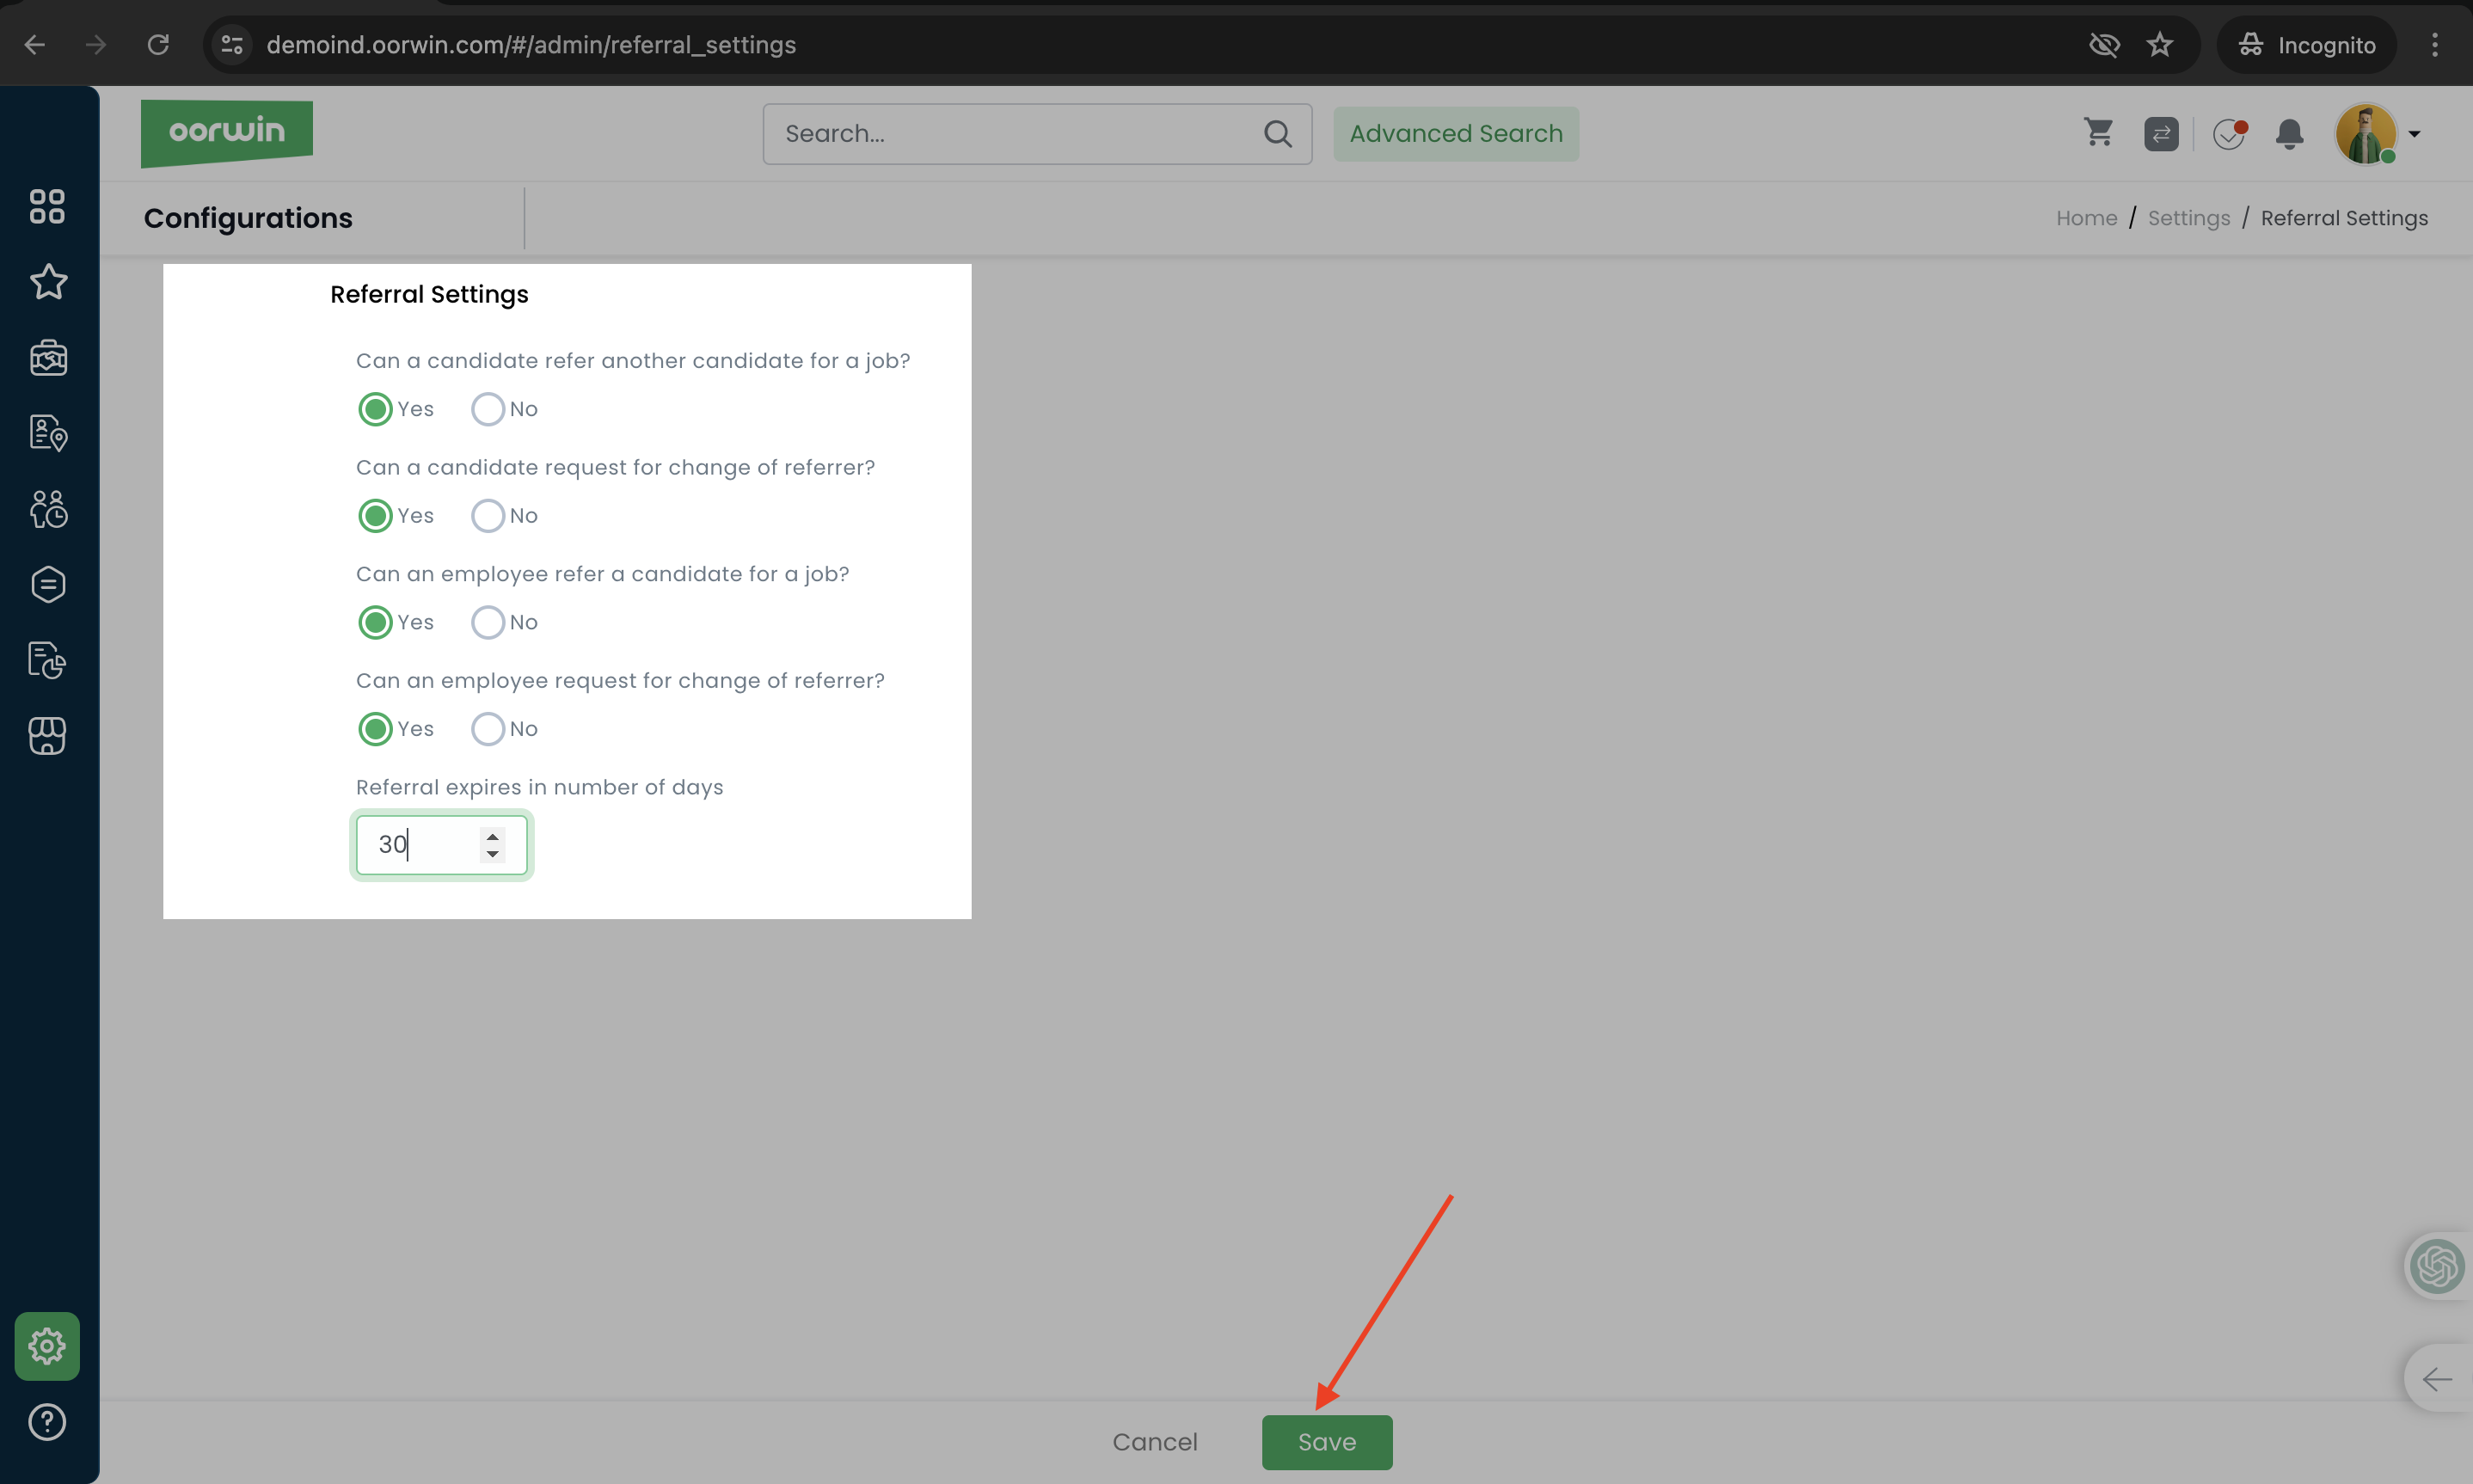
Was this article helpful?
Lists & Categories can be tagged against a digital template to organize , making retrieval and management faster and more efficient.
Lists: Lists allow you to group multiple documents into a single collection, enabling you to tag or initiate bulk actions on all necessary documents at once. This is especially useful for managing large-scale scenarios where multiple related documents need to be processed together.
Categories: Categories help identify the function or purpose of each digital template. By organizing templates into specific categories, you ensure that each template is easily identifiable and belongs to a relevant functional group.

Was this article helpful?
There will be a Set up icon on the top right corner which will help to identify all the settings related actions that are associated with employees module. You can directly navigate to any of the setting page by clicking on the listed setting actions related employees
Below are the steps to navigate to it
- Log in to your Oorwin Account and navigate to Employees module from the left menu under HRMS Section
- On the employees listing page click on Setup icon on the top right corner
- It opens popup with the associated settings actions and upon clickingon it user can directly navigate to the specific settings page with out any hassle
Below are the settings that we have in employee setup
- Fields & Forms
- Reminders & Tasks
- Approval Process
- Communication
- Default Settings
- Employee Reporting
- Expenses settings
- Off boarding Policies
- Organizational Hierarchy
- Performance management policies
- Leaves & Attendance settings
- Employee referral configuration
- Access settings

Was this article helpful?
Here’s a guide on how to Export Interviews :
- Login to your “Oorwin account” and Navigate to “Interviews module” on the left menu under the “Recruitment” section.
- Select the Interview records that you want to export.
- Click on the 3 dots/More on the top right corner of the page.
- From the drop down select “Export Interview(s)“.
- User will have the option to select the desired Columns.
- Click on “Export as Excel” or “Export as CSV”.
- Interview records will be Exported and you can download the file from the Notification tab.
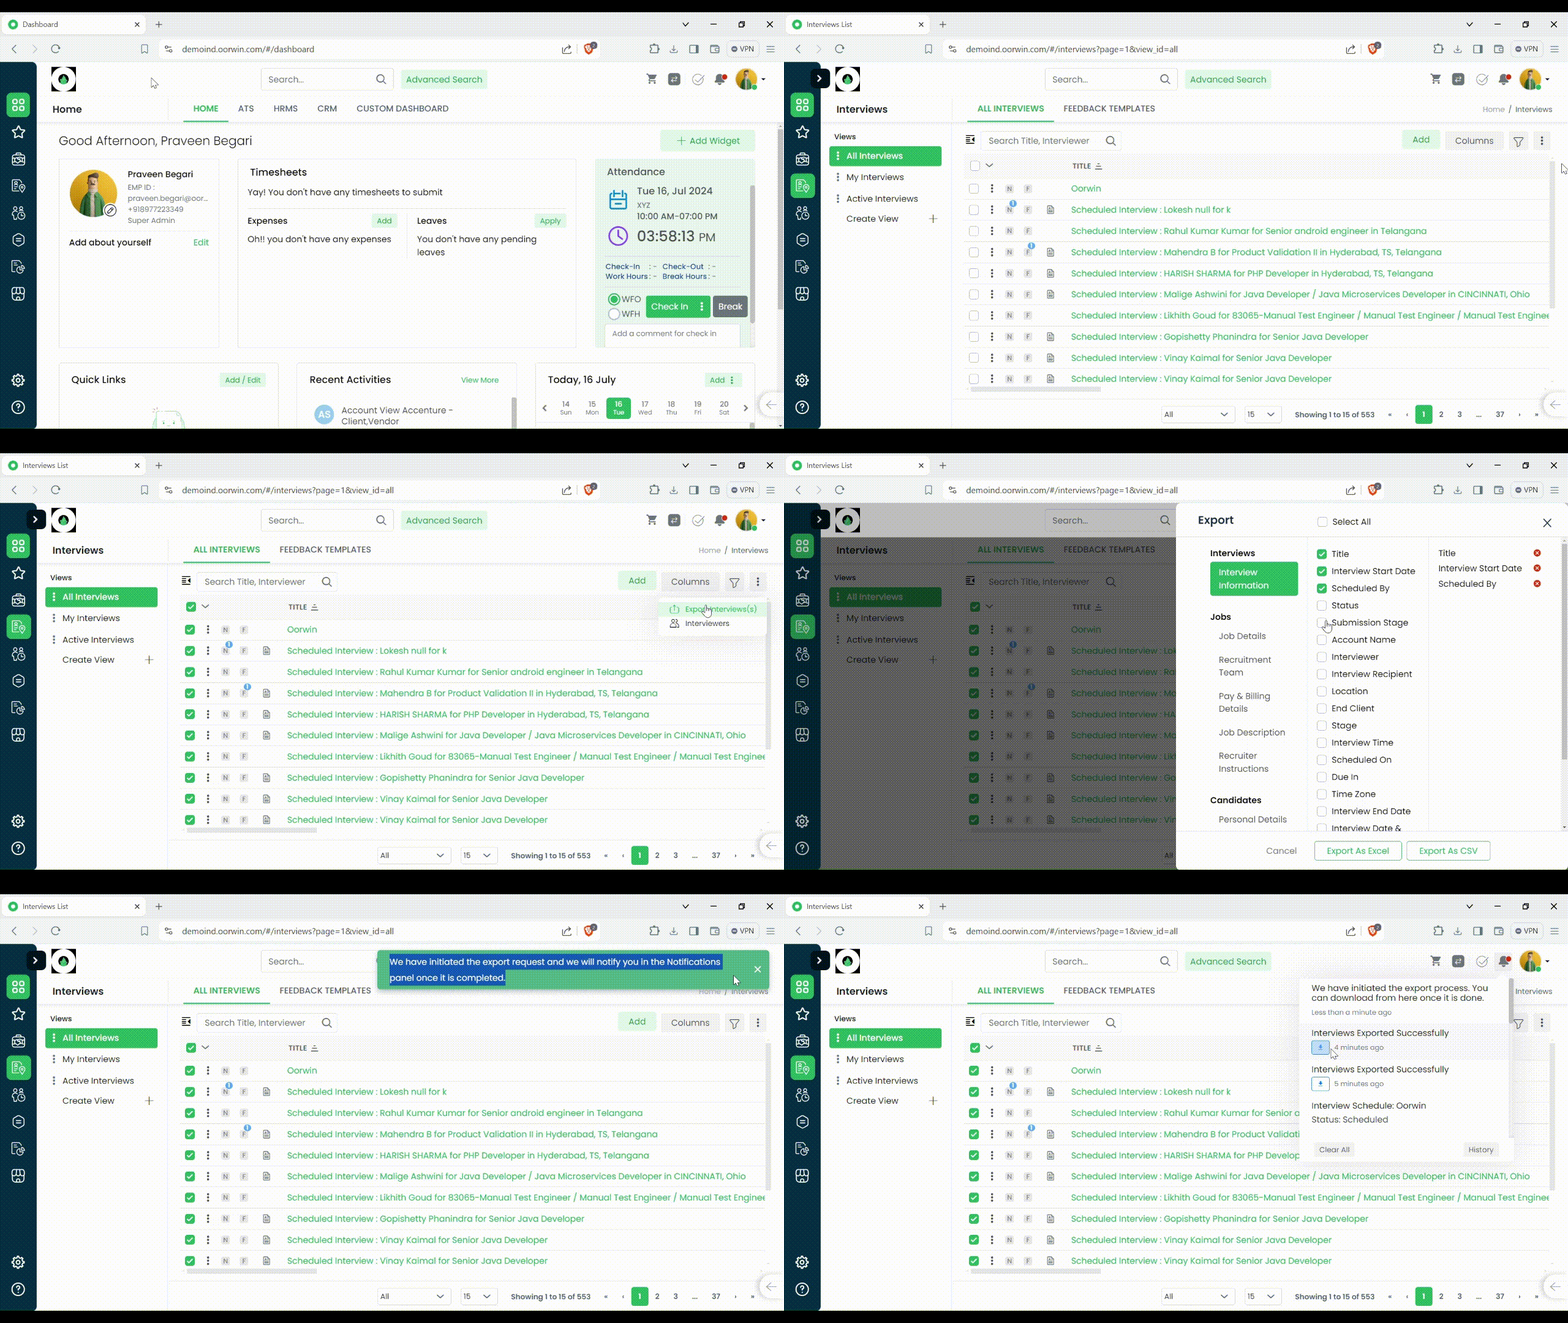
Was this article helpful?
Here’s a guide on how to create a Feedback template:
- Login to your “Oorwin account” and Navigate to “Interviews module” on the left menu under the “Recruitment” section.
- Navigate to Feedback templates page from the header.
- Click on Create Template button on the top right corner.
- Add template page will pop-up on your screen.
- Enter the Template Name and select the Questions.
- Click on Save button on the bottom of your screen.
- The Template will be Saved.

Was this article helpful?
You can filter the accounts through different search criterias like name,type,city,etc. User can also create the custom view based on the filters applied
Below are the steps to add a filter and create a custom view
- Log in to your Oorwin Account and navigate to Accounts module from the left menu under General Section
- On the account listing page click on filter icon on the top right corner
- Select the filter condition on the popup by selecting the field name and condition
- You can add multiple filters by clicking on “+ Add” button below the first condition
- Now click on Apply button, Now accout records will be filtered and displayed on the listing page
- To save the filter click on “Save As” button beside the apply button and provide the filter view name
- Now the custom view will be saved and listed on the left views on the same name you have given

Was this article helpful?
You can filter the employees through different search criteria like name, email, employment type etc. User can also create the custom view based on the filters applied
Below are the steps to add a filter and create a custom view
- Log in to your Oorwin Account and navigate to Employees module from the left menu under HRMS Section
- On the employees listing page click on filter icon on the top right corner
- Select the filter condition on the popup by selecting the field name and condition
- You can add multiple filters by clicking on “+ Add” button below the first condition
- Now click on Apply button, Now employee records will be filtered and displayed on the listing page
- To save the filter click on “Save As” button beside the apply button and provide the filter view name
- Now the custom view will be saved and listed on the left views on the same name you have given
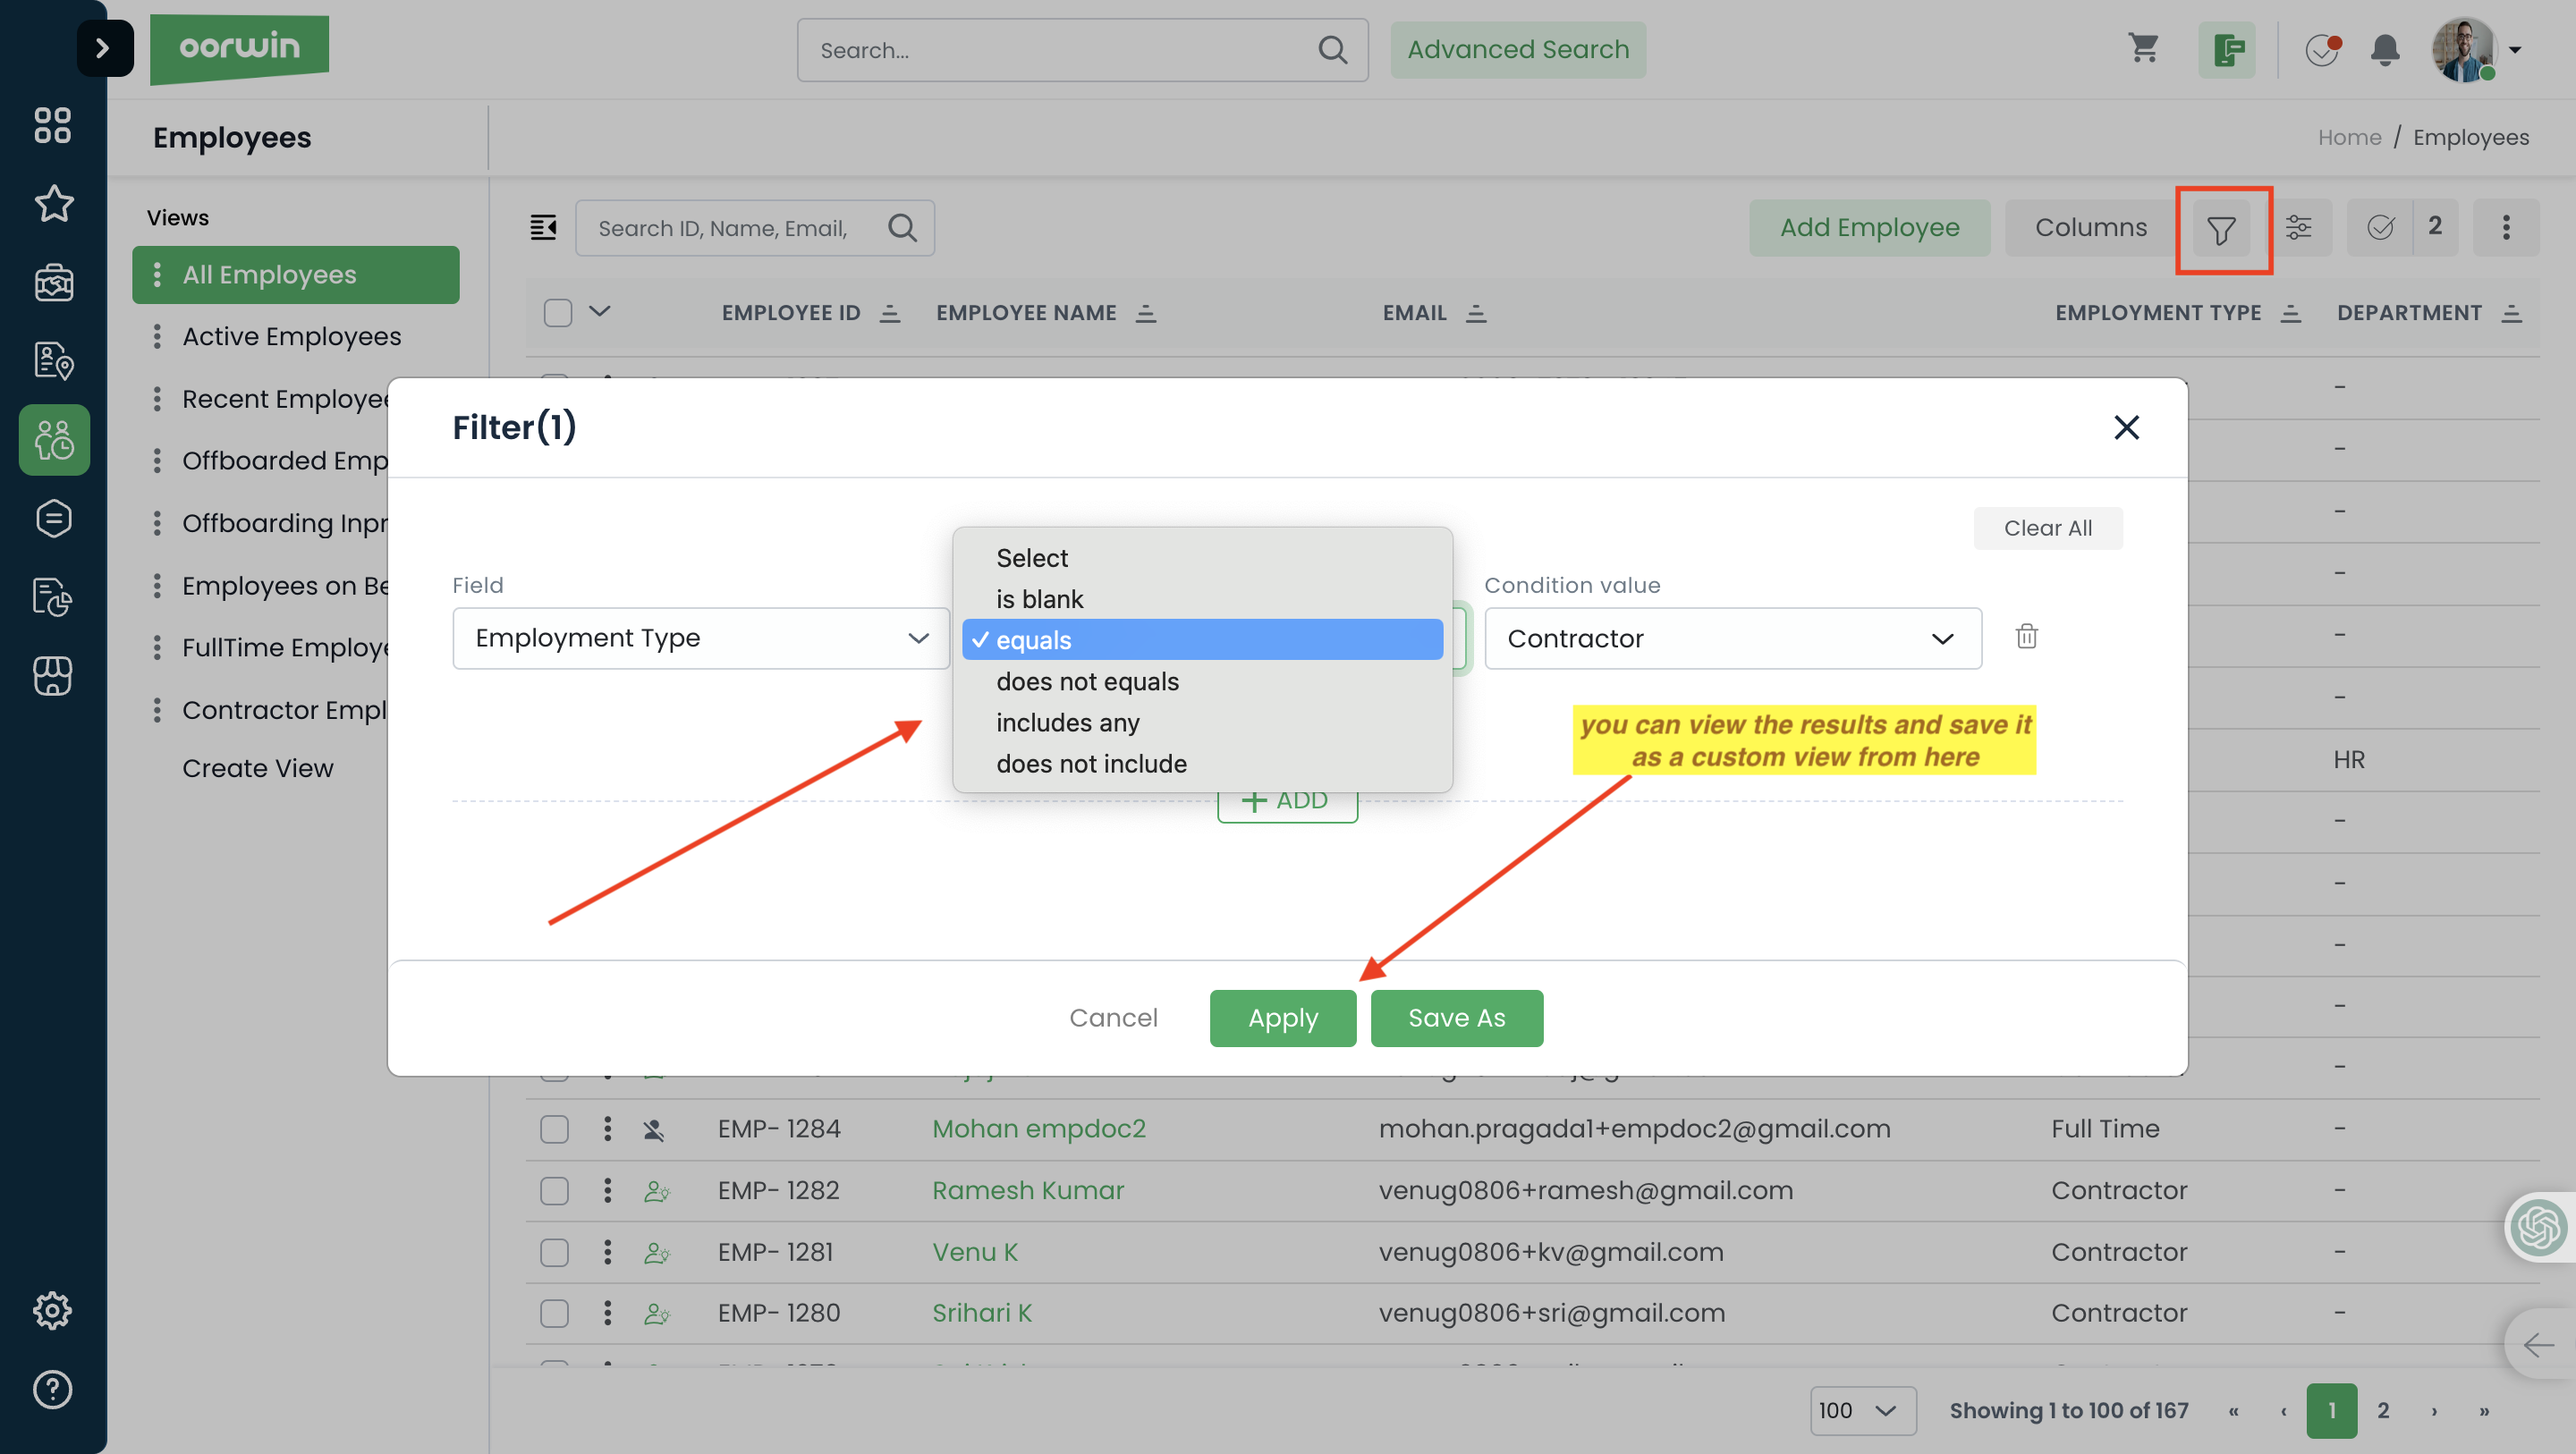
Was this article helpful?
You can filter the leads through different search criteria like name, status ,owner ,etc. User can also create the custom view based on the filters applied
Below are the steps to add a filter and create a custom view
- Log in to your Oorwin Account and navigate to Leads module from the left menu under Sales Section
- On the Leads listing page click on filter icon on the top right corner
- Select the filter condition on the popup by selecting the field name and condition and value
- You can add multiple filters by clicking on “+ Add” button below the first condition
- Now click on Apply button, Now lead records will be filtered and displayed on the listing page
- To save the filter click on “Save As” button beside the apply button and provide the filter view name
- Now your custom view will be saved and listed on the left views on the same name you have given
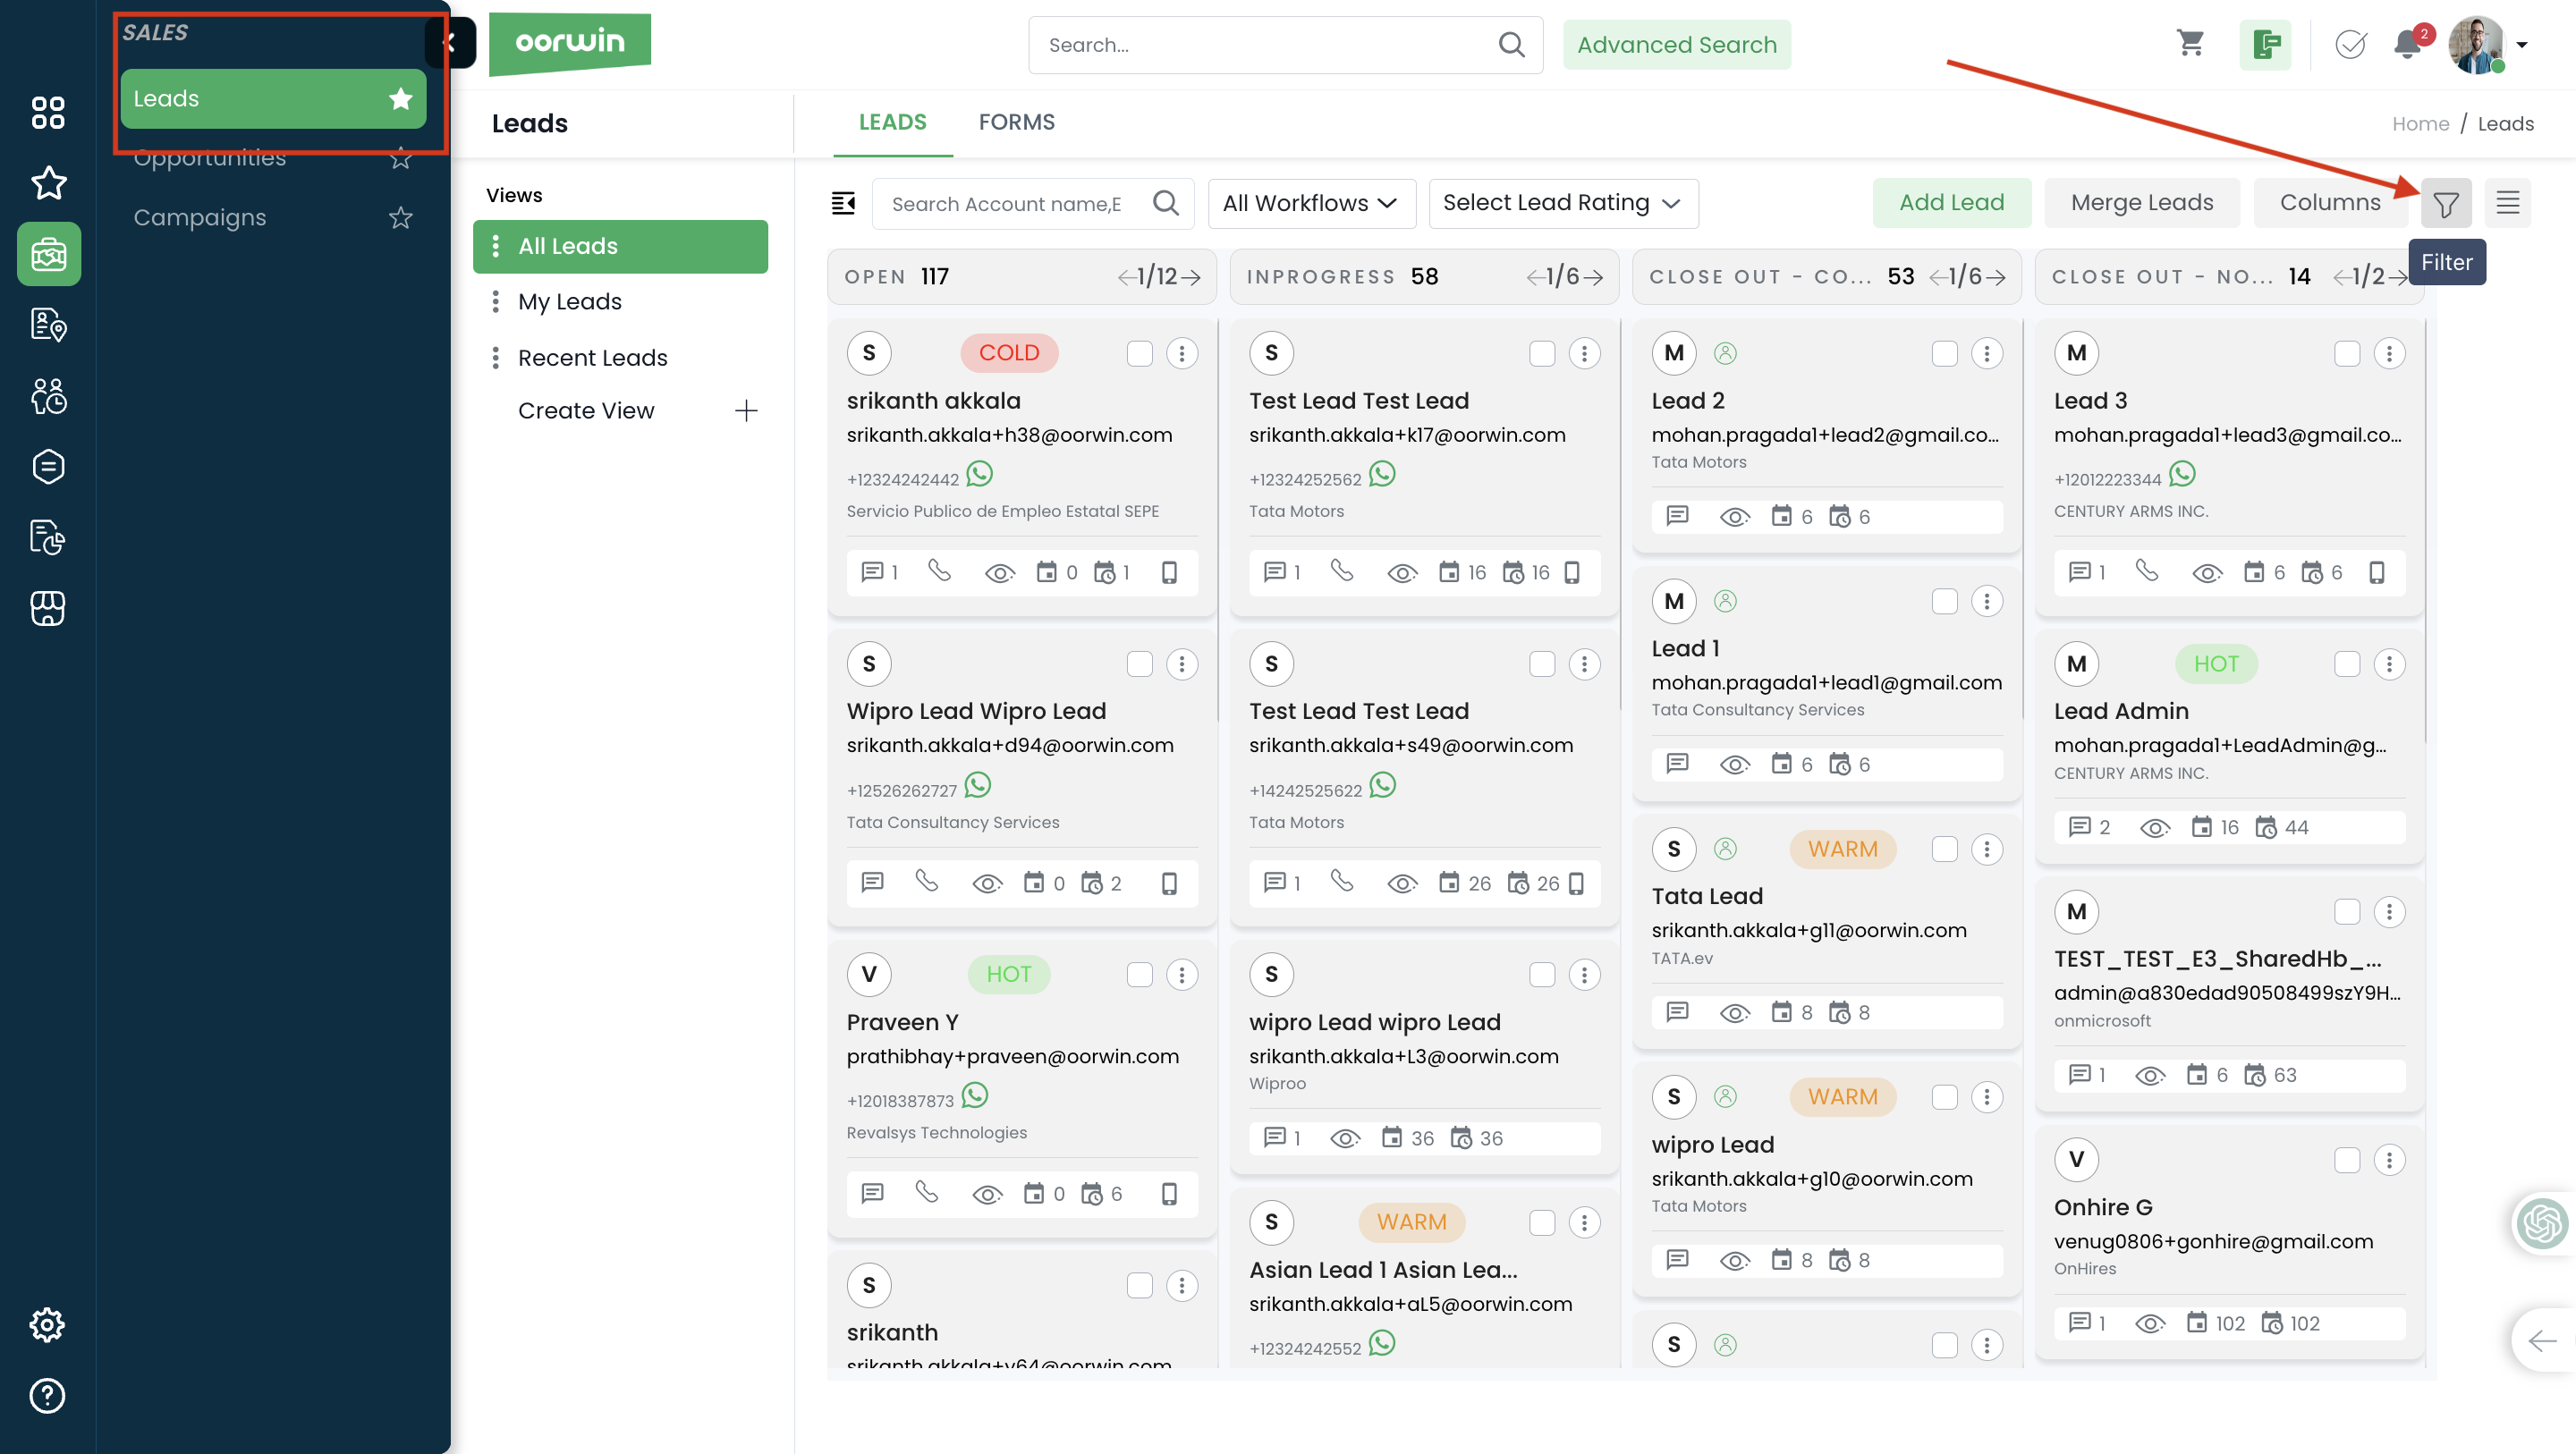

Was this article helpful?
You can filter the opportunities through different search criteria like name, status ,owner ,etc. User can also create the custom view based on the filters applied
Below are the steps to add a filter and create a custom view
- Log in to your Oorwin Account and navigate to Opportunities module from the left menu under Sales Section
- On the opportunities listing page click on filter icon on the top right corner
- Select the filter condition on the popup by selecting the field name, condition and value
- You can add multiple filters by clicking on “+ Add” button below the first condition
- Now click on Apply button, Now opportunities records will be filtered and displayed on the listing page
- To save the filter click on “Save As” button beside the apply button and provide the filter view name
- Now your custom view will be saved and listed on the left views on the same name you have given

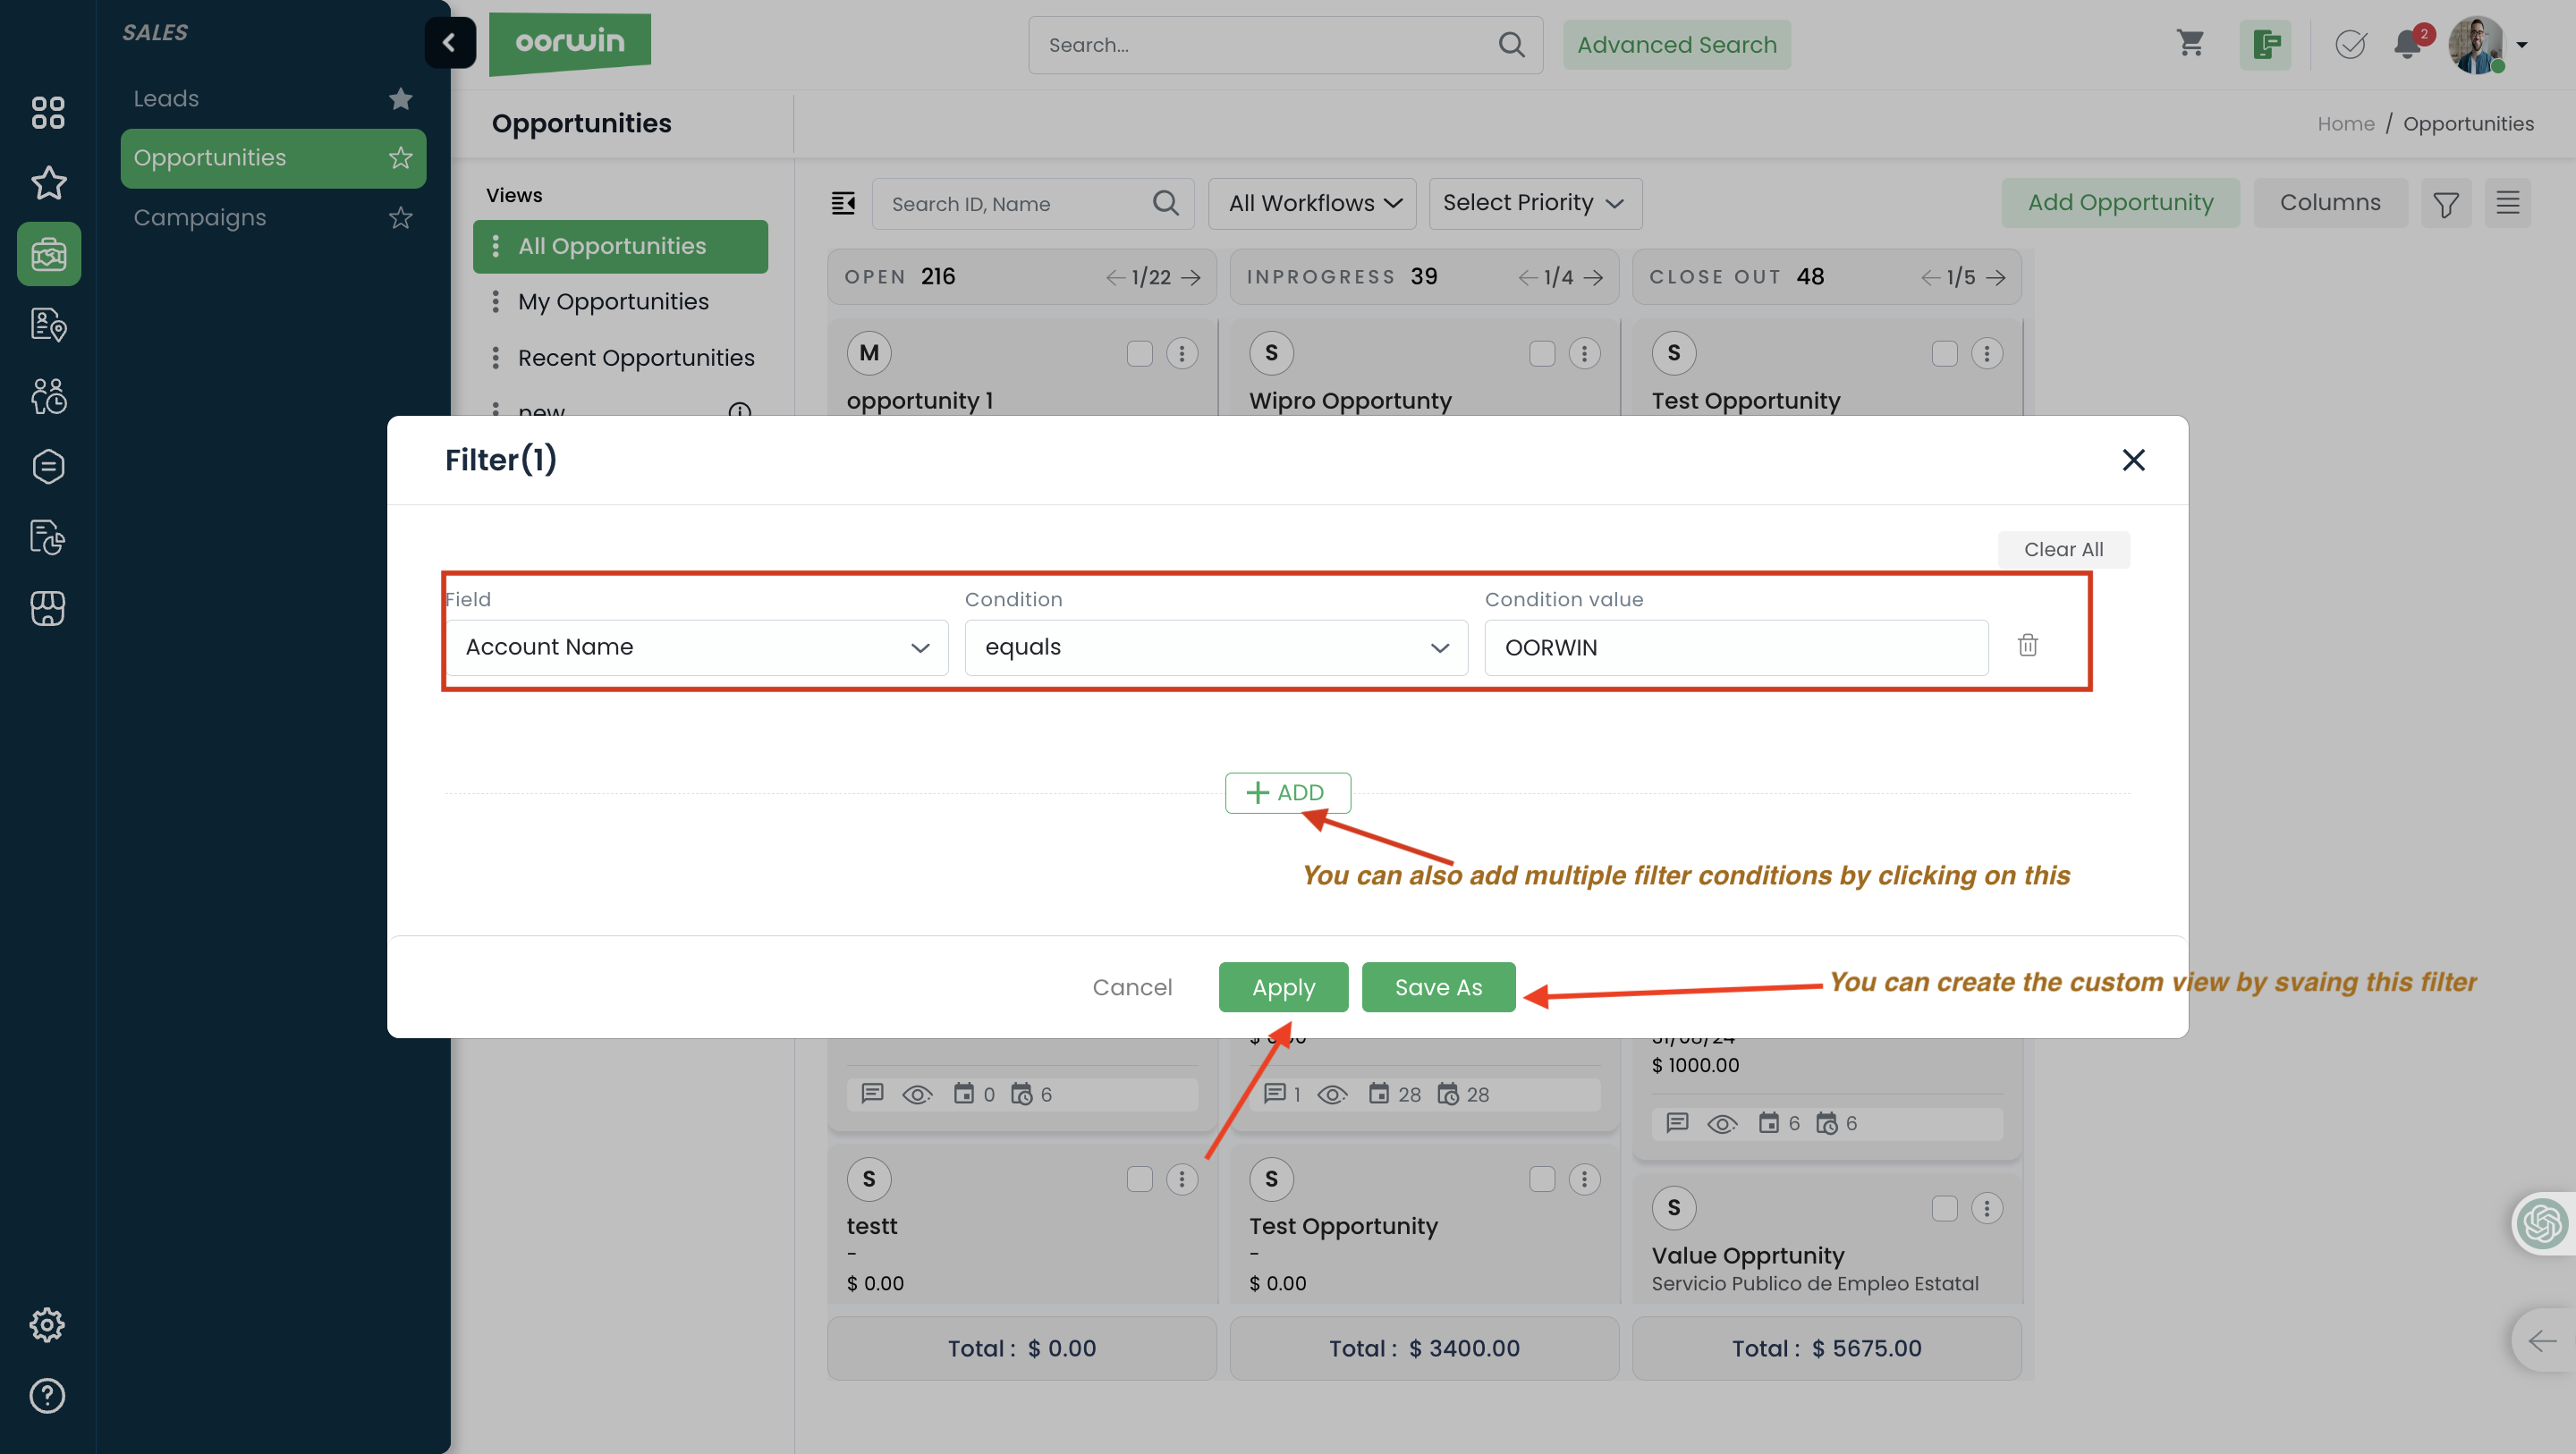
Was this article helpful?
Here’s a detailed guide to on how to find Matching Profiles:
- Login to your “Oorwin account” and Navigate to “Jobs module” on the left menu under the “Recruitment” section.
- Click on the “Job ID/Job Title” and Open the job.
- Click on the Matching Profiles Icon on the Right side Panel.
- All the profiles that are matching to the job will reflect along with the percentage of match, user will have access to filter the candidates and perform actions like Submissions, adding to pipeline and Mass mailing.
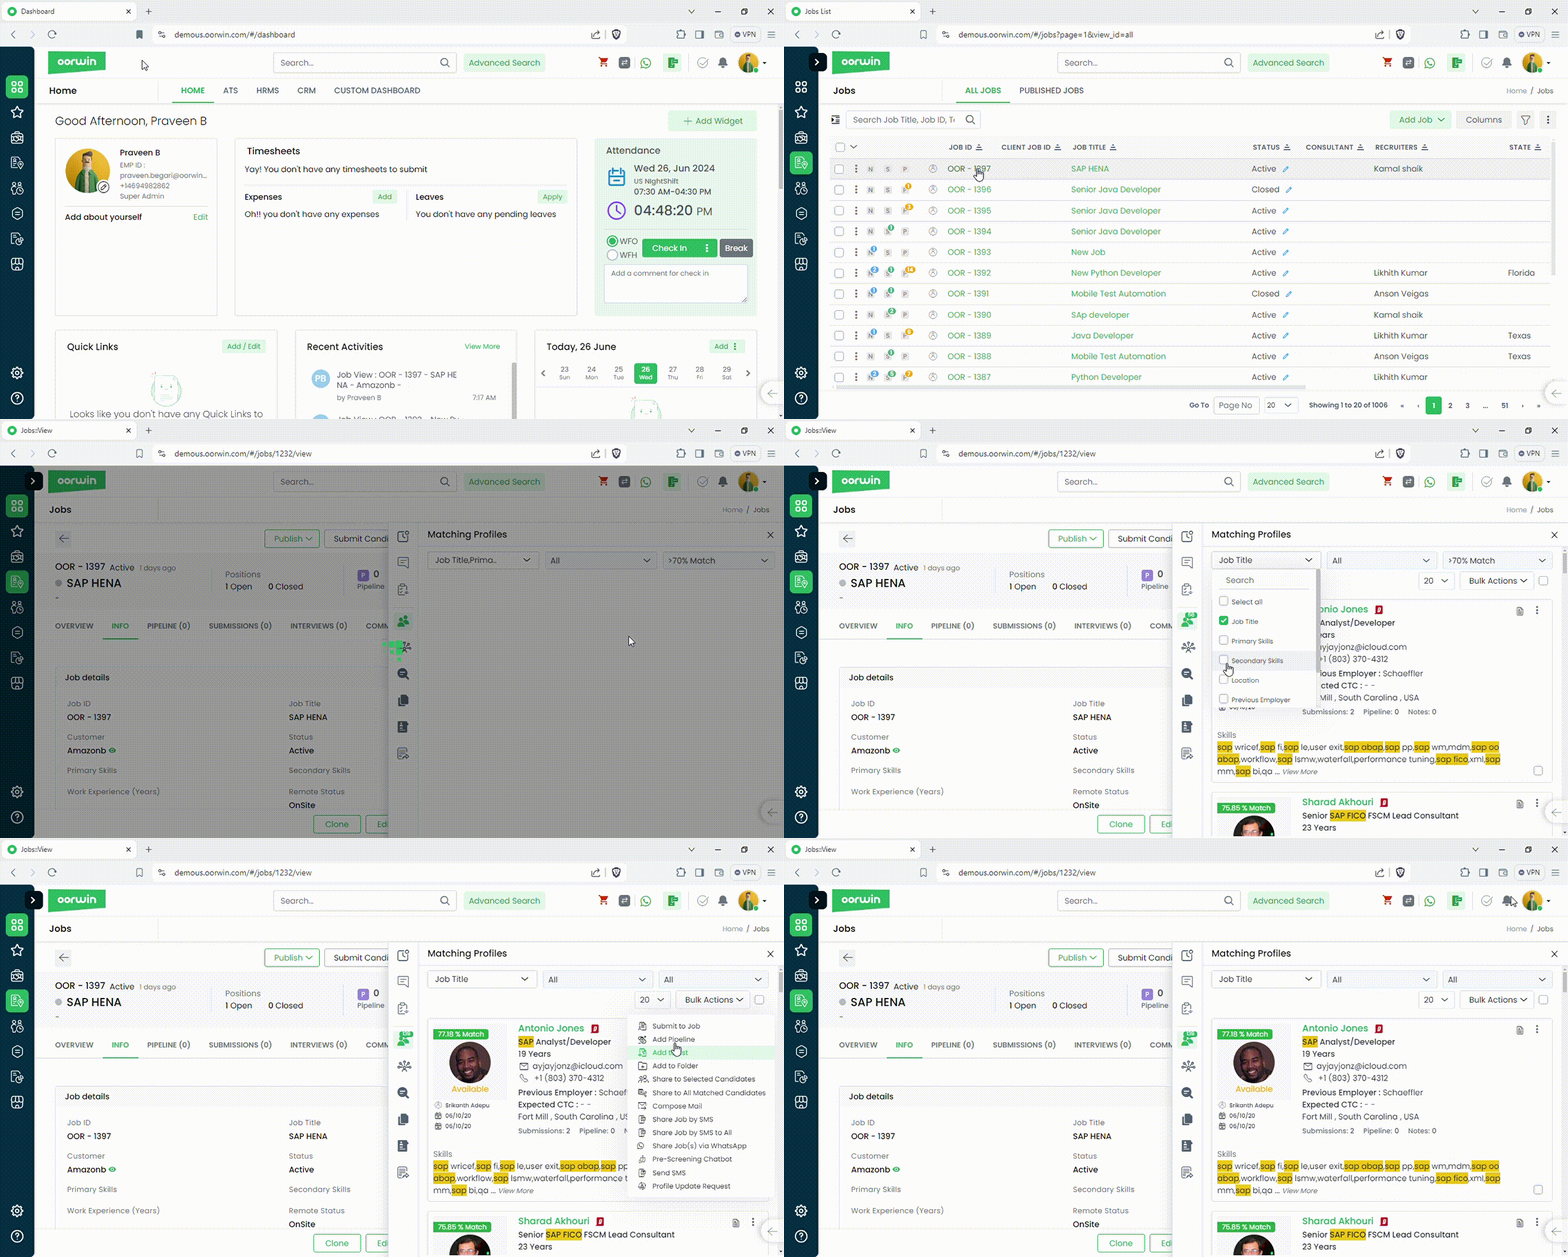
Was this article helpful?
Here’s a guide on how to find similar candidates:
- Login to your “Oorwin account” and Navigate to “Candidates module” on the left menu under the “Recruitment” section.
- Click on the “Candidate ID/ Candidate Name” to open the profile.
- Click on the “Similar Profiles Icon” on the Right side Icon Panel.
- Top 5 profiles similar to the opened candidate profile will be displayed, showing their match percentage. The user will have the ability to filter these candidates and perform actions such as submissions, adding them to the pipeline, and mass mailing.

Was this article helpful?
Generate an Invoice
- Navigate to Invoices
- Click on Create Invoice
- Enter Client information
- Select the Assignment
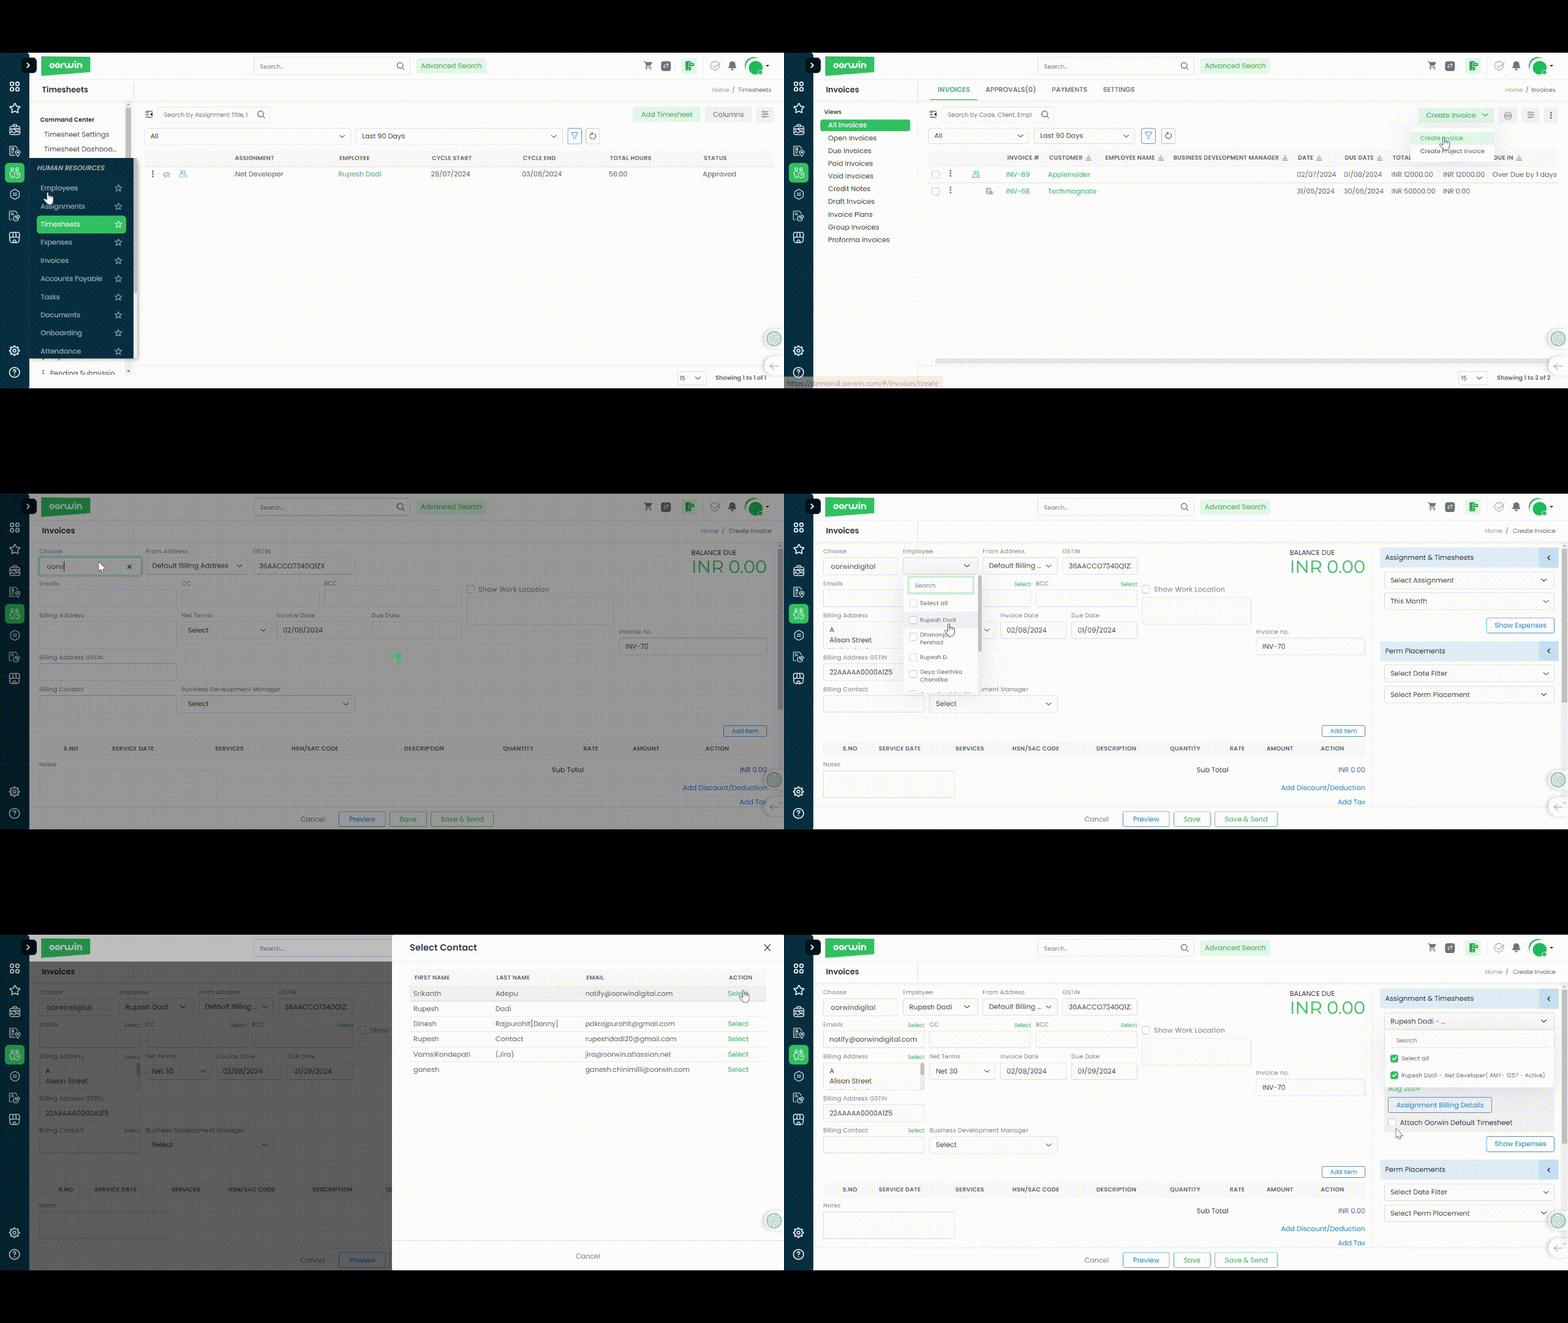
- Select the Time period

- Select Approved Timesheets if available -> Select the days -> Add

orselect Assignment billing details -> Enter start date & end date with hours as needed -> Click on Add

- Add Discount or Taxes if needed
- Save & Send

Was this article helpful?
Generate Bills directly from Draft Bills in Accounts Payables:
Now users do not have o manually generate Bills, You can have that automated where all you need is just to look at it and Approve it and save it
- Navigate to Main Menu
- Accounts Payable
- Draft Bills
- Select your Bill
- Edit
- Make changes if needed
- Save

Was this article helpful?
Generate Invoice for Perm placements
- Navigate to Invoices
- Click on Create Invoice
- Enter Client information and other billing information
- Select the Date range
- Select Perm placement

- Add your Discount & Taxes
- Save and Send Invoice

Was this article helpful?
Resume harvesting helps the users to fetch the resumes automatically into the system from the external job boards and internal resume based on the search criteria that we have configured
To schedule the resume harvesting for the users,Admin needs to enable it and configure the time slots
- Log in to your Oorwin Account and navigate to settings page from the left bottom
- Go to Configurations on the left menu and click on Harvesting module
- Now select the timezone and the time slots for the harvesting to be ran (You can select the maximum of 4 slots a day)
- You can also set the record limits by entering the number in the per harvesting limit field
- Now click on save which saves the harvesting configuration and enabled to schedule

Was this article helpful?
We can create a candidate or a resource pool record from the lead information which you can directly create it from the lead listing page
For this you need to have ATS application subscribed and need to have the add candidate/resource pool permission from the role security
Here is how you can do it
- Log in to your Oorwin Account and navigate to Leads module from the left menu under Sales Section
- Click on “Actions(three dots)” icon for the Lead you wish to move.
- Click on move to candidate link from the list (You need to have candidate add access permission)
- Or Click on move to resource pool link from the list (You need to have resource pool add access permission)
- Click on Yes on the confirmation box and your lead record will be moved as a candidate or resource pool with the information mapped to it

Was this article helpful?
We have multiple batch actions in Employee module which helps the user to perform an action on the multiple employee records with the same result
You can perform this action by selecting multiple employee records and clicking on the batch actions symbol on the top
- Here you can do Bulk assign role of different employees by selecting them and click on Bulk actions button->assign role
- You can also send Profile update request to multiple employees through this option
- You can also archive, send bulk SMS and send email through batch actions which will be triggered to all of the selected records

Was this article helpful?
We have multiple batch actions in leads module which helps the user to perform an action on the multiple lead records with the same result
Here you can do bulk update status of different leads by selecting them and click on Bulk actions button->Update Status
You can also update any of the field in the lead form like Lead owner, Lead name, location, etc
You can also archive and send email through batch actions which will be triggered to all of the selected records

Was this article helpful?
Users can add a page break in a continuous digital document to move content to a new page.
To achieve this:
- Navigate to Menu -> General -> Digital Templates -> Design (Advanced Digital Template) / (Create – Design).
- Add or edit a section.
- Turn on the Page Break option at the section where you want the new page to start.
- Save your changes.
You can preview the areas where page breaks have been added and see how it looks by switching on the preview option. You can also check a PDF preview by clicking on the PDF preview option at the top.
Note: If there are merge fields in your Advanced Digital Template, the preview might not accurately reflect the content, as merge fields will be replaced with actual information, which may have varying character lengths.
Was this article helpful?
Assignments can be utilized to manage various aspects of job information, including client/vendor details, sales data, recruitment processes, pay and billing information, timesheet records, and invoice details.
Assignments can be added in two ways from the employee record
- From the listing page -> Actions
- From the view page -> Assignment tab
Note: You need to have add assignment permission to do this action. This can be enabled from Settings->Role Security->Select HR Role->Assignment Add Permission
Below are the steps to add an assignment from Employee record
- Log in to your Oorwin Account and navigate to Employees module from the left menu under HRMS Section
- Click on “Actions(three dots)” icon for the employee you wish to update.
- Or click on employee name to view the employee record and click on assignment tab on the top
- You will find Add Assignment button in both the above places and click on it
- It opens the add assignment form and enter all the mandatory details regarding the assignment
- Now click on Save button and your assignment got created under the selected employee


Was this article helpful?
Email Signatures are one of the most common features that all professionals use in today’s industry. With email being one of the main forms of communication between internal and external parties, In Oorwin you can customize your mail signature and also use pre-defined templates.
Add Email Signature
- To add an email signature in Oorwin, you have to go to click on your Profile icon
- Go to My Profile & Preferences -> go to My Signature.
- Then you have to enable the Include Signature in Mail.
- Select any of the predefined templates below and the signature will automatically saved with the profile information
- You can also edit and change the details and preview the details once you save it

Was this article helpful?
This Module enables Define default settings for employees, including key parameters such as probation period and employment type. These settings ensure consistency and standardization across employee records, streamlining the onboarding and management processes.
Steps to Configure Employee Default Settings
Was this article helpful?
How to add Reviewers for I-9:
- Navigate to Main Menu
- I-9 Compliance
- Reviewers
- Add Reviewer
- Enter the Information
- Select Internal or External Reviewer
- Save
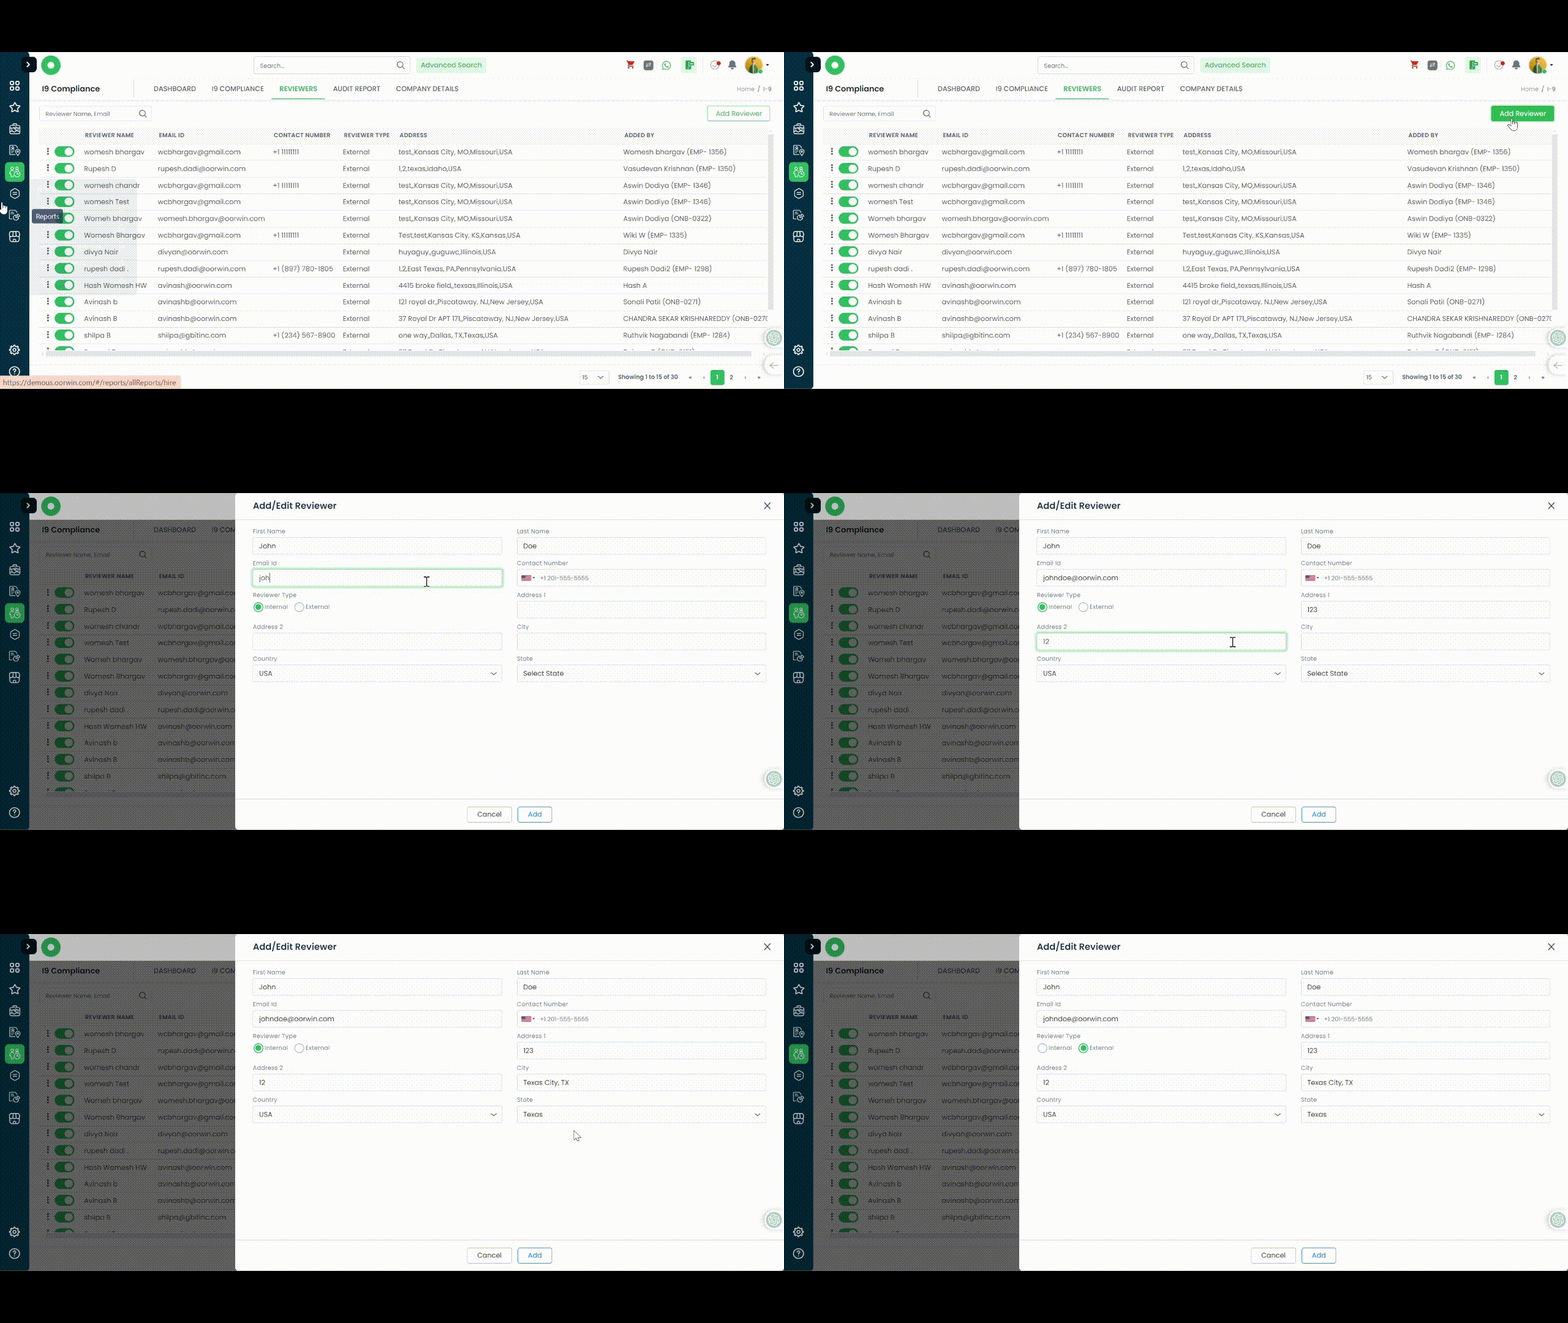
Was this article helpful?
You can add the contact as a candidate without going to the candidates module and fill all the details manually.Contacts module will have an option as “Add to Candidates” where it will automatically fetch all the available details of contact to the candidate
This action will only available to the accounts who has ATS subscription and the logged in user must have add candidate permission from role security.
Below are the steps to do it
- Log in to your Oorwin Account and navigate to contacts module from the left menu under General Section
- Open any contact by clicking on contact name to whom you want to add as a candidate
- Search for Add to Candidate icon on the top right and click on it
- It will automatically opens the add candidate page along with the prefilled details from the contact you selected
- Fill all other mandatory fields and click on save button at the bottom
- Now your contact has been added as a candidate and available in the candidate module

Was this article helpful?
Adjusting an Employee’s Leave Policy Mid-Year
You can change an employee’s leave policy mid-year and align it with your new policy by adjusting the leave credits accordingly.
To achieve this:
- Navigate to Settings -> Configurations -> Time & Attendance -> Leave Management -> Assign Employees to Leave Plan.
- Search for the desired employee whose leave policy you wish to change.
- Click on Options -> Update Leave Plan.
- Select the new leave plan from the dropdown menu on the right.
- You will see the old policy on the left and the new policy on the right. Adjust the leaves by adding or deducting based on the old leave policy, considering any leaves already taken or earned through accruals.
- Enter the number of leaves in positive or negative as needed. The system will adjust the new leaves accordingly and apply the changes.
This allows you to seamlessly update the leave policy while ensuring the leave credits are accurately managed.
Was this article helpful?
In this blog, let’s explore how to apply for a job in a job boards directly from Oorwin
- Go to “Job Grabber” and navigate to the job grabber agent
- Clicks on “Jobs” count and you will be redirected to the list of jobs
- Click on any of the job and system shows a pop-up
- Click on “Apply in [Job Board]”
- System will navigate you to the application page of the job in job board

Was this article helpful?
Approve Your Submitted Expenses
Users can approve expenses in two ways:
1. Approve from Oorwin:
- Navigate to Menu > Expenses > Submitted Expenses
- Click on the Expense Name to open the details
- Review the expense and approve it
- To approve only a partial amount, enter the desired amount and then approve

2. Approve from Email:
Approvers will receive an email notification for expense approvals. In the email, they can approve or reject the expense by clicking the provided buttons. To approve only a specific amount, they can enter the desired amount, add comments, and then approve it.
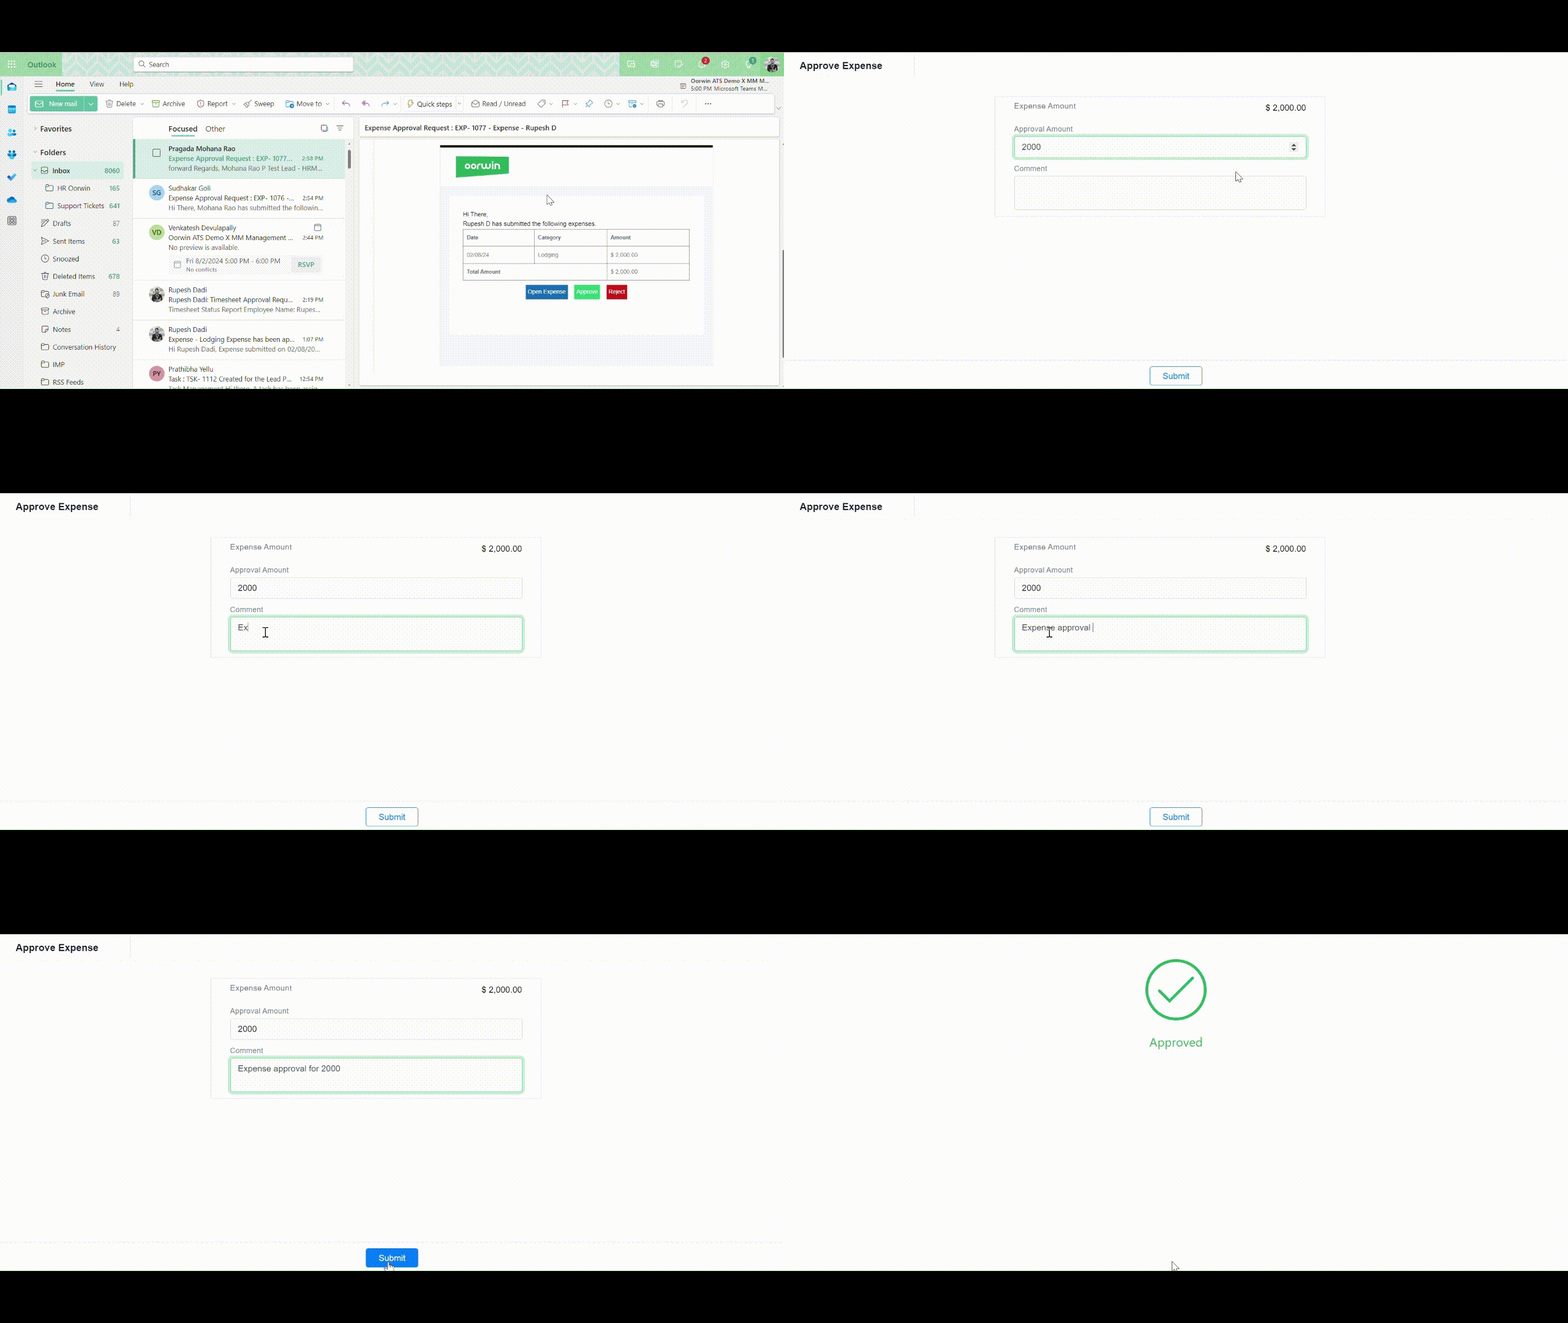
Was this article helpful?
There is an archival option for all the campaign templates that you have created in your system which helps you to do the soft delete from the system and you can also roll back them whenever you wanted
Here is how you can archive the campaign templates and snippets
- Log in to your Oorwin Account and navigate to Campaigns module from the left menu under Sales Section
- You will find a tab called Email Templates & Snippets
- You will have all the list of templates like text,graphical,hotlist & snippets on the left side
- Select the template on which type you wanted to archive and then click on three dots icon for that template
- You will find an option called Archive on the actions drop down
- Click on Archive and click on yes on the confirmation box
- Now your template got archived and you cannot no longer access to that template
- You can also find the archived records in My profile->Archivals to restore them at any time

Was this article helpful?
Follow the below steps to edit and update the employee record
- Log in to your Oorwin Account and navigate to Employees module from the left menu under HRMS Section
- Click on “Actions(three dots)” icon for the employee you wish to provide login access
- Click on Assign Role link and select the desired employee role from the list of roles
- It opens a confirmation popup and click on Yes on it
- It opens a welcome email popup and you can change the content if you need and click on Send
- And that’s it! the employee will get the welcome email along with the activation link
Note: To assign employee to a role you need to have available employee credits which you can purchase through the billing & usage section
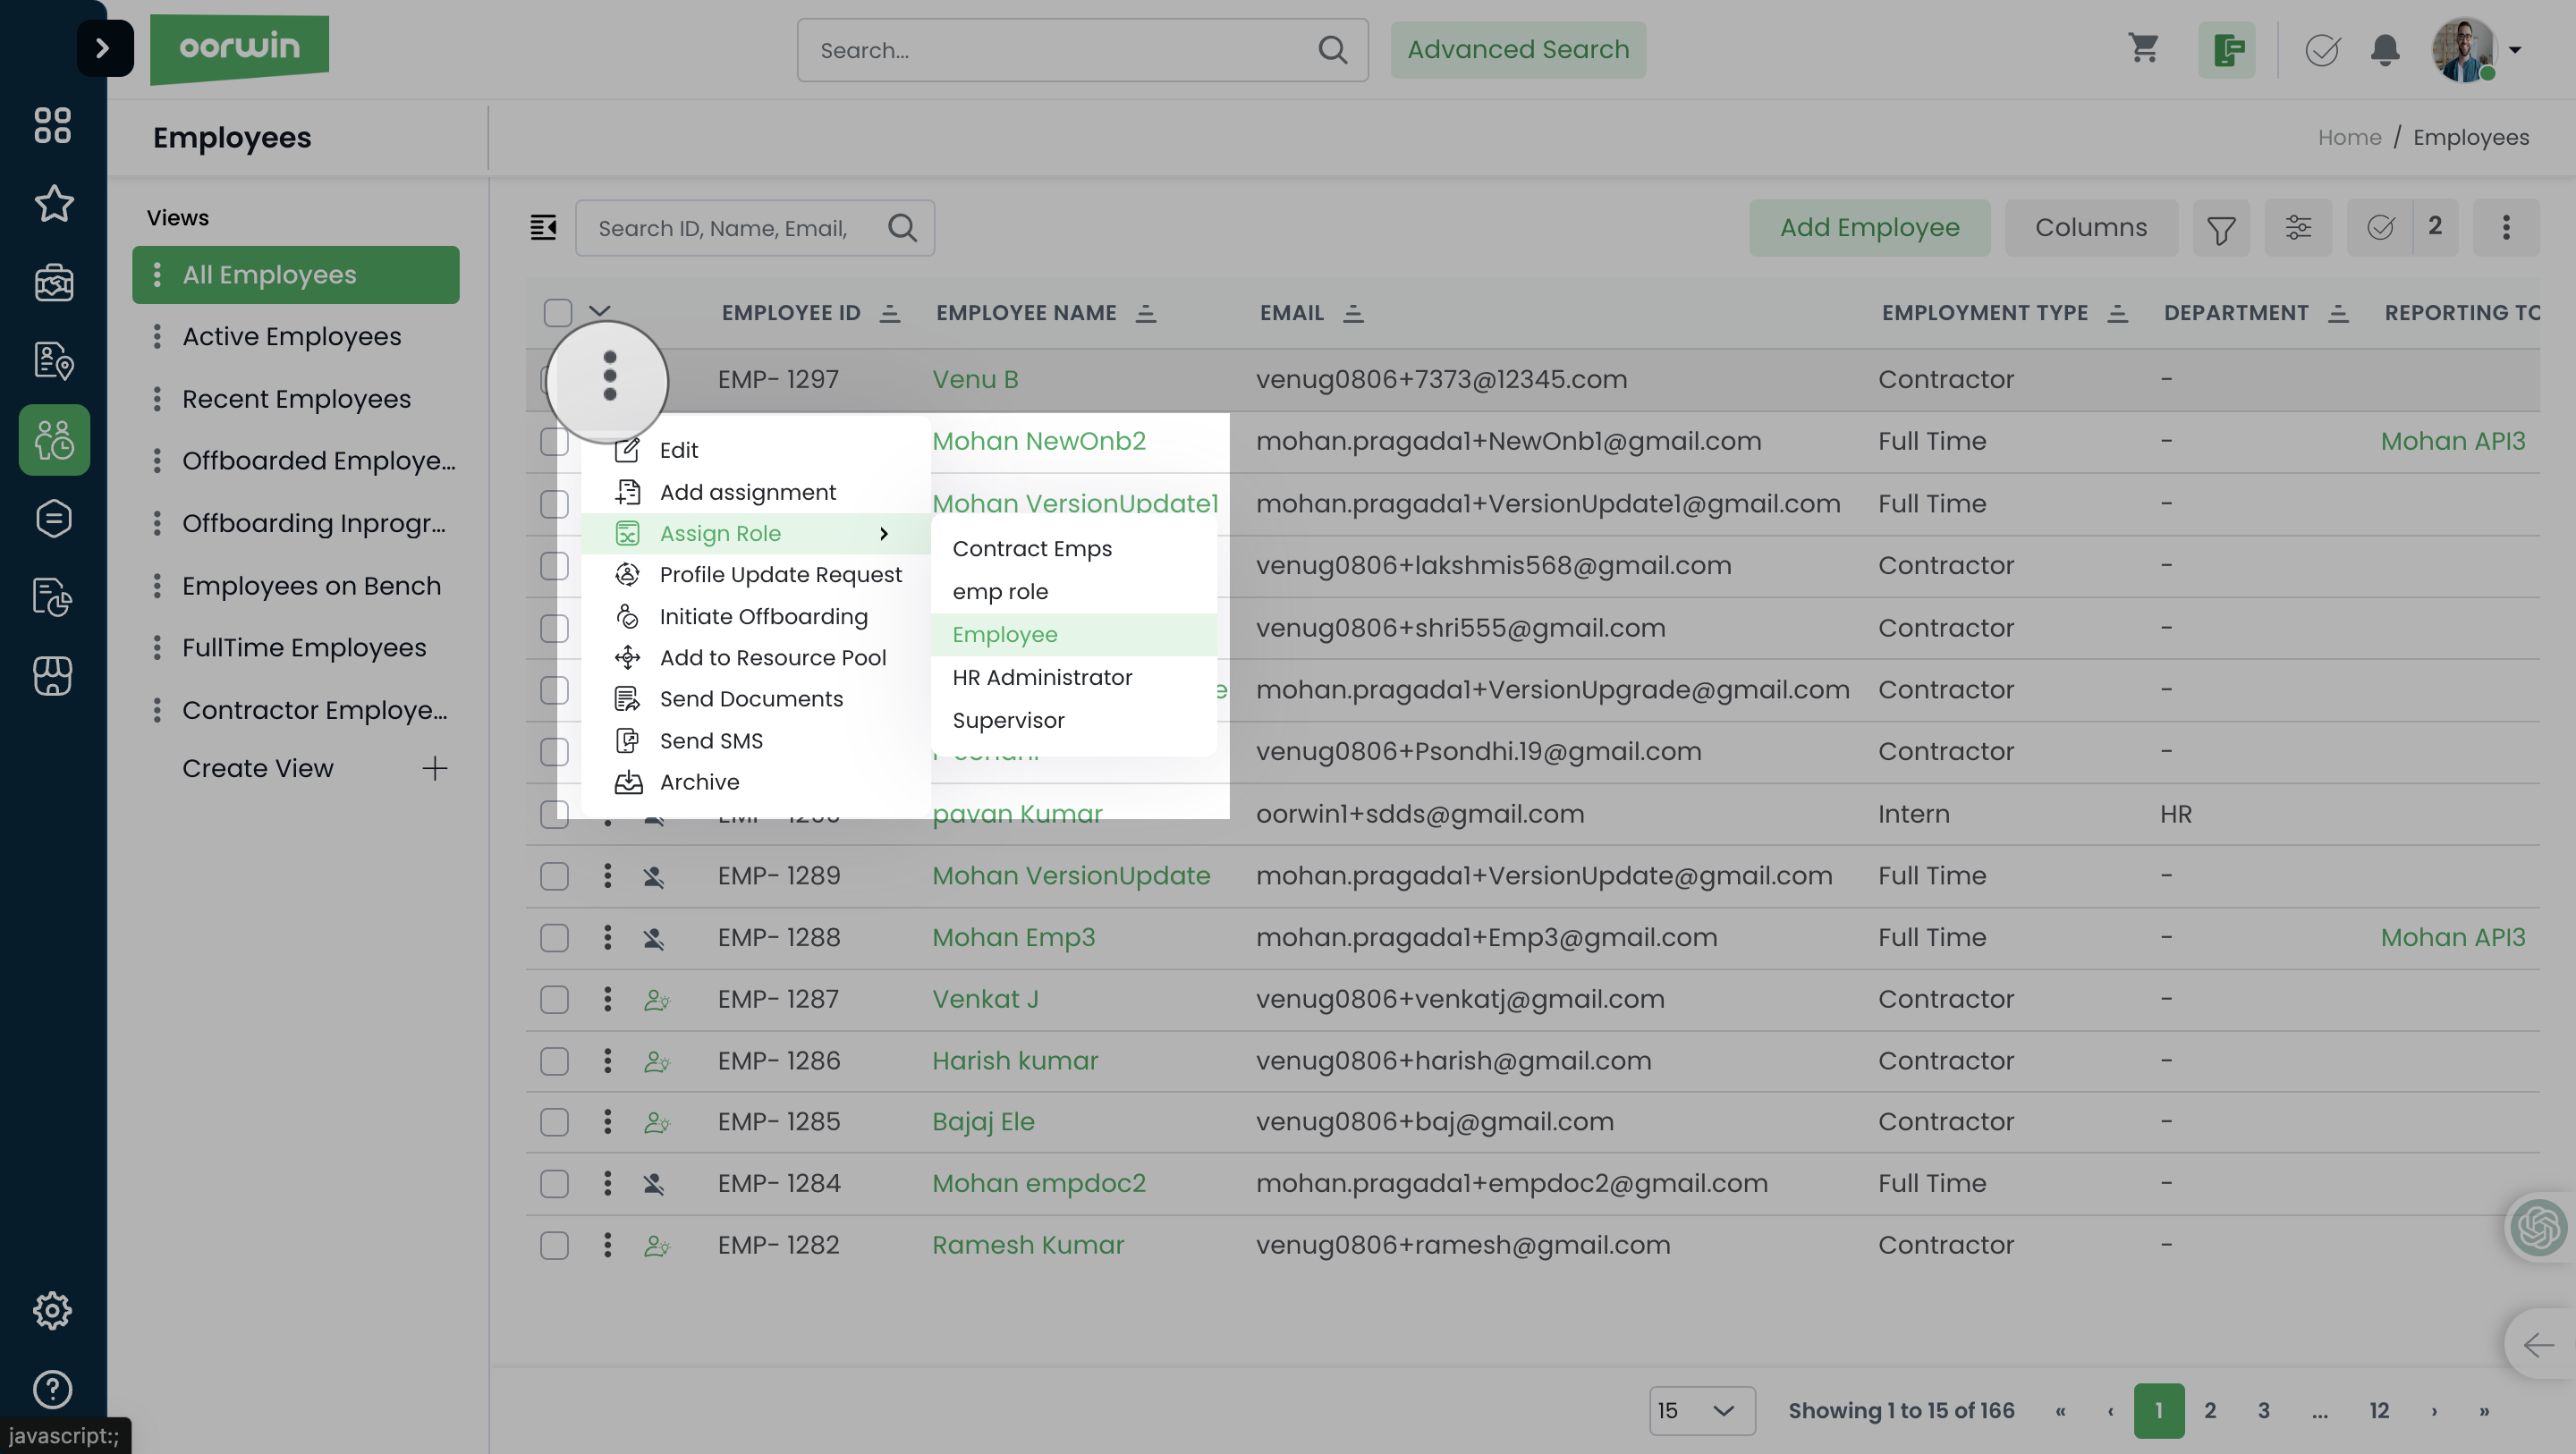
Was this article helpful?
You can assign contact search- Accounts to a user through the credit allocation page which allows the user to fetch contact detail from LinkedIn profiles
Here is how you can do it:
- Log in to your Oorwin Account and navigate to settings page from the left bottom
- Go to Configurations on the left menu and click on Credit Allocation page which shows all the addons credit related information
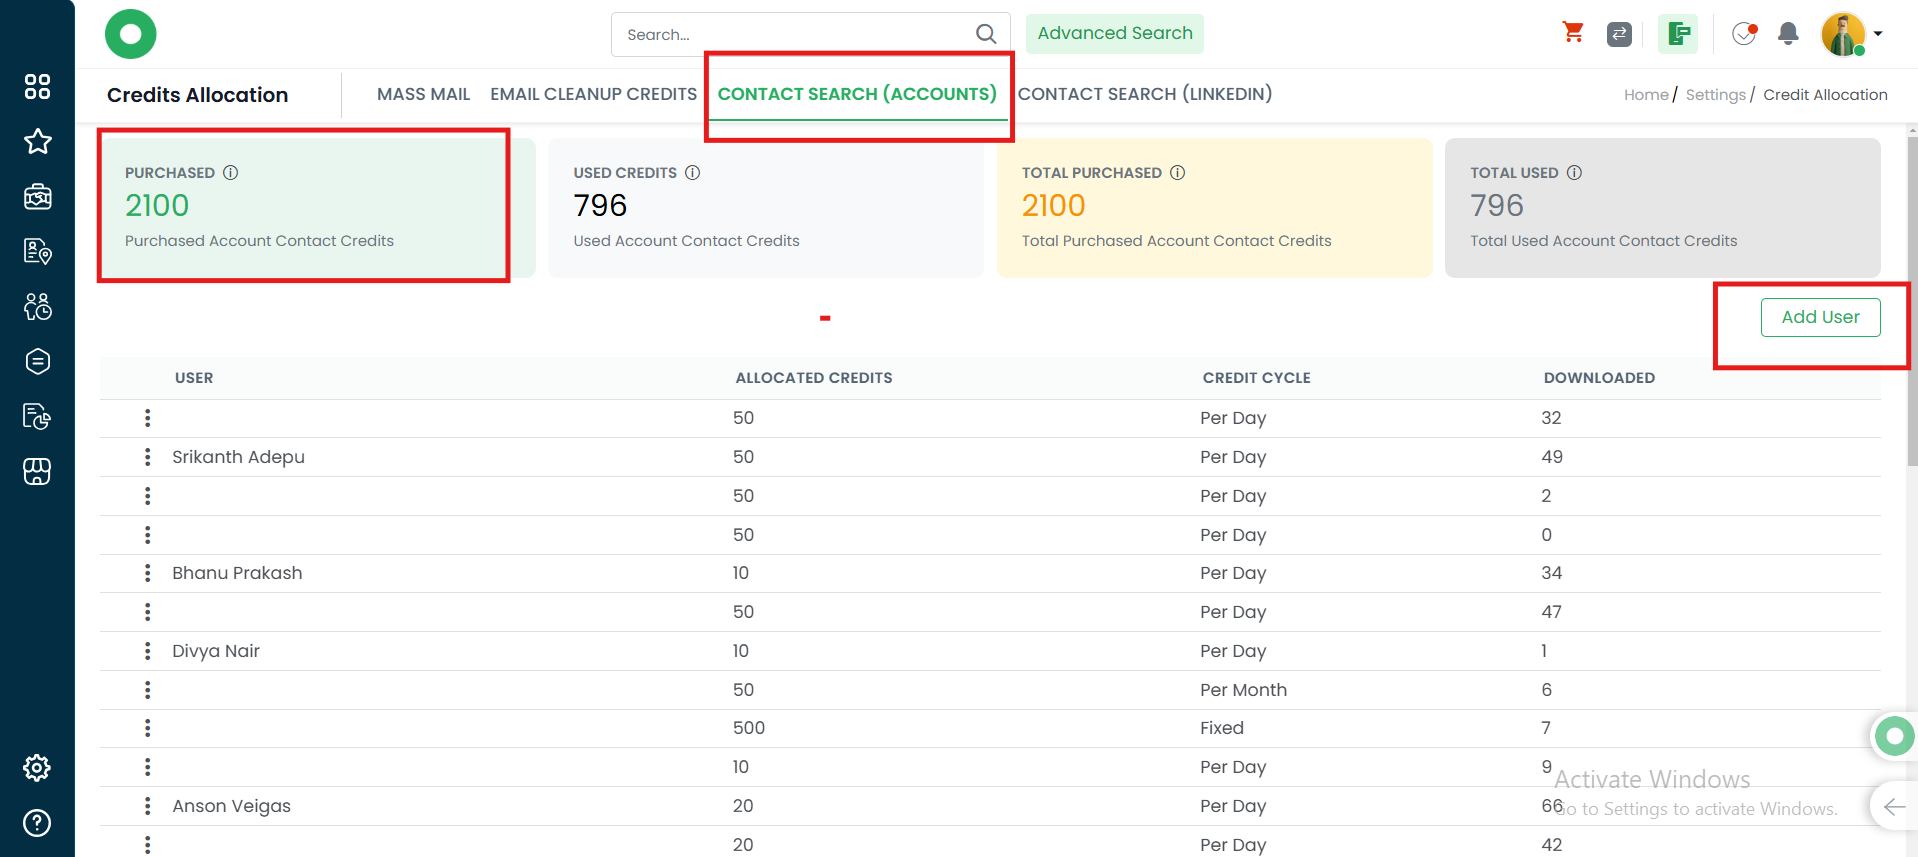
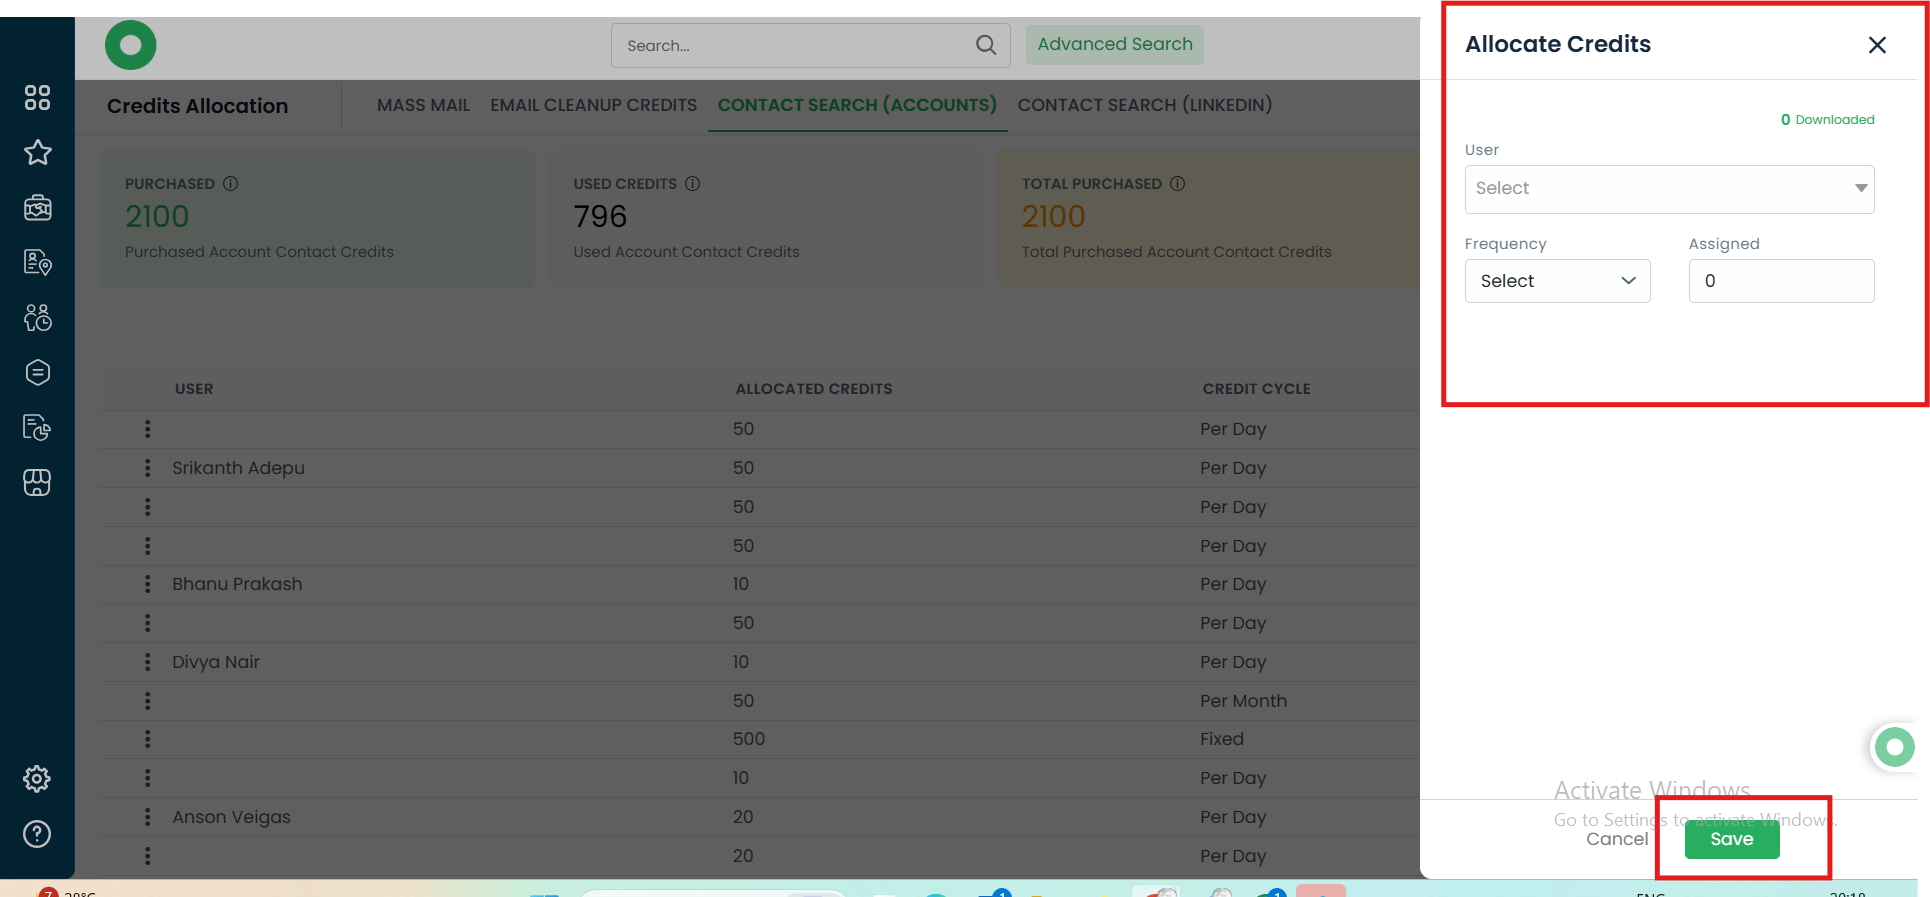
- Now click on the option Contact Search(Accounts), Click on add User button on the top right corner to allocate credits
- It opens a popup to select the system user and enter the credits that you wish to add and click on Save
- Now the user will have these allocated credits in his account and he can fetch contacts
- Also there will be an option to auto allocate credits based on the condition “If available credits are less than the specified number” The system will automatically assign the credits to that user if the condition matches
Was this article helpful?
You can assign the Contact Search (LinkedIn) to a user through the credit allocation page which allows the user to search the contact details of the profile in LinkedIn,
Here is how you can do it:
- Log in to your Oorwin Account and navigate to settings page from the bottom left corner.
- Go to Configurations on the left menu and click on Credit Allocation page which shows all the addons credit related information.
- In the Top Menu bar it shows as Contact Search (LinkedIn) when clicked on it will show the Purchased, Used Credits, Total Purchased & Total Used credits.
- Now click on Add User button on the top right corner to allocate credits.
- It opens a popup to select the system user and enter the Frequency and credits that you wish to add and click on Save.
- Now the user will have these allocated credits in his account and he can be able to search contact details in LinkedIn.

Was this article helpful?
You can assign the email Cleanup credits to a user through the credit allocation page which allows the user to validate all campaign related emails like job shares, resume shares, sales campaigns,etc
Here is how you can do it:
- Log in to your Oorwin Account and navigate to settings page from the left bottom
- Go to Configurations on the left menu and click on Credit Allocation page which shows all the addons credit related information
- The Second tab shows you the available email cleanup credits that you purchased and utilized as of now.
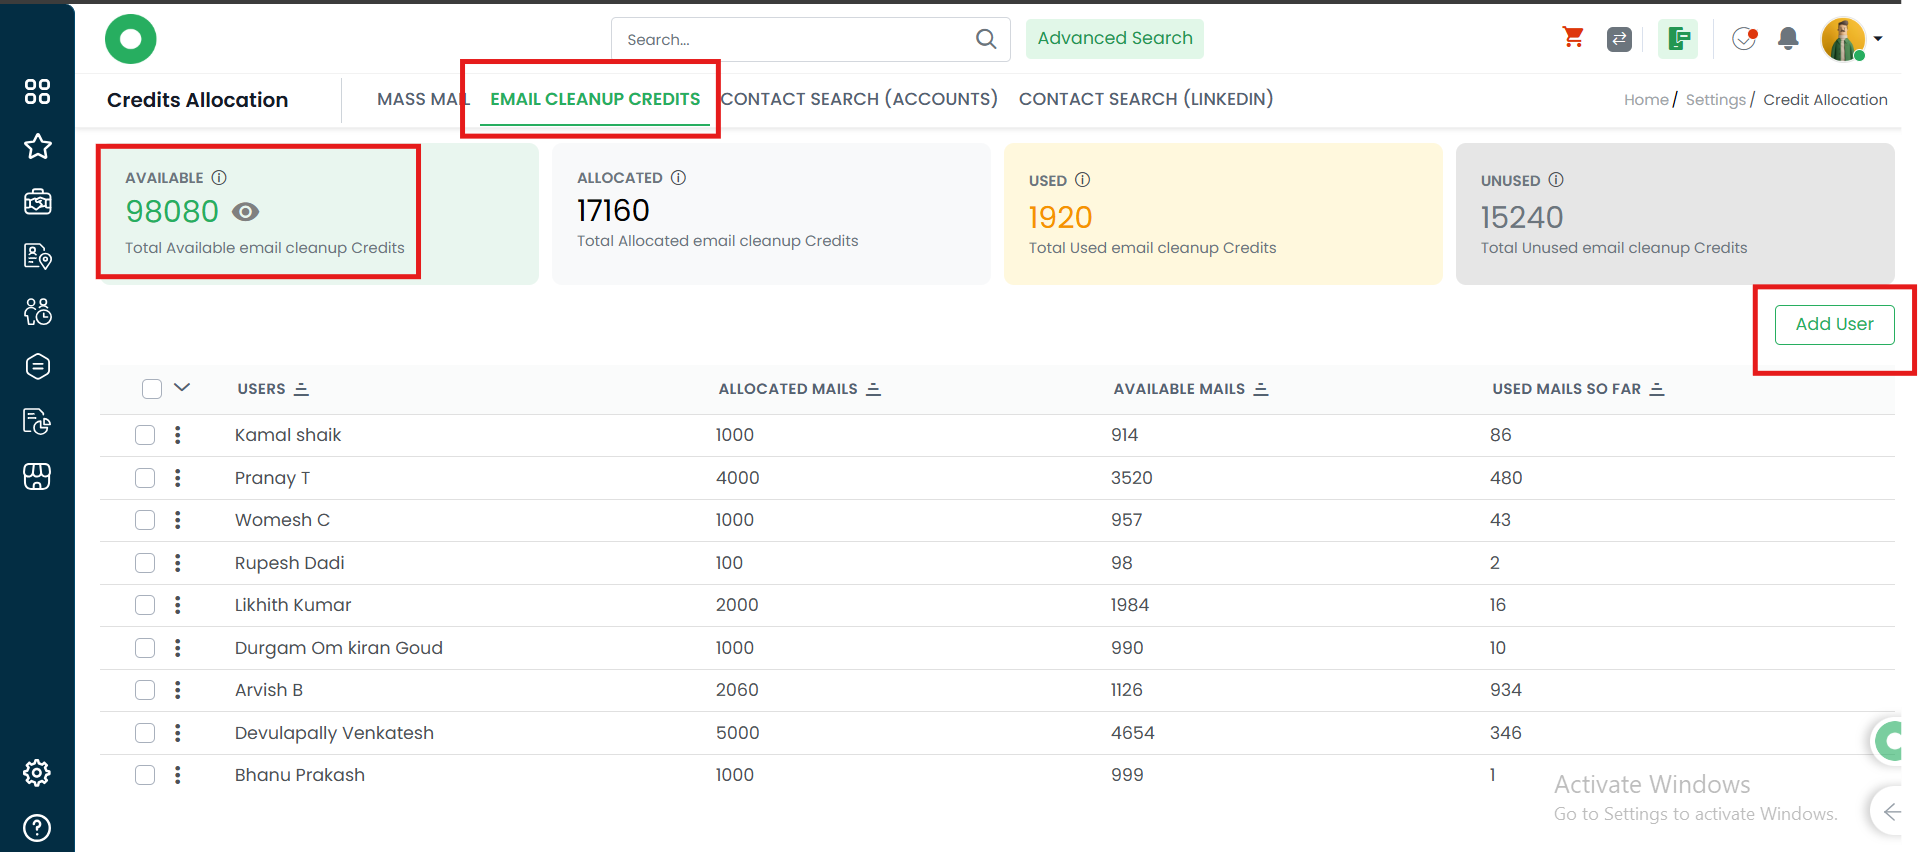
- Now click on Add User button on the top right corner to allocate credits
- It opens a popup to select the system user and enter the credits that you wish to add and click on Save
- Now the user will have these allocated credits in his account and he can be able to upload email cleanup credits and validate the list.
- You can also click on (Auto renew Credits) and add no of auto renew credits when the user has the no of credits below the no FOR Example :- if user have credits less than a particular number of credits system will automatically add the credits given in the auto renew credits field
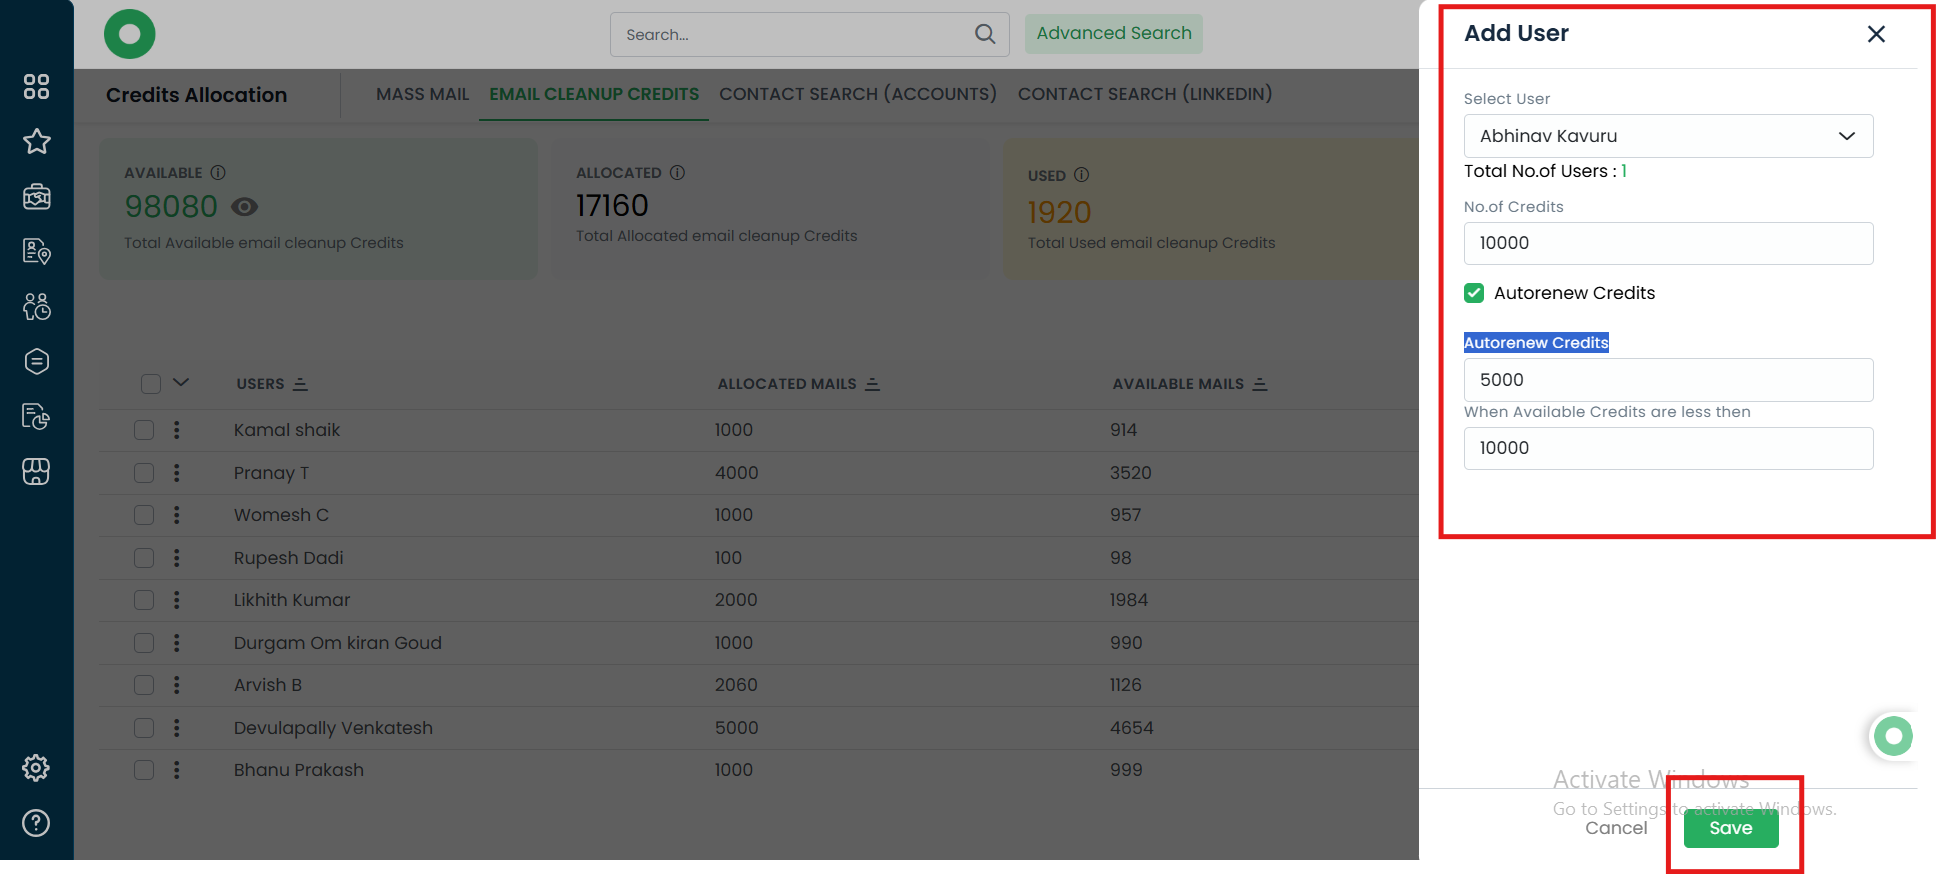
Was this article helpful?
You can assign the Email Cleanup credits to a user through the credit allocation page which allows the user to verify the emails before running campaigns like job shares, resume shares, sales campaigns.
Here is how you can do it:
- Log in to your Oorwin Account and navigate to settings page from the left bottom
- Go to Configurations on the left menu and click on Credit Allocation page which shows all the addons credit related information
- The Second tab shows you the available Email Cleanup credits Allocated/Used/Unused credit detail
- Now click on Add User button on the top right corner to allocate credits
- It opens a popup to select the system user and enter the credits that you wish to add and click on Save
- Now the user will have these allocated credits in his account and he can be able to upload and verify the vendor list.
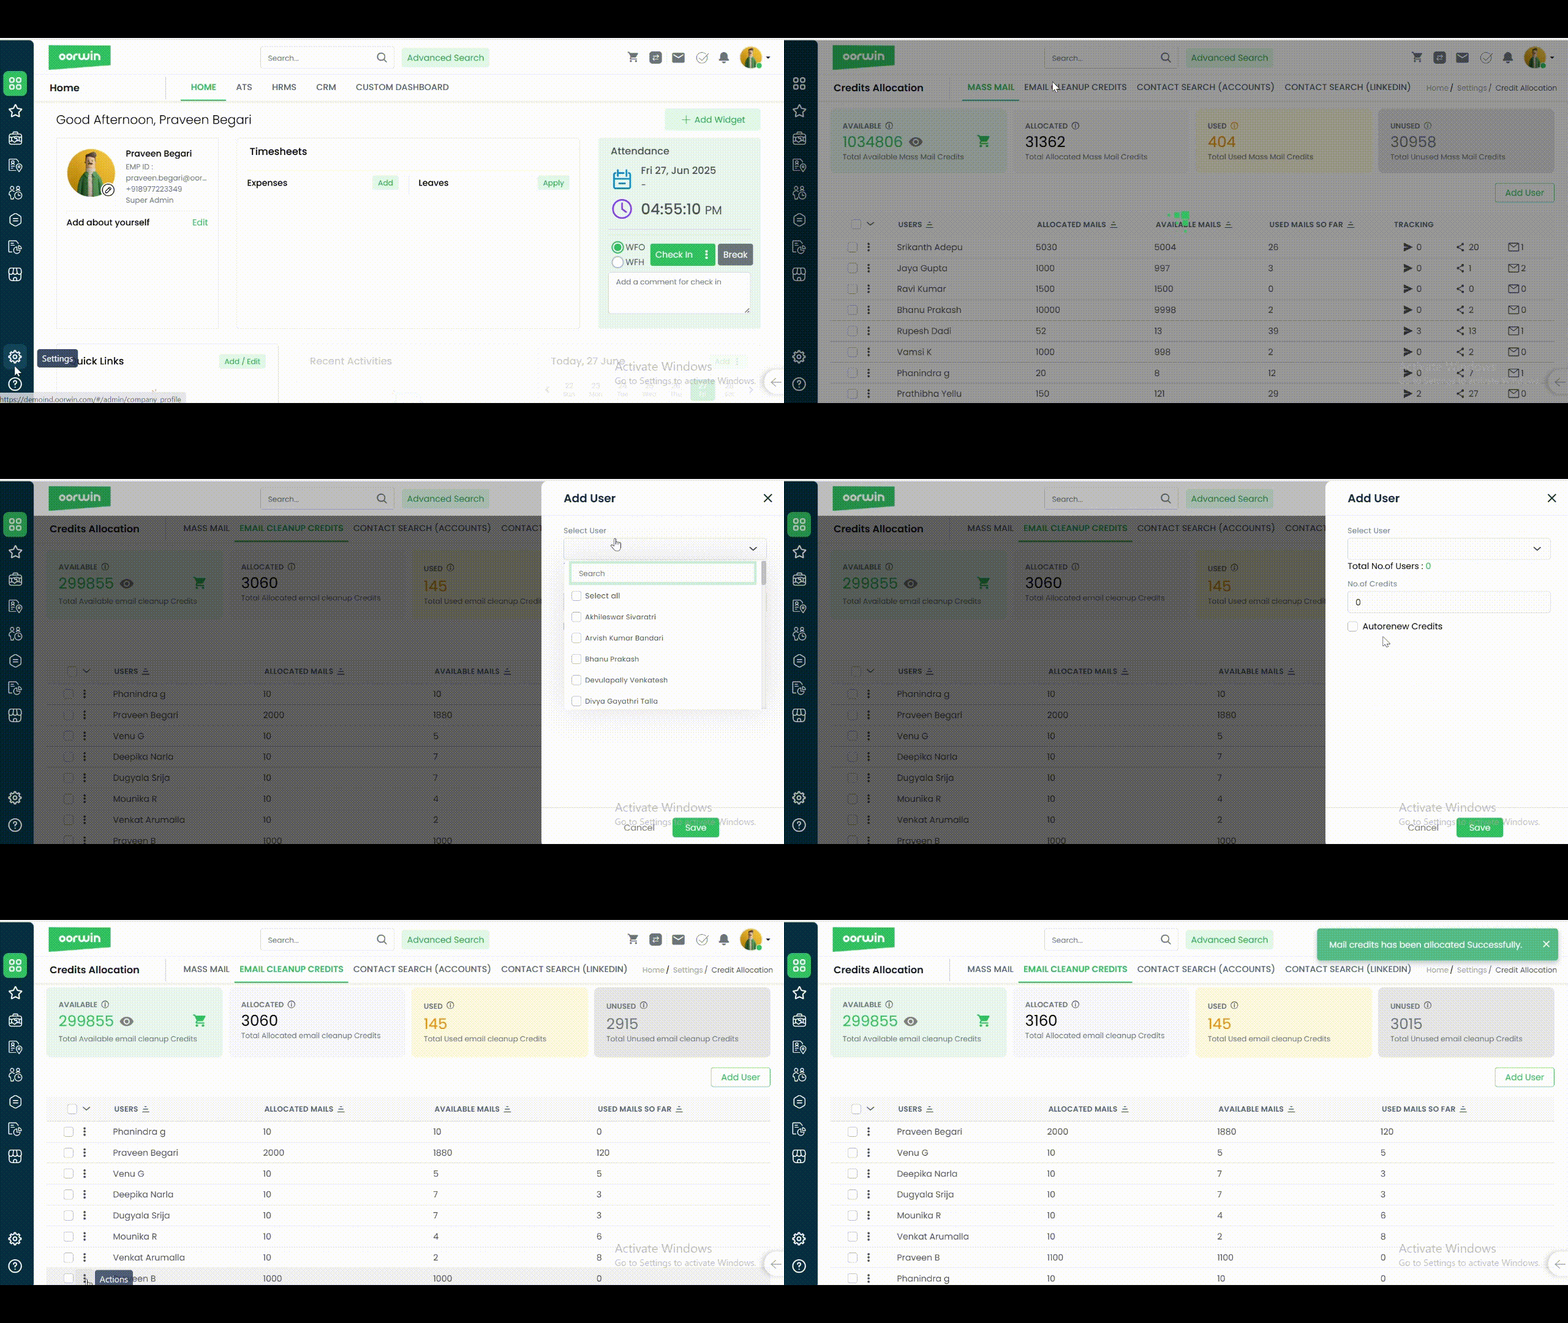
- Also there will be an option to auto allocate credits based on the condition “If available credits are less than the specified number” The system will automatically assign the credits to that user if the condition matches
Was this article helpful?
You can assign the mass mail credits to a user through the credit allocation page which allows the user to send all campaign related emails like job shares, resume shares, sales campaigns,etc
Here is how you can do it:
- Log in to your Oorwin Account and navigate to settings page from the left bottom
- Go to Configurations on the left menu and click on Credit Allocation page which shows all the addons credit related information
- The first tab shows you the available mass mail credits that you purchased and utilized as of now

- Now click on Add User button on the top right corner to allocate credits
- It opens a popup to select the system user and enter the credits that you wish to add and click on Save
- Now the user will have these allocated credits in his account and he can be able to send mass emails and run campaigns etc

- Also there will be an option to auto allocate credits based on the condition “If available credits are less than the specified number” The system will automatically assign the credits to that user if the condition matches
Was this article helpful?
You can configure the Configure interview reminders and which will automatically trigger the reminders to the candidates and organizer whenever interviews are scheduled.
Here is how you can Configure interview reminders
- Log in to your Oorwin Account and navigate to settings page from the left bottom
- Go to Configurations on the left menu and click on Default Settings module
- Now go to interview on the left menu and you can configure reminders ( Send reminder for Interviewer/candidate/Organizer.
- You can also configure reminder for Feedback mail for Interviewer.
- Once you configure and Reminders & Feedbacks and click on save.
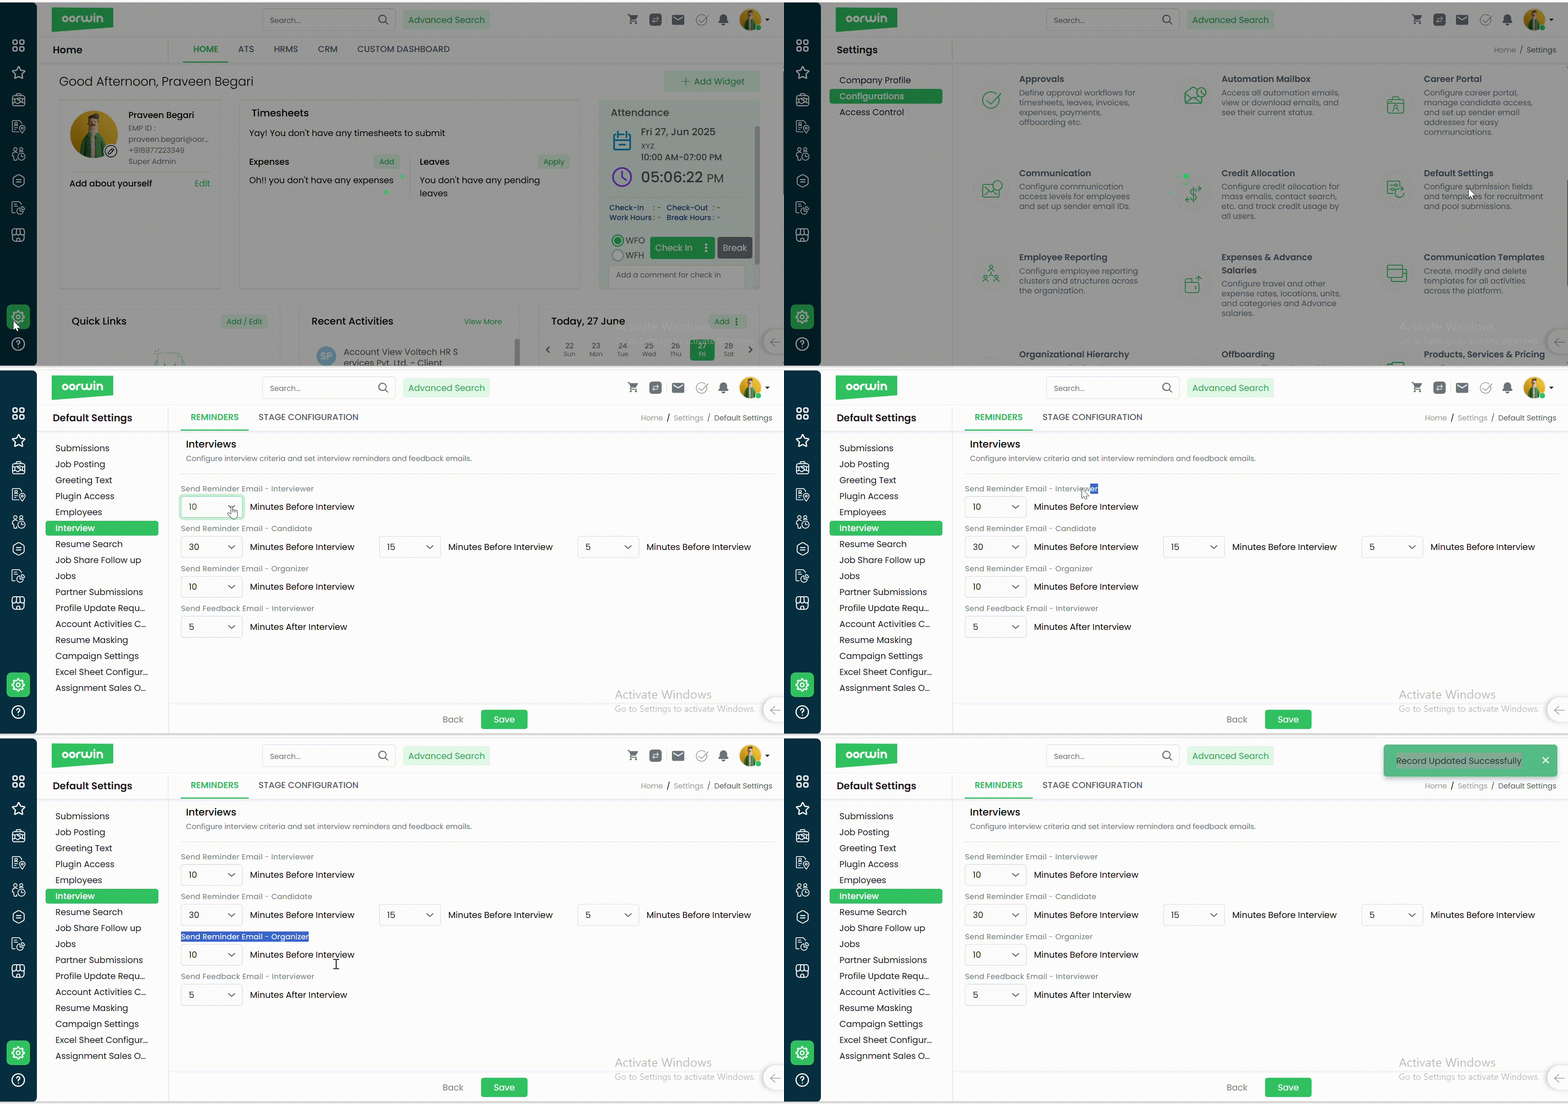
Was this article helpful?
Awarding Leave Credits:
To award leave credits, users can do so from two areas:
- Navigate to Menu -> HR -> Attendance -> Leaves -> Leave credits -> Award Leave credit. This will prompt a pop-up allowing users to select an employee from the list of employees who report to them, or all employees if they have Admin (HR Admin or Super Admin) access. This can also be done directly from the Attendance section.
- Navigate to Menu -> Employees -> Open Desired Employee -> Open Leaves tab -> Leave credits -> Award Leave credit. This method is useful if you prefer to open a specific employee record and then award the credits.
Both methods serve the same purpose: to award leave credits.
Follow the steps below after navigating to the mentioned areas:
- Select the desired employee.
- Choose the Leave Type (only leave types configured as mentioned above and existing in the leave policy will be displayed).
- Specify the number of Days (ensure it does not exceed the maximum number of credits configured).
- Enter the Reason.
- Confirm.
- The credits will be added to the employee.
An email notification will be triggered to the employee, along with the mentioned reason.
Both users and employees can view the newly awarded leaves in the Leaves section with the source indicated as “awarded”. To view this, navigate to Menu -> Employees -> Open Desired Employee -> Open Leaves tab -> Click on View All -> Expand the Leave type -> check your leaves here.
Was this article helpful?
You can change/Customize your logos in your account with your company logo.For this you need to have a super admin access to update these details through settings.The company branding and icons uploaded here will be used in mail Communications, publishing jobs in boards and social media.
Here is how you can do it
- Log in to your Oorwin Account and navigate to settings page from the left bottom
- It opens the company profile page with multiple sections in it
- Click on branding section under company profile page
- It opens the logos section of your company and social media posting logos
- Click on browse and upload your company logo for both company logo and social logo
- Now click on save on the bottom and your company logo has been updated in the system

Was this article helpful?
Here is how you can change the lead status
- Go to Leads module from the left menu under CRM Section
- Click on lead name for any lead to whom you want to change the status
- It navigates to lead view page and on the top you will have all the statuses displayed
- Click on any status that you wanted to move and the status will get changed
Note: You can also drag and drop the lead from one stage to another stage in the grid view
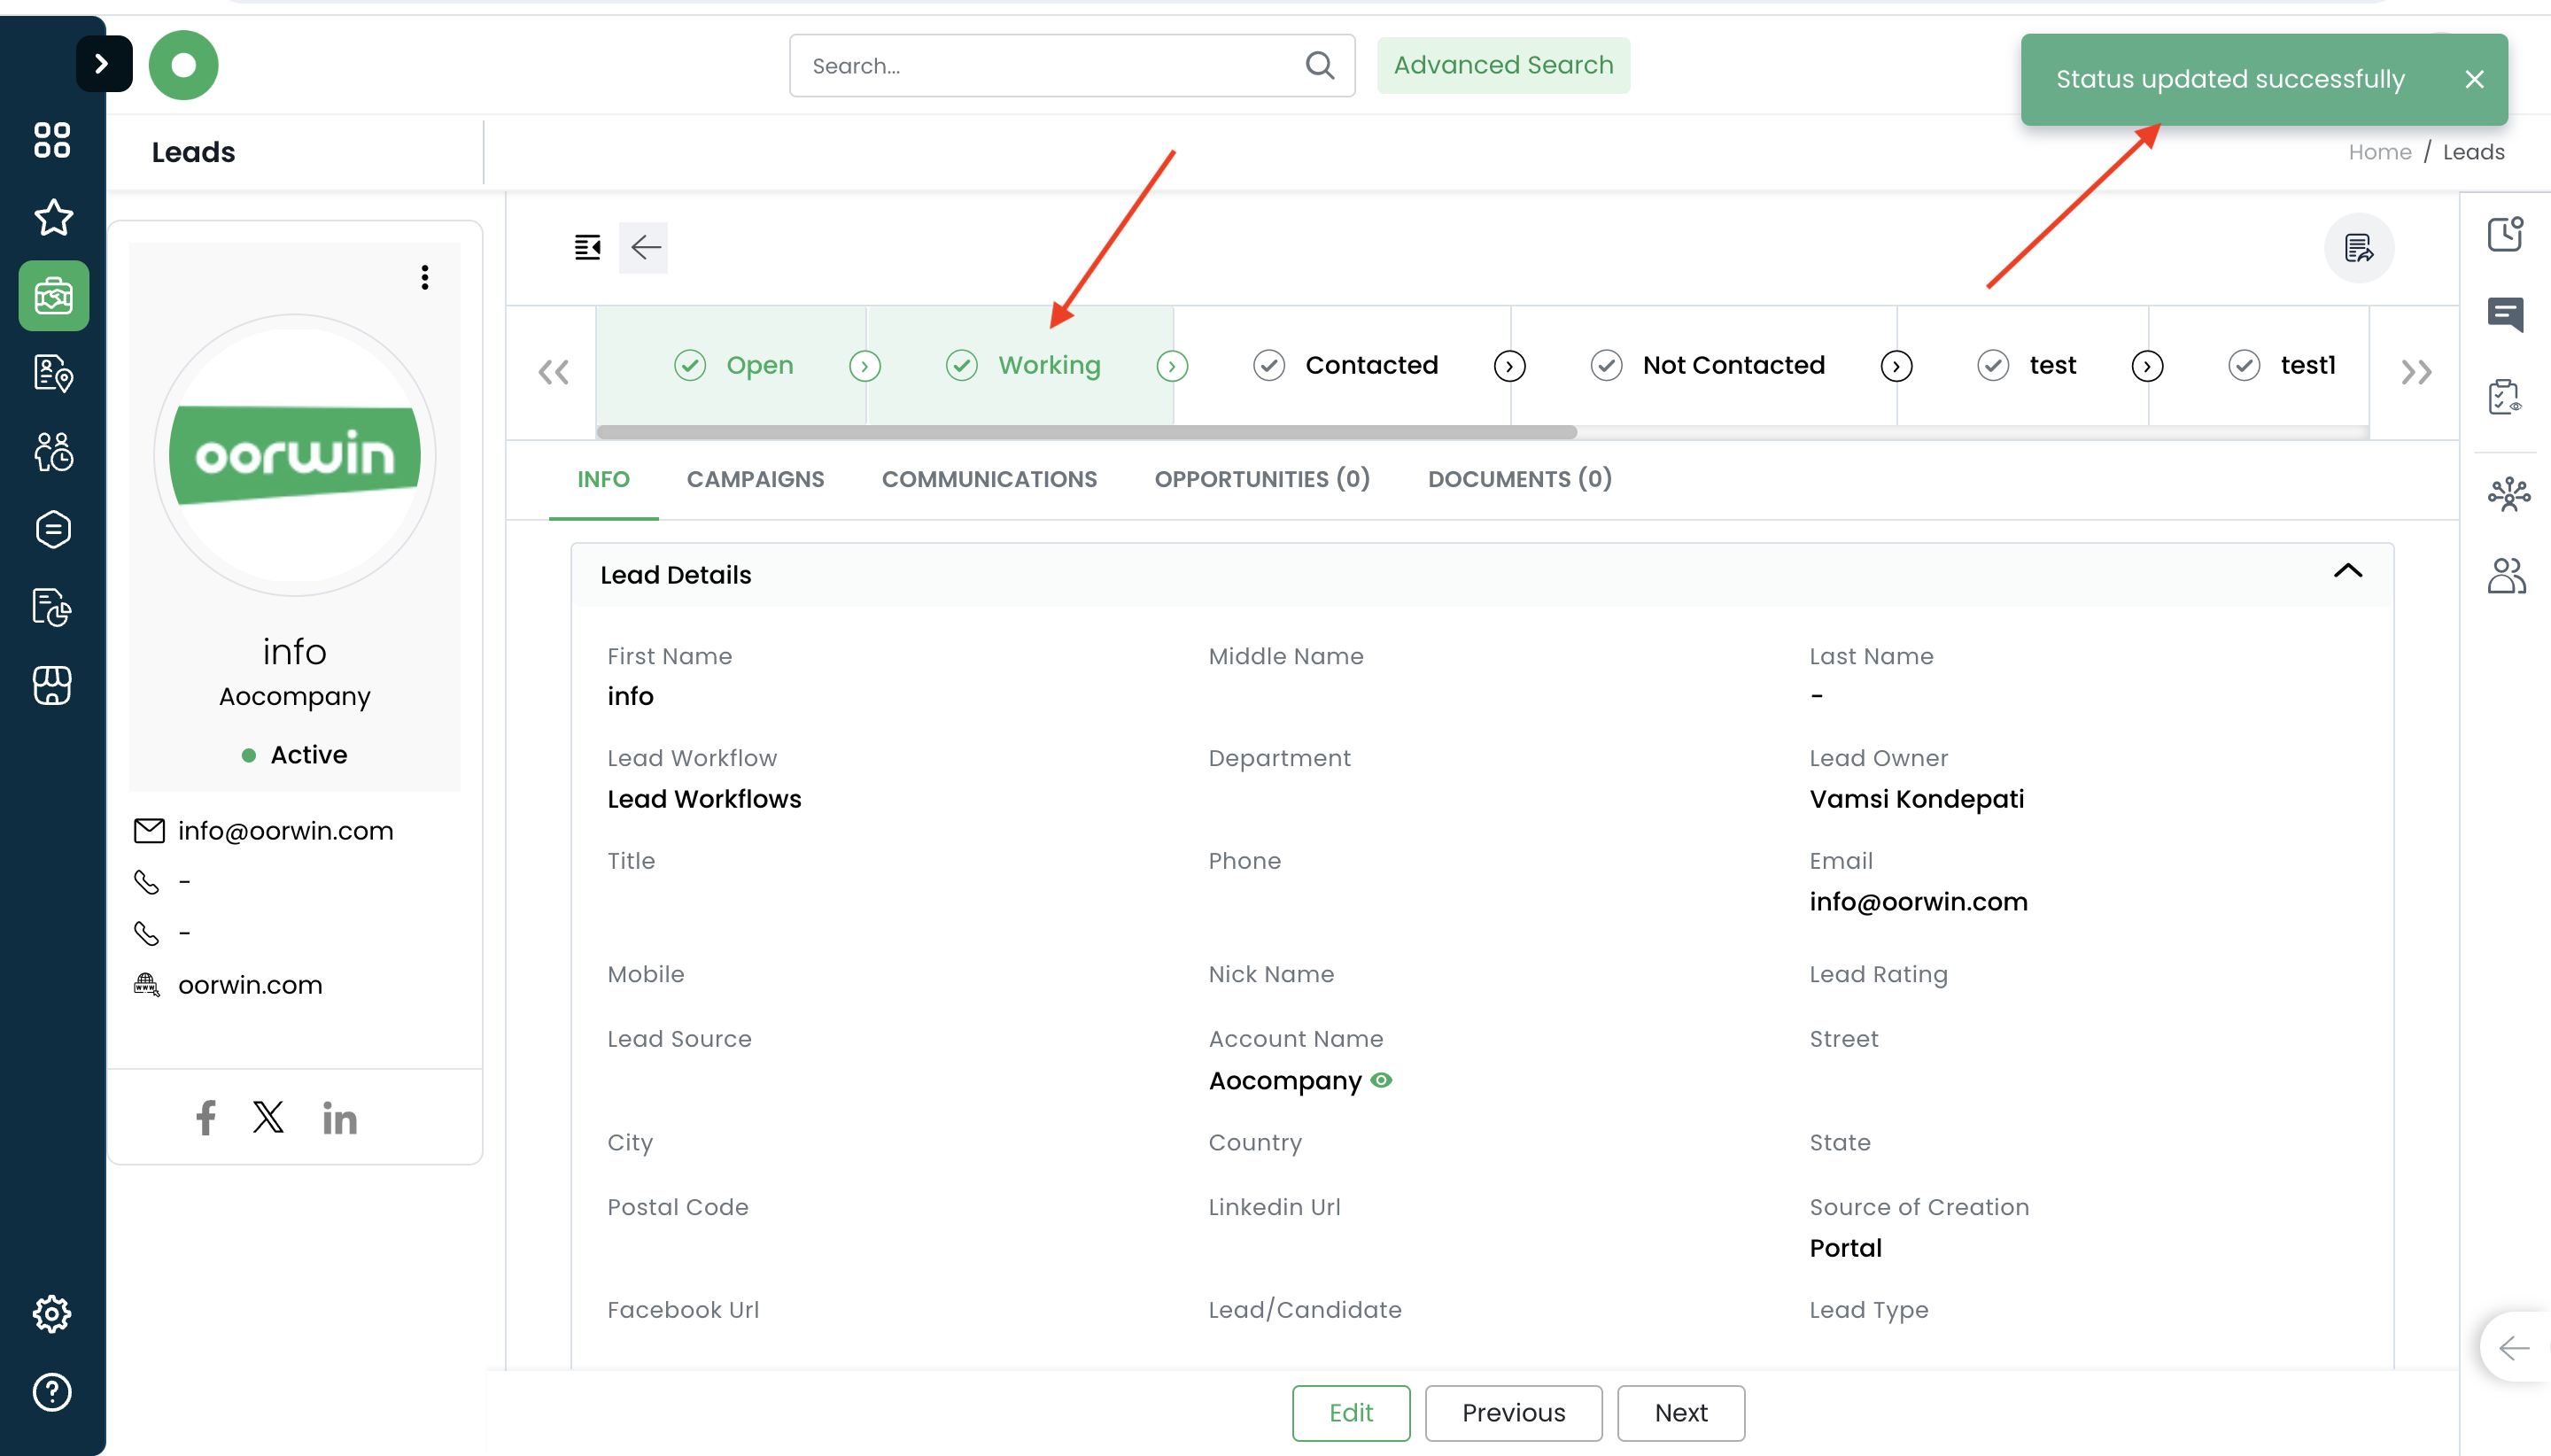
Was this article helpful?
Here is how you can change the Opportunity status
- Go to Opportunities module from the left menu under CRM Section
- Click on Opportunity name for any opportunity to whom you want to change the status
- It navigates to opportunity view page and on the top you will have all the statuses displayed
- Click on any status that you wanted to move and the status will get changed
Note: You can also drag and drop the opportunity from one stage to another stage in the grid view
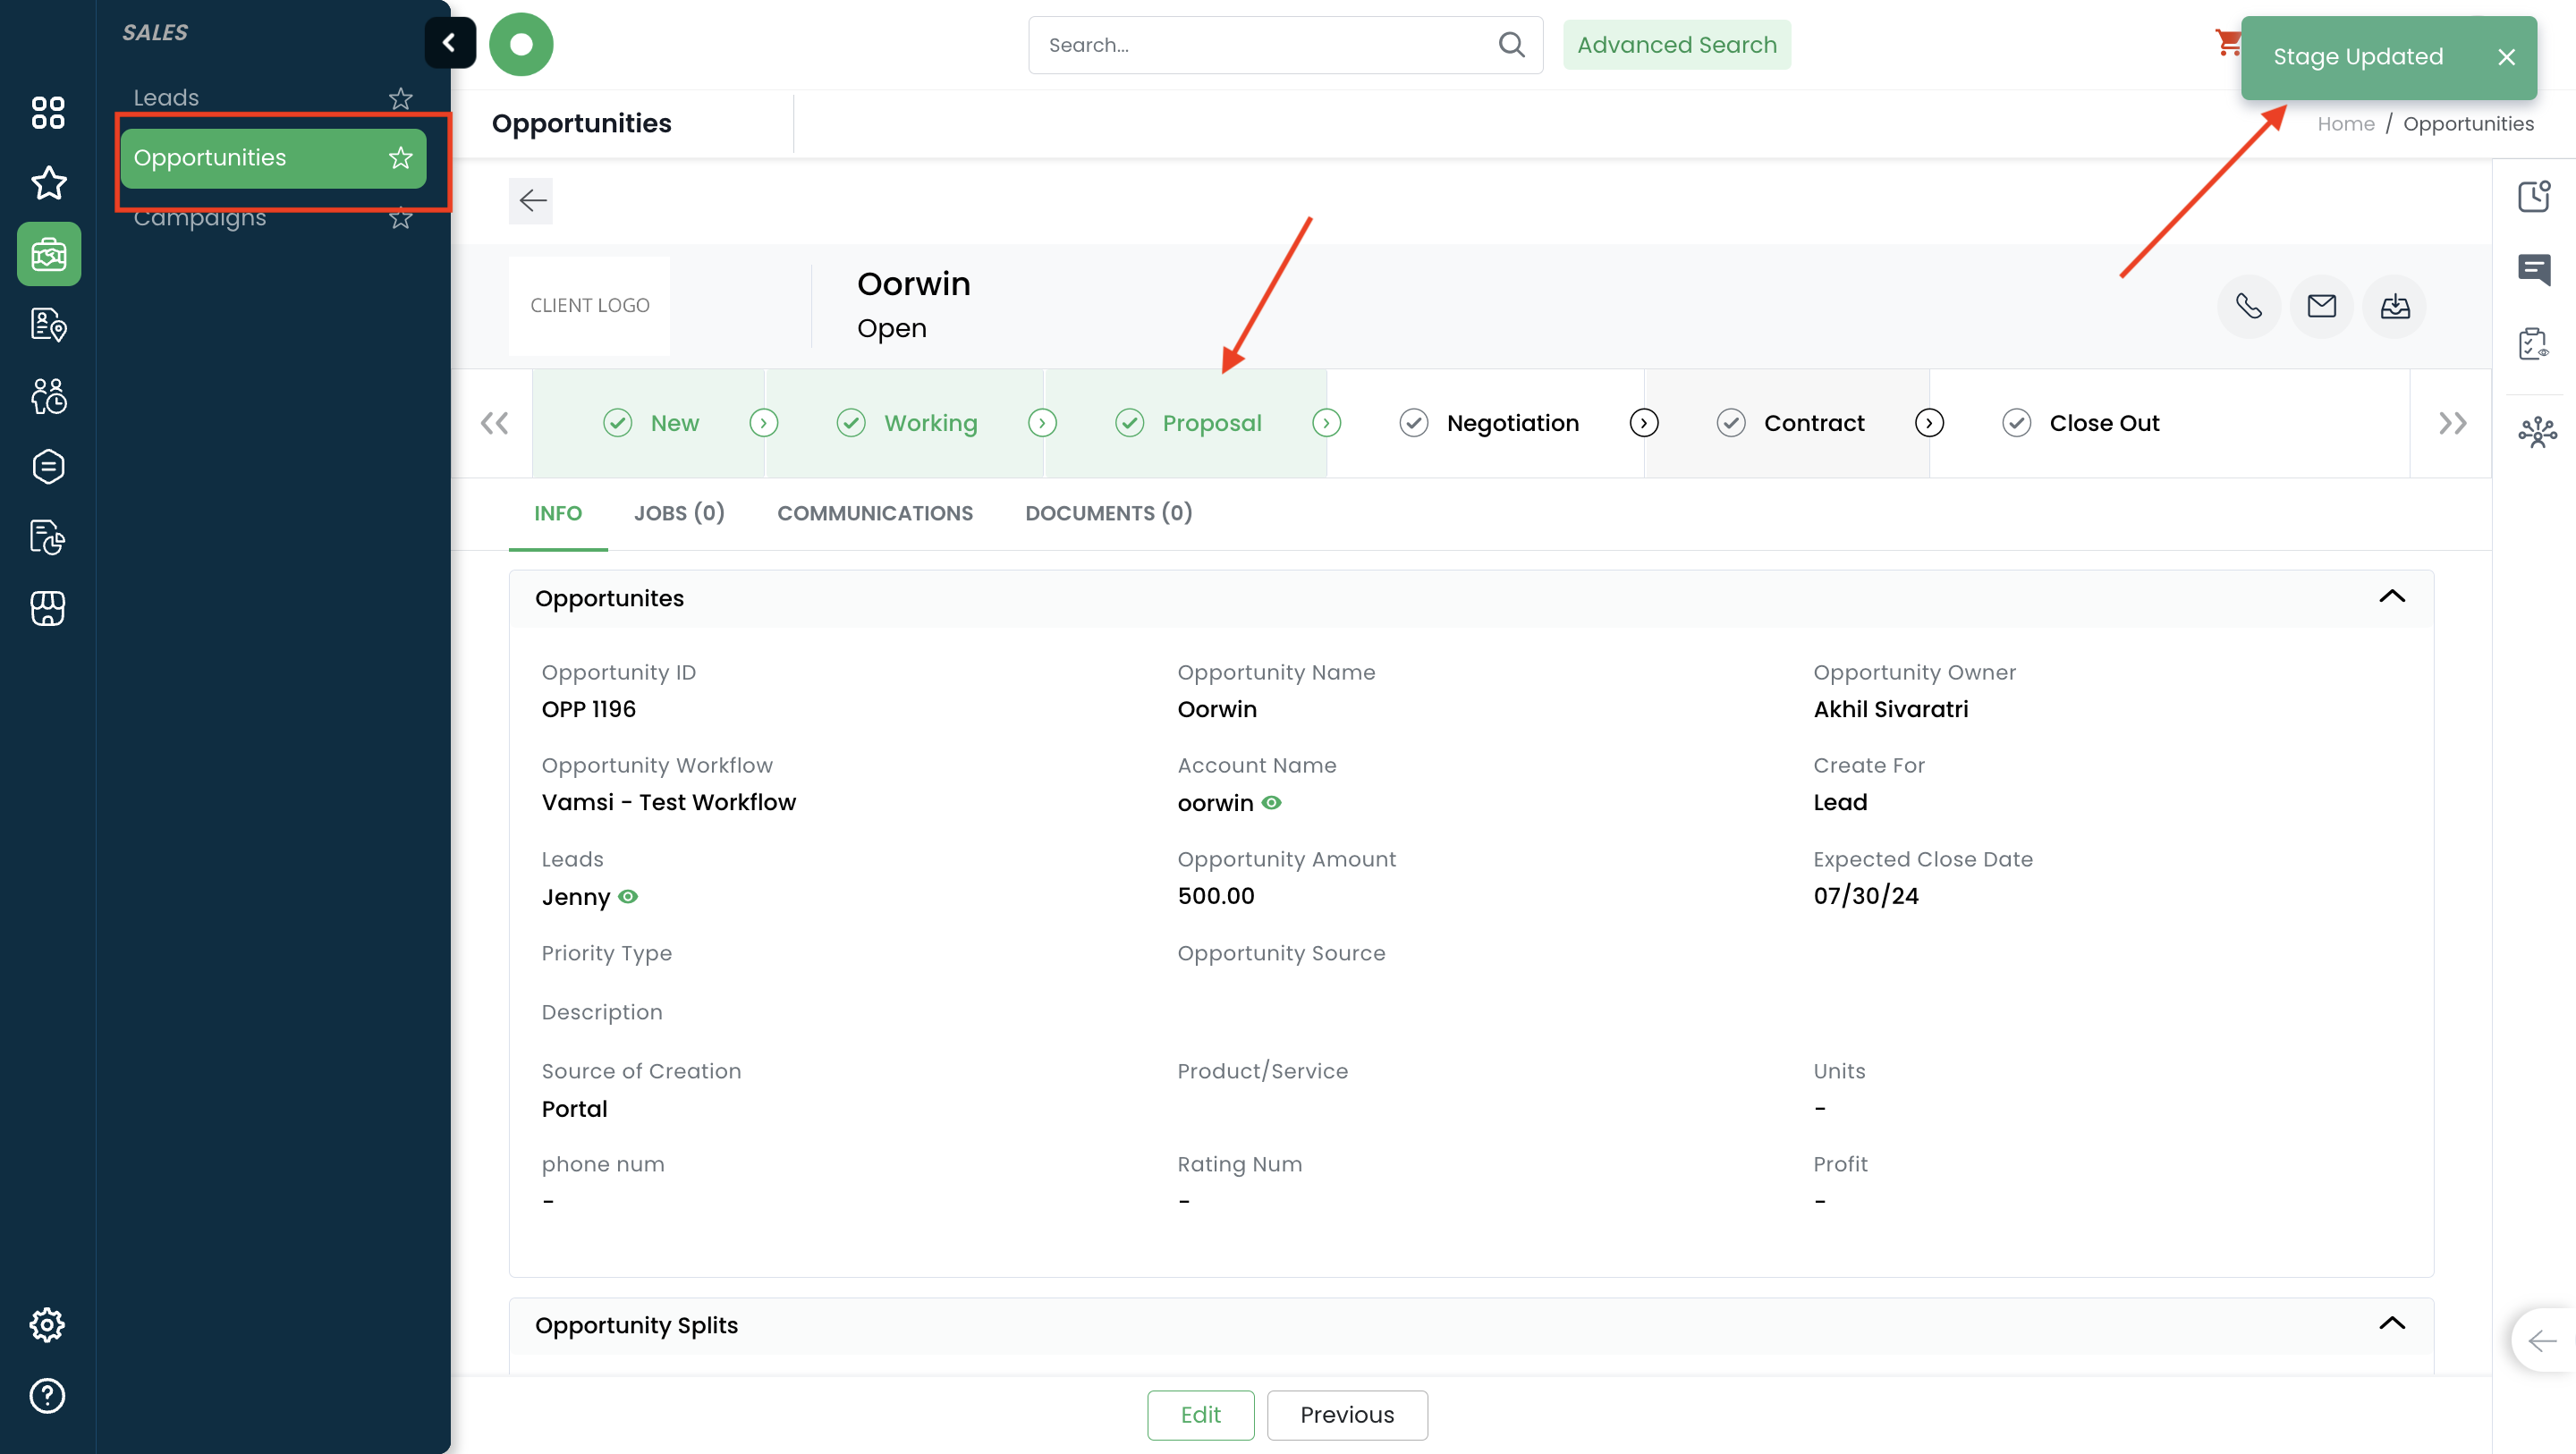
Was this article helpful?
You can update the company timezone and date formats through settings->company profile->locale information details section where these details would reflect throughout the application. The country of operation cannot be changed once configured in sign up.
Here is how you can do it:
- Log in to your Oorwin Account and navigate to settings page from the left bottom
- It opens the company profile page with multiple sections in it
- Click on Locale Information section under company profile page
- Change the date format as you needed from the date format field and time format can be selected as 24/12hr format
- Time zone can be changed through the timezone field based on your business working location
- Now click on Save on the bottom and all the details were updated in the system

Was this article helpful?
To change/manage the invoice template, please follow the below steps
- Navigate to assignments
- Click on Invoice information
- Click on invoice template and select the invoice module and click on save to update the records
Was this article helpful?
Define and configure the default follow-up campaign to automate and streamline post-campaign interactions. This feature ensures timely and consistent follow-ups, improving engagement and maintaining momentum throughout the campaign lifecycle.
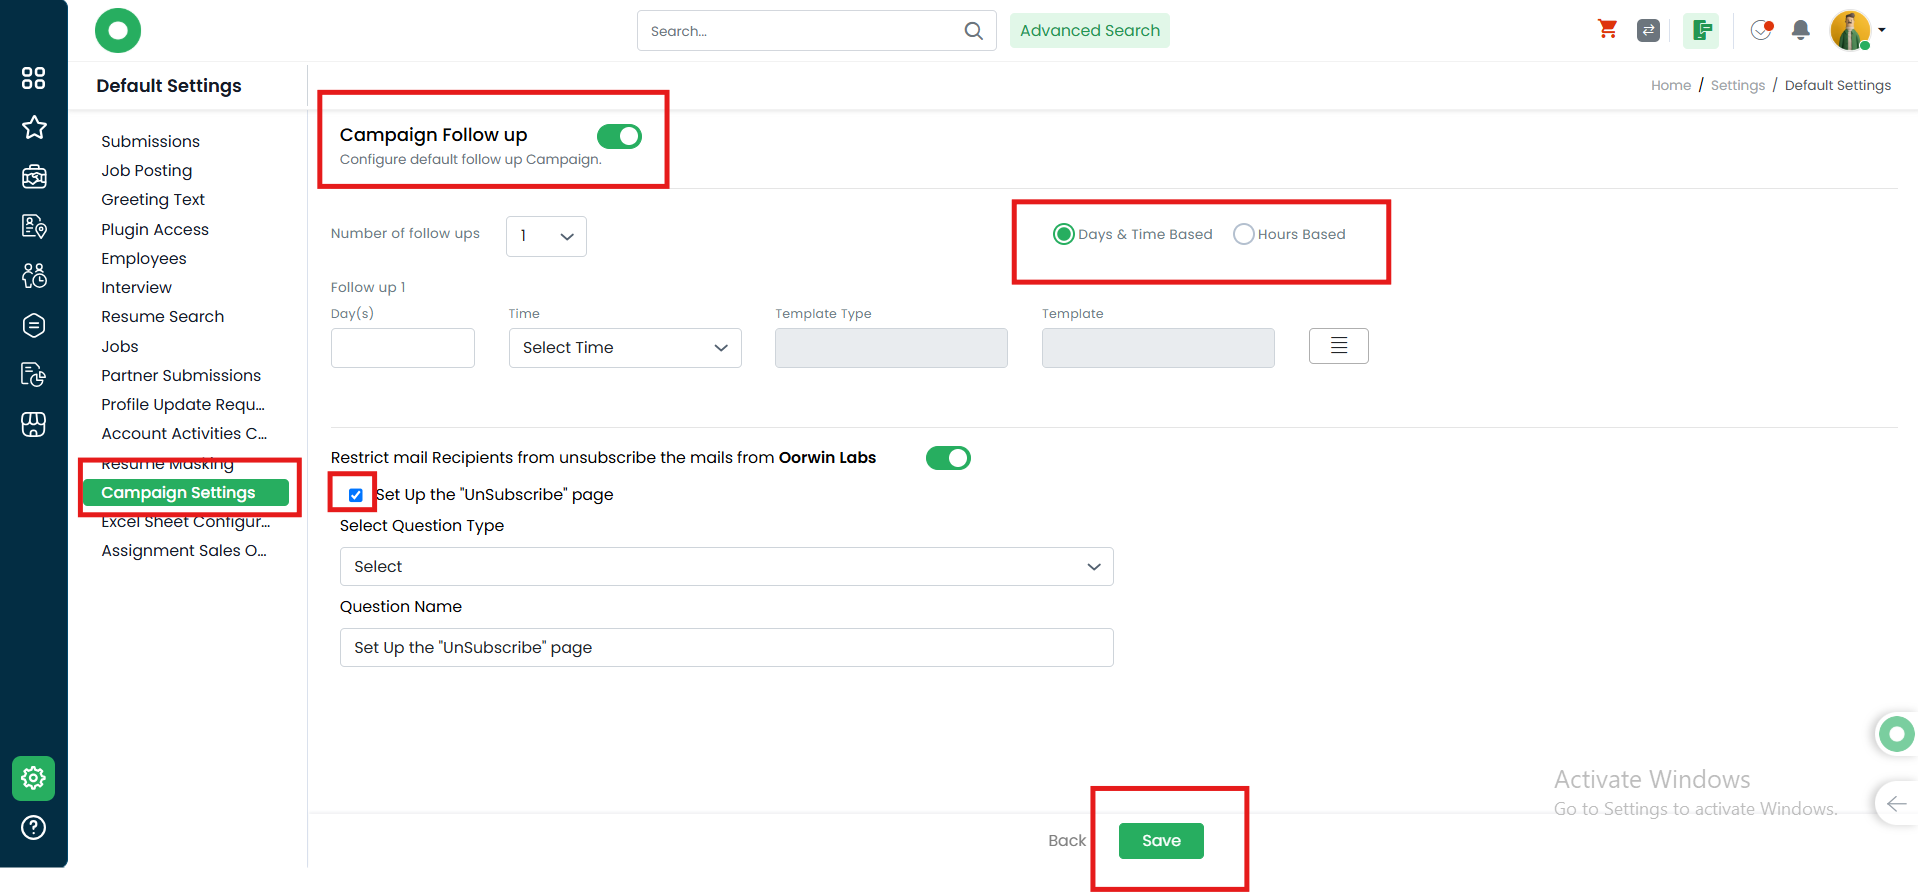
To configure the default follow-up campaign, please follow these steps:
- Navigate to Settings:
Go to Settings → Configuration → Default Settings. - Access Campaign Follow-up Settings:
- Click on Campaign Follow-up and enable the feature.
- Define Follow-up Parameters:
- Select the Number of Follow-ups.
- Choose the Follow-up Configuration settings, including Days, Time, and Template.
- Manage Unsubscribe Settings:
- Enable the option to Restrict mail recipients from unsubscribing from Oorwin Labs emails.
- Set Up the Unsubscribe Page:
- Click on Set Up the “Unsubscribe” Page.
- Select the Question Type and Question Name as per your requirements.
These configurations help automate and manage the follow-up process, ensuring effective communication and compliance with unsubscribe preferences.
Was this article helpful?
Oorwin provides a comprehensive selection of job board integrations, enabling you to efficiently search for candidates and publish job listings across multiple job boards directly from the Oorwin platform. This integration streamlines recruitment efforts, ensuring broader visibility and a more seamless hiring process.
To configure job board integrations, follow these steps:
- Navigate to the Marketplace:
Go to Menu → Marketplace. - Select Job Boards:
Click on Job Boards and choose the desired job boards for integration. - Configure Accounts:
- Click on Accounts.
- Select either Resume Search or Job Postings depending on your requirement.
- Enter the necessary user details.
- Add User to the Account:
- Once the account is configured, select the account and click on Add User.
- Assign credits, set the duration, enable access, and click Save.
This process allows you to seamlessly integrate job boards, manage user access, and configure job posting or resume search functionalities.
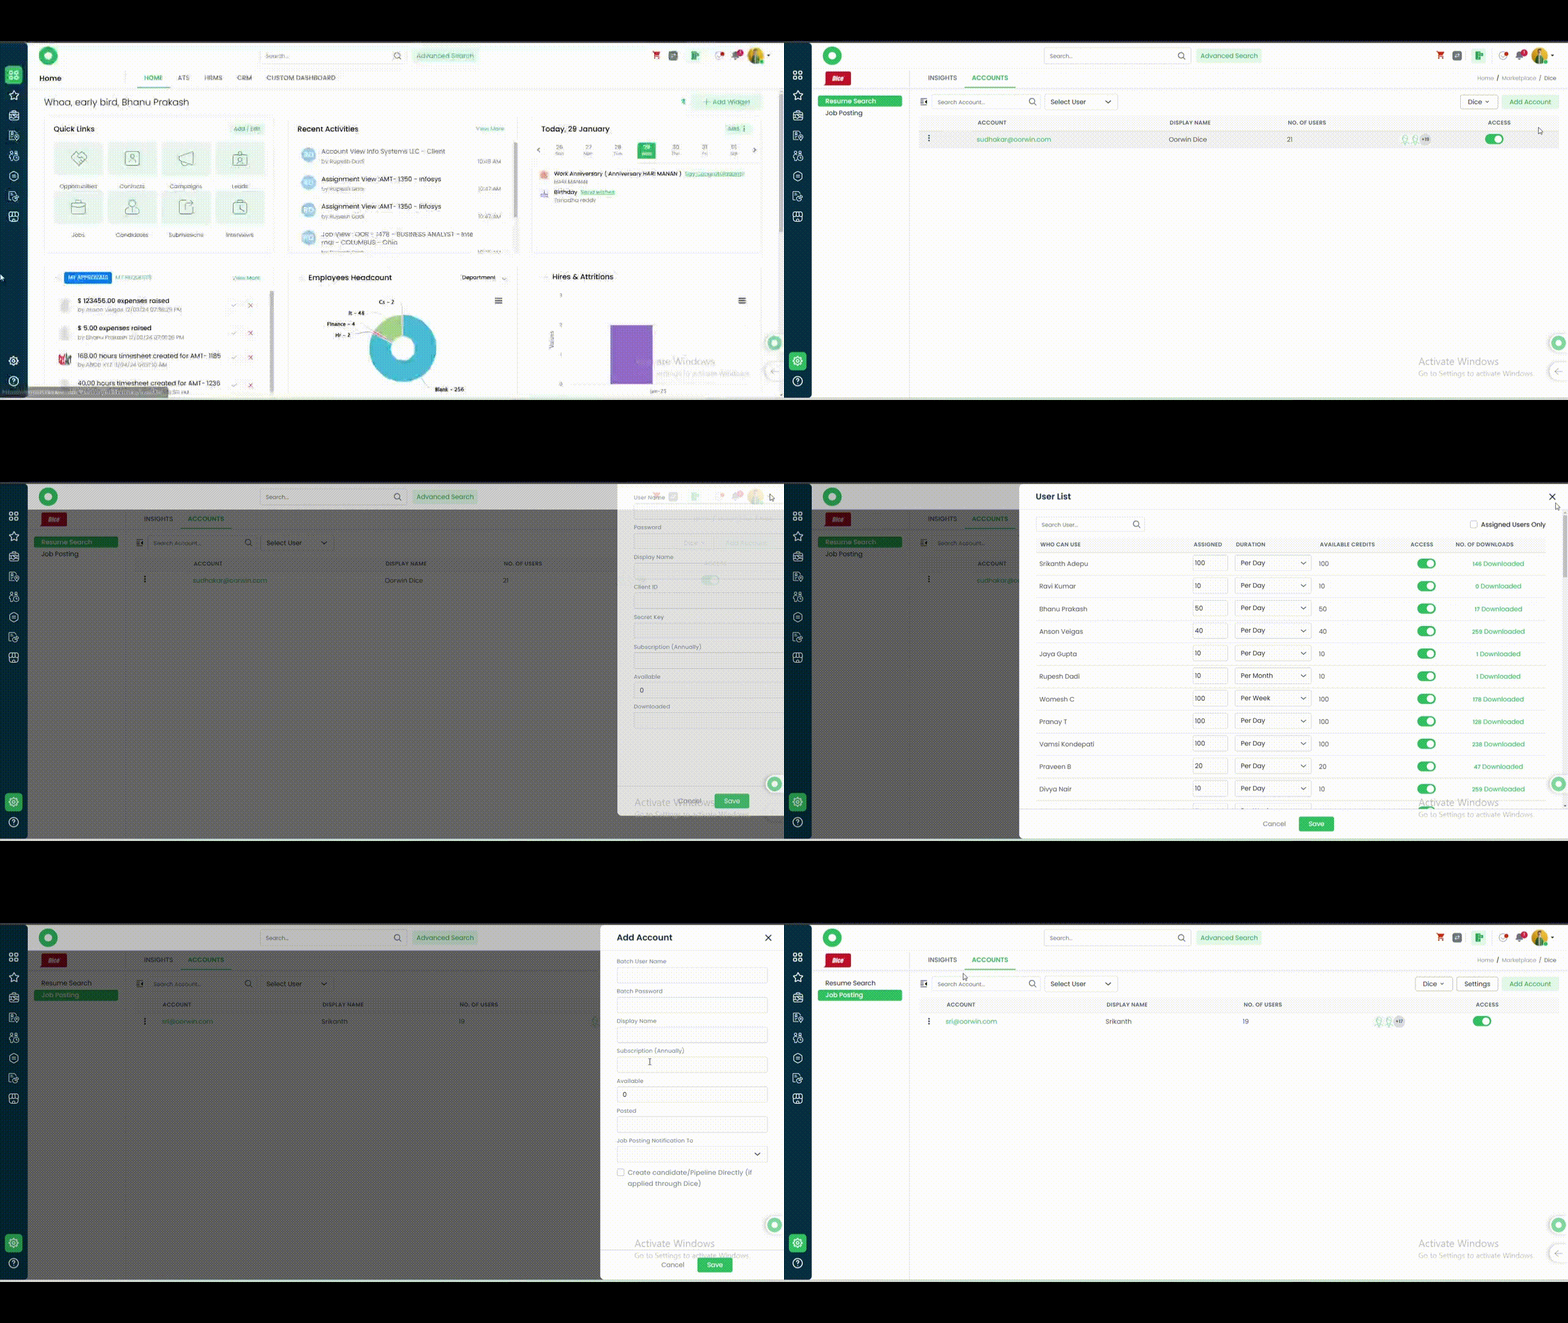
Was this article helpful?
In this blog, lets see how to configure Job Grabber settings
- Go to “Settings > Configurations > Harvesting”
- Click on “Jobs”
- You will find “Harvesting Frequency” section with the following two fields
- Time Zone:
- System will show multiple time zones and you should select one and only one-time zone
- Time:
- System shows multiple times
- You can select up to six times
- You can select the job boards that should be selected by default by the system for both “Job Search Agent” and “Instant Job Search Agent”
- Click on “Save” to save the settings
- Time Zone:

Was this article helpful?
Partner Login Configuration
To configure Partner Login settings, follow these steps:
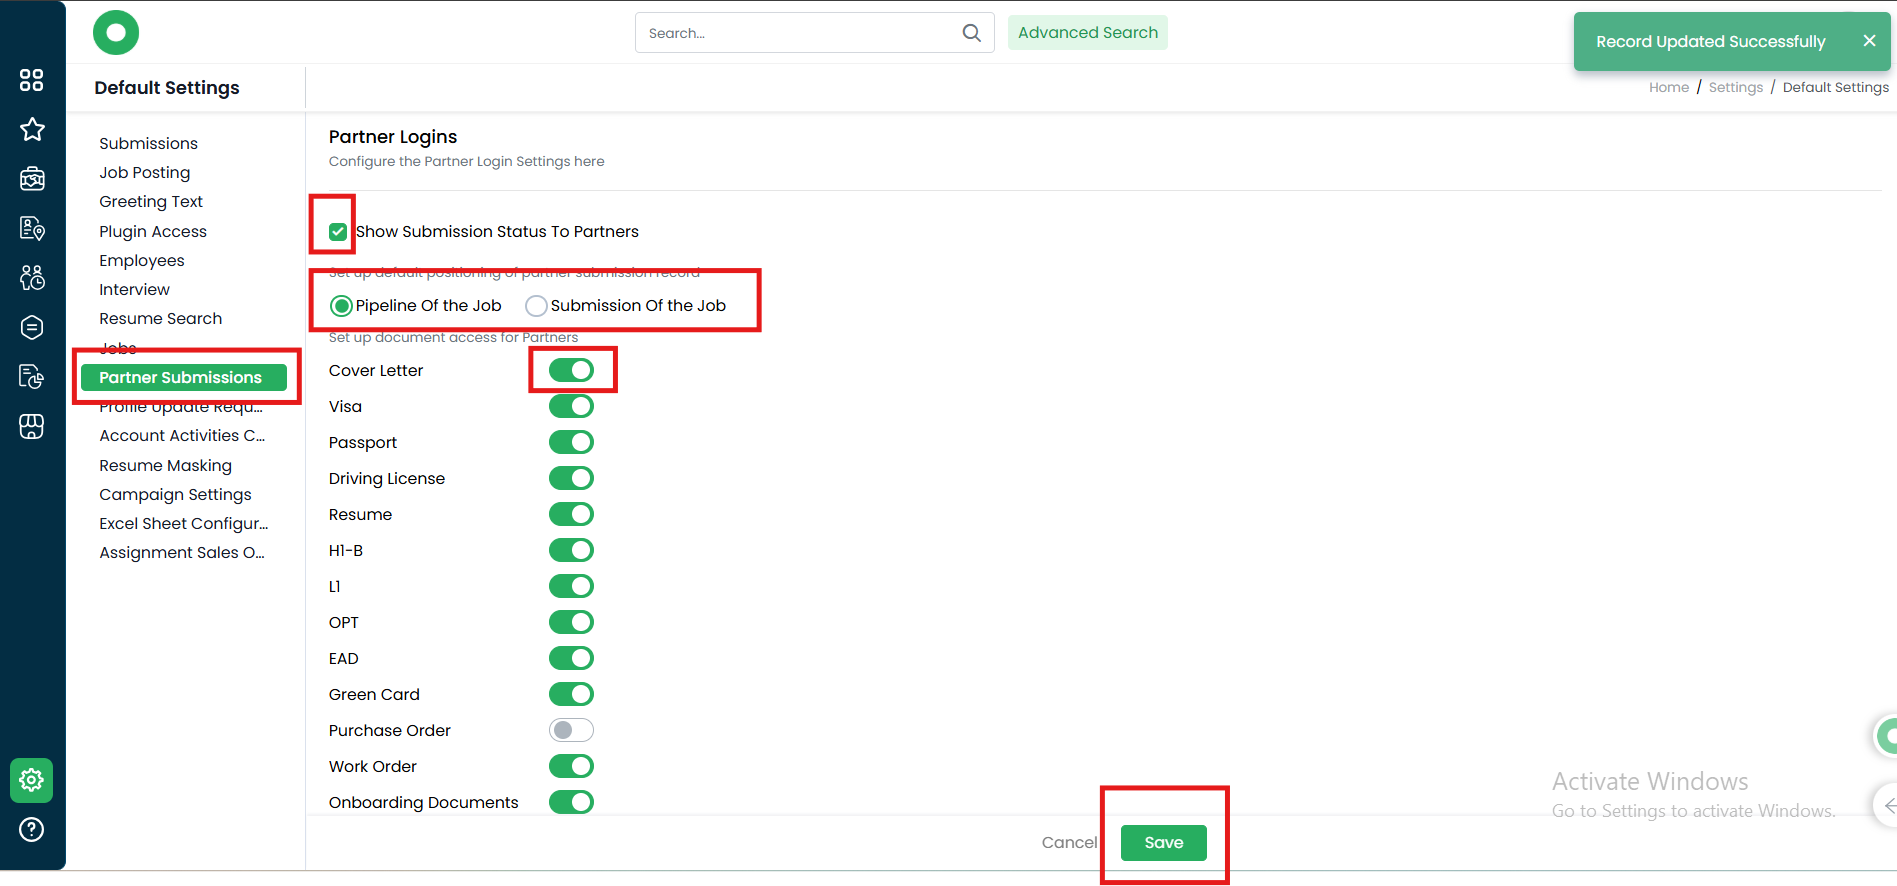
- Navigate to Settings:
Go to Settings → Configuration → Default Settings. - Enable Submission Status for Partners:
- Click on Show Submission Status to Partners to enable this option.
- Configure Document Access for Partners:
- Set document access for partners in the following areas:
- Pipeline of the Job
- Submission of the Job
- Set document access for partners in the following areas:
These settings allow you to manage partner access to relevant job-related documents and submission statuses, enhancing collaboration and transparency.
Was this article helpful?
Define and configure default settings for Profile Update Requests to streamline and standardize updates for employees, candidates, and the resource pool.
These settings enable efficient management of profile updates, ensuring consistency across different user groups while maintaining data accuracy and compliance.
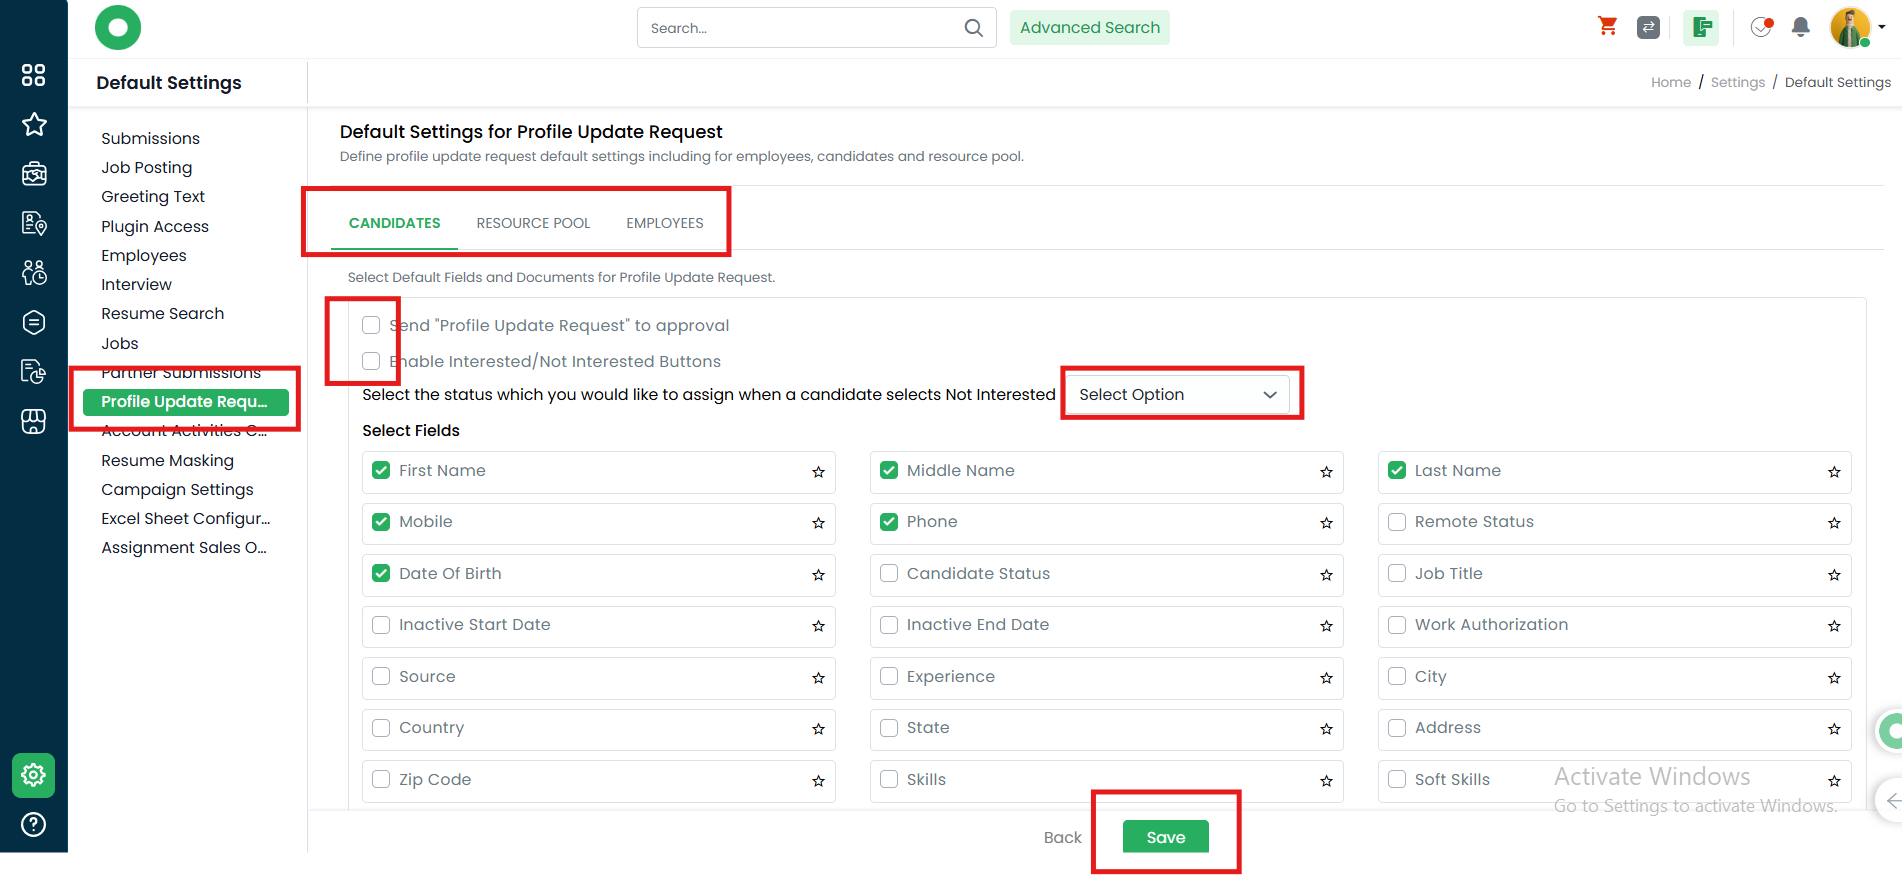
To configure the profile update request settings, follow these steps:
- Navigate to Settings:
Go to Settings → Configuration → Default Settings. - Configure Candidate Settings:
- Click on Candidates and select Manage to add the required fields.
- Set Profile Update Request Options:
- Choose the option to Send “Profile Update Request” to approval.
- Enable the Interested/Not Interested buttons for candidate interactions.
- Configure Status for Not Interested:
- Select the status you would like to assign when a candidate selects Not Interested.
- Click on save to update the records.
These configurations allow you to effectively manage profile update requests and candidate responses, ensuring a smooth and consistent workflow.
Was this article helpful?
How to Configure Public Access File (PAF):
- Navigate to Main Menu
- US Immigration
- Case Management
- Settings
- Templates
- Add Template
- Select Document & Name it
- Design and Save
- Navigate to Public Access File
- Check this new Template
- Save
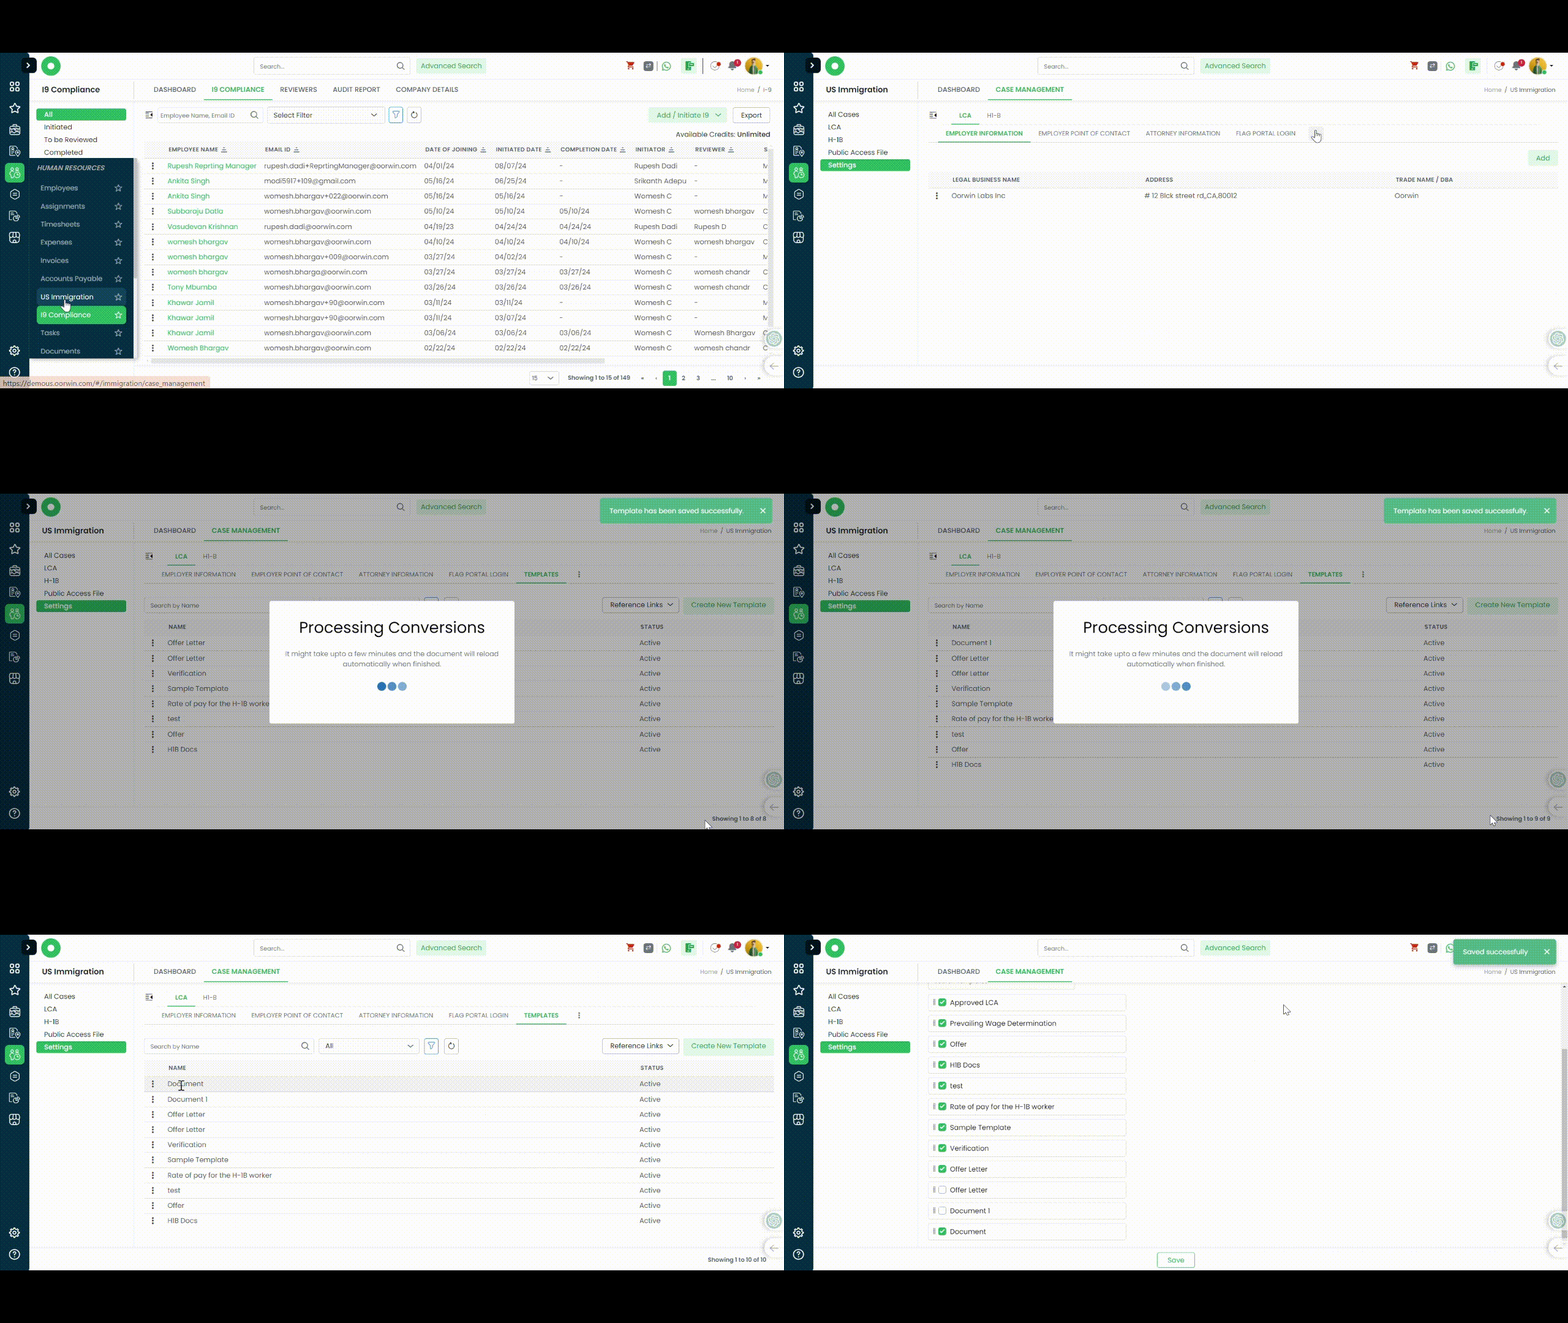
Was this article helpful?
The interview module enables organizations to streamline and manage the interview process effectively. You can configure interview criteria, set automated reminders, and manage feedback emails to ensure a structured and efficient workflow.
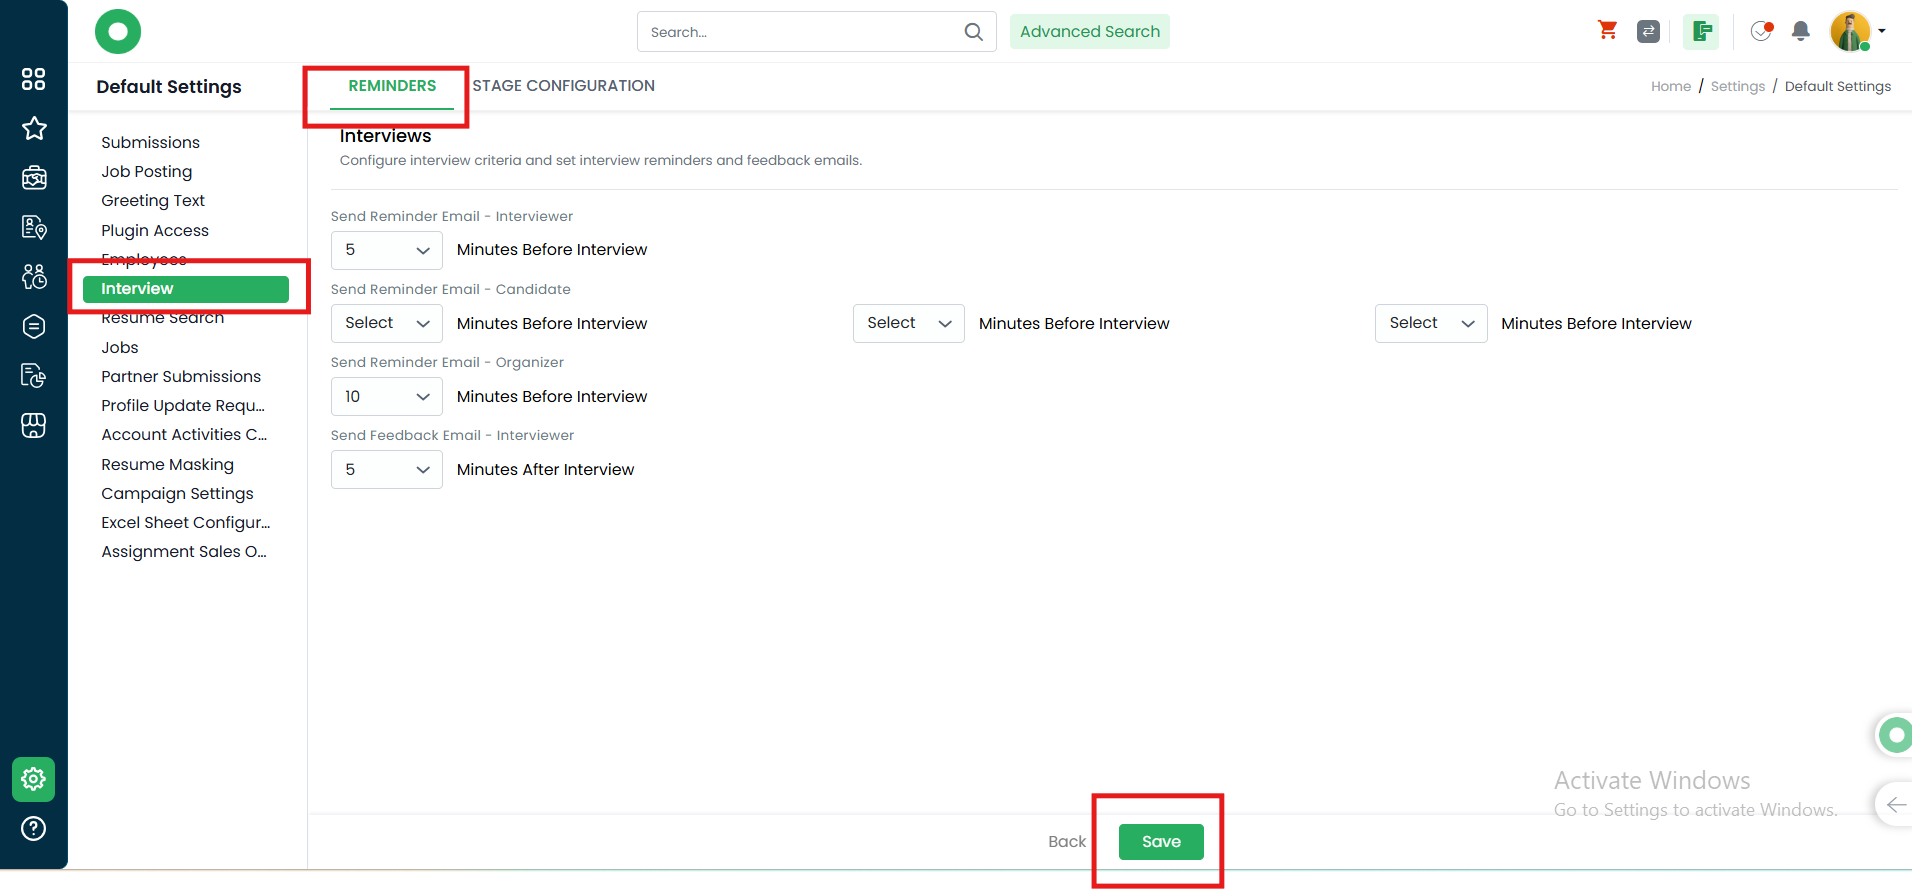
-
Configurable Email Reminder and Feedback Settings
Below are the configurations that can be managed for interview-related communications:
- Email Reminders to Interviewer:
Set the timeline to send automated email reminders to the interviewer before the scheduled interview. - Email Reminders to Candidate:
Configure the timeline to ensure candidates receive timely email reminders about their upcoming interview. - Email Reminders to Organizer:
Manage the timeline to send reminders to the organizer, ensuring proper coordination and preparedness. - Feedback Emails to Interviewer:
Set up the timeline to automatically send feedback request emails to the interviewer post-interview.
These configurations help maintain efficient communication, ensuring all participants are informed and aligned throughout the interview process.
- Email Reminders to Interviewer:
STAGE CONFIGURATION
Was this article helpful?
SMS Integration
Set up SMS integration to enable sending text messages directly from the Oorwin portal. This integration allows for seamless communication with candidates, clients, or team members, enhancing engagement and improving overall workflow efficiency.
To configure SMS integration, follow these steps:
- Navigate to the Marketplace:
Go to Menu → Marketplace → SMS. - Select Service Provider:
Choose the desired SMS service provider for integration. - Configure the Account:
- Click on Configure and add the account details.
- Enter the User Login details and assign user access.
- Save the Configuration:
Click Save to complete the integration setup.
This will enable SMS functionality within the Oorwin portal, allowing you to send text messages directly from the platform.
Was this article helpful?
In this Blog, lets learn how to configure VMS in Oorwin.

- Click on “Market Place” in “Left Menu”

- Un Select “All” & Select “VMS” and Scroll through the VMS
- Else, you can also search the VMS by name
- Once you find the VMS, Click on it
- Once you click on VMS, you will be redirected to “Overview” page of the VMS”. Click on “Configure Tab”

- Click on “Add VMS” button

- Enter “User Name” and “Password”

- If you want system to auto – populate some of the fields, enter or select the required options

- You can also ask system to assign the recruiter automatically in 3 ways
- General: You can select the recruiters and System will assign the job to all the recruiters
- Round Robin: You can select the recruiters and system will assign the jobs to the recruiters one after the other
- Least Assigned: Youn can select the recruiters and system will assign the job to the recruiter who have least no of active jobs

- You can also assign the recruiters based on “Customer”

- You can also ask system to send notification if the “Password” has been changed and you can select the recipient of the email as well
- Click on “Save” and system will connect the VMS account to your Oorwin account and when a job is posted in the VMS, system will push the job to Oorwin
Was this article helpful?
External Approver :- Whenever if external approver wants to approve the submitted timesheets, below is the steps to follow
In order to assign external approver, we need to create the external approval details and below are the steps to create approval flow.
- Navigate to the assignments- edit the assignments
- Navigate to timesheet information
- Select the approval flow option and select the drop down and choose the external approval and click on (+) on the field
- New Screen pop-ups to enter the external approval details along with the configuration details and click on save
- once the above changes are done, anytime timesheets submitted by that employee will be notified to the external approver to approve the timesheets.
Was this article helpful?
Related Posts
Creating a job in Oorwin is as simple as brewing a coffee! Whenever you receive a requirement from your client, the first thing you need to do is load all the details in Ooriwn and start searching for the candidate
Below are the steps to follow while creating a job in Oorwin
- Login to your Ooriwn account and Go to Job module on the left menu under the recruitment section
- Click on “Add Job” on the top right corner
- Click “Manual Add” button from the drop down menu
- Fill all the mandatory fields like Job Title, Client Name, Location..etc
- Now click on “Save”. Thats It! your job has been created in Oorwin

Was this article helpful?
In this blog, let’s explore how to create a “Job Grabber Agent”
- Go to Menu > Recruitment and click on “Job Grabber”
- Locate “Create Agent” option in the top right corner of the module
- Clicking on that, system will show two options
- Job Search Agent
- Instant Job Search Agent
- Enter clicking on “job Search Agent” system will show a pop-up with 3 steps
- Agent Details:
- Provide a name to the agent
- Enter the required criteria for the job search (Keyword/Skills/Job title/Boolean String)
- Enter all the remaining details and click on “Next”
- Mapped Resources:
- Select all the pool candidates/Bench Consultants
- This step is not a mandatory one
- Upon clicking on “Next”, system will take you to “Job Boards/Prime Vendor Page”
- Job Boards/Prime Vendor:
- Select all the job boards and prime vendors
- Click on “Create Agent” and system will create the agent
- Agent Details:
- Post agent creation, system will go through all the job boards and will fetch all the jobs
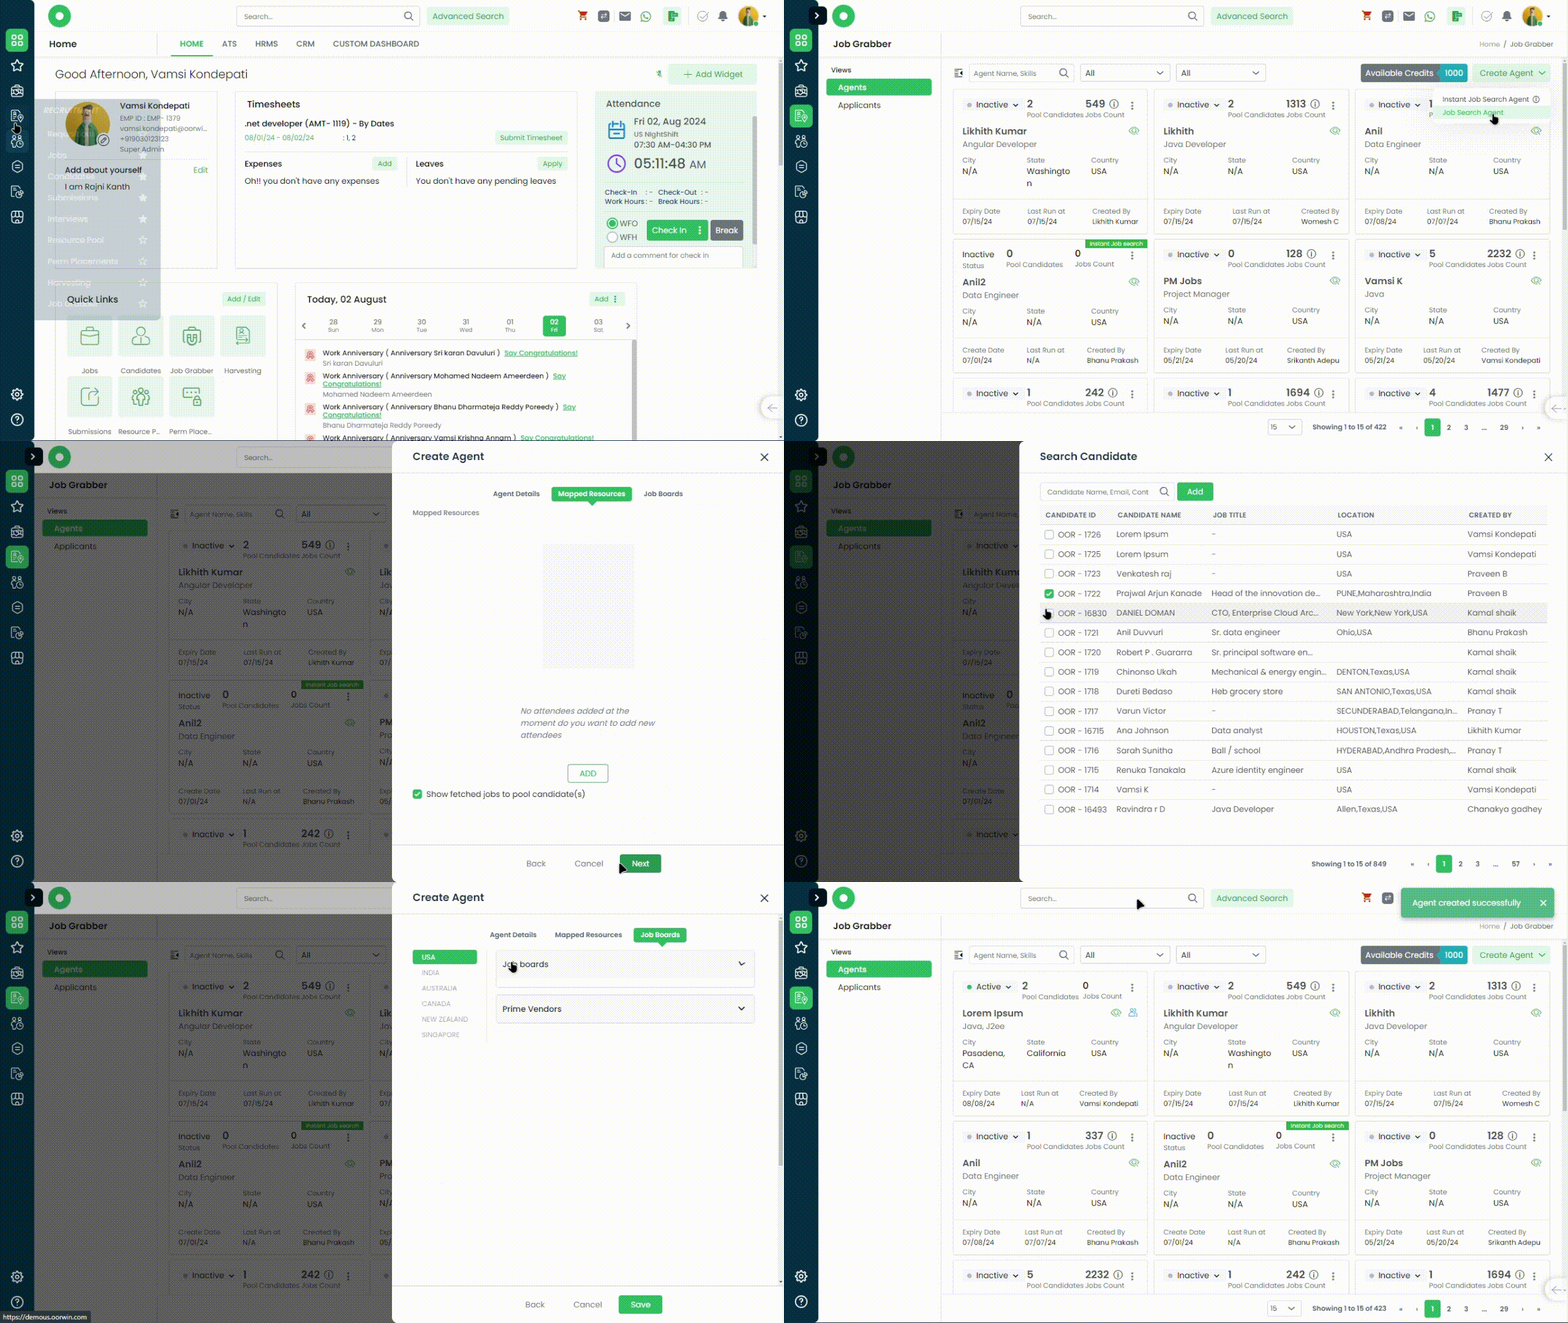
Was this article helpful?
Oorwin helps you to capture, track, and manage potential customers, streamline lead qualification, and nurture prospects through targeted communication, ultimately converting them into sales opportunities
Here is how you can create a lead
- Go to Leads module from the left menu under CRM Section
- Click on Add Lead button on the top right corner

- Enter all the required fields like name, email, phone, client etc
- Once entered all the details click on Save button and your Lead has created in Oorwin

Was this article helpful?
Let learn how to create a “Perm Placement” from a submission
- To Create a “Perm Placement” from a submission, the submission must have Placement Type of “One Time Placement” or “RPO”
- Once User selects “On boarding – In Progress” or “On boarding – On boarded”, then system will redirect user to “Perm Placement” create page
- Candidate & Job details will be auto – populated by the system
- You have to enter following details
- Billing Details
- Actual Date of Joining
- Tentative Date of Joining
- Invoice Details
- Once user clicks on “Save”, perm placement will be create

Was this article helpful?
- Navigate to Recruitment Menu and Click on “Perm Placement”
- Locate “Create Perm Placement”
- Clicking on you will find two options and you can select any one option
- Submissions:
- Select the submission to which you want to create a perm placement
- Jobs & Candidates:
- Select the job you want
- Select the candidate you want
- Submissions:
- You will be redirected to Perm Placement create page
- Candidate and Jobs Detail will be auto populated by the system
- Enter Billing details, invoice details, Tentative and Actual Joining Date and Other required fields
- Clicking on “Save”, the perm placement record will be created

Was this article helpful?
Here is a Detailed Guide on How to create a resource Pool record
- Go to Menu and Hover on “Recruitment”
- you will find a menu and Click on “Resource Pool”
- You will see “Create Pool”
- You will find a form and Enter all the details of the pool candidate
- Click on “Save” button to save the pool record

Was this article helpful?
In Oorwin, user will have option to create, assign and track multiple tasks and make them done on time.Here you can create module specific tasks or generalized standard tasks
Follow the below steps to create a new task
- Go to Tasks module from the left menu under Human Resources Section
- This will list all the available tasks that were created and assigned previously
- Now click on Create Task button on the top right corner to create a new task
- Select the task category like module specific task or standard task category which you were created in the category section
- Enter all the mandatory details like Title, Description, assigned to,priority, due date etc
- Once everything filled click on Save button which will create a new task and an automatic email will trigger to the assigned user

Was this article helpful?
Teams are helpful in assigning specific roles and responsibilities, and assigning team based targets and fetching the reports and dashboards by team wise
Here is how you can create a team in Oorwin
- Log in to your Oorwin Account and navigate to settings page from the left bottom
- Go to Access Control on the left menu and click on Teams module
- Now click on Add Team button on the top right corner which opens a popup to enter the team details
- Enter team name, team lead and the members in the team by selecting the users from the drop down
- Enter any description if you wish and click on Save button

Was this article helpful?
Creating an employee record in Oorwin typically involves following steps:
- Log in to your Oorwin Account and navigate to Employees module from the left menu under Human Resources Section
- Click on “Add Employee” button on the top right corner.
- Fill all the mandatory details like Personal Information, Employment Details, Education Details,Documents, etc.
- Once you’ve filled in all the necessary information, click on the “Save” button below
- Thats it! A new employee record has been created in Oorwin.

Was this article helpful?
In this blog, let’s explore how to create an “Instant Job search Agent”
- Go to Menu > Recruitment and click on “Job Grabber”
- Locate “Create Agent” option in the top right corner of the module
- Clicking on that, system will show two options
- Job Search Agent
- Instant Job Search Agent
- Upon clicking on “Instant Job Search Agent” system will show a pop-up with 3 steps
- Agent Details:
- Provide a name to the agent
- Enter the required criteria for the job search (Keyword/Skills/Job title/Boolean String)
- Enter all the remaining details and click on “Next”
- Mapped Resources:
- Select all the pool candidates/Bench Consultants
- This step is not a mandatory one
- Upon clicking on “Next”, system will take you to “Job Boards/Prime Vendor Page”
- Job Boards/Prime Vendor:
- Select all the job boards and prime vendors. You can select upto 10
- Click on “Create Agent” and system will create the agent
- Agent Details:
- Post agent creation, system will go through all the job boards and will fetch the fresh jobs
Was this article helpful?
To create an user you need to have super admin access in Oorwin and you can create multiple users in the system and assign them different roles in multiple applications like ATS,CRM and HR
Here is how you can create an user in the system
- Log in to your Oorwin Account and navigate to settings page from the left bottom
- Go to Access Control on the left menu and click on User module
- Click on Add User button on the top right corner which will open the user creation form
- Enter all the user information like name, email, phone and address details etc
- Now select role access permissions for ATS,HR & CRM applications from the drop down
- You can also leave the access drop downs empty if don’t want to give permission to particular application
- You can also give super admin access to another user by selecting the Super Admin check box
- Now assign permissions for reports, designation, reporting fields and access to the different plugins
- Now click on Register button which will create an user and an welcome email will be triggered to the given email id to set up the password

- Register & Activate button will ask the admin to create the password and activate from the same page itself
Was this article helpful?
How to create C2C Bill for Timesheets from Accounts Payable
- Navigate to Main Menu
- Accounts Payable
- Add Bill
- Enter your Vendor Name
- Select Your Employee
- Enter your Billing Details and Billing contact information
- Select your Assignment from the assignments Drop down
- Select date range fbelow the assignments drop down
- Either select Eistiong Timesheets & Hours
Or
You can select assignment and enter Start date, End date and Hours manually - A New Line item will be added on the Bill
- Add any attachments if you want
- Save or Save & Send the Bill

Was this article helpful?
User can also customize his email signature based on his requirement in different formats
To do this follow below steps
- Go to your Profile icon and click on My Profile & Preferences
- Now to My Signature section and click on Create my Own Signature option
- It opens a popup and you need to mention the template name, and other details of your signature
- Now finally click on Save and your custom signature will be saved and will be sent through across all your emails

Was this article helpful?
- Log in to your Oorwin Account and navigate to settings page from the left bottom
- Go to Configurations on the left menu which opens multiple sections in it
- Click on Reminders section under configurations page
- It opens list of all the existing reminders that you have set previously
- To create a new reminder click on “Add Reminder” button on the top right corner
- Give the reminder name and type (In this scenario we select it as document expiry type)
- Select the from email from the list of oorwin users from which email that you want to get the reminder
- Now select the module name, type of the document and enter the expiring in days and click on next button
- Now in the set schedule tab, select the reminder cycle(daily, weekly, monthly), time along with the timezone
- Now in the set notifications section, select the checkbox to whom you want to send the notification(Employee/Consolidated users) and click on Next
- Based on the notification selection the mail templates will be displayed with the default content and user can change the content except the table
- Now click on Save on the bottom and your reminder has created and the notifiers will get the reminder notifications based on the time configured
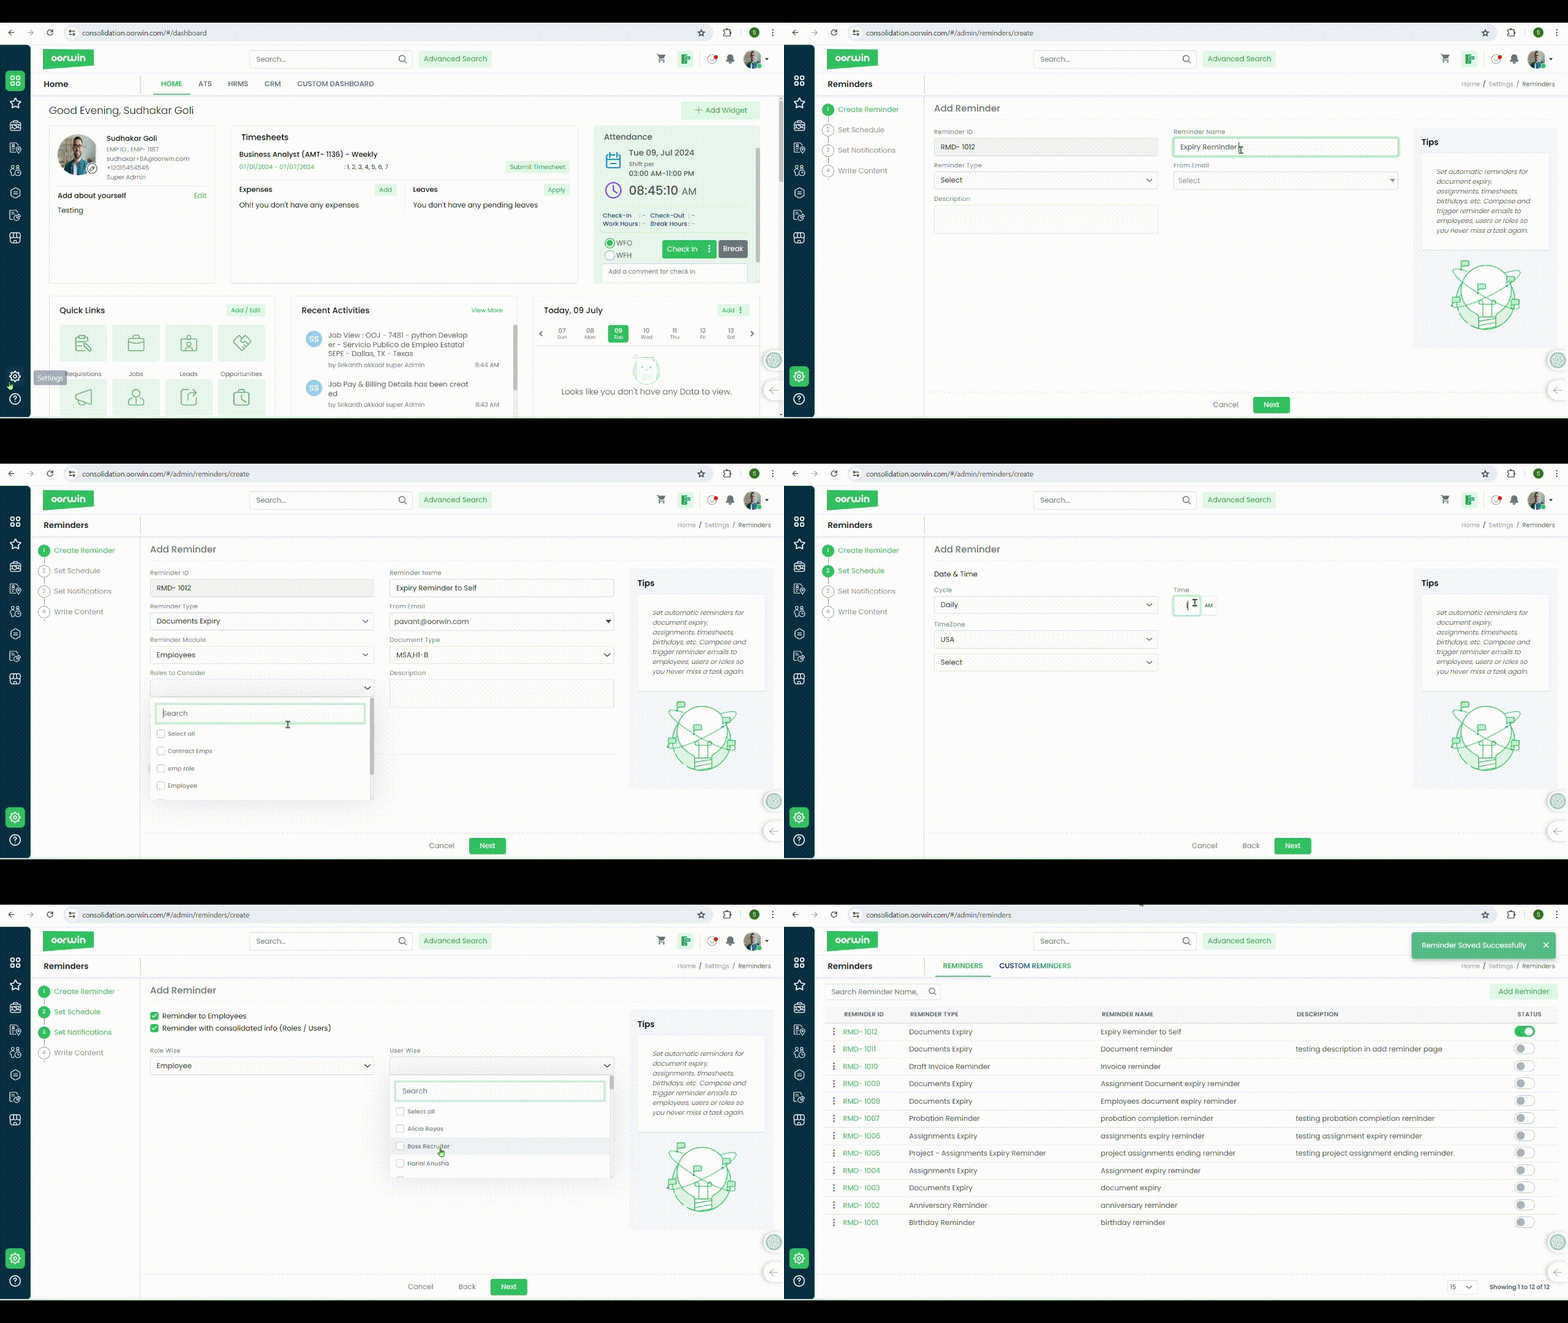
Was this article helpful?
Enable the creation of customizable greeting templates with placeholders for job and hotlist sharing. This functionality allows users to design, configure, and manage templates while providing the flexibility to restrict or lock the configuration as needed.
With this feature, users can ensure consistent communication while maintaining control over the template’s structure and content.
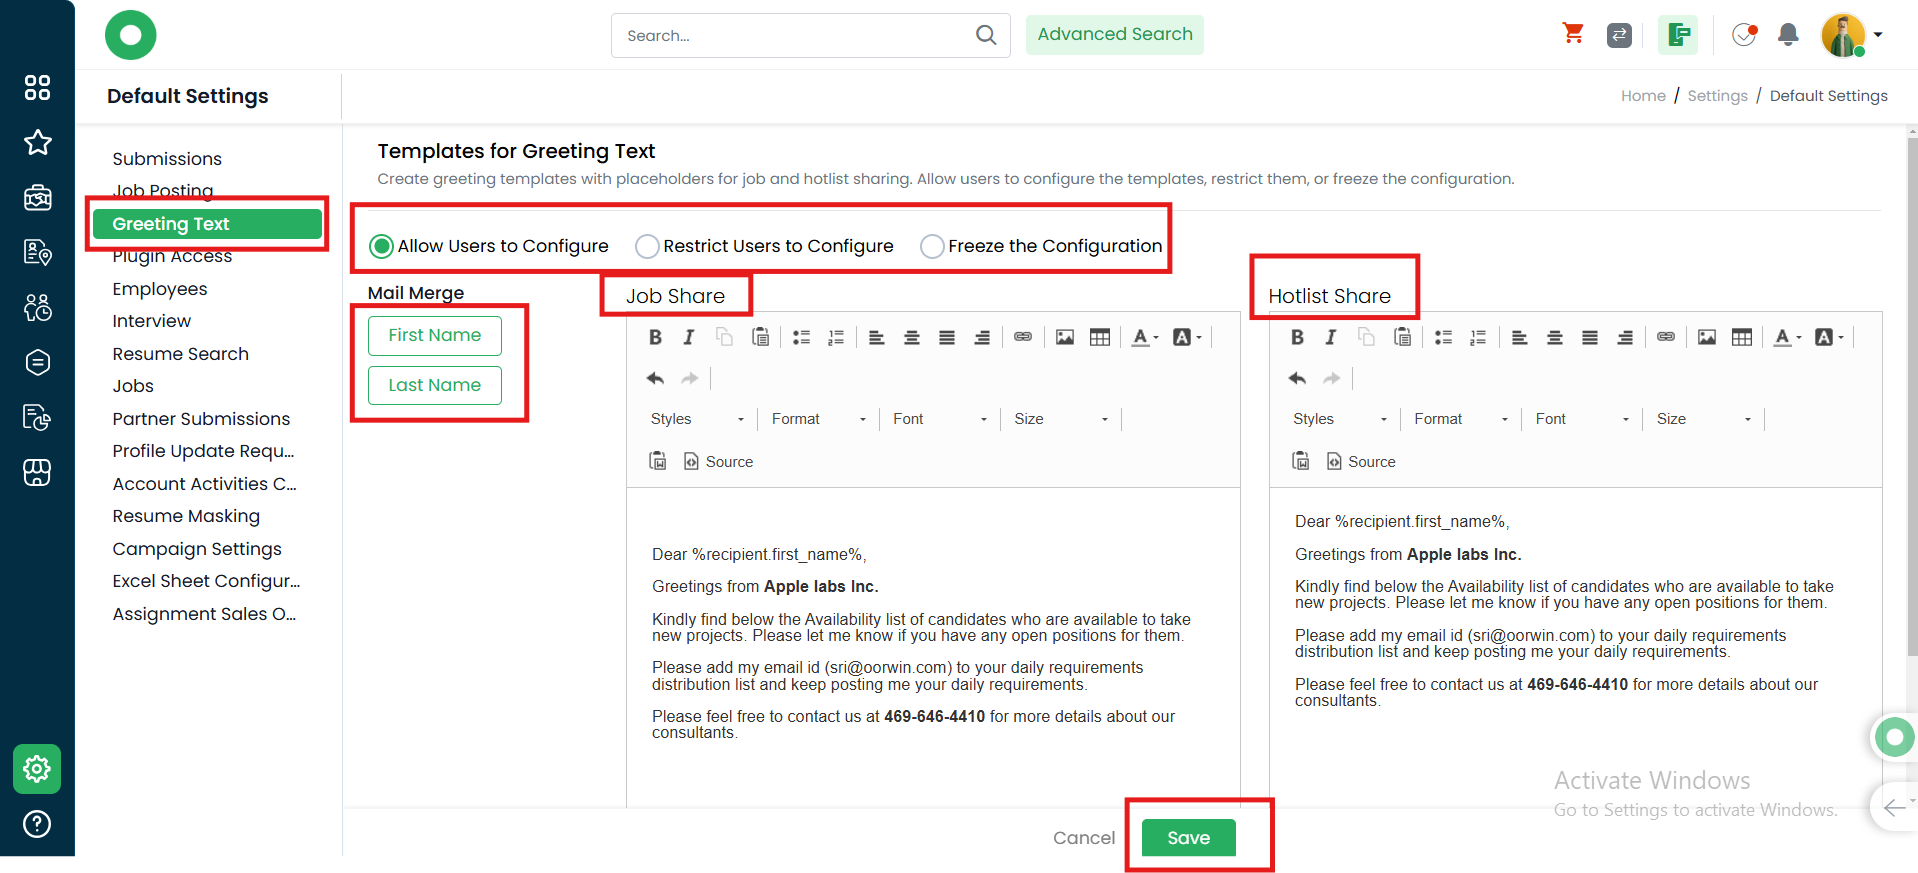
Was this article helpful?
Oorwin allows you to create multiple groups which can be useful while mentioning or assigning a group of members in all over the application by selecting the particular group
Here is how you can create a group in Oorwin
- Log in to your Oorwin Account and navigate to settings page from the left bottom
- Go to Access Control on the left menu and click on User Groups module
- Now click on Add New button on the top right corner which opens a popup to enter the group details
- Enter group name, and select the group users from the members drop down
- Now click on Save button on the bottom which will create a new group on the mentioned name and will be reflected in the application to mention that group

Was this article helpful?
Oorwin customers can customize their own career portal and embed the career portal link into their website. So that all the jobs posted through Oorwin can be published to their career portal to make them visible in their website.
Oorwin is providing three different career portal templates and customers can choose their most liked template for the configuration
Below are the steps to configure career portal
- Log in to your Oorwin Account and navigate to Settings page from the left bottom
- Go to Career Portal under Configurations section
- Preview the pre configured templates by selecting the templates from the Select Template drop down and choose any of the template from the list
- Customize the job fields from the customize fields section and select what job fields to be visible in the career portal
- Configure the color combinations like background color, button color, text color and sizes etc from the top configuration strip
- Check the toggle buttons for other job boards to apply and sign options to display and enable if it is required
- After all these steps user can also view the customized career portal by clicking on “Preview” button below
- Once everything is set up, click on Save button on the bottom which will save all your configurations
- Copy the embed link through Embed Code button and insert the code in designated area in your website which will show your customized career portal in your company website

Was this article helpful?
Oorwin chrome plugin will allows you to perform all the major actions like Creation of jobs, candidates, submissions, accounts, contacts etc through multiple places like gmail, linkedin, monster, shine, chatGPT and Gemini etc
Download chrome plugin:
- You can download the chrome plugin by navigating the chrome extensions in your browser and search for Oorwin.
- You can also navigate through Oorwin portal by clicking on “Download Chrome” option in My Profile->Personal Detaila->Plugins section
- Or you can directly navigate from the below link https://chromewebstore.google.com/detail/oorwin/mknnokdoimnnbiojigiifegoagcchipd?pli=1
Install Chrom Plugin
- After navigating the above link in click on Add to chrome option on the top right
- This will ask for confirmation to install the extension and you need click on Add extension option
- This action will download & install the Oorwin chrome extension in your browser and all gmail, linkedin and other platforms will have the Oorwin icon
- Upon clicking on this Oorwin icon, it asks for the user name and password to login with your existing Oorwin credentials
- Now you will have Oorwin chrome plugin installed and perform all the actions from plugin without logging in to Oorwin portal
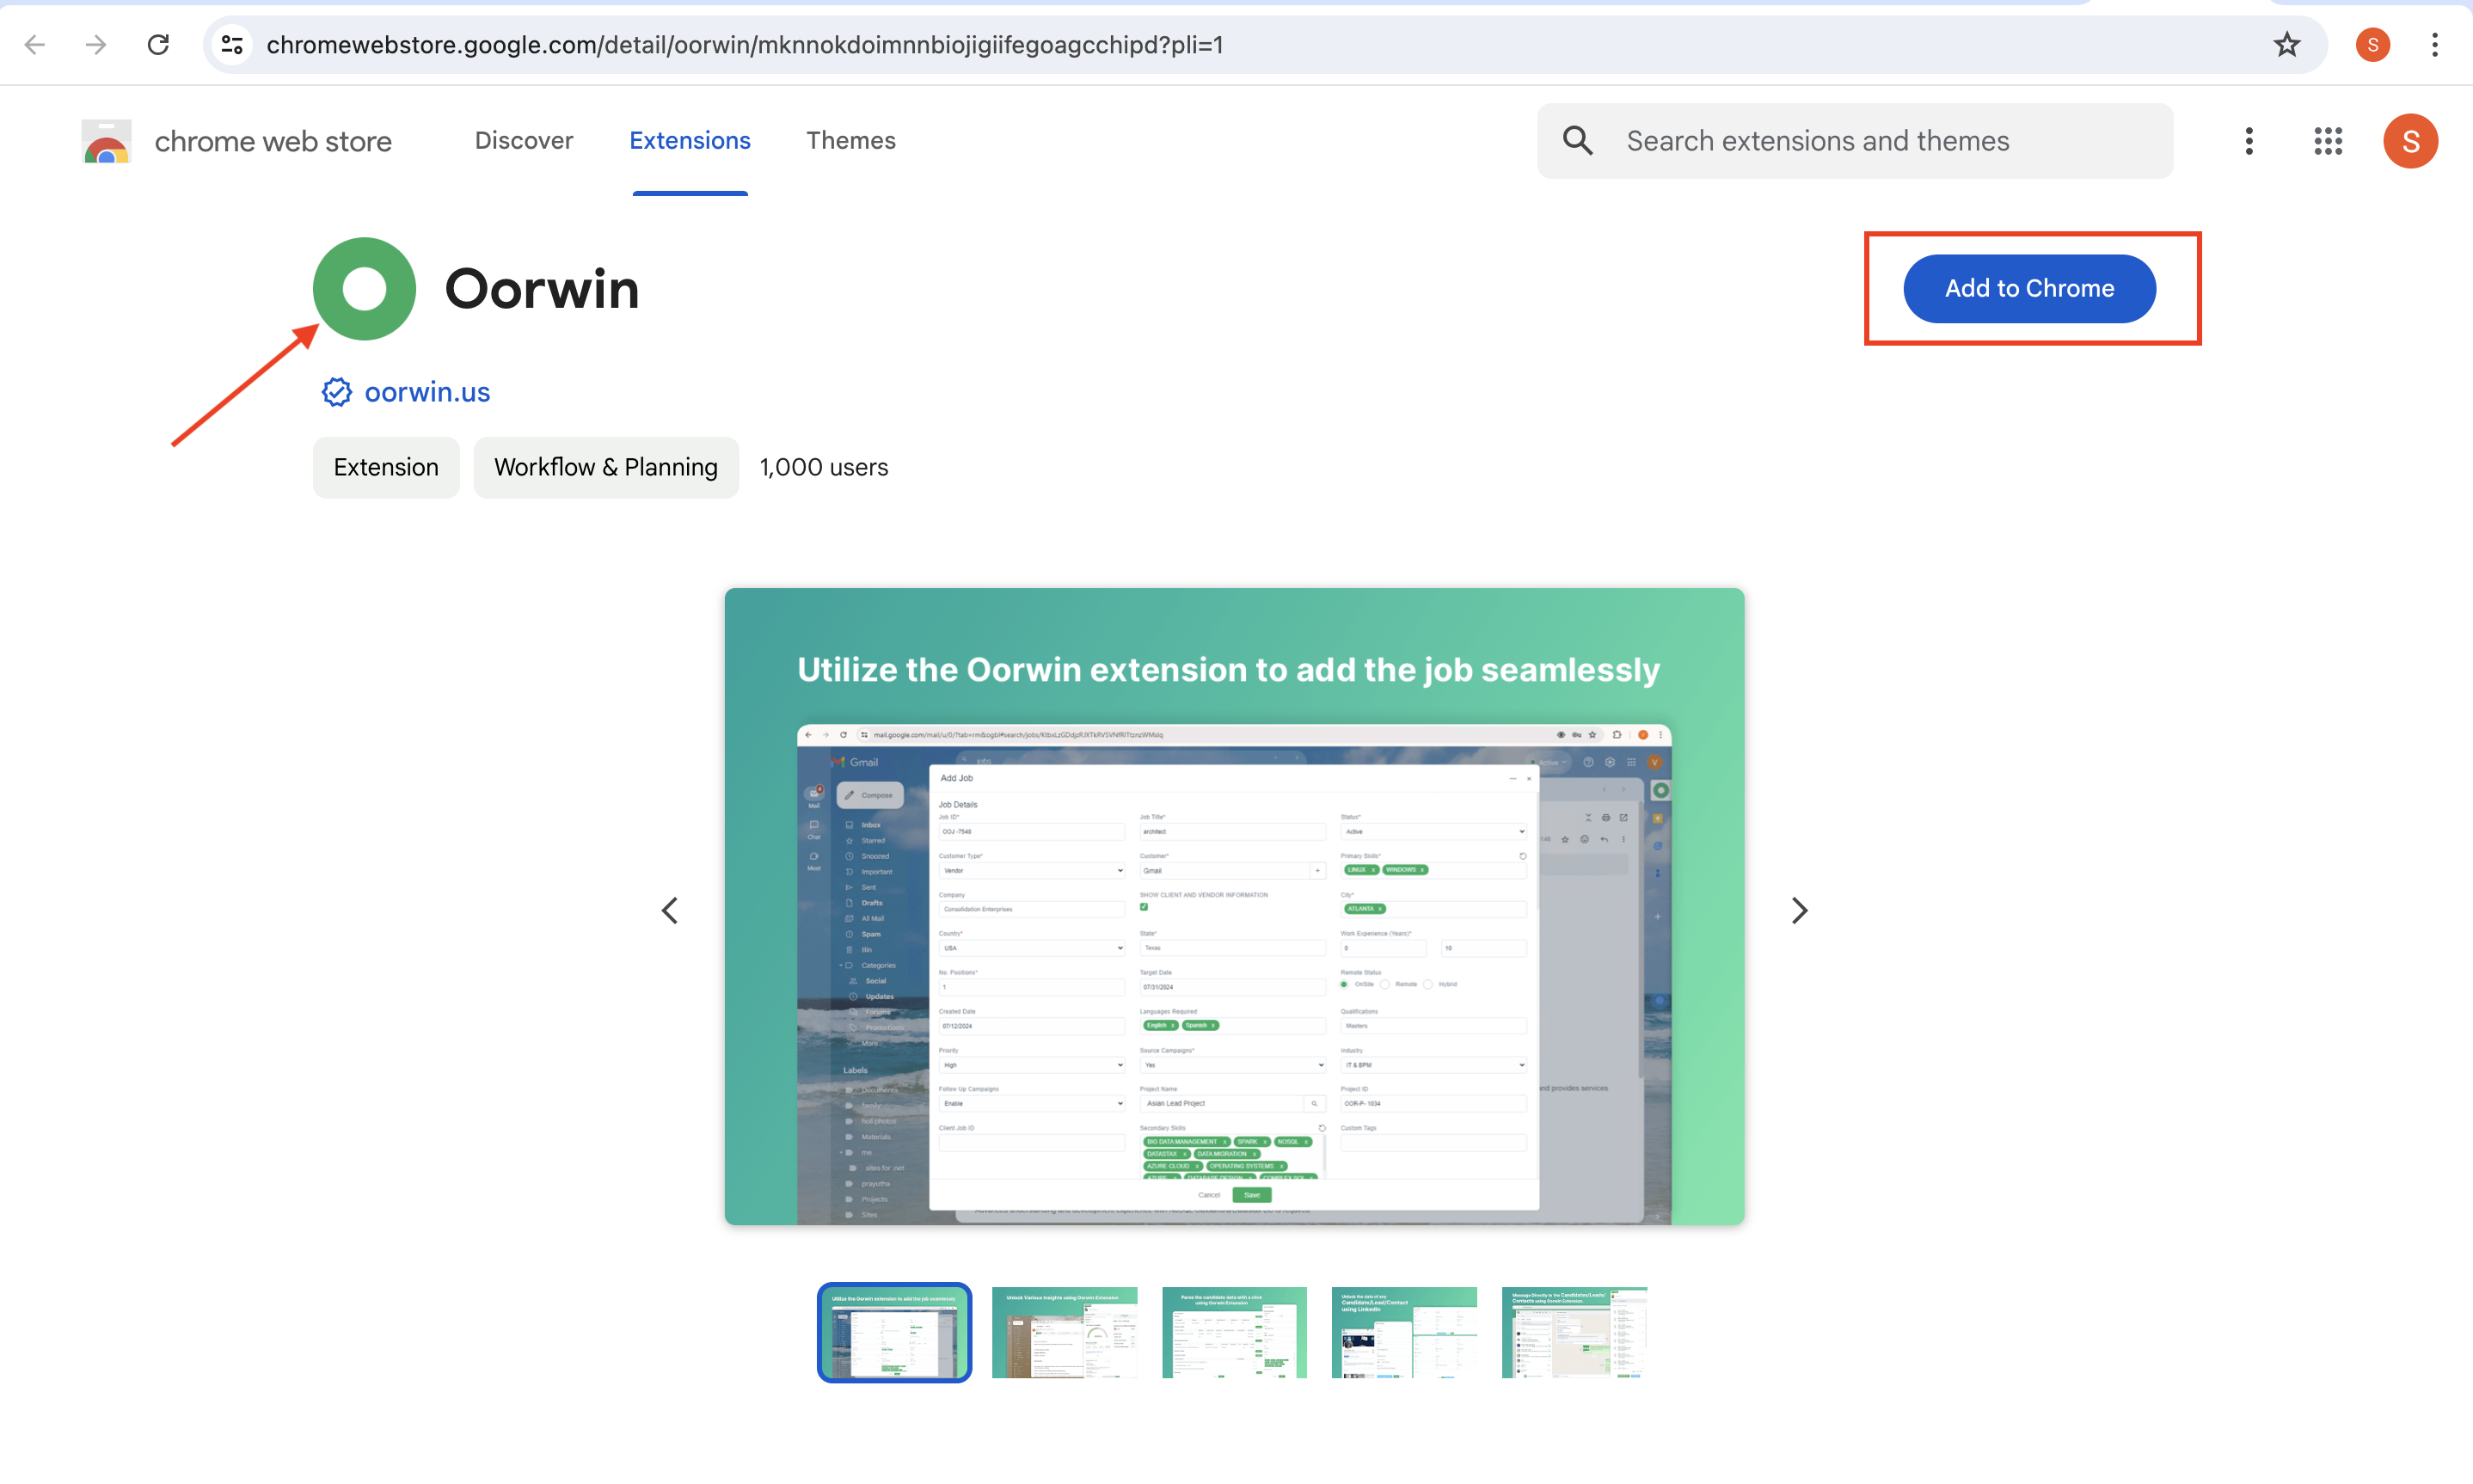
Was this article helpful?
In this blog, lets see how to download Chrome Plugin.
- Go to Chrome Web store and Search for “Oorwin” or Click here
- Click on “Add to Chrome”
- Upon clicking on “Add to Chrome”, system will add the extension to your chrome browser
- You can go to any of the following sites to use this browser
- Linked In
- WhatsApp Web
- Gmail
- X (Formerly Twitter)
- Chat GPT
- Shine
- Gemini

- Login in and enhance your productivity with Oorwin’s Chrome Browser
Was this article helpful?
What is oorwin Assessment:
Oorwin Assessment is a tool within the Oorwin platform designed to evaluate candidates’ skills and suitability for specific roles. It allows recruiters and hiring managers to create, manage, and administer various types of assessments, such as aptitude tests, non-it tests and personality assessments. This feature helps streamline the hiring process by providing insights into candidates’ abilities and fit for the job, ensuring more informed and efficient hiring decisions.
Here’s a detailed guide on how to enable oorwin assessment:
- Log in to your Oorwin Account and navigate to Marketplace module from the left menu.
- Under Assessment tools category > Click on oorwin assessment
- Assign users and allocate the credits.
- The users assigned to the assessments will be allowed to initiate assessments to the candidates.


Was this article helpful?
Resume harvesting helps the users to fetch the resumes automatically into the system from the external job boards and internal resume based on the search criteria that we have configured
To enable resume harvesting for the users,Admin needs to enable it from the configuration page
- Log in to your Oorwin Account and navigate to settings page from the left bottom
- Go to Configurations on the left menu and click on Harvesting module
- Now select the timezone and the time slots for the harvesting to be ran (You can select the maximum of 4 slots a day)
- You can also set the record limits by entering the number in the per harvesting limit field
- Select the roles and users to enable the resume harvesting module from the below section called ”
User Access for Scheduled Harvesting”
- Now click on save which saves the harvesting configuration and enabled the module to the selected users and roles to start scheduling the harvesting

Was this article helpful?
Configure the system to automatically mask sensitive information on candidate or resource pool resumes when sharing. This ensures privacy and data protection while maintaining compliance with relevant regulations.
Navigate to settings – configuration – Default settings — Enable the Resume masking feature
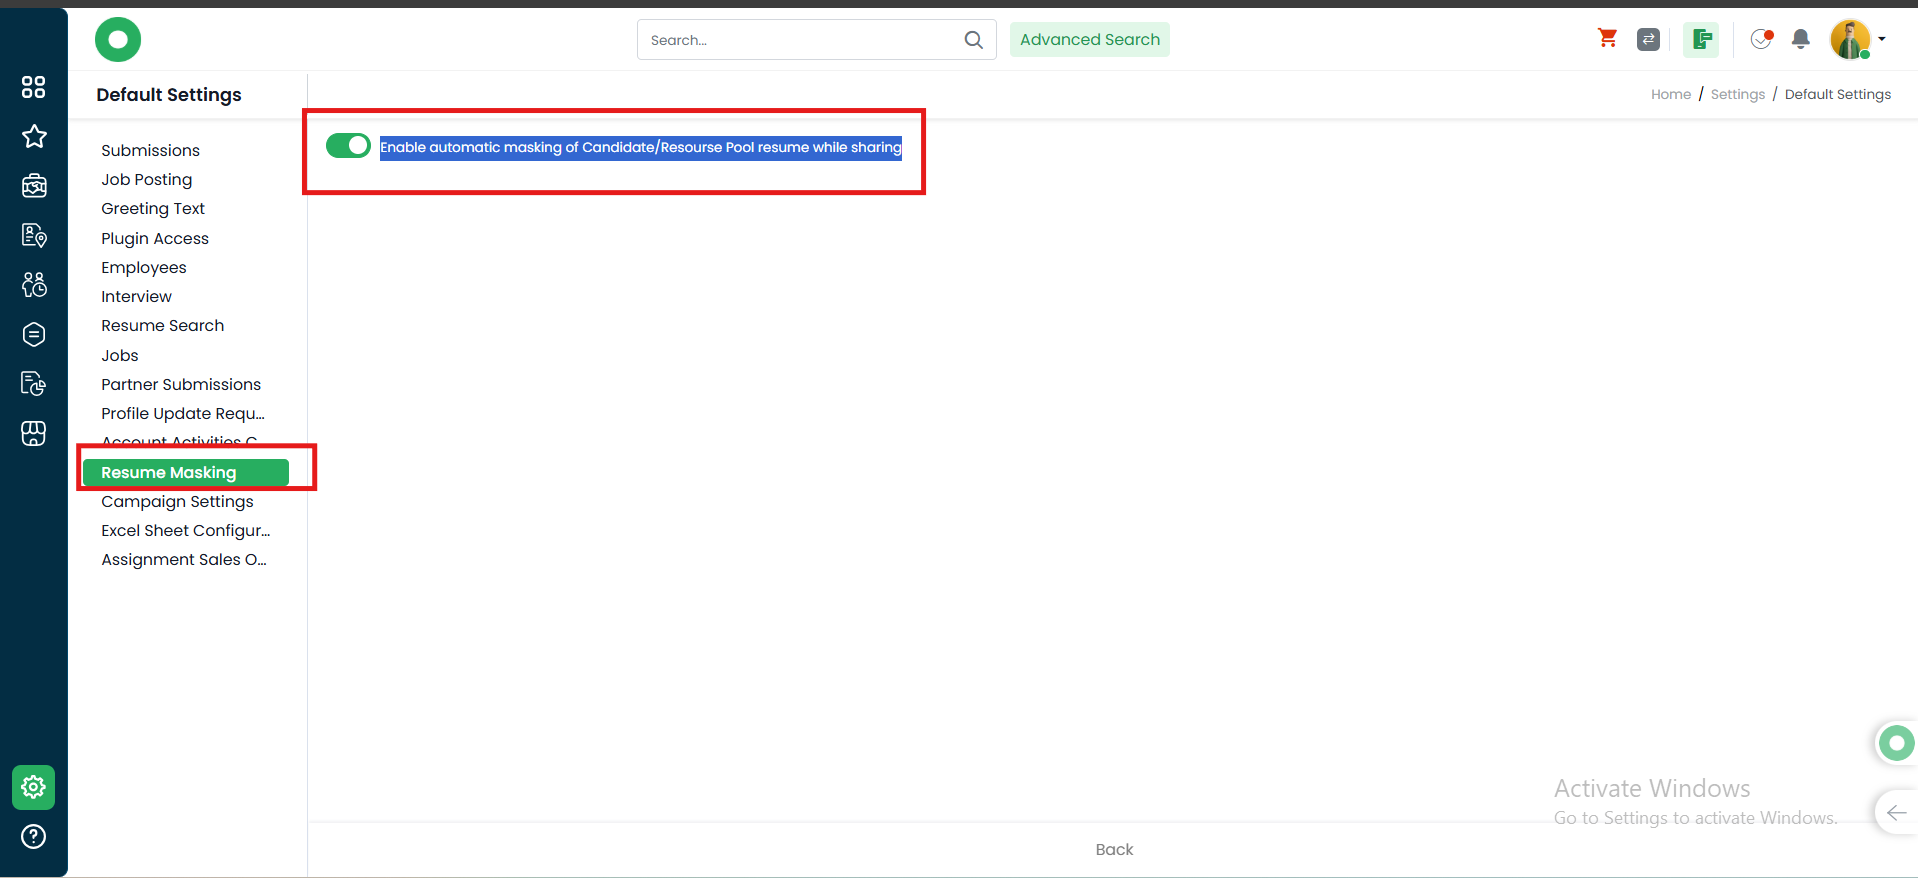
Was this article helpful?
You can export the lead records as excel and csv files to your local system by customizing the preferred columns
Below are the steps to export the lead list
- Log in to your Oorwin Account and navigate to Leads module from the left menu under CRM Section
- Change the grid view to list view from the change view icon and select any of the view that you wanted to export the list from the left panel
- Now click on three dots on the top right corner and click on Export option
- It opens a popup to select the columns to be exported from different sections in the lead page
- After selecting the preferred columns, click on Export as Excel or Export as CSV which you preferred
- Now your export request has taken and sent it to queue and once it done it will be notified in the notifications section on the header
- Now click on download on the notifications to save your exported sheet in your local machine


Was this article helpful?
You can export the opportunity records as excel and CSV files to your local system by customizing the preferred columns
Below are the steps to export the opportunity list
- Log in to your Oorwin Account and navigate to Opportunities module from the left menu under CRM Section
- Change the grid view to list view from the change view icon and select any of the view that you wanted to export the list from the left panel
- Now click on three dots on the top right corner and click on Export option
- It opens a popup to select the columns to be exported from different sections in the opportunity page
- After selecting the preferred columns, click on Export as Excel or Export as CSV which you preferred
- Now your export request has taken and sent it to queue and once it done it will be notified in the notifications section on the header
- Now click on download on the notifications to save your exported sheet in your local machine
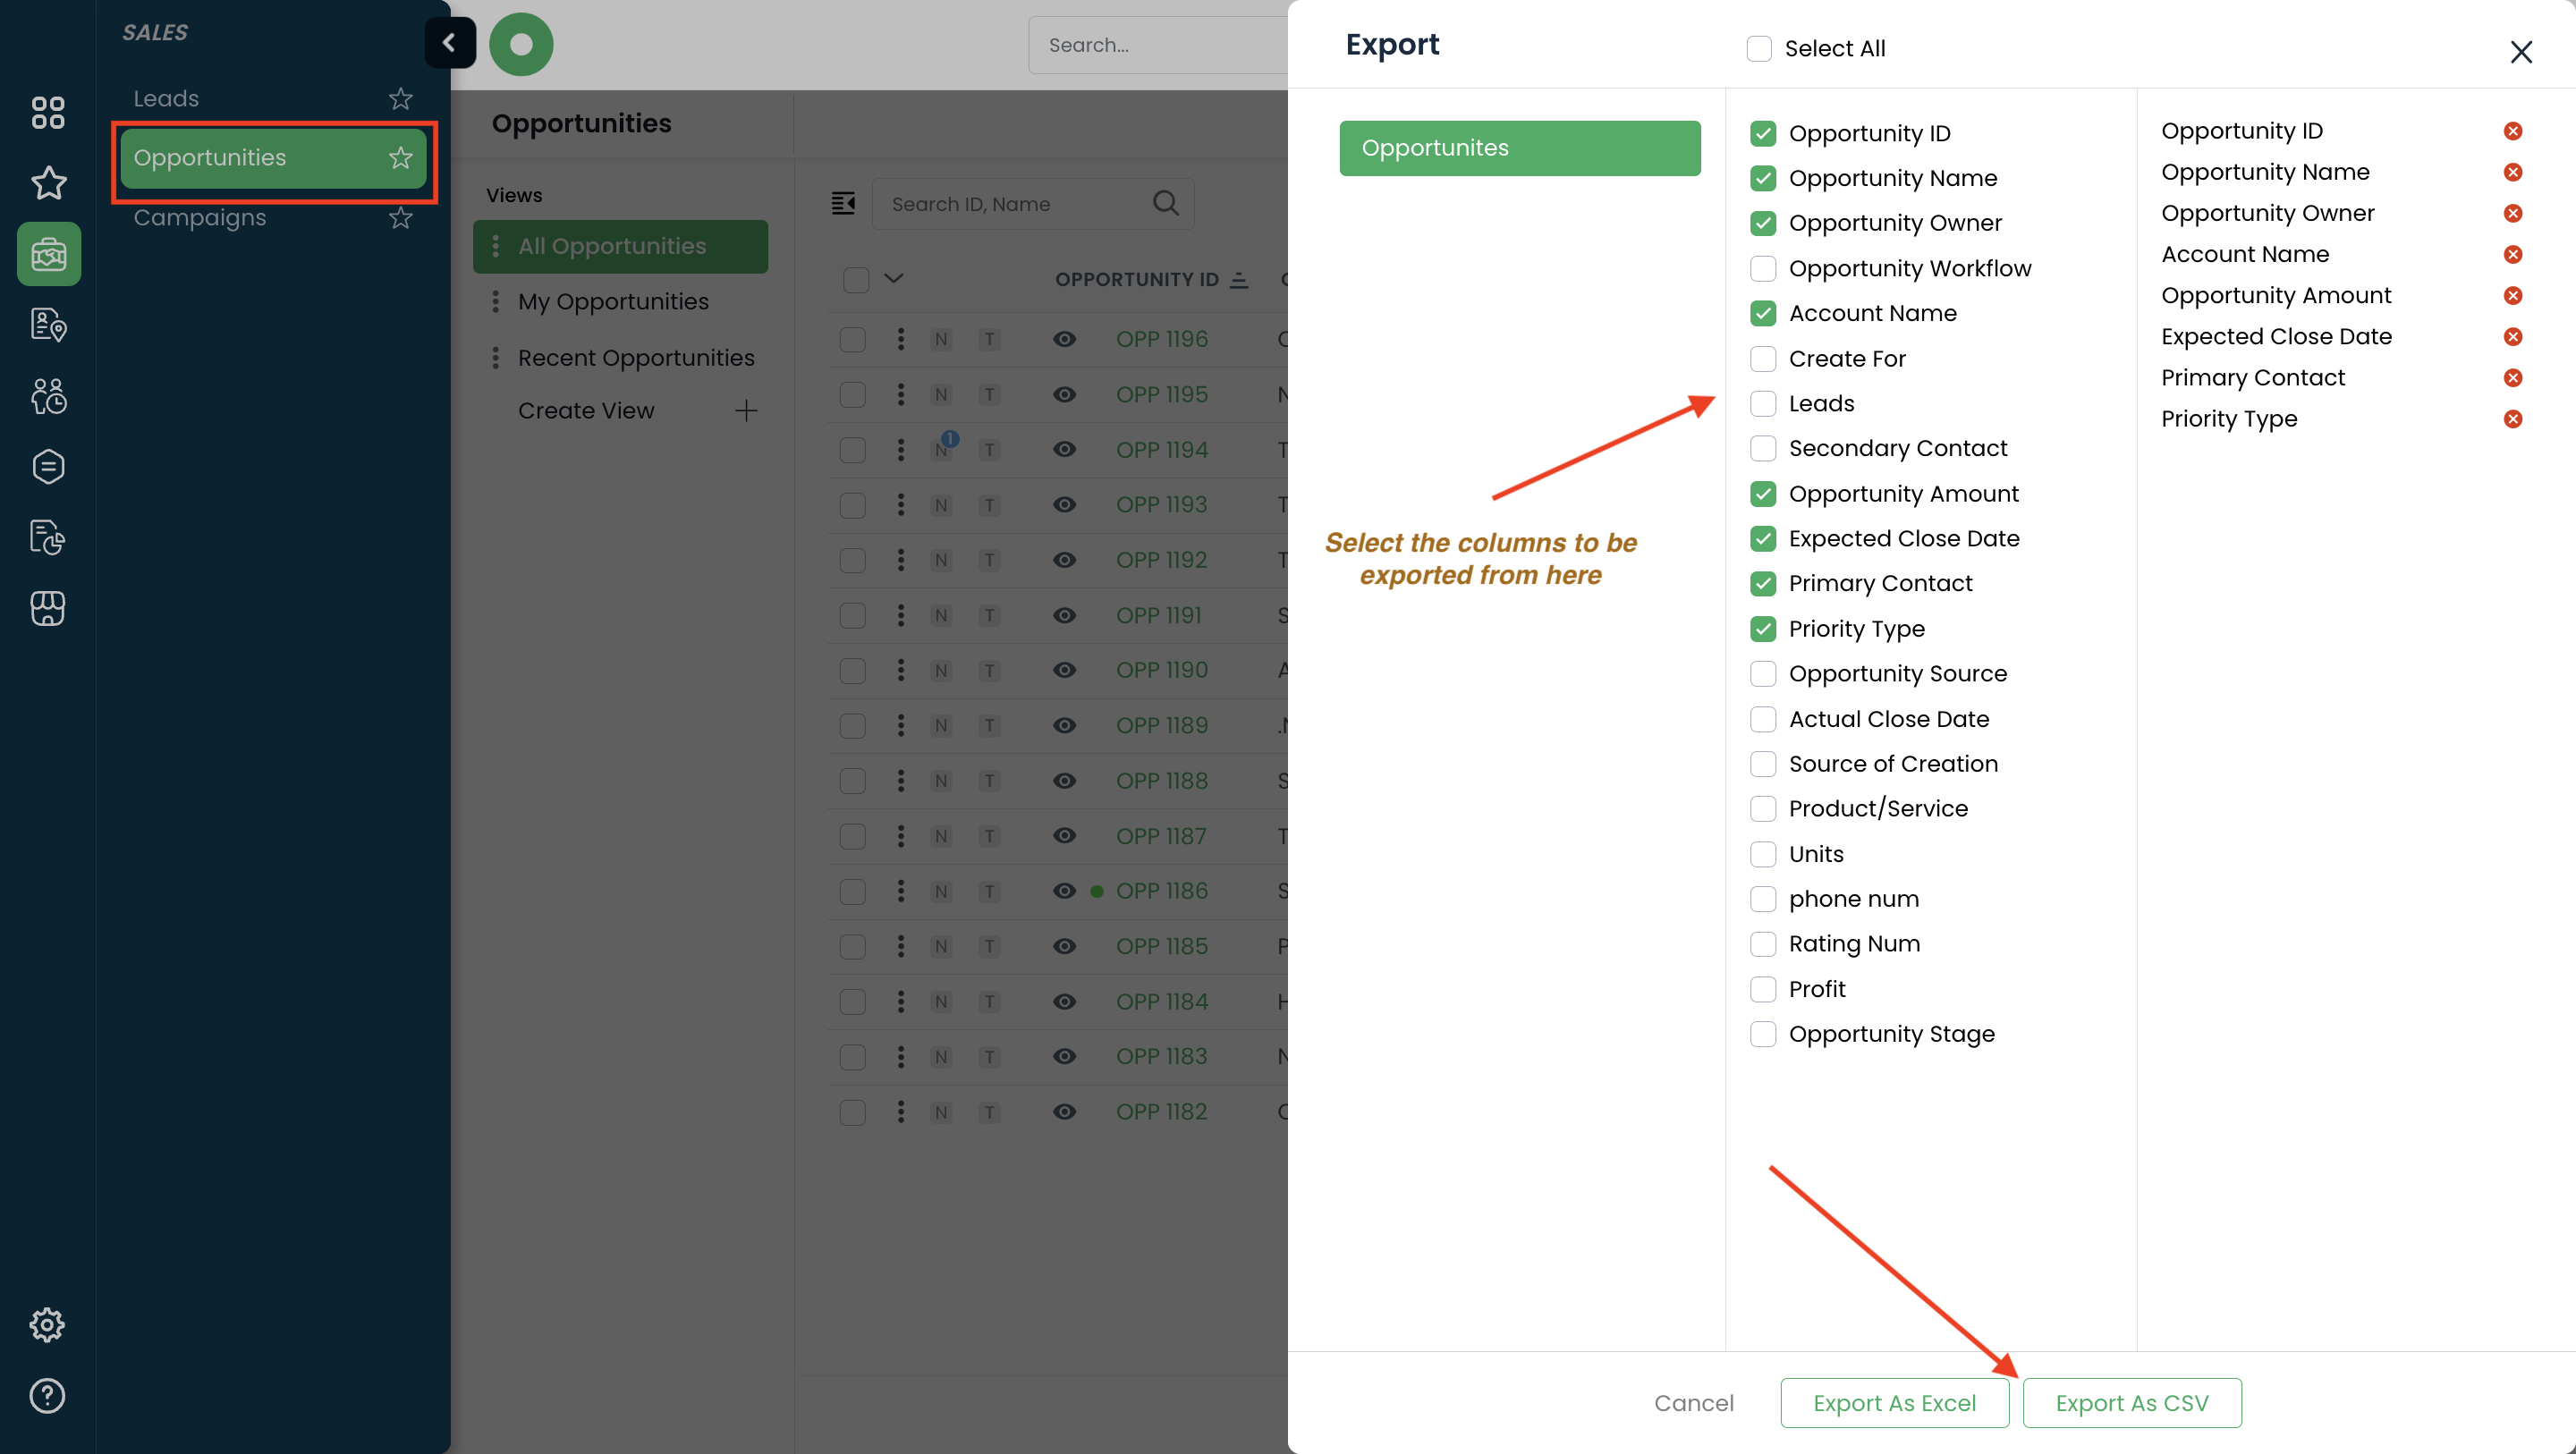
Was this article helpful?
How to Export Performance review process with final ratings
- Navigate to Performance Module
- Manage Reviews
- Select Completed as status
- Actions
- Export Review Submissions

Was this article helpful?
You can export the account records as excel and csv files to your local system by customizing the preferred columns
Below are the steps to export the accounts list
- Log in to your Oorwin Account and navigate to Accounts module from the left menu under General Section
- Select any of the view that you wanted to export the list
- Now click on three dots on the top right corner and click on Export option
- It opens a popup to select the columns to be exported from different sections in the account view
- After selecting the preferred columns, click on Export as Excel or Export as CSV which you preffered
- Now your export request has taken and sent it to queue and once it done it will be notified in the notifications section on the header
- Now click on download on the notifications to save your exported sheet in your local machine

Was this article helpful?
You can export the contacts records as excel and csv files to your local system by customizing the preferred columns
Below are the steps to export the contacts list
- Log in to your Oorwin Account and navigate to contacts module from the left menu under General Section
- Select any of the view that you wanted to export the list
- Now click on three dots on the top right corner and click on Export option
- It opens a popup to select the columns to be exported from different sections in the contacts view
- After selecting the preferred columns, click on Export as Excel or Export as CSV which you preffered
- Now your export request has taken and sent it to queue and once it done it will be notified in the notifications section on the header
- Now click on download on the notifications to save your exported sheet in your local machine
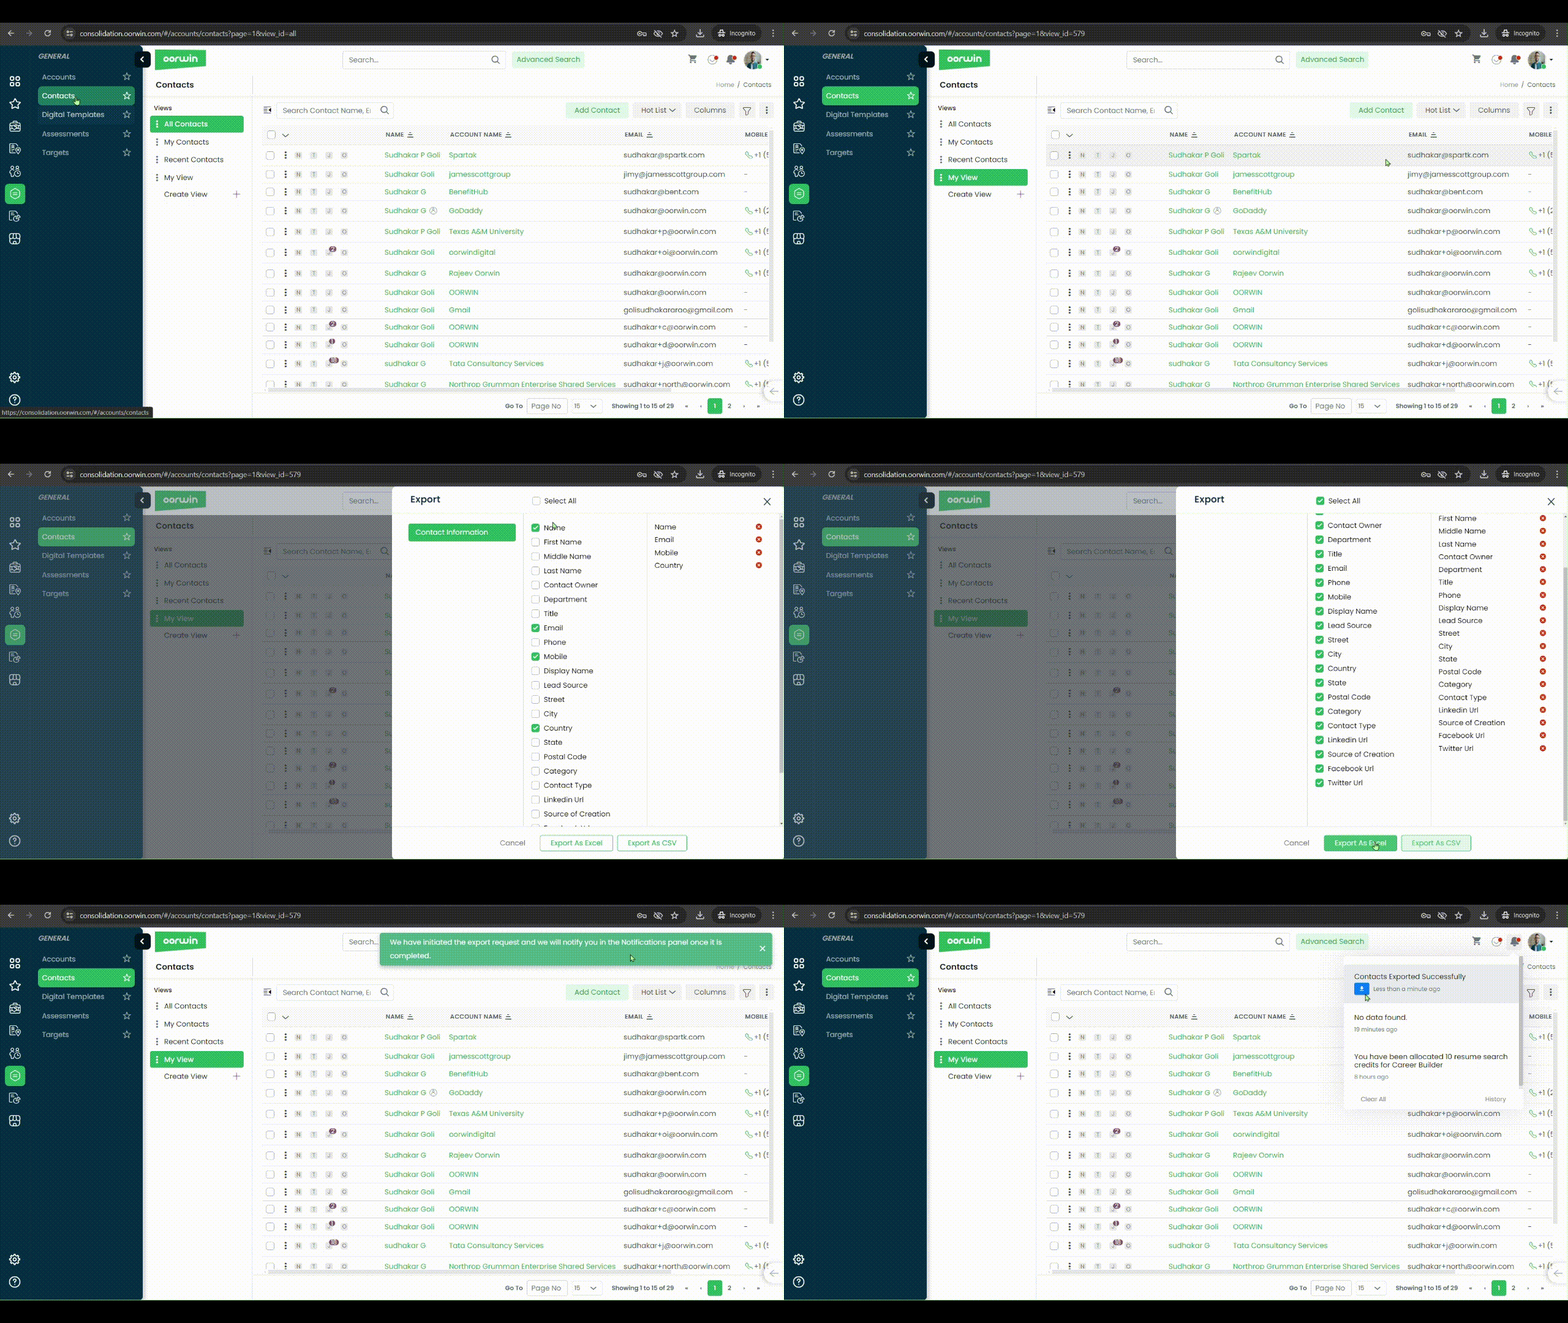
Was this article helpful?
You can export the employee records as excel and csv files to your local system by customizing the preferred columns
Below are the steps to export the employees list
- Log in to your Oorwin Account and navigate to Employees module from the left menu under HRMS Section
- Select any of the view that you wanted to export the list
- Now click on three dots on the top right corner and click on Export option
- It opens a popup to select the columns to be exported from different sections in the account view
- After selecting the preferred columns, click on Export as Excel or Export as CSV which you preferred
- Now your export request has taken and sent it to queue and once it done it will be notified in the notifications section on the header
- Now click on download on the notifications to save your exported sheet in your local machine


Was this article helpful?
You can filter the contacts through different search criterias like name,type,city,etc. User can also create the custom view based on the filters applied
Below are the steps to add a filter and create a custom view
- Log in to your Oorwin Account and navigate to Contacts module from the left menu under General Section
- On the contacts listing page click on filter icon on the top right corner
- Select the filter condition on the popup by selecting the field name and condition
- You can add multiple filters by clicking on “+ Add” button below the first condition
- Now click on Apply button, Now contact records will be filtered and displayed on the listing page
- To save the filter click on “Save As” button beside the apply button and provide the filter view name
- Now the custom view will be saved and listed on the left views on the same name you have given

Was this article helpful?
If any of the employee doesn’t have an active assignment at this moment then we will consider them as bench employees and you can verify them in employees module all at once
Here is how you can view the list of bench employees
- Log in to your Oorwin Account and navigate to Employees module from the left menu under Human Resources Section
- You will find all the default views on the left panel
- Look for the default view called “Employees on Bench” and click on it
- This will list of all the bench employees who doesn’t have an active assignment at this moment
- You can also make this view as default by clicking on three dots->set as default

Was this article helpful?
How to Initiate Offboarding:
- Navigate to Main Menu
- Offboarding
- Initiate Offboarding
- Select Employee from the drop down
- Select “Is this a resignation or Termination”
- Resignation: When Resignation is selected, Select Resignation date, Can Organization rehire, Comments and Last date per the policy.
- Termination: When Termination is selected, Can Organization rehire, Reasons, Comments and Last date per the policy.
- Request

Was this article helpful?
How to Initiate, Update, and Complete an Onboarding Workflow Stage
Before initiating your onboarding process, ensure you select your Onboarding Workflow from the dropdown menu, then click the “Initiate” button at the bottom of the page.
Initiate:
To initiate a workflow stage, locate the “Initiate” button on the relevant workflow stage and click it to start the process.
Send Update:
If your workflow includes digital templates, they may require your attention for configuration and confirmation as they are important digital documents. Click on “Configure,” review the document, make any necessary changes or fill in the required information, and then click the “Send Update” button above the workflow to initiate your stage.
Complete:
Once all actions in the workflow stage are completed, you can finish the stage by clicking the “Complete” button available in the workflow stage. Note that you will not be able to complete the stage if there are any pending actions, such as approvals or rejections.
Was this article helpful?
Select from a wide range of VoIP providers to enable in-app calling functionality. Please note that only one VoIP provider can be active at any given time, ensuring seamless integration and performance within the application.
To configure a VoIP provider for in-app calling, follow these steps:
- Navigate to the Marketplace:
Go to Menu → Marketplace. - Select VoIP Service:
Click on VOIP and choose the VoIP service you wish to configure. - Configure the Service:
Click on Configure, then enter the required details to complete the setup.
This will enable you to configure the selected VoIP provider for in-app calling functionality.
Was this article helpful?
Oorwin will automatically identify the duplicate conatacts in your system and we can merge those contacts into one contact by merging the information
Here is how you can do it:
- Log in to your Oorwin Account and navigate to contacts module from the left menu under General Section
- Open any contact by clicking on contact name to whom you want to check the duplicacy
- Search for Duplicate contacts icon on the right panel and click on it
- It opens a popup with all the duplicate contacts matched if any
- Select the checkboxes of the contact that you want to merge and click on merge button
- Select the master record and field values from other record to be merged to the master record
- Now click on save on the bottom and thats it, your duplicate contacts has been merged as one

Was this article helpful?
If you find two leads are similar in Oorwin, you can merge those two leads as one with all the information in one lead. You can merge maximum three leads as one at a time.
To merge the leads follow the below steps:
- Log in to your Oorwin Account and navigate to Leads module from the left menu under CRM Section
- Click on “Merge Leads” button on the top right corner.
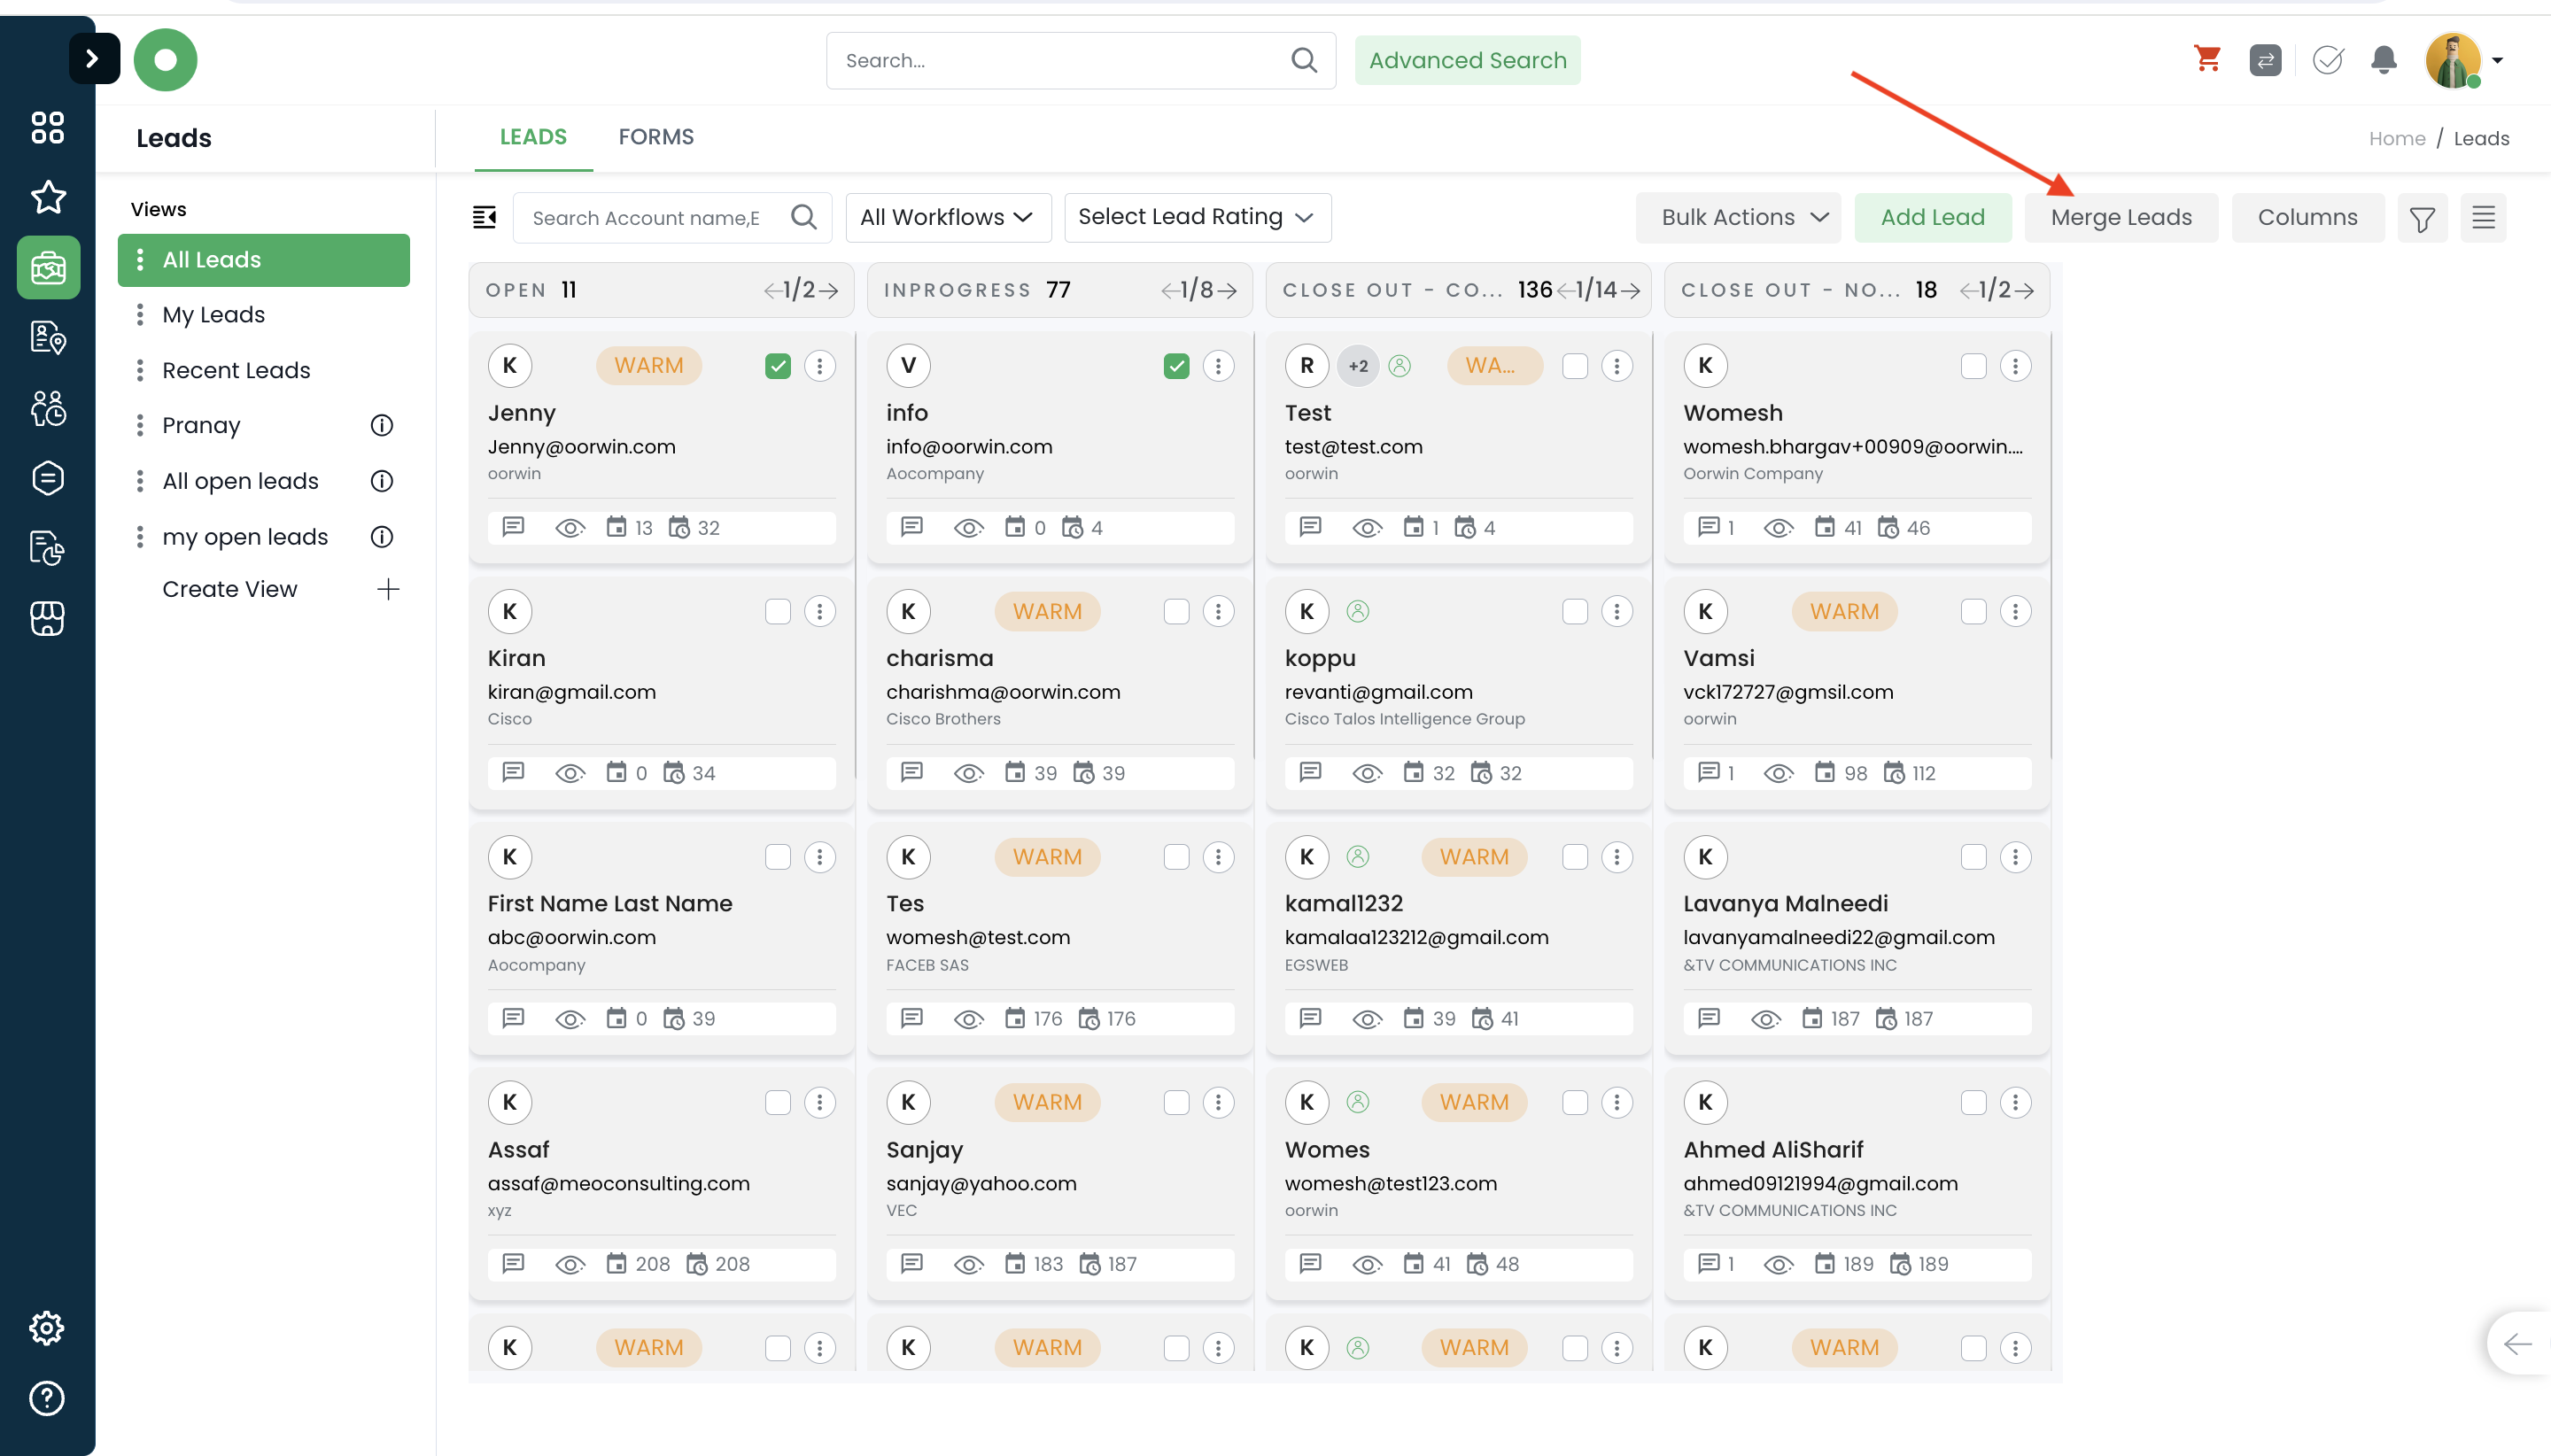
- Enter the lead name in the select the lead field and select the two leads from the drop down you wish to merge
- Once you select the leads click on Next button at the bottom
- Select the Master record radio button for which lead you want to keep in the system
- And select the field values radio buttons to which you want to merge into master record
- Click on Merge button on the bottom and then click Confirm on the confirmation box to update all the data to master record
- The second lead record will automatically removed from the system once the merging is done
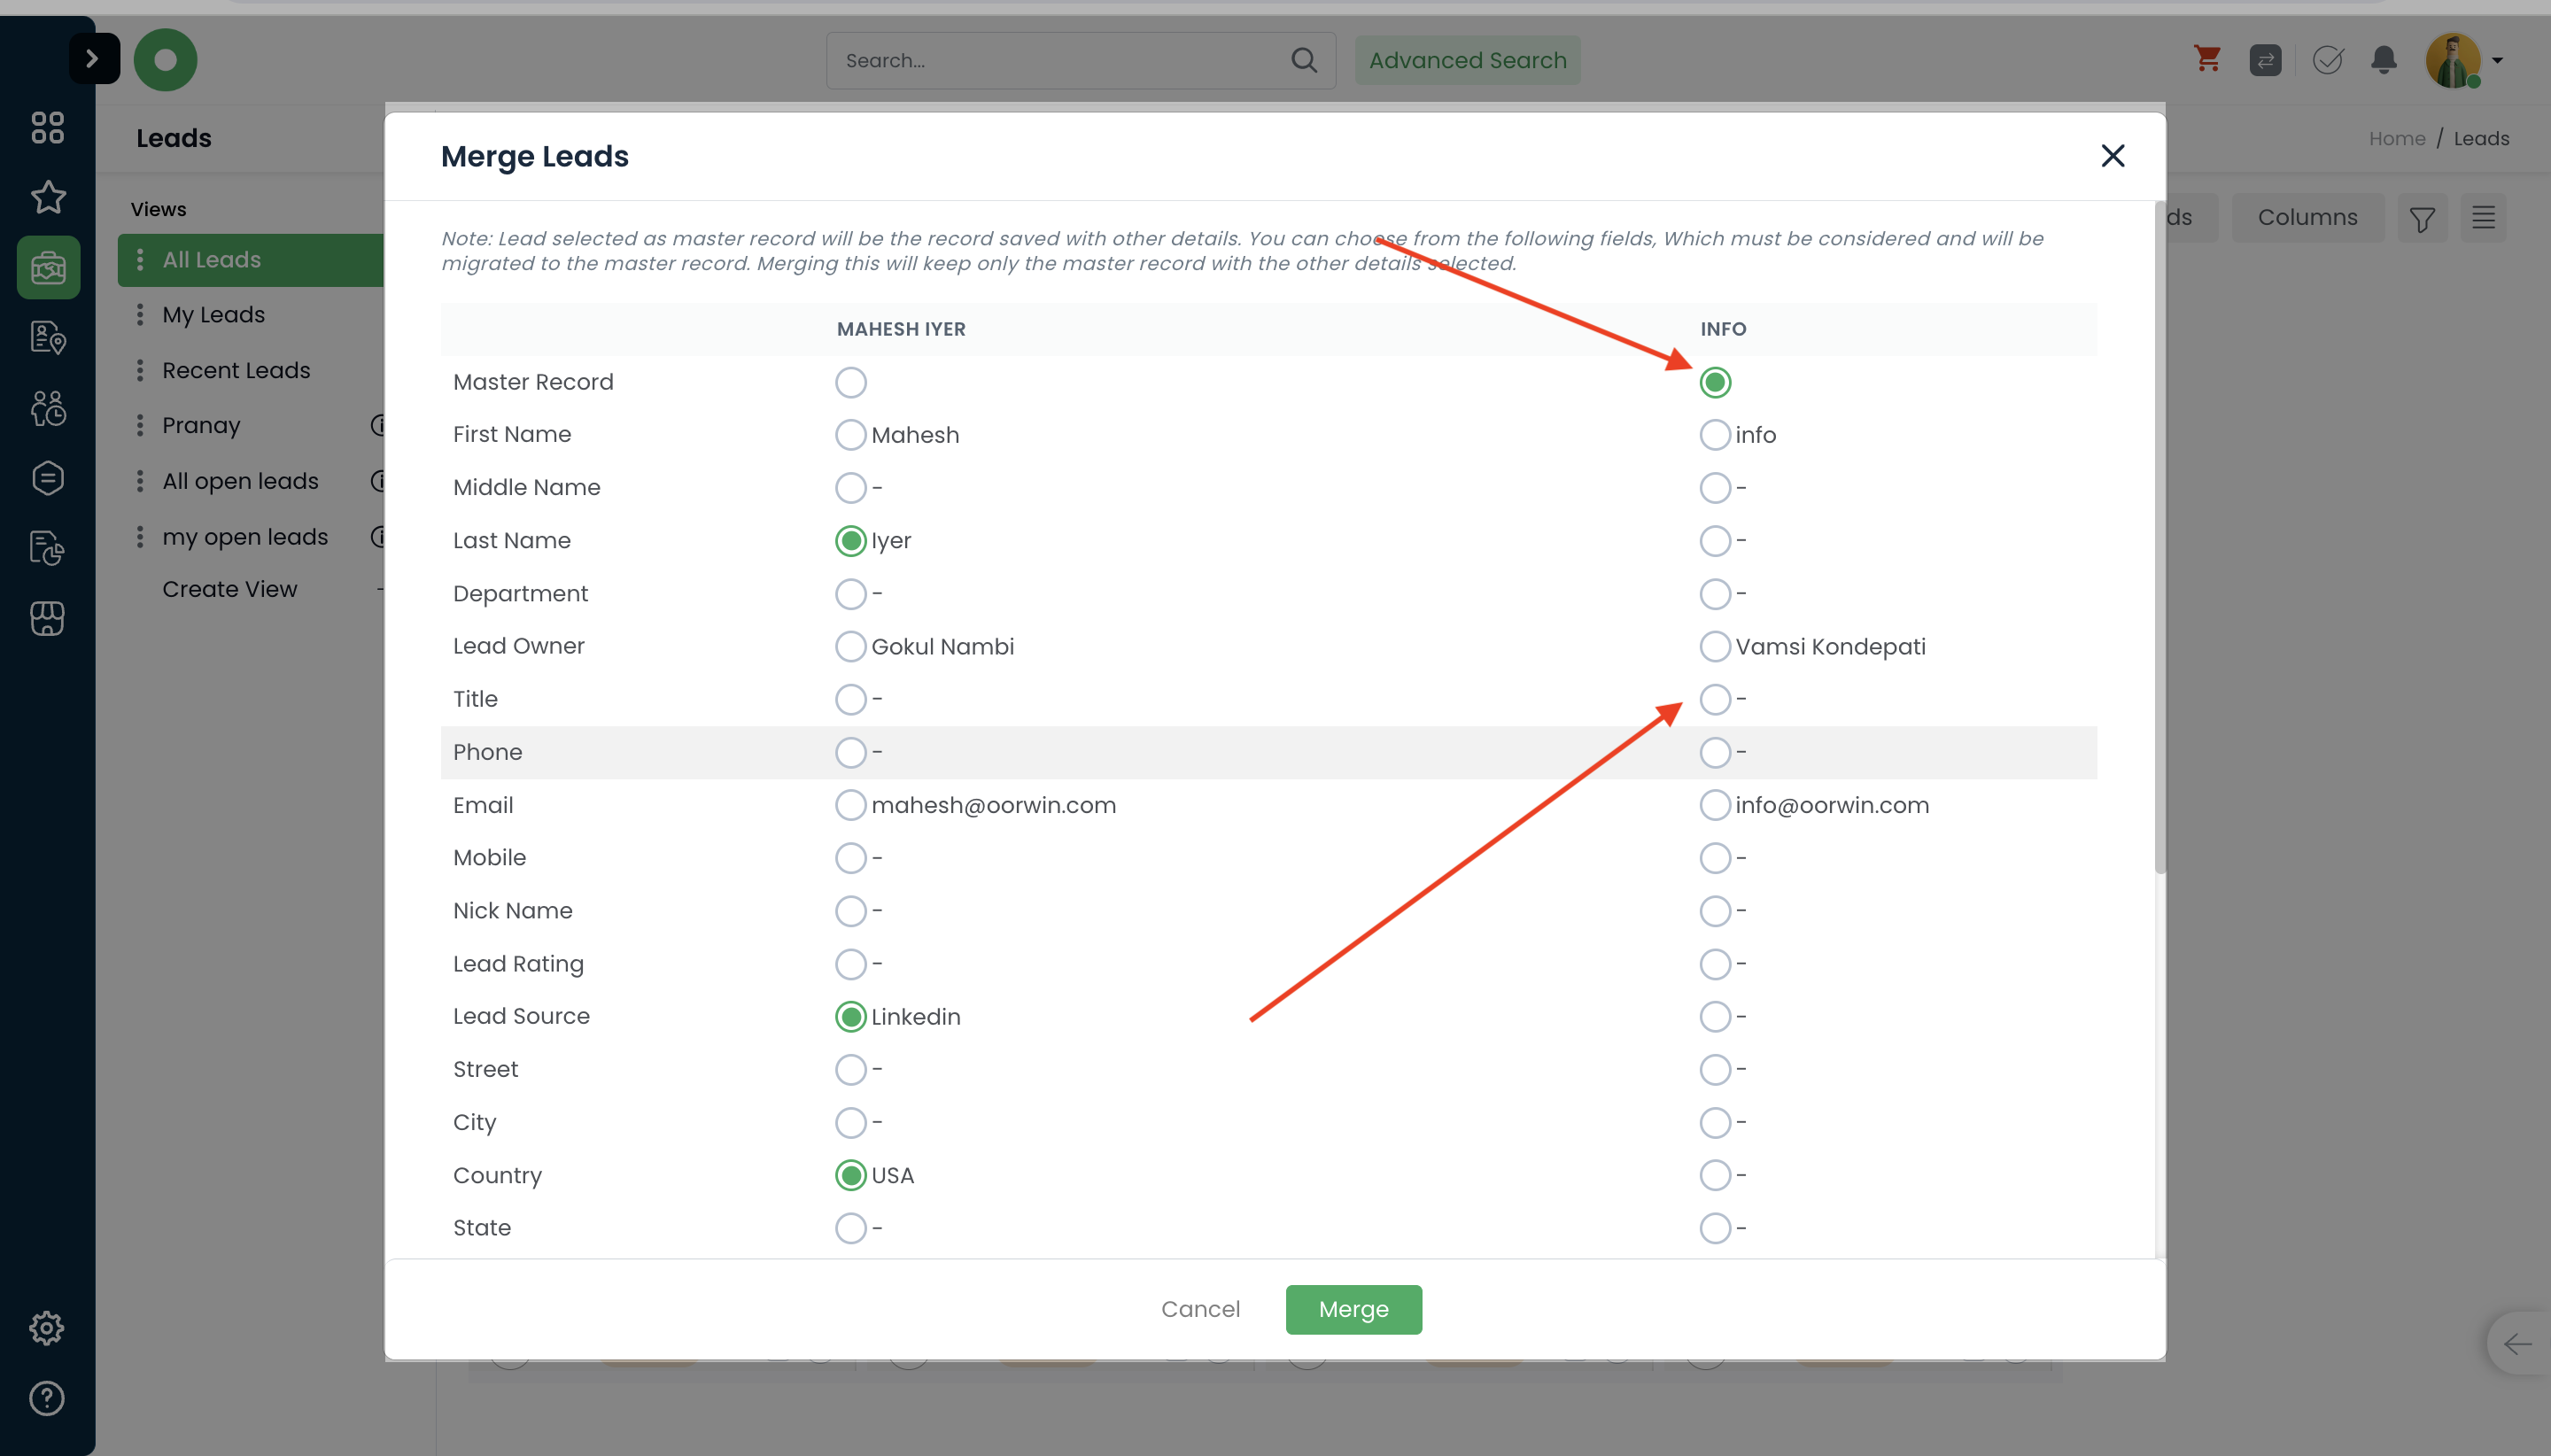
Was this article helpful?
User can schedule the reports to get them in their email based on the configuration and different time cycles they set
Here is how we can do it
- Log in to your Oorwin Account and navigate to Settings page from the left bottom
- Go to Reports module on the menu and click on any report that you wish to schedule
- There will be a button called Schedule Report on the top right corner which opens a popup to configure the report scheduler
- Enter all the fields like Name, time cycle like daily, weekly, monthly etc and select the time
- Now select the roles and users to whom the report should be sent and you can add additional recipients also as emails
- Now click on save, and your report will be saved as a schedule report and you can verify all the scheduled reports in Scheduled Reports tab

Was this article helpful?
- In this blog lets see how Harvesting works in Oorwin
- Navigate to “Advanced Search”
- Click on “Schedule Harvesting” option
- you will find following options
- Schedule Options:
- On Selected Date: Allows you to specify a particular date when the system will harvest resumes.
- Till Selected Date: Enables harvesting until a specified end date, collecting resumes continuously until that point
- Continue Until Disabled: Keeps the harvesting process ongoing until manually stopped by the user.(This is considered as Automated Resume Harvestin)
- Limit:
- Maximum Profiles: You can set a limit on the number of resumes to be harvested. In this example, the limit is set to 10 profiles.
- Interval:
- The system offers specific time intervals at which the resume harvesting process will run. In the image, the options are:
- 05:00 AM
- 07:00 AM
- 04:00 PM
- Harvest from:
- This section lets you choose the sources from which resumes will be harvested. Available options include:
- Internal (company’s own database)
- Dice
- Monster
- Career Builder
- TechFetch
- The user can select multiple sources to gather a diverse set of resumes.
- This section lets you choose the sources from which resumes will be harvested. Available options include:
- Search Criteria:
- Keyword Input: Allows you to input specific keywords to refine the harvesting process, ensuring that only resumes matching the desired criteria are collected.
- Boolean Search: The option to use Boolean operators (e.g., AND, OR, NOT) allows for more complex search queries, making it easier to target specific candidate profiles.
- Save:
- After configuring the settings, the user can save the setup, and the automated harvesting process will run according to the specified parameters.
- The system offers specific time intervals at which the resume harvesting process will run. In the image, the options are:
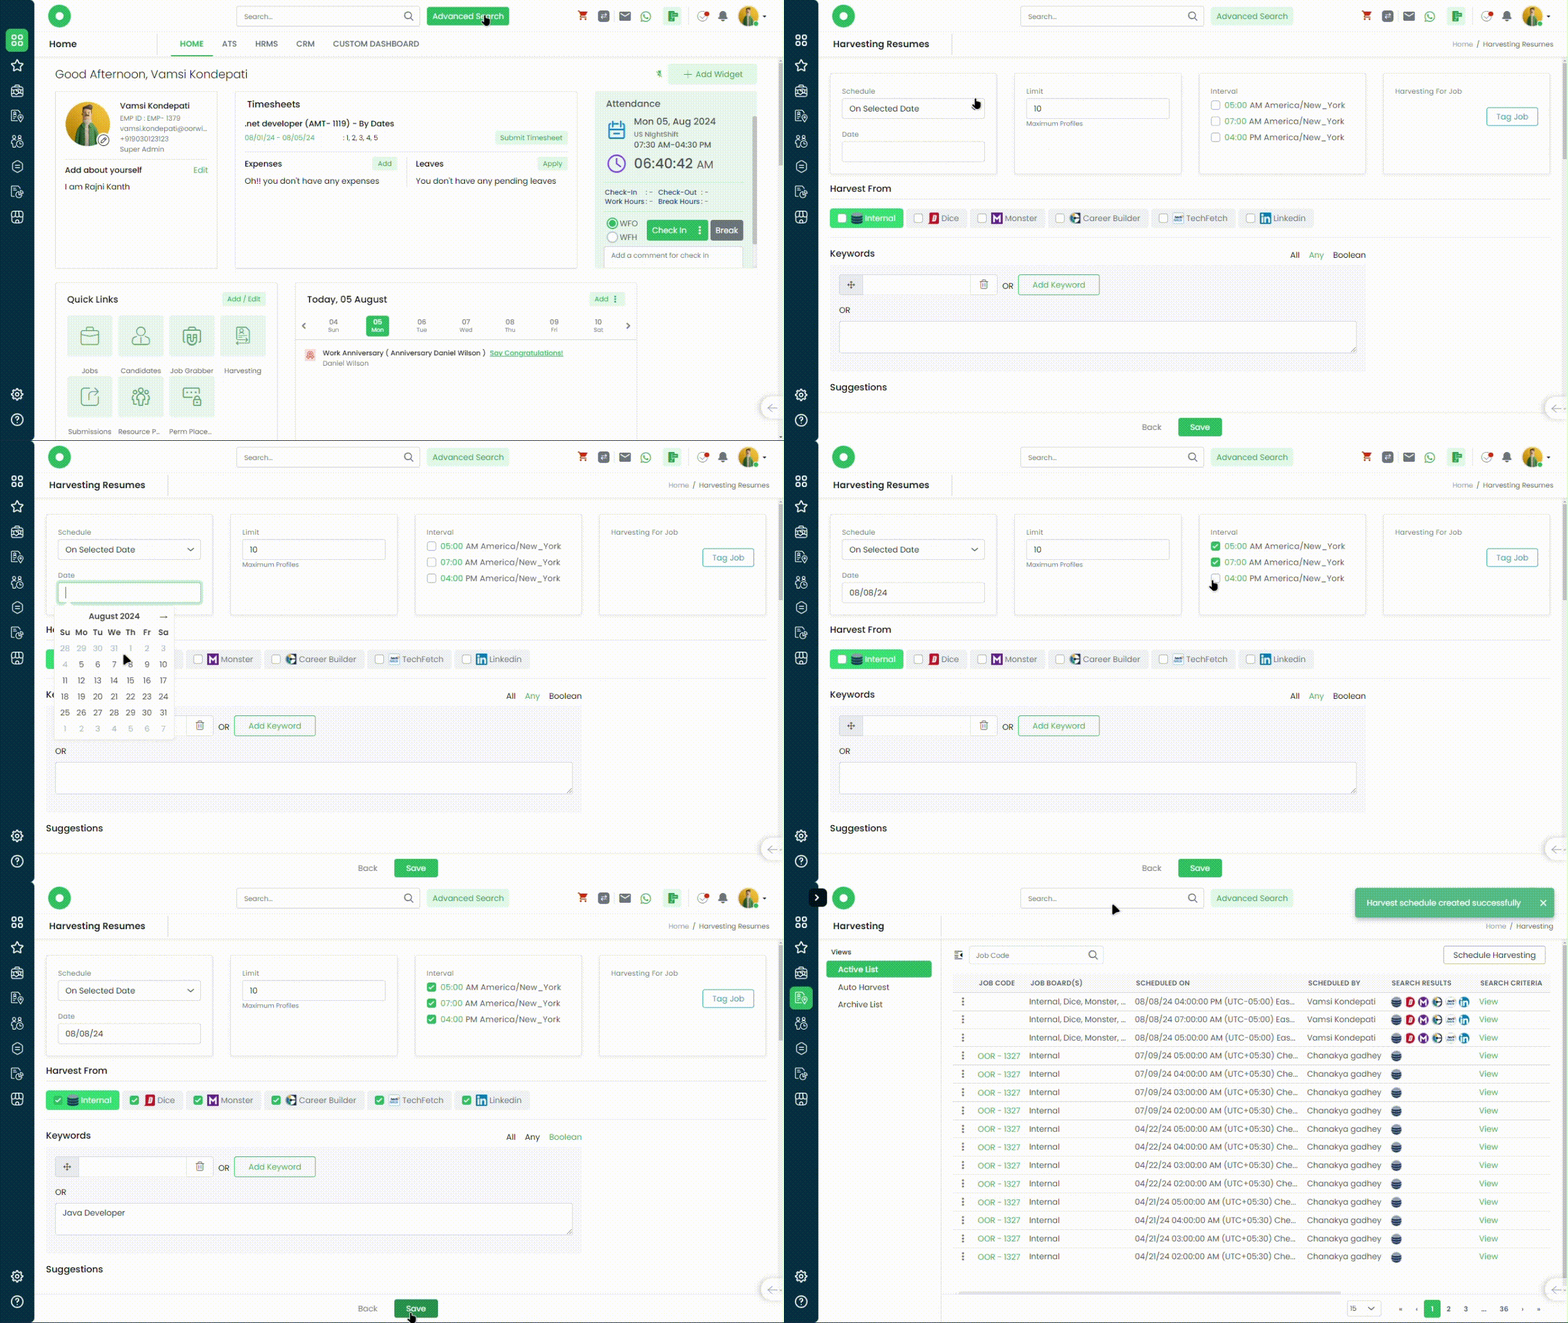
Was this article helpful?
You can send an email to the account contact through Oorwin portal by following below steps
- Log in to your Oorwin Account and navigate to Contacts module from the left menu under General Section
- Select any contact to whom you want to send an email
- Click on three dots and then click on Compose mail option from the actions drop down
- You can select the pre defined email templates or enter your own content in the email body
- Enter any additional recipients in the CC field and add Subject on your own
- You can add attachments also from the select attachements section
- User can also use the mail merge option to replace with the name of the receiver in the mail body
- Once you are done with all the content then click on Send button to send the email to your receivers

Was this article helpful?
You can send an email to the Employee through Oorwin portal by following below steps
- Log in to your Oorwin Account and navigate to Employees module from the left menu under HRMS Section
- Select any Employee to whom you want to send an email and click on it
- You will find Compose mail option below the candidate profile image and click on it
- You can select the pre defined email templates or enter your own content in the email body
- Enter any additional recipients in the CC field and add Subject on your own
- You can add attachments also from the select attachments section
- You can also select from email form the drop down which will display that email to the receiver
- Once you are done with all the content then click on Send button to send the email to your receivers

Was this article helpful?
You can send different type of documents like digi sign,Manual and FYI to a contact to fill and sign on it in multiple situations.You can also request few documents which you need to get from the client contact. Upon submission of all these documents by the contact, these will be automatically saved in the client document section
Here is how you can send and request the documents to a contact:
- Log in to your Oorwin Account and navigate to contacts module from the left menu under General Section
- Open any contact by clicking on contact name to whom you want to send & request documents
- Search for Send & Request Documents icon on the top right and click on it
- It will automatically opens the list of documents along with the request option
- Select the documents from the drop down in request documents section by clicking on the check boxes
- And select digi sign templates,manual FYI which you want the contact be signed on
- Now click on send button below which will trigger an email to the contact email id along with the link to access all these documents

Was this article helpful?
You can send different type of documents like Digi sign,Manual and FYI to an employee to fill and sign on it in multiple situations. Upon submission of all these documents by the employee, these will be automatically saved in the employee document section
You can perform this action in two ways
- From employees listing page->Actions->Send Documents
- Employee view page->Send Documents
Here is how you can send the documents to an employee:
- Log in to your Oorwin Account and navigate to Employees module from the left menu under HRMS Section
- Open any employee by clicking on employee name to whom you want to send documents
- Search for Send Documents icon just below the profile image and click on it
- It will automatically opens the list of documents to select along with the create digi template option
- Select the documents like digi sign templates, manual FYI which you want the employee to be signed on
- Now click on send button below which will trigger an email to the employee email id along with the link to access all these documents
- Employee can access these documents from the link and complete it by filling the necessary details and then submit it again to the sender


Was this article helpful?
Navigate to Main Menu -> General -> Digital Templates -> Add/Edit -> Enable Send as FYI
By doing this, The default recipient(Candidate/contact) to whom this document is intended to, would receive this document as an attachment which can be downloaded.
However, if there re Approvals or Signing required it would still work, Its just the default recipient would have this document as an downloadable FYI document where he/she can not perform any actions such as signing or accepting rather they will be downliading.
These Digital templates can be used in different modules such as Contacts, Candidates, Employees and many more.
We have considered Onboarding as an example below:
Step1: Open Onboarding
Step2: Add Document
Step3: Configure document (Just to ensure that the document data has been picked)
Step4: Send Update
Step5: Approver approves the document (As this document has approver as shown above)
Step6: Candidate would recieve this document as an attachment to their email.
Was this article helpful?
Profile update request is a feature which helps you to request the missing details from an employee without logging to the portal.
Here’s a guide on how to profile update Request to Employees:
- Log in to your Oorwin Account and navigate to Employees module from the left menu under HRMS Section
- Click on “Actions(three dots)” icon for the employee you wish to send profile update request.
- Click on Profile update request link from the list under the actions list
- It opens a popup where you can select the missing fields to be requested from the employee
- Select all the required Fields & Documents to update and Click on “Send”.
- The Employee will receive an email notification about the requested details to update
- Employee can access the link provided in the email and update all the requested details and submit
- The sender will also get an email notification to approve the submitted details from the employee
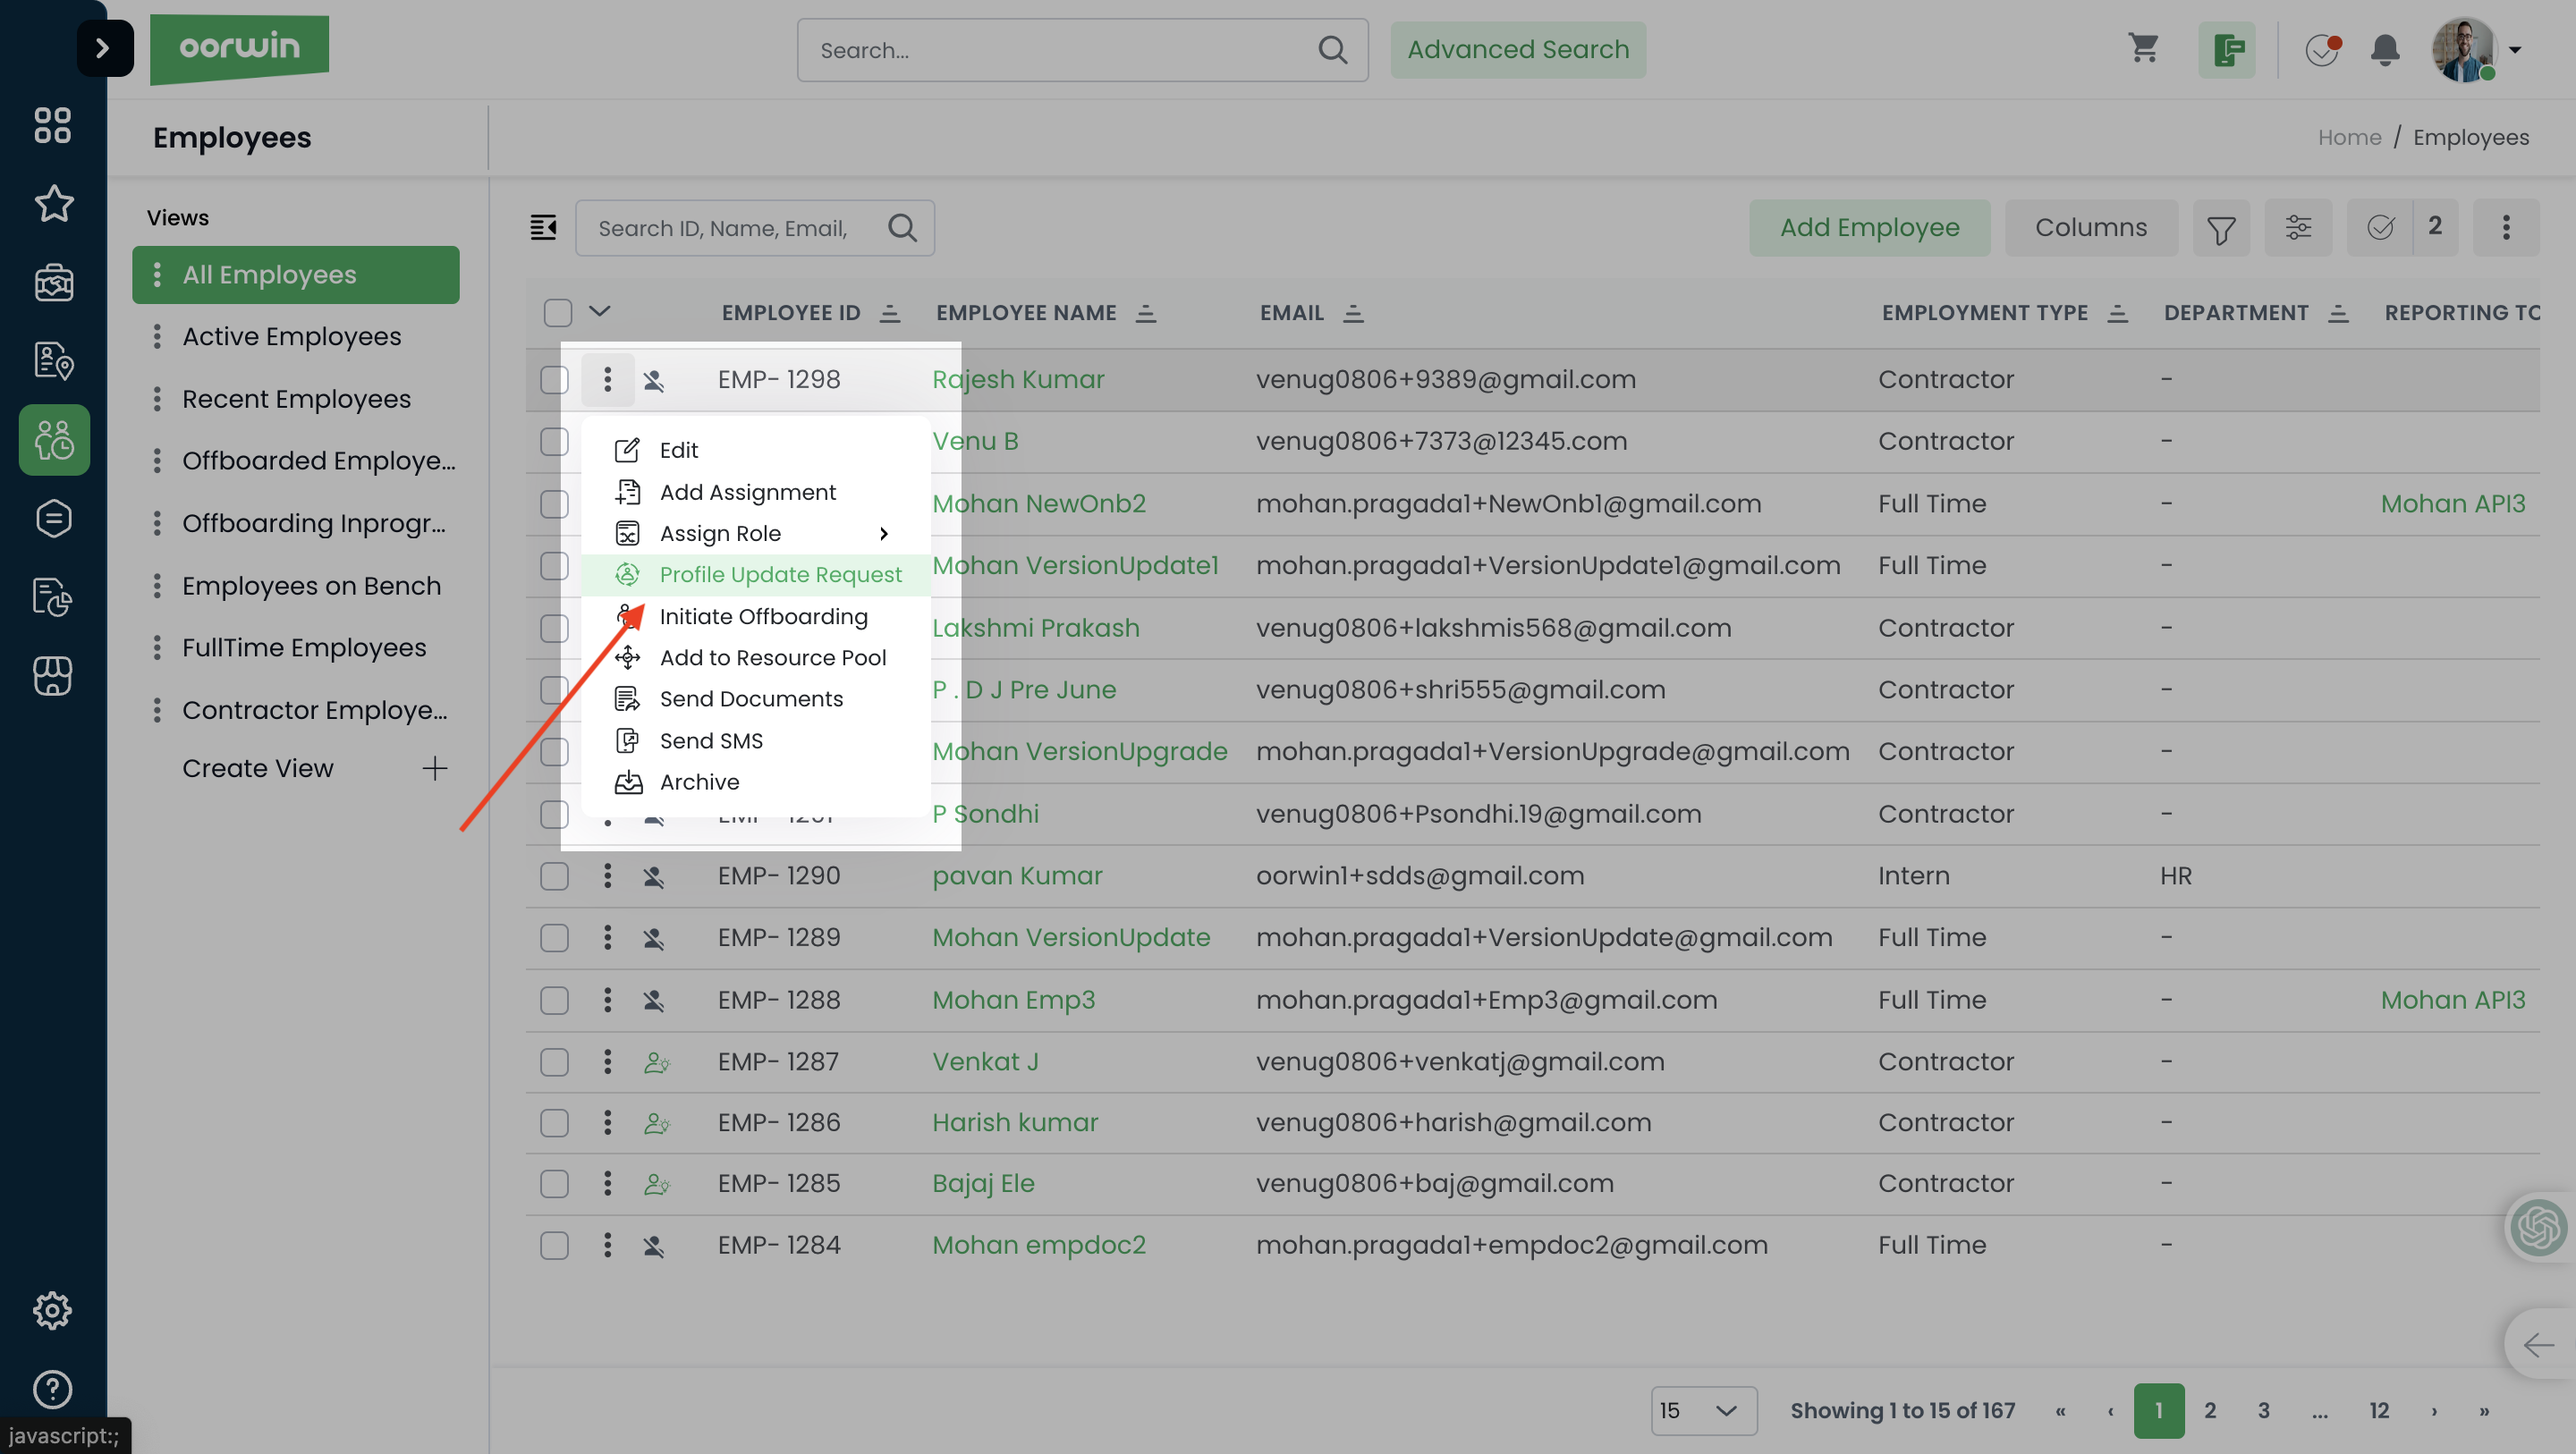
Was this article helpful?
You can configure attendance check-in or check-out reminders along with late login reminders to the reporting managers. You can configure them through the attendance configuration page from the settings
Below are the steps to do it
- Log in to your Oorwin Account and navigate to Settings page from the left bottom
- Go to Configurations on the left menu and click on Time & Attendance section
- In the attendance tab general section there is a notification configurations for different types
- User can configure and enter the check-in/check-out notification time before or after shift start
- User can also configure the late login notification to the reporting manager if any employee logins late after the shift start time
- Based on this configuration system will send a timely reminders to the employee on the check-in and check-out reminders along with the late login notification to reporting manager if any employee logins after the specified time when the shift starts

Was this article helpful?
Oorwin helps you to set and track all the Individual,Team & Organizational targets based on the time cycle. This helps the organization to track the performance of each employee as individual and team
Here is how you can set target to CRM user
- Go to Targets module from the left menu under General Section
- Select CRM on the left menu which will show you the list of targets assigned to you
- Click on Set Targets button on the top right corner to create a new target
- Select the User/Team/Organization drop down and select the users to whom you want to set target
- Now select the target cycle like day, week, month etc to track the target on this cycle

- Now click on Next which shows you different set of targets for each module like leads closures, notes creations, Calls, Opportunity amounts etc
- Enter all the preferred targets for each person and click on Save
- You can also set bulk apply the same target for all the users by checking the checkboxes and click on bulk actions

Was this article helpful?
This feature allows jobs to be automatically posted to designated job boards as soon as they are created in Oorwin, streamlining the job posting process based on preconfigured settings.
Configuration Steps:
- Navigate to Settings:
Go to Settings → Configuration → Default Settings. - Access Job Postings:
Click on Job Postings. - Set Up Job Boards:
- Select the desired job boards.
- Enable the option to Post Job on Creation for each selected job board.
- Provide Contact Details:
Enter the Contact Person, Email, and Phone Number required to post jobs on the respective job boards. - Save Changes:
Click Save to apply the configurations.
Automated Job Posting:
Once the configuration is complete, the system will automatically post new jobs to the selected job boards immediately after they are created, ensuring efficient and consistent job distribution.
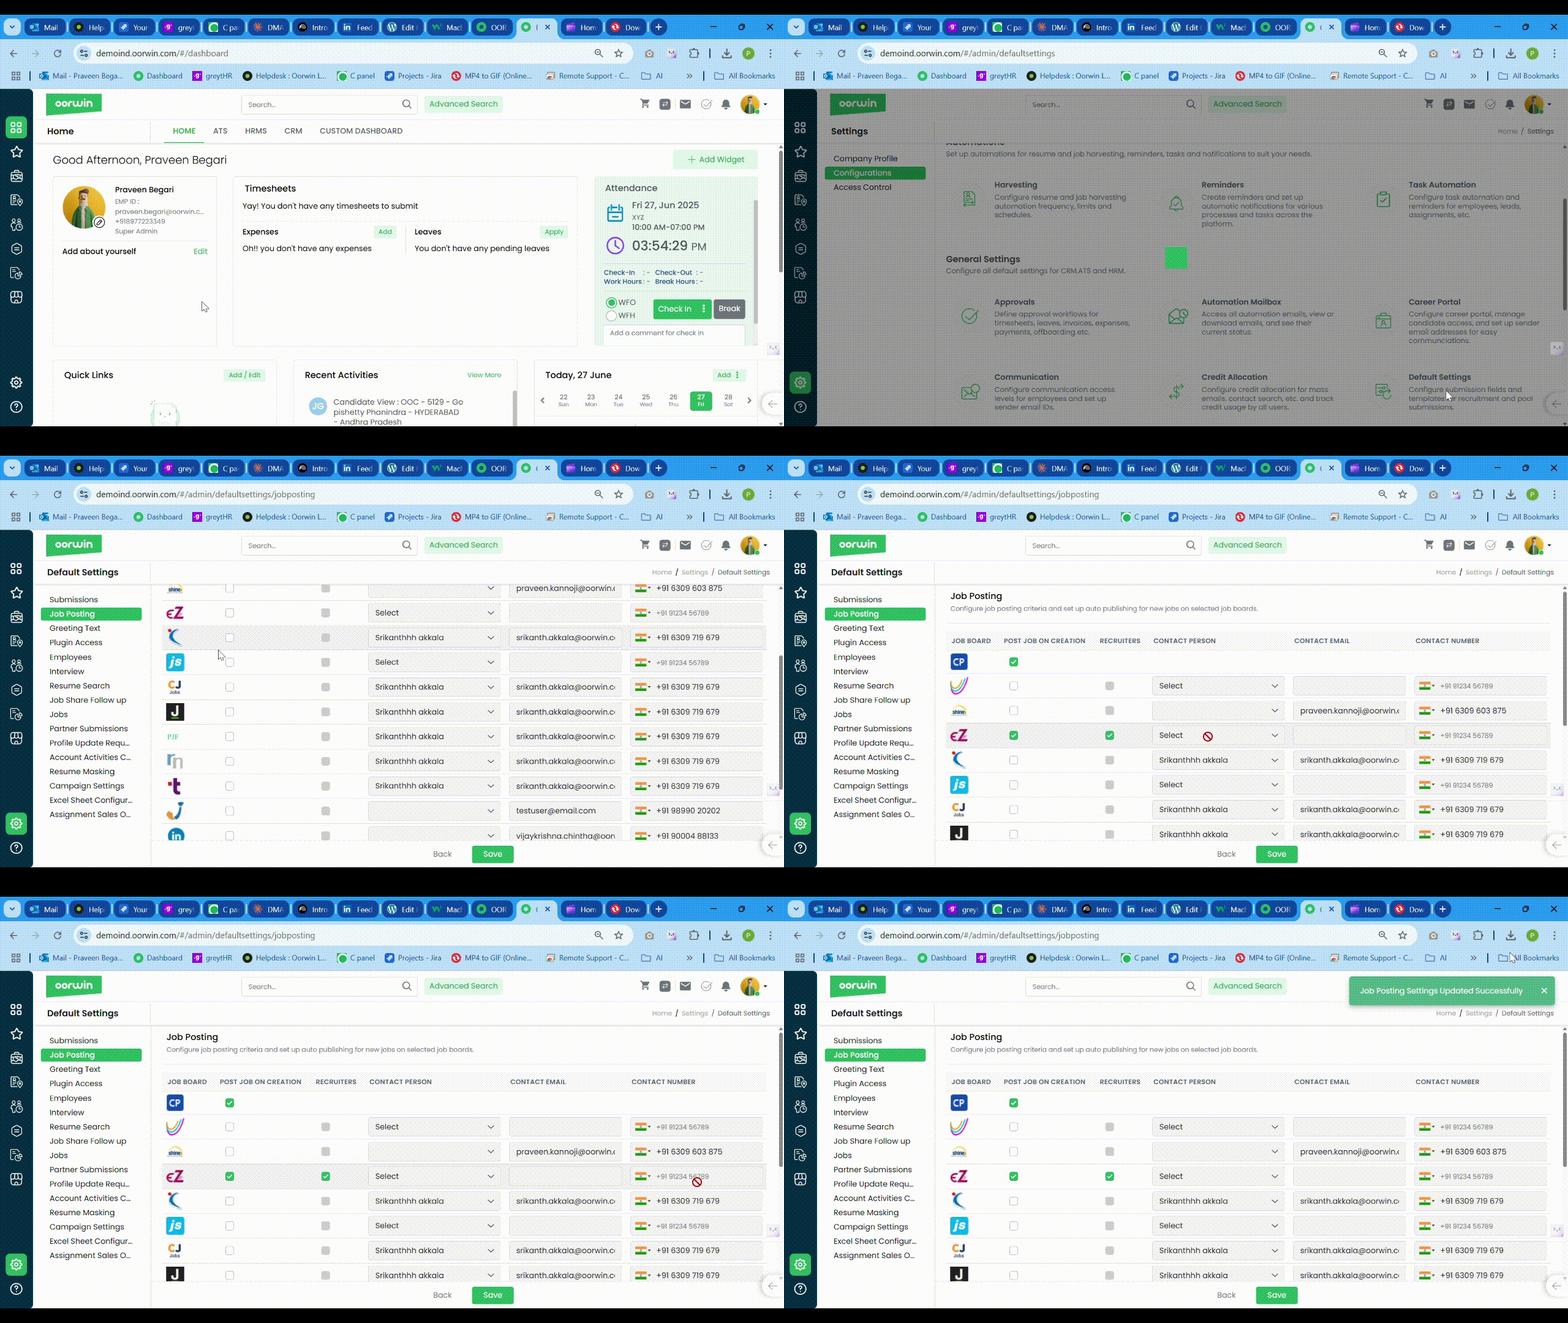
Was this article helpful?
Oorwin lets you customize your email communications by allowing you to send and receive emails from your company domain.
Here is how you can do it:
- Log in to your Oorwin Account and navigate to settings page from the left bottom
- It opens the company profile page with multiple sections in it
- Click on Email DNS section under company profile page
- Enter your domain name in teh add domain field in this format “notify.yourmaildomain.com” and click on update
- This action will generate the TXT,CNAME and MX records in the same page below
- Now go to your domain and login and create a DNS (Type) record on your domain with the DNS details from this screen
- Now come to oorwin and click on ‘Verify‘ once details are updated on your domain.
- A green tick will be visible for verified records and all records must be verified which gives you a conformation of the verified DNS records
- This process completes the DNS verification and from now onwards all the emails will be sent through your domain from Oorwin
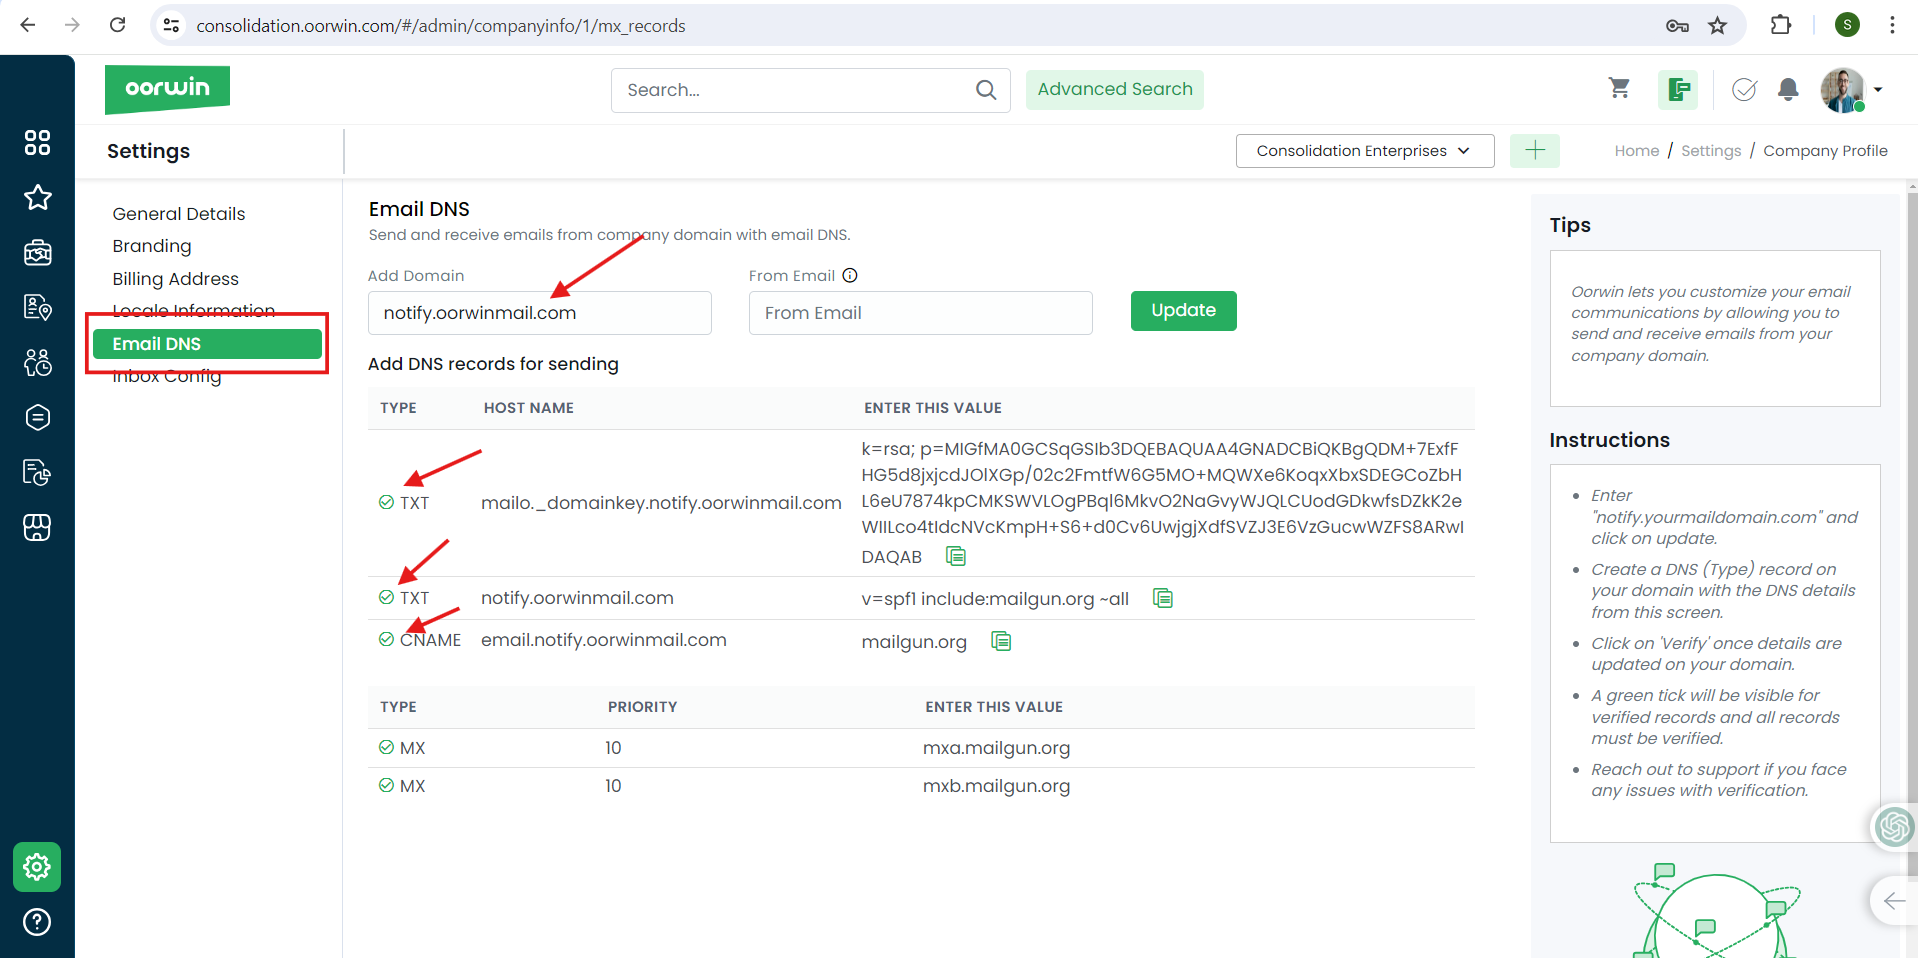
Was this article helpful?
To show the Purchase order number in the invoice, please follow the below steps
- Navigate to the assignments
- Click on invoice information
- check the box for ( Show PO number in invoice) in the bottom of the page
- click on save to update the records
- From now whenever invoice raised for this project , PO number will be shown in the invoice
Was this article helpful?
Here’s a detailed guide to on How to Unpublish Jobs:
- Login to your “Oorwin account” and Navigate to “Jobs module” on the left menu under the “Recruitment” section.
- Select “Published Jobs“ button in the header.
- You’ll have access to all the Published jobs from there.
- Now select the published jobs that you want to Unpublish or Bulk select all the published Jobs.
- You can also select the jobs by Job boards or Publisher.
- Click on Batch Actions drop down and Select Unpublish option.
- The Selected Jobs will be Unpublished.
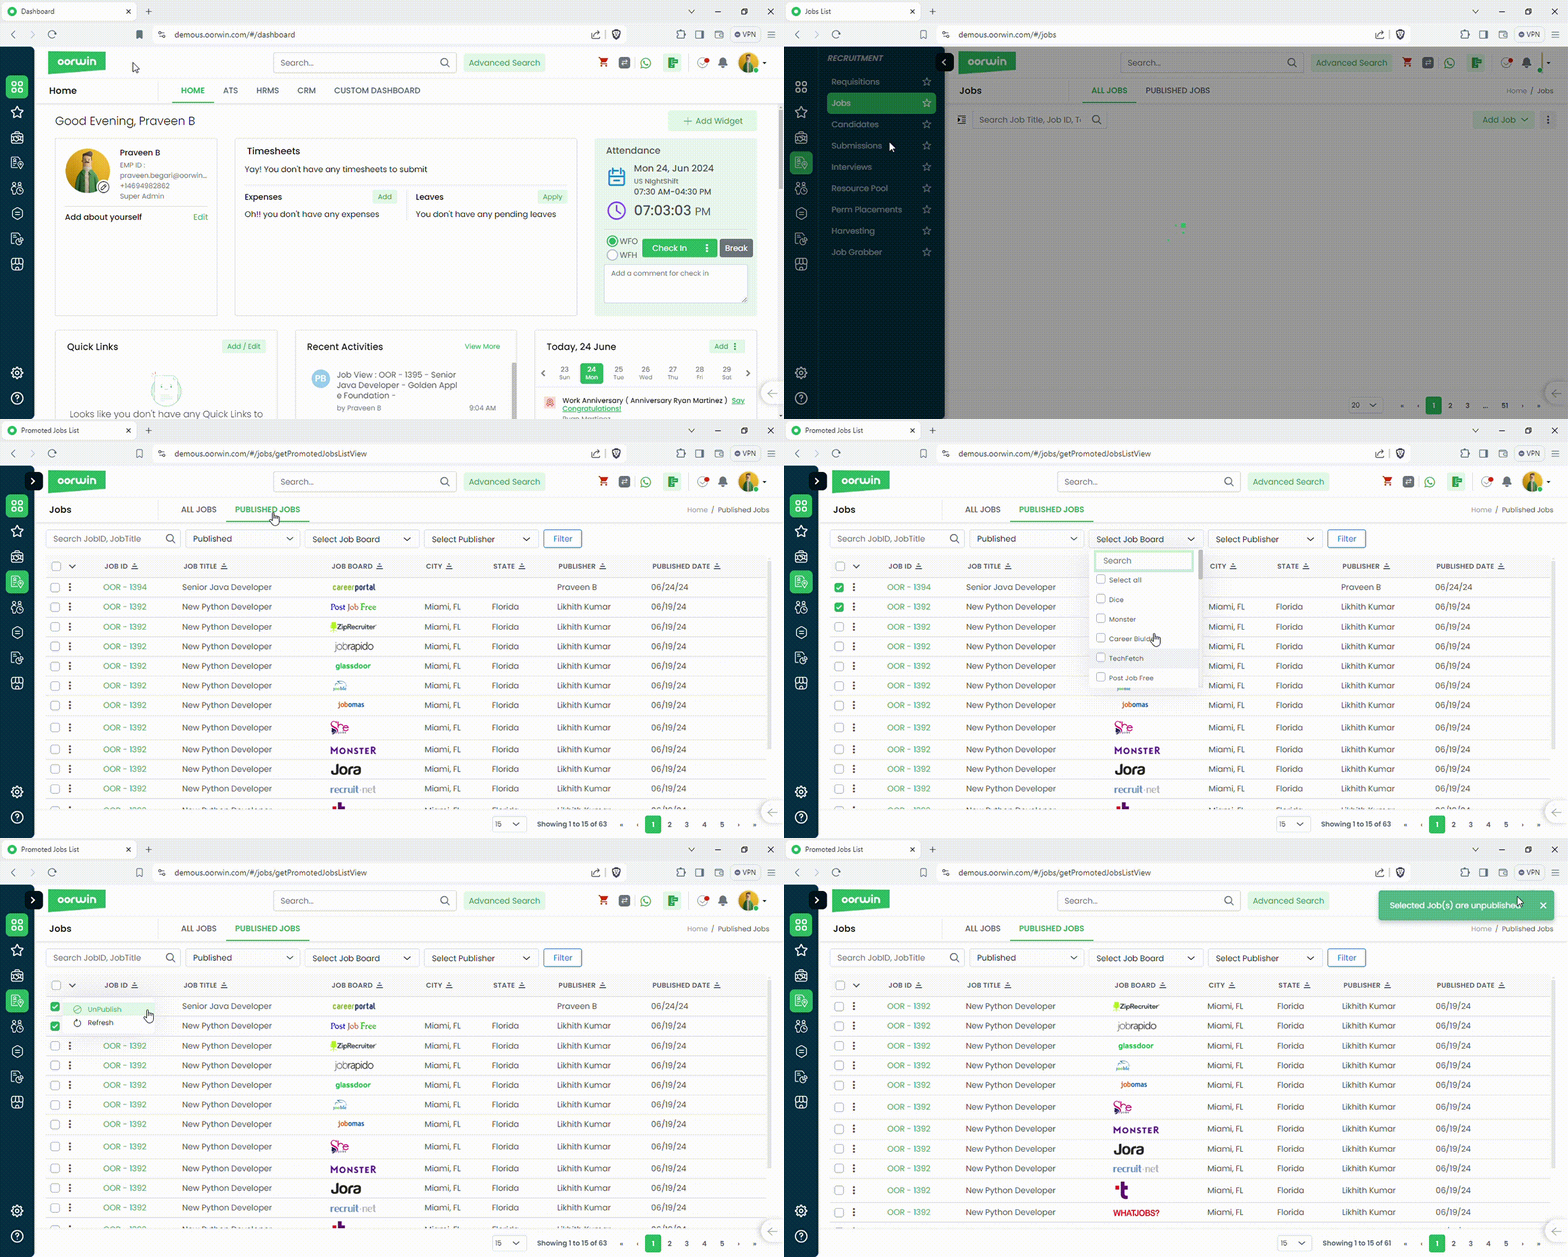
Was this article helpful?
You can change/Customize company details like name,website,currency,contact details etc at any point of time. These details will be used across the platform where it is needed
You need to have a super admin access to update these details through settings Here is how you can do it
- Log in to your Oorwin Account and navigate to settings page from the left bottom
- It opens the company profile page with multiple sections in it
- Click on general details section under company profile page
- Enter all the details that you wanted to update
- Now click on save on the bottom and all your company details has been updated in the system
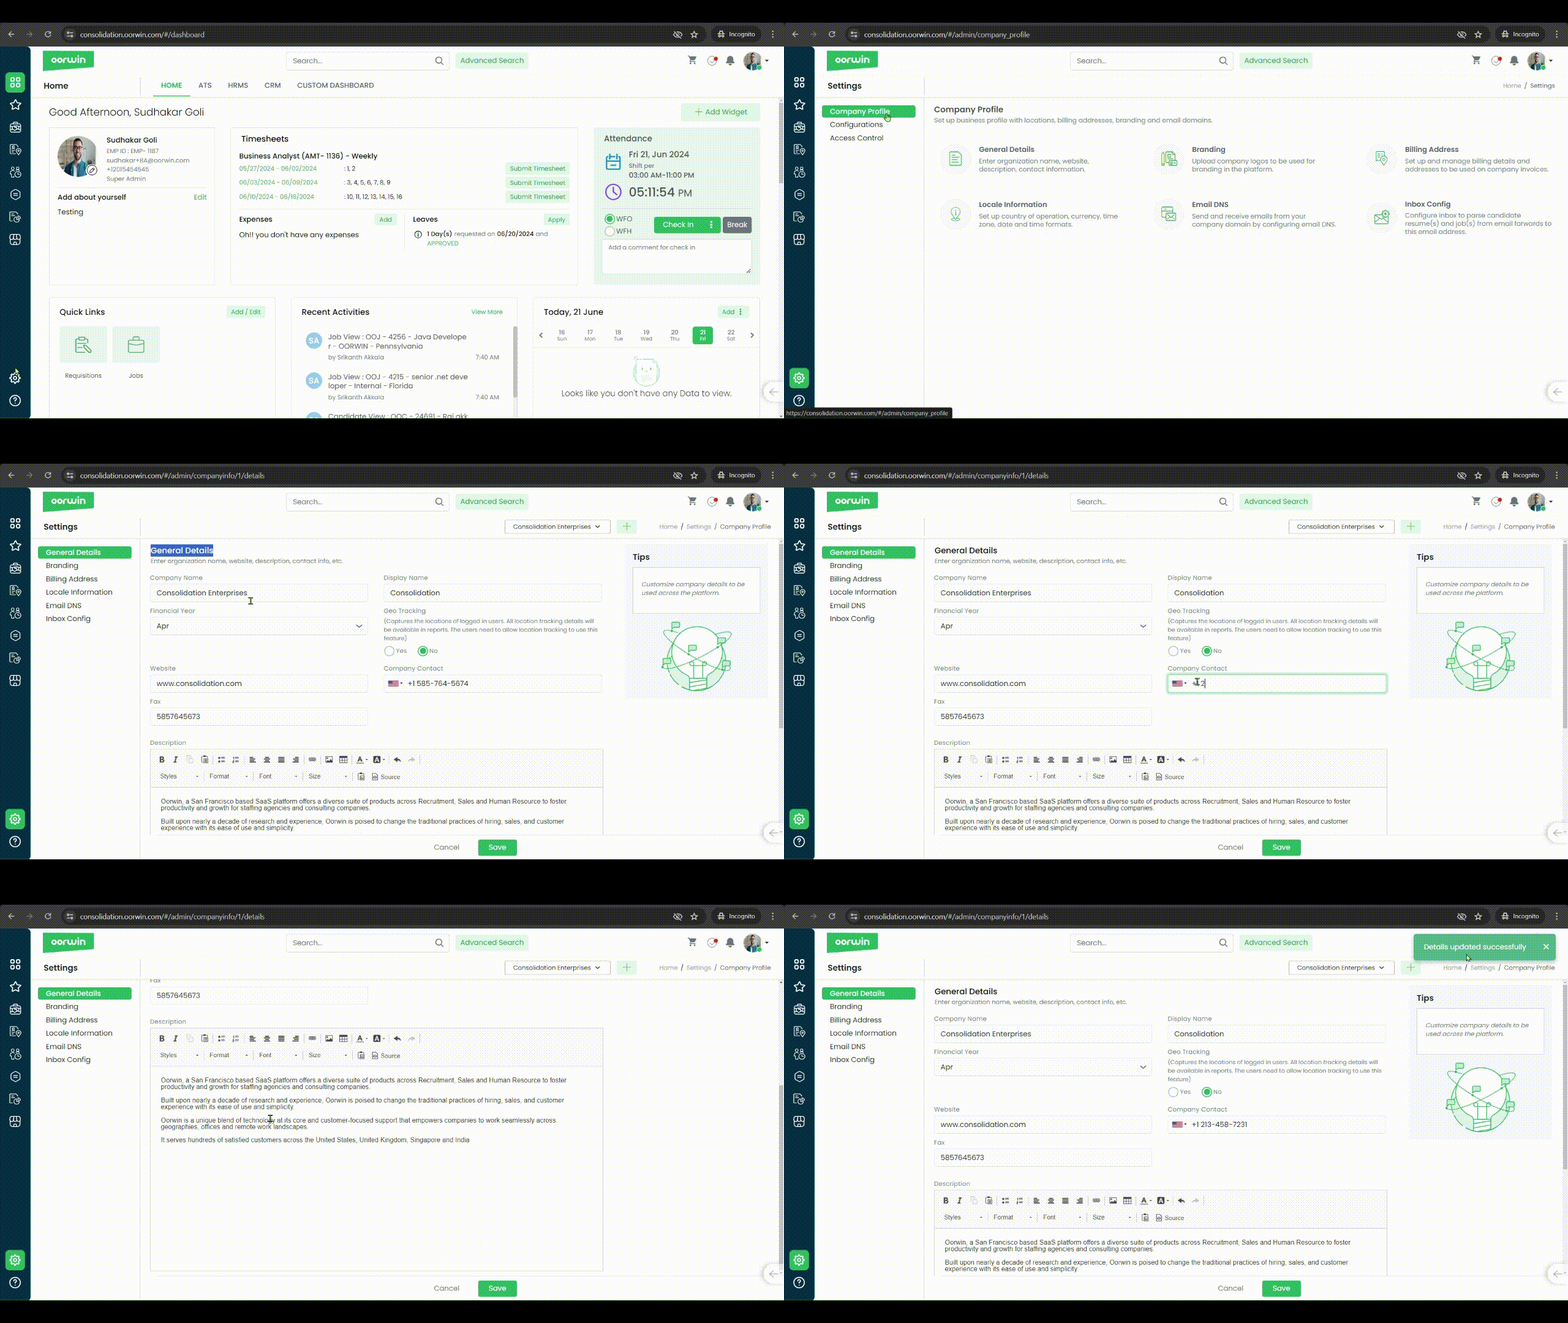
Was this article helpful?
Inorder to update the new Bill/Pay rate in the exsisting assignment, please follow the below steps.
- Navigate to assignments module and edit the module
- Click on Billing information
- Click on add/Revise
- Update the the revised information and based on the details pay/bill rate will be effective from the effective date you select.
- click on save to update the records.
Was this article helpful?
You can check all the actions that everyone has done on the contact as an activity log at any point of time.
Below are the steps to verify the activity log for a contact
- Log in to your Oorwin Account and navigate to contacts module from the left menu under General Section
- Open any contact by clicking on contact name to whom you want to verify the activity log
- Search for Activities icon on the top or click on activities button on the right panel
- It opens a popup with all the activities that all your team did on it
- User can also search/filter the activities based on the action or user from the filter drop down

Was this article helpful?
You can check all the actions that everyone has done on the account as an activity log at any point of time.
Below are the steps to verify the activity log for an account
- Log in to your Oorwin Account and navigate to Accounts module from the left menu under General Section
- Click on any account name to whom you want to verify the activity log
- Search for Activities icon on the top or click on activities button on the right panel
- It opens a popup with all the activities that all your team did on it
- User can also search/filter the activities based on the action or user from the filter drop down
- You can also verify the other module activity log linked to that particular account

Was this article helpful?
You can check all the actions that everyone has done on the employee record as an activity log at any point of time.
Below are the steps to verify the activity log for an employee
- Log in to your Oorwin Account and navigate to Employees module from the left menu under HRMS Section
- Click on any employee name to whom you want to verify the activity log
- Search for Activities icon on the right panel and click on it
- It opens a popup with all the activities that all your team did on it
- User can also search/filter the activities based on the action or user from the filter drop down
- You can also verify the onboarding/offboarding activity log linked to that particular employee

Was this article helpful?
How to View and Download Public Access File (PAF):
- Navigate to Main Menu
- US Immigration
- Case Management
- Public Access File
- Select Employee Name
- Download individual file/document
or
Download as a single PDF(Where all the files/documents would be collated as one single PDF)
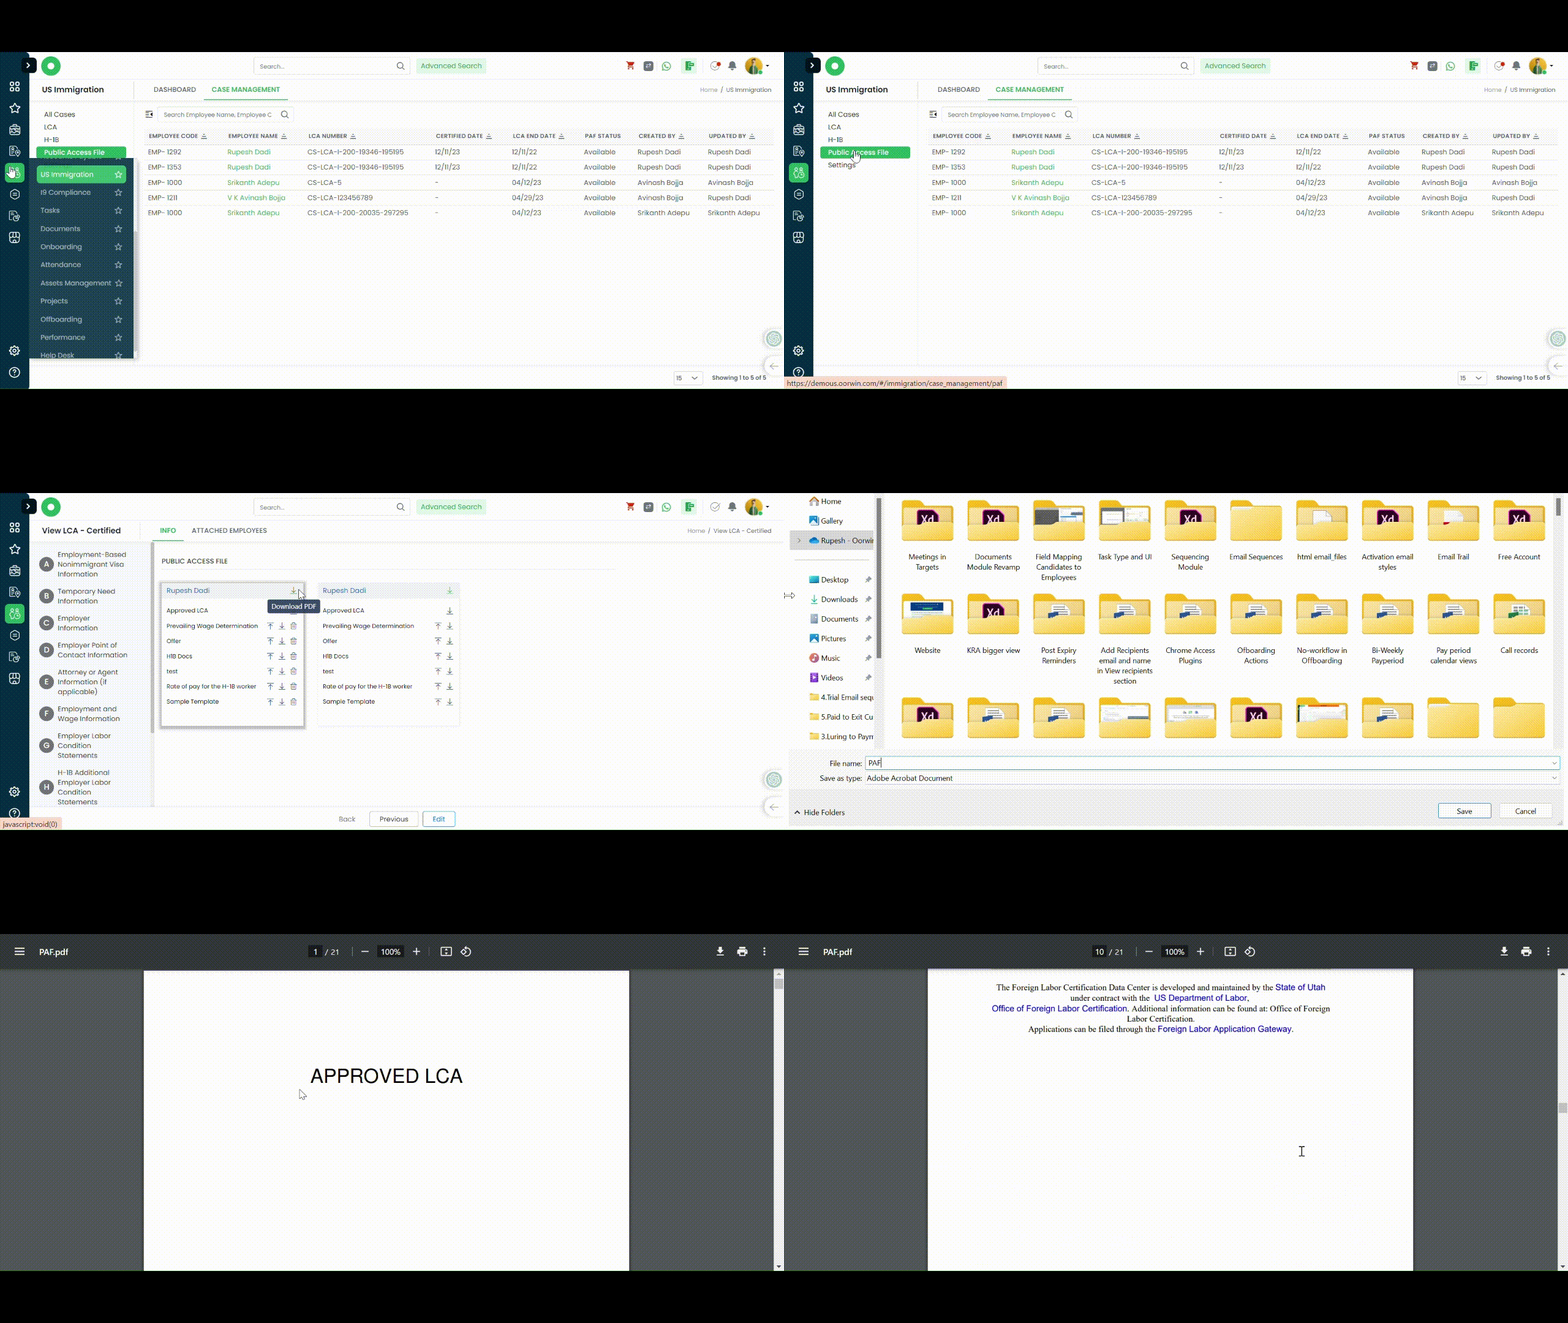
Was this article helpful?
You can also import the multiple users at a time by just uploading through excel sheet and the same can be done by following below steps
To import users list, you must go to Settings -> choose Access Control -> Click on Users.
Once you reach the users screen, click on three dots on the top right corner and you will find the import and export options under the drop down

- You can download an existing template and mention the user details in that template.
- Later, you can upload the same template into the system to add all users onto the system.
- All the mentioned users will be added in the system without any role and you can add the role for each record from the list page

You can also export the existing user record by navigating the same page, by clicking on export option on the top right corner side
Was this article helpful?
Easily import your timesheets through Excel for quick and accurate tracking of work hours and project time.
Download Template
- Navigate to Menu
- Timesheets module
- All Timesheets
- Import Timesheets
- Download Template
- Select Timesheet Cycle, Client, Employees, Assignments and select Date range
- Download
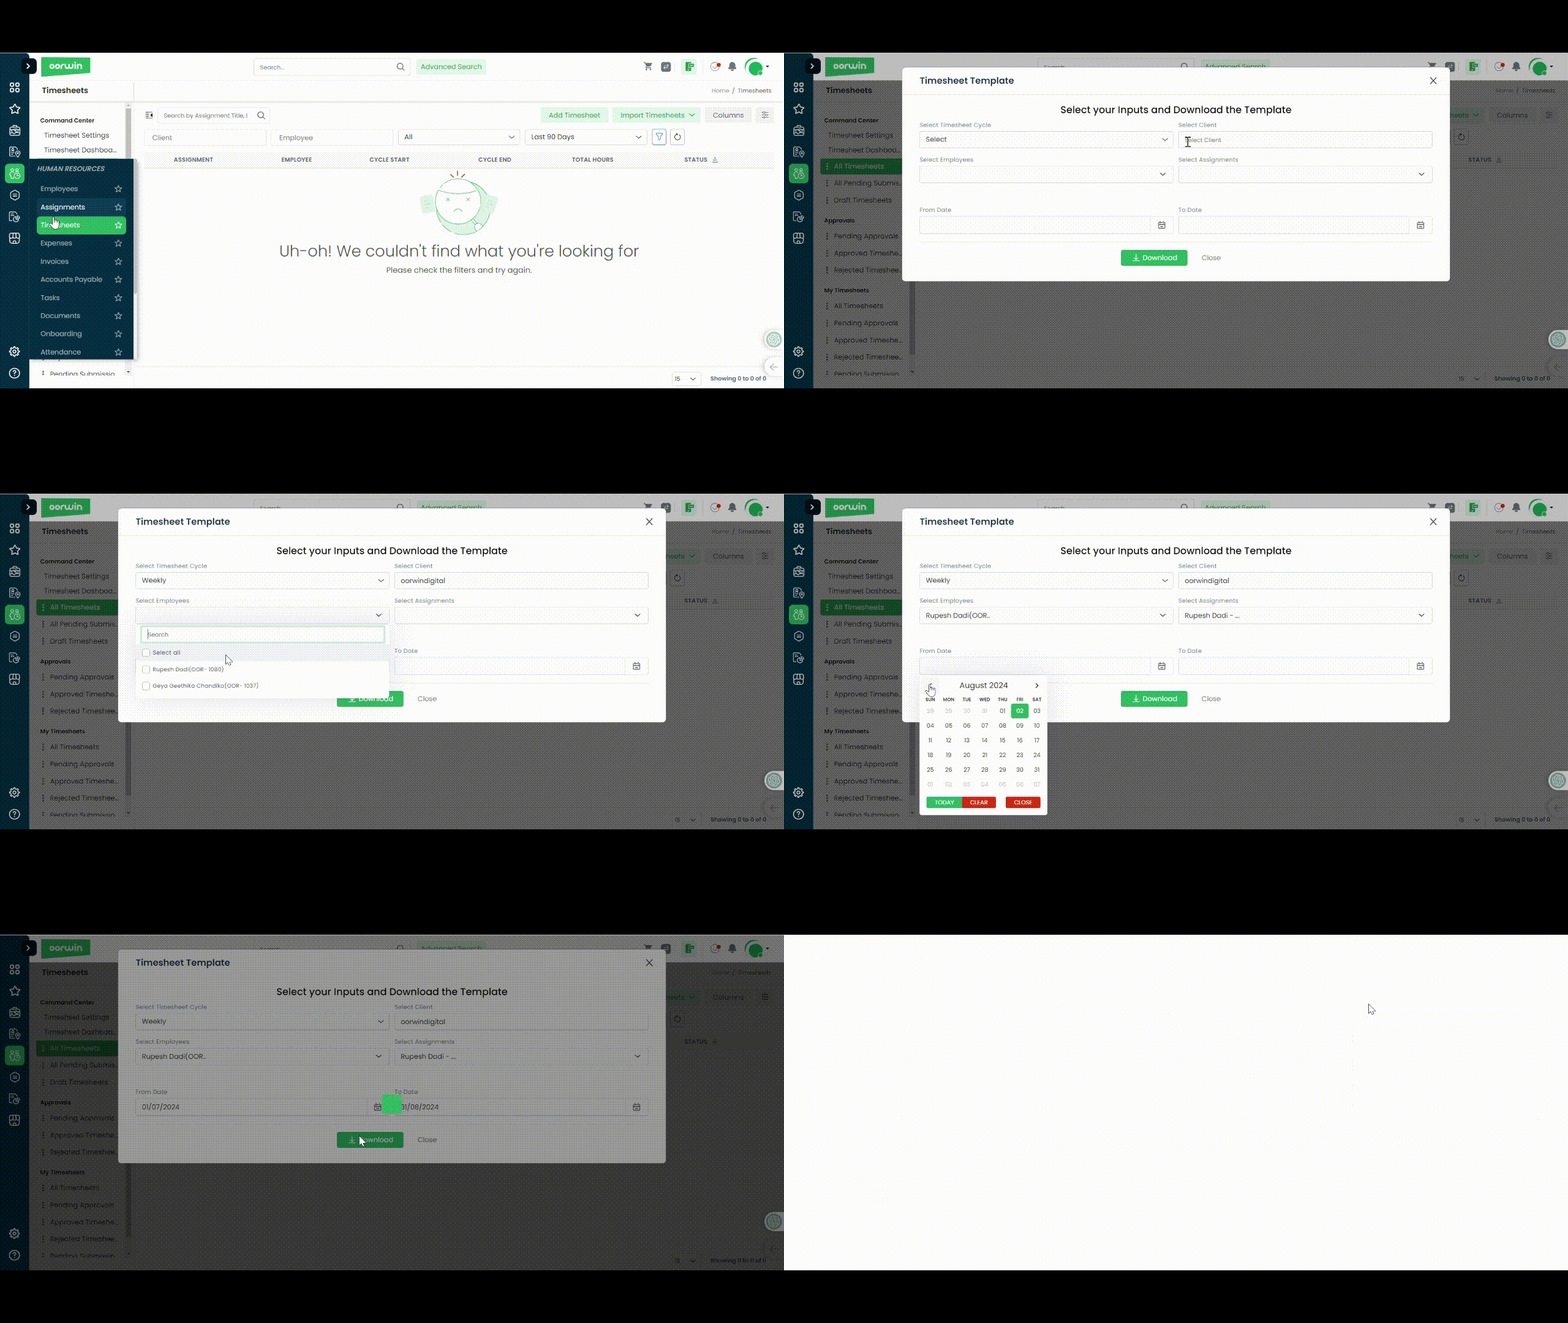
Work on your Template
- Open downloaded Excel
- Enter your time entries in the specified columns
- Save Excel
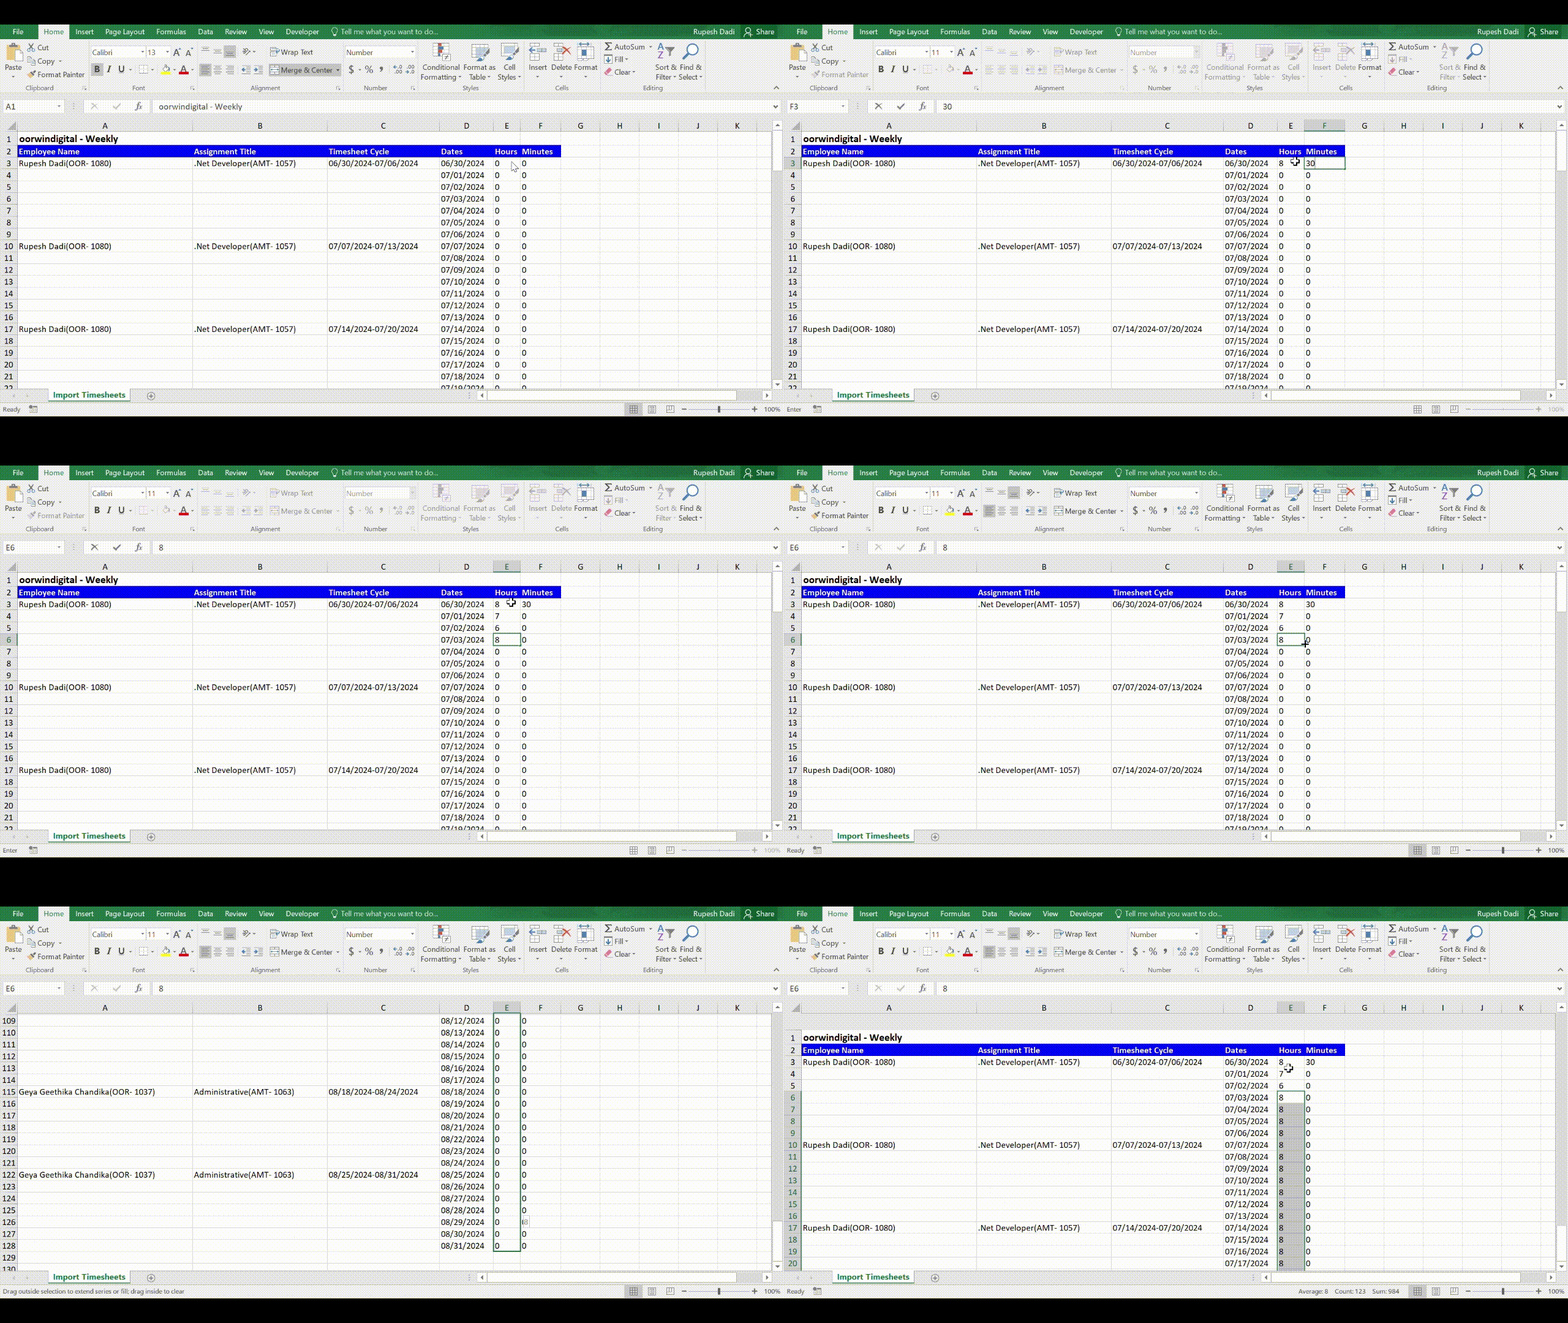
Upload Template(Excel)
- Navigate to Menu
- Timesheets
- All Timesheets
- Import Timesheets
- Upload Template
After uploading the Excel file, all timesheets will be saved as draft invoices with the hours recorded as per the Excel sheet. Users can then review and submit the timesheets
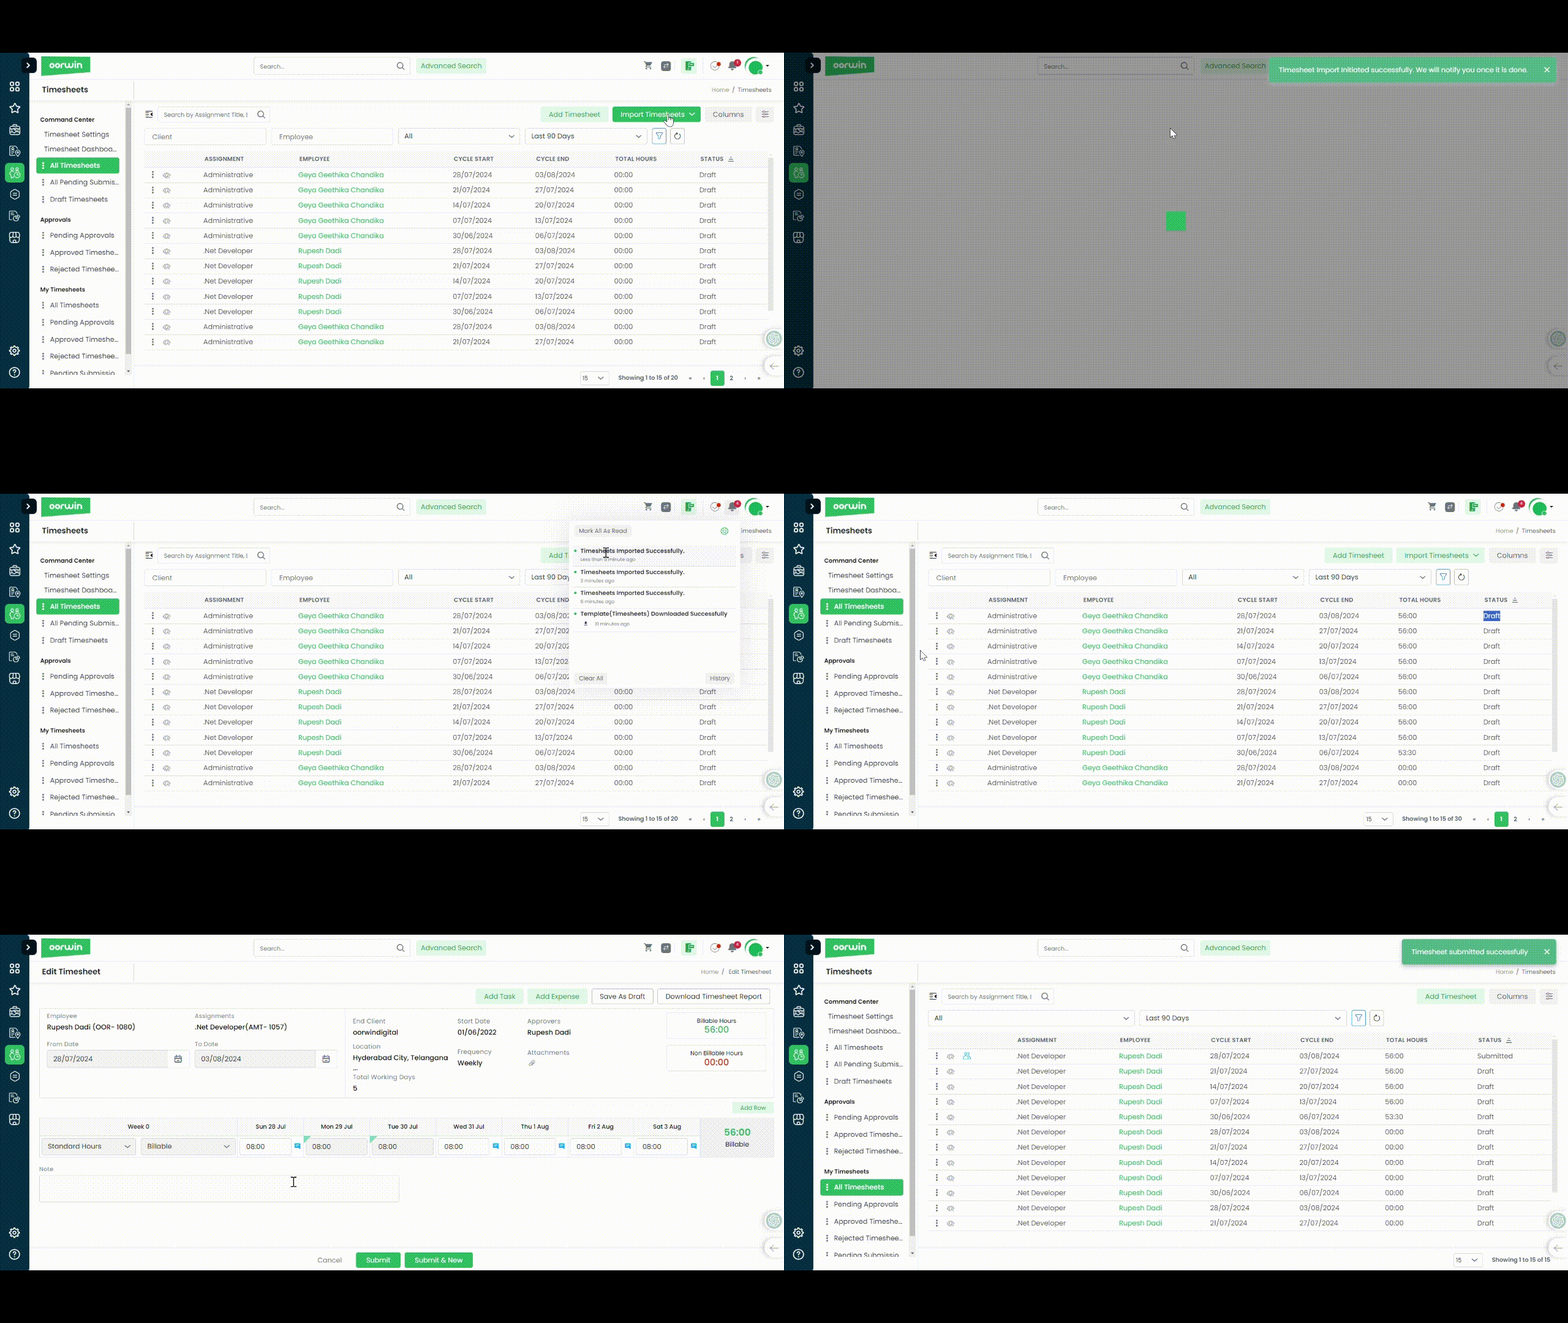
Was this article helpful?
Initiate electronic I-9:
- Navigate to Main menu
- I-9 Compliance
- Initiate I-9
- Electronic I-9
- An email pops up
- Allow Employee to add Reviewer
Yes: Would allow Employee select his/her own reviewer
No: Would ask you to select your own reviewer
(refer – How to add your I-9 Reviewer to understand in detail) - customize email body if needed
- Click on Send

Was this article helpful?
Here’s a detailed guide on how to Share Job URL:
- Login to your “Oorwin account” and Navigate to “Jobs module” on the left menu under the “Recruitment” section.
- Click on the “Job ID/Job Title” and Open the job.
- Click on the “Actions button” on the right side corner and Select “Copy job URL”.
- You can generate and share unique Job URL & QR code for different platforms. (Ex: WhatsApp, Text message, Blogs, Referral portals, job boards, etc.)
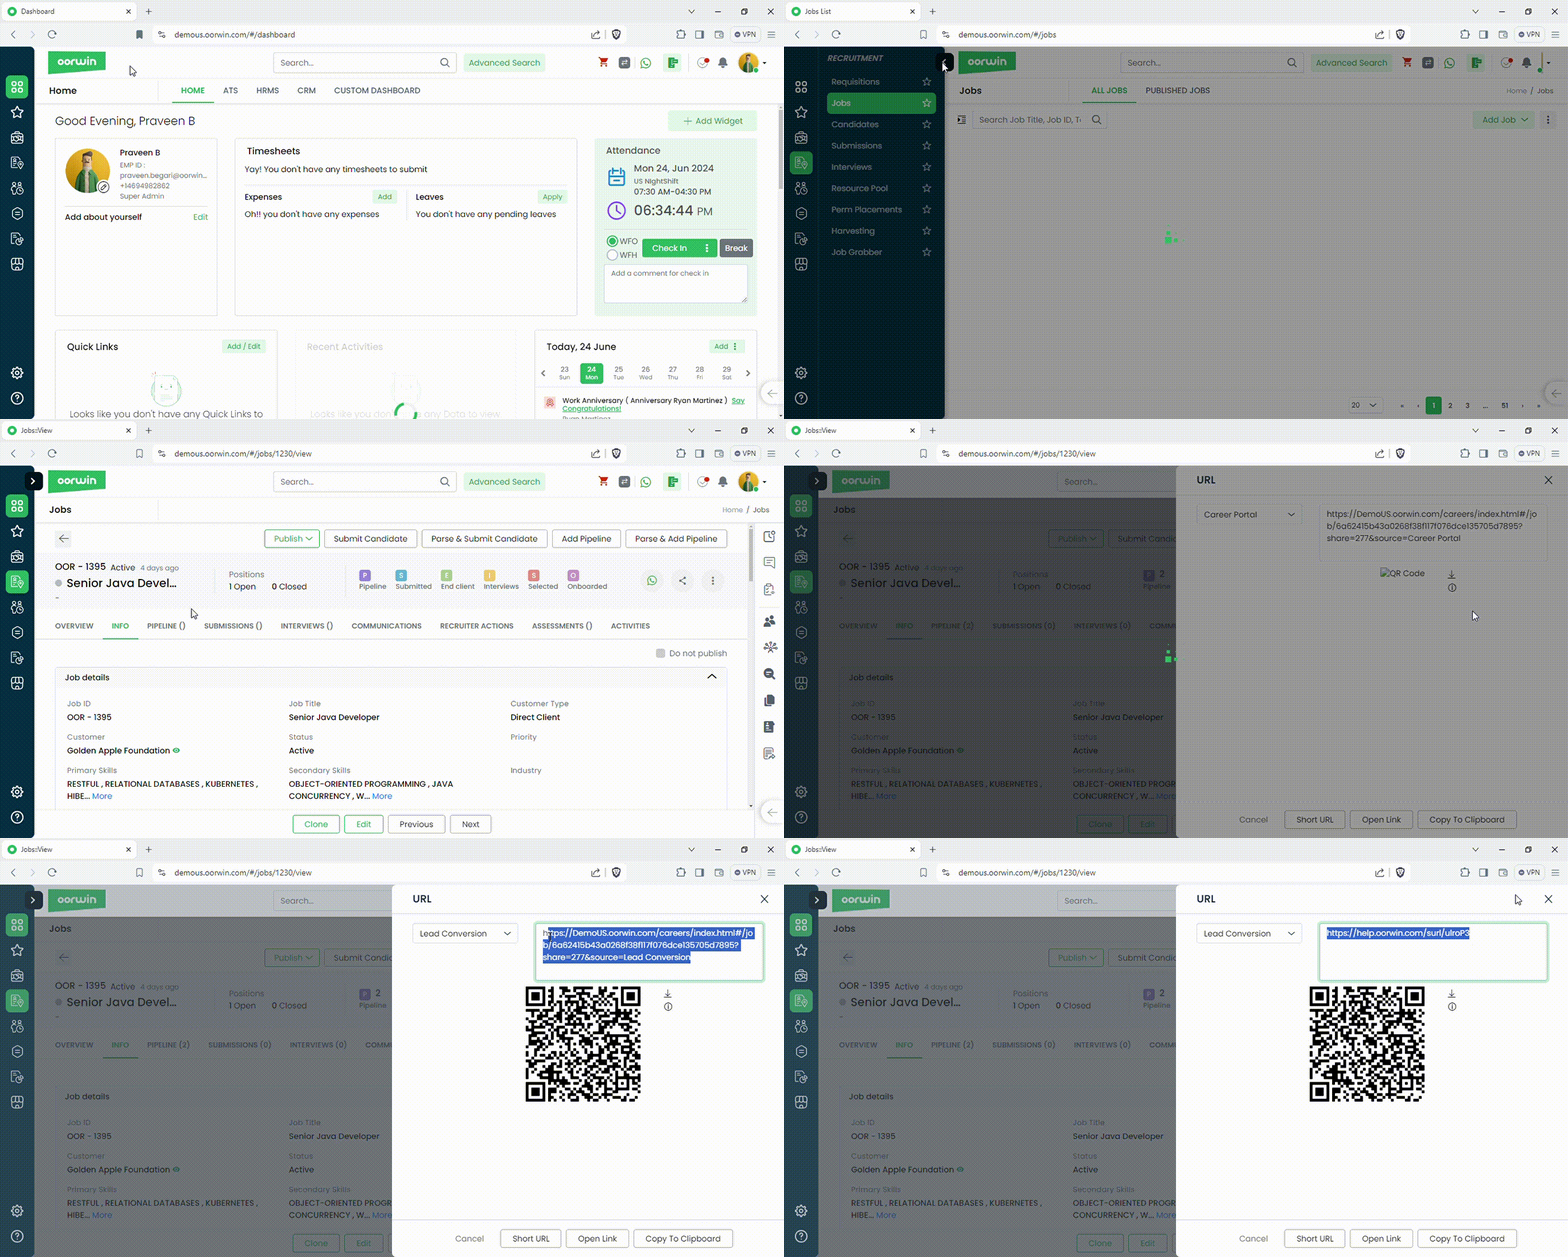
Was this article helpful?
Integrate Social Media Accounts with Oorwin
According to the current market scenario, one of the recently fond ways of recruitment has been social recruiting to both recruiters and the candidates. According to LinkedIn, 56% of the job seekers use social professional networks and the top recruiters are 60% more engaged with the LinkedIn recruiting tools. So, in this article let us understand how you can link your social media accounts with Oorwin.
- Link X (Account
- Link LinkedIn Account
- Link Google Account
Here is how you can link your social media account
- To link your Twitter account with Oorwin, click on your Profile icon -> go to My Profile & Preferences -> under the Personal Details section, you will find Social Media Account.

- Here, click on any of the social media icon which will navigate to the respective social media page to authenticate with your credentials
- Enter and authenticate with your credentials and authorize Oorwin app in respective social media pages
- Once you authenticate and authorize the credentials you will be redirected to Oorwin screen with your account name on the social media accounts
- Follow the same process for other social media accounts also to post all your jobs directly from Oorwin to get the timely responses from the candidates

Was this article helpful?
Below are the steps to access Matching Jobs:
- Login to your “Oorwin account” and Navigate to “Candidates module” on the left menu under the “Recruitment” section.
- Click on the “Candidate ID/ Candidate Name” to open the profile.
- Click on the Matching Jobs Icon on the Right side Icon Panel.
- Job listings matching to the Candidates profile basing upon skills, experience, location, salary expectations will reflect over here.
- User can perform action like submitting the Candidate to the job, adding to the pipeline, Sharing the job details with the Candidate.

Was this article helpful?
If you find two accounts are similar in Oorwin, you can merge those two accounts as one with all the information in one account. You can merge maximum three accounts as one at a time.
To merge the acocunts just follow the below steps:
- Log in to your Oorwin Account and navigate to Accounts module from the left menu under General Section
- Click on “Merge Accounts” button on the top right corner.
- Enter the account name in the select the account field and select the two accounts from the drop down you wish to merge
- Once you select the accounts click on Next at the bottom
- Select the Master account and the field values to which you want to merge all the data to one
- Click on Merge button on the bottom and then click Conform on the confirmation box to update all the data to master record
- The second account will automatically removed from the system once the merging is done

Was this article helpful?
Here’s a guide on how to move a Candidate to Resource pool:
- Login to your “Oorwin account” and Navigate to “Candidates module” on the left menu under the “Recruitment” section.
- Click on the “3 dots/Actions” beside the Candidate ID and from the drop down click on “Move to Pool”.
- A pop-up will come up on your screen and select Yes.
- The Candidate record(s) moved to pool.
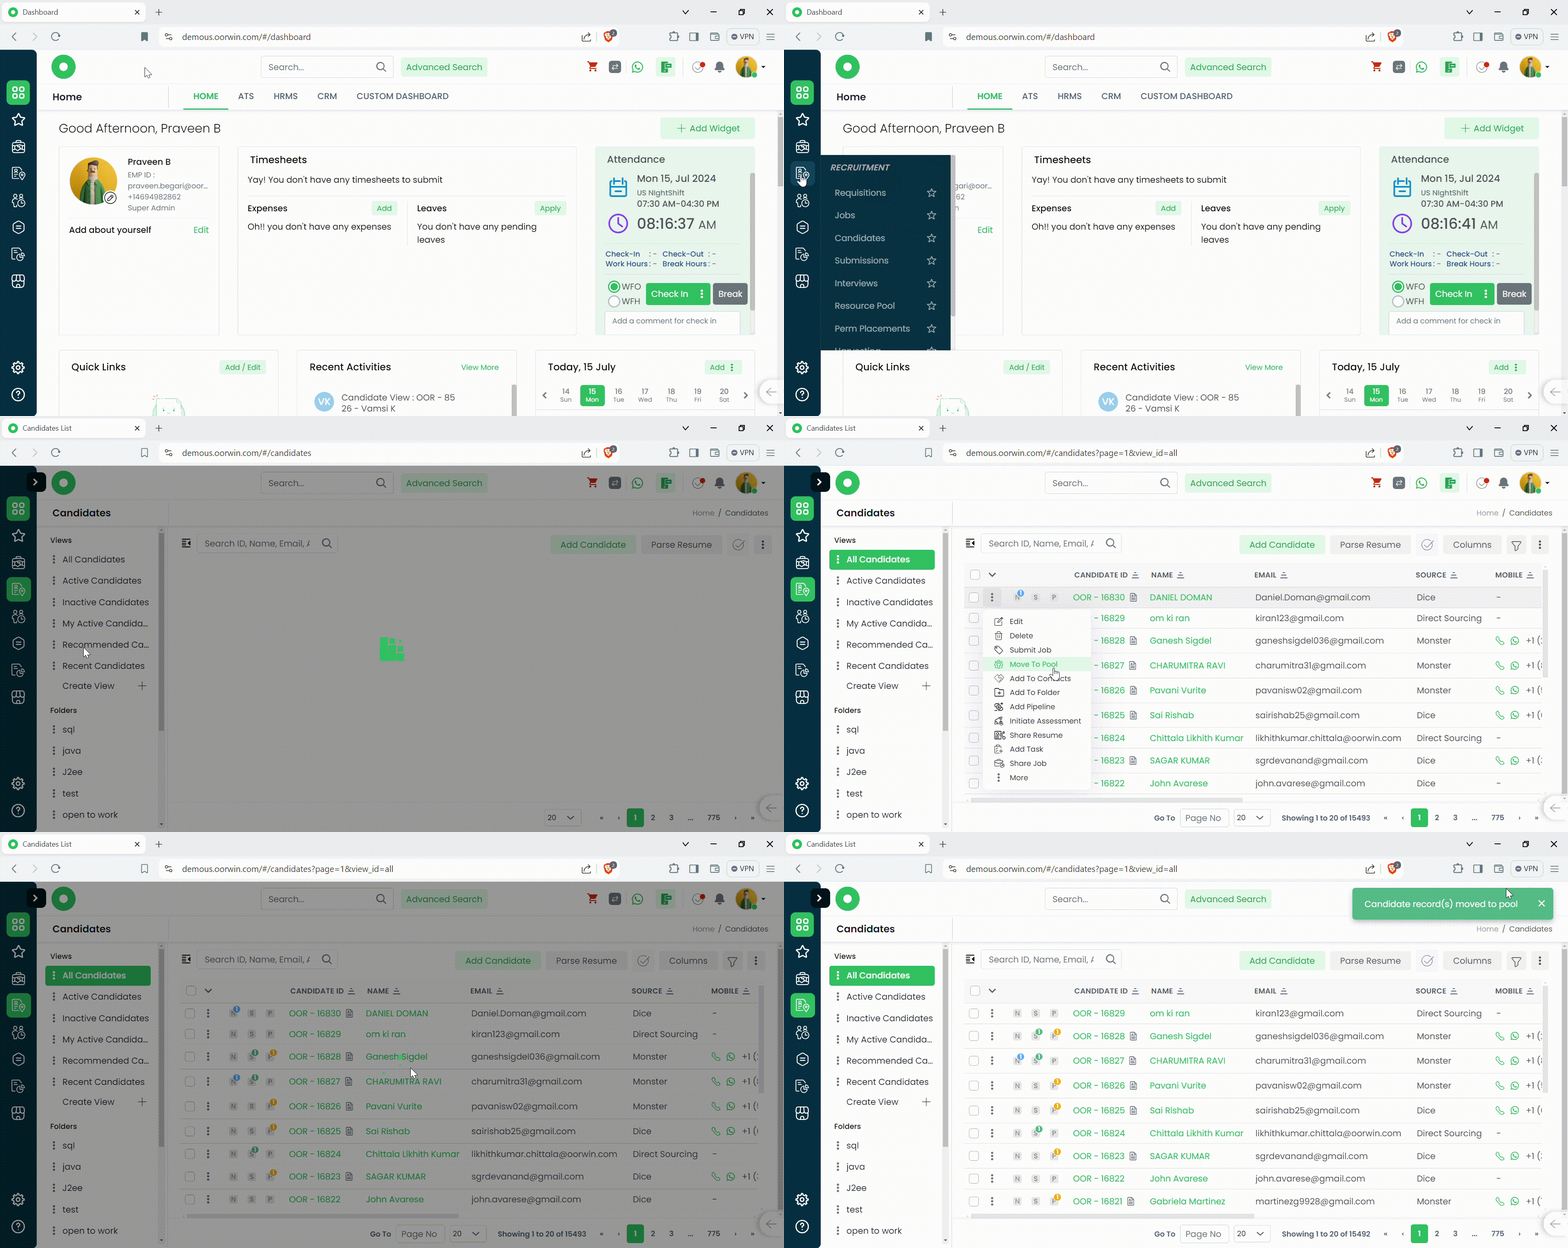
Was this article helpful?
Here’s a guide on how to move a Candidate from Resource pool to Candidate module:
- Login to your “Oorwin account” and Navigate to “Candidates module” on the left menu under the “Recruitment” section.
- Click on the “3 dots/Actions” beside the Candidate ID and from the drop down click on “Move to Candidate”.
- A pop-up will come up on your screen and select Yes.
- The record(s) will be moved to Candidates module.

Was this article helpful?
Here’s a guide on how to Add a Candidate as a Contact from Candidates Module:
- Login to your “Oorwin account” and Navigate to “Candidates module” on the left menu under the “Recruitment” section.
- Click on the “3 dots/Actions” beside the Candidate ID and from the drop down click on Add to Contacts.
- The page will be redirected to Contact Information page.
- Tag an Account & fill in the Required Information then click on “Save”.
- The Candidate information will be saved as a Contact.

Was this article helpful?
“Parse & Add to Pipeline” feature helps the users to streamline the process of adding candidates to the hiring pipeline, improving efficiency and ensuring that all candidate information is accurately captured and managed. The user can make any necessary adjustments to the extracted information to ensure accuracy. After reviewing and confirming the parsed details, the user can proceed to add the candidate to the pipeline.
Here’s a detailed guide on how to Parse & Add a Candidate to pipeline:
- Login to your “Oorwin account” and Navigate to “Jobs module” on the left menu under the “Recruitment” section.
- Click on the “Job ID/Job Title” and Open the job.
- Click on “Parse & Add Pipeline”, it’ll open your local drive files then select the resume from your local machine and click on parse.
- Fill in the required details in “Quick Add – Candidate” page and click on “save and next” on the bottom of the page.
- Select the pipeline stage & pipeline status, click on “Submit” to add the Candidate to the Pipeline.

Was this article helpful?
Candidates module is designed to enhance the efficiency and effectiveness of managing candidates in various contexts. Allows for the input of candidate information such as name, contact details, qualifications, and other relevant data for managing and evaluating a list of candidates based on certain criteria.
Here’s a guide on how to Add a Candidate (Parse Resume):
- Login to your “Oorwin account” and Navigate to “Candidates module” on the left menu under the “Recruitment” section.
- Click on “Parse Resume” button.
- Select the “Candidate Resume” and parse the document.
- Fill in all the required information and add additional documents if any
- Now click on the “Save” button on the bottom of the screen.
- The profile is now added to the “Candidates Module”.

Was this article helpful?
Here’s a guide on how to Parse a Resume:
- Login to your “Oorwin account” and Navigate to “Resource-pool module” on the left menu under the “Recruitment” section.
- Click on “Parse Resume” button.
- Select the “Candidate Resume” from your local machine and parse the document.
- Fill in all the required information and add additional documents if any.
- Now click on the “Save” button on the bottom of the screen.
- The profile will be saved to the Resource pool module.
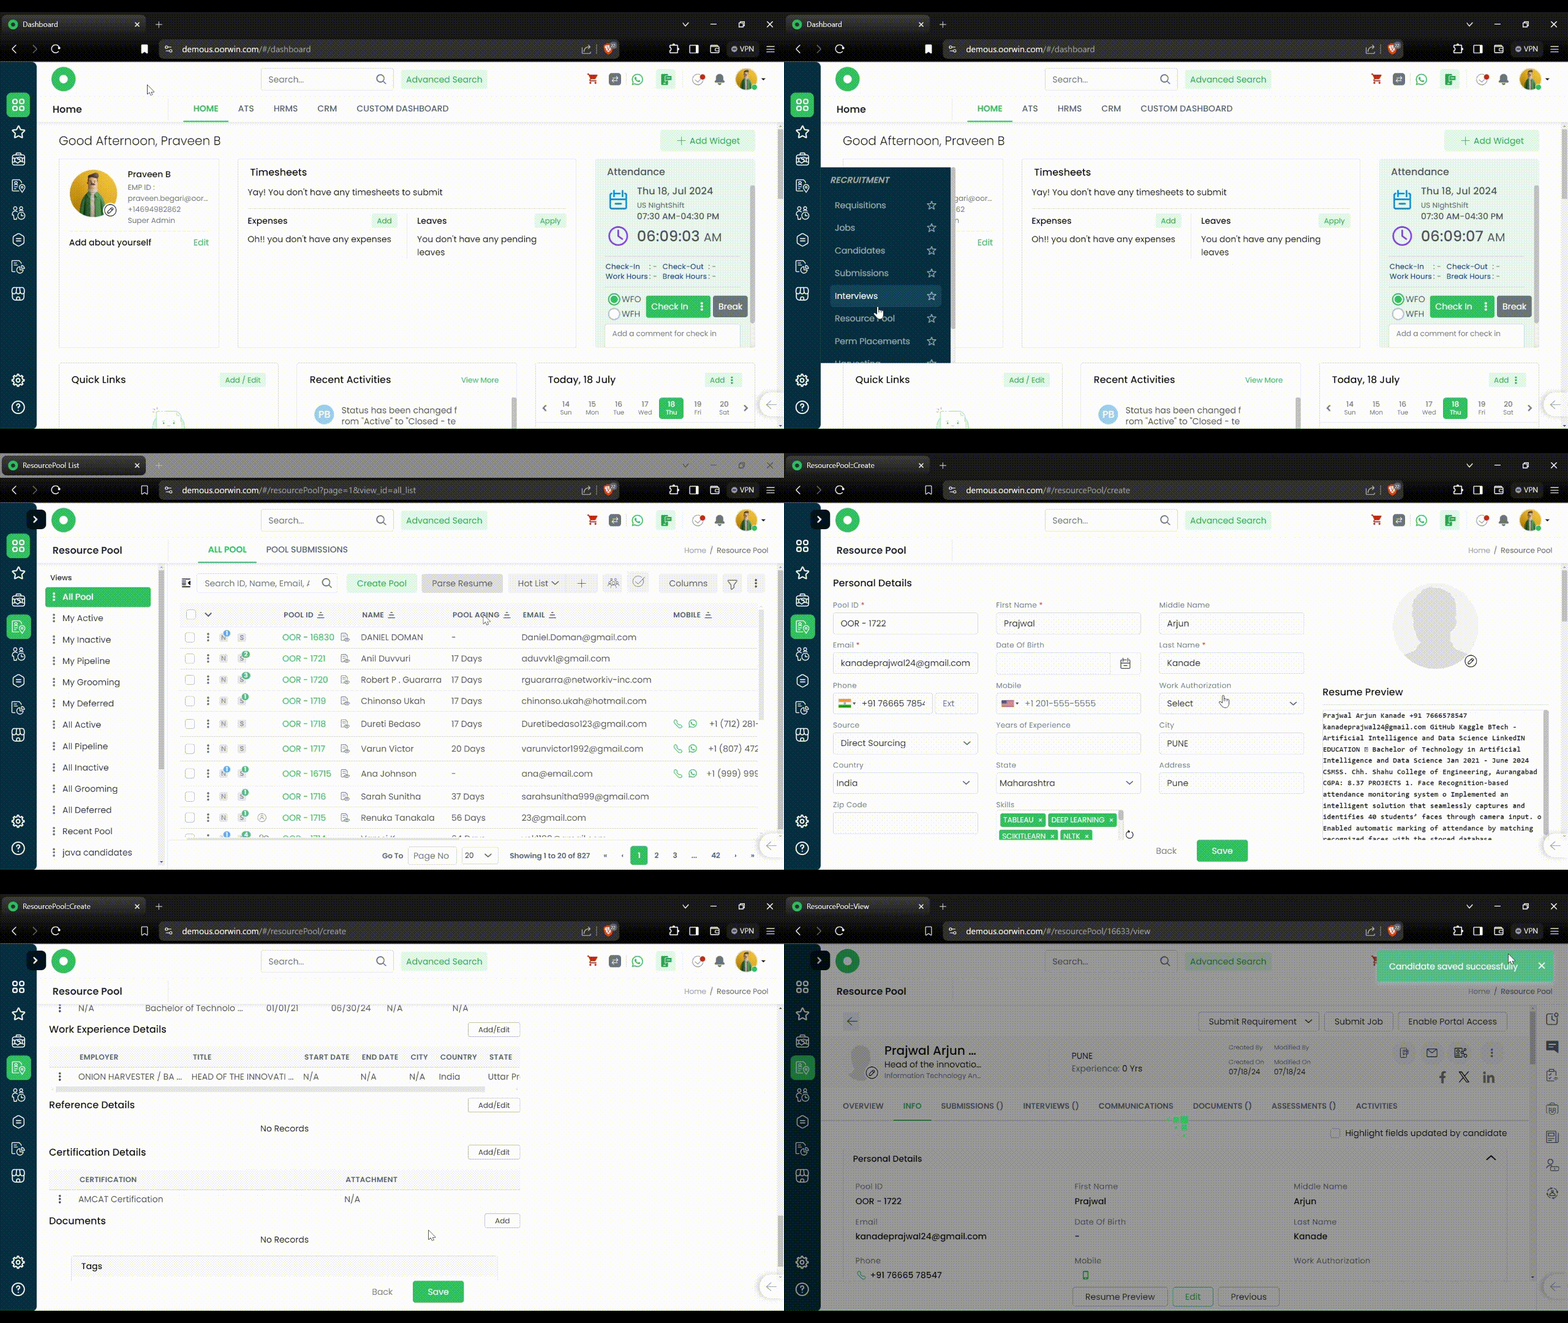
Was this article helpful?
We have multiple batch actions in Opportunities module which helps the user to perform an action on the multiple opportunity records with the same value/result
Here you can do bulk update status of different opportunities by selecting them and click on Bulk actions button->Update Status
You can also archive multiple opportunity records by selecting them and click on Bulk actions button->Archive

Was this article helpful?
Performance Management System (PMS) – General Settings Configuration:
Configure your General Settings for Performance Management System.
- Navigate to Settings
- Configurations
- Performance
- General Settings
- Enable your KRAs/Objectives and label it as per your need
- Enable your weightages
- Create your own Status Labels and Percentages as needed
- Enable your Email notifications
- Rating Scales -> Mention your Label names, Short codes and Descriptions for rating scale

Was this article helpful?
Performance Management System (PMS) – Review Process Settings
Configure your PMS review processes as per your frequency, You can set up step by step by enabling your required configuration.
- Navigate to Settings
- Configurations
- Performance
- Review Process Settings
- Create Review Process
-
- Review Information:
Enter Your Review Process Name, Select your cycle start month and select your frequency
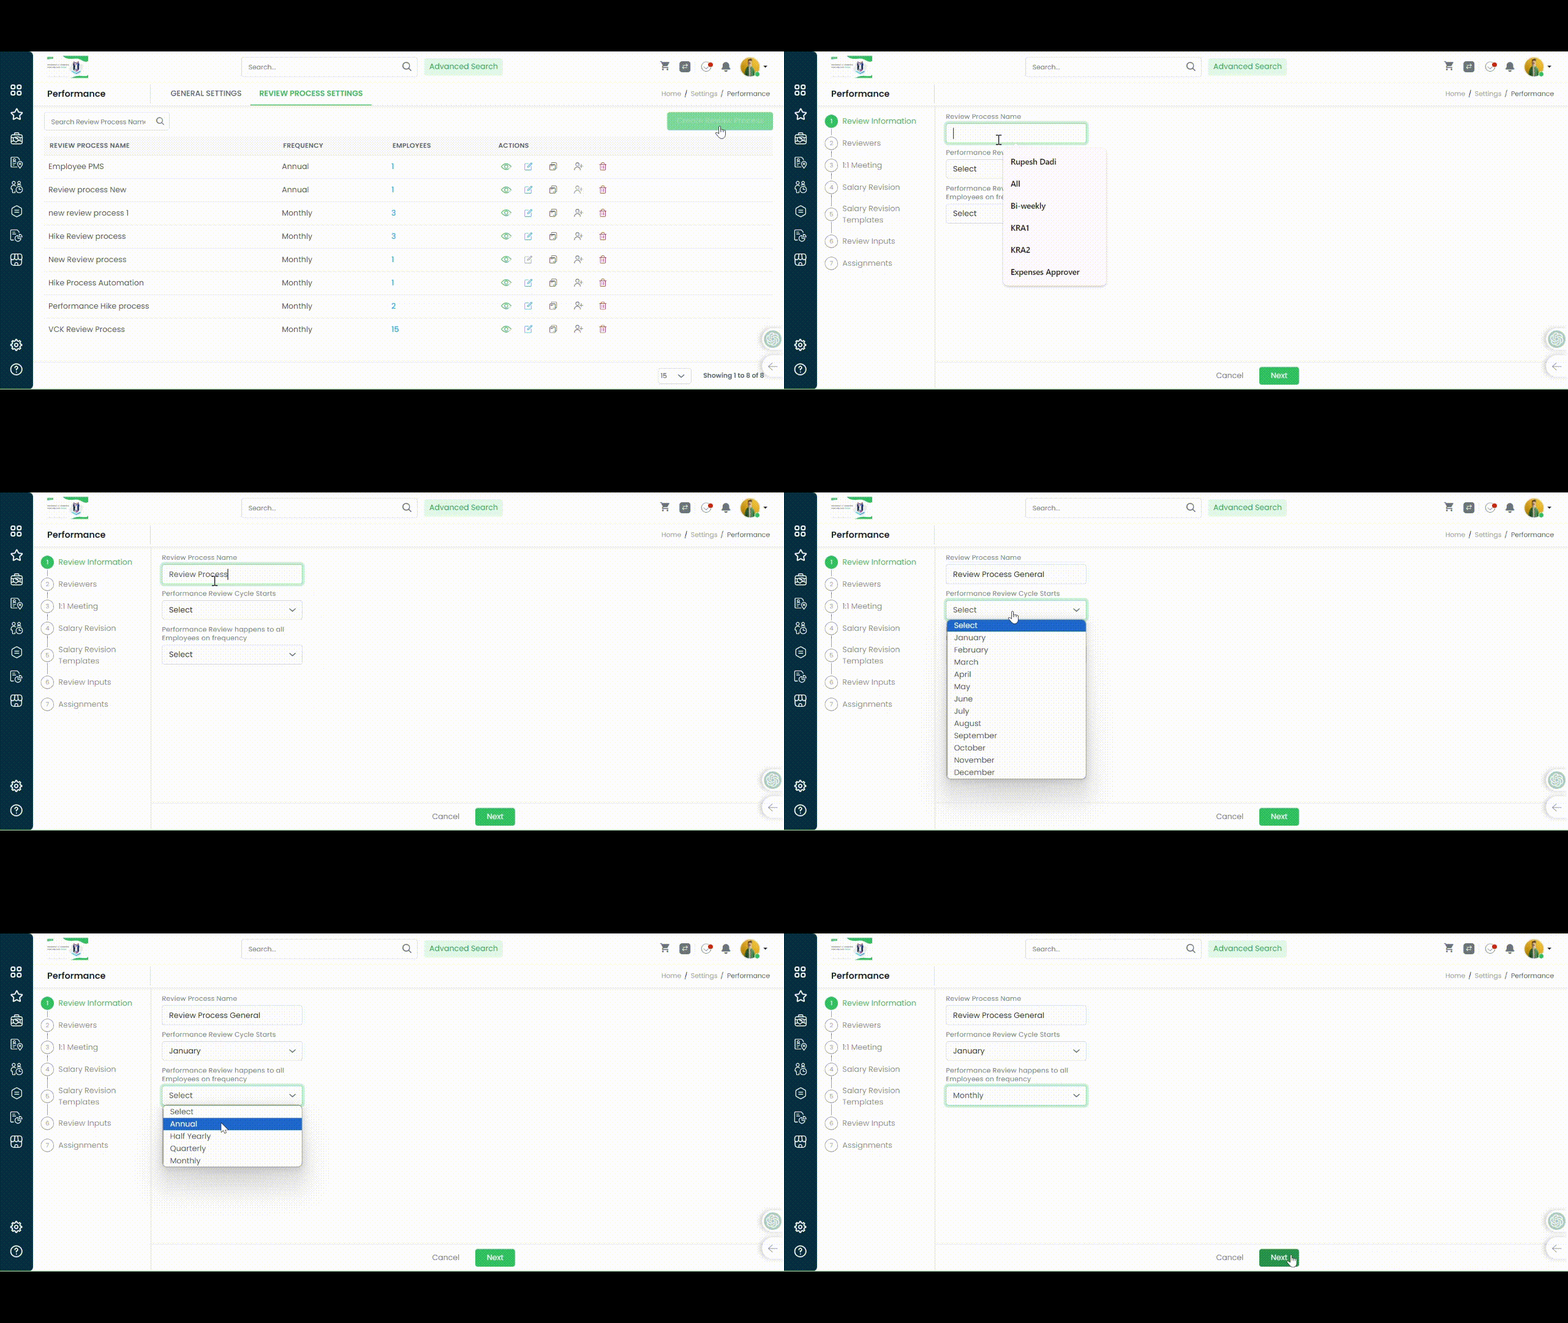
- Review Information:
- Reviewers:
Enter Your Reviewers to submit. It is a 4 level Review form flow which are
-
- Self Review – Employees can submit their Self reviews
- Reporting Manager – Immediate reporting managers can review the Employee
- L2 Manager – Level 2 Manager or indirect manager cam review the employee
- Select Employee – Any other Employee (CEO/an other executive level) can be selected as final Reviewer

- 1:1 Meetings:
1:1 Meetings is not a mandatory selection, Users can include this stage or opt out from the review process.Configure 1:1 meetings, Customize Questions and Review participants.
-
- Review Participants: Meetings and questions can be scheduled up to 3 levels which are Reporting Manager, L2 Manager and Specific Employee(CEO/an other executive level).
- Customize Questions: Questions can be customized as needed
- Make Comments section as mandatory while submitting the reviews
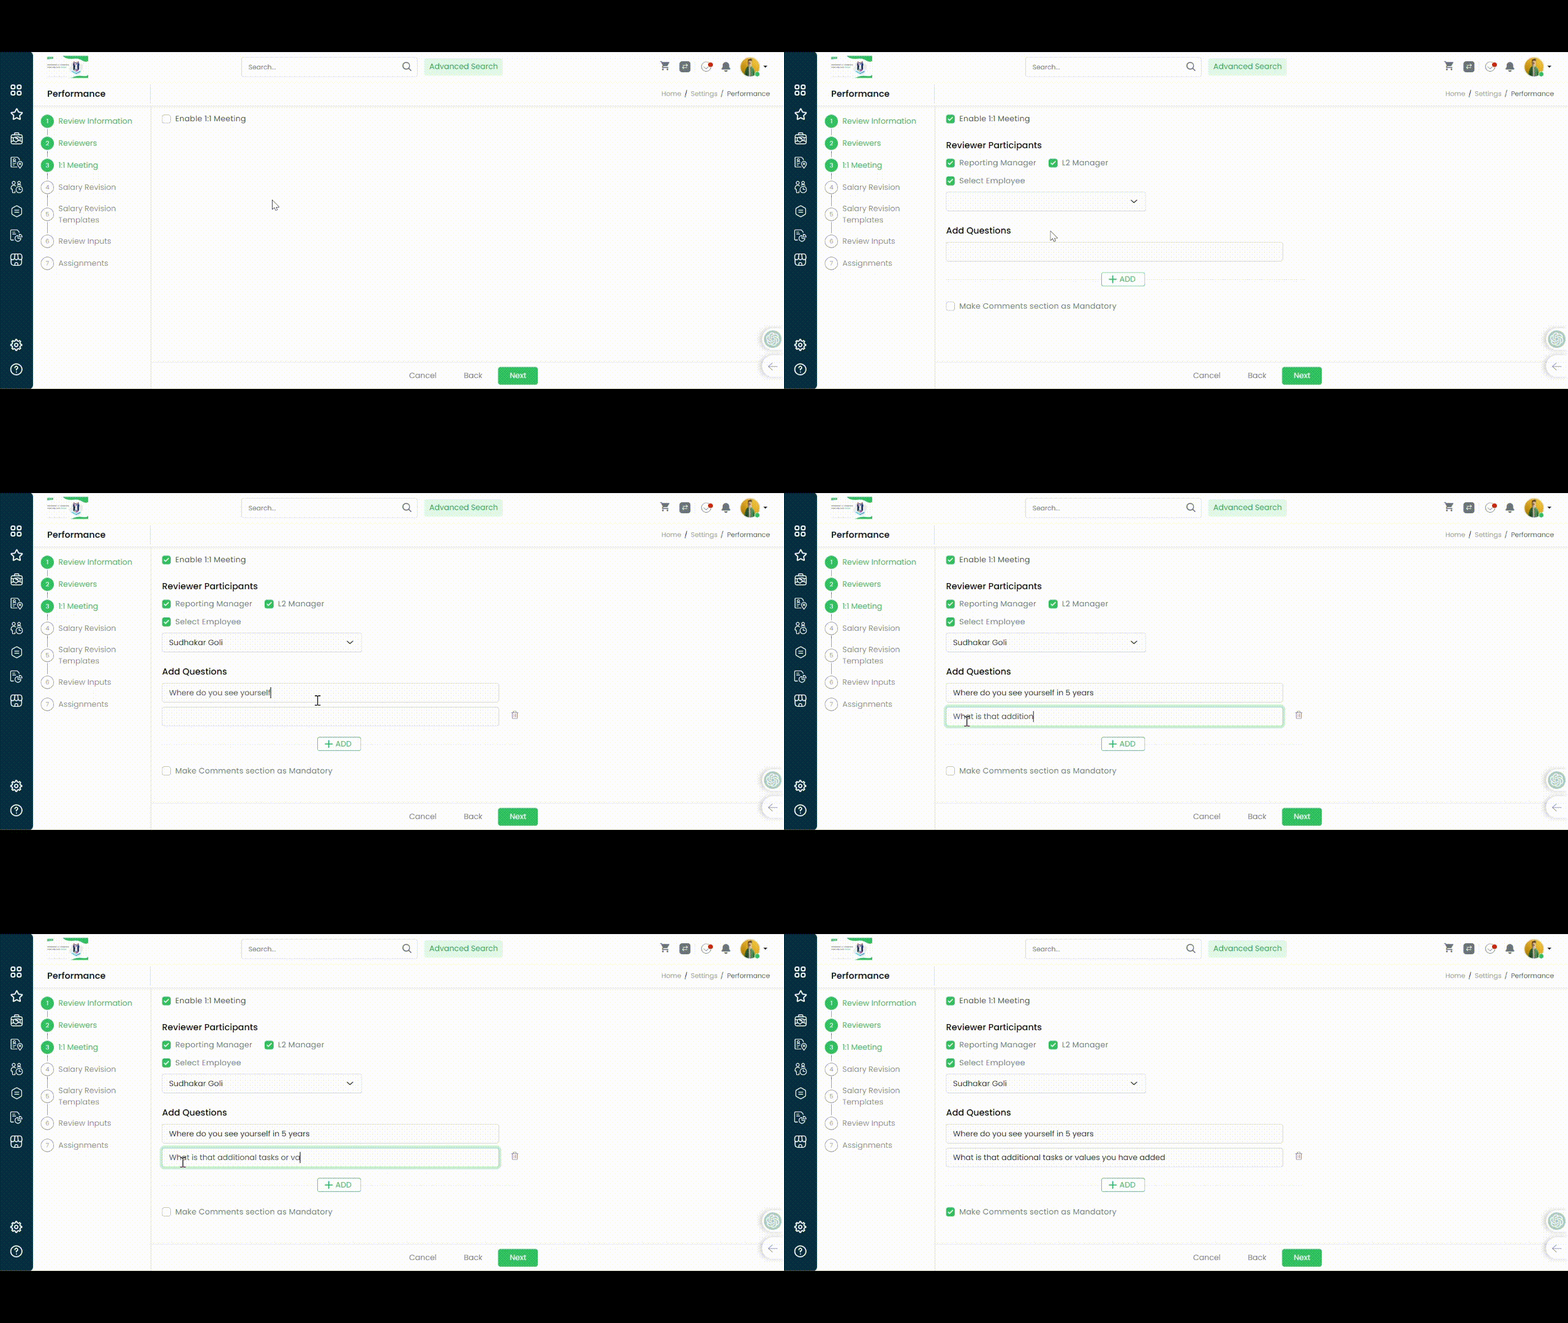
- Salary Revision:
Salary Revision is not a mandatory selection, Users can include this stage or opt out from the review process by not checking the option which says “Enable Standard Salary Revision Metrics”
-
- Salary revision type can be selected based on Type which are “Percentage” and “Value”
- Select Salary Revision Range, Which is based on frequrncies 0.25, 0.5 and 1 .Which divides the rating on 5 points.Enter the salary revisions based on specific vale or percentage in the salary revision field.

- Salary Revision Templates:
Salary Revision Templates is not a mandatory selection, Users can include this stage or opt out from the review process by checking “Enable Revision Templates”

- Review Inputs:
Configure Review forms initiation as needed
-
- Automatic: Would have the options to select on what date to initiate review process.This cycle would be based on the interval selected in Review information above.
- Manual: Would have no options to select here. However, when the process is configured and setup.User can find the option in Performance Management Process Module -> Manage Reviews.

- Assignments:
Select your Employees and assign them to the process.You can filter based on Employee names or Department and select multiple employees in one go and add them.
Note**:When an employee is already assigned to another Review process, It won’t allow to add the same employee in this process

“Save” the Process.
Was this article helpful?
Profile update request is a feature which allows the recruiters to send an email to candidates requesting the details which candidate can fill them and send back to recruiter. Once the recruiter receives information from the candidate he can check them and approve it, after that those details will be updated in candidate record.
Here’s a guide on how to profile update Request to Candidates:
- Login to your “Oorwin account” and Navigate to “Candidates module” on the left menu under the “Recruitment” section.
- Click on any “Candidate ID/ Name” to open the profile.
- Once you’re on detailed page, click on the “3 dots/Actions” on the right hand corner and click on profile update request option.
- Select all the required Fields & Documents to update and Click on “Send”.
- The Candidate will receive an email notification about the requested details to update
- Candidate can access the link provided in the email and update all the requested details and submit
- The sender will also get an email notification to approve the submitted details from the candidate

Was this article helpful?
Here’s a detailed guide on how to Publish a Job on Social Media Platforms ( LinkedIn, Twitter ):
- Login to your “Oorwin account” and Navigate to “Jobs module” on the left menu under the “Recruitment” section.
- Click on the “Job ID/Job Title” and open the job >> Click on “Publish” Button >> From the drop down select “Publish on Social Media” option.
- Select the “Social media platforms” where you want to publish the Job (LinkedIn, Twitter) and enter Required Information.
- Click on “Publish” and the job will be Published on the selected Social media Platform.

Was this article helpful?
Here’s a detailed guide on how to Publish Job on Career portal & Job-boards:
- Login to your “Oorwin account” and Navigate to “Jobs module” on the left menu under the “Recruitment” section.
- Click on the “Job ID/Job title” and open the job >> Click on “Publish Button” >> From the drop down select “Publish” option.
- Select the “Career portal” and the “Job boards” from the list which you would like to Publish.
- Fill the mandatory fields of respective job boards by clicking on Actions > Configure.
- Finally, click on “Publish” on the bottom of the screen and the job will be published on all selected Job boards.

Note : Super-admin should configure and give access to the Job-boards from Settings >> Market place >> Job boards.
Was this article helpful?
You can rehire an off boarded employee through the onboarding process and you can also request all the documents needed from the employee again
Below are the steps to follow to Re-Hire an off boarded employee
- Log in to your Oorwin Account and navigate to off boarding module from the left menu under Human Resources Section
- You will find all the sections on the left menu based on the off boarding status and shows the employees list based on that status
- Select the employee that you wanted to re-hire from the off boarding completed list
- Click on three dots for the specific employee that you wanted to Re-Hire
- Click on “Re-Hire” option from the drop down list and click Yes on the confirmation box
- Now the employee record will be opened in a new tab with all the pre filled details and user can update the existing details if there are any changes
- User select the onboarding workflow from the drop down list and initiate the on boarding process as a re hire

Was this article helpful?
Here’s a guide on how to Schedule an Interview from Submissions Module:
- Login to your “Oorwin account” and Navigate to “Submissions module” on the left menu under the “Recruitment” section.
- Click on the “3 dots/Actions” beside the submission ID and from the drop down click on Schedule Interview.
- Add Interview page will pop-up on your screen.
- Fill in the Interview details, select the date & time, status, stage, description etc.
- Click on Save or Save & Schedule.
- Interview record will be created.

Was this article helpful?
Search and Select SOC for LCA from onet site:
- Navigate to Main Menu
- US Immigration
- Add/Edit LCA
- Temporary Need Information
- Enter Job Title
- Click on Search button for Job Title
- Select the appropriate SOC code widget with information shown on the righ
or
Click on View Icon, which redirects to the new tab to the onet site and then select from the widgets

Was this article helpful?
You can send an email to the account contact through Oorwin portal by following below steps
- Log in to your Oorwin Account and navigate to Accounts module from the left menu under General Section
- Click on any account name to whom you want to send an email to the contact
- Click on Compose Email button on the top right corner
- You can select the pre defined email templates or enter your own content in the email body
- Enter any additional recipients in the CC field and add Subject on your own
- You can add attachments also from the select attachements section
- User can also use the mail merge option to replace with the name of the receiver in the mail body
- Once you are done with all the content then click on Send button to send the email to your receivers
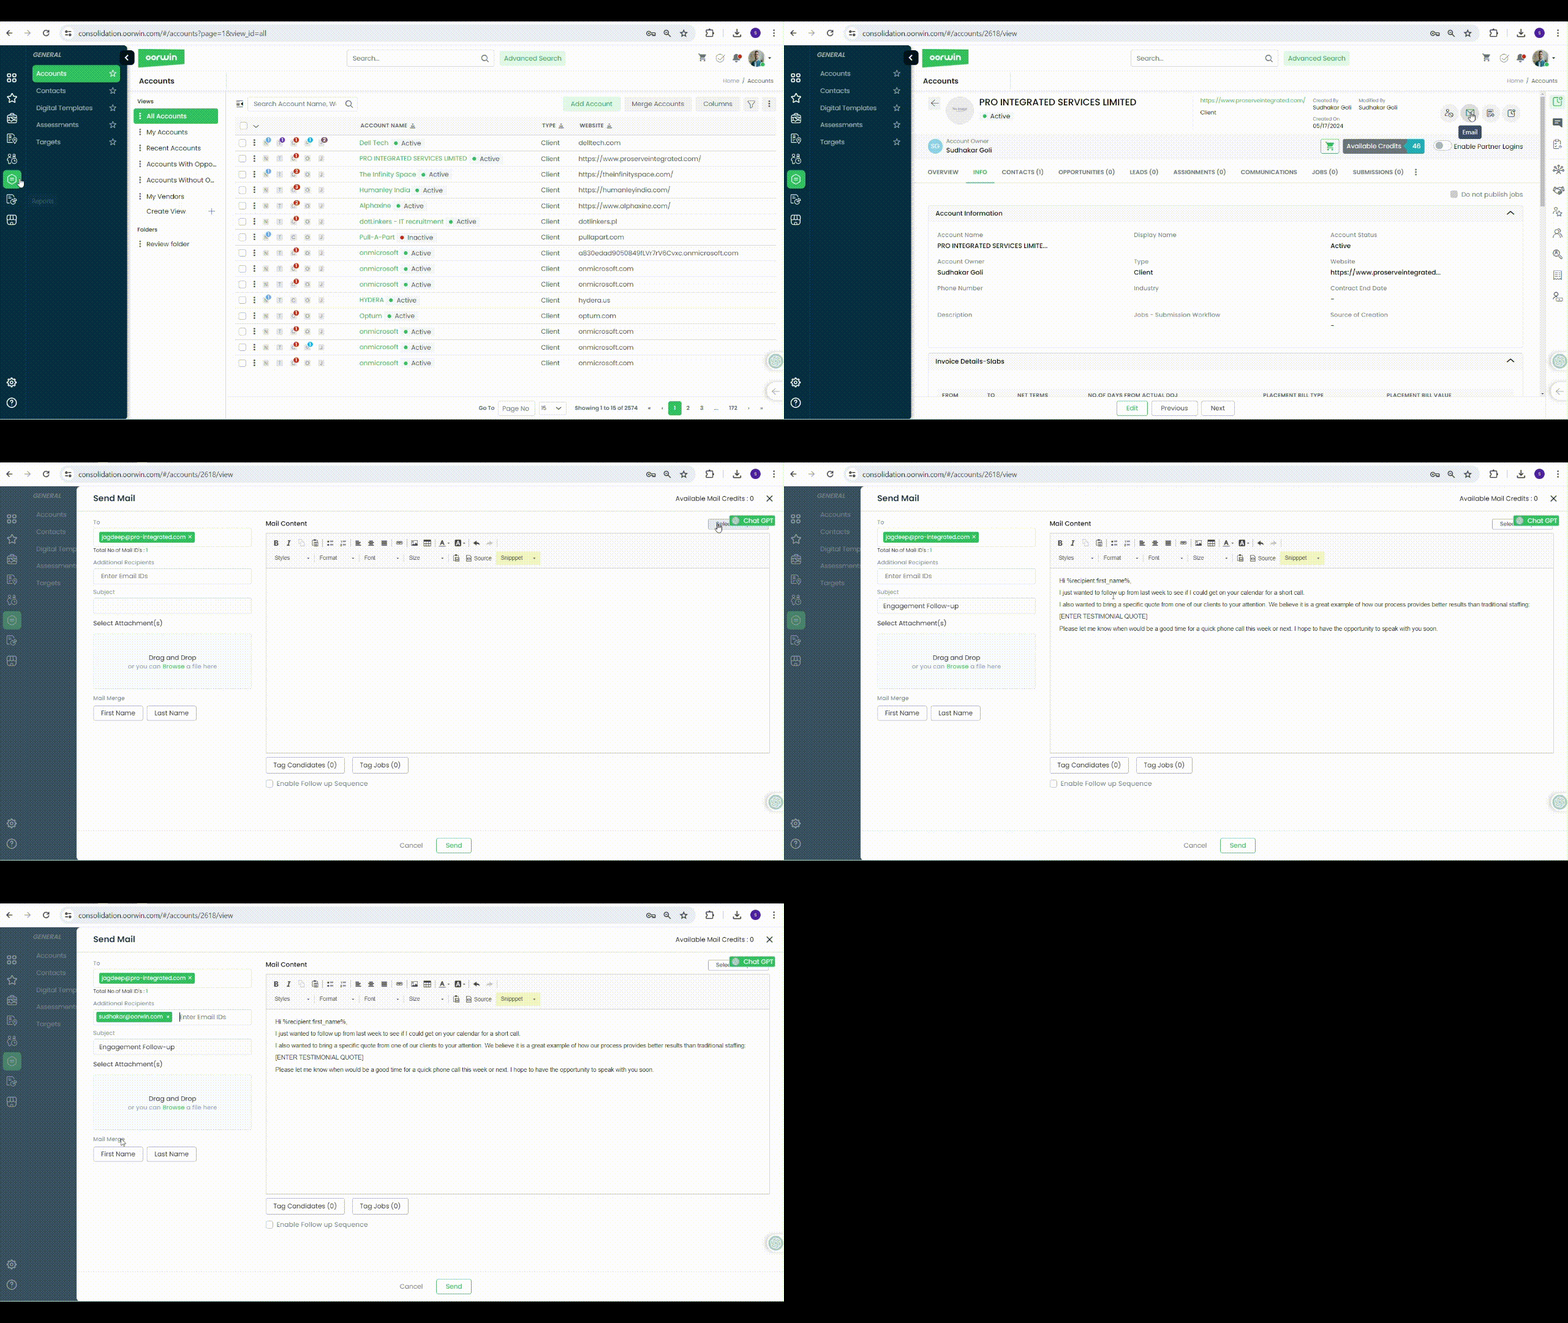
Was this article helpful?
You can send an email to the Lead contact through Oorwin portal by following below steps
- Log in to your Oorwin Account and navigate to Leads module from the left menu under Sales Section
- Go to any lead and click on three dots actions to whom you want to send an email
- Click on Compose Email action under the actions list which opens a popup
- Enter the recipients and subject line and add additional recipients in the CC field
- You can select the pre defined email templates or enter your own content in the email body
- User can also use the mail merge option to replace with the name of the receiver in the mail body
- You can add attachments also from the select attachments section
- You can also enable the followup sequences based on the hours or days based condition
- Once you are done with all the content then click on Send button to send the email to your receivers and followup sequences will auto schedule

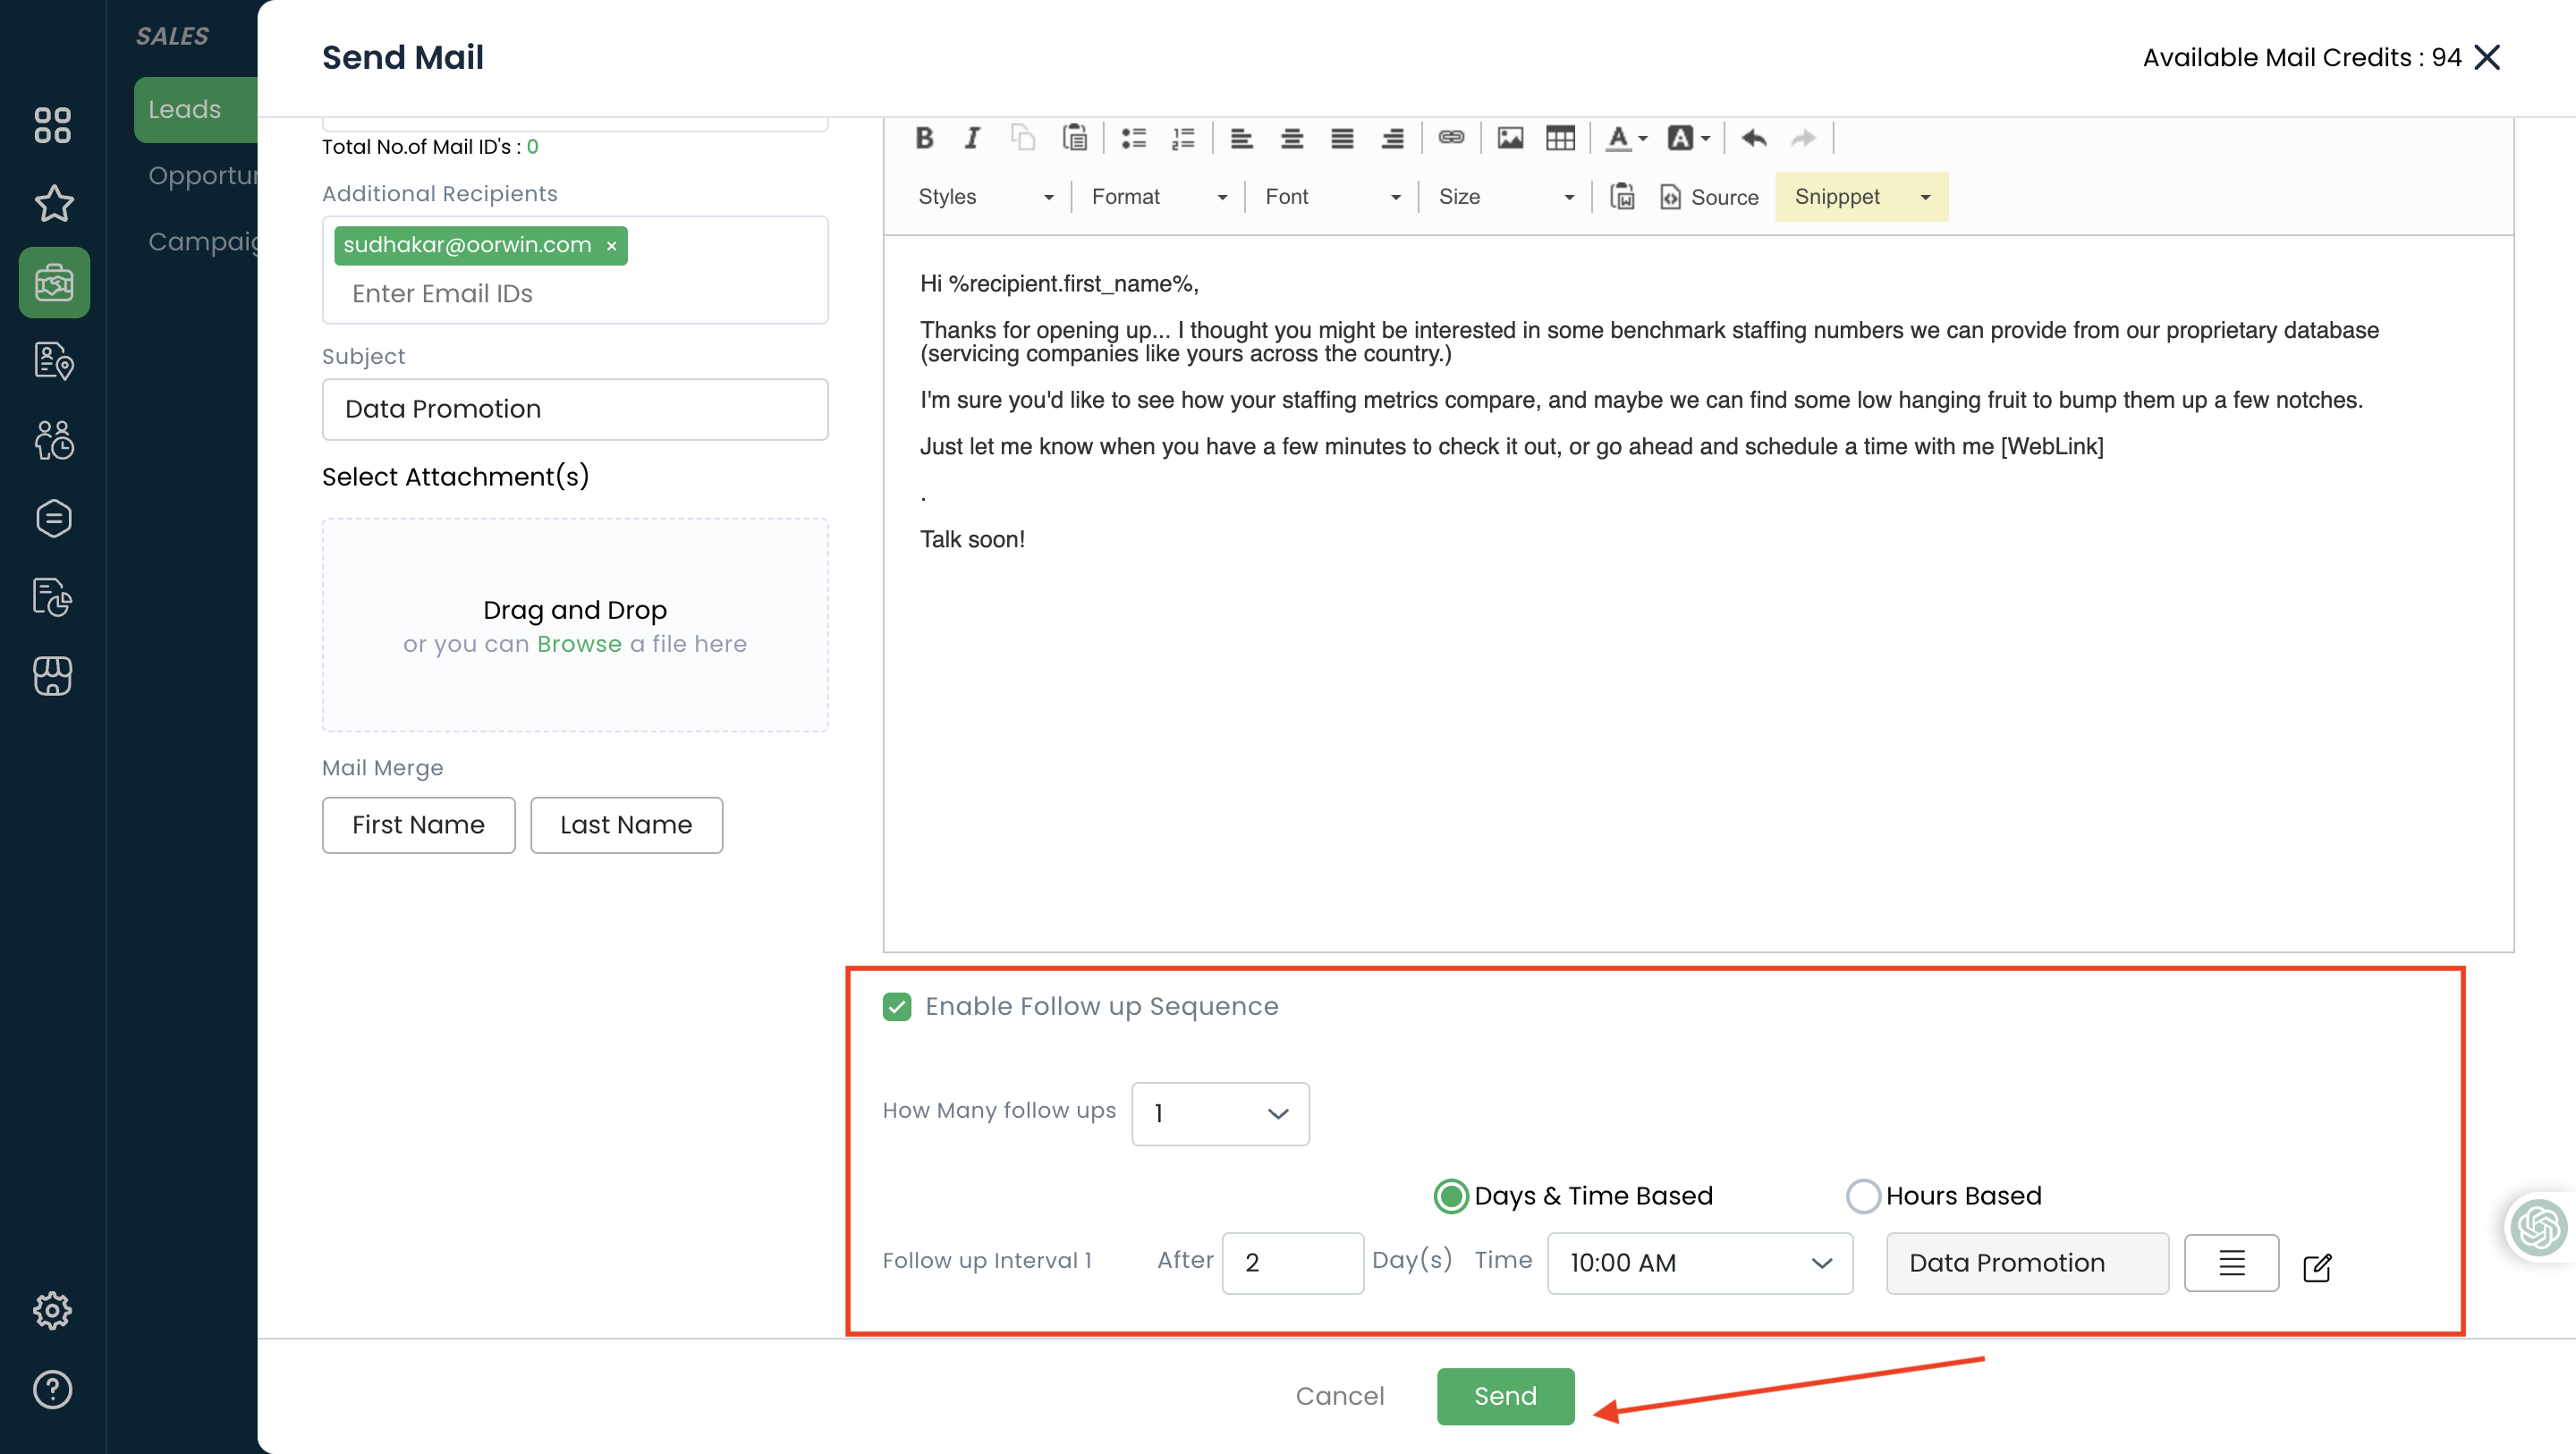
Was this article helpful?
You can send an email to the opportunity contact through Oorwin portal by following below steps
- Log in to your Oorwin Account and navigate to Opportunity module from the left menu under Sales Section
- Click on any Opportunity name to whom you want to send an email to the contact
- Click on Compose Email button on the top right corner
- You can select the pre defined email templates or enter your own content in the email body
- Enter any additional recipients in the CC field and add Subject on your own
- You can add attachments also from the select attachments section
- User can also use the mail merge option to replace with the name of the receiver in the mail body
- You can also enable the followup sequences based on the hours or days based condition
- Once you are done with all the content then click on Send button to send the email to your receivers and followup sequences will auto schedule


Was this article helpful?
Admin can enable task automation when an employee joins in their organization which will ask the respective teams to complete the pre onboarding tasks that were enabled
Here is how we can do it
- Log in to your Oorwin Account and navigate to Settings page from the left bottom
- Go to Access Control on the left menu and click on Task Automation section
- On the employee section, click on employee joins link and click on Add Task button

- Enter all the information on the task creation popup and assign to the respective user so that he will get the notification when an employee joins
- Once entered all the details click on Save and the task will be created and you can create multiple tasks on the same which needs to be completed by different teams on the employee onboarding

Was this article helpful?
Here’s a guide on how to Share an Interview :
- Login to your “Oorwin account” and Navigate to “Interviews module” on the left menu under the “Recruitment” section.
- Click on the “3 dots/Actions” beside the Interview and from the drop down click on Share.
- A Pop-up with Email Template will come up on your screen, Enter the email address.
- Click on Send button on the bottom of your screen.
- The interview record has been shared.
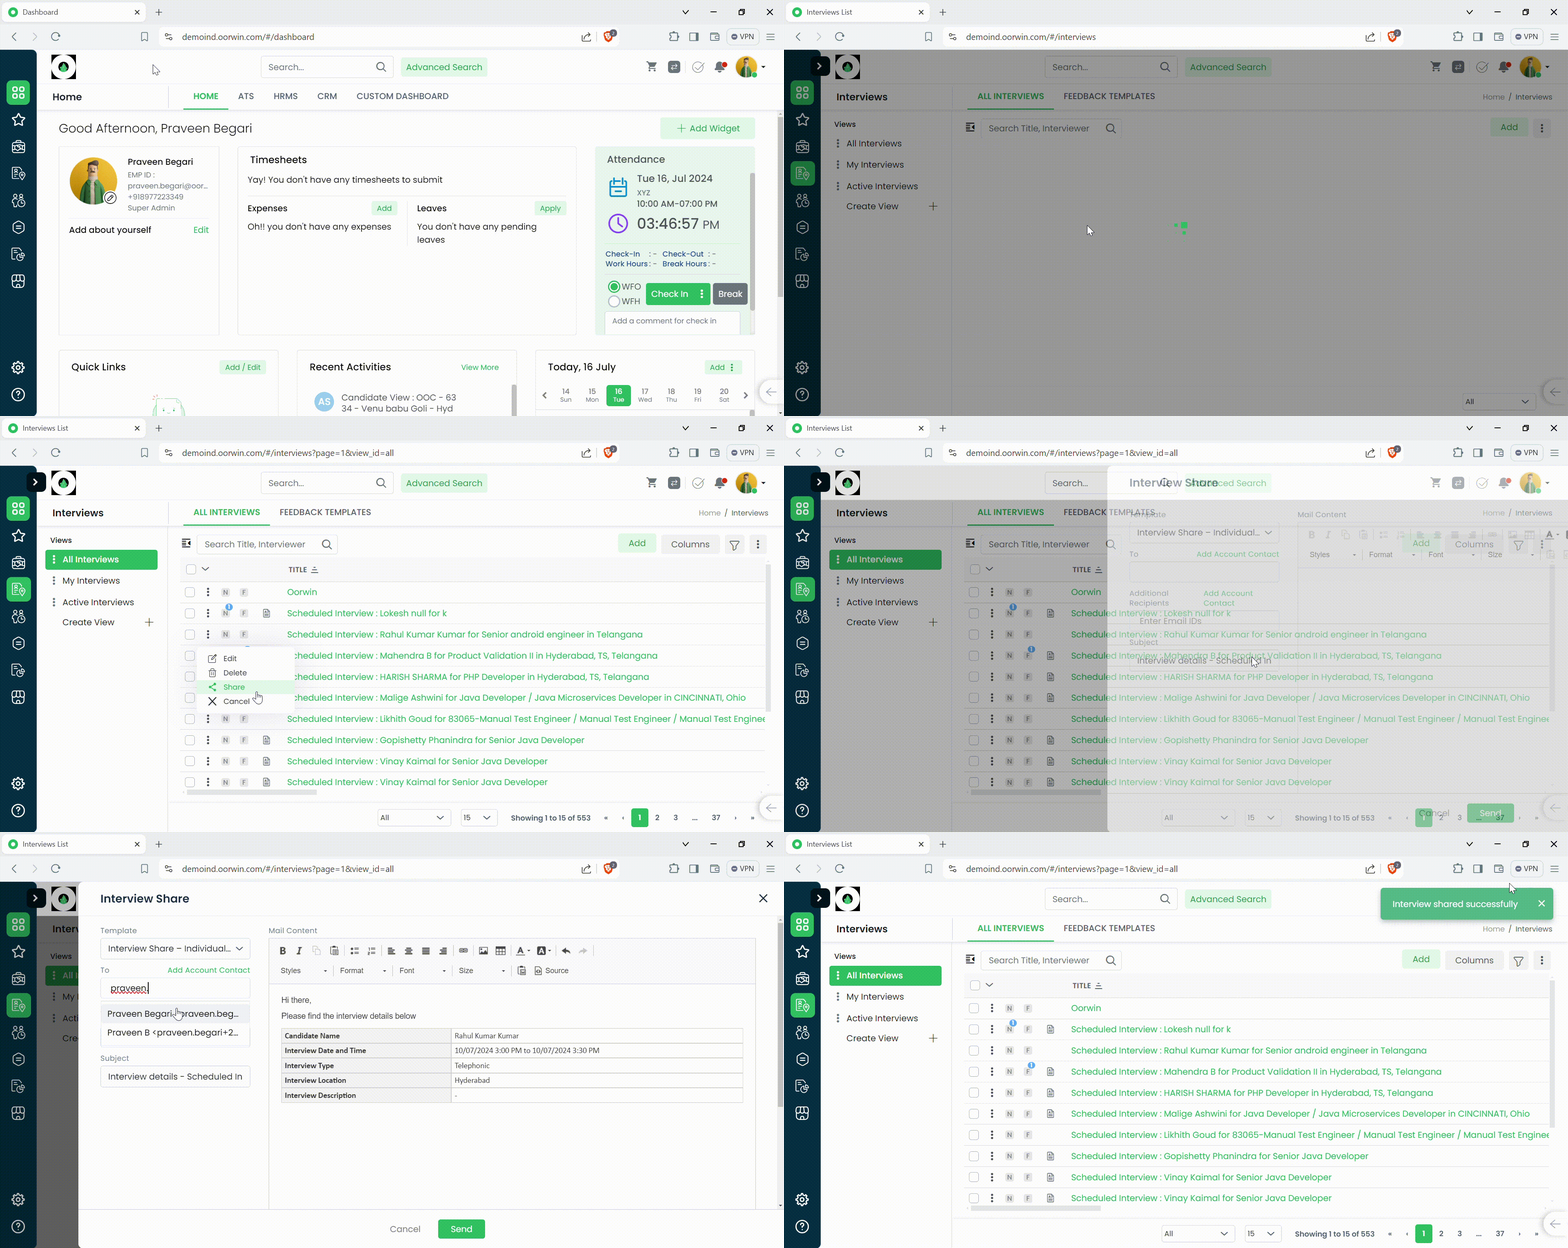
Was this article helpful?
User can create share a job to account conatct from account view page.
Follow the below steps to share a job to the account contact
- Log in to your Oorwin Account and navigate to Accounts module from the left menu under General Section
- Select any account name whom you wanted to share job for contact
- Click on “Contacts” tab on the top header
- Select any contact and click on three dots icon for that contact
- Click on share job option from the actions list
- It opens a popup with the list of jobs that you have access to
- Select the desired job from the list which you wanted to share to this contact
- It opens a share job compose mail popup with all the prefilled content
- Add any additional recipients and other details if needed and click on send button below

Was this article helpful?
You can share a job to an account contact or multiple contacts from contact module listing page
To do this action you need to have Promote Jobs permission enabled for your role from the Settings->Role security->Campaigns
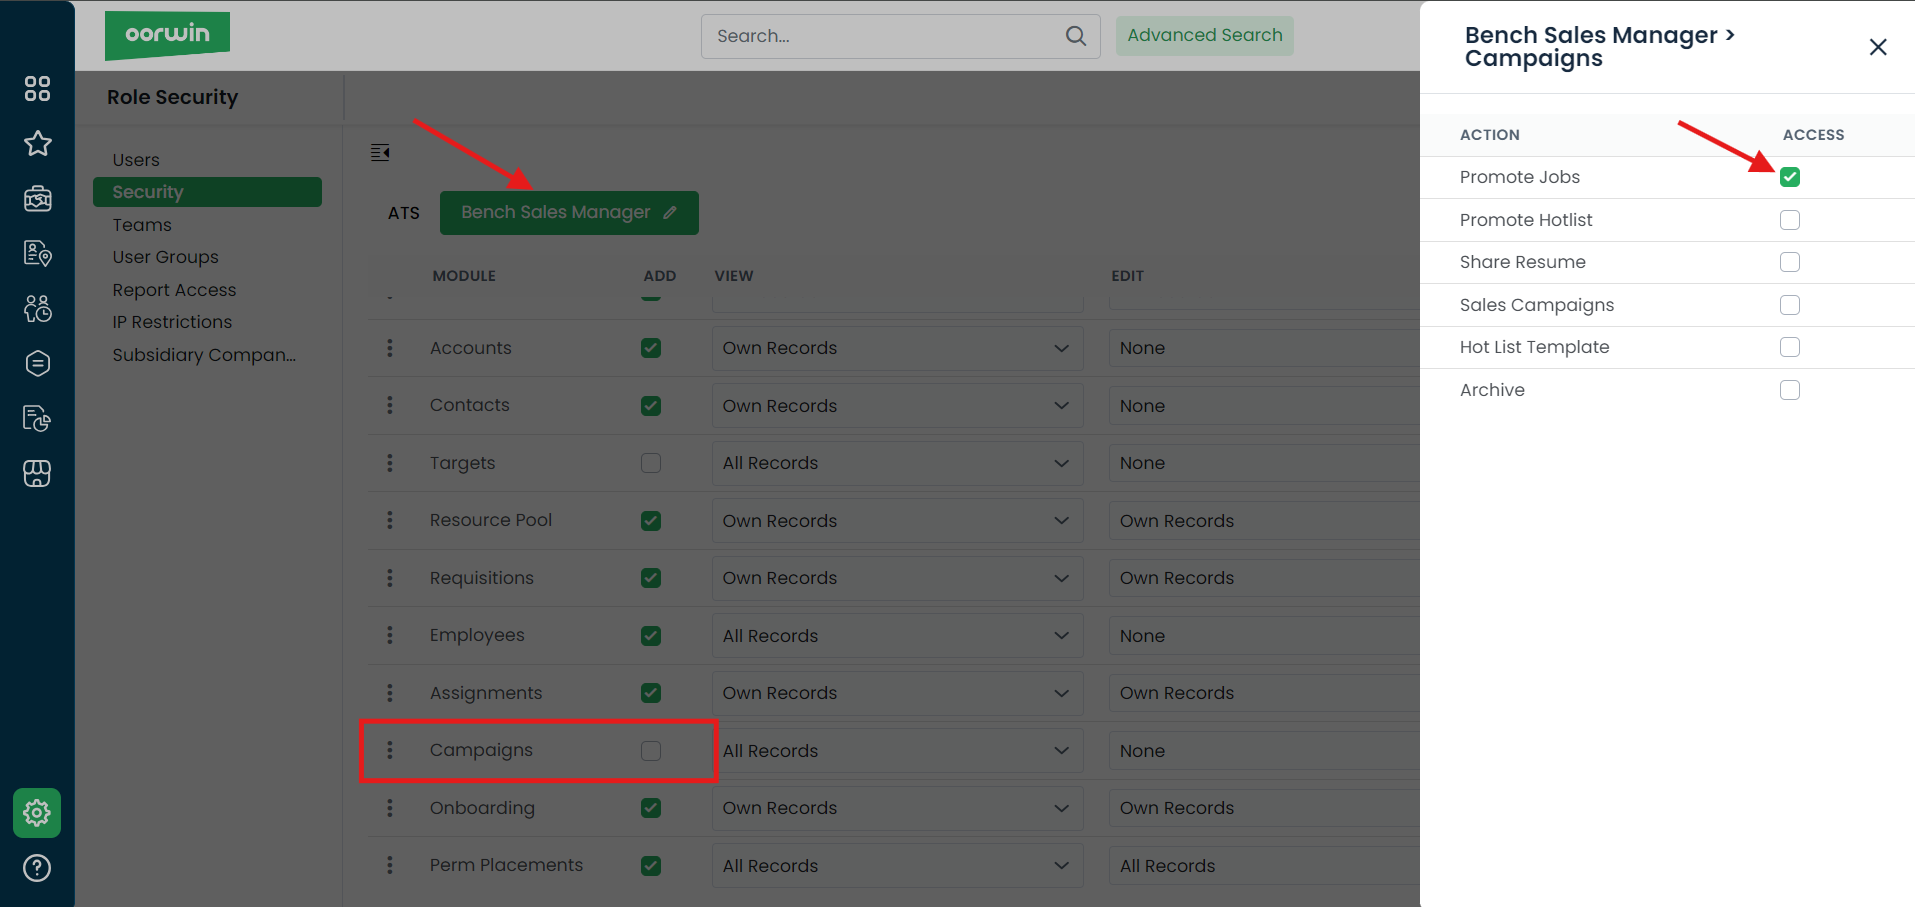
Please follow the below steps to promote/share job
- Log in to your Oorwin Account and navigate to Contacts module from the left menu under General Section
- Click on “Actions(three dots)” icon for the contact you wish to share a job.
- Click on Share job link from the list (You need to have promote jobs access permission)
- It opens a popup with the list of jobs available in your oorwin account
- Select any job by clicking on the job id and it opens a compose mail popup with all the job details and sender details loaded in it
- Select any predefined job templates from the drop down and enter any other details like additional recipients,lists,followups,etc
- Now click on send button below and your job will be share with all the contacts that you have selected
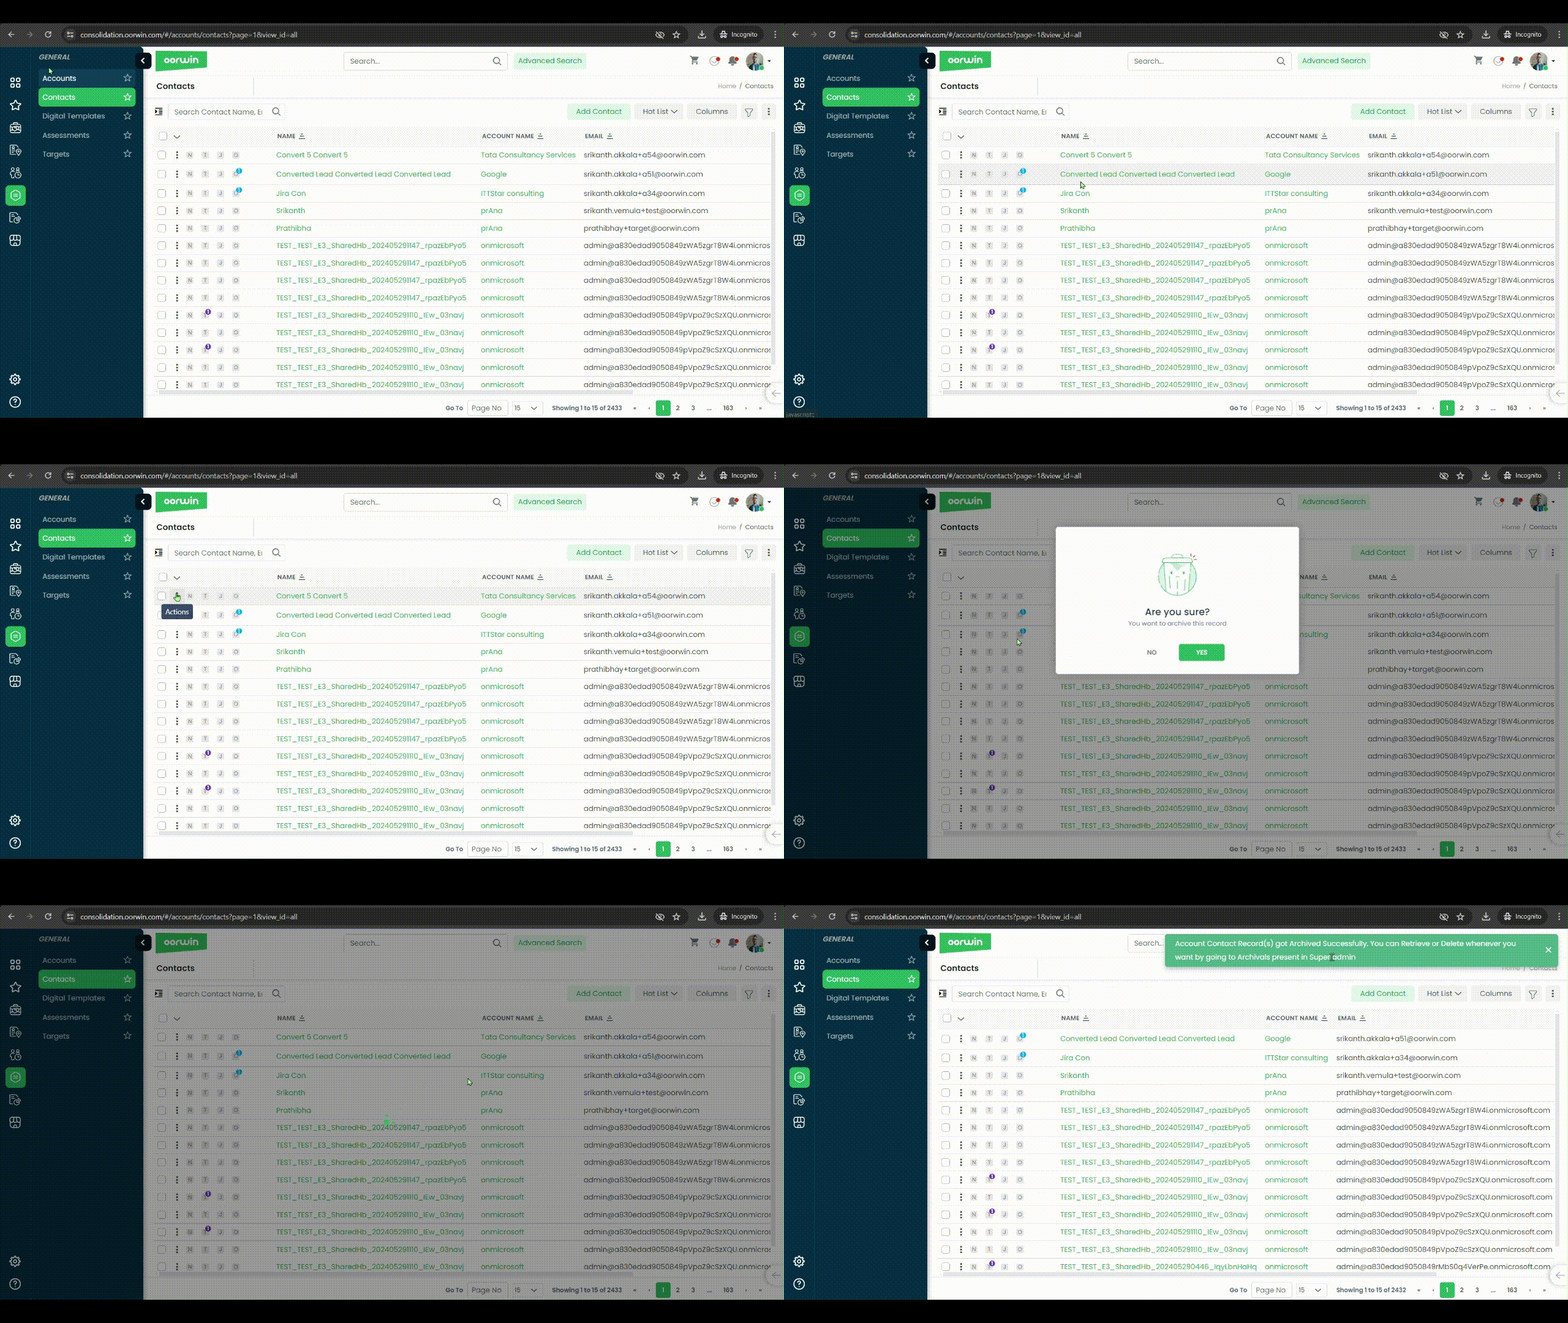
Was this article helpful?
Here’s a guide on how to Share Resume from Candidate Listing Page:
- Login to your “Oorwin account” and Navigate to “Candidates module” on the left menu under the “Recruitment” section.
- Click on the “3 dots/Actions” beside the Candidate ID and from the drop down click on Share Resume.
- Email Share Screen will pop-up.
- Enter the desired email address and click on “Submit” button.
- The Resume will be shared to the entered Email address.

Was this article helpful?
Here’s a guide on how to Share Resume from Resource Pool :
- Login to your “Oorwin account” and Navigate to “Candidates module” on the left menu under the “Recruitment” section.
- Click on the “3 dots/Actions” beside the Candidate ID and from the drop down click on Share Resume.
- Once the Share Resume Pop-up comes upon your screen.
- Select the email template and user can edit the email and enter the required email address.
- Click on Submit to share the resume.
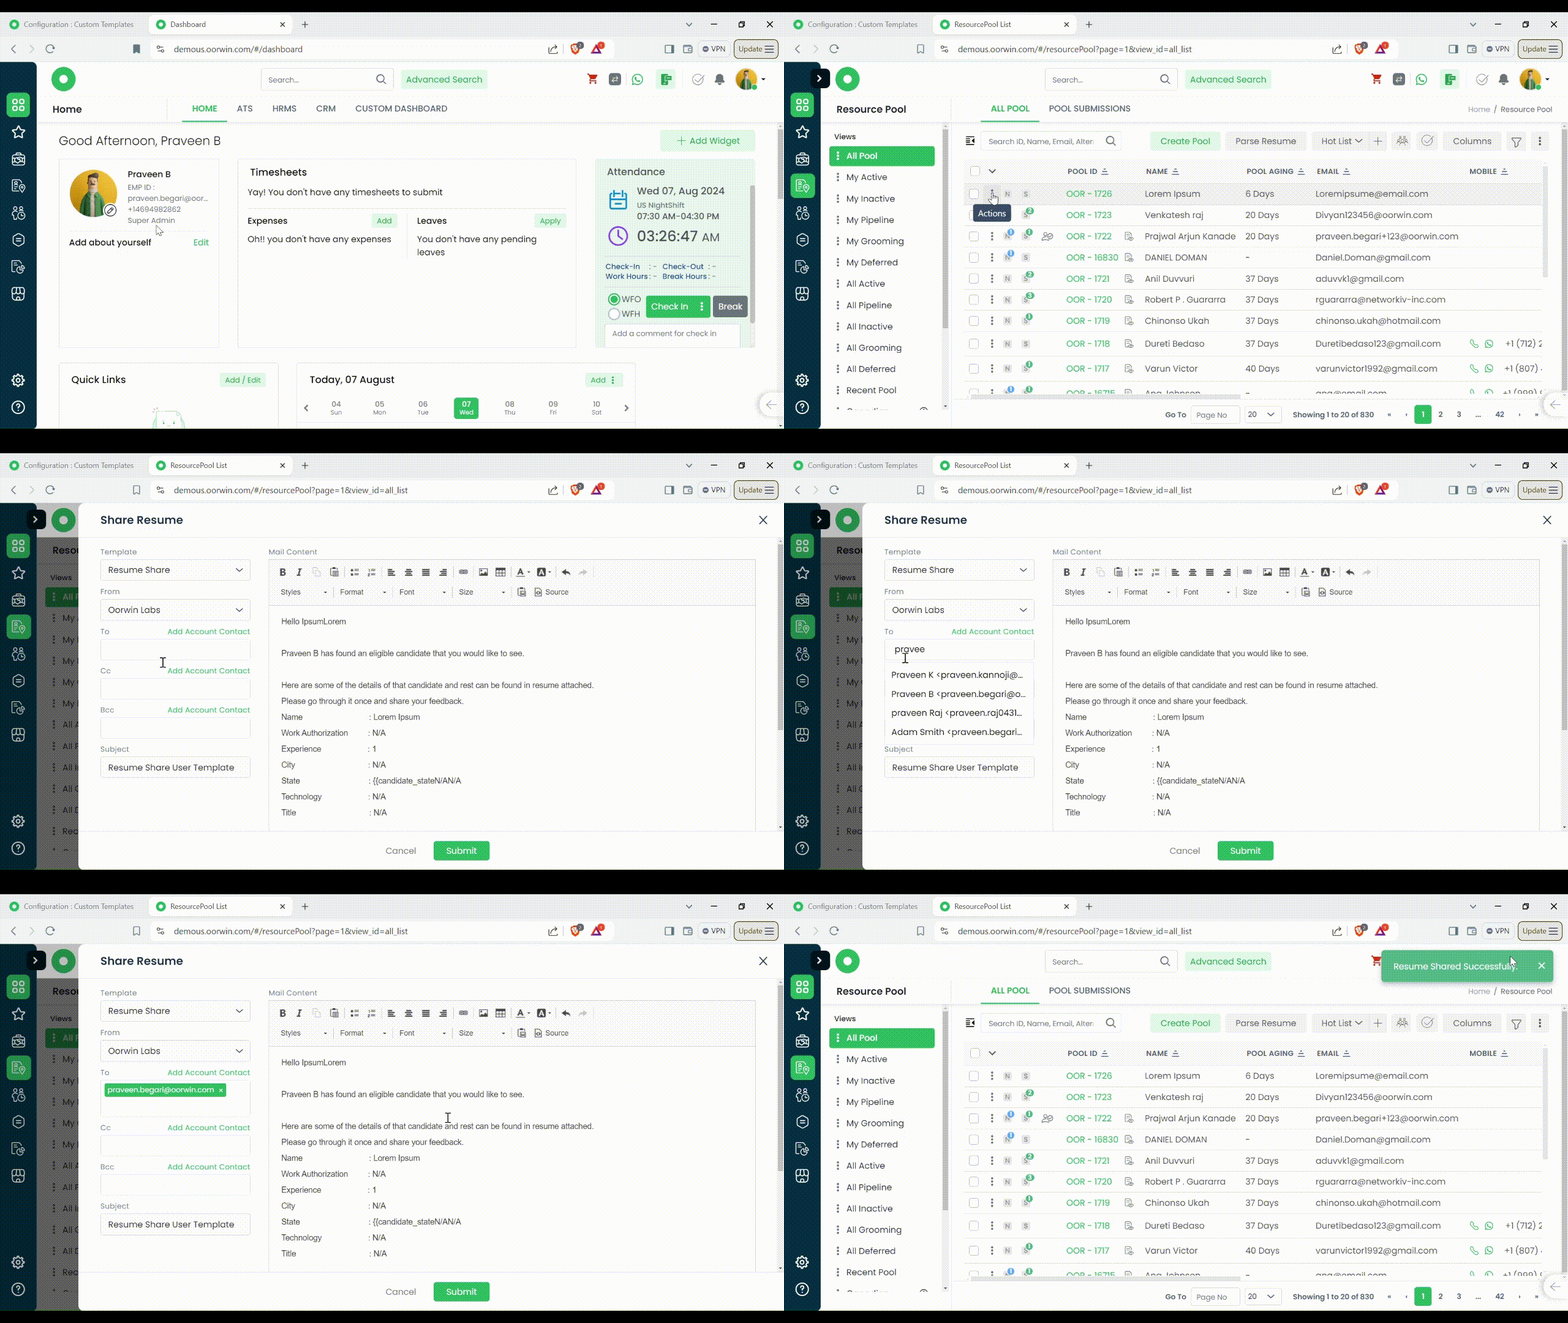
Was this article helpful?
Users can share the Submission Records to Internally, Vendors, Direct clients or to any specific Email address from Oorwin using the share Option.
Here’s a guide on how to Share Submission Record:
- Login to your “Oorwin account” and Navigate to “Submissions module” on the left menu under the “Recruitment” section.
- Click on the “3 dots/Actions” beside the submission ID and from the drop down click on Share.
- Select the option to share Internal, Client or Direct share.
- It’ll redirect you to an email Template.
- Enter the email address and click on the Send button on the bottom of your screen.
- The Submission record will be shared.

Was this article helpful?
Here’s a guide on how to Submit job from Candidate Listing page:
- Login to your “Oorwin account” and Navigate to “Candidates module” on the left menu under the “Recruitment” section.
- Click on the “3 dots/Actions” beside the Candidate ID and from the drop down click on Submit Job.
- Jobs Listing pop-up will come up on your screen.
- Search & Select the Job to which you want to submit the Candidate.
- You’ll be redirected to the Submission Details page.
- Fill in the Submission details and click on “Save” or “Save & Submit”.
- The Candidate will be tagged and will be Submitted to the selected Job.

Was this article helpful?
Here’s a guide on how to Submit a Candidate to the job from Candidates Module:
- Login to your “Oorwin account” and Navigate to “Candidates module” on the left menu under the “Recruitment” section.
- Click on “Candidate ID/ Name” to open the profile.
- Click on “Submit Job” button and a pop will come upon your screen.
- From the pop-up search for the “Job” and select the Job.
- Fill in the required submission details on the Job Submission Page and click on “Save” button on the bottom of your screen and the Candidate is submitted to the job.
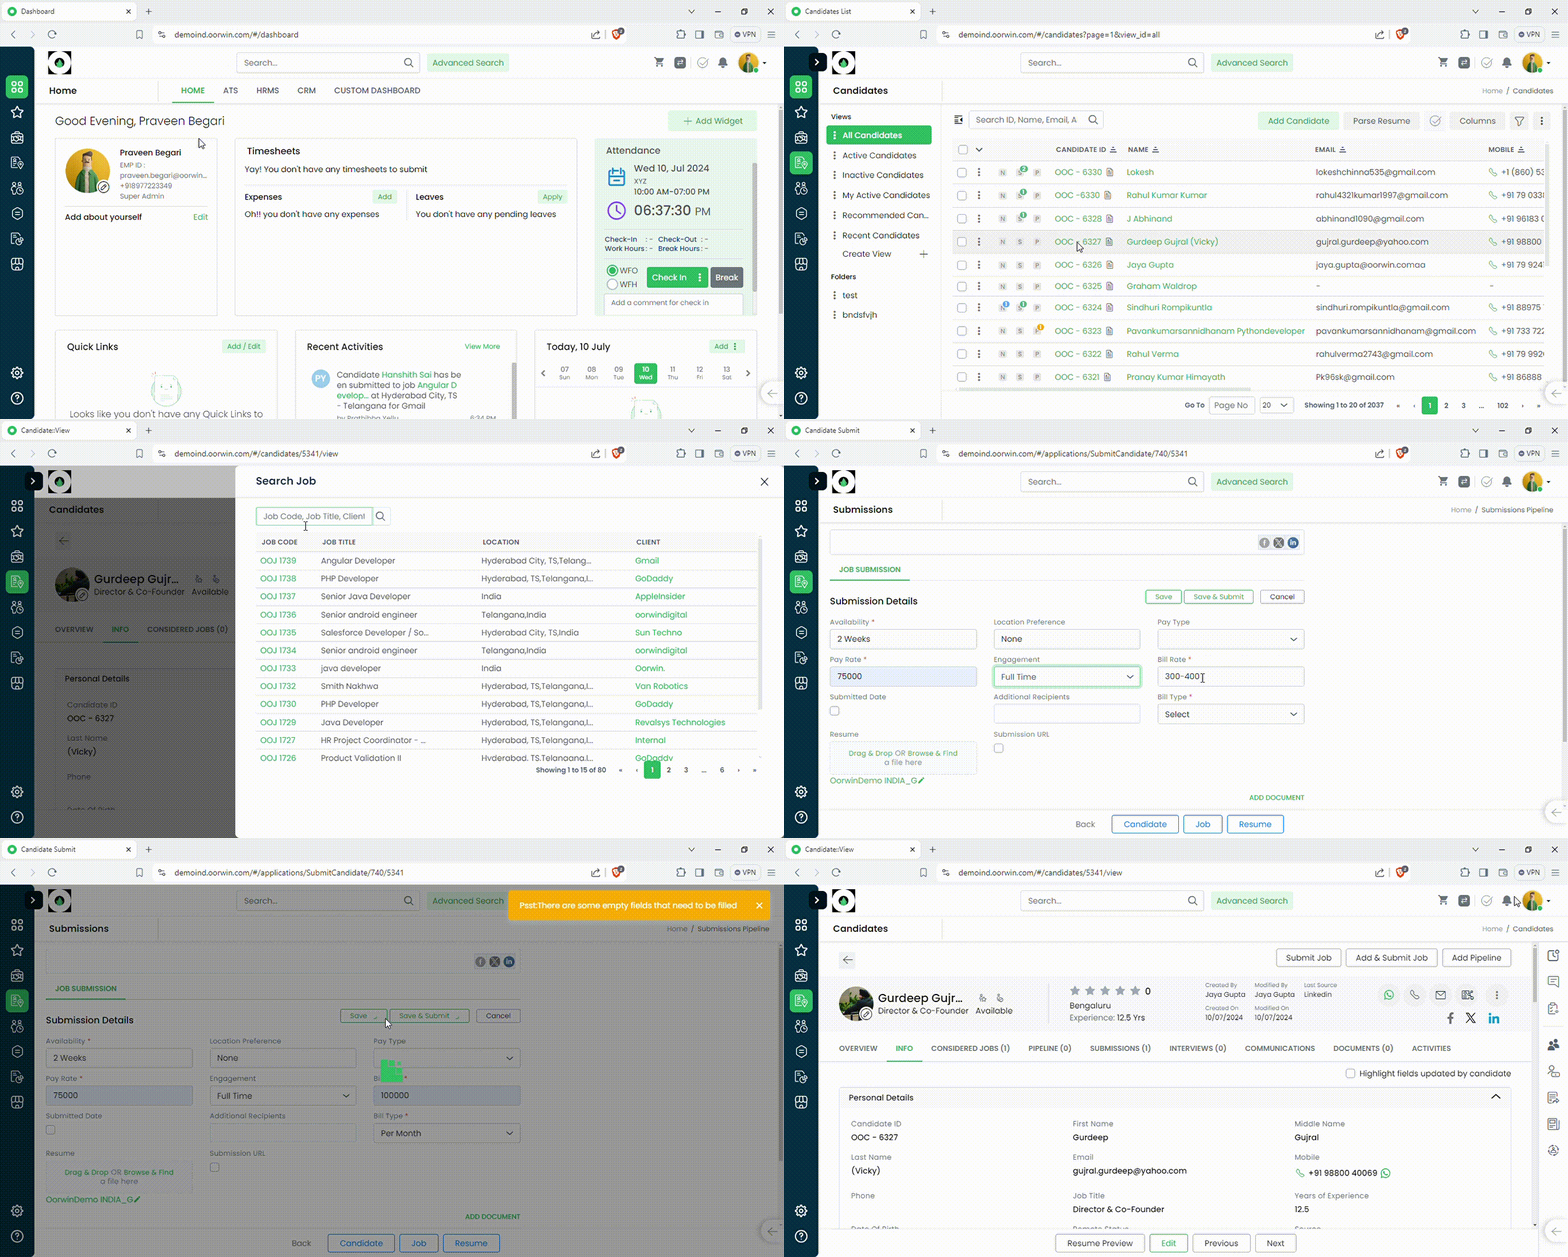
Was this article helpful?
Here’s the detailed guide on how to submit a Candidate to job from Jobs Module:
- Login to your “Oorwin account” and Navigate to “Jobs module” on the left menu under the “Recruitment” section.
- Click on the “Job ID/Job Title” and Open the job.
- Click on “Submit Candidate” button and once the pop-up comes up on your screen, search for the candidate and select the candidate.
- Fill in the required submission details on the Job submission Page and click on “Save” button on the bottom of the page to complete the Submission.

Was this article helpful?
Tag Employees against a Project:
- Navigate to Main Menu
- Projects
- Add/Open Projects
- Assigned Employees
- Assign Employee
- Search for your desired Employee
- Select Employee
If there is no Assignment, Create a New Assignment for an Employee
Then Select Employee - Assign

Was this article helpful?
You can verify all the timesheet external approvers at one place based on the tagged account and also you can verify which approver was tagged to which assignment
To view this list you need to have timesheet admin access which can be enabled from the settings->Role security
- Log in to your Oorwin Account and navigate to Timesheets module from the left menu under Human Resources Section
- You will find all the sections on the left menu and click on Timesheet settings on the top
- You will find a section called External Approvers on the left views and click on it
- This shows all the timesheet external approvers which are linked to the specific accounts
- User can also verify the assignments associated with the external approver by clicking on three dots->view linked assignments
- User can also create new external approver from here by clicking on “Create External Approver” button on the top right corner

Was this article helpful?
Here’s a detailed guide to View All Published Jobs:
- Login to your “Oorwin account” and Navigate to “Jobs module” on the left menu under the “Recruitment” section.
- Select “ Published Jobs “button in the header.
- You’ll have access to all the Published jobs on the landing page.
- You can filter the jobs published by Job boards or by the Publisher.

Was this article helpful?
Keywords is a place where you can configure all your field types, note types, status values, drop down field values etc in all over the modules based on your business needs. This is also a form of customization of the specific field values to be displayed while creating a record
Here is how you can create a keyword:
- Log in to your Oorwin Account and navigate to settings page from the left bottom
- Go to Configurations on the left menu which opens multiple sections in it
- Click on Keywords section under configurations page
- It opens all the modules on the left pane which opens the module specific keywords on the right pane upon clicking on it
- Click onany of the module that you wanted to configure the keywords
- Go to any section and click on Add button on the top right corner
- Now enter the name of the keyword on the popup form and click on Save
- Your new keyword has now added and visible in that module form while creating/editing the module record
- User can also delete or make inactive for unused keywords by clicking on three dots on that specific keyword

Was this article helpful?
Communication tab helps the users/admins to track all the communications that has been made to that employee like sent emails, onboarding related emails any calls that made to that employee
Here is how you can verify the communications made to an employee
- Log in to your Oorwin Account and navigate to Employees module from the left menu under HRMS Section
- Click on any employee name to whom you want verify the communications
- Search for Communications tab on the top and click on it
- It shows all the communication emails that are made to the selected employee
- Verify the sent emails, on boarding emails etc by navigating the tabs on the left panel

Was this article helpful?
Custom forms allows you to customize all your module forms based on your business needs. Here you can customize the forms like adding a new section, new field,Field/section access control and remove the section or a field. This can be done for all the major modules in Oorwin
Here is how you can create a custom form fields:
- Log in to your Oorwin Account and navigate to settings page from the left bottom
- Go to Configurations on the left menu which opens multiple sections in it
- Click on Custom Forms section under configurations page
- It opens all the modules on the left pane which opens the module specific form on the right pane upon clicking on it
- Click on any of the module that you wanted to add a custom section or a field
- Click on Add Field icon in the section header to create a new custom field
- Now select the field type like text,radio,check box,.etc and enter the field name in text box
- User can also assign the access privilege for the creating field to the other roles by selecting the radio buttons
- Now click on Create button on the buttom and now your new custom field has been created in the specific form

Was this article helpful?
In our ATS, “Placement Type” and “Job Type” serve different purposes. “Placement Type” refers to how a firm places a candidate with a client, such as through One Time Placements or RPO or C2h. In contrast, “Job Type” describes how the client categorizes the job itself, like full-time, part-time, or contractual. Understanding this distinction helps clarify the employment arrangement and avoid confusion during the hiring process. Keeping these fields distinct ensures smooth communication between the recruitment firm, client, and candidates.
Was this article helpful?
Oorwin lets you parse your jobs and resumes simply by forwarding them to pre-defined email addresses. The system can also allows non-oorwin users to parse resumes or jobs by forwarding the mails to these addresses.
Here is how you can set it up:
- Log in to your Oorwin Account and navigate to settings page from the left bottom
- It opens the company profile page with multiple sections in it
- Click on Inbox Config section under company profile page
- There will be a system generated forwarding emails for both Resume and Job Inbox
- Users can forward resumes to ‘Resume Inbox‘ email to parse them and to create candidate records
- Similarly, Job Inbox parses the job information from the emails forwarded to the ‘Job Email’ inbox
- You can also customize the email for non-Oorwin users by updating ‘Resume forwarding email’ with your own email id
- Also user can select the candidate owner as well as the job notifiers in the same page to notify the system users when a job/candidate created
- There will also an option like Reply back with acknowledgement which will auto trigger an acknowledgement email to the user who forwards the resume
- Now click on save on the bottom and all your configuration will be saved in the inbox config page and now you can create a candidate/job without logging to your oorwin account

Was this article helpful?
Job Grabber is an Oorwin module that assists bench sales executives in finding Job opportunities on all of the major employment/job boards. The user must create a job grabber agent and specify the relevant keywords. The user should also pick the job boards, and after successful creation, the system will go to all of the selected job boards and get the jobs.
Was this article helpful?
Partner logins are a seperate portal which can be accessed with the login credentials which we can enable it to the account contacts. From partner login portal, account contact can verify the status of submitted candidates to their jobs and verify the interviews scheduled etc
This is a seperate addon where you need to purchase this addon based on the licenses as per your need. Once you purchase the partner login credits,then this will be enabled in account view and follow below steps to enable the partner login access to an account contact
- Log in to your Oorwin Account and navigate to Accounts module from the left menu under General Section
- Select any of the account which you want to enable the partner login
- Now click on account view and enable partner login toggle on the top right
- It opens a popup to select the contact from the list to which you want to enable partner login
- Now click on save on the bottom, Thats it, your partner login has enabled and the contact person will get a link to login to the partner portal
Was this article helpful?
You can directly verify all the pending approvals of employee module related to employee info requests and profile update requests at one place which has assigned to you.
If you are an admin you can also approve the pending requests from “Approve as Admin Tab”
This also helps the approver/admin to verify how many requests have submitted/approved/pending and rejected at one place

Was this article helpful?
- “Placement Type” in the jobs module dictates how the considered candidates will be put from the firm’s perspective.
- If the placement type is “One Time Placement” or “RPO”, the system will divert the user to the “Perm Placements” module when attempting to “On Board” the candidate. Otherwise, they will be sent to the “On Boarding” module.
Was this article helpful?
Quick view helps the user to open the lead in the same page in a popup where user can perform multiple actions like update the status, create note, edit field, add task, etc
Here is how you can open the lead in quick view and perform any action:
- Log in to your Oorwin Account and navigate to Leads module from the left menu under CRM Section
- Select any Lead name whom you wanted to open in Quick view
- Click on “Eye icon (Quick View)” for the lead you wanted to open

- It opens the lead in a popup where you will have all the actions to be performed on the popup
- Hover on any field and click on it, then it opens in edit mode and you can easily update the field value for that particular field
- You can also create a note, change the status etc from the quick view page

Was this article helpful?
Quick view helps the user to open the opportunity in the same page in a popup where user can perform multiple actions like update the status, create note, edit field, add task, etc
Here is how you can open the opportunity in quick view and perform any action:
- Log in to your Oorwin Account and navigate to Opportunity module from the left menu under CRM Section
- Select any Opportunity name whom you wanted to open in Quick view
- Click on “Eye icon (Quick View)” for the opportunity you wanted to open

- It opens the opportunity in a popup where you will have all the actions to be performed on the popup
- Hover on any field and click on it, then it opens in edit mode and you can easily update the field value for that particular field
- You can also create a note, change the status etc from the quick view page

Was this article helpful?
Resume harvesting is the process of system automatically collecting, organizing, and storing resumes from various sources job boards based on search criteria provided by the sourcer/recruiter. By building a comprehensive resume database, recruiters can quickly and efficiently identify qualified candidates when new job openings arise.
Was this article helpful?
Search contact option is a premium feature where you can find the available contacts of a particular client/account from the cloud. From this you can verify and download the available contacts to your oorwin portal along with their email id mobile number based on the availability
This is a premium addon where you need to purchase this addon based on the credit based as per your need. Once you purchase this addon the credits will be allocated to your company and then you need to allocate individual credits to each user from Settings->Credit allocation page within the platform

Follow the below steps to search contact for a particular account
- Go to Accounts module from the left menu under General Section
- Select any of the account which you want to perform the search contact option
- You will get two options Get available emails and email finder along with the website prefilled in the website field
- From the email finder you can search a contact based on the first name and last name and system will provide the contact details if available
- Now click on search button below and it fetches all the available contacts for that account
- Select the checkboxes of the contacts which you wanted to download and click on Batch actions
- Click on Add to contacts from the actions list in the drop down.
- Thats it, all the selected contacts have downloaded and created as contacts in your oorwin system

Was this article helpful?
What is Signature Certificate: A Signature Certificate adds a new page to the document, displaying the signature Envelope ID, digital signatory details, IP addresses, and more. This certificate is essential for verifying the authenticity of the signatures, ensuring legal compliance, and providing a clear audit trail. It enhances document security and transparency, making it easier to track and validate each signature’s origin and integrity.
How to Configure:
- Navigate to Main Menu
- General
- Digital Templates
- Configuration
- Additional Configurations
Hide Sender’s IP Location: Would help you in hiding the sender IP addres
Show envelope originator as Company ID: Would show the default company name and billing address on the signature cretificate

Was this article helpful?
Admin Setup
Configure and manage various settings like customize parameters, user permissions, system preferences and workflows which suit your business requirements.
