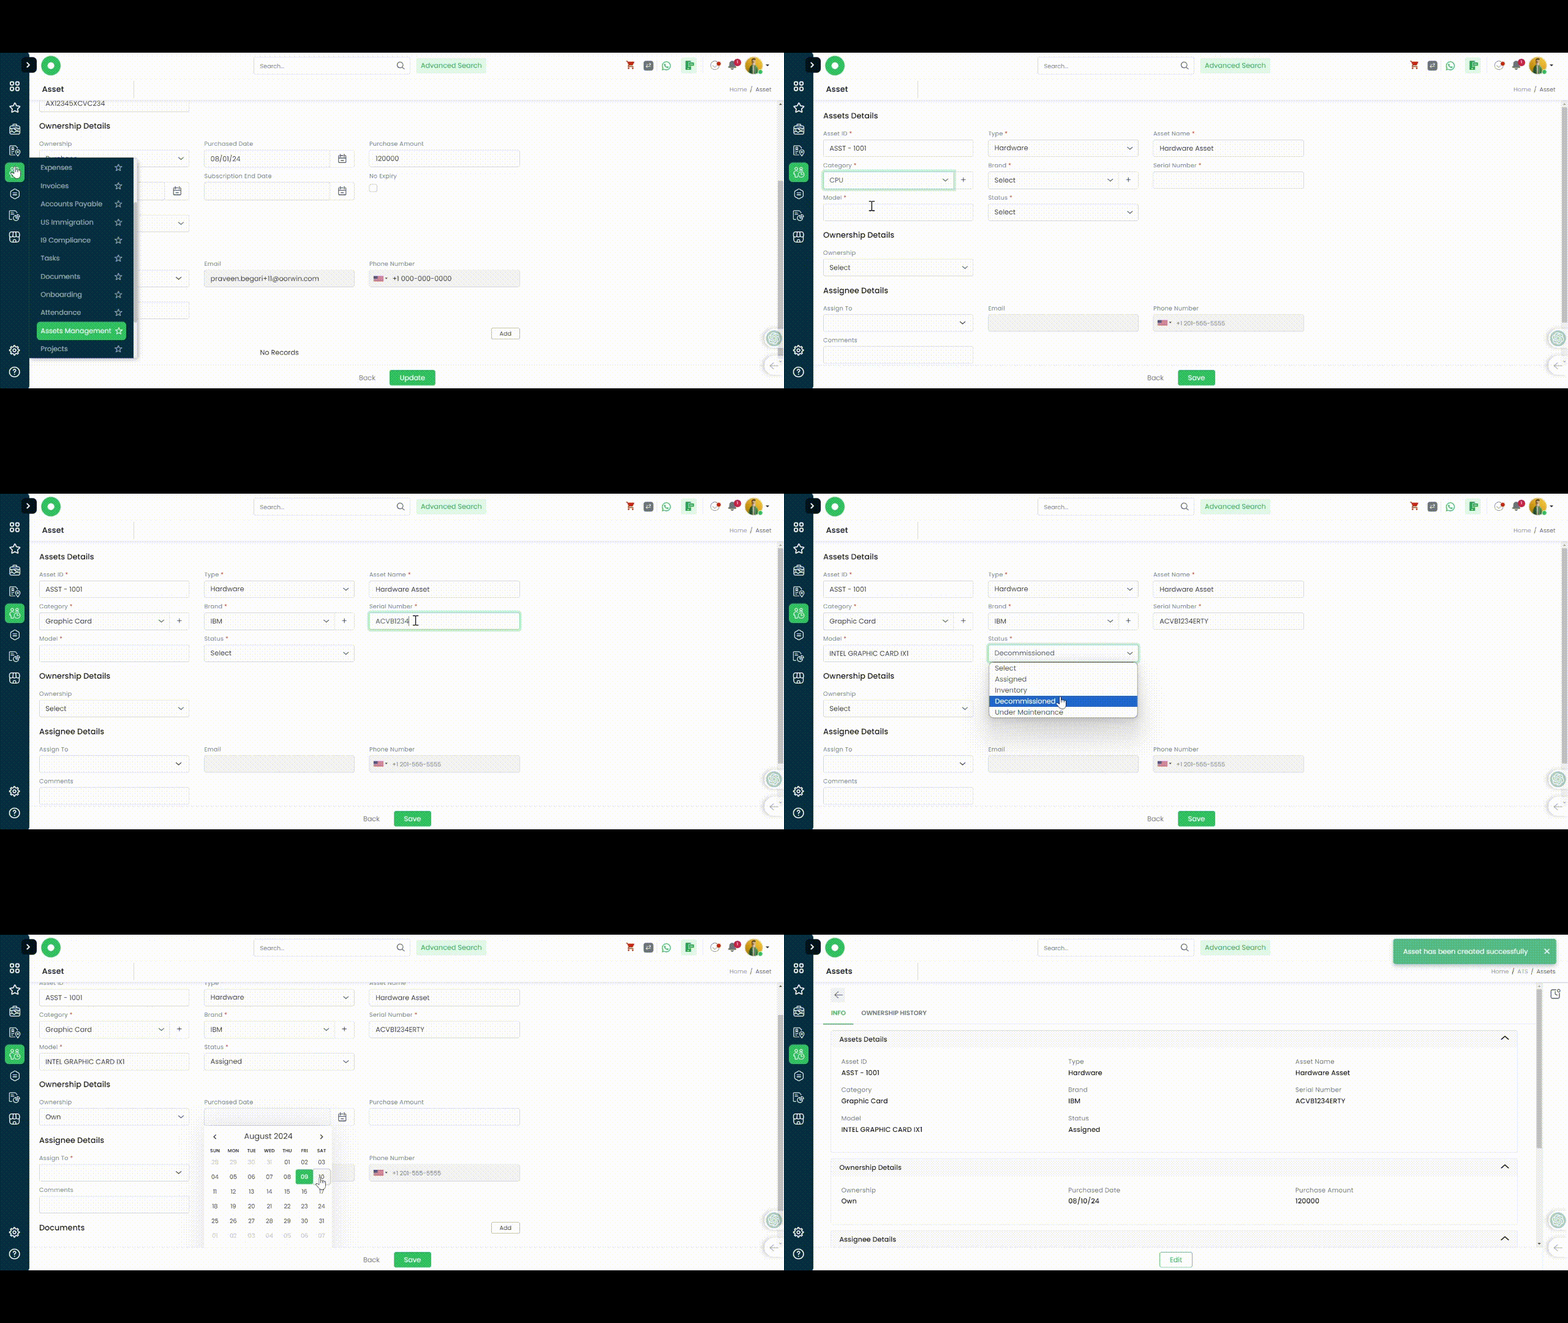
Add Hardware Asset:
- Navigate to Main Menu
- Asset Management
- Add Asset
- Select Type as “Hardware”
- Asset Name
- Category – Select from drop down or click on “+” to create a new category
- Brand – Select from drop down or click on “+” to create a new category
- Serial Number – Mention Serial number of the asset
- Model – Enter the Model number information
- Status –
Assigned: select this status , if the assigned is assigned to any employee
Inventory: Select this status, if the Asset is in the Inventory
Decomissioned: Select this status, if the Asset is Decomissioned or Expired
Under Maintenance: Select this status, if the Asset is Under maintenance/repair - Ownership Details –
- Own: Select Own, if the asset has been purchased by you and you own it
Select Purchased Date and Amount - Rent: Select Rent, if the asset has been rented.
Select Rental date, Rental end date, Vendor from whom you have rented the asset and Rental Amount.
- Own: Select Own, if the asset has been purchased by you and you own it
- Asignee Details – Select “Assign To” drop down and select desired employee to whom it was assigned to
- Comments – Enter Comments
- Add Any Documents/Invoices/Warranty etc in Add Dcouments section
- Save
Was this article helpful?
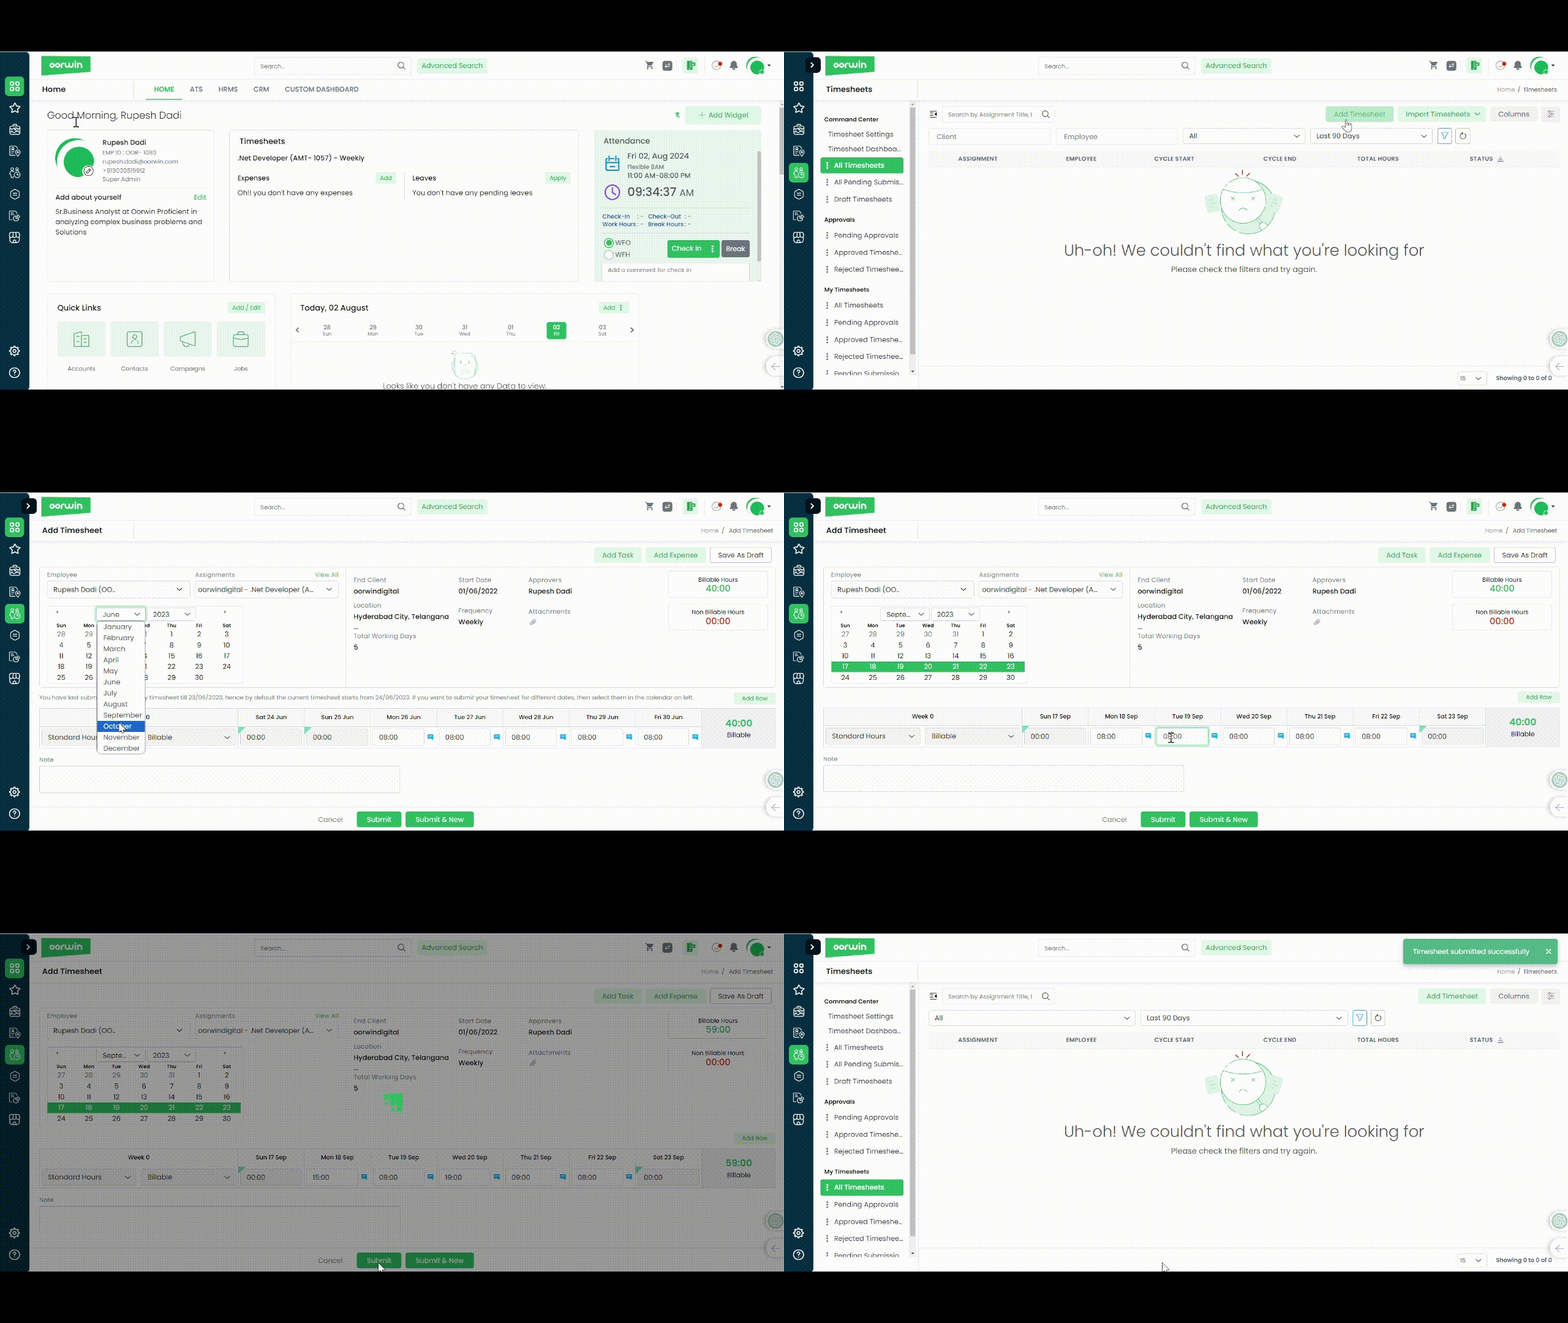
Log your work hours and track project time by adding your timesheets here.
Navigate to Menu -> Timesheets -> Add Timesheet
- Select your Assignment from the drop down
- Select your dates(as per your timesheet cycle)
- Enter your hours worked
- Add Attachments if necessary
- Enter your comments if necessary
- Submit
Was this article helpful?
Approvals is a place where you can configure multiple set of approvals with different type of approval levels on the same approval flow
Here is how you can create approval flow for Invoices
- Log in to your Oorwin Account and navigate to settings page from the left bottom
- Go to Configurations on the left menu and click on Approvals module
- Now go to Invoices tab which opens the new form to create a approval flow

- Enter the Invoice approval flow name and select any applicable option ( Specifically like Amount & Clients)
- Now select the access levels or users from the drop down which acts as the first approver and also enable the DIGI SIGN for the approvals
- If you want to add multiple approvers then click on “+” icon which opens another row to select another user/access level as a next approver
- Likewise you can add multiple approvers on the same flow and click on Save button
- This will save your approval flow for Invoices and will be available to add as a approver flow while creating the Invoices.
Was this article helpful?
Adjusting an Employee’s Leave Policy Mid-Year
You can change an employee’s leave policy mid-year and align it with your new policy by adjusting the leave credits accordingly.
To achieve this:
- Navigate to Settings -> Configurations -> Time & Attendance -> Leave Management -> Assign Employees to Leave Plan.
- Search for the desired employee whose leave policy you wish to change.
- Click on Options -> Update Leave Plan.
- Select the new leave plan from the dropdown menu on the right.
- You will see the old policy on the left and the new policy on the right. Adjust the leaves by adding or deducting based on the old leave policy, considering any leaves already taken or earned through accruals.
- Enter the number of leaves in positive or negative as needed. The system will adjust the new leaves accordingly and apply the changes.
This allows you to seamlessly update the leave policy while ensuring the leave credits are accurately managed.
Was this article helpful?
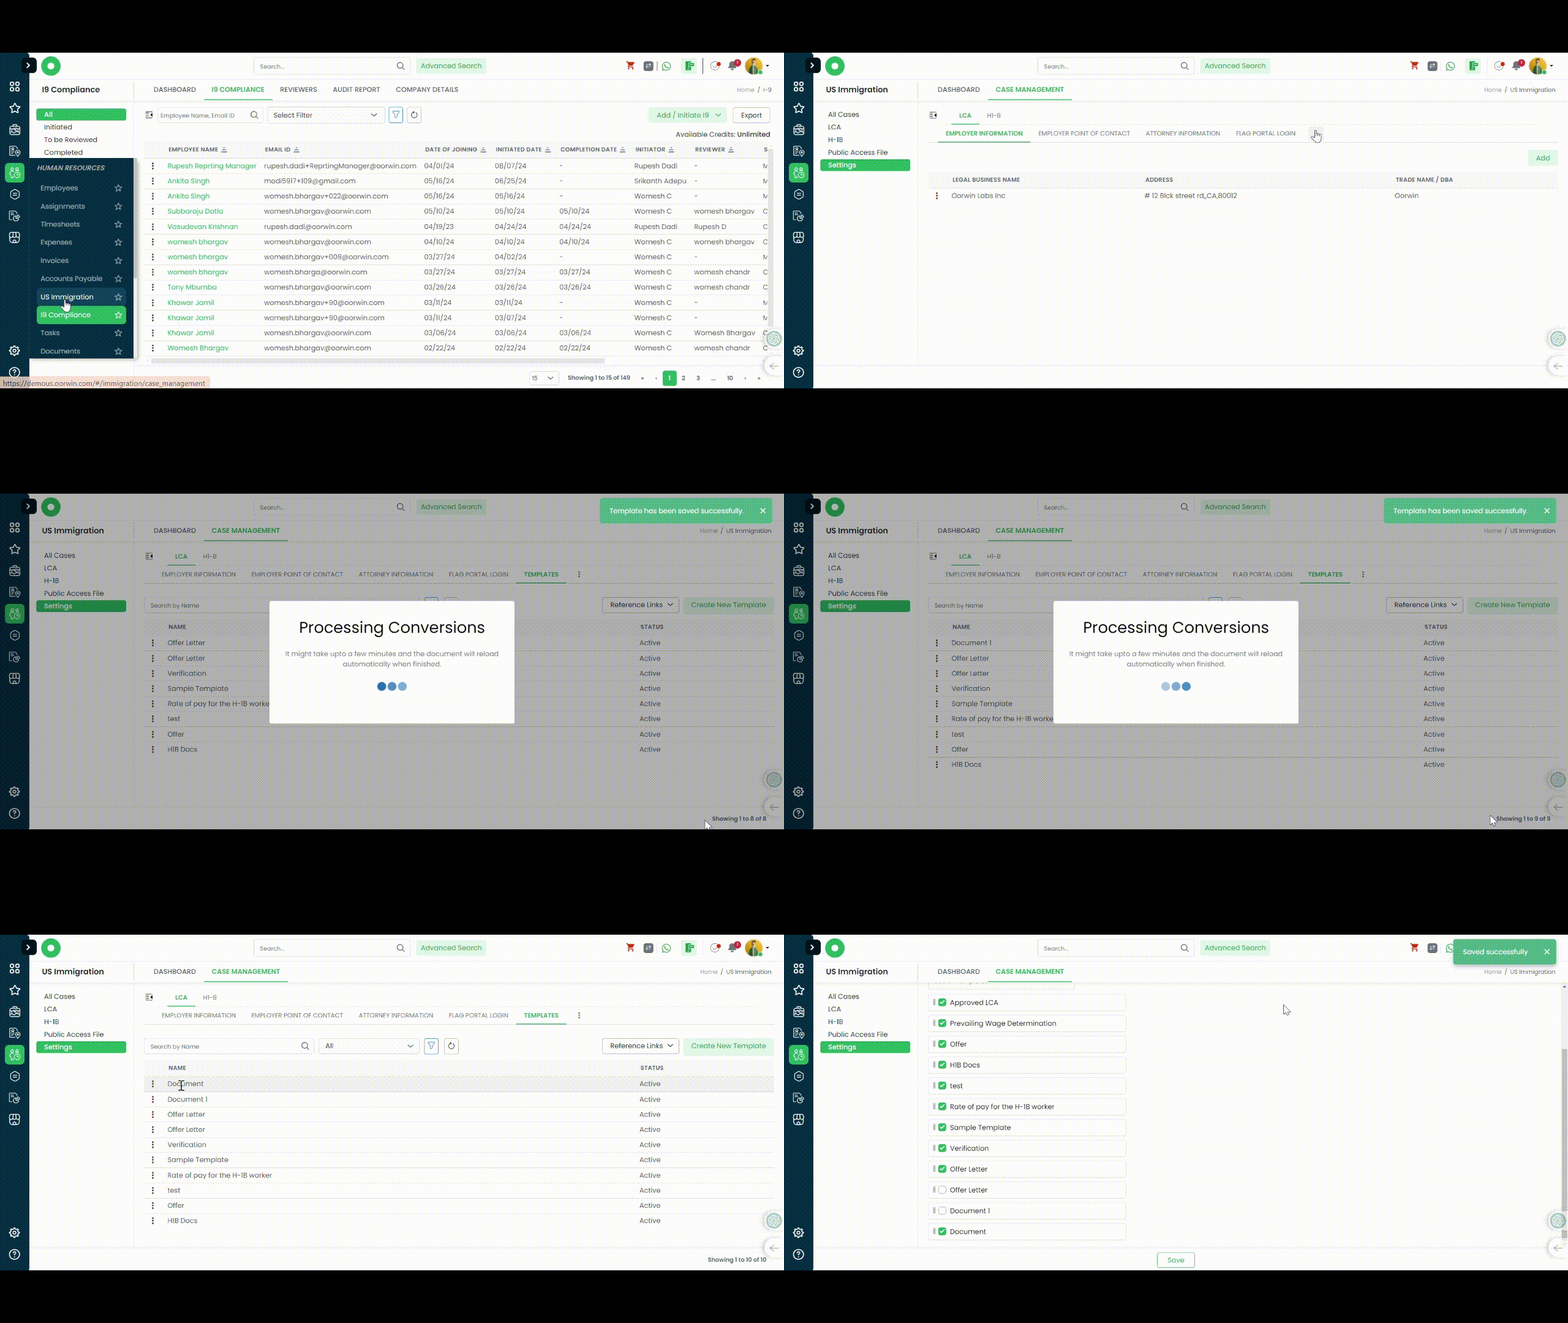
How to Configure Public Access File (PAF):
- Navigate to Main Menu
- US Immigration
- Case Management
- Settings
- Templates
- Add Template
- Select Document & Name it
- Design and Save
- Navigate to Public Access File
- Check this new Template
- Save
Was this article helpful?
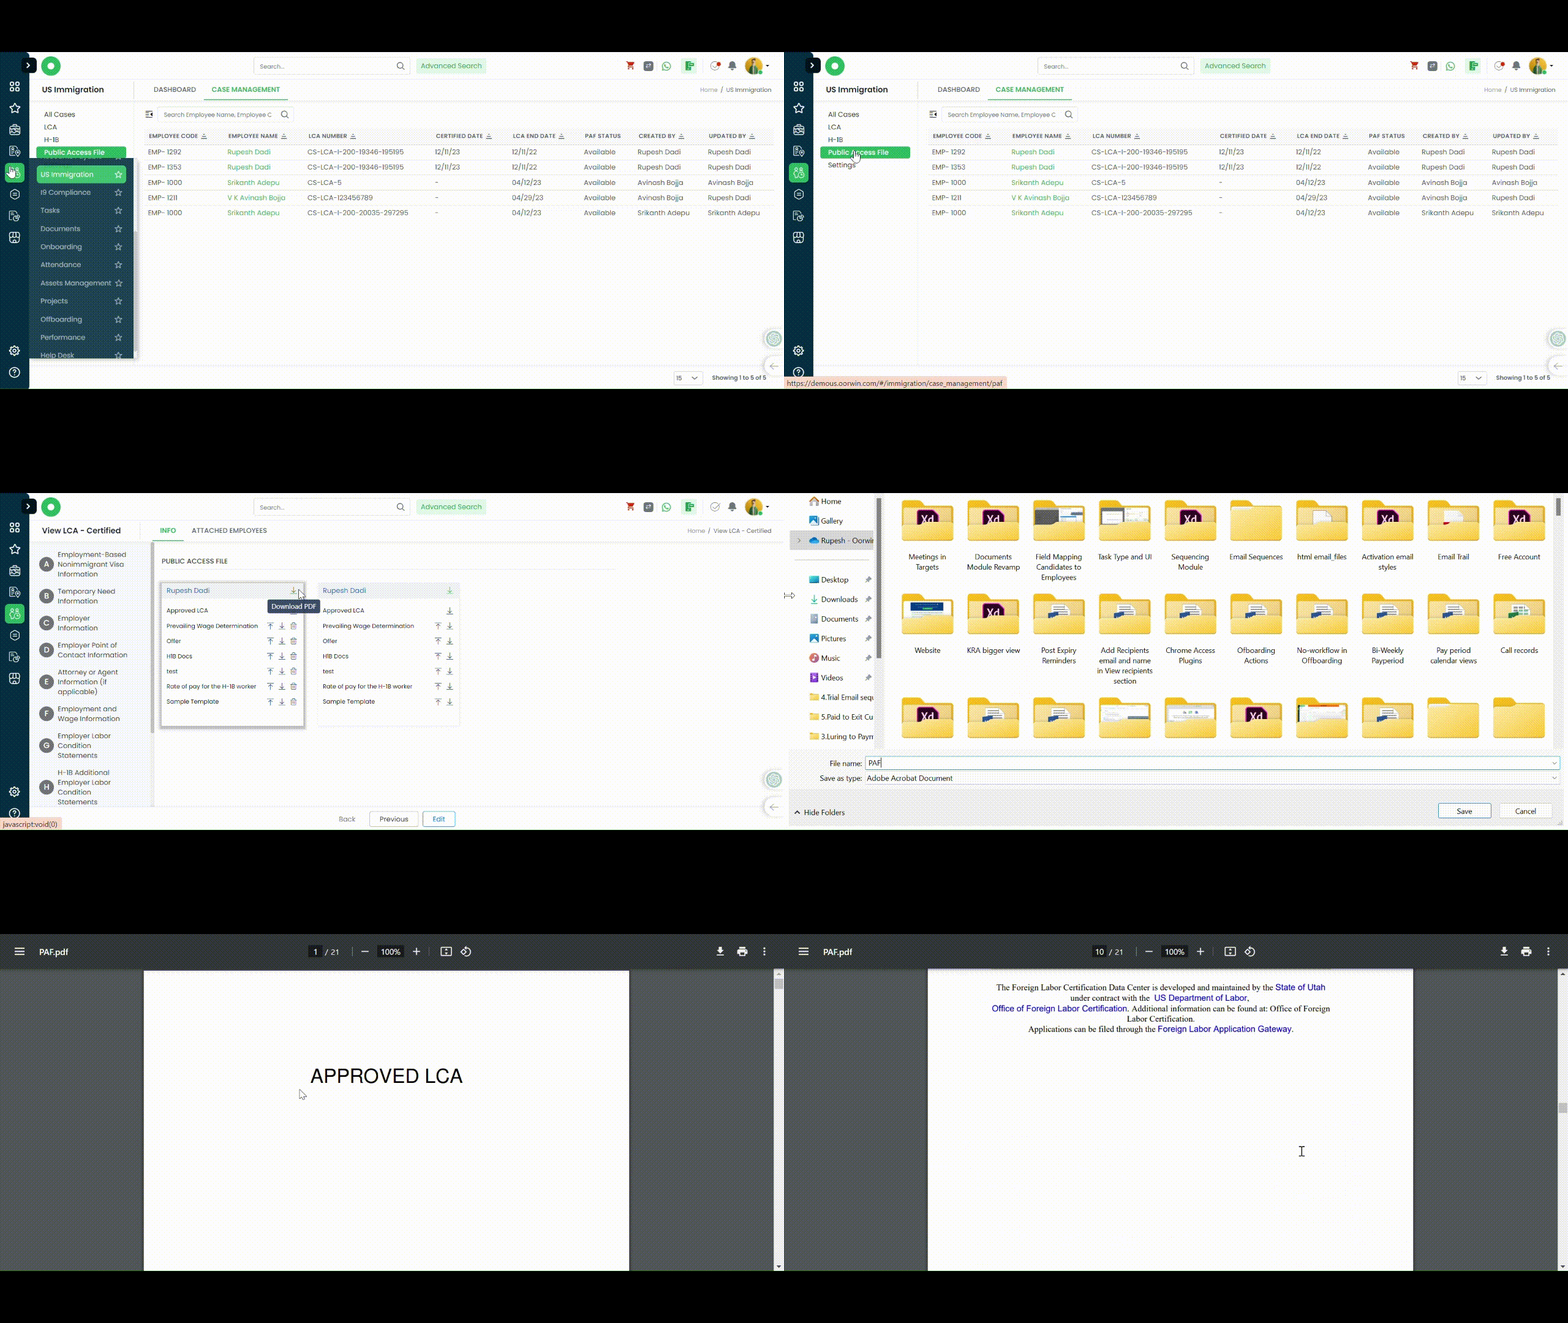
How to View and Download Public Access File (PAF):
- Navigate to Main Menu
- US Immigration
- Case Management
- Public Access File
- Select Employee Name
- Download individual file/document
or
Download as a single PDF(Where all the files/documents would be collated as one single PDF)
Was this article helpful?
Easily import your timesheets through Excel for quick and accurate tracking of work hours and project time.
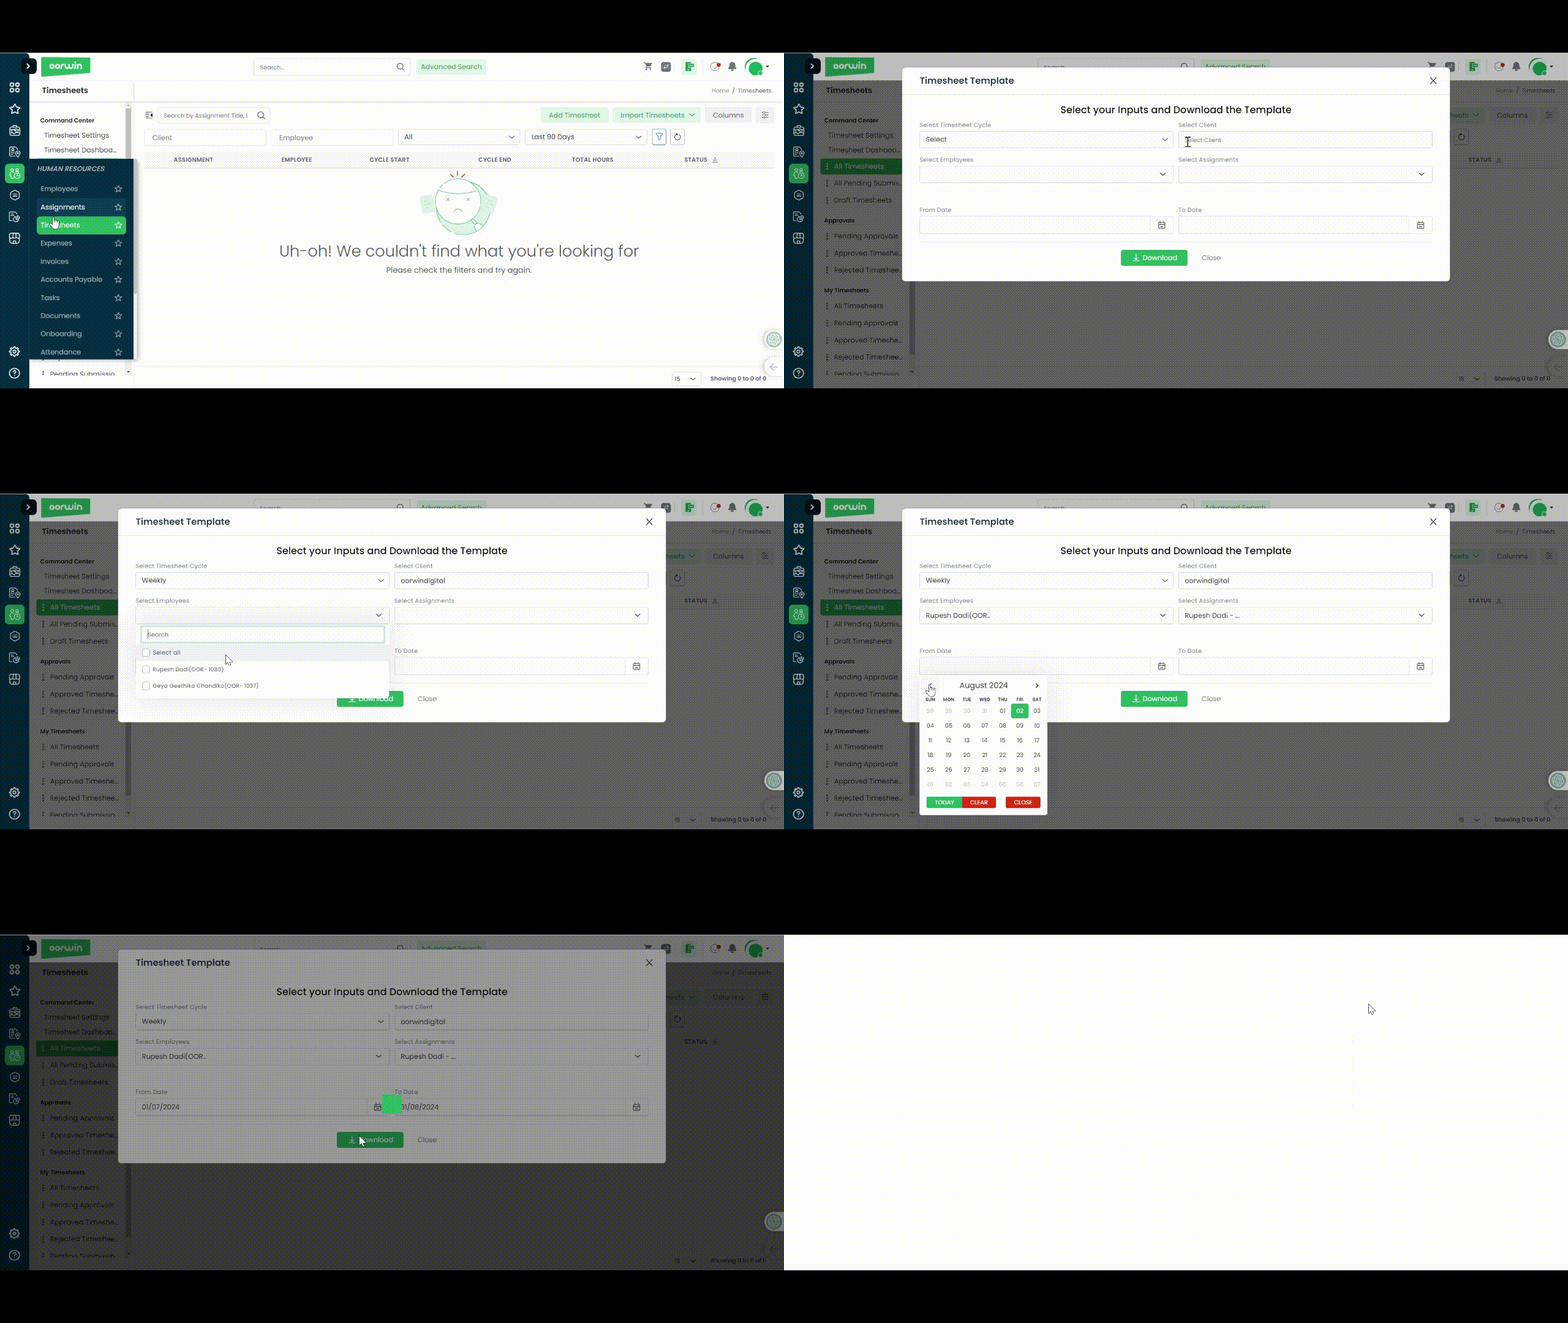
Download Template
- Navigate to Menu
- Timesheets module
- All Timesheets
- Import Timesheets
- Download Template
- Select Timesheet Cycle, Client, Employees, Assignments and select Date range
- Download
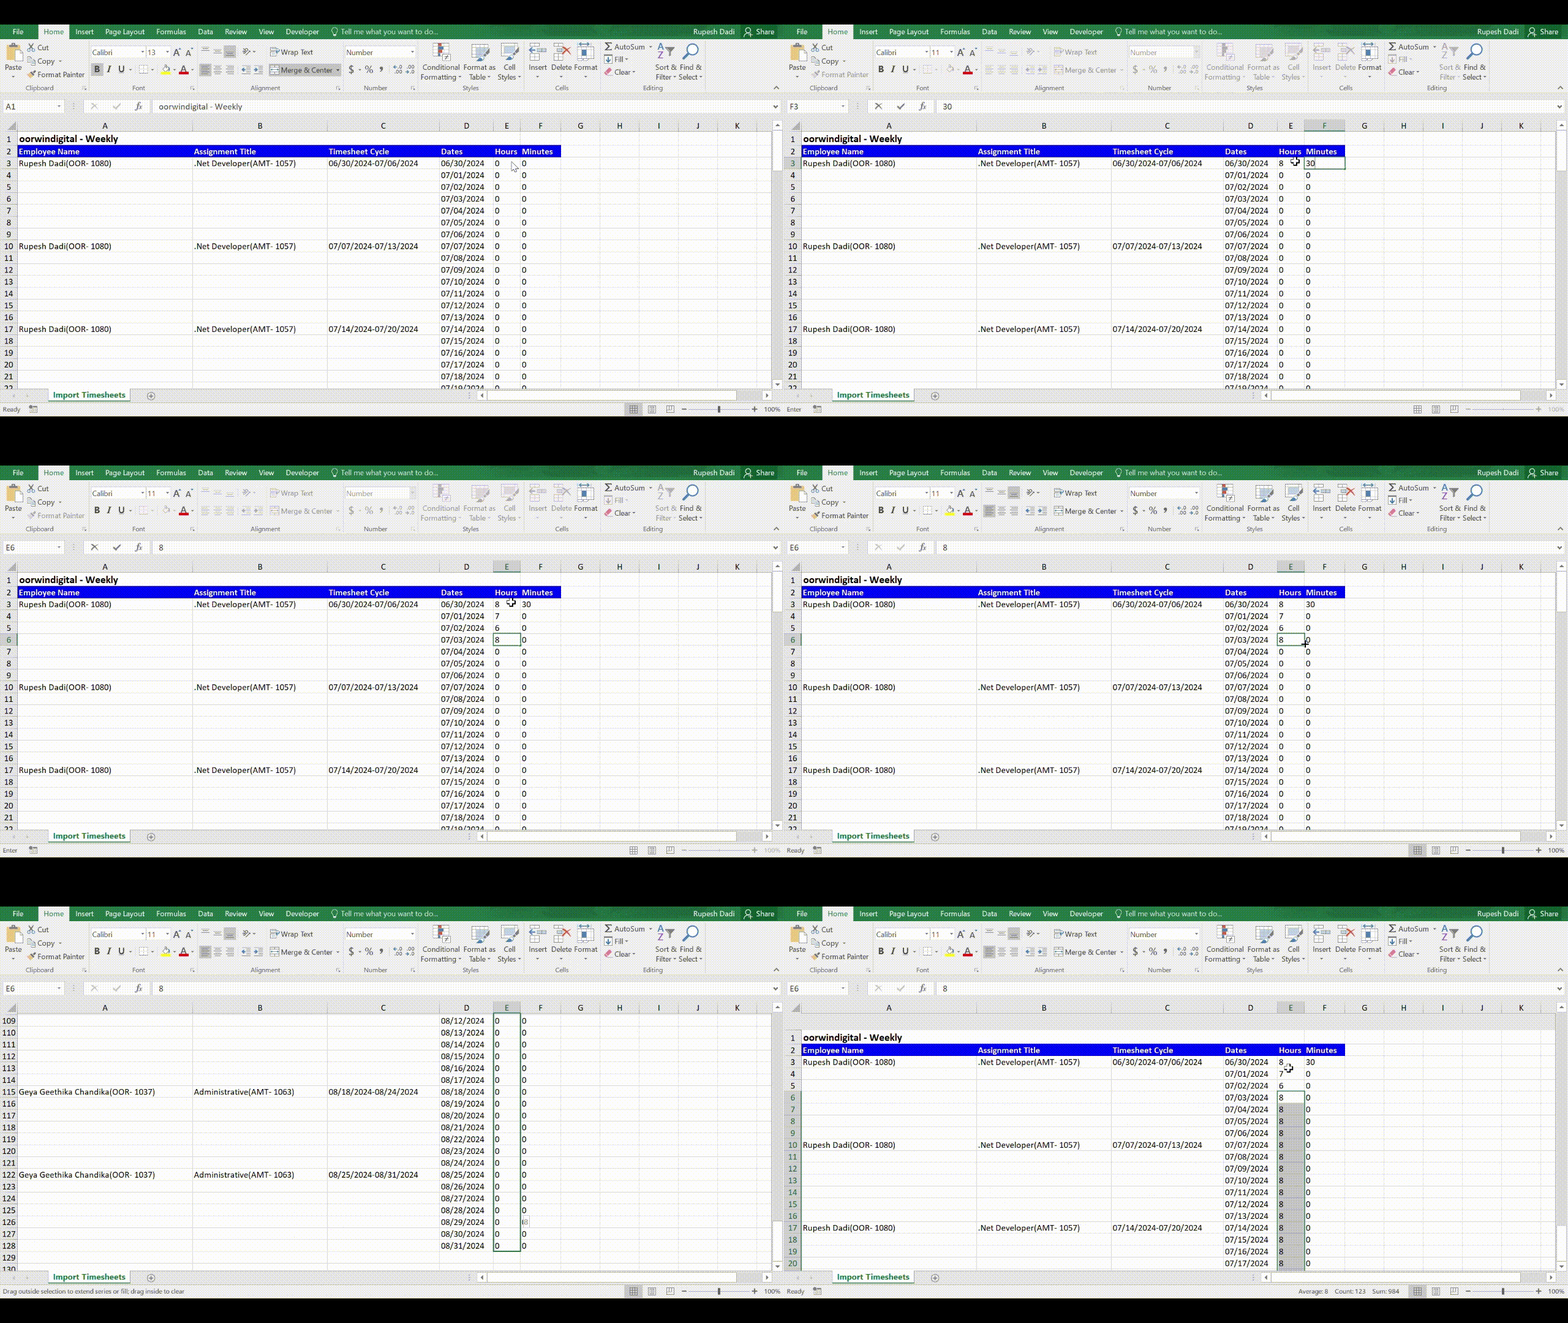
Work on your Template
- Open downloaded Excel
- Enter your time entries in the specified columns
- Save Excel
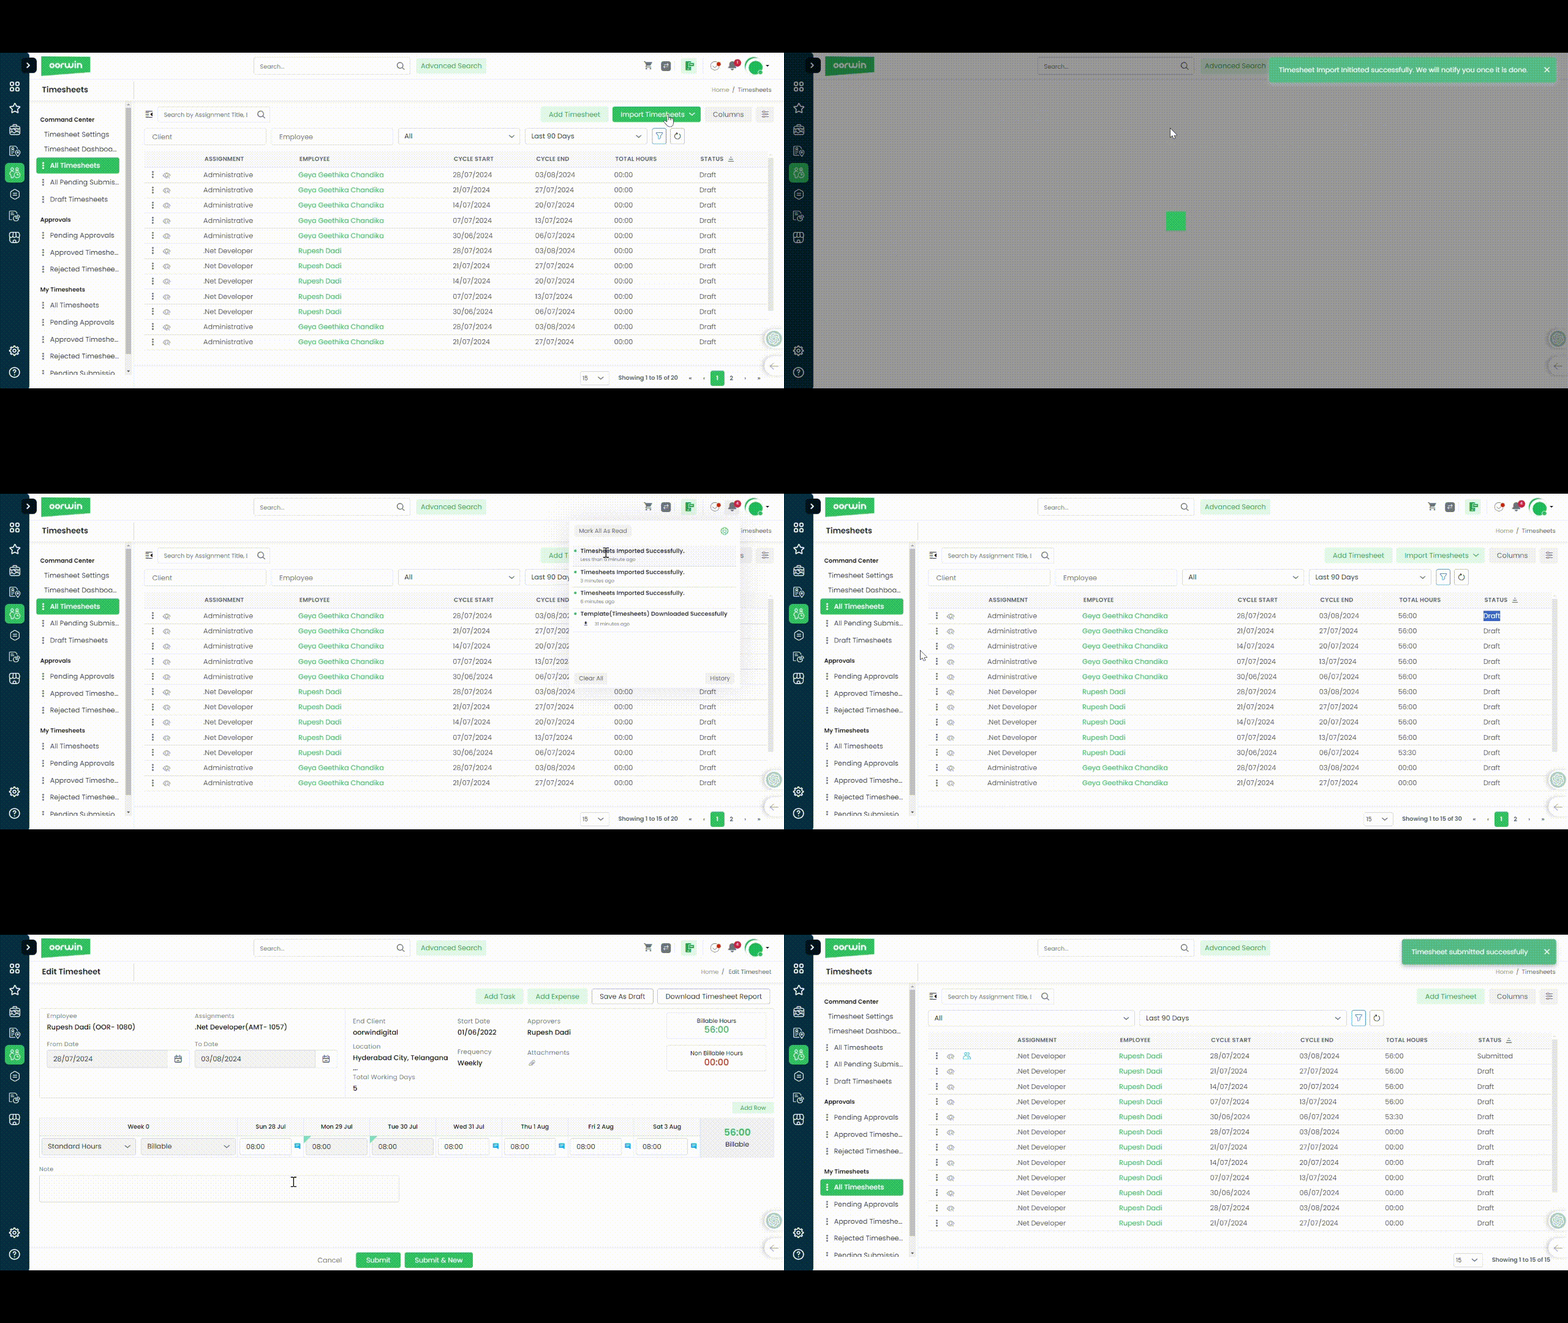
Upload Template(Excel)
- Navigate to Menu
- Timesheets
- All Timesheets
- Import Timesheets
- Upload Template
After uploading the Excel file, all timesheets will be saved as draft invoices with the hours recorded as per the Excel sheet. Users can then review and submit the timesheets
Was this article helpful?
What is Signature Certificate: A Signature Certificate adds a new page to the document, displaying the signature Envelope ID, digital signatory details, IP addresses, and more. This certificate is essential for verifying the authenticity of the signatures, ensuring legal compliance, and providing a clear audit trail. It enhances document security and transparency, making it easier to track and validate each signature’s origin and integrity.
How to Configure:
- Navigate to Main Menu
- General
- Digital Templates
- Configuration
- Additional Configurations
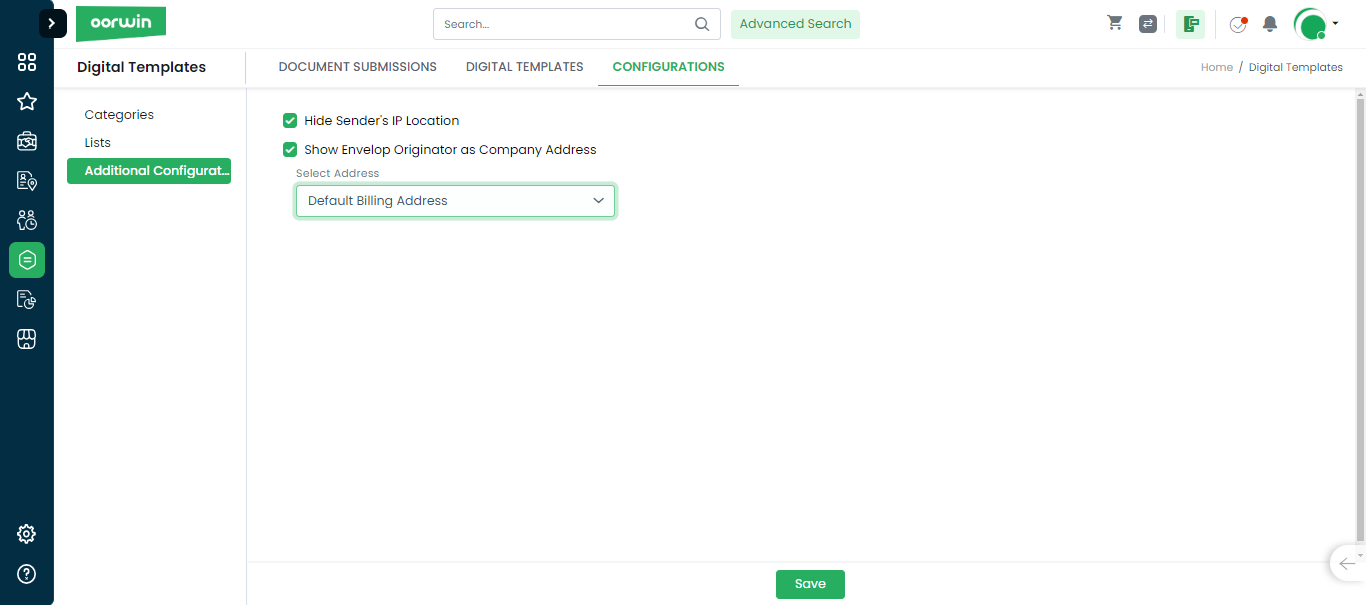
Hide Sender’s IP Location: Would help you in hiding the sender IP addres
Show envelope originator as Company ID: Would show the default company name and billing address on the signature cretificate


